
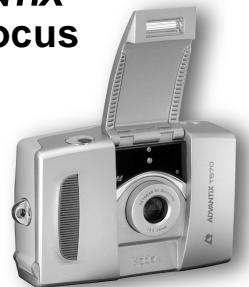
T570 - Appareil photo KODAK - Notice d'utilisation et mode d'emploi gratuit
Retrouvez gratuitement la notice de l'appareil T570 KODAK au format PDF.

| Type de produit | Appareil photo argentique au format Advanced Photo System (APS) |
| Dimensions (L x H x P) | 91,8 x 60,9 x 33,8 mm |
| Poids | 118 g (sans pile ni film) |
| Alimentation | 1 pile lithium 3 V KODAK KCR2 (ou équivalente) |
| Objectif | KODAK EKTANAR 28 mm f/3,5 tout verre, mise au point automatique |
| Système de mise au point | Autofocus actif à 130 zones, de 0,4 m à l'infini |
| Obturateur | Programmé, pleine ouverture, 1/4 à 1/500 s |
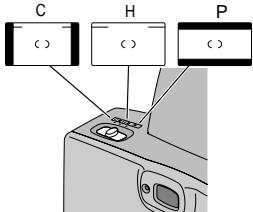
| Formats d'impression | Classique (C), Groupe/HDTV (H), Panoramique (P) – sélectionnables |
| Flash | Intégré escamotable, modes automatique, forcé, éteint, vue nocturne |
| Portée du flash (ISO 200) | 0,4 m à 5,5 m |
| Fonctions spéciales | Retardateur (10 s), verrouillage de mise au point, impression date/heure/titre, sélection de titre (10) et langue (6) |
| Sensibilité film compatible | ISO 50 à 1600 (DX) |
| Entretien et nettoyage | Nettoyer l'objectif avec un chiffon doux non pelucheux et un soufflet ; ne pas utiliser de solvants ni de produits abrasifs |
| Sécurité | Ne pas démonter l'appareil ni le flash ; tenir les piles hors de portée des enfants ; ne pas recharger les piles |
| Pièces détachées et réparabilité | Consulter un technicien agréé ; ne pas tenter de réparation soi-même |
| Informations générales | Charge par système APS « drop-in » ; rebobinage automatique ou manuel ; protection contre les doubles expositions |
FOIRE AUX QUESTIONS - T570 KODAK
Questions des utilisateurs sur T570 KODAK
0 question sur cet appareil. Repondez a celles que vous connaissez ou posez la votre.
Poser une nouvelle question sur cet appareil
Téléchargez la notice de votre Appareil photo au format PDF gratuitement ! Retrouvez votre notice T570 - KODAK et reprennez votre appareil électronique en main. Sur cette page sont publiés tous les documents nécessaires à l'utilisation de votre appareil T570 de la marque KODAK.
MODE D'EMPLOI T570 KODAK

Consumer Imaging
EASTMAN KODAK COMPANY
Rochester, NY 14650
© Eastman Kodak Company, 2001
Kodak ADVANTiX
T570 Auto-Focus
Camera
ENGLISH/ESPAÑOL

ADVANCED PHOTO SYSTEM

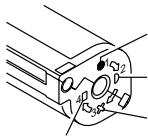
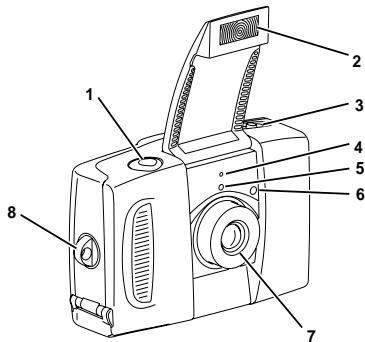
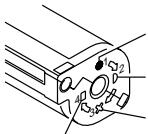
Camera Identification
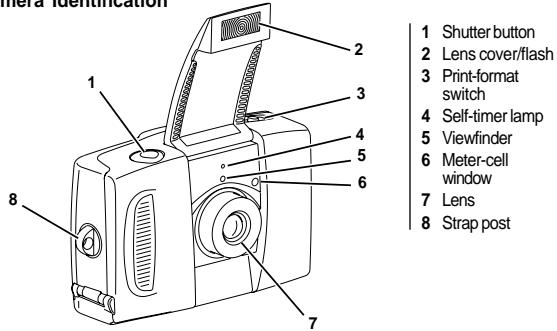
1 Shutter button
2 Lens cover/flash
3 Print-format switch
4 Self-timer lamp
5 Viewfinder
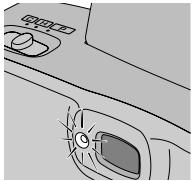
6 Meter-cell window
7 Lens
8 Strap post
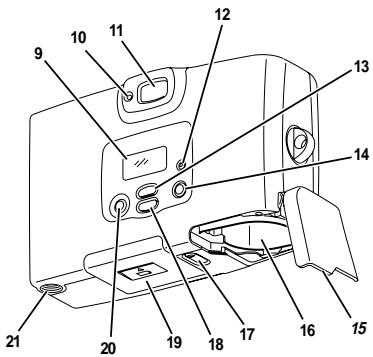
Camera Identification
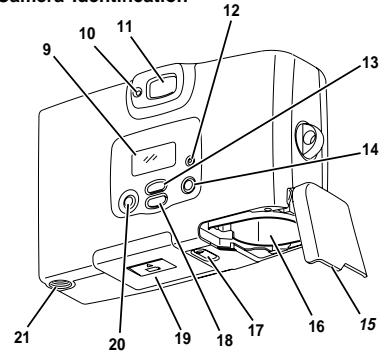
9 LCD panel
10 Flash/camera-ready lamp
11 Viewfinder
12 Film-rewind button
13 MENU
14 ENTER
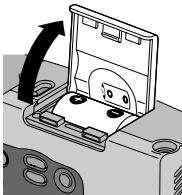
15 Film door
16 Film chamber
17 Film-door switch
18 SELECT
19 Battery door
20 MODES
21 Tripod socket
This device complies with part 15 of the FCC Rules. Operation is subject to the following two conditions: (1) this device may not cause harmful interference, and (2) this device must accept any interference received, including interference that may cause undesired operation.
NOTE: Your model camera has been tested and found to comply with the limits for a Class B digital device, pursuant to Part 15 of the FCC Rules. These limits provide reasonable protection against interference in residential use. The camera generates, uses and can radiate radio frequency energy and, if not used in accordance with the instructions, may cause interference to radio communications. There is no guarantee that interference will not occur. If this camera does cause interference to radio or television reception, which can be determined by turning the camera off and on, you may reduce the interference by the following:
Reorient or relocate the receiving antenna.
— Increase the separation between the camera and the receiver.
- Consult the dealer or an experienced radio/television technician for help.
Changes or modifications not approved by the party responsible for compliance could void the user's authority to operate the equipment.
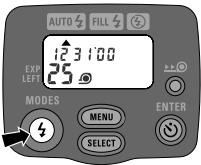
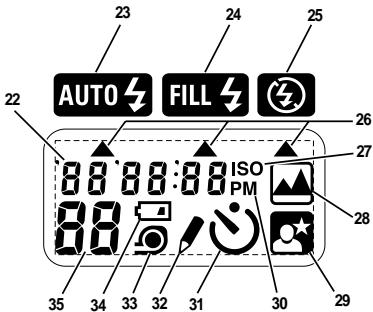
LCD Panel
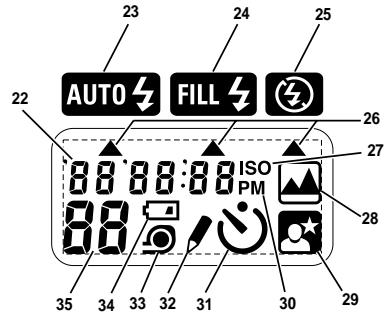
22 Date/time display
23 Auto-flash indicator
24 Fill-flash indicator
25 Flash-off indicator
26 Mode selector arrow
27 ISO film-speed display
28 Infinity-focus indicator
29 Nightview indicator
30 PM indicator
31 Self-timer indicator
32 Title-select indicator
33 Film-presence symbol
34 Battery symbol
35 Picture counter
KODAK ADVANTIX
T570 Auto-Focus Camera
NEED HELP WITH YOUR CAMERA OR MORE INFORMATION ABOUT THE ADVANCED PHOTO SYSTEM?
Go to our web site at http://www.kodak.com or call:
Kodak (USA only) from 9:00 a.m. to 7:00 p.m. (Eastern time) Monday through Friday at 1 (800) 242-2424.
When you call, please have your camera available.
For warranty purposes, please keep your sales receipt as proof of the date of purchase.
CONTENTS
CAMERA FEATURES AND BENEFITS ... 3
GETTING STARTED 7
Loading the battery 7
Date and time 8
Setting the date 8
Setting the time 10
Attaching the camera strap 12
CONTROL-BUTIONACTUATOR 13
OTHER BATTERY INFORMATION 13
Low-battery indicator 13
Battery tips 14
Power shut-off 15
LOADING THE FILM 16
TAKING PICTURES 18
Typical print sizes (forms) 20
Using the focus lock 21
Tips for better pictures 22
FLASH AND PICTURE
TAKING OPTIONS 23
Flash/camera-ready lamp indicator 24
Auto flash 24
Fill flash 24
Flash off 25
Nightview 25
Infinity focus 25
Selecting the flash and picture-taking options 26
Flash/warning-lamp signals 27
Flash-to-subject distance 28
USING THE SELF-TIMER 28
SETTING THE PRINT TITLE
AND LANGUAGE 30
Title-select list 32
Language-select list 33
UNLOADING THE FILM 33
Automatic rewind 33
Manual rewind 35
CARING FOR YOUR CAMERA 36
TROUBLESHOOTING 37
SPECIFICATIONS 40
CAMERA FEATURES AND BENEFITS
Three Print Formats
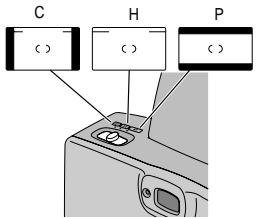
- You can take three different size pictures: Classic (C), Group/HDTV (H), and Panoramic (P) pictures from the same film cassette. The viewfinder changes to show the selected picture size.
Picture Quality Information Exchange (PQix)
This camera records vital scene data on the film's magnetic information strip and communicates that information to the photo lab to optimize lighting and color for better-looking prints.
Date, Time, and Title Imprinting
- The date, time, and cassette ID number are printed on the back of your prints, which makes it easy to organize pictures and order reprints. You can choose from one of 10 pre-programmed titles
(6 languages available) to print on the back of the prints. See your photofinisher for a full description of the available services.
Flip Flash
- The extension of the flash helps to minimize red eyes in flash pictures and prevents hand obstruction in front of the flash. When the flash is closed, it protects the lens and viewfinder.
Double Exposure Protection (DEP)
- You don't need to worry about accidentally re-exposing your film. Your camera reads the Film Status Indicator (FSI) on the film cassette to prevent re-exposure.
Easy, Drop-in Loading
- Easy, drop-in loading is fast and virtually error-free, eliminating blank rolls and double exposures. The camera uses KODAK ADVANTIX Film. The film cassette, unlike the traditional 35 mm cartridge, becomes the carrier and storage container for the processed film.

Look for this logo to be certain that the film you buy is made for this camera.

Look for this logo to select a certified photofinisher for developing your film and to assure that you get all the features of the Advanced Photo System.
Film Status Indicator (FSI)
A highlighted indicator advances from one symbol to another to identify the status of the film inside the cassette.
Unexposed
Partially exposed
Fully exposed
Processed Negatives
GETTING STARTED
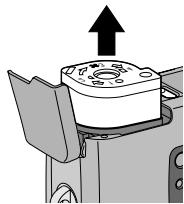
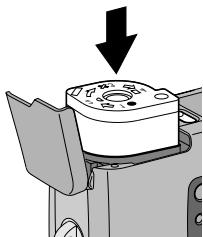
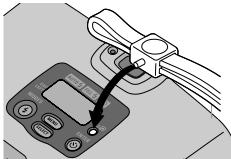
Loading the battery
This camera uses one 3V lithium KODAK KCR2 (or equivalent) Battery that supplies power for all camera operations.
- Open the battery door (19).
Before you remove the old battery, close the lens cover/flash.
-
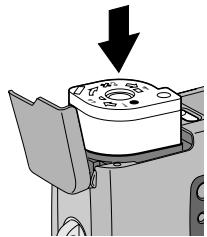
Insert the battery into the chamber as shown.
-
Snap the battery door closed.
After you load a new battery into the camera, you will need to reset the date and time.
Date and time
This camera has a quartz clock and automatic calendar through the year 2040. It uses the film's magnetic data-recording capability to record date and time information which your photofinisher imprints on the back of your prints.
Setting the date
You can choose from three formats: month/day/year, day/month/year, or year/month/day.
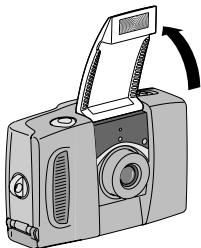
- Completely lift up the Lens cover/flash (2) to raise the flash and to turn on the camera.
- Repeatedly press MENU (13) until the blinking "date format" of your choice appears on the LCD panel (9).
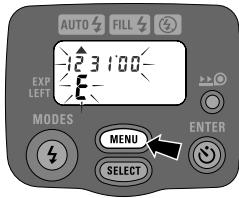
-
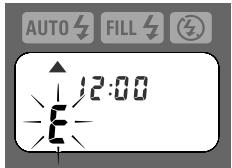
The blinking "E" indicates there is no film in the camera.
-
Press ENTER (14) to set the format.
-
If the camera is already at this format, you can bypass this step.
-
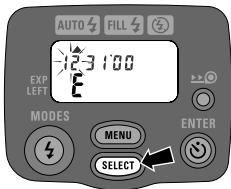
Press SELECT (18) to actuate the setting for month.
-
Repeatedly press and/or hold SELECT to select the new number for month.
-
Press ENTER (14) to set the month and to actuate the setting for day.
Press ENTER again if you want to end the selection.
- Follow steps 4 and 5 to finish setting the date.
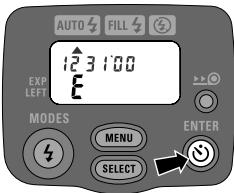
Setting the time (hour/minutes)
The camera has a 12-hour clock with PM display.
-
Completely lift up the Lens cover/flash (2) to raise the flash and to turn on the camera.
-
Repeatedly press MENU (13) until the time appears on the LCD panel (9).
- Press SELECT (18) to actuate the setting for hour.
-
Repeatedly press and/or hold SELECT to select the new number for hour.
-
Press ENTER (14) to set the hour and to actuate the setting for minutes.
- Follow steps 3 and 4 to finish setting the time.
- The camera automatically defaults to the date setting but you can view the time by pressing MENU.
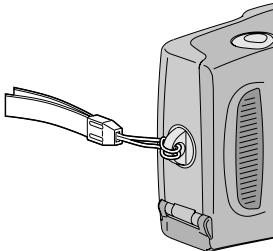
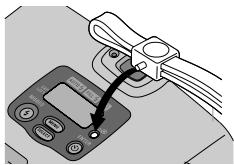
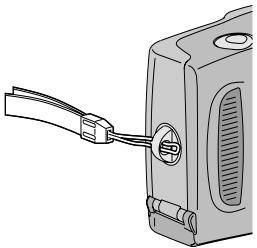
Attaching the camera strap
- Insert the shorter looped end of the strap behind the Strap post (8).

- Thread the longer end of the strap through the shorter loop.
- Pull the strap tight.
CONTROL-BUTION ACTUATOR
You can use the knob on the clasp of the camera strap to actuate the small control buttons on the camera.

OTHER BATTERY INFORMATION
Low-battery indicator

It's time to replace the battery when —
the Battery symbol (34) "blinks" on the LCD panel (9) or
none of the indicators, except for a steady battery symbol, appears on the LCD panel and the Shutter button (1) cannot be operated.
Battery tips
- Dispose of battery according to local and national regulations.
- Keep a spare battery with you at all times.
- Read and follow all warnings and instructions supplied by the battery manufacturer.
- Keep batteries away from children.
-
Do not try to take apart, recharge or short circuit the battery, or subject it to high temperature or fire.
-
Store the battery in its original packaging prior to use.
- Do not use rechargeable batteries.
- Remove the battery from the camera when the camera is not going to be used for an extended length of time.
-
In the unlikely event that battery fluid leaks onto your skin, contact Kodak Health, Safety and Environment Information in the U.S. at 1-716-722-5151. Customers outside the U.S. can contact their local health care provider.
-
In the unlikely event that battery fluid leaks inside the camera, U.S. customers can contact the Kodak Information Center (KIC) at 1-800-242-2424. Customers outside the U.S. can contact their local Kodak Customer Service representative.

Automatic Energy Saving Features
Power shut-off
To conserve battery power, the camera automatically goes to sleep if it is not operated for more than 212 minutes. You can press any of the control buttons, except for the print-format switch, or close and reopen the Lens cover/flash (2) to awaken the camera. When the camera is not used for an extended time, close the lens cover/flash to completely turn off the camera.
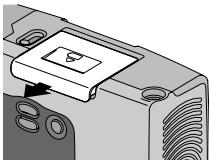
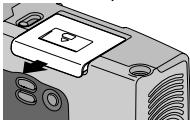
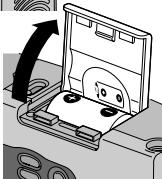
LOADING THE FILM
You can load film into the camera with the camera on or off.
- Turn the camera upside down and move the Film-door switch (17) to open the Film door (15).
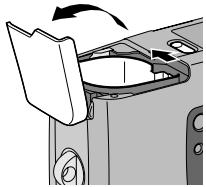
-
The safety interlocked film door opens only when the film chamber is empty or the film in the camera is completely re wound into the film cassette.
-
Insert the film cassette completely into the Film chamber (16).
-
Make sure the Film Status Indicator (FSI) on the film cassette is at (#1 position) for a new cassette.
-
Do not force the film cassette into the film chamber.
-
Close the film door to start the automatic film advance.
-
The Picture counter (35) on the LCD panel (9) shows the number of pictures remaining on the film.
TAKING PICTURES
You can take Classic (C), Group/HDTV (H)*, and Panoramic (P) pictures on the same film cassette. Your photoprocessing cost may be based on the format size(s) that you use to expose the film.
-
Completely lift up the Lens cover/flash (2) to raise the flash and to turn on the camera.
-
The ISO film speed briefly appears on the LCD panel followed by the date.
-
Frame your subject within the Viewfinder eyepiece (11). For a sharp picture, stand at least 1.3 ft (0.4 m) from your subject.
-
Slide the Print-format switch (3) to select the desired format (C, H, or P). The viewfinder changes to show the selected picture size.
See the Typical print sizes (formats) on page 20.
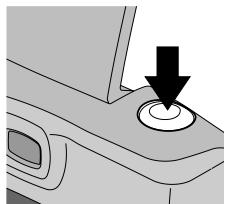
- Partially press down the Shutter button (1).
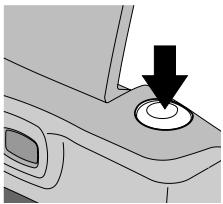
- When the Flash/camera-ready lamp (10) glows green, fully press down the shutter button to take the picture.
- See the Flash/warning-lamp signals on page 27.

Typical print sizes (formats)
C H
P
| Classic | Group(HDTV) | Panoramic |
| 3.5 x 5 in. or 4 x 6 in. | 3.5 x 6 or 4 x 7 in. | 3.5 x 8.5 in. to 4 x 11.5 in. |
| (88.9 x 127 mm or 102 x 152 mm) | (88.9 x 152 mm or 102 x 178 mm) | (88.9 x 216 mm to 102 x 292.7 mm) |
NOTE: Your photofinisher generally provides 4 × 6 , 4 × 7 , and 4 × 11.5 in. (102 x 152, 102 x 178, and 102 x 292.7 mm) sizes. Some local printers may offer 3.5 × 5 , 3.5 × 6 , and 3.5 × 8.5 in. (88.9 x 127, 88.9 x 152, and 88.9 x 216 mm) sizes.
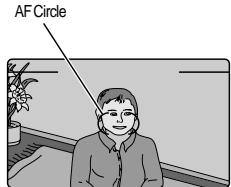
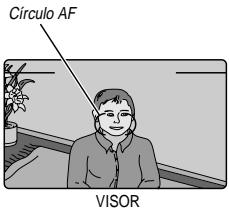
Using the focus lock
This camera automatically focuses on whatever is within the Auto Focus (AF) circle of the viewfinder eyepiece. To get a sharp picture, make sure the AF circle is on your main subject. If you want to take the picture with the subject positioned outside of the AF circle, use the focus lock as follows:
- Place the AF circle on the subject that you want focused in the picture.
VIEWFINDER
-
Partially press down and hold the Shutter button (1) to lock the focus position.
-
While still partially pressing down on the shutter button, move the camera until your subject is where you want it within the Viewfinder eyepiece (11).

VIEWFINDER
- Press the shutter button completely down to take the picture.
Tips for better pictures
- Move close enough to your subject so it fills the viewfinder but not closer than 1.3 ft (0.4 m).
Take pictures at the subject's level. Kneel down to take pictures of children and pets. - Hold your camera vertically to capture tall, narrow subjects, such as a waterfall, skyscraper, or a single person.
-
Add interest to your picture by framing it with a tree branch, a window, or even the rails of a fence.
-
Keep the sun behind you. This provides the best subject illumination.
- Stand at an angle to shiny surfaces like windows or mirrors to avoid flash reflection and bright spots in your pictures.
- Turn on all room lights and have your subject look at the flash to reduce red eyes in flash pictures.
FLASH AND PICTUREDAKING OPTIONS
Besides the auto-flash mode (default setting of the camera),
you can select fill flash, flash off, infinity focus without flash, and nightview with flash.
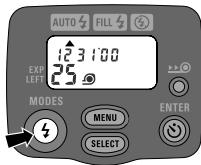
Repeatedly press MODES (20) to select the flash mode that best suits your subject and surroundings or a picture-taking mode that lets you tailor the camera's fully automatic settings.
Flash/camera-ready lamp indicator
When you partially press down the Shutter button (1) and the Flash/camera-ready lamp (10) glows green, the flash is fully charged and ready for you to take pictures.
Auto flash

In dim light, such as indoors or outdoors in heavy shade, or on dark overcast days, you need flash. Your camera features an automatic flash that fires when you need it. The flip-up flash helps to minimize red eyes in flash pictures and prevents hand obstruction in front of the flash.
Fill flash

When in bright sun or when bright light comes from behind the subject, dark shadows (especially on faces) may occur. Use fill
flash to lighten these shadows and to add sparkle to your subject's eyes.
Flash off

When you do not want to use the flash, especially indoors where flash is prohibited, or to capture the ambiance of existing light, use the flash-off feature.
Use a tripod or place the camera on another firm support, and use high-speed film because the shutter speed in these situations will most likely be slow.
Nightview

In this mode, the camera balances the flash and existing light exposure so you can take beautiful pictures of people at sunset or at night. Use a tripod or place the camera on another firm support, and use high-speed film because the shutter speed at night will most likely be slow.
Infinity focus

Capture sharp, distant scenery when you take pictures outdoors during the day or through windows.
Selecting the flash and picture-taking options
- Completely lift up the Lens cover/flash (2) to raise the flash and to turn on the camera.
- Keep the subject within the distance range for the speed of film in your camera (see Flash-to-subject distance table on page 28).
-
Don't take pictures beyond the maximum distance or your pictures will be dark.
-
Repeatedly press MODES (20) until the Mode selector arrow (26) points to the Autoflash indicator (23), Fill-flash indicator (24) or Flash-off indicator (25), or until the Infinity-focus indicator (28) or Nightview indicator (29) appears on the LCD panel (9).
-
Frame your subject within the Viewfinder eyepiece (11).
-
Partially press down the Shutter button (1). When the Flash/camera-ready lamp (10) glows green, fully press down the shutter button to take the picture.
The flash, infinity-focus, and nightview modes remain selected after you take the picture. To cancel the selection, press MODES to select another setting or close and reopen the lens cover/flash to automatically return to the default setting.
Flash/warning-lamp signals
| Lamp Indicator | Situation |
| Glows green | • Flash fully charged |
| Glows red* | • Subject closer than 1.3 ft (0.4 m) |
| "Blinks" red* | • Flash not fully charged • Camera movement |
Flash-to-subject distance
| ISO film speed | Flash-to-subject distance |
| 50 | 1.3 to 9 ft (0.4 to 2.7 m) |
| 100 | 1.3 to 13 ft (0.4 to 4.0 m) |
| 200 | 1.3 to 18 ft (0.4 to 5.5 m) |
| 400 | 1.3 to 26 ft (0.4 to 7.9 m) |
| 800 | 1.3 to 36 ft (0.4 to 11 m) |
| 1600 | 1.3 to 52 ft (0.4 to 15.8 m) |
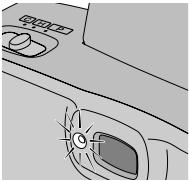
USING THE SELF-TIMER

Use this feature to include yourself in pictures.
- Use the Tripod socket (21) to attach the camera to a tripod or place it on another firm support.
-
Completely lift up the Lens cover/flash (2) to raise the flash and to turn on the camera.
-
Press ENTER (14).
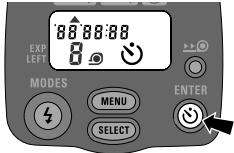
-
The Self-timer indicator (31) appears on the LCD panel (9).
-
Look through the Viewfinder eyepiece (11) to compose the picture and to allow room for yourself in it.
-
Press the Shutter button (1).
-
Quickly position yourself in the composed picture making sure that you see the Self-timer lamp (4).
-
The self-timer lamp on the front of the camera blinks for approximately 10 seconds before the picture is taken.
- To cancel the self-timer selection before the shutter releases, press ENTER twice or close the lens cover/flash.
- The self-timer automatically turns off after the shutter releases.
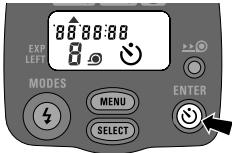
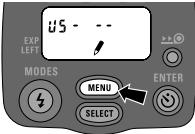
SETTING THE PRINT TITLE AND LANGUAGE

You can choose a print title from
one of 10 preprogrammed titles anda language (6 options)before you take thepicture. The title you
select is recorded on the film's magnetic data strip. At certified Advanced Photo System labs, the title is printed on the back of your photograph.
- Repeatedly press MENU (13) until the Title-select

indicator (32) appears on the LCD panel (9).
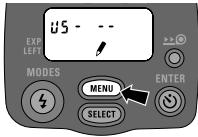
-
Press SELECT (18).
-
The "title-select indicator" and the No-title (cancel title) designator _ _ blinks.
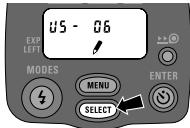
-
Repeatedly press and/or hold SELECT to select a title number. See the Title-select list on page 32.
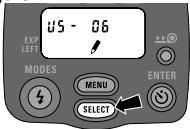
-
Press ENTER (14) to set the title and to start the language setting.
-
The language code "US" and the "title-select indicator" blinks.
-
Repeatedly press SELECT to select the language code. See the Language-select list on page 33.
-
Press ENTER to set the language and end your selection.
-
The print title/language remains selected after you take the picture.
- To cancel the title for subsequent pictures, follow steps 1 through 3, but for step 3, select No title (cancel title) "____" or select a different title.
Title-select list
The following table lists the title numbers for the in-the-camera-stored titles.
| Title number | Title |
| 01 | Birthday |
| 02 | Vacation |
| 03 | Wedding |
| 04 | Graduation |
| 05 | Congratulations |
| 06 | Christmas |
| 07 | Holiday |
| 08 | I Love You |
| 09 | Party |
| 10 | Family |
| -- | No title (cancel title) |
Language-select list
| Language code | Language |
| US | US English |
| Eng | UK English |
| FrA | French |
| ESP | Spanish |
| dEU | German |
| JP | Katakana |
UNLOADING THE FILM
Automatic rewind
The camera automatically rewrites the film into the cassette after the last exposure.
-
Wait for the film to completely rewind into the film cassette and for the motor to stop running.
-
When the motor stops running, the Picture counter (35) indicates "0."
-
Move the Film-door switch (17) to open the Film door (15).
- Remove the film cassette from the camera and reload with new KODAK ADVANTIX Film.
The FSI on the fully-exposed film cassette is at ±bx (#3 position) and the picture counter displays "E."
Manual rewind
If you do not want to take pictures on the entire film, you can manually start the automatic rewind.
- Gently press the Film-rewind button (12) with the control按钮 actuator on the camera strap to start the automatic rewind.
- See Automatic rewind, steps 1 through 3.
NOTE: You cannot reload partially exposed film into this camera and continue to take pictures.
CARING FOR YOUR CAMERA
- Protect the camera from dust, moisture, sudden impact, and excessive heat.
CAUTION: Do not use solvents or harsh or abrasive cleaners on the camera body. - If the lens appears dirty, breathe on it to form a mist and wipe the surface gently with a soft, lintless cloth or a camera lens-cleaning tissue. Never wipe a dry lens.
CAUTION: Do not use solvents or solutions not designed for cleaning camera lenses. Do not use chemically treated tissues intended for cleaning eyeglasses.
- Remove the battery when you store the camera for an extended time.
CAUTION: To prevent possible damage and electrical shock, do not attempt to disassemble or repair the camera or flash unit by yourself.
TROUBLESHOOTING
| What happened | Probable cause | Solution |
| Camera will not operate | Battery weak, dead, missing, or improperly loaded | Replace or reload the battery |
| Lens cover/flash closed | Open lens cover/flash | |
| Film does not advance or rewind | Battery weak, dead, missing, or improperly loaded | Replace or reload the battery |
| LCD panel is blank | Battery weak, dead, missing, or improperly loaded | Replace or reload the battery |
| Camera in sleep mode | See Power shut-off on page 15 | |
| LCD panel is blank | Lens cover/flash closed | Open lens cover/flash |
| Shutter button will not operate | Lens cover/flash closed | Open lens cover/flash |
| Flash/camera ready lamp "blinks" red | Flash not fully charged | Wait for lamp to glow green |
| Insufficient light | Use fill-flash feature and recompose picture | |
| Camera movement | Hold camera steady | |
| Flash/camera ready lamp glows red and shutter button locks | Subject between 10 in. (25.4 cm) and 14 in. (35.6 cm) from camera | Move back and recompose picture |
| Film-presence indicator “blinks” on LCD panel | Loaded exposed (X), partially exposed (Y), or processed film (■) into the camera | Load only new film (●) into the camera |
| Film door does not open | Film cassette loaded in film chamber | Press the rewind button (see Manual rewind on page 35) or continue taking pictures |
SPECIFICATIONS
Film type: KODAK ADVANTIX Film for color and black-and-white pictures
Lens: Autofocusing 28 mm motorized, f/3.5, all-glass KODAK EKTANAR Lens
Focus system: 130 zones, active AF
Focus range: 1.3 ft (0.4 m) to infinity
Viewfinder: Real image with C, H, & P format display
Film-speed: DXIX (ISO) 50-1600 for color and black-and-white films
Flash unit: Built-in, KODAK SENSALITE™ Flash
Flash range (ISO 200):1.3-18 ft (0.4 - 5.5m)
Apertures: f/3.5-f/11
Shutter: Programmed, full-aperture shutter 1/4-1/500 seconds
Power source: Main power: one 3 V lithium KODAK KCR2 (or equivalent) Battery
Dimensions: 3.6 × 2.4 × 1.3 in (91.8 x 60.9 x 33.8 mm)
Weight: 4.2 oz. (118 gm) without film or battery
Kodak, Advantix, Ektanar, Sensalite, and the Advanced Photo System symbol and logotype are trademarks.
Este dispositivo cumple con la parte 15 de las reglamentaciones de la FCC. El manejo está supedited a las siguientes dosCONDITIONs: (1) Este dispositivo peut no causar intereferencia daiina, y (2) este dispositivo debecar apt称号 intereferencia recibida, incluyendo intereferencia la cui pudiese hacer unccionamento indesable.
NOTA: El modelo de su CAMERA ha sido abrorado y cumple con las limitaciones establecidas para un dispositivo digital Clase B, de acuerdo con la Parte 15 de las relictamente de la FCC. Estas limitaciones proveen una proteccion reasonable en contra de la interferencia que se enquiry a en uso residencial. Laamera genera, usa, y peut emitir energia de fecundia radial y si no es usada de acuerdo con las instruetiones, pueda causar interferencia a comunicaciones de radio. No se pueda garantizar que esta interferencia no occurs. En caso de que estaamera cause interferencia a la recepcion de radio o television, lo coulda ser determinado encendiando y apagando laamera,能把 reduir la interferencia能做到 lo?sigue:
Vuelva orientar o situar la antenna de recepcion
- Aumente la distancia entre la camarà y el receptor
- Para recibirtipsa consulten el distribuidor o un先进技术pecializado en radio/televisión
Cambios omericanos no abprobadas por el contraste responsable de acatar estas regulaciones podra anular la autoridad del consumidor para operar este equipo.
J.NECESITA AYUDA CON SU CAMARA O MAS INFORMACION ACERCA DEL ADVANCED PHOTO SYSTEM?
Visite我们的址in la red mundial electrònica (worldwide web) a la direccion http://www.kodak.com o llame a:
Kodak (en los Estados Unidos solamente), llamada sin cargo al número 1 (800) 242-2424, de lunes a viernes de 9:00 a.m. a 7:00 p.m. ( hora del este). Cuando llame, por favoronga su CAMERA disponible.
Para hacer valida la garantía, sirvase guardar el recibo de vente como prueba de la Fecha de compra.
Identificacion de la CAMERA
1 Disparador
2 Cubierta del lente/flash
3 Interruptor del formato de impresión
4 Lampa para autodisparador
5 Visor
6 Ventana de medidor de celula fotovoltaica
7 Lente
8 Presilla de la correa
9 Panel de cristal liquido
10 Lampara de flash/camara lista
11 Ocular del visor
12 Boto n del rebobinado de la pellicula
13 MENU (MENU)
14 ENTRAR (ENTER)
15 Puerta del compartmento de la pellicula
16 Compartimento de la pellicula
17 Interruptor de la puerta del compartmento de lapellicula
18 SELECTION (SELECT)
19 Puerta del compartmento de la bateria
20 MODOS (MODES)
21 Montaje para tripode
22 Exhibitión de Fecha/hora
23 Indicador de flash automático
24 Indicador de flash de relleno
25 Indicador de flash apagado
26 Flecha de selector de modo
27 Exhibito de sensibility de ISO
28 Indicador de enfoque infinito
29 Indicador de vista de noche
30 Indicador de PM
31 Indicador de autodisparador
32 Indicador de selección de tíolu
33 Símbol de la presencia de la或多plata
34 Simbolo de la bateria
35 Contador de fotografias
CONTENIDO
BENEFICIOS Y CHARACTERISTICAS
DE LA CAMARA 49
PROCEDIMIENTOS INICIALES .... 52
Como cargar la bateria 52
Fecha y hora 53
Como configurar la Fecha .... 53
Como configurar la hora 56
Como ajustar la correa
de la-camera 57
ACTIVADOR DEL BOTON
DE CONTROL 58
INFORMACION ADICIONAL
SOBRE LA BATERIA 59
Indicador de bateria débil 59
Consejos para usar la bateria...... 59
Apagado automatico 61
COMO CARGAR LA PELICULA...... 61
COMOTOMARFOTOGRAFIAS 63
Tamaños típicos de
impresión (formatos) 66
Como usar el carrojo
del enfoque 67
Consejos para obterer
mejores fotografias 68
OPCIONES DEL USO DEL FLASH
Y LA TOMA DE FOTOGRAFIAS .... 70
Indicador de flash/lampara
de camaralaista 71
Flash automático 71
Flash de relleno 72
Flashapagado 72
Vista de noche 72
Enfoque infinito 73
Como seleccionar las-optiones
de flash y toma de fotografias ... 73
Seniales de flash/lampara de advertencia 75
Distancia entre el sujeto y el flash 76
COMO USAR EL AUTODISPARADOR 77
COMO CONFIGURAR EL TITULO DE LA IMPRESION Y EL IDIOMA 79
Lista de selección de titulos 82
Lista de selección de idiomas..... 83
COMO DESCARGAR LA PELICULA 83
Rebobinado automática 83
Rebobinado manual 85
CUIDADO DE SU CAMARA 86
PROBLEMAS Y SOLUCIONES 87
ESPECIFICACIONES 90
BENEFICIOS Y CHARACTERISTICAS DE LA CAMARA
Selección triple de formatting
- Usted puede tener, en el mismo rollo, fotografias en tres tamanos differentes: Clásico (C), Grupo/HDTV (H) y Panorámico (P). El marco del ocular del visor cambia para exhibir el tamanó selecciónado de la fotografia.
Intercambio de información sobre la calidad de la fotografia (PQix)
-Esta cármara registra la informacion importante de la escena en la cinta magnética de la pellicula y comunica esta informacion al laboratorio de fotocabajo para perfeccionar lascharactericasde luz y color y de esta forma ofrecer la mayor impresion.
Impresión de Fecha, hora y titulo
- La información de la Fecha, hora y número de identificacion del cartucho son impresos en la parte de aftas de sus fotografias, lo que hace fácil el organizar y mandar a hacer reproducciones de sus fotografias. Puede escoger uno de los 10 titulos programados (disponibles en 6 idiomas) el cui sera impreso en la parte de aftas de sus fotografias. Vea a su servicios de fotocabajo para una descriccion total de los servicios disponibles.
Flash abatible
- La extension del flash abatable可以帮助 a reducir ojos rojos en fotografias con flash y-previene la obstruccion del flash. Cuando el flash esta cerrado, protege el lente y el visor.
Protección en contra de doble exposión (DEP)
- Nocede preoccuparse de accidentalmente volver a exponer supellicula ya usada. Su-cameraleeIelIndicador del estado de lapellicula (FSI) en el cartucho de lapellicula yde esta formapreviene la doble exposacion.


Busque este logotipo para asegurar de que lapellicula que usted compre este hecha para esta CAMERA.
Busque este logotipo para selectionar un service deFotoacabado certificado para revelar su rollo y para asegurar de aprovechar todos los Beneficios del Advanced Photo System.
Carga de rollo fácil
- La hora de rollo fácil es rápida y virtuallynstein error, eliminating rollos en blanco y doble exposión. La-camera usapelícula KODAK ADVANTIX. Elcartuche delpelícula, no igual a los cartuchos tradiconales de 35 mm, se convierte en elcargador y envase de lapelícula procesada.
Indicador del estado de lapellicula (FSI)
- El indicator realizado avanza de un*symbolo a other para identificar el estado de lapellicula Dentro del cartucho.
Negativos procesados
No expuesta
Parcialmente
expuesta
Completely
expuesta
PROCEDIMIENTOS INICIALES
Como cargar la bateria
Estaámarautilizaunabatería de litio de3voltiosKODAK KCR2 (o su equivalente)que proportionla energia necessaria para todas lasfunrientoesde laámara.
- Abra la puerta del comparti- miento de la bateria (19).
- Antes de quitar la bateria Usada, cierra la cubierta del lente/flash.
-
Coloque la bateria en su compartmentimiento como aquise indica.
-
Cierre la puerta a presión.
-
Después que cargue la bateria de una vez en la camara, necessitarávoltar a poner laecha y hora.
Fecha y hora
Esta CAMERA tiene un reloj de curzo y un calendario automático hasta el año 2040. Su CAMERA usa la característica de la franca magnética en la película para registrar la información deecha y hora, la cuales su fotoproducesor imprime en la parte de aftas de sus fotografías.
Como configurar la Fecha
Puede escoger entre uno de los tres formatos: mes/día/año, días/ameas/año, o años/meses/día.
- Levante Completely la cubierta del lente/flash (2) para levantar el flash y encender la-camera.
- Oprima repetidamente MENU (MENU) (13) hasta que el «furmo de fecha» parpadeante que uguedesee aparezca en el panel de cristal liquido (9).
La «E» parpadeante indica que no haypellicula en la cama.
- Oprima ENTRAR (ENTER) (14) para establercer el formatting.
-
Si la CAMERA ya está configurada al formatting deseado, pueda pagar al;)roneplexo.
-
Oprima SELECTION (SELECT) para activar la configuracion para la fecha.
-
Oprima repetidamente u oprima y mantenga oprimido SELECTION (SELECT) para selectionar el numero del mes.
-
Oprima ENTRAR (ENTER) (14) para configurar el mes y para activar la configuracion para el dia.
-
Oprima ENTRAR (ENTER) una vez más si desea finalizar la selección.
-
Repita los pasos 4 y 5 para continuar configurando la Fecha.
Como configurar la hora (hora/minutos)
La webcam Tiene un reloj de 12 horas con un indicator de p.m. (PM).
- Levante completeness la cubierta del lente/flash (2) para levantar el flash y encender la CAMERA.
- Oprima repetidamente MENU (MENU) (13) hasta que la hora aparezca en el panel de cristal liquido (9).
- Oprima SELECTION (SELECT) para activar la configuracion para la hora.
-
Oprima repetidamente u oprima y mantenga的概率o SELECTION (SELECT) para selectionar el numero de la hora.
-
Oprima ENTRAR (ENTER) (14) para configurar la hora y para activar la configuración para los Minutes.
-
Repita los pasos 3 y 4 para!.
continuar configurando la hora. -
La CAMERA automáticamentePGA a la configuración de la Fecha pero usted可以选择 ver la hora al oprimir MENU.
comoajustarla correa de la camarara
- Pase el extremo corto de la lazada de la correa bajo de la presilla de la correa (8).
- Pase el extremo largo de la correa a工程技术 de la lazada del corte.
- Tire de la correa hasta que quede ajustada.

ACTIVADOR DEL BOTON DE CONTROL
Puede usar la perilla en la hebilla de la correa de la camera para activar los botones pequeños en la camera.
INFORMACION ADICIONAL SOBRE LA BATERIA
Indicador de bateria débil
Debe cambiar las bacterias cuando —
- el<sistema de la bateria (34) "parpadea" en el panel de cristal liquido (9), o
- ninguno de losindicadores, excepto el significo de la bateria, aparecen en el panel de cristal liquido y el disparador (1) no funciona.
Consejos para usar la bateria
- Deseche la bateria según las regulaciones locales y naciasas.
- Acuérdese delever una bateria de repuesto con usted en todo momento.
- Lea y siga todas las advertencias e instructaciones del fabricante de la bateria.
- Mantenga las baterias fuera del alcance de los niños.
-
No intente descarmar, recargar o causar un cortocircuito en la bateria o exponerla a altas temperatas o fuego.
-
Antes de usarla, guarde la batería en su empaque original.
No use bacterias recargables. - Remueva la bateria de la camera cuando no vaya a usar para un periodo de tiempo prolongado.
-
En caso de que el liquido de la bateria se derame en su piel,pongase en contacto con la informacion de Kodak sobre Salud, Seguridad y el Medio Ambiente llamando al 1-716-722-5151 en los Estados Unidos. Componente para los Estados Unidos peuvent ponserse en contacto con su proveedor local de salute.
-
En caso de que el liquido de la bateria se derrime bajo de laamera, los clientes en los Estados Unidos peuvent ponser en contacto con el Centro Informativo de Kodak (KIC) llamando al 1-800-242-2424. Clientes可以更好 del Estado Unidos可以更好 ponser en contacto con surepresentante local de Kodak.

Characterística de Ahorro Automático de Energía
Apagado automatico
Cuando la CAMERA no se usa por aproximamente 2 1/2 instantos, esta se apagará automatistically para conservar la energia de la bateria. Para activar la CAMERA, puedaocrimir qualquiera de los botones de control, excepto el interruptor del formatting de impresión, o cerrar yvoltar a partir la cubierta del lente/flash (2). Cuando no vaya a usar la CAMERA por un periodo de tiempo prolongado, cierra Completely la cubierta del lente/flash para apagarla.
COMO CARGAR LA PELICULA
Puede cargarpellicula en la camara con la camara encendida o apagada.
- Vire laamera con la parte de abajo hacía arriba y deslice el interruptor de la puerta del compartmentimiento de lapellicula (17)
para abrir la puerta del compartmento de la pellicula (
-
La puerta del compartmento depellicula se abrirá solamente cuando el compartmento depellicula estávacio o lapellicULA enlačamarestecompletamente rebobinada Dentrolcartocho de lapellicula.
-
Ponga el cartucho de lapellicula completamente Dentro del compartmentimiento de lapellicula (16).
-
Asegürese de que el Indicador del estado depellicula (FSI) en el cartacho de la pellicula esté en (position #1) para un cartacho nuevo.
-
No fuerce el cartucho de la pelicula en el compartmento de la pelicula.
-
Cierre la puerta del compartmentio de la película para comenizar el avance automatico de laquia.
-
El contador de fotografías (35) en el panel de cristal liquido (9) muestra el número de fotografías restantes.
COMOTOMAR FOTOGRAFIAS
Puedeayar fotografias Clasicas (C), Grupo/HDTV (H)^* y Panoramicas (P) usingdo el mismo cartucho de pellicula. Elcosto del revelado de sus fotografiasmaybeestarbasado enel/los tamanos del formato que usoalamarotarafogia.
- Levante completamente la cubierta del lente/flash (2) para levantar el flash y encender la camarra.
- La sensibilitidad ISO de lapelícula y laecha aparecenpor unoicoseguidon enelpanelde cristal liquido.
-
Encuadre a su sujeto bajo del ocular del visor (11) para composer su fotografia. Para una fotografia nitida, mantengase a una distancia minima de 0,4 m (1,3 pies) de su sujeto.
-
Desícle el interruptor del formatting de impresión (3) para selecciónar el formatting deseado (C, H o P). El visor cambia para exhibir el時間 de fotografia的选择ación.
Veas Tamanos típicos de impresión (formatos) en la page 66.
- Oprima parcialmente el disparador (1).
-
Cuando la lámpara de flash/camara lista (10) brille verde,oprima Completely eldisparador paraayarla fotografia.
-
Vea las Sénares de flash/ lampara de advertencia en la网首页 75.

Tamaños típicos de impresión (formatos)
C
H
P
| Clásica | Grupo (HDTV) | Panorálico |
| 88,9 x 127 mm ß | 88,9 x 152 mm ß | 88,9 x 216 mm a |
| 102 x 152 mm | 102 x 178 mm | 102 x 292,7 mm |
| (3,5 x 5 plgds. ß | (3,5 x 6 plgds. ß | (3,5 x 8,5 plgds. a |
| 4 x 6 plgds.) | 4 x 7 plgds.) | 4 x 11,5 plgds.) |
NOTA: Su laboratorio de fotocambio usualmente provee impresiones en los tamaños de 102 x 152, 102 x 178 y 102 x 292,7 mm (4 x 6, 4 x 7 y 4 x 11,5 pulgadas). Algunos laboratorios locales de fotocambio PODen.Ofrecer impresiones en los tamaños 88,9 x 127,88,9 x 152 y 88,9 x 216 mm (3,5 x 5,3,5 x 6 y 3,5 x 8,5 pulgadas).
Como usar el carrojo de enfoque
Esta CAMERA se enfoca automáticamente en cualquier objeto que aparezca Dentro del círculo de enfoque automático (AF) del ocular del visor. Para tener una fotografia nitida, asegúrese que el sujeto a fotografia se encontrar Dentro del círculo de enfoque automático (AF). Si眼看umar una fotografia con el sujeto fuera del círculo de enfoque automático (AF), use el cerrojo de enfoque de lasuma forma:
- Coloque el circulo de enfoque automatico (AF) sobre el sujeto que quiera enfocar en la fotografia.
- Oprima parcialmente y mantenga的优势 del disparador (1) para asegurar la posicion enofada.
- Con el disparador parcialmente oprimido, mueva la camera hasta que el sujeto se entrega en la posicion que ugusted seesee dentro del ocular del visor (11).

VISOR
- Oprima Completely el disparador paraayar la fotografia.
Consejos para Obtenerolestes fotografias
- Acerquese lo suficiente al sujeto a fotografia de modo que este ocupe todo el visor, pero no masURTCA DE 0,4 m 1,3 pies).
Tome fotografias al nivel del sujeto. Arrodillese para fotografiar niños y animales.
Haga tomas verticales de susjetos altos y angostos, como cascadas, rascacielos o una persona sola.
- Agregue interes a sus fotografias incluyendo una rama, una ventana o una Hera.
- Mantengase de espalda al sol.
Así se logra la mayor iluminación del sujeto.
- Pârese en ángulo a superficies brillantes tal como ventanas o espesos, para de esta forma evitar refléjos del flash y manchas luminosas en sus fotografías.
- Encienda todas las luces en el cuarto y haga que su sujet mire a la luz de reduccion de ojos rojos para reducir los ojos rojos en fotografias con flash.
OPCIONES DEL USO DEL FLASH Y LA TOMA DE FOTOGRAFIAS
Además del modo de flash automático (configuración predeterminada de fabricula de laamera), pueda seleccionar flash derelleno, flash apagado, enfoque infinito sin flash y vista de noche con flash.
Oprima repetidamente MODOS (MODES) (20) para esconger el modo de flash que mejor favorece a su sujejo y contornos. Internacionalmente, esconger el modo de toma de fotografia que le permite ajustar las configuraciones automaticas de laamera.
Indicador de flash/lampara de CAMERA lista
Cuando oprima parcialmente el disparador (1) y la lámpara de flash/camera lista (10) brille verde, el flash está Completely cargado y lista para que usted pueda tener la fotografia.
Flash automático

APɑca luz, ya sea en interiores, en exteriores donde hay mucha sombra o en días oscuros o nublados, necessitar auser el flash. Su CAMERA incluye un flash automatico el cui se dispara cuando es besoinio.
El flash abatibleGROUND a reducir al minimo los ojos rojos en fotografias con flash y previene la obstruccion del lente.
Flash de relleno

Cuando alayar la fotografia haya un sol brillante o cuando los@sujetos tengan como iluminacion de fondo una luz brillante, esta iluminacionuedecausar sombras (especialmente enlas caras).Use el flash de relleno para aclarar estas sombras y para añadir vivacidad los ojos de su suteto.
Flash apagado

Cuando no quiera usar el flash,
especialmente en interioresdonde
el uso del flash está prohibido o
cuando quiera capturar el ambiente
con la luz existente, use la
characteristica de flash apagado. Use un tripié o coloque laamera sobre otra base firme, y usepellicula de alta sensibilitidad de ISO porque la mayor probabilitad es que la abertura del diafragma, en estas situaciones, sera lenta.
Vista de noche

Use este modo para crea un balance entre el flash y la luz presente y poderizar fotografias bellas de personas a la puesta del sol o por la noche. Use un tripie o colque laamera sobre otra base firme y usepelicula de alta sensibilitidad porque la mayor
probabilidad es que la abertura del diafragma, por las noches, sera lenta.
Enfoque infinito
Capture fotografías nitidas de escenas a mucha distancia cuando tome fotografías en exteriores durante el día o a工程技术 de una planta.
Como seleccionar las.optiones de flash y toma de fotografias
-
Levante completeness la cubierta del lente/flash (2) para levantar el flash y encender la camarra.
-
Mantenga al sujeto a fotografia bajo el alcance indicado para la sensibility de la película en su cármara (vea la sección Distancia entre el sujejo y el flash en la頁a 76).
-
No tome fotografías a más distancia de la indicada o sus fotografías saldrán oscuras.
-
Oprima repetidamente MODOS (MODES) (20) hasta que la flecha de selector deodos (26) apunta al indicator de flash automatico (23),indicador de flash de relleno (24), o el indicator de flash apagado (25), o hasta que el indicator de enfoque infinito (28) o el indicator de vista de noche (29) aparezcan en el panel de cristal liquido (9).
-
Encuadre a su susjeto dentro del ocular del visor (11).
-
Oprima parcialmente el disparador (1). Cuando la lámpara de flash/camara lista (10) brille verde, oprima Completely el disparador paraayarla fotografia.
Losrchos de la fotografia. Para cancelar la seleccion,oprima MODOS para seleccionar other configuracion o cierra y vuela a abrir la cubierta del lente/flashpara regresar automaticallya la configuracion predeterminada de fabrica de laamera.
Señales de flash/lampara de advertencia
| Indicador luminoso | Situación |
| Brilla verde | ·El flash está Completely cargado |
| Brilla rojo* | ·El sujeeto se incluye más cerca de 0,4 m (1,3 pies) de la*camara |
| "Parpadea" rojo* | ·El flash no está cargado Completely |
| ·Movimiento de la*camara |
- Para educación más detallada, vea la lista PROBLEMAS Y SOLUCIONES.
Distancia entre el sujeto y el flash
| Sensibilidad ISO | Distancia entre el sujeto y el flash de lapellicula |
| 50 | 0,4 a 2,7 m (1,3 a 9 pies) |
| 100 | 0,4 a 4,0 m (1,3 a 13 pies) |
| 200 | 0,4 a 5,5 m (1,3 a 18 pies) |
| 400 | 0,4 a 7,9 m (1,3 a 26 pies) |
| 800 | 0,4 a 11 m (1,3 a 36 pies) |
| 1600 | 0,4 a 15,8 m (1,3 a 52 pies) |
COMO USAR EL AUTODISPARADOR

Use la caracteristica de auto-disparadoro cuando se quiera incluir en las fotografias.
- Use el montaje para tripode (21) para montar la CAMERA en el tripio o colocque la CAMERA sobre othera base firme
-
Levante completeness la cubierta del lente/flash (2) para levantar el flash y encender la CAMERA.
-
Oprima ENTRAR (ENTER) (14).
-
Elindicadoradobotdisparador31)apacere inelpanelde cristalfiquido9).
-
Mire a工程技术 del ocular del visor (11) para componer la fotografia y para hacer un espacio libre en la fotografia sobre el peñado colocarse.
-
Oprima el disparador (1).
- Situés rápidamente en el espacio quedeo libre asegurándose de que pueda ver la lampara de autodisparador (4).
-
La lámpara de autodisparador en el frente de la-camera parpadea aproximadamente 10segundosantesdeTomarafotografia.
-
Para cancelar la selección de autodispasarán前后 tomar la fotografia,oprima ENTRAR (ENTER) dos veces o cierra la cubierta del lente/flash.
- Después que tome la fotografia, el autodis- parador se apaga automatistically.
COMO CONFIGURAR EL TITULO DE LA IMPRESION Y EL IDIOMA
Escoja un titulo de uno de los diez titutos programados y seleccione un idioma (6 OPCIONES) antes deizar la fotografia. El titulo que
seLECTIONe sera registrado en la franja magnética de lapellicula. Laboratorios certifications
en el Advanced Photo System imprimirán el titleseLECTIONado en la parte de atras de su fotografia.

- Oprima repetidamente MENU (MENU) (13) hasta que el indicator de seleccion de tuito (32) aparece en el panel de cristal liquido (9).
-
Oprima SELECTION (SELECT) (18).
-
El «indicador de selección de titulo» y la designación Ningun-titulo (cerrar titulo) «_» parpadean.
- Oprima repetidamente y/o mantenga oprimido SELECTION (SELECT)(18) para seleccione el numero correspondiente al titulo que ugusted desee. Vea la lista de seleccion de titulos en la page 82.
-
Oprima ENTRAR (ENTER) (14) para configurar el Titulo y para comenzar la configuracion del idioma.
-
El número del idioma «US» y el «indicador de selección de titulo» parpadean.
-
Oprima repetidamente SELECTION (SELECT) (18) para seleccionar el@codigo correspondiente alidioma que usted desee.Vea la Liesta de codigos de idioma en la pagea 83.
- Oprima ENTRAR (ENTER) (14) para configurar el idioma y terminar su seleccion.
-
El titles de impresión/idioma permanece selecciónado antes que ugusted tome la fotografia.
-
Para cancelar el titulo en fotografias subsecueres, sigas los pasos 1 al 3 pero para el paso 3 seleccione Ningun-titulo (cancelar titulo) «_» o seleccione un titulo diferente.
Lista de selección de titulos
La?siquiente tabla indica losnumeros de los titulos guardados en la memoria de la CAMERA.
| Número de titULO | Titulo |
| 01 | Cuplescaños |
| 02 | Vacaciones |
| 03 | Boda |
| 04 | Graduación |
| 05 | Felicidades |
| 06 | Navidad |
| 07 | Fiesta |
| 08 | Te quiero |
| 09 | Fiesta |
| 10 | Familia |
| -- | Ningún titulo (cancelar titULO) |
Lista de selección de idiomas
| Códigoidioma | deldioma |
| US | Inglés en losEstados Unidos |
| En9 | Inglés en elReino Unido |
| FrA | Francés |
| ESP | Espanol |
| dEU | Alemán |
| JP | Katakana |
COMO DESCARGAR LA PELICULA
Rebobinado automática
La webcam automatistically rebobina la pellicula en el cartucho una vez que se haya tornado la ultima fotografia.
-
Espere a que lapelicula se rebobine completamente dentro del cartucho y a que el motor se detenga.
-
Cuando el motor se detenga, el contagador de fotografia (35) indica 0
-
Mueva el interruptor de la puerta del compartmento de la pellicula (17) paraaabrir la puerta del compartmento de la pellicula (15).
-
Retire el cartucho depellicula de la camaray y vuela a cargarla con un rollo nuevo depellicula KODAK ADVANTIX.
-
El FSI en el cartucho depellicula Completelyexpuesto está en ±bx (posicion #3)y el contador offotografias exhibirá «E».

Rebobinado manual
Si no deseaayar todas las fotografias en el rollo completo de pellicula,uede manual-mente comenzar la reboinado automatico.
- Oprima suavamente el botón del rebo-binado de lapellicula (12) con el activador de los botones de control en la hebilla de la correa de la CAMERA para comenzar el rebobinado automatico de lapellicula.
- Vea los pasos del 1 al 3 de la sección Rebobinado automático.
NOTA: En esta CAMERA, no(puede volver a cargarpellicula parcialmente expuesta ycontinuar tomando fotografias.
CUIDADO DE SU CAMARA
Proteja la-camera del polvo, humedad, golpe repentino, y calor excessivo.
Precaución: No use solvents oSolutiones asperas o abrasivas en el cuero de laamera.
- Si el lente se ve sucio, cubralo con su allyento para empasarlo y limpie la superficie cuidadosamente con un paño suave que no tengapelulas o con un pañuelo especially disnéado para la limpieza de lentes. Nunca limpie el lente en seco.
Precaución: No use solventa o satisfueras que no hayan sido capazidades de las manos.
No usepanicuelos con químicos diseñados para la limpieza de lentes de las camareras. No usepanuelos con químicos diseñados para la limpieza de gafas.
- Remueva la bateria cuando vaya a guardar la CAMERA por un periodo de tiempo prolongado.
Precaución: Para prevenir la posibididad de dano y是如何 electrico, no trate, ustcd甚么, de desarmar o reparar la CAMERA o launidad del flash.
PROBLEMAS Y SOLUCIONES
| Problema | Causa probable | Soluciones |
| Laámara no funciona | La batería está débil, descargada, mal colocada, o falta colocarla | Reemplace o vuelva aargar la bateria |
| La cubierta del lente/flash está cerrada | Abra la cubierta del lente/flash | |
| Lapelícula no avanza o se rebobina | La batería está débil, descargada, mal colocada, o falta colocarla | Reemplace o vuelva aargar la bateria |
| El panel de cristal liquido está en blanco | La batería está débil, descargada, mal colocada, o falta colocarla | Reemplace o vuelva aargar la bateria |
| Laámara está en el modo de apagado automatístico | Vea Apagado auto-mático en la págrina 61 | |
| El panel de cristal liquido está en blanco | La cubierta del lente/flash está cerrada | Abra la cubierta del lente/flash |
| El disparador no funciona | La cubierta del lente/flash está cerrada | Abra la cubierta del lente/flash |
| La lámpara de flash/camera lista “parpadea” rojo | El flash no está Completely cargado | Espere a que la lámpara brille verde |
| No hay suficiente iluminación | Use la característica de flash de relleno y vuelva a composer su fotografia | |
| Movimiento de la*camera | Mantenga la*camera estable | |
| La lámpara de flash/cármara lista brilla rojo y el disparador se traba | El sujeeto se encuesta entre 25.4 cm (10 plgds.) y 35.6 cm (14 plgds.) de la cármara | Párese más lejos del sujeeto y vuelve a composer la fotografia |
| El indicator de la presencia de lapelícula «parpadea» en el panel de cristal liquido | La cármara hasido cargada conpelícula expuesta (X), parcialmente expuesta (Y) o procesada (■) | Cargue la cármara solamente conpelícula nuevo (●) |
| La puerta del compartmentimiento de lapelícula no abre | Hay un cartucho depelícula cargado en el compartmentimiento de lapelícula | Oprima el botón de rebobinado (vea Rebobinado manual en la頁a 85) o continúptomando fotografías |
ESPECIFICACIONES
Tipo depellicula:
Película KODAK ADVANTIX parafotografiaas a color y blanco y negro
Lente: KODAK EKTANAR todo vidrio con enfoque automatico motorizzato de 28 mm, f/3,5
Grupo de enfoque: Activo AF con 130 zonas
Alcantac del enfoque: De 0.4m (1,3 pies) a infinito
Visor: Imagen real con exhibencia de forma C, H y P
Sensibility de la或多cula:
DXIX (ISO) 50-1600 para fotografias a color y blanco y negro
Unidad del flash:
Integroado, flash KODAK SENSALITECTM
Alcance del flash (ISO 200): 0,4-5,5 m (1,3-18 pies)
Abertura de diafragma: f / 3,5 - f / 11
Obturator: Programado, obturador con completinga abertura de 1/4-1/500segundos
Fuente de energia: Primaria: una bateria de litio de 3 voltios KODAK KCR2 (o su equivalente)
Dimensiones: 91,8 x 60,9 x 33,8 mm (3,6 x 2,4 x 1,3 pulgadas)
Peso: 118 g (4,2 onzas) sin pelicula n Baheria
El sintbolo y logotipo de Kodak, Advantix, Ektanar, Sensalite, y el Advanced Photo System son MARCAS registrasidas
NOTES
- Camera Identification
- LCD Panel
- KODAK ADVANTIX
- T570 Auto-Focus Camera
- NEED HELP WITH YOUR CAMERA OR MORE INFORMATION ABOUT THE ADVANCED PHOTO SYSTEM?
- CONTENTS
- CAMERA FEATURES AND BENEFITS ... 3
- GETTING STARTED 7
- CONTROL-BUTIONACTUATOR 13
- OTHER BATTERY INFORMATION 13
- LOADING THE FILM 16
- TAKING PICTURES 18
- FLASH AND PICTURE
- TAKING OPTIONS 23
- CAMERA FEATURES AND BENEFITS
- Three Print Formats
- Picture Quality Information Exchange (PQix)
- Date, Time, and Title Imprinting
- Flip Flash
- Double Exposure Protection (DEP)
- Easy, Drop-in Loading
- Film Status Indicator (FSI)
- GETTING STARTED
- Loading the battery
- Date and time
- Setting the date
- Setting the time (hour/minutes)
- Attaching the camera strap
- CONTROL-BUTION ACTUATOR
- OTHER BATTERY INFORMATION
- Low-battery indicator
- Battery tips
- Automatic Energy Saving Features
- Power shut-off
- LOADING THE FILM
- TAKING PICTURES
- Typical print sizes (formats)
- Using the focus lock
- Tips for better pictures
- FLASH AND PICTUREDAKING OPTIONS
- Flash/camera-ready lamp indicator
- Auto flash
- Fill flash
- Flash off
- Nightview
- Infinity focus
- Selecting the flash and picture-taking options
- USING THE SELF-TIMER
- SETTING THE PRINT TITLE AND LANGUAGE
- Title-select list
- Language-select list
- UNLOADING THE FILM
- Automatic rewind
- Manual rewind
- CARING FOR YOUR CAMERA
- SPECIFICATIONS
- J.NECESITA AYUDA CON SU CAMARA O MAS INFORMACION ACERCA DEL ADVANCED PHOTO SYSTEM?
- Identificacion de la CAMERA
- CONTENIDO
- BENEFICIOS Y CHARACTERISTICAS
- PROCEDIMIENTOS INICIALES .... 52
- ACTIVADOR DEL BOTON
- INFORMACION ADICIONAL
- COMO CARGAR LA PELICULA...... 61
- COMOTOMARFOTOGRAFIAS 63
- OPCIONES DEL USO DEL FLASH
- BENEFICIOS Y CHARACTERISTICAS DE LA CAMARA
- Selección triple de formatting
- Intercambio de información sobre la calidad de la fotografia (PQix)
- Impresión de Fecha, hora y titulo
- Flash abatible
- Protección en contra de doble exposión (DEP)
- Carga de rollo fácil
- Indicador del estado de lapellicula (FSI)
- PROCEDIMIENTOS INICIALES
- Como cargar la bateria
- Fecha y hora
- Como configurar la Fecha
- Como configurar la hora (hora/minutos)
- comoajustarla correa de la camarara
- ACTIVADOR DEL BOTON DE CONTROL
- INFORMACION ADICIONAL SOBRE LA BATERIA
- Indicador de bateria débil
- Consejos para usar la bateria
- Characterística de Ahorro Automático de Energía
- Apagado automatico
- COMO CARGAR LA PELICULA
- COMOTOMAR FOTOGRAFIAS
- Tamaños típicos de impresión (formatos)
- Como usar el carrojo de enfoque
- Consejos para Obtenerolestes fotografias
- OPCIONES DEL USO DEL FLASH Y LA TOMA DE FOTOGRAFIAS
- Indicador de flash/lampara de CAMERA lista
- Flash automático
- Flash de relleno
- Flash apagado
- Vista de noche
- Enfoque infinito
- Como seleccionar las.optiones de flash y toma de fotografias
- Señales de flash/lampara de advertencia
- COMO USAR EL AUTODISPARADOR
- COMO CONFIGURAR EL TITULO DE LA IMPRESION Y EL IDIOMA
- Lista de selección de titulos
- COMO DESCARGAR LA PELICULA
- Rebobinado automática
- Rebobinado manual
- CUIDADO DE SU CAMARA
- ESPECIFICACIONES
- Tipo depellicula:
- Sensibility de la或多cula:
- Unidad del flash:
- NOTES
Marque : KODAK
Modèle : T570
Catégorie : Appareil photo