MODE D'EMPLOI ADVANTIX T550 KODAK
Kodak
ADVANTiX
T550 Auto Focus Camera
Camera Identification
Camera Identification
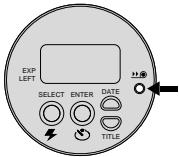
LCD Panel
| This device complies with part 15 of the FCC Rules. Operation is subject to the following two conditions: (1) this device may not cause harmful interference, and (2) this device must accept any interference received, including interference that may cause undesired operation. |
| NOTE: Your model camera has been tested and found to comply with the limits for a Class B digital device, pursuant to Part 15 of the FCC Rules. These limits provide reasonable protection against interference in residential use. The camera generates, uses and can radiate radio frequency energy and, if not used in accordance with the instructions, may cause interference to radio communications. There is no guarantee that interference will not occur. If this camera does cause interference to radio or television reception, which can be determined by turning the camera off and on, you may reduce the interference by the following:
— Reorient or relocate the receiving antenna.
— Increase the separation between the camera and the receiver.
— Consult the dealer or an experienced radio/television technician for help.
Changes or modifications not approved by the party responsible for compliance could void the user's authority to operate the equipment. |
Welcome to the innovative world of the Advanced Photo System! And thank you for buying this KODAK ADVANTIX Camera.
NEED HELP WITH YOUR CAMERA?
Go to our web site at http://www.kodak.com or call:
Kodak in your country.
When you call, please have your camera available.
For warranty purposes, please keep your sales receipt as proof of the date of purchase.
ADVANCED PHOTO SYSTEM FEATURES AVAILABLE WITH THIS CAMERA
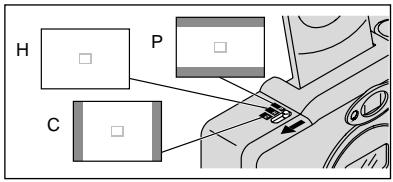
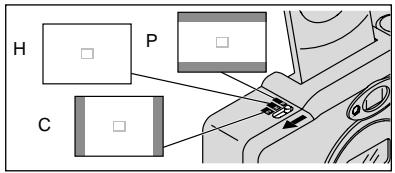
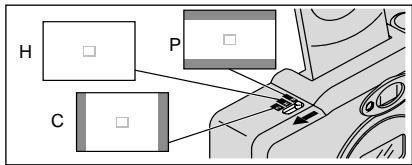
- You can take three different size pictures: Classic (C), Group/HDTV (H), and Panoramic (P) pictures from the same film cassette. The viewfinder frame changes to match each format selection.
Date and time imprinting/titling
- You can choose to have date and time information printed on the front and back of your prints or on the back only.
- With this camera, you can also choose a title from the Title-select list and a language (five options) before taking the picture. The selected title will be printed on the back of your photograph. (See your photofinisher for a full description of available services.)
Double exposure protection (DEP)
- You don't need to worry about accidentally re-exposing your film. Your camera reads the Film Status Indicator (FSI) on the film cassette to prevent re-exposure.
- Your camera features magnetic information exchange that records information about lighting conditions and exposure on the film cassette to assist the photofinishing lab with color correction and exposure adjustments, providing you with the best possible results.

Look for this logo to be certain that the film you buy is made for this camera.

Look for this logo to select a certified photofinisher for developing your film and to assure that you get all the features of the Advanced Photo System.
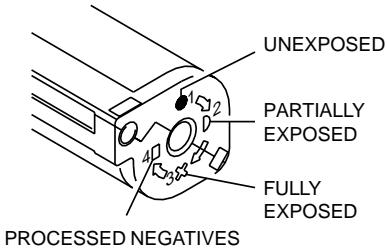
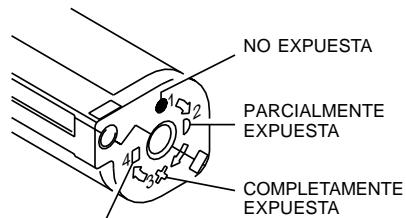
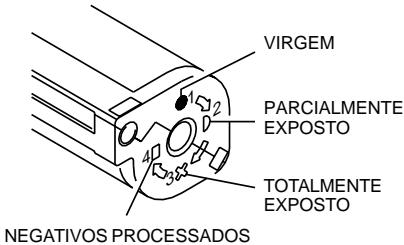
Film Status Indicator (FSI)
A highlighted indicator advances from one symbol to another to identify the status of the film inside the cassette.
CONTENTS
CAMERA IDENTIFICATION 5
ATTACHING THE STRAP 6
LOADING THE BATTERY 6
Low-battery indicator 6
Battery tips 7
Power shut-off 7
LOADING THE FILM 7
TAKING PICTURES 8
Typical print sizes (formats) 9
Using the focus lock 9
Tips for better pictures 10
TAKING FLASH PICTURES 10
Flash/warning-lamp signals 11
Flash-to-subject distance 11
SELECTING THE FLASH AND
INFINITY-FOCUS MODES 11
Fill flash 11
Flash off 12
Night-view 12
Infinity focus 13
USING THE SELF-TIMER 13
DATE AND TIME IMPRINTING 14
Setting the date and time 14
SETTING THE LANGUAGE 15
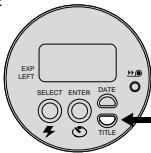
PRINT TITLE IMPRINTING 15
Title-select list 16
UNLOADING THE FILM 16
Automatic rewind 16
Manual rewind 17
CARING FOR YOUR CAMERA .17
TROUBLESHOOTING 18
SPECIFICATIONS 19
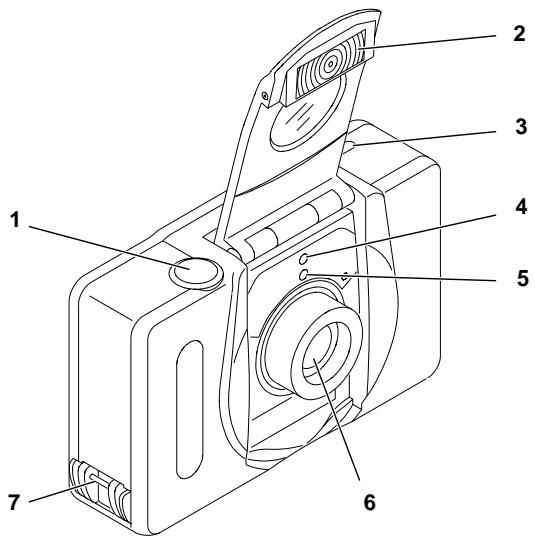
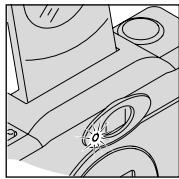
CAMERA IDENTIFICATION
(see inside cover flaps for camera diagrams)
1 SHUTTER BUTTON
2 LENS COVER/FLASH
3 FORMAT-SELECTOR SWITCH
4 SELF-TIMER LAMP
5 METER-CELL WINDOW
6 LENS
7 STRAP POST
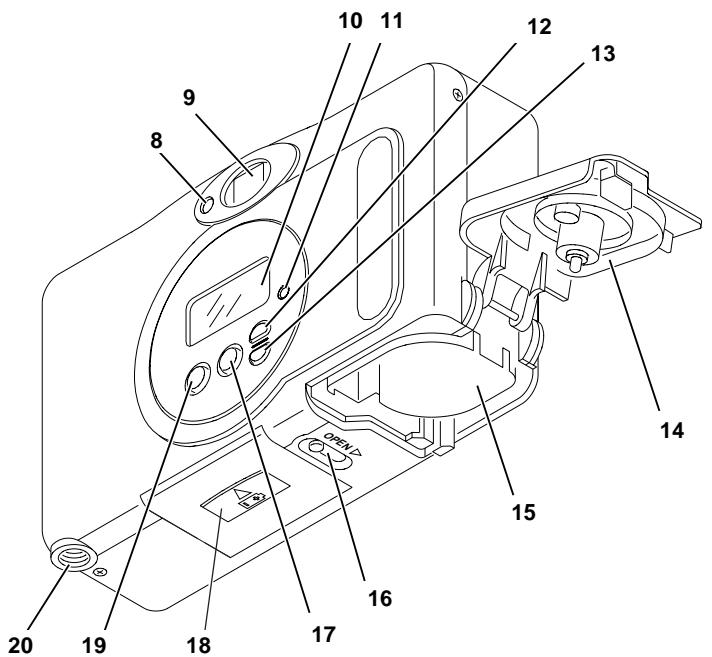
8 FLASH/CAMERA-READY LAMP
9 VIEWFINDER EYEPIPCE
10 LCD PANEL
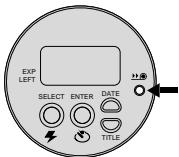
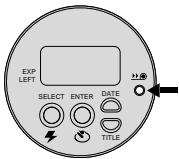
11 FILM-REWIND BUTTON
12 DATE BUTTON
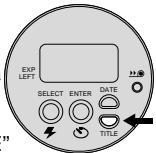
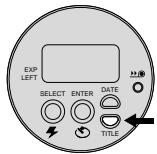
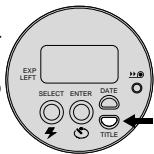
13 TITLE BUTTON
14 FILM DOOR
15 FILM CHAMBER
16 FILM-DOOR SWITCH
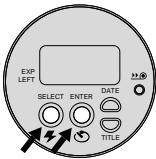
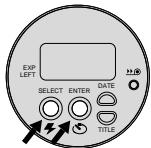
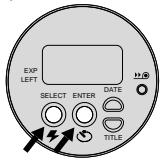
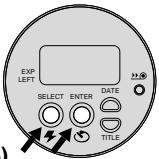
17 ENTER/SELF-TIMER BUTTON
18 BATTERY DOOR
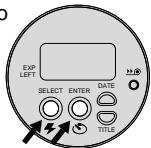
19 SELECT/FLASH BUTTON
20 TRIPOD SOCKET
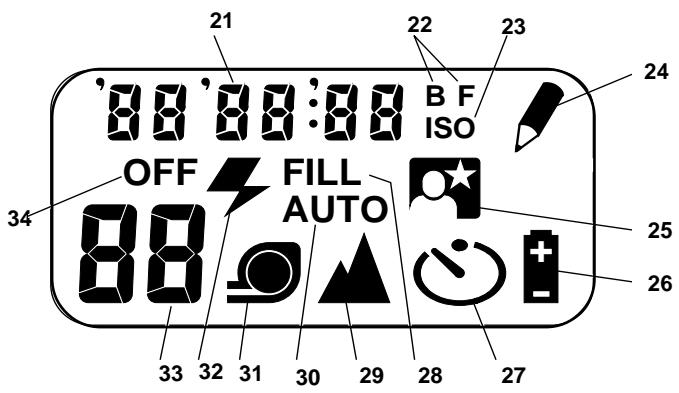
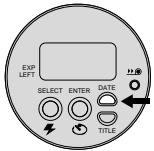
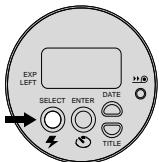
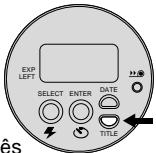
LCD Panel
21 DATE/TIME DISPLAY
22 BACK-/FRONT-PRINTING INDICATOR
23 ISO FILM-SPEED DISPLAY
24 TITLE-SELECT INDICATOR
25 NIGHT-VIEW INDICATOR
26 BATTERY SYMBOL
27 SELF-TIMER INDICATOR
28 FILL-FLASH INDICATOR
29 INFINITY-FOCUS INDICATOR
30 AUTO-FLASH INDICATOR
31 FILM-PRESENCE INDICATOR
32 FLASH SYMBOL
33 FRAME COUNTER
34 FLASH-OFF INDICATOR
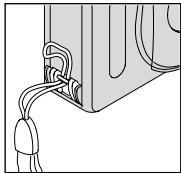
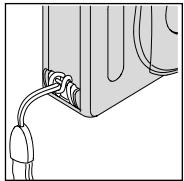
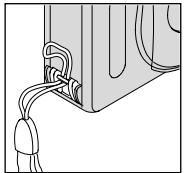
ATTACHING THE STRAP
- Insert the shorter looped end of the strap behind the STRAP POST (7).
- Thread the longer end of the strap through the shorter loop.
- Pull the strap tight.
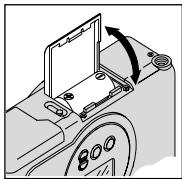
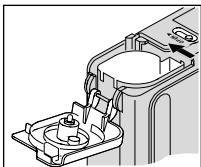
LOADING THE BATTERY
This camera uses one 3-volt lithium KODAK KCR2 (or equivalent) Battery that supplies power for all camera operations.
-
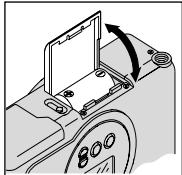
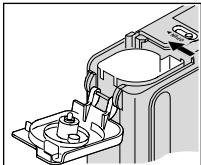
Open the BATTERY DOOR (18).
-
Before you remove the old battery, close the lens cover/flash.
-
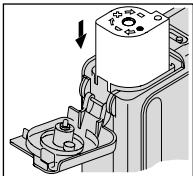
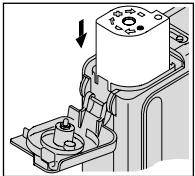
Insert the battery into the chamber as shown.
- Snap the battery door closed.
After you load a new battery into the camera, you will need to reset the date and time.
Low-battery indicator
It's time to replace the battery when
- the BATTERY SYMBOL (26) "blinks" on the LCD PANEL (10) or
- none of the indicators, except for a "blinking" battery symbol, appears on the LCD panel and the SHUTTER BUTTON (1) cannot be released.
Battery tips
- Remember to keep a spare battery with you at all times.
- Read and follow all warnings and instructions supplied by the battery manufacturer.
- Keep batteries away from children.
- Do not try to take apart, recharge or short circuit the battery, or subject it to high temperature or fire.
- Store batteries in their original packaging prior to use.
Power shut-off
To save battery power, the camera will automatically go into a sleep mode if it is not operated for more than approximately 3 minutes. You can press any of the control buttons to awaken the camera.
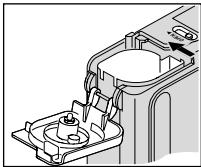
LOADING THE FILM
You can load film into the camera with the
camera ON or OFF.
- Turn the camera upside down and move the FILM-DOOR SWITCH (16) to open the FILM DOOR (14).
-
The safety interlocked film door will open only when the film chamber is empty or the film in the camera is completely rewound into the film cassette.
-
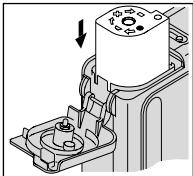
Insert the film cassette completely into the FILM CHAMBER (15).
Make sure the Film Status Indicator (FSI) on the film cassette is a new cassette.
- Do not force the film cassette into the film chamber.
- Close the film door to start the auto-film advance. The FRAME COUNTER (33) on the LCD PANEL (10) will show the number of frames remaining on the film cassette.
TAKING PICTURES
You can take Classic (C), Group/HDTV (H)^* , and Panoramic (P) pictures on the same film cassette. Your photoprocessing cost may be based on the format size(s) that you use to expose the film.

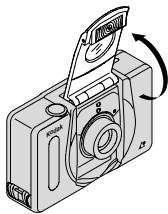
- Open the LENS COVER/FLASH (2) to raise the flash and to turn the camera ON.
- Move the FORMAT-SELECTOR SWITCH (3) to select desired format (C, H, or P) . The viewfinder will change to show the selected field of view.
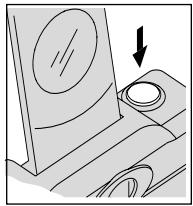
- Frame your subject within the VIEWFINDER EYEPIECE (9). For a sharp picture, stand at least 0.4m from your subject.
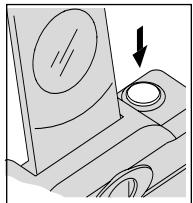
- Partially depress the SHUTTER BUTTON (1). When the FLASH/ CAMERA- READYLAMP (8) glows green, fully depress the shutter button to take the picture (see table for Flash/warn
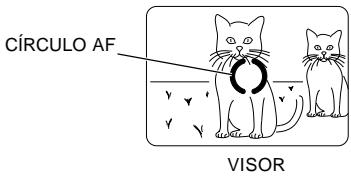
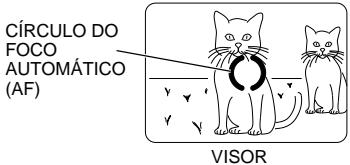
Using the focus lock
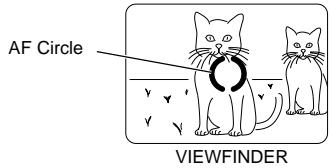
This camera automatically focuses on whatever is within the auto-focus (AF) circle of the viewfinder eyepiece. To get a sharp picture, make sure the AF circle is on your main subject. If you want to take a picture with the subject positioned outside of the AF circle, use the focus lock as follows:
- Place the AF circle on the subject that you want focused in the picture.
| C | H | P |
| Classic | Group (HDTV) | Panoramic |
| 88.9 x 127 mm or 102 x 152 mm | 88.9 x 152 mm or 102 x 178 mm | 88.9 x 216 mm to 102 x 292.7 mm |
NOTE: Your photofinisher will generally provide 102 x 152, 102 x 178, and 102 x 292.7 mm sizes. Some local printers may offer 88.9 x 127, 88.9 x 152, and 88.9 x 216 mm sizes.
-
Partially depress and hold the SHUTTER BUTTON (1) to lock the focus position.
-
While still partially depressing the shutter button, move the camera until your subject is where you want it within the VIEWFINDER EYEPIECE (9).

VIEWFINDER
- Press the shutter button completely down to take the picture.
Tips for better pictures
- Move close enough to your subject so it fills the viewfinder but not closer than 0.4 ~m .
- Take pictures at the subject's level. Kneel down to take pictures of children and pets.
- Hold your camera vertically to capture tall, narrow subjects, such as a waterfall, skyscraper, or a single person.
- Add interest to your picture by framing it with a tree branch, a window, or even the rails of a fence.
- Keep the sun behind you. This provides the best subject illumination.
TAKING FLASH PICTURES
In dim light, such as indoors or outdoors in heavy shade, or on dark overcast days, you need flash. Your camera features an automatic flash that fires when you need it. The flip-up flash helps to minimize red eyes in flash pictures and to prevent hand obstruction in front of the flash.
- Open the LENS COVER/FLASH (2) to raise the flash and to turn the camera ON.
- Frame your subject within the VIEWFINDER EYEPIECE (9).
- Partially depress the SHUTTER BUTTON (1). When the FLASH/CAMERA-READY LAMP (8) glows green, fully depress the shutter button to take the picture (see Flash lamp signals).
- Keep the subject within the distance range for the speed of film in your camera (see Flash-to-subject distance). Don't take pictures beyond the maximum distance or your pictures will be dark.

Flash/warning-lamp signals
| Lamp Indicator | Situation |
| Glows green | Flash fully charged |
| "Blinks" green | Camera shake warning* |
| Glows red | Subject closer than 0.4 m |
| "Blinks" red | Flash not fully charged* |
- See TROUBLESHOOTING table for more information.
Flash-to-subject distance
| ISO film speed | Flash-to-subject distance |
| 50 | 0.4 to 2.7 m |
| 100 | 0.4 to 4.0 m |
| 200 | 0.4 to 5.5 m |
| 400 | 0.4 to 7.9 m |
| 800 | 0.4 to 11 m |
| 1600 | 0.4 to 15.8 m |
SELECTING THE FLASH AND INFINITY-FOCUS MODES
Besides the auto-flash mode, you can
select fill flash, flash off, night-view, and infinity-focus modes.
Press the SELECT/FLASH BUTTON (19) until the desired indicator appears on the LCD PANEL (10).
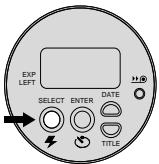
The flash and infinity-focus modes remain selected after you take the picture. To cancel the selection, press the select/flash button or close and reopen the lens cover/flash to return to the auto-flash start position.
Fill flash

When bright light indoors or outdoors comes from behind the subject (backlighting), dark shadows (especially on faces) may occur. Use fill flash to lighten these shadows.
-
Open the LENS COVER/FLASH (2) to raise the flash and to turn the camera ON.
-
Press the SELECT/FLASH BUTTON (19) repeatedly until the FILL-FLASH INDICATOR (28) appears on the LCD PANEL (10).
- Frame your subject within the VIEWFINDER EYEPIECE (9).
- Partially depress the SHUTTER BUTTON (1). When the FLASH/CAMERA-READY LAMP (8) glows green, fully depress the shutter button to take the picture.
Flash off

When you do not want to use the flash, especially indoors where flash is prohibited, such as in theaters and museums, or when you want to take twilight scenes or distant subjects that are beyond the flash range, or capture the ambiance of existing light, use the flash-off feature. Use a tripod or place the camera on another firm support, and use high-speed film because the shutter speed in these situations will most likely be slow.
-
Open the LENS COVER/FLASH (2) to raise the flash and to turn the camera ON.
-
Press the SELECT/FLASH BUTTON (19) repeatedly until the FLASH-OFF INDICATOR (34) appears on the LCD PANEL (10).
- Frame your subject within the VIEWFINDER EYEPIECE (9).
- Press the SHUTTER BUTTON (1) to take the picture.
Night-view

In this mode, the camera balances the flash and existing light exposure so you can take beautiful pictures of people at sunset or at night. Use a tripod or place the camera on another firm support, and use high-speed film because the shutter speed at night will most likely be slow.
- Open the LENS COVER/FLASH (2) to raise the flash and to turn the camera ON.
-
Press the SELECT/FLASH BUTTON (19) repeatedly until the NIGHT-VIEW INDICATOR (25) with flash appears on the LCD PANEL (10).
-
Frame your picture in the VIEWFINDER EYEPIECE (9).
- Press the SHUTTER BUTTON (1) to take the picture.
Infinity focus

In this mode, you can capture sharp, distant scenery when you take pictures outdoors.
- Open the LENS COVER/FLASH (2) to raise the flash and to turn the camera ON.
- Press the SELECT/FLASH BUTTON (19) repeatedly until the INFINITY-FOCUS INDICATOR (29) appears on the LCD PANEL (10).
- Frame your subject within the VIEWFINDER EYEPIECE (9).
- Press the SHUTTER BUTTON (1) to take the picture.
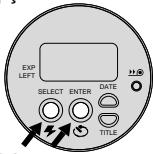
USING THE SELF-TIMER

Use this feature to include yourself in pictures.
- Use the TRIPOD SOCKET (20) to attach the camera to a tripod or place it on another firm support.
- Open the LENS COVER/FLASH (2) to raise the flash and to turn the camera ON.
- Press the ENTER/SELF-TIMER BUTTON (17).
- Frame your picture in the VIEWFINDER EYEPIECE (9).
-
Press the SHUTTER BUTTON (1). The SELF-TIMER LAMP (4) on the front of the camera will blink for approximately 10 seconds before the picture is taken.
-
To cancel the self-timer selection before the shutter releases, repress the enter/self-timer button or close the lens cover/flash.
- The self-timer automatically turns off after the shutter releases.
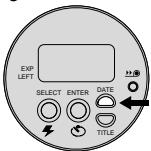
DATE AND TIME IMPRINTING
Traditional cameras print date and/or time information directly onto the film. Your camera uses the film's magnetic data-recording capability to record date and time information which your photofinisher can imprint on the back and front or back only of your photographs. This camera has a quartz clock and automatic calendar through the year 2029.
Setting the date and time
You can record the date in a choice of three formats: (year/month/day, month/day/year or day/month/year) and one time format (hour/minute).
-
Press the DATE BUTTON (12) repeatedly to scroll and select desired date and printing formats.
-
"B F" on the LCD panel indicates back- and front-printing options; "B" indicates back printing only.
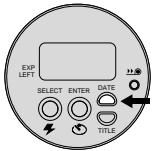
- Press and hold the date button until the first number(s) in the date-option mode "blinks."
- Press the SELECT/FLASH BUTTON (19) to change the number(s).
- Press the ENTER/SELFTIMER BUTTON (17) to store the selected number(s) and to activate the next "blinking" number(s) for date or time (follow steps 3 and 4 to complete your selection).

SETTING THE LANGUAGE
"US" English is initially set into the memory of this camera or you can change the language code to "FrE" for French, "SPA" for Spanish, "GEr" for German, or "JP" for Katakana.
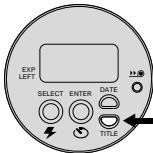
- Press and hold the TITLE BUTTON (13) for approximately 2 seconds. The title number and TITLE-SELECT INDICATOR (24) will "blink" on the LCD PANEL (10).
- Press the ENTER/SELF-TIMER BUTTON (17). The language code and TITLE-SELECT INDICATOR (24) will "blink."
- Press the SELECT/FLASH BUTTON (19) repeatedly to select the desired language code.
- Press the enter/self-timer button to set the information.
PRINT TITLE IMPRINTING
You can choose a print title from the Title-select list and choose a language (see
Setting the language)
before you take the picture. The title you select will be recorded on the film's magnetic data strip. At certified Advanced Photo System labs, the selected title will be printed on the back of your photograph.

- Press and hold the TITLE BUTTON (13) for approximately 2 seconds. The title number and TITLE-SELECT INDICATOR (24) will "blink" on the LCD PANEL (10).
-
Press the SELECT/FLASH BUTTON (19) to select the title number (see Title-select list for desired title number).
-
Press the ENTER/SELFTIMER BUTTON (17) twice to set the title.
-
The print-title selection cancels after you take a picture.
Title-select list
The following table indicates the title numbers for the in-camera stored titles.
| Title
Number | Title |
| 01 | Birthday |
| 02 | Vacation |
| 03 | Wedding |
| 04 | Graduation |
| 05 | Congratulations |
| 06 | Christmas |
| 07 | Holiday |
| 08 | I Love You |
| 09 | Party |
| 10 | Family |
UNLOADING THE FILM
Automatic rewind
The camera automatically rewrites the film into the cassette after the last exposure.
- Wait for the film to completely rewind into the film cassette and for the motor to stop running.
- When the motor stops running, the FRAME COUNTER (33) will indicate "0."
- Move the FILM-DOOR SWITCH (16) to open the FILM DOOR (14) and to partially eject the film cassette.
- Remove the film cassette from the camera and reload with new KODAK ADVANTIX Film.
- The FSI on the fully-exposed film cassette will be at X (#3 position) and the LCD panel will display "E."
Manual rewind

If you don't want to take pictures on the entire film, you can manually activate the automatic rewind.
- Press the FILM-REWIND BUTTON (11) to start the auto-film rewind.
- See Automatic rewind, steps 1-3.
NOTE: You cannot reload partially exposed film into this camera for continuous picture-taking.
CARING FOR YOUR CAMERA
- Protect the camera from dust, moisture, sudden impact, and excessive heat.
CAUTION: Do not use solvents or harsh or abrasive cleaners on the camera body.
- If the lens appears dirty, breathe on it to form a mist and wipe the surface gently with a soft, lintless cloth or a camera lens-cleaning tissue. Never wipe a dry lens.
CAUTION: Do not use solvents or solutions not designed for cleaning camera lenses. Do not use chemically treated tissues intended for cleaning eyeglasses.
- Remove the battery when you store the camera for an extended time.
CAUTION: To prevent possible damage and electrical shock, do not attempt to disassemble or repair the camera or flash unit by yourself.
TROUBLESHOOTING
| What happened | Probable cause | Solution |
| Camera will not operate | Battery weak, dead, missing, or improperly loaded | Replace or reload the battery |
| Film does not advance or rewind | Battery weak, dead, missing, or improperly loaded | Replace or reload the battery |
| LCD panel is blank | Battery weak, dead, missing, or improperly loaded | Replace or reload the battery |
| Camera in sleep mode | Press mode selector button or close and reopen lens cover/flash |
| Lens cover/flash closed | Open lens cover/flash |
| Flash/camera ready lamp "blinks" red | Flash not fully charged | Wait for lamp to glow green |
| Flash/camera ready lamp "blinks" green | Insufficient light | Use fill-flash feature and recompose picture |
| Camera movement | Hold camera steady |
| Flash/camera ready lamp glows red | Subject too close to camera | Move back and recompose picture |
| Film-presence indicator "blinks" on LCD panel | Loaded exposed (X), partially exposed (Y), or processed film (■) into the camera | Load only new film (●) into the camera |
| Film door does not open | Film cassette loaded in film chamber | Press the rewind button (see Manual rewind) or continue taking pictures |
SPECIFICATIONS
Film type: KODAK ADVANTIX Film for color and black-and-white pictures
Lens: Autofocusing 28 mm motorized, f/3.5, all-glass KODAK EKTANAR Lens
Focus system: 130 zones, active AF
Focus range: 0.4 m to infinity
Viewfinder: Real image with C, H, & P format display
Film-speed: DXIX (ISO) 50-1600 for color and black-and-white films
Flash unit: Built-in, KODAK SENSALITE™ Flash
Flash range (ISO 200): 0.4 - 5.5m
Apertures: f/3.5-f/11
Shutter: Programmed, full-aperture shutter 1/4-1/500 seconds
Power source: Main power: one 3 V lithium KODAK KCR2 (or equivalent) Battery
Dimensions: 392 X 61.5 X 34 mm
Weight: 120 g without film or battery
Este dispositivo cumple con la parte 15 de las reglamentaciones de la FCC. El manejo está supeditado a las siguientes dos conditiones: (1) Este dispositivo pueda no causar interferencia dañana, y (2) este dispositivoDebe acpetarrialquier interfeceria recibida, incluyendo interfeceria la cuales pudiese causar un funcionalement indesaeble.
NOTA: El modelo de su CAMERA ha sido ab的概率 y cumple con las limitaciones existables para un dispositivo digital Clase B, de acuerdo con la Parte 15 de las reglamentaciones de la FCC. Estas limitaciones proveen una proteccion reasonable en contra de la interferencia que se encuesta en uso residencial. La CAMERA genera, usa, y pueda emitir energia de Frequencia radial y si no es usada de acuerdo con las instrucciones,uede causar interferencia a comunicaciones de radio.No se可以选择 garantizar que esta interferencia no occurra.En caso de que esta CAMERA cause interferencia a la recepcion de radio o television, lo which maybe ser determinado encendiando y apagando la CAMERA,ouldecircurla interfencia能做到o lo suiviente:
- Vuelva a orientar o situar la antenna de recepción
- Aumente la distancia entre la camarà y el receptor
- Para recibirtips con el distribuidor o un先进技术pecializzato en radio/televisión
Cambios o modificaciones no abrobadas por el contratante responsable de acatar estas regulaciones podra anular la autoridad del consumidor para operar este equipo.
Bienvenidos al mundo innovador del Advanced Photo System!
Y gracias por comprar esta CAMERA KODAK ADVANTIX.
NECESITAAYUDA CONSUCAMARA?
Visite我们的址in la red mundial electrònica (worldwide web) a la direccion http://www.kodak.com o llame, en su País, a Kodak.
Cuando设计方案, por favor asegüres de tener la CAMERA disponible.
Para hacer valida la garantía, sirvase guardar el recibo de vente como prueba de la Fecha de compra.
CHARACTERISTICAS DEL ADVANCED PHOTO SYSTEM DISCONTINIBLES CONESTACAMARA
- Usted puede.tomar, en el本身就是 rollo, fotografias en tres tamanos differsentes: Clásico (C), Grupo/HDTV (H), y Panorámico (P). El marco del ocular del visor cambia según el formatting selecciónado.
Impresión de Fecha y hora/titulo
- Usted puede escoger si quiere que la informacion de la fecha y hora sea impresa en el ante y la parte de atras de sus fotografias o solamente en la parte de atras.
- Con estaámara, antes deayar la fotografia, usted también peut preseccionar titulos de la lista de selección de titulos y un idioma (cinco OPCiones). El titulo seleccionado sera impreso en la parte de aftas de su fotografia. (Vea a su serviceo de fotoacabado para una descripción total de los servicios disponibles).
Protección en contra de doble exposión (DEP)
- No debe preocuparse de accidentalmente volver a exponer supelícula ya usada. Su CAMERA lee el Indicador del estado de película (FSI) enel cartucho de laVELICU y de esta forma previene la doble exposión.
- Su CAMERAiene la caracteristica de intercambio de informacion magnetica laequal registra informacion, en el cartucho de la pelicula, acerca de la condidion deluminacion y exposicion.Estacharacteristica asiste al laboratorioo dephotoacabado en la rectificacion del color y losajustesdeexposacionyde esta forma se provee el mejorresultado possible.


Busque este logo para asegurar que la película que usted compre esté hecha para esta CAMERA.
Busque este logo para selectionar un service de fotocabajo certificado para revelar su rollo y para aseguarse de aprovechar todos los Beneficios del Advanced Photo System.
Indicador del estado de la película (FSI)
El indicator realizado avanzará de una posión a otra para identificar el estado de la película bajo del cartucho.
NEGATIVOS PROCESADOS
CONTENIDO
IDENTIFICACION DE LA CAMARA...... 25
COMO AJUSTAR LA CORREA
DE LA CAMARA 26
COMO CARGAR LA BATERIA 26
Indicador de bateria débil 26
Consejos para usar la bateria...... 27
Apagado automatico 27
COMO CARGAR LA PELICULA 27
COMOTOMARFOTOGRAFIAS 28
Como usar el cerrojo de enfoque .... 29
Tamaños típicos de impresión de fotografías (formatos) 29
Consejos utiles para Obtener meyes fotografias 30
COMO TOMAR FOTOGRAFÍAS
CON FLASH 30
Señales de la lámpara de advertencia del flash 31
Distancia del sujeto al flash 31
COMO SELECTIONAR LOS MODOS
DE FLASH Y ENFOQUE INFINITE ... 31
Flash de relleno 31
Flashapagado 32
Vista de noche 32
Enfoque infinito 33
COMO USAR EL
DISPARADOR AUTOMÁTICO 33
COMO IMPRIMIR LA FECHA Y HORA .. 34
Como fiar la Fecha y hora 34
COMO FIJAR EL IDIOMA 35
COMO IMPRIMIR EL TITOLO DE LA IMPRESION 35
Lista de selección de títulos 36
COMO DESCARGAR LA PELICULA .... 36
Rebobinado automatico 36
Rebobinado manual 37
CUIDADO DE LA CÁMARA 37
PROBLEMAS Y SOLUCIONES 38
ESPECIFICACIONES 39
IDENTIFICACION DE LA CÁMARA (vea las partes de adentro de la cubierta para los diagrams de la-camera)
1 DISPARADOR
2 CUBIERTA DEL LENTE/FLASH
3 INTERRUPTOR DE SELECTIONDE FORMATO
4 LÁMPARA DE DISPARADOR AUTOMÁTICO
5 VENTANA DE MEDIDOR DE CÉLULA FOTOELECTRICA
6 LENTE
7 PRESILLA DE LA CORREA
8 LÁMPARADE FLASH/CÁMARALISTA
9 OCULAR DEL VISOR
10 PANEL LCD
11 BOTON DE REBOBINADO DE PELICULA
12 BOTONDEFECHA
13 BOTONDE TITULO
14 PUERTA DEL COMPARTIMIENTO DE PELICULA
15 COMPARTIMIENTO DE PELICULA
16 INTERRUPTOR DEL COMPARTIMIENTO DE PELICULA
17 BOTONDE ENTRADA/DISPARADOR AUTOMÁTICO
18 PUERTA DEL COMPARTIMIENTO DE BATERIA
19 BOTONDE SELECTION/FLASH
20 MONTAJE PARATRIPODE
Panel LCD
21 EXHIBICION DE FECHA/HORA
22 INDICADOR DE IMPRESION DELANTE/ATRÁS
23 EXHIBICION DE SENSIBILIDAD ISO
24 INDICADOR DE SELECTION DE TITULOS
25 INDICADOR DE VISTA DE NOCHE
26 SIMBOLO DE BATERIA
27 INDICADOR DE DISPARADOR AUTOMÁTICO
28 INDICADOR DE FLASH DE RELLENO
29 INDICADOR DE ENFOQUE INFINITO
30 INDICADOR DE FLASH AUTOMÁTICO
31 INDICADOR DE LA PRESENCIA DE PELICULA
32 SIMBOLO DEL FLASH
33 CONTADOR DE CUADROS
34 INDICADOR DE FLASH APAGADO
COMO AJUSTAR LA CORREA DE LA CÁMARA
- Pase el extremocorto de la correadebajo de la PRESILLA DE LA CORREA (7).
- Ponga el extremo largo de la correa a工程技术 del corto.
- Tire de la correa hasta que quede ajustada.


COMO CARGAR LABATERIA
Esta CAMERA usa una batería de litio de 3 voltios KODAK KCR2 (o su equivalente) que proportionscionan la energia necesaria para todas las functions de la CAMERA.
-
Abra la PUERTA DEL COMPARTIMIENTO DE BATERIA (18).
-
Antes de retirar la bateria Usada, ciderre la cubierta del lente/flash.
- Coloque las baterías en su compartmentimiento comoAquise indica.
-
Cierre la puerta a presión.
-
Después que cargue la bateria新加 en la camara, necessitaré volver aponer la Fecha y hora.
Indicador de bateria débil
Debe &,i ar la bateria cuando -
- el SIMBOLO DE LA BATERIA (26) "parpadea" en el PANEL LCD (10) o
- ninguno de losindicadores,excepto el simbolo "parpadeante"de la bateria, aparece en el panel LCD y el DISPARADOR (1) no funciona.
Consejos para usar la bateria
- Acuédese de落户 a bateria de repuesto con usted en todo momento.
- Lea y siga todas las advertencias e instrucciones del fabricante de la bateria.
- Mantenga las baterías cuando el alcance de los niños.
- No intente descarmar, recargar o causar un cortocircuito en las baterías o exponerlas a altas temperatas o fuego.
- Antes de usarlas, guarde las baterías en su empaque original.
Apagado automatico
Cuando la CAMERA no se usa por aproximamente 3 instantos, esta se apagará automatistically para conservar la energia de la batería. Paraactivar la CAMERA,ouldoperimir综合素质 de los botones de control.
COMOCARGAR LAPELICULA
Puede cargarpelliculenu camara
cuando lamamara este ENCENDIDA o
APAGADA.
- Vire la CAMERA con lo de arriba hacía bajo y deslice la PALANCA DEL COMPARTIMIENTO DE PELICULA (16) PARA abrir la PUERTA DEL PELICULA (14).
- La puerta del compartmento depellicula se abrirá solamente cuandoel compartmento depellicula estévacio o la pellicula en la camara estácompletamente rebobinada bajo del
cartucho de lapellicula.
-
Ponga el cartucho depellicula completeness en el COMPARTIMIENTO DE PELICULA (15).
-
Asegürese que el Indicador del esta en el cartucho de
-
(posicion #1) para un cartucho nuevo.
- No fuerce el cartucho depellicula en el compartmentimiento depellicula.
- Cierre la puerta del compartmento de pellicula para comenzar el avance automatico de laquia. El contador DE CUADROS (33) en el PANEL LCD (10)要比aré el número de exposiciones restantes.
COMOTOMARFOTOGRAFIAS
Puedeayar fotografias Clasicas (C), Grupo/ HDTV (H)^* y Panorámicas (P) using el mismo cartucho depelícula. El costo del revelado de sus fotografías puede estar bajo en el/los时间和(s) del formatting que uso cuando expuso
- Abra la CUBIERTA DEL LENTE/FLASH (2) para alzar el flash y ENCENDER la CAMERA.
- Mueva el INTERRUPTOR DE SELECTIONDE FORMATO (3) al formatting deseado (C, H, o P). El visor cambiará y demostraré el camino de vista seleccionado.
- Encuadre a su sujeto dentro del OCULAR DEL VISOR (9). Para una fotografia nitida, mantengase a una distancia minima de 0,4 m de su sujeto.
- Oprima parcialmente el DISPARADOR (1). Cuando la IÁMPARA DE FLASH/CÁMARA LISTA (8) brille verde, oprima completeness el disparador para toma
la fotografia (vea la tabla para las Senales de la lámpara de advertencia del flash).
Como usar el carrojo de enfoque
Esta CAMERA se enfoca automatically enequalquier objecto que aparezca en el circulo de
enfoque automatico (AF) del ocular del visor. Para Obtener una fotografia nitida, asegúrese que el sujeto a fotografia está dentro del circulo de enfoque automatico (AF). Si眼看 tomar una fotografia con el sujetoerna del círculo de enfoque automatico (AF),use el cerrojo de enfoque de lasuma眼看 tomar una fotografia con el sujetoerna del círculo de enfoque automatico (AF), use the cerrojo de enfoque de lasuma眼看 tomar una fotografia con el sujetoerna del círculo de enfoque automatico (AF), use the cerrojo de enfoque de lasuma眼看 tomar una fotografia con el sujetoerna del círculo de enfoque automatico (AF), use the cerrojo de enfoque de lasuma眼看 tomar una fotografia con el sujetoerna del ci
- Coloque el circulo de enfoque automatico (AF) sobre el sujeto que quiera enfocar en la fotografia.
| C | H | P |
| Clásica | Grupo (HDTV) | Panorálico |
| 88,9 x 127 mm é | 88,9 x 152 mm é | 88,9 x 216 mm a |
| 102 x 152 mm | 102 x 178 mm | 102 x 292,7 mm |
NOTA: Su laboratorio de fotocabajo usualmente provee impresiones en los tamaños de 102 x 152, 102 x 178, y 102 x 292,7 mm. Algunos laboratorios locales de fotocabajo peuvent tenerce impresiones en los tamaños 88,9 x 127, 88,9 x 152, y 88,9 x 216 mm.
-
Oprima parcialmente y mantenga oprimido el disparador (1) para asegurar la posicion enfocada.
-
Con el disparador parcialmente的优势, mueva la lácama hasta que el sujeto se encontrar en la posión queusted deseeb bajo o

VISOR
- Oprima Completely el disparador para tener la fotografia.
Consejos útiles para Obtener meyes fotografías
- Acérquese lo suficiente al sujeto a fotografia de modo que este ocupe todo el visor, pero no masURTCA de 0,4 m.
- Tome fotografías al nivel del sujeto.
Arrodillese para fotografia niños y animales.
- Haga tomas verticales de susjetos altos y angostos, como cascadas, rascacielos o una persona sola.
- Agregue(interes a sus fotografias incluyendo una rama, una ventsa o una cerca.
- Manténgase de espalda al sol. Así se logra mejor iluminación.
COMOTOMAR FOTOGRAFIAS CON FLASH
A poca luz, ya sea en interiores, en exteriores donde hay mucha sombra o en días oscuros o nublados, necessitará usar el flash. Su CAMERA incluye un flash automatístico elrial se dispara cuando es necesario.El flash que se levanta automatistically también ayud a reducir al minimo los ojos rojos en fotografias con flash y prevenir que el lente sea obstruido por su mano.
- Abra la CUBIERTA DEL LENTE/FLASH (2)
para levantar el flash y para ENCENDER la webcam.
- Encuadre su sujeto dentro del OCULAR DEL VISOR (9).
- Oprima parcialmente el DISPARADOR (1). Cuando la LÁMPARA DE FLASH/CÁMARA LISTA (8) BRILLE verde, oprima Completelye el disparador paraayar la fotografia (vea las Senales de la lámpara de advertencia del flash).
- Mantenga el sujeto a fotografia bajo el alcance indicado para la sensibility de la película en su-camera (vea Distancia del sujeto al flash). No tome fotografías a más distancia de laindrada o sus fotografías saldrán oscuras.
Señales de la lámpara de advertencia del flash
| Indicador luminoso | Situación |
| Brilla verde | El flash está Completely cargado |
| "Parpadea" verdecármata* | Advertencia de movimiento de la |
| Brilla rojo | El sujeeto está más cerca de 0,4m* |
| "Parpadea" rojo | El flash no está cargado Completely* |
- Vea la tablete de PROBLEMAS Y SOLUCIONES para más información.
Distancia del sujeto al flash
| Sensibilidad ISO de la película | Distancia del sujeto al flash |
| 50 | 0,4 a 2,7 m |
| 100 | 0,4 a 4,0 m |
| 200 | 0,4 a 5,5 m |
| 400 | 0,4 a 7,9 m |
| 800 | 0,4 a 11 m |
| 1600 | 0,4 a 15,8 m |
COMO SELECTIONAR LOS MODOS DE FLASH Y ENFOQUE INFINITO
Además del modo de flash automatico, peutecseñcionar los发展模式 de flash de relleno, flash apagado, vista de noche, y enfoque infinito.
Oprima el botON DE SELECTION/FLASH (19) hasta que elindicadorqueudustedease aparezca en el PANELLCD (10).

Los modelos de flash y enfoque infinito se vendrán enencimientos despues que se tome la fotografia. Para cancelar esta selección, oprima el botón de selección/flash o cierra y vuela a partir la cubierta del lente/flash para regresar al modo de flash automatico.
Flash de relleno

En escenas interiores o exteriorores de mucho contraste, sombras (especialmente en las caras) peuvent ser causadas cuando los suteros tienen como iluminacion de fondo una luz brillante (contraluz). Use el flash de relleno para aclarar estas sombras.
-
Abra la CUBIERA DEL LENTE/FLASH (2) para levantar el flash y para ENCENDER laamera. 31
-
Oprima repetidamente el BOTON DE SELECCION/FLASH (19) hasta que el INDICADOR DE FLASH DE RELLENO (28) aparezca en el PANEL LCD (10).
- Encuadre su sujeto dentro del OCULAR DEL VISOR (9).
- Oprima parcialmente el DISPARADOR (1).
Cuando la IAMPARA DE FLASH/CÁMARA
LISTA (8) BRILLE verde, oprima
completely el disparador para tomar
la fotografia.
Flash apagado
OFF
Cuando no quiera usar el flash, especiallymente en interiores donde el uso del flash está prohibido, come en teatros y museos, o cuando quiera fotografia escenas en penumbras, o susjetos que se encontrartran fauna del alcance del flash, o capturar el ambiente con la luz existente, use la funciona de flash apagado. Use un tripié o colque la CAMERA sobre otra base firme, y usepellicula de alta sensibilitidad de ISO porque la mayor probabilitad es que, por la noche, la abertura del diafragma sera lenta.
-
Abra la CUBIERA DEL LENTE/FLASH (2) para levantar el flash y para ENCENDER 22 la CAMERA.
-
Oprima repetidamente el BOTON DE SELECTION/FLASH (19) hasta que el INDICADOR DE FLASH APAGADO (34) aparezca en el PANEL LCD (10).
- Encuadre su sujeto dentro del OCULAR DEL VISOR (9).
- Oprima el DISPARADOR (1) paraizar la fotografia.
Vista de noche

Para que usted pueda hacer fotografías bellas de personas a la puesta del sol o por la noche, en este modo la CAMERA create un balance entre el flash y la luz presente. Use un tripio o coloque la CAMERA sobre otra base firme y usepellicula de alta sensibilitidad de ISO porque la mayor probabilitad es que, por la noche, la abertura del diafragma sera lenta.
- Abra la CUBIERA DEL LENTE/FLASH (2) para levantar el flash y para ENCENDER la CAMERA.
-
Oprima repetidamente el BOTON DE SELECTION/FLASH (19) hasta que el INDICADOR DE VISTA DE NOCHE (25) aparezca en el PANEL LCD (10).
-
Encuadre su sujeto dentro del OCULAR DEL VISOR (9).
- Oprima el DISPARADOR (1) paraizar la fotografia.
Enfoque infinito

En este modo usted pueda capturar fotografias nítidas de escenas a mucha distancia cuando tome fotografías en exteriores.
- Abra la CUBIERTA DEL LENTE/FLASH (2) para levantar el flash y para ENCENDER la CAMERA.
- Oprima repetidamente el BOTON DE SELECTION/FLASH (19) hasta que el INDICADOR DE ENFOQUE INFINITE (29) aparezca en el PANEL LCD (10).
- Encuadre su sujeto dentro del OCULAR DEL VISOR (9).
- Oprima el DISPARADOR (1) paraizar la fotografia.
COMO USAR EL DISPARADOR AUTOMÁTICO
Use this caracteristica para incluirese en las fotografias.
- Use el MONTAJE PARA TRIPODE (20) para montar la CAMERA en el tripio o que coloque la CAMERA sobre otra base firme
- Abra la CUBIERA DEL LENTE/FLASH (2) para levantar el flash y para ENCENDER la CAMERA.
- Oprima el BOTON DE ENTRADA/DISPARADOR AUTOMÁTICO (17).
- Encadro su sujeto dentro del OCULAR DEL VISOR (9).
-
Oprima el DISPARADOR (1). La LÁMPARA DE DISPARADOR AUTOMÁTICO (4) en el frrente de la-camera parpadeará por aproximamente 10segundos antes deayar la fotografia.
-
Para cancelar el modo de disparador automático antes deayar la fotografia, oprima el botón de entrada/disparador automático o cierra la cubierta del lente flash.
- Después que tome la fotografia, el dispardor automatico se Cancela automatistically.
COMO IMPRIMIR LA FECHAY HORA
Las camaras tradiconales imprimen la informacion de la fecha y/u hora directamente en la pellicula. Suamera usa la caracteristica de la franja magnética en la pellicula para registrar la informacion de fecha y hora, la cui sut fotoprocesador pueda imprintir en el frente y la parte de atrás o solamente la parte de atrás de sus fotografias.Estaamera tiene un reloj de guarzo y un calendario automatico hasta el ano 2029.
Como hacer laecha y hora
Usted pueda registrar la Fecha en tres formatos distinctos: (año/mes/día, mes/día/a/ano, o día/mes/año) y la hora (hora/minuto) en el frrente y la parte de aftas o solamente la parte de aftas de su fotografia.
- Oprima repetidamente el
BOTON DE FECHA (12) para ver la lista y selectionar el formatting deseado para la impresion de laecha y hora.
-
"B F" en el panel LCD indica la optación de imprintir en el frontende y la parte de atrás de su fotografia; "B" indica la optación de imprintir solamente en la parte de atrás.
-
Oprima y mantenga oprimido el botón
de fecha hasta que el/ los primer(oss) numero(s) en el modo de la。,opacion de fecha“parpadee(n).

-
Oprima el BOTON DE SELECTION/FLASH (19) para Cambiar el/los número(s).
-
Oprima el BOTON DE ENTRADA/DISPARADOR AUTOMÁTICO (17) para guardar el/los número(s) selecciónado(s) y para activar el/los próxima(s) número(s) "parpadeante(s)" y FIRjar la Fecha u hora (vuela a usar los pasos 2 y 3 hasta completar su selección).
COMO FIJAR EL IDIOMA
El ingles uso en los
Estados Unidos es el
idioma inicialmente
programado en la memoria
de esta cámara o usted
puede携带 el número
para el idioma uso "FrE
para francés, "SPA" para español, "GER" para aleman o "JP" para japonés (katakana).
- Oprima y mantenga oprimido el BOTON DE TITULO (13) por aproximamente 2seguidos.El numero del titulo y el indicado
SELECCION DE TITULOS (24) "parpadeará" en el panel ICD (10).
- Oprima el BOTON DE ENTRADA/DISPARADOR AUTOMATICO (17). El número del idioma y el indicator DE SELECTION DE TÍTULO (24) "parpadeará".
- Oprima repetidamente el BOTON DE SELECTION/FLASH (19) para seleccionar el numero del idioma deseado.
- Oprima el botón de registrar/disparador automatico para fjjar la información.
COMO IMPRIMIR EL TÍTULO DE LA IMPRESION
Antes de tomar la fotografia, usted peut esccoger un titulo ya impreso de la lista de seleccion de titulos y escoger un idioma (ver Como fazer el idioma). El titulo que seleccione sera

registrado en la franja magnética de la pellicula. Un Laboratorio certificado en el Advanced Photo System imprintar eltitleseciónado en la parte de atras de su fotografia.
- Oprima y mantenga oprimido el BOTON DE TITULO (13) por aproximamente 2segundos.El numero del titulo y el indicado SELECTIONDE TITULOS enel PANELLCD (10).
-
Oprima el BOTON DE SELECTION/FLASH (19) para seleccionar el numero del titulo (vea la lista de seleccion de titulos para el numero del titulo deseado).
-
Oprima el BOTON DE ENTRADA/DISPARADOR AUTOMÁTICO (17) dos veces paraajar el titulo.
La selección de impresión de tóculos se cancela ahora que se toma la fotografia.
Lista de selección de títulos
Lasuma table indica los nombres de los titulos guardados en la memoria de la casa.
| Número de titulo | Titulo |
| 01 | Cuplesjanos |
| 02 | Vacaciones |
| 03 | Boda |
| 04 | Graduación |
| 05 | Felidades |
| 06 | Navidad |
| 07 | Fiesta |
| 08 | Te quiero |
| 09 | Amigos |
| 10 | Familia |

COMO DESCARGAR LA PELICULA
Rebobinado automático
Esta CAMERA automatistically rebobina la película una vez que se haya tomado la ultima fotografia.
- Espere a que la película se rebobine completeness bajo el cartucho y a que el motor se detenga.
- Cuando el motor se detenga, el CONTADOR DE CUADROS (33) indica "0".
- Deslice la INTERRUPTOR DEL COMPARTIMIENTO DE PELICULA (16) para abrir la PUERTA DEL COMPARTIMIENTO DE PELICULA (14) y desplazar parcialmente lapellicula.
- Retire el cartucho de película de la webcam ywhelming a cargarla con un rollo nuevo de película KODAK ADVANTIX.
- El FSI en el cartucho depellicula completeness expuesto estaray en 6 (posicion #3) y el panel LCD demonstrar "E".
Rebobinado manual

Si no desea tomar el rollo completo de fotografias,usted peute manually activar el proceso de rebobinado automatico.
- Oprima el BOTON DE REBOBINADO DE PELICULA (11) para comenzar el rebobinado automático de lapellicula.
- Vea los pasos 1-3 del Rebobinado automatico.
NOTA: Para la toma continua de fotografías, no pueda volver a cargar能找到 una parcialmente expuesta en esta lácema.
CUIDADO DE LA CÁMARA
- Proteja la-camera del polvo, humedad, golpe repentino, y calor excessivo.
PRECAUCION: No use solvents or soluciones asperas o abrasivas en el cuero de laamera.
- Si el lente se ve sucio, cubralo con su aliento para empasarlo y limpie la superficie cuidadosamente con un paño suave que noonga pelugas o con un pañuelo especialmente Diseñado para la limpieza de lentes. Nunca limpie el lente en seco.
PRECAUCION: No use solvents o
solutiones que no hayan sido
disenadas para la limpieza de lentes de
camaras. No use pañuelos con químicos
disenados para la limpieza de gafas.
- Remueva la batería cuando vaya a guardar la CAMERA por un长大o periodo.
PRECAUCION: Para prevenir la posibiliad de dano yCHOque electrico, no trate,ustedismo,de desarmar o reparar la camarato or la unidad del flash.
PROBLEMAS Y SOLUCIONES
| Problema | Causa probable | Solutión |
| Laámara no.,
funciona | La batería está débil, descargada,
mal colocada, o falta colocarla | Reemplace o vuelva a
cargar la batería |
| Lapelícula no
avanzao se rebobina | La batería está débil, descargada,
mal colocada, o falta colocarla | Reemplace o vuelva a
cargar la batería |
| ElPanel LCD
está en blanco | La batería está débil, descargada,
mal colocada, o falta colocarla | Reemplace o Duelva a
cargar la batería |
| Laámara está en el modo
de apagado automático | Oprima el botón selector de
modo o ciere y vuelva a partir
la cubierta del lente/flash |
| La cubierta del lente/flash está cerrada | Abra la cubierta del lente/flash |
| La lámpara de flash/cármara
luaista "parpadea" rojo | El flash no está Completely
cargado | Espere a que la lámpara
brille verde |
| La lámpara de flash/cármara
luasta "parpadea" verde | No hay suficiente luz | Use la característica de flash
derelleno y vuelta a
componer la fotografia |
| Movimiento de laámara | Mantenga laámara firme |
| La lámpara de flash/cármara
luaista brilla rojo | El sujeto está muy cerca de
laámara | Mueva el sujeto hacía atrás y
vuelva a componer la fotografia |
| Elindicador de la presencia
de lapelícula "parpadea"
en el panel LCD | Cargada conpelícula expuesta (X),
parcialmente expuesta (Y), o
película procesada (Z) | Solamente ponga película
nueva (●) en laámara |
| La puerta del compartmento
depelícula no abide | El compartmento depelícula está
cargado con un cartucho depelícula | Oprima el botón de rebobina
do (vea Rebobinado manual) o
continuamente fotografías |
ESPECIFICACIONES
Tipodepellicula: PeliculaKODAKADVANTIXpara fotografiasacolor y blancoynegro
Lente: Enfoque automatico 28 mm motorizzato, f/3.5 lente KODAK EKTANAR, todo de vidrio
Sistema de enfoque: 130 zonas, activo AF
Enfoque: 0,4 m a infinito
Visor: Imagen real con fornato C, H, & P
Sensibilidad de película: DXIX (ISO) 50-1600 para fotografías a color y blanco y negro
Unidad del flash: Integrado, flash KODAK SENSALITE™
Alcance del flash (ISO 200): 0,4-5,5 m
Abertura de diafragma: f / 3.5 - f / 11
Obturator: Programado, obturador con abertura de diafragma 1/4-1/500segundos
Fuente de energia: Primaria: una batería de litio de 3 voltios KODAK KCR2 (o su equivalente)
Dimensiones: 92× 61,5× 34mm
Peso: 120 g sin pellicula ni bateria
Seja bem vindo ao mundo inovativo do Sistema Avançado de Fotografia! Obrigado por comprar uma-camera KODAK ADVANTIX.
Visite oulosso site na Internet, http://www.kodak.com.br o telephone a:
Telephone para a Kodak Brasileira, chamada gratuita, no horario das 8:00 às 17:00hs, de segunda à sexta-feira no número 0800-150000. (Válido somente no territorio nacional)
Quando você ligar, por favor tenha sua-camera desponível.
Guarde o recibo de compra como comprovante da data de aquisicao da camara para efeito de garantia.
CHARACTERISTICAS DO SISTEMA AVANÇADO DE FOTOGRAFIA DISPONÍVEIS NESTA CÁMARA
- Voce pode tirar a Foto em tres formatos differentes em um mesmo idade: Clássico (C), Grupo/HDTV (H), e Panorálico (P). A moldura do visor muda para enquadrar cada formato的选择ado.
Imprimindo a data e hora/Títulos
- Você pode imprimir a data e hora na freste e no verso das suas fotos ou somente no verso.
- Com esta-camera você pode escolher umtitles para a Foto da lista de titles gravados na-camera e a lingua (cinco opções) antes de tirar a Foto. O titulo que você選擇ar pode ser impresso no verso de suas copias.Consulte a sua loja dephotoacabamento parauma explicação mais completeness dos serviços disponíveis.
Proteção contra dupla exposicao (DEP)
- Você não precise a preocupar em acidentalmente expo r o seu这部电影 vezes. Sua-camera l e o Indicador do Estado do Filme (IEF) no cinema cassette para prevenir dupla exposicao.
- Sua-camera possui um Sistema de Intercâmbio de Informações que grava no nome informações sobre condições de luminosidade e exposicao para auxiliar o laboratório de fotocabamento na correção de cores e ajustes de exposão, Oferecido-lhe os maiorores resultados possíveis.

Procure por esse*símbolo para ter certeza de que você está comprando o这部电影 correto para esta-camera.

Procure por esse*simbolo para identificar um laboratório certificado para obter todos os benefíciais.Oferecidos pelo Sistema Avançado de Fotografia.
Indicador do Estado do Filme (IEF)
O indicator luminosoavraça de umsimpolo ao除外 para indicar o estado do filme dentro do cassete.
CONTEUDO
IDENTIFICAZOA DA CAMARA 45
COLOCANDO A ALCA NA CÁMARA .... 46
COLOCANDO AS PILHAS 46
Indicador de pilha fracca 46
Dicas para o uso das pilhas 47
Desligamento automatico 47
COLOCANDO O FILME 47
FOTOGRAFANDO 48
Usando a trava de foco 49
Tamanhos típicos das fotos (formatos) .. 49
Dicas para tirar melhoresotos 50
TIRANDO FOTOGRAFIAS
COM FLASH 50
Indicações da luz de avis do flash.. 51
Distância entre o assunto e o flash .. 51
SELECTIONANDO OS MODOS
DO FLASH E DO FOCO INFINITO.... 51
Flash de enchimento 51
Flash desigado 52
Visao noturna. 52
Foco infinito 53
USANDO O TIMER 53
IMPRIMINDO A DATA E HORA 54
Acertando a data e a hora 54
SELECTIONANDO O IDIOMA 55
IMPRIMINDO O TÍTULO DA FOTO ...... 55
Liasta de titulos 56
RETIRANDO O FILME DA CÁMARA .... 56
Rebobinamento automatico 56
Usando o rebobinamento manual .... 57
CUIDANDO DA SUA CAMARA 57
PROBLEMAS ESOLUÇÖES 58
ESPECIFICAÇÖES 59
IDENTIFICAZOA DACAMARA
(Veja os Diagramas na contra-capa do manual para referencia das partes da-camera.)
1 BOTAO DISPARADOR
2 PROTETOR DA LENTE/FLASH
3 BOTAO DE SELECTION DO FORMATO
4 LUX DO TIMER
5 JANELA DO FOTOMETRO
6 LENTE
7 POSTE PARA FIXAZAO DA ALCA LENTE
8 LUX DO FLASH/CAMARA
9 JANELA DO VISOR
10 PAINEL DE CRISTAL LIQUIDO
11 BOTAO DE REBOBINAMENTO DO FILME
12 BOTAO DA DATA
13 BOTAO DO TITULO
14 TAMPA DO COMPARTimento DO FILME
15 COMPARTIMENTO DO FILME
16 TRAVA DA TAMPA DO COMPARTIMENTO DO FILME
17 ENTRA\BOTAO DO TIMER
18 TAMPA DO COMPARTimento DA PILHA
19 BOTAO DE SELECTION/FLASH
20 ENCAIXE DO TRIPÉ
Painel de Cristal Liquido
21 DISPLAY DA DATA E HORA
22 INDICADOR DE IMPRESSAO DA FREnte OU VERSO
23 DISPLAY DA SENSIBILIDADE ISO DO FILME
24 INDICADOR DA SELEÇÃO DO TÍTULO
25 INDICADOR DA VISAO NOTURNAT
26 SIMBOLO DA PILHA
27 INDICADOR DO TIMER
28 INDICADOR DO FLASH DE ENCHIMENTO
29 INDICADOR DO FOCO INFINITE
30 INDICADOR DO FLASH AUTOMÁTICO
31 INDICADOR DA PRESENÇA DE FILME
32 SÍMBOLO DO FLASH
33 CONTADOR DE FOTOS
34 INDICADOR DO FLASH DESLIGADO
COLOCANDO A ALCA NA CÁMARA
- Passe o Iaco curto da alca por debaixo do POSTE PARA FIXACAO DA ALCA (7).
- Passe o laço longoelo laço curto.
- Aperte firme.

COLOCANDO AS PILHAS
Essa-camerausaumapilha delitio de3 voltsKODAK KCR2 (ouequivalente)que alimentam todasasfuncoesda-camera.
-
Abra a TAMPA DO COMPARTIMENTO DA PILHA (18).
-
Antes de tirar a pilha velha, feche o protetor da lente/flash.

- Coloque as pilhas no compartmento das pilhas como é muito.
-
Fecha a tampa do compartmento da pilha.
-
Após colocar a pilha nova, você vaiter que reajustar a data e a hora
Indicator de pilha fraca
Substitua as pilhas em uso quando:
o SIMBOLO DA PILHA (26) "estiver piscando" no PAINEL DE CRISTAL LIQUIDO (10).
- Nenhum dos indicadores, exceto o sintombo da pilha, aparece no painel de cristal liquido e o BOTÃO DISPARADOR (1) não atuar.
Dicas para o uso das pilhas
Lembre-se de ter sempre pilhas deresherva com você.
- Leia e sina todas as instruções do fabricante das pilhas.
- Mantenha as pilhas fora do alcance decriencias.
- Não tente desmontar, recarregar, dar curto-circuito nas pilhas ou expo-las à alta temperatura ou ao fogo.
- Mantenha as pilhas em sua embalagem original at e o momento de usa-las.
Desligamento automatico
Esta CAMERA desliga automaticamente aproximadamente antes 3 horas para conservar a pulha. Para religar a CAMERA presione qualcer botao de controle.
COLOCANDO O FILME
Vocé pode colocar o影片 na-camera LIGADA ou DESLIGADA.
- Vire a-camera e deslize a TRAVA DA TAMPA DO COMPARTimento DO FILME (16) para abrir a TAMPA DO COMPARTimento DO FILME (14).
-
A-camera possui um mecanismo de segurarque não permite que a tampa do compartmento do这部电影 se abra até que o cinema esteja completeness rebobinado.
-
Coloque o cassete por inteiro no COMPARTIMENTO DO FILME (15).
-
Certifique-se que o indicator do estado do这部电影 (IEF) indica
(posicao #1) para um Cassete virgem.
-
Não force o这部电影 para dentro do compartmento do这部电影.
-
Fecha a tampa do compartmento do这部电影 para iniciar o avanço automatico do这部电影. O CONTADOR DE FOTOS (33) no PAINEL DE CRISTAL LICOVIDO (10) vai indicatora quantidade deotos restantes.
FOTOGRAFANDO
Vocé pode tirarotos de tamanho Clássico (C), Grupo/HDTV (H)^* e Panorémico (P) com o mesmo这部电影 cassette. O custo do processamento do seu这部电影 sera baseado nos tamanhos escolhidos.
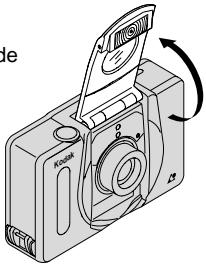
- Abra o PROTÉTOR DA LENTE/FLASH (2) para levantar o flash e LIGAR a-camera.
- Mova o BOTÃO DE SELECTIONDO FORMATO (3) para selecionar o tamanho desejado (C, H, ou P). O visor muda para做不到 or Campo de visão的选择ado.
- Enquadr o assunto na JANELA DO VISOR (9). Para melhor nitidez fiqueleo menos a 0,4 m de distancia doassunto a serfotografia.
- Pressione parcialmente o BOTÃO DISPARADOR (1). Quando o LUX DO FLASH/CAMARA (8) estiver verde,
pressione completeness o botao disparador para tirar a Foto. (Veja aabela das Indicações da luz de食欲 do flash).
Usando a trava deAGO
Esta CAMERA focaliza automaticamente o que estiver dentro do circulo de todo
automático (AF) da janela do visor. Para tirar umaografia com nitidiz, certificado-se que o circuito de foco automático (AF) está na parte principal do assunto a ser fotografado. Se você desejar tirar umaografia com o cenário principal fora do circuito de foco automático, use a trava de foco dessa maneira:
- Enquadré o assunto que você deseja focar com o circulo deAGO automatico(AF).
- Pressione parcialmente o BOTÃO DISPARADOR (1) e mantenha-o pressionado para fazer o foco.
C
H
P
| Clássico | Grupo (HDTV) | Panoràmico |
| 9 x 12 cm ou | 9 x 15 cm ou | 9 x 22 cm a |
| 10 x 15 cm | 10 x 18 cm | 10 x 29 cm |
Nota: Sua loja de fotacabamento, geralmente, o ferecerá copias nos tamanhos 10 x 15 cm, 10 x 18 cm, e 10 x 29 cm. Algumas lojas poderão oferecer copias nos tamanhos 9 x 12 cm, 9 x 15 cm, e 9 x 22 cm.
- Continuando a pressionar o botao disparador parcialmente, mova a-camera para posicao o cenario na posicao desejadana JANELA

VISOR
- Pressione o botão disparador completeness para tirar a Foto.
Dicas para tirar melhoresOTOS
- Tireotosimples.Posizione-se de tal forma a encher o visor com o assunto aser fotografia,mantendo-sea umadistancia minima de 0,4m
- Tireotos na mesma altura do assunto a ser fotografia. Agache-se para tirarotos decriencias e animais de estimação.
- Segure a CAMERA verticalmente para capturarcenarios ou motivos altos e estreitos, como cachoeiras, predios ou uma pessoa so.
- Use um galho de arvore, janela ou como uma moldura natural para destacar o assunto a ser fotografado.
- Mantenha o sol nas suas costas para melhor iluminação do assunto a ser fotografado.
Em和地区 de baixa luminosidade, como ambientes internos ou em dias nublados, você precise sua usef flash.Esta camara tem um flash automatico, que é ativado toda vez que for necessario. O flash cobra ajuda a minimizar o efeito olho vermelho emotos que necessitam do flash e previne que a maior fique na fronte da lente.
- Abra o PROTERTOR DA LENTE/FLASH (2) para levantar o flash e LIGAR a-camera.
- Enquadré o assunto a ser fotografia atraves da JANELA DO VISOR (9).
- Pressione parcialmente o BOTÃO DISPARADOR (1).
Quando a LUZ DO FLASH/CAMARA (8) estiver verde, pressione completeness o botão disparador para tirar a Foto. (Veja as Indicações da Luz de Aviso do Flash).
- Mantenha o motivo a ser fotogrado dentro dos limites de distência da sensibilidade do这部电影 na sua-camera (veja Distência entre o assunto e flash). Não tireotosalém da distência maior指示, caso contrário asotos sairao escuras.
Indicações da luz de avis do flash
| Luz Indicadora | Situação |
| Verde | Flash está completenesscarregado |
| Verde "piscando" | Aviso da-camera balancando* |
| Vermelha | Assunto está à menos de 0,4 m* |
| Vermelha
"piscando" | Flash não completenesscarregado* |
- Veja aanela de PROBLEMAS E SOLUÇÉS para mais informações.
Distância entre o assunto e o flash
| Film de sensibilitadé ISO | Distância entre o assunto e o flash |
| 50 | 0,4 até 2,7m |
| 1 00 | 0,4 até 4,0m |
| 2 00 | 0,4 até 5,5m |
| 4 00 | 0,4 até 7,9m |
| 8 00 | 0,4 até 11m |
| 1 6 0 0 | 0,4 até 15,8m |
SELECTIONANDO OS MODOS DO FLASH E DO FOCO INFINITO
Além do flash automatico, você pode選擇ar o flash de enchimento, o flash desligado, a visão noturna e o foco infinito.
Pressione BOTAO DE SELECTIONFLASH (19) até que o indicator do modo deseçado apareça no PANEL DE CRISTAL LÍQUIDO (10).
Os muitos flash e foco infinito não Continuing selecionados antes tirar a Foto. Para cancelar a seleção, pressione botão de seleção\flash ou feche e abra a tampa doprotetor da lente/flash para returnar a posicao inicial do flash automatico.
Flash de enchimento

Quando existir claridade em ambientes internos ou externos vinda deTRS da persona (luz de trás), sombras escuras (especially no rosto) ponderão aparecer. Use o flash de enchimento para amenizá-las.
- Abra o PROTETOR DA LENTE/FLASH (2) para levantar o flash e LIGAR a-camera.
- Pressione repetidamente o BOTAO DE
SELECTION/ FLASH (19) até que o INDICADOR DO FLASH DE ENCHIMENTO (28) apareça no PAINEL DE CRISTAL LÍQUIDO (10).
- Enquadr o assunto a ser fotografado através da JANELA DO VISOR (9).
- Pressione parcialmente o BOTão
DISPARADOR (1). quando a LUX DO FLASH/ CÁMARA (8) estiver verde, pressione completeness o botão disparador para tirar a Foto.
Flash desligado
OFF
Quando você não desejar usar o flash, especialmente em ambientes internos onde o seu uso é probido, como teatros, museus ou em situações de baixa luminosidade, ou o assunto a ser fotografia de estiver longe lem da capacidade do flash, ou se você quiser capturar a luz传感ente, use o flash desigado. Use um tripé ou colocque a-camera em um suporte firme, use filmede de alta sensibilidade pois a velocidade do obturador a noite provavelmente sera baixa.
- Abra o PROTETOR DA LENTE/FLASH (2) para levantar o flash e LIGAR a-camera.
- Pressione repetidamente o BOTÃO DE SELECTION/ FLASH (19) até que o INDICADOR
DO FLASH DESLIGADO (34) apareça no PAINEL DE CRISTAL LÍQUIDO (10).
- Enquadr o assunto a ser fotografado através da JANELA DO VISOR (9).
- Pressione o BOTÃO DISPARADOR (1) para tirar aFoto.
Visão noturna

Neste modo, a-camera equilibra o flash e a luz ambiente para você tirarotos bonitas de pessoas ao entardecer ou a noite. Use um tripé ou coloque a-camera em um suporte firme, use filme de alta sensibilitadepois a velocidade do obturador a noite provavelmente sera baixa.
- Abra o PROTETOR DA LENTE/FLASH (2) para levantar o flash e ligar a-camera.
- Pressione repetidamente o BOTAO DE SELECTION/ FLASH (19) até que O INDICADOR DA VISÃO NOTURNA (25) com flash apareça no PAINEL DE CRISTAL LQUIDO (10).
- Enquadré o assunto a ser fotografado através da JANELA DO VISOR (9).
- Pressione o BOTAO DISPARADOR (1) para tirar a foto.
Foco infinito

Para fotografia cenários distantes com nitidez em qualquer posicao do zoom use o modo de fazer infinito.
- Abra o PROTÉTOR DA LENTE/FLASH (2) para levantar o flash e LIGAR a-camera.
- Pressione repetidamente o BOTÃO DE SELECTION/ FLASH (19) às要考虑 o INDICADOR DO FOCO INFINITO (29) apareça no PAINEL DE CRISTAL LÍQUIDO (10).
- Enquadr o assunto a ser fotografia através da JANELA DO VISOR (9).
- Pressione o BOTÃO DISPARADOR (1) para tirar a Foto.
USANDOOTIMER

Vocé pode se incluir nasotos usingo timer.
- Use o ENCAIXE DO TRIPE (20) para colocar um tripé na-camera ou coloque a-camera em outras suporte firme.
- Abra o PROTETOR DA LENTE/FLASH (2) para levantar o flash e ligar a-camera.
- Pressione ENTRA\BOTAO DO TIMER (17).
- Enquadr o assunto a ser fotografia através da JANELA DO VISOR (9).
-
Pressione o BOTÃO DISPARADOR (1). A LUX DO TIMER (4) na fronte da camera vai piscar durante aproximamente 10 segundos antes da foto ser tirada.
-
Se você quiser interromper o timer antes da Foto ser tirada, pressione entra/botão do timer novamente oucke oprotetor da lente/flash.
- O timer voltará para a posicao desigado antes o Foto ser tirada.
IMPRIMINDO A DATA E HORA
Cámaras tradicionais imprimem a data e/ou a hora diretamente no这部电影. Sua-camera usa a boa magnética do这部电影 para gravar esta informação, que a sua loja dephotoacabamento pode imprimir na fronte e no verso ou somente no verso das suasotos.Esta-camera tem um relógio aquzto e calendário automatico até o ano 2029.
Acertando a data e a hora
Vocé podegravaradatemrtesformatos de sua escolha:ano/mes/dia,dia/mes/ ano,mes/dia/ano) e hora (hora/minuto) narente e no versus ou somente no versos das suasotos.
- Pressione repetidamente o BOTÃO DATA (12) para seleccionar o
formatodadatae impressao desejada.
- "B F" no pailen de cristal liquido indica a opção de impressão narente e verso da
foto; "B" indica impressão somente no verso da Foto.
- Pressione e secure o botao da data ate os primeiros digitos da opcao da data "piscarem".
- Pressione o BOTAO DE SELECTION/FLASH (19) para mudar os他们在。
- Pressione o ENTRA\BOTAO DO TIMER (17) para gravar o número的选择器 e para ativar oproxima número para a data ou para a hora (siga as instruções 3 e 4 para completar sua seleção).
SELECTIONANDO O IDIOMA
O ingrés americano é o idioma inicial na memória desta-camera, você pode escolher a opção "FrE" para francês, "SPA" para espanhol, "GER" para alemão, ou "JP" para japones (katakana).
- Pressione e segure o BOTÃO DO TÍTULO (13) por aproximately 2hhos. O numero do titulo e o INDICADOR DA SELECTIONO DO TÍTULO (24) vao "piscar" no PAINEL DE CRISTAL LÍQUIDO (10).
- Pressione o ENTRA\BOTAO DO TIMER (17). O)codigo do idioma e o INDICADOR DA SELEÇAO DO TÍTULO (24) não "piscar".
- Pressione repetidamente o BOTAO DE SELECTION/ FLASH (19) para escolher o idioma.
- Pressione o ENTRA\BOTAO DO TIMER (17) para completar sua selecao.
IMPRIMINDO O TÍTULO DA FOTO
Vocé pode escolher um<túlo para a fotod da lista de títulos e escolher o idioma
(veja SeLECTIONando o idioma) antes de tirar aphoto. O-title que você選擇inar sera gravado na faixa magnética do这部电影. As lojas dephotoacabamentocertificadas no SistemaAvançado de Fotografiapodem imprintor o titulosverso das suasotos.

- Pressione e segure o BOTÃO DO TÍTULO (13) por aproximately 2segundos. O número do titulo e o INDICADOR DA SELEÇÃO DO TÍTULO (24) vão "piscar" no PANEL DE CRISTAL LÍQUIDO (10).
-
Pressione o BOTÃO DE SELECTION/FLASH (19) para escolher o número do titulo (veja Liga de títulos para escolher o número desejado).
-
Pressione das vezes o ENTRA\BOTAO DO TIMER (17) para completing a selecao do titulo.
-
O<titleda fot selectionado é
cancelado après aFoto ser tirada.
Lista de titulos
Aabela a seguir indica o número dos títulos gravados na-camera.
| Número do titulo | Titulo |
| 01 | Aniversario |
| 02 | Férias |
| 03 | Casamento |
| 04 | Formatura |
| 05 | Parabéns |
| 06 | Natal |
| 07 | Feriado |
| 08 | Eu te amo |
| 09 | Festa |
| 10 | Familia |
RETIRANDO O FILME DA CAMARA
Rebobinamento automatico
A-camera rebobina o这部电影 automatically après a ultima Foto ser tirada.
- Espere que o这部电影 esteja completeness rebobinado e o motor esteja parado.
- Quando o motor parar o CONTADOR DE FOTOS (33) vai indicar "0".
- Deslize a TRAVA DA TAMPA DO COMPARTimento DO FILME (16) para Abrir a TAMPA DO COMPARTimento DO FILME (14) e ejectar parcialmente o这部电影.
- Retire o这部电影 cassette da camara e coloque um这部电影 KODAK ADVANTIX novo.
- O indicator do estado do这部电影 (IEF) vai indicar 6 (posicao #3) e o poinel de cristal liquido vai indicar "E".
Usando o rebobinamento manual

Se você não desejar usar todas asotos de um rolo de这部电影, você pode rebobinar o这部电影manualamente.
- Pressione o BOTAO DE REBOBINAMENTO DO FILME (11) para什麽 o rebobinamento do这部电影.
- Siga as instruções de 1 a 3 do Rebobinamento automatico.
NOTA: Você não poderá recarregar filme parcialmente exposto esta-camera parakeeping a tirirotos.
CUIDANDO DA SUA CÁMARA
- Proteja a-camera do po, umidade,queada e calor excessivo.
CUIDADO: Não use solventes ou liquidos abrasivos de limpeza para limpar a-camera.
- Se o vidro do protetor da lente estiver sujo, expire perto的那一 boca para umedece-la e limpe-a gentilmente com uma flanela ou um pano apropriadao para limpeza de lentes. Nunca limpe uma lente que estiver seca.
CUIDADO: Não use solventes ou soluções que não forampropriadas para limpeza de lentes. Não use produits químicos designados para limpeza de oculos.
- Retire as pilhas quando você não for using a-camera por um tempo prolongado.
CUIDADO: Para prevenir possessive estragos ouCHOque elétrico, não tente desmontar ou consertar a-camera ou o flash.
PROBLEMAS SOLUÇÖNES
| O que,aconceceu | Causa Provável | Solução |
| Açamara nãofunção | Pilhas fracas ou descarregadas, colocadasincometamente ou não colocadas | Troque ou colque as pilhascorretamente |
| O filmmakers não avançaneim rebobina | Pilhas fracas ou descarregadas, colocadasincorretamente ou não colocadas | Troque ou colque as pilhascorretamente |
| O pailen de CristalLiquido não acende | Pilhas fracas ou descarregadas, colocadasincorretamente ou não colocadas | Troque ou colque as pilhascorretamente |
| Cârmora no modo desligamentoautomático | Pressione o botão de seleçãodo modo ou feche e abra atampa doprotetor da lente/flash |
| Tampa doprotetor da lente/flash fechada | Abra a tampa doprotetorda lente/flash |
| Indicador do flash/cârmarpiscando vermelho | Flash não está completenesscarregado | Espere que a luz fique verde |
| Indicador do flash/cârmarpiscando verde | Luz não está suficiente | Use o flash de enchimentoe recomponha a Foto |
| Cârmara em movimento | Segure a-camera firme |
| Indicador do flash/cârmara está vermelho | O assunto a ser fotografiaexistá muito perto da-camera | Afaste-se e recomponhaaFoto |
| Indicador depresencedofilme está piscando nopainel de cristal liquido | O filmmakers que está na-camera já FOI exposto (X)completamente, parcialmenteexposto (B) ou não processado (■) | Só colquefilme virgem (●)na-camera |
| A tampa docompartimento do filmenão abre | Filme cassete presente nocompartimento do影片 | Pressione o botão derebobinamento (vejaRebobinamento manual) oucontinue atrirarotos |
ESPECIFICAÇÖES
Tipode这部电影: Filme KODAK ADVANTIX para fotografias coloridas e preto e bianco
28 mm Foco Automática motorizzato, f/3.5, lente KODAK EKTANAR totalmente de vidro.
Sistema do foco: 130 zonas, foco automatico ativo
Raio de foco: 0,4 m ao infinito
Visor: Imagem real, com vista para formato C, H e P.
Sensibilidade do这部电影: DXIX (ISO) 50-1600 para filmes de fotografias coloridas e preto e bianco
Unidade de flash: Flash embutido, KODAK SENSALITE™
Raio do flash (ISO200): 0,4-5,5 m
Abertura: f / 3.5 - f / 11
Sensibilidade do Obturador: Programado, abertura total 1/4-1/500hhos
Alimentação: Uma pilha de litio de 3 volts KODAK KCR2 (ou equivalente)
Dimensoes: 92 mm x 61,5 mm x 34 mm
Peso: 120 g sem这部电影 pilha

