
PUTMAN - Drone PARROT - Notice d'utilisation et mode d'emploi gratuit
Retrouvez gratuitement la notice de l'appareil PUTMAN PARROT au format PDF.
| Type de produit | Cadre photo numérique |
| Marque | Parrot |
| Modèle | Putman |
| Taille de l'écran | 7 pouces (LCD) |
| Résolution d'affichage | 720 x 480 pixels |
| Mémoire interne | 64 Mo |
| Poids | 695 g |
| Dimensions (L x H x P) | 219 x 174 x 25 mm |
| Alimentation | Adaptateur AC/DC : entrée 100-240 V~, 50-60 Hz, 0,2 A ; sortie 12 V CC, 1,2 A |
| Connectivité Bluetooth | Oui, code PIN 0000, profils FTP, OPP, BIP |
| Port USB | Oui, pour connexion PC |
| Formats d'image supportés | JPEG, GIF |
| Cartes mémoire compatibles | SD, micro SD, mini SD, SDHC, mini SDHC, MMC, MMC plus, MMC mobile, MMC micro (avec adaptateur) |
| Diaporama | 5 diaporamas : 1 par défaut, 3 personnalisables, 1 carte SD |
| Fonctions de gestion des photos | Affichage, classement, copie, suppression, transfert via USB, Bluetooth ou carte mémoire |
| Accrochage mural | Possible avec crochet fourni |
| Température maximale d'utilisation | 55 °C |
| Humidité maximale | 65 % |
| Garantie | 1 an (hors usure normale et modifications) |
| Nettoyage | Chiffon sec uniquement |
| Consommation énergétique | Non spécifiée |
FOIRE AUX QUESTIONS - PUTMAN PARROT
Questions des utilisateurs sur PUTMAN PARROT
0 question sur cet appareil. Repondez a celles que vous connaissez ou posez la votre.
Poser une nouvelle question sur cet appareil
Téléchargez la notice de votre Drone au format PDF gratuitement ! Retrouvez votre notice PUTMAN - PARROT et reprennez votre appareil électronique en main. Sur cette page sont publiés tous les documents nécessaires à l'utilisation de votre appareil PUTMAN de la marque PARROT.
MODE D'EMPLOI PUTMAN PARROT
Parrot
BY
4^ k1k2 = 90^
QUICK START
GUIDE
一

Index
Diagrams:
Recommendation. p.4
Installation. p.6
Sending pictures.. p.7
English. p.9
日本語. p.15
Technical Specification. .p.22
General Information. p.23

In order to avoid any display problem, make sure the power lead connector is fully plugged into the transformer.
注:表示エラ一を避たの用、電源コトが変压器に正しく接続さてい的か確認てくだき。

- Installation
- フレムの設置
- Sending pictures
-Flreumi写真を送る
English
This simplified guide of the Parrot Digital Frame by André Putman gives you the main instructions to easily use this product. For more information, refer to the our website www.parrot.com.
Index
Using the frame for the 1st time. .09
Installing of the frame. 09
- Scrolling through the menus 10
Pairing the frame with your phone. 10
Sending pictures to the frame. 11
Sending pictures from a Phone or PDA
via Bluetooth® 11
Sending pictures from a Computer via Bluetooth.....11
Sending pictures via USB 11
Transferring pictures using a memory card. 12
Managing the pictures. 12
Picture Display Order. 12
13
Choosing and Creating a Slideshow. 13
Using the frame for the 1st time
Installing the frame
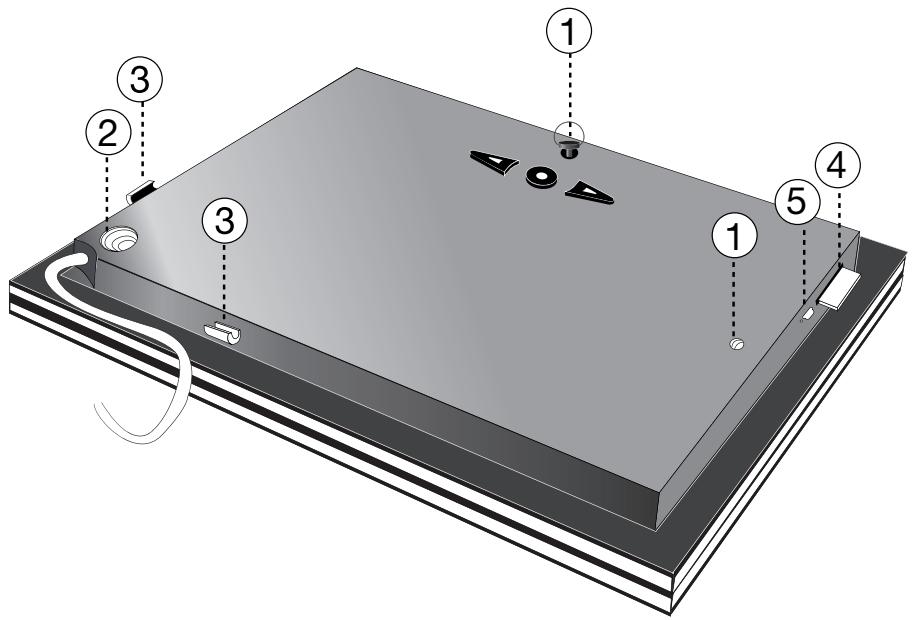
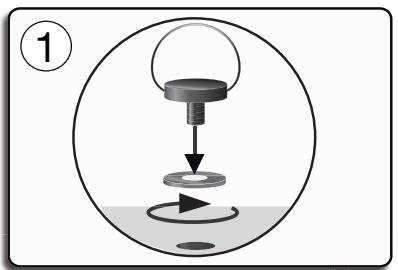
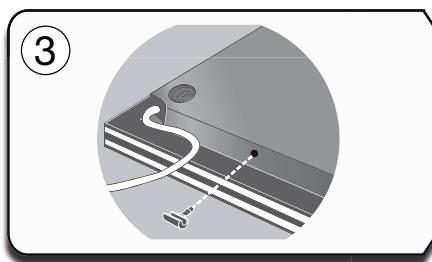
- Screw the metal rod into the back of the frame.
If you rotate the frame, the photo displayed turns to match the new position of the Parrot Frame by Andreée Putman.
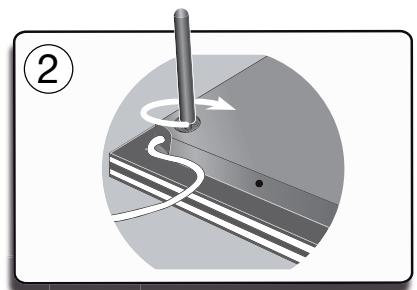
- Connect the power cable connector to the transformer and plug it into an electrical socket.
The frame automatically switches on.

In order to avoid any display problem, make sure the power lead connector is fully plugged into the transformer.
- Choose the language to be used.

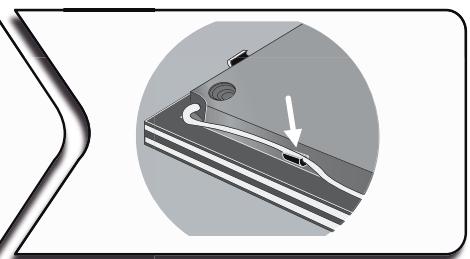
The frame can also be hung on the wall. In this case, screw the hook into the back, insert the provided clips into the slots and run the power lead through the clips.
Scrolling through the menus
You can scroll through the menus using the buttons on the back of the frame. To access the main menu, press the button on the back of the frame.

: Move left or up, depending on the frame's orientation. It can also be used to select the previous photo.

: Move right or down, depending on the frame's orientation. It can also be used to select the next photo.

: Enters the selected menu or selects a photo.
The
A icon takes you back to the previous menu or the menus.
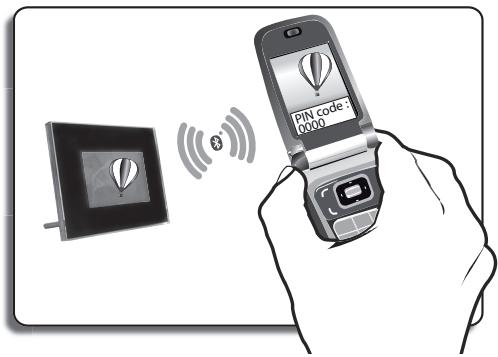
Pairing the frame with your phone

Depending on the model of your phone / computer, this phase might be optional. However, it will enable you to send your photos to the frame more quickly.
- Ensure that the frame is visible to all Bluetooth® devices. To do so, select Settings > Bluetooth > Visibility.
- Activate the Bluetooth feature on your phone / computer (refer to your phone's or computer's user guide or visit the Support heading on our website at www.parrot.com
for further information).
- Search for Bluetooth devices on your phone / computer.
- Select «Putman Frame» in the list of Bluetooth devices proposed by your phone / computer.
- On your phone / computer, enter the code «0000».
Your two devices are now paired.
Sending pictures to the frame
Sending pictures from a Phone or PDA via Bluetooth
- Ensure that the frame is visible to all Bluetooth devices. To do so, select Settings > Bluetooth > Visibility.
- Make sure the Bluetooth feature is activated on your phone or PDA.
- On your phone/PDA, go to the Pictures menu. Select a picture and choose "Send via Bluetooth". Your device starts searching for Bluetooth peripherals.
- Once the search has finished, select «Putman Frame».
- If your device prompts you to enter a code, type «0000», The picture is then sent to the Parrot Frame by André Putman.
During transmission, the Bluetooth icon appears on the screen and the picture is displayed.

Several pictures can be sent at a time, though this feature will depend on your device.
Sending pictures from a Computer via Bluetooth
(Windows, Linux)
- Ensure that the frame is visible to all Bluetooth devices. To do so, select Settings > Bluetooth > Visibility.
-
Activate the Bluetooth feature on your computer.
-
Right-click on the picture that you wish to send and choose "Send via Bluetooth".
Your PC will search for any nearby Bluetooth peripherals.
- Select «Putman Frame».
- Type «0000» if your PC prompts you to enter a code.
During transmission, the Bluetooth icon appears on the screen and the picture is displayed.

It is also possible to send pictures from a Mac.
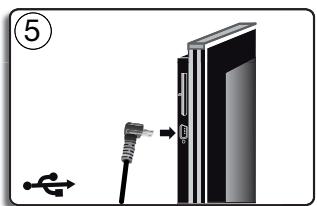
Sending pictures via USB
- Connect the frame to your PC with the USB cable.
The computer detects a new device.
- Copy your JPEG or GIF pictures to the frame.
- Disconnect the cable from the frame.
The pictures are automatically saved.
- Repeat the procedure if you wish to transfer new pictures.
!
The Putman Frame features 10 Mb of storage space: to save space, remember to resize your pictures before copying them to the internal memory. Otherwise transfer your pictures and disconnect the cable when the «memory full» message is displayed. Then reconnect the cable and transfer the remaining pictures.
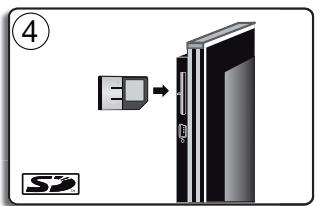
Transferring pictures using a memory card
- Insert the memory card into the appropriate slot.
The JPEG and GIF pictures stored on the memory card are displayed.
You can now navigate through the memory card content using the buttons.
-
Select the icon. Select one of the following options as required:
-
Copy current picture
- Copy selected pictures (in this case, you must select the pictures that you wish to copy by using the
and buttons, select the icon and then confirm your choice)
- Copy all pictures
- Confirm your choice.
The selected photos are resized and copied to the internal memory.

If you wish to switch back to the internal memory, select the icon.
Managing the pictures
Picture Display Order
- Access the main menu of the Parrot Frame by Andree Putman and then select the Arrange the pictures menu.
Your pictures are displayed as thumbnails.

The display may run over several pages: holding down one of the buttons will allow you to scroll through the previous and next pages. Simply release the button to stop scrolling.
- Select the picture with the buttons and then press the button on the back of the frame to confirm your choice.
The selected photo is placed at the top of the screen on the frame and a cursor indicates the photo's position in the album.
- Press the buttons to change the photo's position. You can change its position in all the pages of your album.
- Once the cursor is in the position where you want to place the image, press the button.
Deleting pictures
Access the main menu of the frame and then select the icon.
The Delete menu provides you with the following options:
- Delete this picture: Deletes the displayed picture.
- Delete these pictures: Deletes the selected images.
- Delete all pictures: Deletes all pictures on the internal memory.
Choosing and Creating a Slideshow
- The Parrot Frame by Andree Putman features five slideshows: a default slideshow with all the photos in the internal memory, three user-definable customised slideshows and an SD card slideshow.
- Once the slideshow has been selected, you can enable / disable or configure it.
-
The following options are available for creating a slideshow:
-
Picture choice: use the and buttons to select the photos for your slides how. The selected photos are marked with a tick (not available for the default slideshow).
-
Timer: defines the slideshow display time.
- Picture order: used to define the order in which the photos are displayed in the slideshow (not available for the default slideshow).
- Random: arranges the photos in the slideshow at random.
- Delete slideshow: resets the slideshow (the selected images will no longer be part of the slideshow, but they will not be deleted from the frame's memory).
- Transition: defines the transition effect between the photos in your slideshow.
日本語
はじてFLERUMを使用する

FLLEUMを設置する
はじてFLREUMを使用する. 15
FleuHm to设置.. 15
己 二一画面見的. 16
FlreUmを電話機と通信可能にし....16
FleuMに写真を送る. 17
Bluetoothを経由て電話機 / PDAから写真を送る 17
Bluetooth (Windows, Linux)を経由てPCから写真を送る. 17
USB經由画像送 18
MOMIL一力一力使中FLEUMus 18
画像を整理する. 18
画像の表示順序を決る. 18
画像を削除する. 19
St现代农业一·作成的.....19
設定を変更する 20
时刻の調整. 20
明的を調整する. 20
Stansbaiyem一DtoPGBaHsur....20
- フレムの裏面に金属棒を取り付けます。
マモ:トレーマの向きを変えると、写真はそのに合わせ自動の回軼いたします。
2.電源PLA格を変圧器に差込、変圧器をCONsetトに接続てくさ。
フレムに自動の電源が入ります。
表示電拉一を避たの効、電源コトが変圧器に正確接続いたしますか確認くださいます。
- フレム用使用説語を選てckだ。

FRLEUM是壁掛載的とまてごは。その场合、壁の引掛掛載をFRLEUMの裏面に取付け、CLRTRP為適切な位置に插入し、その電源は一ave上滑りまてごは。
一画面見
flre-umの裏面にるbonten使て、Mnue一画面を見的事がごは。MxinMneu一にAekesusるに、flre-um裏面の bonten押てくさ。
:flreumの向きにて、左側たは上部にるbontです。ごbontを使て、前の写真を選択するとも成長む。
→:flre-umの向きにようて、右側または下部にるbontenです。ごbontenを使て、次の写真を選択するともはきます。
:選扱了MEXUN一にアクせスしつり、写真为選扱るごてがてきま�。
aiycon 使上、前的m二一与了
i、m二一为终了的之和能
FLUELMを電話機と通信可能にする

MEX:使的電機。はに元一夕の機種にとは、のStapは才予。」」上。。
- 對に連のBluetooth®搭载ソルがBluetoothPutmanを検知くださいます、Bluetoothの調整を進行てんだき。調整するはに、調節 > Bluetooth > 靬明度を選択てくだき。
- 使得電話機 / メンピューダのBluetooth 機能をONに載てんだき。 (お使いの電話機の説明書をご参照了一份か、当社ウープサイト www.parrot.comのサボーツローをご覈くんだき)。
- お使の電話機 / バンビーナタから、Bluetooth近接檢知を行てんだき。
- 使你的電話機 / 曰一上,打數。連用都可
- 使你的電話機 / メンリフロー、コーダ「000」を入力くださいます。>こじて2つの機器は通信可能,Thant。
FLREUM写真送
Bluetoothを經由と電話機 / PDAから写真を送る
- 小�にのBluetooth搭載ツルがFFFFFFPutmanを檢知得起ually、FFFFFFの調整を行て:<だい。調整するはは、調節>Bluetooth>鮮明度を選択し:<だい。
- 使の電話機 / PDAのBluetooth機能をONにしてんだき。
- 電話機 / PDAの画像メニeerから画像を一�選い、「Bluetoothで送信する」を選択てくdecess。
お使用的機器がBluetooth近接検知を開始ます。
- 檢知が完了んだ、「FlreUmPutman」を選択てくだき。
- 一入力是必要場は、「000」人力はくさ。
フレム画像送ら表示。
画像の軽送中は、画像が減少表示をいき表示。画面上にBluetoothアトコ表示。

お使の機種にようは、一度に複数の画像を送信するとが電子郵件。

Bluetooth (Windows, Linux) を経由てPCから写真を送る
- 對にごのBluetooth搭載ソルがFFFFFFPutmanを檢知くださいます。FFFFFFの調整を進行てんださ。調整するのは、調節 > Bluetooth > 青鮮度を選択てんださ。
- 使のOneをBluetooth機能をONに
- 送信た画像を右クリックて、「Bluetooth經由送信る」を選択てくさ。
PCが周边のBluetooth近接検知を開始いたします。
4.「Flre-umPutman」を選択てくだい。 - 使のPCにeer下カ力が必要か場は、
「0000」とカ力てくさ。画像の転送中は画面にBluetoothアイコンが表示さ、画像が少しぃ表示さていきま�。
USB經由圖画画為送來
- USBケーフルを使て、トレーマをコングチローに接続てくだい。
ペンデローが新い周边機器の検知を行います。
2.JPEGまたはGIF形式の画像を、写真フレムにコは一てくだき。 - イーテルをFLREUMにら外にしんだき。
フレムが自動のに画像を保存いたします。
- 新い画像を軸送んだ場合は、その操作を操り返てくださ。
写真の送信は10Moなか可能です。画像を軽送し、「メモリ一がいばいす」とうマツルーニが表示くださいますようお願いいたします。内部メモリ一がいばいになうまて、その操作を操り返してくださいます。残量を増やった場合は、内部メモリ一にコビーする前提に、あらかじて軽送する画像のサイズを変更するご本文ご请点击む。
MEXI一力一使去FLEUM使用
- マモリーダーを適切な場所にセットてください。
MOTO一力一上存保存はい的JPGははGIF形式の画像表示さは。
□□bonten使て、MOMI一力一中身見るとがてきま�。
-
亚马逊在選扱てくだき。希望に応て、以下の才広言を選扱てくだき:
-
現在の画像をコビ一する
-
選択した画像をコビ一する(▲□ プタtons。はい,0。ボタを使て、コビ一する画像を選択てくさ。」。アイロー選択た後、選択を決定てくさ)。
-すての画像をコ一する
3.選択を決定てくだい。
選択了写真のサイズが変更いたします、内部Mモリ一にコビ一き)=(1)

内部Mモリ一を確認た场合、ロアドンを選択てくさい。
画像を整理する
画像の表示順序を決定る
- フレムのメイングモニーミ、画像を整理す
來選扱載くだき。
画像が マニサイズで表示いたします。

MEX:複数のご一ジを表示いたします。
Bopantonのいりかを押し続む、前のご一ジんだは次のご一ジを統て表示する这句话能否行呢。Bopantonを離すと、ご一ジの切りを禁止る这句话能否行。
- ▲□ 暂を使て画像を選択た後、フレム裏面の●暫を押て、選択を決定てくさ。
選択了写真はフレム画面上部に移動し、なかのアルバム中的写真の位置がカーリル表示いたします。
- 求之。把文言文言文言文言文言文言文言文言文言文言文言文言文言文言文言文言文言文言文言文言文言文言文言文言文言文言文言文言文言文言文言文言文言文言文言文言文言文言文言文言文言文言文言文言文言文言文言文言文言文言文
- 画像を配置くださいます場所にカーナル移動いたします。● バンを押てんだoes。
画像を削除する
米丿人乙一加、口艾可在選抑快下。也。廿木二一削除,如、以下的才不阿在選抑持之,已之能
- 現在の画像を削除する:表示心中的画像を削除しま�。
-複数の画像を削除する:選択た画像を削除しま�。
-すばての画像を削除する:内部メモリ一にあるすばての画像を削除いたします。
ス现代农业一を選択・作成する
- フレーリムPutmanには、5つのスライドシャーが)”あら-six:内部メモリーに係すての写真で構成さるデフローのスライドシャー、3種類の設定可能なスライドシャー、SDカーツのスライドシャー。
- 斯拉日德専一を選択了一份、そのを有効 / 無効にしり、設定するとが電子郵件。
-
斯拉丹納一の内容は、以下の項目をお選択了一份だけお願い:
-
画像を選択する: 波尔トはリフローはんだりを使て、スイドンOneを構成する写真を選択いたします。選択した写真には印が付けようります(デフィルトのスイドンOneははなし)。

- フリセット表示時間:スライドローを表示する時間を決定いたします。
- 整理: スライドローを構成する写真の表示順序を決定にとが成長す(デ fasルトのスライドローはなし)。
- マンダム・モード:スライドローを構成する写真をランダムに配置いたします。
-スライドシャーの削除:スライドシャーの構成を初期化いたします(選択isted画像はこれ以降スライドシャーに含まえませが、フレムかは削除くださいます。)
-ト lam'don:slaivdə一の写真と写真の間のト lam'don效果を決定む。
設定を変更する
時刻の調整
トクを押た後時間を選択てくさ。以下の才庁言が表示いたします:
- 調整: 。 プタンを使て、時刻を調整てくstadt。● プタンを押て決定てくstadt。
-表示:時刻表示をONたはOFFにしま�。 - 形式:時刻表示モ一ドを選択する二ossaにきま�。
明的を調整する
- 普尔夫を押た後明るを選択てくさい。
- 求本子使、画面明的调整了。
- 木子を押て決定てだい。
StansbHm一DtoF
拥持的二和可以達。
- 自動:-Stamen ロ馬一トの移行は、Flre 一ム上の照明Senかに応てプロガラムさ 量いたします。
- フリセット時間:その才予はに、画面に電源を入る時間帯を決定のとがてきま�。
- マニュアル:スローはに移行いたします

Technical specification
| Screen size LCD | 7” |
| Screen resolution | 720 x 480 pixels |
| Internal memory | 64 Mo |
| Weight | 695 g |
| Dimensions | 219 x 174 x 25 mm |
| Power supply | - Input: 100-240 V~, 50-60 Hz, 0.2 A - Output: 12Vdc, 1.2A |
| Bluetooth PIN Code | 0000 |
| Profiles supported | FTP, OPP, BIP |
| Compatible memory cards | SD, micro SD, mini SD, SDHC, mini SDHC MMC, MMC plus, MMC mobile, MMC micro (with adapter) |
| Humidity | 65% |
| Maximum temperature | 55°C |
General Information
Warranty
Without prejudice of legal warranty, Parrot products are warranted during 1 year from the date of purchase for defects in materials and workmanship, provided that no deterioration to the product has been made, and upon presentation of proof of purchase (date of purchase, location of sale and product serial number) to the retailer or Parrot directly.
Warranty does not cover: upgrading of the software items of the Parrot products with Bluetooth® cell phones for compatibility purpose, data recovery, deterioration of the external aspect due to normal use of the product, any damage caused by accident, misuse, misapplication, or non-Parrot products. Parrot is not responsible for storage, loss or damaged to data during transit or repair.
Any product wrongfully declared to be defective will be returned to sender and inspection, process and carriage costs will be invoiced to him.
Correct disposal of This Product

(Waste Electrical & Electronic Equipment)
(Applicable in the European Union and other European
countries with separate collection systems).
This marking shown on the product or its literature, indicates that it should not be disposed with other household wastes at the end of its working life. To prevent possible harm to the environment or human health from uncontrolled waste disposal, please separate this from other types of wastes and recycle it responsibly to promote the sustainable reuse of material resources.
Household users should contact either the retailer where they purchased this product, or their local government office, for details of where and how they can take this item for environmentally safe recycling. Business users should contract their supplier and the terms and conditions of the purchase
contract. This product should not be mixed with other commercial wastes for disposal.
Modifications
The explanations and specifications in this guide are given for information purposes only and may be modified without prior notice. They are deemed to be correct at time of going to press. The utmost care has been taken when writing this guide, as part of the aim to provide you with accurate information. However, Parrot shall not be held responsible for any consequences arising from any errors or omissions in the guide, nor for any damage or accidental loss of data resulting directly or indirectly from the use of the information herein. Parrot reserves the right to amend or improve the product design or user guide without any restrictions and without any obligation to notify users. As part of our ongoing concern to upgrade and improve our products, the product that you have
purchased may differ slightly from the model described in this guide. If so, a later version of this guide might be available in electronic format at Parrot's website at www.parrot.com.
FCC Compliance Statement
This device complies with part 15 of the FCC rules. Operation is subject to the following two conditions:
(1). this device may not cause harmful interference, and
(2). this device must accept any interference received, including interference that may cause undesired operation.
Note: The manufacturer is not responsible for any radio or tv interference caused by unauthorized modifications to this equipment. Such modifications could void the user's authority to operate the equipment.
This equipment has been tested and found to comply with the limits for a Class B digital device, pursuant to
Part 15 of the FCC Rules. These limits are designed to provide reasonable protection against harmful interference in a residential installation. This equipment generates, uses and can radiate radio frequency energy and, if not installed and used in accordance with the instructions, may cause harmful interference to radio communications. However, there is no guarantee that interference will not occur in a particular installation. If this equipment does cause harmful interference to radio or television reception, which can be determined by turning the equipment off and on, the user is encouraged to try to correct the interference by one or more of the following measures:
- Reorient or relocate the receiving antenna.
- Increase the separation between the equipment and receiver.
- Connect the equipment into an outlet on a circuit different from that to which the receiver is connected.
- Consult the dealer or an experienced radio/TV technician for help.
Declaration of Conformity
We, Parrot S.A. of 174 quai de Jemmapes, 75010 Paris, France, declare under our sole responsibility that our product, the Parrot Digital Photo frame by Putman to which this declaration relates is in conformity with appropriate standards EN 300328, EN 301489-17, IEC 60950 following the provision of Radio Equipment and Telecommunication Equipment directive, with requirements covering EMC directive 89/336/EEC and Low Voltage directive 73/23/EEC. Identification N. 394 149 496 R.C.S. PARIS Parrot S.A.
Protection and personal safety
Carefully read the user guide and follow the indicated procedure when setting up the device. Do not dismantle or open the device and do not touch the electronic components or the drivers. Do not attempt to dismantle or modify either of the speakers. Never introduce any metal object to
avoid the risks of electric shocks, fire, short circuits or dangerous emissions. If your device shows signs of faulty operation, call the approved Parrot technical support centre or an approved retailer. Never leave the frame exposed to rain or chemical products; do not place them in a damp area or where they are likely to be splashed with water. Never place your device on a recipient containing any type of liquid, which might seep inside the device. Doing so will reduce the risks of electric shocks, short circuits, fire and injury.
Copyrights
Copyright © 2007 Parrot. All rights reserved. The total or even partial reproduction, transmission or storage of this guide in any form or by any process whatsoever (electronic, mechanical, photocopy, recording or otherwise) is strictly prohibited without prior consent from Parrot.
Licences
The Bluetooth® word mark and logos are owned by the Bluetooth SIG, Inc. and any use of such marks by Parrot S.A. is under license.
Other trademarks and trade names are those of their respective owners.
Bluetooth QDID: B013783, B012423, B013838
Important safety instructions
The exclamation point within an equilateral triangle is intended to alert the user to the presence of important operating and maintenance (servicing) instructions in the literature accompanying the product.
- This apparatus shall not be exposed to dripping or splashing and no object filled with liquid, such as vases, shall be placed on the apparatus.
- The AC/DC adaptor which provides disconnection from mains supply
shall remain readily operable. Unplug this apparatus when unused for long periods of time.
- Read these instructions
- Keep these instructions
- Heed all warnings
- Follow all instructions
- Do not use this apparatus near water.
- Clean only with dry cloth.
- Do not block any ventilation openings. Install in accordance with the manufacturer's instructions.
- Do not install near any heat as radiators. Heat registers, stoves or other apparatus (including amplifiers) that produce heat.
-
Do not defeat the safety purpose of the polarized or grounding type plug. A polarized plug has two blades with one wider than the other. A grounding type plug has two blades and a third grounding prong. The wide blade or the third prong are provided for your safety. If the provided plug does not fit into your outlet, consult an electrician for replacement of the obsolete outlet.
-
Only use attachments/accessories specified by the manufacturer.
- Unplug this apparatus during lightning storms or when unused for long periods of time.
- WARNING: To reduce the risk of fire or electric shock, do not expose this apparatus to rain or moisture and objects filled with liquids, such as vases, should not be placed on this apparatus.. This apparatus is designed for indoor use only.
Do not expose the Parrot digital frame by Putman system to outside temperatures below 5^ or above 55^ . The system could be damaged or the cabinet warped. Avoid placing the system near a source of heat or exposing it to sunlight (even through a window). Similarly, excessively low temperatures and humidity could damage the device.
Hotline
Our hotline is at your disposal from Monday to Friday between 9 am and 6 pm (GMT + 1) Hot-line@parrot.com
Italy: [+39] 02 59 90 15 97
Spain: [+34] 902 404 202
UK: [+44] (0)870 112 5872
Germany: 0900 1727768
USA: [+1] (877) 9 Parrot (toll free)
Hong Kong: [+852] 2736 1169
France:0148036069
Europe: [+33] 148036069 (Spoken languages: French, English, Spanish and German)


Federal
Communications
Commission
FCC ID: RKXAP


Parrot
move wireless
Parrot S.A. - 174, quai de Jemmapes - 75010 Paris - France
Fax +33 148030666/Phone+33148036060
www.parrot.com
- Parrot
- Index
- Diagrams:
- English
- Using the frame for the 1st time
- Installing the frame
- Scrolling through the menus
- Pairing the frame with your phone
- Sending pictures to the frame
- Sending pictures from a Phone or PDA via Bluetooth
- Sending pictures from a Computer via Bluetooth
- Sending pictures via USB
- !
- Transferring pictures using a memory card
- Managing the pictures
- Picture Display Order
- Deleting pictures
- Choosing and Creating a Slideshow
- 日本語
- はじてFLERUMを使用する
- FLLEUMを設置する
- 一画面見
- FLUELMを電話機と通信可能にする
- FLREUM写真送
- Bluetoothを經由と電話機 / PDAから写真を送る
- Bluetooth (Windows, Linux) を経由てPCから写真を送る
- USB經由圖画画為送來
- MEXI一力一使去FLEUM使用
- 画像を整理する
- 画像の表示順序を決定る
- 画像を削除する
- ス现代农业一を選択・作成する
- 設定を変更する
- 時刻の調整
- 明的を調整する
- StansbHm一DtoF
- Technical specification
- General Information
- Warranty
- Correct disposal of This Product
- Modifications
- FCC Compliance Statement
- Declaration of Conformity
- Protection and personal safety
- Copyrights
- Licences
- Important safety instructions
- Hotline
Marque : PARROT
Modèle : PUTMAN
Catégorie : Drone