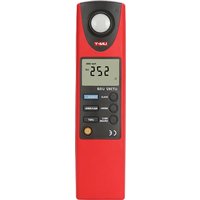
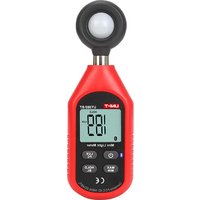
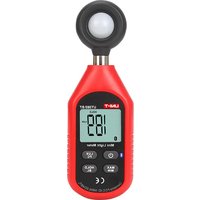
UT382 - Luxmètre Uni-T - Notice d'utilisation et mode d'emploi gratuit
Retrouvez gratuitement la notice de l'appareil UT382 Uni-T au format PDF.


| Type de produit | Luxmètre numérique |
| Marque | Uni-T |
| Modèle | UT382 |
| Dimensions | 150 x 70 x 30 mm |
| Poids | 200 g |
| Alimentation | Pile 9V |
| Plage de mesure | 0 à 200 000 lux |
| Précision | ±3% |
| Affichage | Écran LCD avec rétroéclairage |
| Fonction maintien (Hold) | Oui |
| Sélection de plage | Automatique |
| Indicateur de batterie faible | Oui |
| Mise hors tension automatique | Oui (après env. 15 min) |
| Température de fonctionnement | 0°C à 40°C |
| Humidité de fonctionnement | < 80% HR |
| Entretien | Nettoyer avec un chiffon sec. Éviter l'humidité et les chocs. |
| Sécurité | Ne pas exposer à des sources lumineuses dépassant la plage maximale. Utiliser dans des conditions normales. |
| Réparabilité | Non réparable par l'utilisateur. Contacter le SAV. |
| Accessoires fournis | Pile, manuel d'utilisation |
| Garantie | 2 ans |
FOIRE AUX QUESTIONS - UT382 Uni-T
Questions des utilisateurs sur UT382 Uni-T
0 question sur cet appareil. Repondez a celles que vous connaissez ou posez la votre.
Poser une nouvelle question sur cet appareil
Téléchargez la notice de votre Luxmètre au format PDF gratuitement ! Retrouvez votre notice UT382 - Uni-T et reprennez votre appareil électronique en main. Sur cette page sont publiés tous les documents nécessaires à l'utilisation de votre appareil UT382 de la marque Uni-T.
MODE D'EMPLOI UT382 Uni-T
UT381/382
Operating Manual

Luminometer
I Overview
UT380 series luminometer has two models: UT381 and UT382. UT380 series luminometer is a kind of digital meter applying high-precision digital visible light sensor and 8-bit microprocessor processing data.
Illuminance: Illuminance means the luminous flux received on each unit area of illuminated object, with adopted unit of foot candle (12 inches make 1foot) in Britain and USA and meter candle in Europe. 1 foot candle means the illuminance received on the surface from the direct 1 candle light source with 1 foot away from the illuminated surface, abbreviated as FC. In the same way, 1 meter candle means the illuminance received on the surface from the direct 1 candle light source with 1 meter away from the illuminated surface, abbreviated as Lux. UT380 series can test illuminance within 0 20,000Lux , and UT382 can be connected with PC to realize real-time data storage and analysis, and the data recorded in luminometer can be transmitted to PC to analyze, print and record, etc.
II Unpacking Inspection
Unpack and check, if there is any damage or loss, contact with the nearest local sales service agency
- Mainframe 1 pc
- Instruction manual 1 pc
- USB testing line (only for UT382) 1 pc
- Software disc(only for UT382) 1 pc
- 9V battery 1 pc
- Sensitive mirror cap 1 pc
III Safety Instruction

Warning
Actions and conditions that may pose hazard to the user or may cause damage to the Luminometer.
please use the luminometer as specified in the manual, otherwise it may cause damage to the luminometer or personal injury. In order to avoid luminometer damage and personal injury, please operate according to following instructions.
- Check if luminometer shell is broken or any part is lost before using. Do not use the meter if it is damaged.
- When battery indicating sign “ 📄 ” appears, please replace battery as soon as possible to avoid measured data error.
- When the luminometer works abnormally, do not use it, and please send it to the designated maintenance center of our company for repair by professional personnel.
- Please do not use it in the place adjacent to explosive gas, steam and dust.
- Do not dismantle the shell of luminometer without authorization to avoid luminometer damage.
- Do not charge the battery to avoid battery explosion and personal injury. Please pay attention to the “+” and “-” of the battery during installing.
- Especially keep the sensitive mirror clean and away from scratch, cover it with cap after completing measurement.
IV Meter Structure
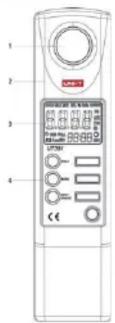
- Meter structure (Figure 1, Table 1)

Table 1
Figure 1
- Display symbols (Figure 2, Table 2)
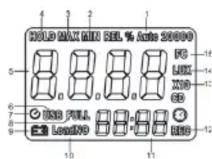
Figure 2
| 1 | Auto | Auto range |
| 2 | MIN | Minimum value display |
| 3 | MAX | Maximum value display |
| 4 | HOLD | Data hold |
| 5 | Main display | |
| 6 | FULL | Full storage display |
| 7 | Auto power off | |
| 8 | USB | USB communication (UT382 only) |
| 9 | Low battery Indication | |
| 10 | LoadNo | record number |
| 11 | Secondary display | |
| 12 | REC | Data record storage |
| 13 | Indicator for "reading × 10 " | |
| 14 | Illuminance unit (Lux) | |
| 15 | Illuminance unit (Britain and USA) |
Table 2
3.Keys description (Figure 3)
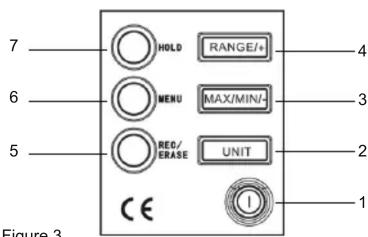
- Power on/off key: long press to power on, shot press to power off.
- Unit selection key: under measuring state, press this key to switch the unit of reading between Lux and FC
- Maximum and minimum values selection key: under measuring state, press the key to switch from normal measurement→MAX→MIN modes. When “MAX” or “MIN” sign is displayed on LCD, the luminometer just displays maximum or minimum reading.
- Auto range and Manual range selection key: in auto range state, press the key to enter manual range state; press once again to enter low range and high range one by one; long press the key to return to auto range state.
- Data memory and delete key: press this key to save measured data automatically or manually, the luminometer can save up to 2044 sets. press this key and power on the meter at the same time, you can delete the recorded data.
- Menu key: long press this key to enter the function setting mode; short press to access USB→APO→SEC→CODE→DEF?→Normal measurement; press HOLD key to exit menu mode.
- Data hold key: press this key to lock the measured data display on LCD, and display "HOLD" sign at the same time; press this key again to exit hold function.
V Setting and Operation
-
Auto power off: power off in about 10 minutes automatically
-
Auto power off or not selection setting function: long press "MENU" to enter function selection menu, and then short press it to select "APO.0" or "APO.1" interface, and then press "RANGE/+" or "MAX/MIN/-" key to switch between "APO.0" and "APO.1"; press "MENU" key to enter next function setting or press "HOLD" key to exit function setting, and luminometer will record the updated settings.
- When "APO.0" is selected, auto power off function is closed, namely, the meter won't be power off automatically; if "APO.1" is applied, auto power off function is selected, and the auto power off sign is displayed on the screen at the same time. After power off, the luminometer will record the settings which will be restored after it is power on, it is unnecessary to set up again at each time.
- Data memory and delete: auto and manual data memory
- The interval of auto data memory is within 0.5-255 seconds, which is
adjustable; long press "MENU" to enter function selection menu, and then short press it to select SECREC interface, while the auto memory interval is displayed on the main display; press "RANGE/+" or "MAX/MIN/-" key to adjust the auto memory interval; press "MENU" key to enter next function setting or press "HOLD" to exit function setting. And luminometer will save the updated settings.
- Long press “REC/ERASE” to save data automatically, and “REC” sign on secondary display flashes, and the luminometer will save the measured data according to the current auto saving interval setting; if the storage space of luminometer is fully taken up, the system will exit auto memory; and “FULL” sign will be displayed on LCD; press “REC/ERASE” key to exit auto data memory function.
- Manual data memory: in the normal measurement state, press "REC/ERASE" once to save one measured data, and "REC" sign displayed on secondary display flashes once.
- When 2044 pieces of data is fully recorded, "FULL" sign will be displayed on LCD, and no data can be saved at this moment.
- Under power-off state, press "REC/ERASE" and power on meanwhile, when "CLR" sign is displayed on LCD, all saved data will be cleared.
3. View saved data:
- Short press “MENU” to enter view recorded data function; if there is no data record in the luminometer, “— — — —” sign will be displayed on both LCD main display and secondary display, and the luminometer will return to normal measurement state in about 0.5 seconds; If there a certain data records in the luminometer, the total number of current data records will be displayed on LCD secondary display, and the value of the last piece of data will be displayed on the main display.
- After entering option of view recorded data, press "UNIT" to view the 1st piece of recorded data; press "RANGE/+" and "MAX/MIN/-" keys to view data records forward or backward; each press on HOLD button to increment by 100 sets, the meter will return to the first record when the maximum number has been reached.
- The luminometer can store up to 2044 records.
4. Restore to factory defaults:
- Long press "MENU" key to enter function setting, and then short press this key to select "DEF?" option, and "DEF?" sign displays on the LCD and flashes, at this moment you can press "HOLD" to restore to factory defaults; press "MENU" or "REC/ERASE" to exit.
- After restoring to factory defaults, the defaulting state of the system is: USB.0 (no USB transmission); APO1 (auto power off); 60s (auto record interval is set up as 60s); clearing all data records.
5. USB data transmission function: (only for UT382, See Figure 4)
- Long press "MENU" to enter USB transmission setting, and "USB.0" or "USB.1" will be displayed on LCD; USB.0 means that data can't be transmitted; "USB.1" means that data can be transmitted; press "RANGE/+" or "MAX/MIN/-" key to switch between "USB.0" and "USB.1".
- The meter is set to "USB.0" mode automatically every time it is powered on.
- The luminometer (UT382) communicates with PC using USB wire and your PC must have a USB port. See Figure 4 for the connection diagram.
- When connecting UT382 to the computer, you cannot operate any functional buttons during transmission.
6. Illuminance measurement
- In process of measuring illuminance, the sensitive mirror must be perpendicular to the measured illuminating source to ensure accuracy of measured data..
- If distance between measured illuminating source and illuminometer, measuring position, angle or environment is different, then the measured data will be different; because the intensity of light varies with change of distance, position, angle and environment.
- Make sure there is no scratch or dirt on sensitive mirror of luminometer, or the measured data won't be accurate.
- When the illuminance exceeds the measuring range of the luminometer, "OL" sign will be displayed.
- After completing measuring, cover the sensitive mirror with cap to avoid scratch on sensitive mirror and keep it clean.
VI Specifications
1. General specification
• LCD: 3 1/2-bit display, 2000-count.
• Over range display: "OL"

- Low battery indication:
- Type of sensor: digital visible light sensor
- Sampling rate: 100 times/s
• Power supply: one 1604A 6F22 9V battery - Battery life: 200 hours for typical battery (alkaline battery)
• Dimensions: 195mmx 45mmx 26m
• Weight: about 185g (including battery)
2. Environment limit
- Indoor use
• Safety standards: EN61326: 2006;
EN 5 5 0 2 2: 1 9 9 8 + A 1 + A 2
EN 5 5 0 2 4: 1 9 9 8 + A 1 + A 2
- Pollution degree 2
- Operating temperature and humidity:
0 ^ ° C - 3 0 ^ ° C ( no more than 8 0 % RH)
30°C - 40°C (no more than 75% RH)
4 0 ^ ° C - 5 0 ^ ° C ( no more than 4 5 % RH)
- Storage temperature and humidity: -20°C - + 60°C (no more than 80% RH)
3. Electrical specification
- Accuracy tolerance: ± (a%reading +b digits), calibrate once each year
• Environment temperature: 23° C ± 5°C
• Environment humidity: ≤80% RH - Temperature coefficient: 0.1× (accuracy tolerance)/°C
Illuminance measurement
| Function | Range | Resolution | Accuracy Tolerance: ± (a %reading +b digits) |
| Illuminance measuring (LUX) | 20Lux | 0.01Lux | ± (3% + 20) |
| 200Lux | 0.1Lux | ± (3% + 8) | |
| 2000Lux | 1Lux | ± (3% + 8) | |
| 20000Lux | 10Lux | ± (3% + 8) | |
| Illuminance measuring (FC) | 2FC | 0.001FC | The accuracy tolerance of FC can be verified by unit conversion: FC=10.76lux, if accuracy tolerance verification is needed, it can be achieved by unit conversion. |
| 20FC | 0.01FC | ||
| 200FC | 0.1FC | ||
| 2000FC | 1FC |
VII Maintenance

Warning
During replacing battery or measuring, keep the sensitive mirror from scratch or dirt to avoid damaging the mirror or influencing the measuring precision; and do not charge the replaced battery to avoid explosion and safety accident!
1. Battery installation and replacement
When “☐” is displayed on the luminometer, replace the battery immediately.
Replace the battery by following procedures:
- Power off
- Loosen the screw of battery cover and take it off.
- Replace with a new 6LF22 9V 1604A battery, please use battery with the
same model, and do not use unauthorized battery. - Pay attention to the anode “+” and the cathode “-”. After completing installation, install the cover and tighten the screw.
2. General maintenance
- When the surface of luminometer is dirty, clean with wet cloth and neutral detergent, grinding miller and solvent are forbidden.
- When the luminometer is damaged and needs to be repaired, please send it to the designated maintenance center of our company for repair by professional service man, do not repair it without authorization.
- Especially in the process of using, keep the sensitive mirror of luminometer away from scratch or dirt to avoid damaging the mirror or influencing the measuring precision.
- Remove the battery if it won't be used for a long time.
- Store the luminometer in a place free of moist, high temperature and strong magnetic field.
Specifications and other information shown on this instruction manual are subject to change without notice
UNI-T.
UNI-TREND TECHNOLOGY (CHINA) CO., LTD.
No6, Gong Ye Bei 1st Road,
Songshan Lake National High-Tech Industrial
Development Zone, Dongguan City, Guangdong Province, China
Guangdong Province, China
Tel: (86-769) 8572 3888
http://www.uni-trend.com
- UT381/382
- OPERATING MANUAL
- I OVERVIEW
- II UNPACKING INSPECTION
- III SAFETY INSTRUCTION
- WARNING
- IV METER STRUCTURE
- V SETTING AND OPERATION
- VIEW SAVED DATA
- RESTORE TO FACTORY DEFAULTS
- USB DATA TRANSMISSION FUNCTION: (ONLY FOR UT382, SEE FIGURE 4)
- ILLUMINANCE MEASUREMENT
- VI SPECIFICATIONS
- GENERAL SPECIFICATION
- ENVIRONMENT LIMIT
- ELECTRICAL SPECIFICATION
- VII MAINTENANCE
- BATTERY INSTALLATION AND REPLACEMENT
- GENERAL MAINTENANCE
- UNI-T
Marque : Uni-T
Modèle : UT382
Catégorie : Luxmètre