
CORDLESS NUMBER PAD NOTEBOOKS - Périphériques informatiques LOGITECH - Notice d'utilisation et mode d'emploi gratuit
Retrouvez gratuitement la notice de l'appareil CORDLESS NUMBER PAD NOTEBOOKS LOGITECH au format PDF.

| Type d'appareil | Clavier numérique sans fil |
| Connexion | USB sans fil |
| Compatibilité | Ordinateurs portables et PC |
| Alimentation | Piles AAA |
| Installation | Plug and Play, sans pilote |
| Portée sans fil | Jusqu'à 10 mètres |
| Touches | Touches numériques standard |
| Indicateur d'alimentation | Oui |
| Récepteur USB | Rangement intégré dans le clavier |
| Dimensions | Compact et portable |
| Poids | Léger |
| Compatibilité OS | Windows, Mac OS |
| Fréquence de fonctionnement | 2,4 GHz |
| Matériau | Plastique durable |
| Couleur | Noir |
FOIRE AUX QUESTIONS - CORDLESS NUMBER PAD NOTEBOOKS LOGITECH
Questions des utilisateurs sur CORDLESS NUMBER PAD NOTEBOOKS LOGITECH
0 question sur cet appareil. Repondez a celles que vous connaissez ou posez la votre.
Poser une nouvelle question sur cet appareil
Téléchargez la notice de votre Périphériques informatiques au format PDF gratuitement ! Retrouvez votre notice CORDLESS NUMBER PAD NOTEBOOKS - LOGITECH et reprennez votre appareil électronique en main. Sur cette page sont publiés tous les documents nécessaires à l'utilisation de votre appareil CORDLESS NUMBER PAD NOTEBOOKS de la marque LOGITECH.
MODE D'EMPLOI CORDLESS NUMBER PAD NOTEBOOKS LOGITECH
Logitech Cordless Number Pad for Notebooks

English Insert the two AAA alkaline batteries in the battery compartment on the back of the number pad. The positive pole of both batteries go in the same direction.
Deutsch Insert the two AAA alkaline batteries in the battery compartment on the back of the number pad. The positive pole of both batteries go in the same direction.
Francais Insert the two AAA alkaline batteries in the battery compartment on the back of the number pad. The positive pole of both batteries go in the same direction.
Italiano Insert the two AAA alkaline batteries in the battery compartment on the back of the number pad. The positive pole of both batteries go in the same direction.
Espanol Insert the two AAA alkaline batteries in the battery compartment on the back of the number pad. The positive pole of both batteries go in the same direction.
Portugues Insert the two AAA alkaline batteries in the battery compartment on the back of the number pad. The positive pole of both batteries go in the same direction.
Nederlands Insert the two AAA alkaline batteries in the battery compartment on the back of the number pad. The positive pole of both batteries go in the same direction.
Svenska Insert the two AAA alkaline batteries in the battery compartment on the back of the number pad. The positive pole of both batteries go in the same direction.
Dansk Insert the two AAA alkaline batteries in the battery compartment on the back of the number pad. The positive pole of both batteries go in the same direction.
Norsk Insert the two AAA alkaline batteries in the battery compartment on the back of the number pad. The positive pole of both batteries go in the same direction.
English Insert the two AAA alkaline batteries in the battery compartment on the back of the number pad. The positive pole of both batteries go in the same direction.
Suomi Insert the two AAA alkaline batteries in the battery compartment on the back of the number pad. The positive pole of both batteries go in the same direction.
EANViká Insert the two AAA alkaline batteries in the battery compartment on the back of the number pad. The positive pole of both batteries go in the same direction.
No-pycckn Insert the two AAA alkaline batteries in the battery compartment on the back of the number pad. The positive pole of both batteries go in the same direction.
Magyar Insert the two AAA alkaline batteries in the battery compartment on the back of the number pad. The positive pole of both batteries go in the same direction.
Ceská verze Insert the two AAA alkaline batteries in the battery compartment on the back of the number pad. The positive pole of both batteries go in the same direction.
Po Polsku Insert the two AAA alkaline batteries in the battery compartment on the back of the number pad. The positive pole of both batteries go in the same direction.

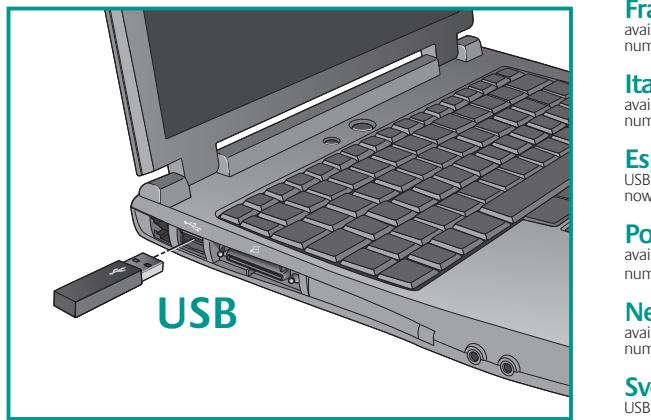
English Plug mini-receiver into an available USB port on your computer. Your number pad is now functional.
Deutsch Plug mini-receiver into an available USB port on your computer. Your number pad is now functional.
Francais Plug mini-receiver into an available USB port on your computer. Your number pad is now functional.
Italiano Plug mini-receiver into an available USB port on your computer. Your number pad is now functional.
Espanol Plug mini-receiver into an available USB port on your computer. Your number pad is now functional.
Portugues Plug mini-receiver into an available USB port on your computer. Your number pad is now functional.
Nederland's Plug mini-receiver into an available USB port on your computer. Your number pad is now functional.
Svenska Plug mini-receiver into an available USB port on your computer. Your number pad is now functional.
Dansk Plug mini-receiver into an available USB port on your computer. Your number pad is now functional.
Norsk Plug mini-receiver into an available USB port on your computer. Your number pad is now functional.
Suomi Plug mini-receiver into an available USB port on your computer. Your number pad is now functional.
Eλνικα Plug mini-receiver into an available USB port on your computer. Your number pad is now functional.
No-pyckn Plug mini-receiver into an available USB port on your computer. Your number pad is now functional.
Magyar Plug mini-receiver into an available USB port on your computer. Your number pad is now functional.
Ceska verze Plug mini-receiver into an available USB port on your computer. Your number pad is now functional.
Po Polsku Plug mini-receiver into an available USB port on your computer. Your number pad is now functional.
English Solving Setup Problems. 1. Turn ON number pad. 2. Check USB mini-receiver connection. 3. Check battery installation. 4. Establish connection: 1) Press the Connect button under the number pad, and then QUICKLY 2) Press the Connect button on the mini-receiver.
Deutsch Solving Setup Problems. 1. Turn ON number pad. 2. Check USB mini-receiver connection. 3. Check battery installation. 4. Establish connection: 1) Press the Connect button under the number pad, and then QUICKLY 2) Press the Connect button on the mini-receiver.
Francais Solving Setup Problems. 1. Tum ON number pad. 2. Check USB mini-receiver connection. 3. Check battery installation. 4. Establish connection: 1) Press the Connect button under the number pad, and then QUICKLY 2) Press the Connect button on the mini-receiver.
Italiano Solving Setup Problems. 1. Turn ON number pad. 2. Check USB mini-receiver connection. 3. Check battery installation. 4. Establish connection: 1) Press the Connect button under the number pad, and then QUICKLY 2) Press the Connect button on the mini-receiver.
Espanol Solving Setup Problems. 1. Turn ON number pad. 2. Check USB mini-receiver connection. 3. Check battery installation. 4. Establish connection: 1) Press the Connect button under the number pad, and then QUICKLY 2) Press the Connect button on the mini-receiver.
Portugues Solving Setup Problems. 1. Turn ON number pad. 2. Check USB mini-receiver connection. 3. Check battery installation. 4. Establish connection: 1) Press the Connect button under the number pad, and then QUICKLY 2) Press the Connect button on the mini-receiver.
Nederland Solving Setup Problems. 1. Turn ON number pad. 2. Check USB mini-receiver connection. 3. Check battery installation. 4. Establish connection: 1) Press the Connect button under the number pad, and then QUICKLY 2) Press the Connect button on the mini-receiver.
Svenska Solving Setup Problems.
1. Turn ON number pad. 2. Check USB mini-receiver connection. 3. Check battery installation. 4. Establish connection: 1) Press the Connect button under the number pad, and then QUICKLY 2) Press the Connect button on the mini-receiver.
Dansk Solving Setup Problems. 1. Turn ON number pad. 2. Check USB mini-receiver connection. 3. Check battery installation. 4. Establish connection: 1) Press the Connect button under the number pad, and then QUICKLY 2) Press the Connect button on the mini-receiver.
Norsk Solving Setup Problems. 1. Turn ON number pad. 2. Check USB mini-receiver connection. 3. Check battery installation. 4. Establish connection: 1) Press the Connect button under the number pad, and then QUICKLY 2) Press the Connect button on the mini-receiver.
Suomi Solving Setup Problems. 1. Tum ON number pad. 2. Check USB mini-receiver connection. 3. Check battery installation. 4. Establish connection: 1) Press the Connect button under the number pad, and then QUICKLY 2) Press the Connect button on the mini-receiver.
ENnVkA Solving Setup Problems. 1.Turn ON number pad.2. Check USB mini-receiver connection.3.Check battery installation.4.Establish connection:1)Press the Connect button under the number pad, and then QUICKLY 2) Press the Connect button on the mini-receiver.
No-PyCCKN Solving Setup Problems. 1. Tum ON number pad. 2. Check USB mini-receiver connection. 3. Check battery installation. 4. Establish connection: 1) Press the Connect button under the number pad, and then QUICKLY 2) Press the Connect button on the mini-receiver.
Magyar Solving Setup Problems. 1. Turn ON number pad. 2. Check USB mini-receiver connection. 3. Check battery installation. 4. Establish connection: 1) Press the Connect button under the number pad, and then QUICKLY 2) Press the Connect button on the mini-receiver.
Ceská verte Solving Setup Problems. 1. Turn ON number pad. 2. Check USB mini-receiver connection. 3. Check battery installation. 4. Establish connection: 1) Press the Connect button under the number pad, and then QUICKLY 2) Press the Connect button on the mini-receiver.
Po polsku Solving Setup Problems. 1. Turn ON number pad. 2. Check USB mini-receiver connection. 3. Check battery installation. 4. Establish connection: 1) Press the Connect button under the number pad, and then QUICKLY 2) Press the Connect button on the mini-receiver.


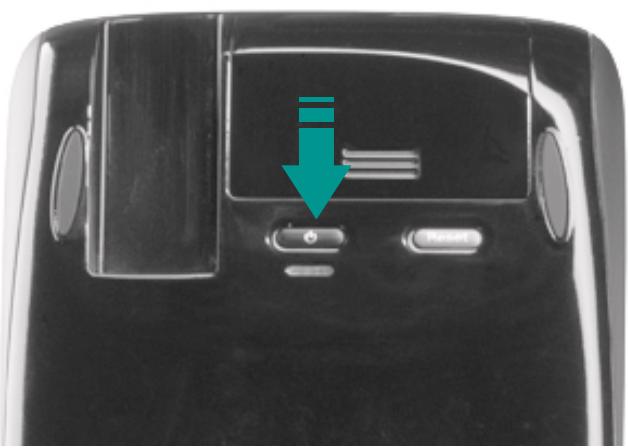
English Battery LED: Blinks red when batteries are low. To save Suomi Battery LED: Blinks red when batteries are low. To save battery power when the number pad is not in use, press the On/Off button on the bottom of the number pad to turn the unit off.
Deutsch Battery LED: Blinks red when batteries are low. To save battery power when the number pad is not in use, press the On/Off button on the bottom of the number pad to turn the unit off.
Francais Battery LED: Blinks red when batteries are low. To save battery power when the number pad is not in use, press the On/Off button on the bottom of the number pad to turn the unit off.
Italiano Battery LED: Blinks red when batteries are low. To save battery power when the number pad is not in use, press the On/Off button on the bottom of the number pad to turn the unit off.
Espanol Battery LED: Blinks red when batteries are low. To save battery power when the number pad is not in use, press the On/Off button on the bottom of the number pad to turn the unit off.
Portugues Battery LED: Blinks red when batteries are low save battery power when the number pad is not in use, press the On/Off button on the bottom of the number pad to turn the unit off.
Nederlandst Battery LED: Blinks red when batteries are low. To save battery power when the number pad is not in use, press the On/Off button on the bottom of the number pad to turn the unit off.
Svenska Battery LED: Blinks red when batteries are low. To save battery power when the number pad is not in use, press the On/Off button on the bottom of the number pad to turn the unit off.
Dansk Battery LED: Blinks red when batteries are low. To save battery power when the number pad is not in use, press the On/Off button on the bottom of the number pad to turn the unit off.
Norsk Battery LED: Blinks red when batteries are low. To save battery power when the number pad is not in use, press the On/Off button on the bottom of the number pad to turn the unit off.
Suomi Battery LED: Blinks red when batteries are low. To save battery power when the number pad is not in use, press the On/Off button on the bottom of the number pad to turn the unit off.
Eληνικα Battery LED: Blinks red when batteries are low. To save battery power when the number pad is not in use, press the On/Off button on the bottom of the number pad to turn the unit off.
No-pyckn Battery LED: Blinks red when batteries are low. To save battery power when the number pad is not in use, press the On/Off button on the bottom of the number pad to turn the unit off.
Magyar Battery LED: Blinks red when batteries are low. To save battery power when the number pad is not in use, press the On/Off button on the bottom of the number pad to turn the unit off.
Ceska Verze Battery LED: Blinks red when batteries are low. To save battery power when the number pad is not in use, press the On/Off button on the bottom of the number pad to turn the unit
Po Polsku Battery LED: Blinks red when batteries are low. To save battery power when the number pad is not in use, press the On/Off button on the bottom of the number pad to turn the unit off.

English
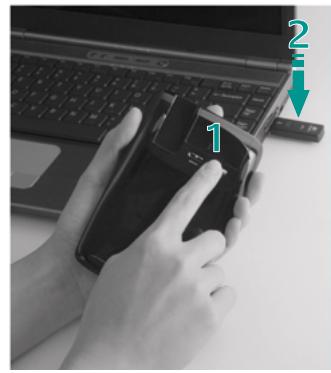
English 1. When not in use, store the receiver conveniently in the bottom of the number pad. 2. Turn the unit off by pressing the On/Off button for two seconds. 3. Place the unit in its protective pouch.
Deutsch
Deutsch 1. When not in use, store the receiver conveniently in the bottom of the number pad. 2. Turn the unit off by pressing the On/Off button for two seconds. 3. Place the unit in its protective pouch.
Francisco
FranCals 1. When not in use, store the receiver conveniently in the bottom of the number pad. 2. Turn the unit off by pressing the On/Off button for two seconds. 3. Place the unit in its protective pouch.
Italiano
Italiano 1. When not in use, store the receiver conveniently in the bottom of the number pad. 2. Turn the unit off by pressing the On/Off button for two seconds. 3. Place the unit in its protective pouch.
F
Espanol 1. When not in use, store the receiver conveniently in the bottom of the number pad. 2. Turn the unit off by pressing the On/Off button for two seconds. 3. Place the unit in its protective pouch.
Bertuay
Portugues 1. When not in use, store the receiver conveniently in the bottom of the number pad. 2. Turn the unit off by pressing the On/Off button for two seconds. 3. Place the unit in its protective pouch.
Niederlands
Neder 1. n t the On/Off button for two seconds, 3. Place the unit in its protective pouch.
Swapske
Svenska 1. When not in use, store the receiver conveniently in the bottom of the number pad. 2. Turn the unit off by pressing the On/Off button for two seconds. 3. Place the unit in its protective pouch.
#
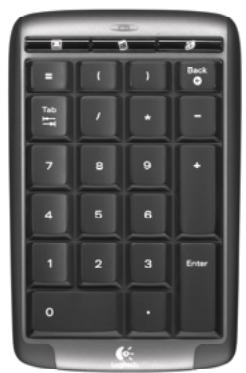
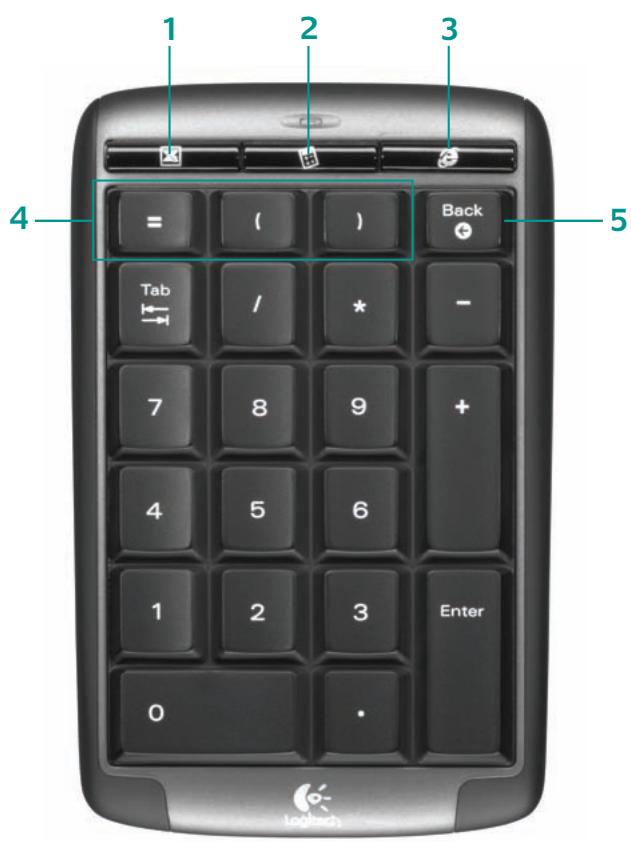
English 1. Launches Microsoft ^ X ccl 2. Launches Windows ^器 calculator 3. Launchs Internet browser 4. One-touch Excel keys 5. Backspace key/Internet Back key
Deutsch
Deutsch 1. Launches Microsoft Excel 2. Launches Windows calculator 3. Launches Internet browser 4. One-touch Excel keys 5. Backspace key/Internet Back key
Francais
Fancais 1. Launches Microsoft® Excel® 2. Launches Windows® calculator 3. Launches Internet browser 4. One-touch Excel® keys 5. Backspace key/Internet Back key
Italiano
Italiano 1. Launches Microsoft ^念 Excel ^念 2. Launches Windows ^念 calculator 3. Launches Internet browser 4. One-touch Excel ^念 keys 5. Backspace key/Internet Back key
F
Espanol 1. Launches Microsoft ^念 Excel ^念 2. Launches Windows ^念 calculator 3. Launches Internet browser 4. One-touch ^念 keys 5. Backspace key/Internet Back key
Portuquês
Portugues 1. Launches Microsoft® Excel® 2. Launches Windows® calculator 3. Launches Internet browser 4. One-touch Excel® keys 5. Backspace key/Internet Back key
Nandrol
Nederland 1. Launches Microsoft® Excel® 2. Launches Windows® calculator 3. Launches Internet browser 4. One-touch Excel® keys 5. Backspace key/Internet Back key
6
Svenska 1. Launches Microsoft ^© Excel ^© 2. Launches Windows ^® calculator 3. Launches Internet browser 4. One-touch Excel ^® keys 5. Backspace key/Internet Back key
Dana
Dansk 1. When not in use, store the receiver conveniently in the bottom of the number pad. 2. Turn the unit off by pressing the On/Off button for two seconds. 3. Place the unit in its protective pouch.
Norsk
NOI SK 1. When not in use, store the receiver conveniently in the bottom of the number pad. 2. Turn the unit off by pressing the On/Off button for two seconds. 3. Place the unit in its protective pouch.
Suomi
SuOH 1. When not in use, store the receiver conveniently in the bottom of the number pad. 2. Iurn the unit off by pressing the On/Off button for two seconds. 3. Place the unit in its protective pouch.
EAAeV
LMI VRU 1. When not in use, store the receiver conveniently in the bottom or the number pad. 2. Turn the unit off by pressing the On/Off button for two seconds. 3. Place the unit in its protective pouch.
#
10-pyckn 1. When not in use, store the receiver conveniently in the bottom of the number pad. 2. Turn the unit off by pressing the On/Off button for two seconds. 3. Place the unit in its protective pouch.
Magy:
Magyar 1. When not in use, store the receiver conveniently in the bottom of the number pad. 2. turn the unit off by pressing the On/Off button for two seconds. 3. Place the unit in its protective pouch.
Cooké
Ceska Verze 1. When not in use, store the receiver conveniently in the bottom of the number pad. 2. Turn the unit off by pressing the On/Off button for two seconds. 3. Place the unit in its protective pouch.
Poon
To Polsku 1. When not in use, store the receiver conveniently in the bottom of the number pad. 2. turn the unit off by pressing the On/Off button for two seconds. 3. Place the unit in its protective pouch.
D.
Dansk 1. Launches Microsoft ^ Excel 2. Launches Windows ^ calculator 3. Launches Internet browser 4. One-touch Excel keys 5. Backspace key/Internet Back key
Norsk
NOTS 1. Launches Microsoft™ Excel® 2. Launches Windows® calculator 3. Launches Internet browser 4. One-touch Excel® keys 5. Backspace key/Internet Back key
squam
SUOTI 1. Launches Microsoft® Excel® 2. Launches Windows® calculator 3. Launches Internet browser 4. One-touch Excel® keys 5. Backspace key/Internet Back key
5)
EANVIKA 1. Launchs Microsoft® Excel® 2. Launchs Windows® calculator 3. Launches Internet browser 4. One-touch Excel® keys 5. Backspace key/Internet Back key
#
TO- DYCKN 1. Launches Microsoft 已 ^ 已 Excel 2. Launches Windows 已 ^ 已 calculator 3. Launches Internet browser 4. One-touch Excel keys 5. Backspace key/Internet Back key
Mog
Magyar 1. Launches Microsoft® Excel® 2. Launches Windows® calculator 3. Launches Internet browser 4. One-touch Excel® keys 5. Backspace key/Internet Back key
C
Ceska Verze 1. Launches Microsoft® Excel® 2. Launches Windows® calculator 3. Launches Internet browser 4. One-touch Excel® keys 5. Backspace key/Internet Back key
D.
Po Polsku 1. Launches Microsoft® Excel® 2. Launches Windows® calculator 3. Launches Internet browser 4. One-touch Excel® keys 5. Backspace key/Internet Back key

Logitech
www.logitech.com
© 2007 Logitech. All rights reserved. Logitech, the Logitech logo, and other Logitech marks are owned by Logitech and may be registered. All other trademarks are the property of their respective owners. Logitech assumes no responsibility for any errors that may appear in this manual. Information contained herein is subject to change without notice.
620-000240.001
English
English Warranty. Your product comes with a limited hardware warranty. Refer to the Logitech Warranty Document or go to
http://www.logitech.com/warranty for more information. Compliance and Safety Your product has been UL tested and should only be used with other UL certified devices. For information regarding power supply and battery usage, go to http://www.logitech.com/compliance.
D. t_2 -th
Deutsch Warranty. Your product comes with a limited hardware warranty. Refer to the Logitech® Warranty Document or go to:
http://www.logitech.com/warranty for more information. Compliance and Safety Your product has been UL tested and should only be used with other UL certified devices. For information regarding power supply and battery usage, go to
http://www.logitech.com/compliance.
Francisco
Francais Warranty. Your product comes with a limited hardware warranty. Refer to the Logitech® Warranty Document or go to
http://www.logitech.com/warranty for more information. Compliance and Safety Your product has been UL tested and should only be used with other UL certified devices. For information regarding power supply and battery usage, go to http://www.logitech.com/compliance
http://www.logitech.com/compliance.
Italiano Warranty. Your product comes with a limited hardware warranty. Refer to the Longitech® Warranty Document or go to:
http://www.logitech.com/warranty for more information. Compliance and Safety Your product has been UL tested and should only be used with other UL certified devices. For information regarding power supply and battery usage, go to http://www.logitech.com/compliance.
Fenqiel
ESPANOT Warranty. Your product comes with a limited hardware warranty. Refer to the Loganitech® Warranty Document or go to:
http://www.logitech.com/warranty for more information. Compliance and Safety Your product has been UL tested and should only be used with other UL certified devices. For information regarding power supply and battery usage, go to http://www.logitech.com/compliance.
Portugues Warranty. Your product comes with a limited hardware
Warranty. Refer to the Logitech Warranty Document or go to http://www.logitech.com/warranty for more information. Compliance and Safety
Your product has been UL tested and should only be used with other UL certified devices. For information regarding power supply and battery usage, go to http://www.logitech.com/compliance.
Nederlands
Nederlands Warranty. Your product comes with a limited hardware
warranty. Refer to the Logitech® Warranty Document or go to http://www.logitech.com/warranty for more information. Compliance and Safety
Your product has been UL tested and should only be used with other UL certified
devices. For information regarding power
http://www.logitech.com/compliance.
#
Svenska Warranty. Your product comes with a limited hardware warranty. Refer to the Logitech Warranty Document or go to
http://www.logitech.com/warranty for more information. Compliance and Safety.
Your product has been UL tested and should only be used with other UL certified
devices. For information regarding power supply and battery usage, go to http://www.hydrogenation.com/
http://www.logitech.com/compliance.
Dansk
Datisk Warranty. Your product comes with a limited hardware warranty. Refer to the Logitech® Warranty Document or go to:
http://www.logitech.com/warranty for more information. Compliance and Safety
Your product has been UL tested and should only be used with other UL certified
devices. For information regarding power supply and battery usage, go to
http://www.logitech.com/compliance.
Norsk
NOT ISR Warranty. Your product comes with a limited hardware warranty. Refer to the Logitech Warranty Document or go to http://www.logitech.com/warranty for more information. Compliance and Safety. Your product has been UL tested and should only be used with other UL certified devices. For information regarding UL testing, please visit www.ULW.org.
power supply and battery usage, go to http://www.logitech.com/compliance.
Suomi Warranty. Your product comes with a limited hardware warranty, Ref to the Logitech Warranty Document or go to http://www.logitech.com/warranty for more information. Compliance and Safety. Your product has been UL tested and should only be used with other UL certified devices. For information regarding power supply and battery usage, go to http://www.logitech.com/compliance.
Power Supply and Battery Usage, go to http://www.logitech.com/compliance.
Eληνικα Warranty. Your product comes with a limited hardware warranty. Refer to the Logitech® Warranty Document or go to
http://www.logitech.com/warranty for more information. Compliance and Safet Your product has been UL tested and should only be used with other UL certified devices. For information regarding power supply and battery usage, go to http://www.logitech.com/compliance.
No-pycckn Warranty. Your product comes with a limited hardware
warranty, Refer to the Logitech® Warranty Document or go to http://www.logitech.com/warranty for more information. Compliance and Safety. Your product has been UL tested and should only be used with other UL certified devices. For information regarding power supply and battery usage, go to:
http://www.logitech.com/compliance
Magyar Warranty. Your product comes with a limited hardware warranty.
Refer to the Logitech Warranty Document or go to http://www.logitech.com/support for more information. Camplisance and Safety
http://www.logitech.com/only/Warranty for More Information, Compliance and Safety Your product has been UL tested and should only be used with other UL certified devices. For information regarding power supply and battery usage, go to http://www.logitech.com/compliance.
Ceska verze Warranty. Your product comes with a limited hardware
warranty. Refer to the Logitech Warranty Document or go to http://www.logitech.com/warranty for more information. Compliance and Safety Your product has been UL tested and should only be used with other UL certified devices. For information regarding your usage, please call customer care
http://www.logitech.com/compliance
Ro polskii
PO POLSKI Warranty. Your product comes with a limited hardware warranty. Refer to the Logitech Warranty Document or go to
Warranty, refer to the logitech Warranty Document or go to http://www.logitech.com/warranty for more information. Compliance and Safety
Your product has been UL tested and should only be used with other UL certified devices. For information regarding power supply and battery usage, go to http://www.logitech.com/compliance.

www.logitech.com/support

| Location | Hotline Technical Help |
| Austria | +43-(0)1 502 221 348 |
| Belgium | Dutch: +32-(0)2 626 89 60; French: +32-(0)2 626 89 62 |
| Czech Republic | +420 239 000 335 |
| Denmark | +45-35 44 55 17 |
| Eastern Europe | English: +41-(0)21 863 54 01 |
| Finland | +358-(0)9 817 100 21 |
| France | +33-(0)1-43 62 34 14 |
| Germany | +49-(0)69-92 032 166 |
| Hungary | +36-177-74 853 |
| Ireland | +353-(0)1-605 8357 |
| Italy | +39-02-214 08 71 |
| Netherlands | +31-(0)10-243 88 98 |
| Norway | +47-(0)23 500 083 |
| Poland | +48-22-854 11 51 |
| Portugal | +351-21 316 4124 |
| Russia | +7(095)-641 3460 |
| Spain | +34 -91-375 33 69 |
| Sweden | +46-(0)8-519 920 20 |
| Switzerland | D +41-(0)21-863 54 11; F +41-(0)21-863 54 31; I +41-(0)21-863 54 61; E +41 (0)21 863 54 01 |
| United Kingdom | +44-(0)207-309-01 26 |
| European, Mid. East, & African Hq, Romanels/Morges, Switzerland | English: +41-(0)21-863 5401Fax: +41-(0)21-863 5402 |