
ORBIT 2 - Sonneur d'alarme IROX - Notice d'utilisation et mode d'emploi gratuit
Retrouvez gratuitement la notice de l'appareil ORBIT 2 IROX au format PDF.


| Type de produit | Sonneur d'alarme filaire |
| Marque | Irox |
| Modèle | ORBIT 2 |
| Dimensions (L x l x h) | 10 x 8 x 4 cm |
| Poids | 150 g |
| Alimentation | Adaptateur secteur 12V DC (inclus) |
| Consommation électrique | 5 W en veille, 15 W en alarme |
| Niveau sonore | Jusqu'à 90 dB à 1 mètre |
| Types de sonneries | 3 tonalités réglables : continue, intermittente, pulsée |
| Fonction test | Bouton de test sur le dessus |
| Indicateur visuel | LED rouge clignotante en alarme |
| Mise en veille | Bouton de sourdine (silence temporaire) |
| Entretien et nettoyage | Nettoyer avec un chiffon doux et sec ; ne pas utiliser de produits abrasifs |
| Sécurité | Homologué CE ; utilisation intérieure uniquement |
| Pièces détachées et réparabilité | Pièces détachées disponibles auprès du fabricant ; réparation par un professionnel recommandée |
| Température de fonctionnement | 0 °C à 40 °C |
| Humidité | 10 % à 90 % sans condensation |
| Couleur | Blanc |
| Garantie | 2 ans |
FOIRE AUX QUESTIONS - ORBIT 2 IROX
Questions des utilisateurs sur ORBIT 2 IROX
0 question sur cet appareil. Repondez a celles que vous connaissez ou posez la votre.
Poser une nouvelle question sur cet appareil
Téléchargez la notice de votre Sonneur d'alarme au format PDF gratuitement ! Retrouvez votre notice ORBIT 2 - IROX et reprennez votre appareil électronique en main. Sur cette page sont publiés tous les documents nécessaires à l'utilisation de votre appareil ORBIT 2 de la marque IROX.
MODE D'EMPLOI ORBIT 2 IROX
iROX
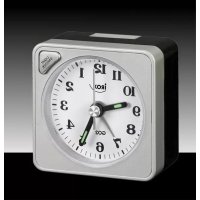
ORBIT 2 - Radio controlled clock with Silent Mode
HOW TO OPERATE
1- To start the clock
Insert the battery into the battery compartment in the indicated polarity. The clock will start to receive the time signal DCF77 automatically.
2- Time signal reception mode
a) Automatic reception mode
- The time reception will start after inserting the battery
- Twice a day the clock will synchronize the time
b) Manual mode
- A time signal reception can be started by pressing the WAVE button for 3 seconds.
After starting a full reception, the seconds, minutes and hours hands will move to the 12 o'clock position and remain there as long as the reception takes place. A full reception may take 3-10 minutes.
Upon completion of a successful reception, the clock will move the hands to the exact time and continue to operate as a clock. Should there be no good reception, the clock will start working from the 12 o'clock position. In this case, you may adjust the time manually.
3- Manual time setting mode
Press and hold the SET button. Now you have entered the manual time setting mode and the minutes hand will keep moving forward for as long as you press the SET button. The clock will exit from the time setting mode if you do not press the SET key for more than 6 seconds and continue to operate as a clock.
4- Reset
On rare occasions the clock may not respond when pressing buttons or well functioning. In this case, you need to reset the clock by pressing the RESET button at the backside of the clock. By doing this, the clock will start-up newly in the same way as described above after inserting a new battery.
5- To set alarm, light, Electronic light and snooze features
Turn the knob on the backside counter-clockwise to set the alarm hand at the desired time.
Then, set the alarm ON/OFF switch on ON position.
When the alarm time is reached, the alarm will sound 2 minutes with increasing intensity. To interrupt the alarm, please read below in section "7-Snooze".
6- Silent mode (to avoid any noise from the clock movement)
The silent mode is enabled by setting the alarm ON/OFF switch on the rear of the clock to the "ON" position. The seconds hand will then move to the 12 o'clock position and remain there until the switch is moved to the OFF position again. Upon activating/deactivating the silent mode, you may have to wait up to one minute to see the seconds hand stop or move again.
7- Snooze
a) Manual
During the 2 minute alarm sound, you may press Snooze (button at the backside above the Alarm ON/OFF switch). The alarm will then be interrupted for 4-5 minutes and then sound again. You may repeat such Snooze cycles within 40 minutes of the initial alarm time. After this, the clock will stop and, if the alarm is left "ON", sound again at the set time 12 hours later.
b) Automatic
If no key is pressed during the 2 minutes alarm sound, then the alarm will be repeated after 5 minutes automatically (there are totally two 2 such automatic repetitions if no key is pressed). After this, the clock will
stop and, if the alarm is left "ON", sound again at the set time 12 hours later.
8- Light
Pressing the Snooze button will also activate the display light for 3 seconds.
NOTE ABOUT THE BATTERY
-The battery lasts max. 1 year. Change the battery once a year to keep the clock operational and accurate
-Remove the battery when the clock is not in use for a longer period.
SPECIAL NOTES ABOUT THE RADIO CONTROLLED CLOCK
The atomic clock time signal DCF 77 is transmitted from Germany. The long-wave transmitter has a range of up to 1500km. If you have reception problems, please observe following points:
- There are fewer disturbances in the atmosphere during the night which increases the likeliness of reception.
- Make sure that the device is at least 2 meters (8 feet) away from possible sources of disturbance such as TV, computer, monitor, microwave etc.
- In rooms with concrete or metal walls (e.g. cellars, modern office buildings etc.) the receipt of the signal may be more difficult due to the shielding. In such cases find a better location for the device near a window. Sometimes it also helps to simply turn the device by 90°, thereby improving the alignment of the receiving antenna.
PRODUCT SPECIFICATION
Operating temperature 0°C to +50°C; Quartz Accuracy (2,5V/25°C) +/- 30 secs/month
Battery life1 year
SUPPORT
This device is a new development of Irox Development Technology. All information was made and checked by means of a functioning device. It may occur that adjustments and improvements of the device will take place that due to typographical procedures were not able to be listed in this manual. Should you notice deviations which make it difficult for you to operate and use of the device, you may at any time download the latest manual onto your PC free of charge at www.irox.com.
© Irox Development Technology


- IROX
- ORBIT 2 - RADIO CONTROLLED CLOCK WITH SILENT MODE
- HOW TO OPERATE
- TO START THE CLOCK
- TIME SIGNAL RECEPTION MODE
- MANUAL TIME SETTING MODE
- RESET
- TO SET ALARM, LIGHT, ELECTRONIC LIGHT AND SNOOZE FEATURES
- SILENT MODE (TO AVOID ANY NOISE FROM THE CLOCK MOVEMENT)
- SNOOZE
- MANUAL
- AUTOMATIC
- LIGHT
- NOTE ABOUT THE BATTERY
- SPECIAL NOTES ABOUT THE RADIO CONTROLLED CLOCK
- PRODUCT SPECIFICATION
- SUPPORT
Marque : IROX
Modèle : ORBIT 2
Catégorie : Sonneur d'alarme