R-09 HR SET - Enregistreur multipiste ROLAND - Notice d'utilisation et mode d'emploi gratuit
Retrouvez gratuitement la notice de l'appareil R-09 HR SET ROLAND au format PDF.

| Type de produit | Enregistreur multipiste portable |
| Marque | ROLAND |
| Modèle | R-09 HR SET |
| Dimensions | 102 x 62 x 28 mm |
| Poids | 130 g (avec piles) |
| Alimentation | 2 piles AA ou adaptateur secteur (optionnel) |
| Formats d'enregistrement | WAV 16 bits (44,1/48 kHz), MP3 (64-320 kbps) |
| Fonctions principales | Enregistrement, écoute, Trim, Conversion MP3, Répétition (Rehearsal), Mode ECO |
| Microphone | Intégré + entrée micro externe avec commutateur de gain |
| Stockage | Carte SD/SDHC |
| Écran | LCD rétroéclairé |
| Contrôle du volume | Boutons (+)/(-) pour l'écoute et la sortie |
| Mode ECO | Réduit la consommation et agrandit la police d'affichage |
| Langues d'affichage | Anglais, Japonais |
| Entretien | Nettoyer avec un chiffon doux et sec, éviter l'humidité |
| Sécurité | Ne pas exposer à des températures extrêmes, utiliser des piles recommandées |
| Réparabilité | Consulter un centre agréé ROLAND |
| Informations générales | Version 3.0, mise à jour ajoutant Trim, Rehearsal, MP3 Convert, ECO Mode |
FOIRE AUX QUESTIONS - R-09 HR SET ROLAND
Questions des utilisateurs sur R-09 HR SET ROLAND
0 question sur cet appareil. Repondez a celles que vous connaissez ou posez la votre.
Poser une nouvelle question sur cet appareil
Téléchargez la notice de votre Enregistreur multipiste au format PDF gratuitement ! Retrouvez votre notice R-09 HR SET - ROLAND et reprennez votre appareil électronique en main. Sur cette page sont publiés tous les documents nécessaires à l'utilisation de votre appareil R-09 HR SET de la marque ROLAND.
MODE D'EMPLOI R-09 HR SET ROLAND
New functionality has been added to the R-09HR. Please read this in conjunction with the owner's manual.
• Using the Rehearsal Function....p. 2
- Saving Only the Useful Part of a Song ......p. 3
- Converting Recordings to MP3 Files ......p. 5
- Changing the Language Used for Indications in the Screen......p. 6
• Using the R-09HR in ECO Mode ......p. 7
Enhanced control over volume for preview monitoring
The handling for the volume during preview monitoring, when playing back songs that have low-volume passages, has been greatly improved in version 3.0. With some songs, if the output volume is set to a high level, the sound may sometimes distort. In such cases, you should adjust the volume of the output using the [(+) and (-) VOLUME Buttons] .
Copyright © 2010 ROLAND CORPORATION
All rights reserved. No part of this publication may be reproduced in any form without the written permission of ROLAND CORPORATION.
R-09HR
1
Saving Only the Useful Part of a Song (Trim)
The item "Trim" has been added to the
This feature allows you to trim away all parts of the song that you don't need, so you end up with only the material you do need.
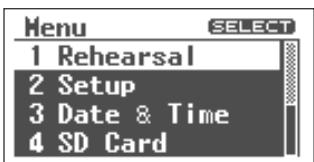
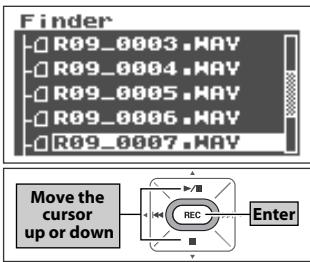
1. Select a song from the .
Use the [PLAY Button ▲] and [STOP Button ▼] to select a song, then press the [REC Button].
MEMO
To select a subfolder, select the folder then press the [NEXT Button
▶]. To move up a level, press the [PREV Button ◀].
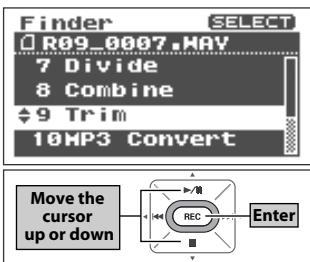
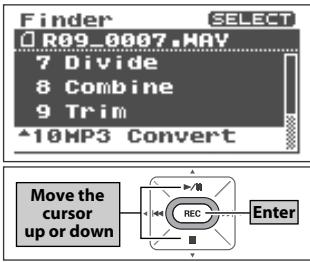
2. Select "Trim."
Use the [PLAY Button ▲] and [STOP Button ▼] to select "Trim," then press the [REC Button].
3. Search for the starting point of the portion you want to keep.
Using the [PLAY Button ▲], [STOP Button ▼], [PREV Button ◀], and [NEXT Button ▶] to fast-forward or rewind, locate the starting point of the portion you want to keep. When you've determined the position, press the [REC Button].
4. Search for the end point of the portion you want to keep.
Using the [PLAY Button ▲], [STOP Button ▼], [PREV Button ◀], and [NEXT Button ▶] to fast-forward or rewind, locate the end point of the portion you want to keep. When you've determined the position, press the [REC Button].
You can return to step 3 by pressing the [FINDER Button].

![Trim R09_0007.HAV 00:00:11.1 Set Start Point, Push [REC] ■ STOP 09:04 Confirm the starting point Rewind Continue to press REC Stop Play Fast Forward Continue to press](/content/2020/04/131081/images/0403db998e0c593a62ba80a9423640f3ec1c934bd5b6b20312bf3f64db28c520.jpg)
![Trim R09_0007.HAV 00:01:11.1 5 00:00:11 Set End Point, Push [REC] ■ STOP 09:06 Confirm the end point Rewind Continue to press REC Play Fast Forward Stop Continue to press](/content/2020/04/131081/images/155e05f533be7602a62ee53b3155715db9b1d130e5f16b00800972d39ed6a9f7.jpg)
Using the Rehearsal Function (Rehearsal)
The menu item Rehearsal has been added to the
- By reducing battery consumption, the number of hours over which the product can be used continuously can be extended.
- By limiting the number of items to be set, the font size of the displayed items can be increased, making operation of the R-09HR easier.
(Normal)
(ECO Mode)
■ Number of hours unit can be used continuously
Continuous recording approximately: 7.5 hours (44.1 kHz, using internal microphone)
■ Precautions concerning use of ECO Mode
Please note that ECO Mode imposes certain limitations regarding the functions that can be used and the parameters that can be set.
| Functions that are limited | Settings that can be used for recordingsSampling Frequency: 44.1 kHz or 48.0 kHzRecording Mode: WAV 16 bitData that can be played backOnly WAV files with a sampling frequency of 44.1 kHz or 48.0 kHz. | |
| Functions that cannot be used | [SPEED Button] (Changing the playback speed)[REVERB Button]TunerMetronomeSelf TimerMP3 Convert | |
| Parameters for which settings can be changed | Sample Rate (44.1 kHz/48.0 kHz)Ext Mic TypeLimiter/AGCLow Cut FreqRepeat | Rec Monitor SwPreview MonitorBrightnessBattery Type |
| Parameters for which the settings cannot be changed(fixed at default settings) | Rec Mode (WAV 16 bit)Max File Size (2 GB)Self Timer (OFF)Metronome (OFF)File Name (Name)Play Mode (SEQUENTIAL) | Peak Hold (On)Display Timer (5 sec)Auto Power Off (30 min)Rec/Peak LED (Normal)Remote Control (Enable) |
![MP3 Convert R09_0007.WAY MP3 Convert Mode: 128kbps Select and push [REC] Changes the value REC Enter](/content/2020/04/131081/images/266bf7049d31c5194ebfd727d309f1034b12df312c7823cb9433d9ca84a020ad.jpg)
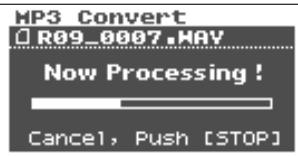
If you want to stop the conversion after it has started, press the [STOP Button ▼].
NOTE
- Do not turn off the power while the conversion is being carried out. - If the card has insufficient free space, the message "SD Card Full" will appear, and this converting operation will not be possible.
MEMO
Once it's been converted to an MP3 file, the resulting song will be saved as a new song. As its name, the characters "-1" will be appended to the name of the source song. The source song will remain in its original state. For example, if the source song was named R09_0001.WAV, the MP3 conversion operation will create a new song named R09_0001-1.MP3.
Changing the Language Used for Indications in the Screen (Language)
A choice of the language used for display has been added to the
- When finished with the settings, press the [MENU button] to return to previous screens, in order.
• After a Factory Reset, the unit will be set to display things in English.
6
■ Setting the ECO Mode
1. Select "ECO Mode" from the
Use the [PLAY Button ▲] and [STOP Button ▼] to select "ECO Mode," then press the [REC Button].
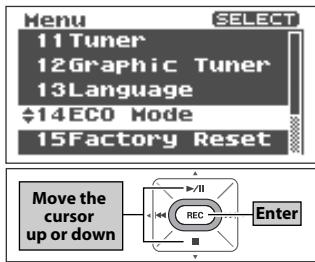
2. Turn on "ECO Mode."
Using the [PREV Button ◀] and [NEXT Button ▶] to select "ON."
| (Default value is bold) | |
| Setting | OFF (Normal) |
| ON (ECO Mode) | |
![ECO Mode ECO Mode: ON Select_and_push [REC] Changes the value REC Enter](/content/2020/04/131081/images/c11ecf34268ce6f6426cf3f662a9fe8dca39b0878262662992a7967dca4c01b3.jpg)
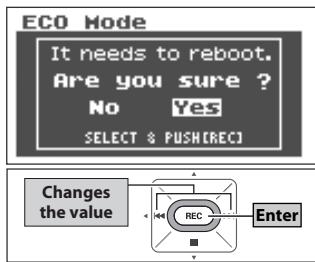
3. Restart the R-09HR.
A screen asking you to confirm that you wish to reboot the unit will appear. Using the [NEXT Button ▶] to select "YES," then press the [REC Button].
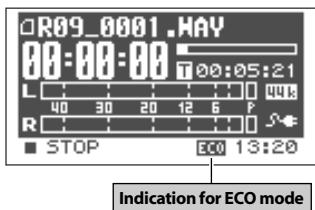
After it has restarted, the R-09HR will switch to ECO mode. While the R-09HR is in ECO mode, the indication "ECO" will be shown in the lower portion of the
MEMO
When in ECO mode, values won't be restored to their defaults if you carry out a factory reset.
To turn ECO mode off, change the settings for ECO mode again.