
4350 - Téléphone mobile HTC - Notice d'utilisation et mode d'emploi gratuit
Retrouvez gratuitement la notice de l'appareil 4350 HTC au format PDF.


| Type de produit | Téléphone mobile de type Pocket PC |
| Dimensions | 108 x 58 x 18 mm (estimation) |
| Poids | 150 g (estimation) |
| Alimentation | Batterie lithium-ion rechargeable, charge via adaptateur secteur ou câble USB |
| Fonctions principales | Appels, SMS, MMS, E-mail, Navigation Internet, Appareil photo 2.0 MP, Lecteur multimédia, Synchronisation Outlook |
| Entretien et nettoyage | Nettoyer avec un chiffon doux et sec ; éviter les liquides |
| Sécurité | Protection par PIN SIM et mot de passe appareil |
| Pièces détachées et réparabilité | Batterie amovible, carte microSD, écran tactile ; réparation par professionnel recommandé |
| Informations générales | Marque HTC, modèle 4350, système d'exploitation Windows Mobile, connectivité GSM/GPRS/EDGE, Bluetooth, Wi-Fi, port USB |
FOIRE AUX QUESTIONS - 4350 HTC
Questions des utilisateurs sur 4350 HTC
0 question sur cet appareil. Repondez a celles que vous connaissez ou posez la votre.
Poser une nouvelle question sur cet appareil
Téléchargez la notice de votre Téléphone mobile au format PDF gratuitement ! Retrouvez votre notice 4350 - HTC et reprennez votre appareil électronique en main. Sur cette page sont publiés tous les documents nécessaires à l'utilisation de votre appareil 4350 de la marque HTC.
MODE D'EMPLOI 4350 HTC
Pocket PC Phone
Quick Start Guide
Contents
- What's in the Box? .... 3
- The Pocket PC Phone...... 4
- Getting Ready 8
- Making a Call 12
- Synchronizing Outlook Information.... 14
- Setting Up E-mail Accounts 15
- Sending a Message.... 17
- Browsing the Internet 18
- Using the Camera 19
- Using Pictures & Videos 20
- Entering Information 22
- Status Indicators.... 24
- Customizing Your Pocket PC Phone 27
- Securing Your Pocket PC Phone 28
- More Information 29
1. What's in the Box?
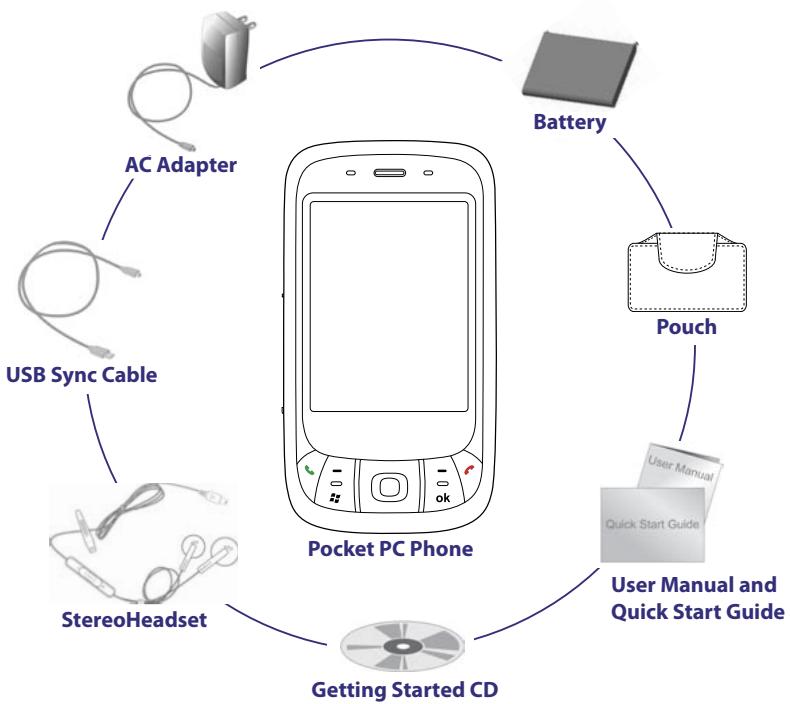
flowchart
graph TD
    A["AC Adapter"] --> B["Pocket PC Phone"]
    C["USB Sync Cable"] --> B
    D["StereoHeadset"] --> B
    E["Battery"] --> F["Pouch"]
    F --> G["User Manual and Quick Start Guide"]
    G --> H["Getting Started CD"]
2. The Pocket PC Phone
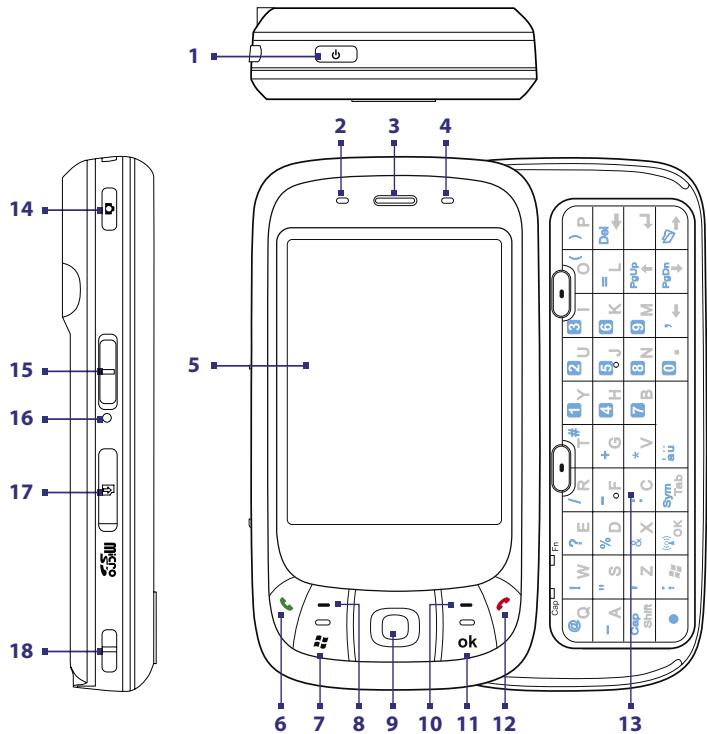
| No. | Item | Function |
| 1 | POWER Button | Press and hold to turn on the device. When the device is turned on, press to turn off the display temporarily. This switches your device to Sleep mode, and you can still receive calls and messages. Press and hold (for about 5 seconds) to turn off the power completely. All functions including the phone will be unavailable for use. |
| 2 | Notification LED 1 | This bi-color LED shows Green and Amber lights for GSM/GPRS/EDGE standby, message, and network status as well as for notification and battery charging status. |
| 3 | Earpiece | Listen to a phone call from here. |
| 4 | Notification LED 2 | This LED shows a blinking Blue light for Bluetooth system notification of powered-up and ready to transmit Bluetooth signal, or a blinking Green light for Wi-Fi status. When both Bluetooth and Wi-Fi are enabled, their lights blink alternately. |
| 5 | Touch Screen | Tap the screen with the stylus to write, draw, or make a selection. |
| 6 | TALK Button | Press to answer an incoming call or dial a number. |
| 7 | START Button | Press to open the Start menu. |
| 8 | Left SOFT KEY | Press to execute the command shown in the label above the button. |
| 9 | NAVIGATION Control/ENTER | Press this multi-directional control up, down, left, or right to move through menus and program instructions; carry out the selection by pressing the center button. |
| 10 | Right SOFT KEY | Press to execute the command shown in the label above the button. |
| 11 | OK Button | Press to confirm your data entries, or to exit the program in use. |
| 12 | END Button | Press to end a call or to return to the Today screen. |
| 13 | Hardware Keyboard | The QWERTY keyboard is similar to a standard keyboard on your PC. |
| 14 | CAMERA Button | Press to launch the Camera; press again to take a photo or video clip, depending on the specified capture mode. |
| 15 | Volume Slider | Slide up or down to adjust the speaker volume. During a call, slide up or down to adjust the earpiece volume. |
| 16 | RESET Button | With the stylus, press the RESET button to soft-reset your device. |
| 17 | microSD Card Slot | Insert a storage card (microSD card) for storing data. |
| 18 | Strap Holder | Attach a strap for carrying your device. |
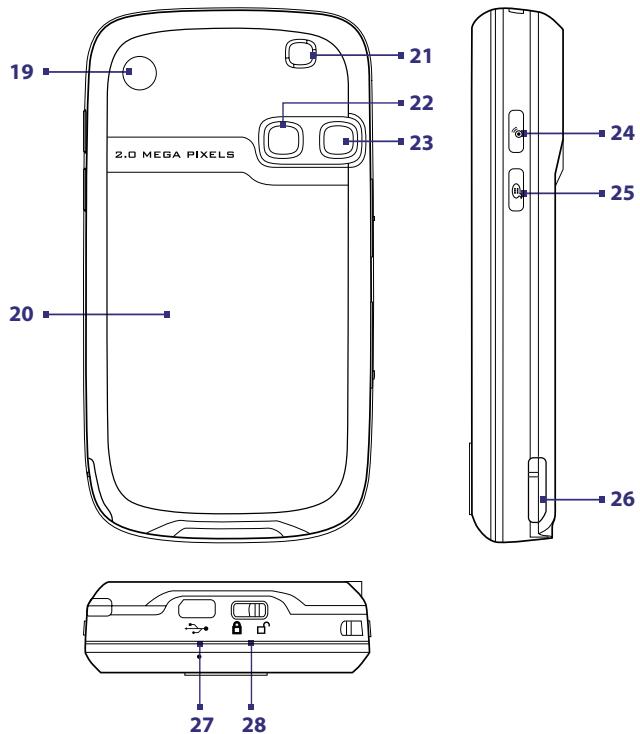
| No. | Item | Function |
| 19 | Car Antenna Connector | Connect your phone to the car antenna while in a car to have better reception quality. Simply peel off the rubber cap and connect the antenna jack. Replace the rubber cap if unused. |
| 20 | Back Cover | This covers the battery and SIM card compartment. To remove, slide the latch that is located at the bottom of your device. |
| 21 | Speaker | Listen to the audio media from here. |
| 22 | Self-Portrait Mirror | Turn the back side of your device to face yourself so that your image reflects on the mirror when taking self-portrait shots. |
| 23 | Camera | This is a 2.0 megapixel CMOS color camera. Use the camera to take still photos and record video clips. |
| 24 | COMM Manager button | Press to launch Comm Manager. Comm Manager lets you easily turn on/off your device's connections (such as Bluetooth and Wi-Fi), ringer, phone, etc. |
| 25 | Voice Command Button | Press to start Voice Speed Dial; press and hold to record a voice note. |
| 26 | Stylus | Use the stylus to write, draw, or select items on the touch screen. |
| 27 | Sync Connector/ Earphone Jack | Use this connector to synchronize data by connecting the provided USB Sync cable or to recharge the battery via the provided AC adapter. You can also connect the provided USB stereo headset for hands-free conversation or for listening to audio media. |
| 28 | Back Cover Latch | Slide this latch to release the back cover. |
3. Getting Ready
Before you start using your device, you must install a SIM card and a charged battery. The SIM card contains your phone number and service details, and it stores phonebook entries and your messages. You can also install a microSD card to expand the storage for your device.
Install the SIM card
- Make sure your device is turned off.
- Slide the back cover latch to the unlock position (☐) to pop up the back cover slightly. Then, remove the back cover by lifting it up from the bottom end.
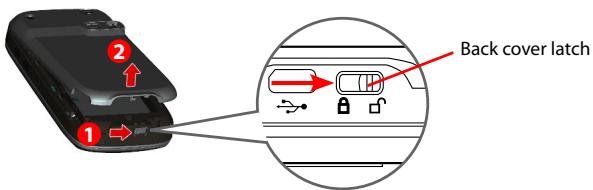
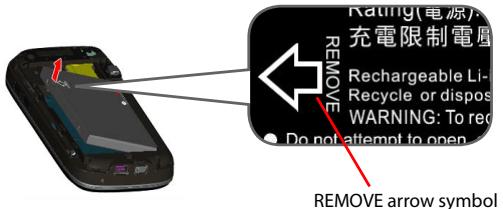
- If you have installed the battery, remove it by lifting it up from the end that is marked with a REMOVE arrow symbol.
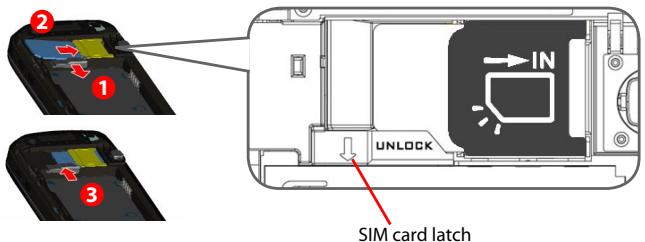
- Pull the SIM card latch downward to unlock the slot. Insert the SIM card into the slot with its gold contacts facing down and its cut-off corner facing toward outside of the slot (see the diagram printed on the slot). After inserting the SIM card, push back the SIM card latch to secure the SIM card in place.
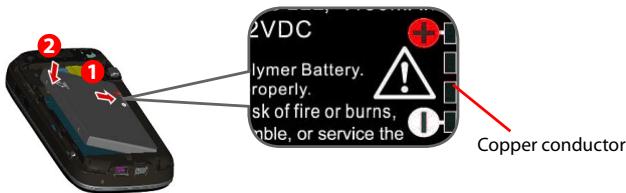
- Install the battery by inserting it with its exposed copper part aligned with the protruding copper conductor on the upper right side of the battery compartment. Insert the right side of the battery first, then gently push the battery into place.
- Replace the back cover and slide the back cover latch to the lock position ( 🔒 ).
Install the microSD card
If you need more storage for your device, you can install a microSD card into the slot on the left side of the device. To install the microSD card, open the rubber cover first, and then insert the card into the slot (with its gold contacts facing down) until it snaps into place. After inserting the card, replace the rubber cover.
To remove the microSD card, make sure that no application is accessing the card. Open the rubber cover and press the card to pop it out slightly. Then, pull the card out of the slot and replace the rubber cover.
Charge the battery
New batteries are shipped partially charged. Before you start using your device, you have to install and charge the battery. Some batteries perform best after several full charge/discharge cycles. You can charge the battery in two ways:
- Connect your device directly to an electrical outlet using the AC adapter.
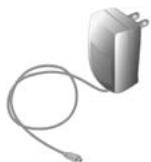
natural_image
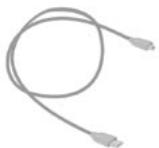
Illustration of a gray plastic electrical plug connected to a coiled cable (no text or symbols)- Plug the sync cable to the USB port on your PC and to the sync connector on your device.
natural_image
Coiled cable with two USB connectors (no text or symbols visible)When your device is turned off, charging is indicated by a solid amber light on the LED indicator. When your device is turned on, charging is indicated by a solid amber light on the LED indicator as well as a charging icon ( ) on the Today screen.
After the battery has been fully charged, the LED indicator becomes green and a full battery icon (☐) appears on the Today screen.
Check the battery power
- Tap the battery level icon (☐) on the Today screen; or
- Tap Start > Settings > Systems tab > Power.
The Power Settings screen will then open where you can see the current battery power level.
When the battery power gets very low, a warning message will be displayed. When you see this, immediately save your data by synchronizing with your PC, or save your data on a storage card, and then turn off your device. Do not attempt to restart your device until you have connected it with the power adapter.
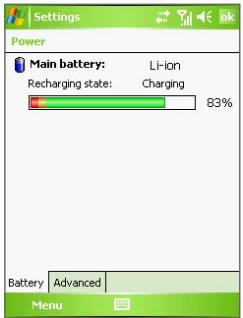
Battery power indicator
Turn on your Pocket PC Phone
Press and hold POWER to turn on your device. When you turn on your device for the first time, a Quick Start Wizard will guide you through the screen calibration process and the setup of regional settings, date and time, password, Outlook e-mail, and POP3/IMAP4 e-mail accounts.
To turn off your device, press POWER again.
4. Making a Call
Like a standard mobile phone, you can use your device to make, receive, and keep track of phone calls and send SMS messages.
The Phone screen
From the Phone screen, you can access Call History, Speed Dial, and Phone settings. To open the Phone screen, do one of the following:
- Use the stylus to tap Start > Phone.
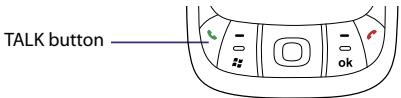
- Press TALK on the device.
Make a voice call
- On the Phone screen, tap the phone number you want to call, then tap Talk or press the TALK button.
5. Synchronizing Outlook Information
Using Microsoft® ActiveSync®, you can synchronize information on your device with information on your PC, such as Outlook content. ActiveSync is already installed on your device, but you need to install it on your PC if you don't already have it. Insert the Getting Started CD into the CD drive of your PC. Follow the instructions on the installation wizard screen to install ActiveSync. Once installation is completed, connect the sync cable to your device and plug it into your PC's USB port.
To set up a partnership between your device and the PC, turn on your device. When the PC detects a USB connection, it starts the ActiveSync Synchronization Setup Wizard. Follow the instructions on the screen and select the Outlook items you want to synchronize.
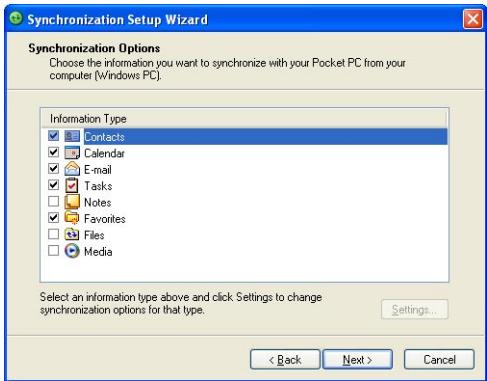
Synchronization Setup Wizard (Synchronization Options)
PC requirement to run ActiveSync 4.x
To connect your device to the PC, you must have the Microsoft® ActiveSync® program installed on your PC. ActiveSync 4.x is included in the Getting Started CD, which is compatible with the following operating systems and applications:
• Microsoft® Windows® 2000 Service Pack 4
- Microsoft® Windows Server® 2003 Service Pack 1
- Microsoft® Windows Server® 2003 IA64 Edition Service Pack 1
- Microsoft® Windows Server® 2003 x64 Edition Service Pack 1
- Microsoft® Windows® XP Professional Service Packs 1 and 2
- Microsoft® Windows® XP Home Service Packs 1 and 2
• Microsoft® Windows® XP Tablet PC Edition 2005
• Microsoft® Windows® XP Media Center Edition 2005
- Microsoft® Windows® XP Professional x64 Edition
- Microsoft® Outlook® 98, Microsoft® Outlook® 2000 and Microsoft® Outlook® XP, and Microsoft® Outlook® 2003 messaging and collaboration clients
• Microsoft® Office 97, excluding Outlook
• Microsoft® Office 2000
• Microsoft® Office XP
• Microsoft® Office 2003
- Microsoft® Internet Explorer® 4.01 or later (required)
• Microsoft® Systems Management Server 2.0
6. Setting Up E-mail Accounts
The E-mail Setup Wizard makes it easy and simple to set up your Outlook e-mail and POP3/IMAP4 accounts on your device.
Set up e-mail accounts using E-mail Setup Wizard
- Tap Start > Messaging.
- Tap Menu > Tools > New Account to access the E-mail Setup Wizard.
- The E-mail Setup Wizard guides you step-by-step through the setup process.
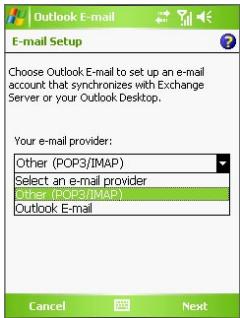
Set up Outlook e-mail
To be able to send and receive Outlook e-mail on your device, you must set up ActiveSync synchronization with your computer or the Exchange Server. For information about setting up ActiveSync synchronization, refer to the user manual.
Set up a POP3/IMAP4 e-mail account
Set up a POP3 or IMAP4 e-mail account on your device if you have an e-mail account with an Internet service provider (ISP) or an account that you access using a VPN server connection (typically a work account).
- Tap Start > Messaging.
- Tap Menu > Tools > New Account.
- On the first E-mail Setup screen, select Other (POP3/IMAP) from the Your e-mail provider list, then tap Next.
- On the next screen, enter your e-mail address, and tap Next. Auto configuration will help you download necessary e-mail server settings.
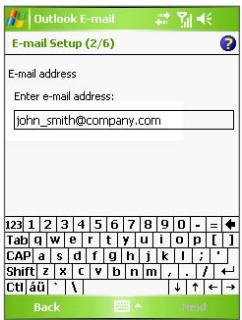
- Once Auto configuration has finished, tap Next.
- Enter your name (the name you want displayed when you send e-mail) and your password.
Tip Select the Save password check box if you want to save your password so that you do not need to enter it again.
7. Sending a Message
Your device is capable of sending and receiving E-mail, SMS, and MMS messages as long as it is connected to the network. Although you can send text messages (SMS) to only mobile phone numbers, MMS messages can be sent to both mobile phone numbers and e-mail addresses.
Compose and send a message
- In the message list, tap Menu > Go To and select an account.
- Tap New.
- Enter the e-mail address or mobile phone number of one or more recipients, separating them with a semicolon. To access addresses and phone numbers from Contacts, tap To.
-
Enter your message.
-
To quickly add common messages, tap Menu > My Text and tap a desired message.
• To check the spelling, tap Menu > Spell Check. -
Tap Send.
![From: (Outlook E-mail) To: ellen_anderson@company.com Subject: Sales meeting Dear Ellen, We need to call an emergency sales meeting, Can you join us? John Smith 123 1 2 3 4 5 6 7 8 9 0 - = + Tab q w e r t y u i o p [ ] CAP a s d f g h j k l ; * Shift z x c v b n m , . / ← Ct âü : \ Send > Menu](/content/2025/01/129759/images/0b02d822055347d9b50e65fd4aee1caf0affa714044110159dfede5ae6a4ee3f.jpg)
Composing Outlook e-mail message
Note SMS and MMS can only be sent if your device is connected to a GSM/EDGE network. E-mail messages can be sent only if your device has Internet access (e.g. via GSM/EDGE/GPRS, USB/Bluetooth connection to computer, etc).
8. Browsing the Internet
You can set up connections to the Internet or to a corporate network to browse the Internet. The pre-loaded browser, Internet Explorer Mobile, is a full-featured Internet browser, and optimized for use on your device.
Use Internet Explorer Mobile
- Tap Start > Internet Explorer.
- To go to a web site, enter the URL address of the desired web site in the address bar that appears at the top of the screen. Tap the down arrow (▼) to choose one web site from previously entered addresses.
- Tap the Go icon ( ) to go to the web address you entered.
- Tap Back to go back to the previous page.
- Tap Menu > Refresh to refresh the web page on the screen.
- Tap Menu > Home to go back to the Home page.
- Tap Menu > Favorites, and then select the favorite web site you want to visit. To add a favorite link while browsing the Internet, go to the page you want to add. Then, tap Menu > Add to Favorites, or tap and hold on the page to select Add to Favorites from the shortcut menu.
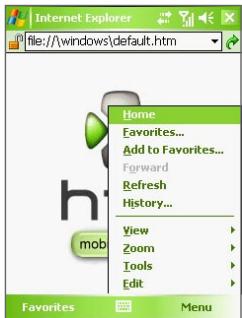
Internet Explorer Mobile
9. Using the Camera
Taking photos and recording video clips along with audio is easy with your device's built-in camera.
Launch the camera
- Tap Start > Programs > Camera.
- Tap Start > Programs > Pictures & Videos, then tap the Camera icon.
- Press the CAMERA button on your device.
To exit the camera, tap the Exit icon (✗) on the screen.
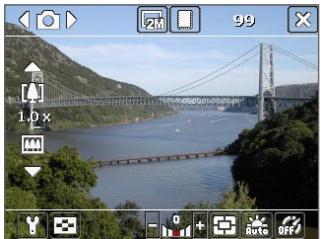
natural_image
Scenic view of a suspension bridge spanning a river, surrounded by green hills and trees (no visible text or symbols)Camera screen
Capture a still image
- After launching the camera, tap ☐ or ☒ at the upper left side of the screen or press NAVIGATION left or right to select the Photo capture mode.
- Press the CAMERA or ENTER button to capture a still image.
Capture a video clip
- After launching the camera, tap ☐ or ☒ at the upper left side of the screen or press NAVIGATION left or right to select the Video capture mode.
- Press the CAMERA or ENTER button to start recording a video clip. To stop recording, press the CAMERA or ENTER button again.
10. Using Pictures & Videos
The Pictures & Videos program collects, organizes, and sorts all of your captured images and video clips on your device.
You can use this program to view/play pictures, GIF animation, and video clips. You can even view pictures as a slide show, beam them, send them via e-mail, edit them, or set them as the background on the Today screen.
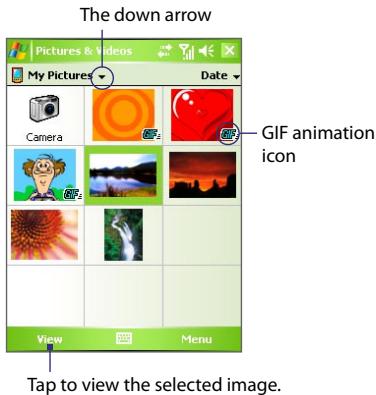
View pictures
- Tap Start > Programs > Pictures & Videos. The files in the My Pictures folder appear as thumbnails by default.
- Select a picture and tap View.
Play GIF animation files
- Tap Start > Programs > Pictures & Videos.
- Select a GIF animation file (marked with a GIF icon) and tap View. The GIF Animation program then opens and plays the animation.
Play videos
- Tap Start > Programs > Pictures & Videos. By default, the contents of the My Pictures folder will be shown.
- To find the video clips that you captured, tap the down arrow (▼) next to the My Pictures folder and tap My Documents. Next, tap My Videos. Video clips are displayed as thumbnails by default, which appear with a media icon (💡).
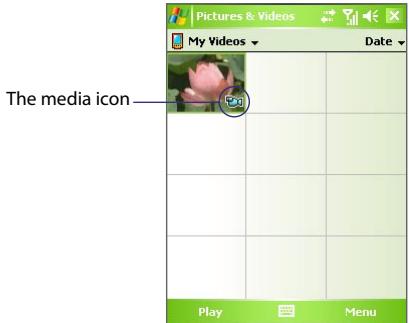
- Tap the desired thumbnail to play it with the built-in Windows Media Player.
11. Entering Information
When you start a program or select a field that requires text or numbers, the Input Panel icon becomes available on the menu bar.
Tap the Input Selector arrow (that appears next to the Input Panel icon) to open a menu where you can select a text input method and customize input options. After selecting a text input method, the corresponding Input Panel is then displayed and you can use it to enter text. To toggle between showing and hiding the Input Panel, simply tap the Input Panel icon.
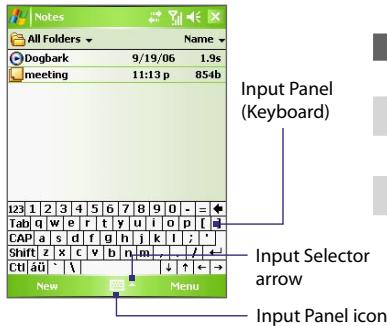
Icon Input method

On-screen keyboard

Letter Recognizer or Block Recognizer

Symbol Pad

Transcriber
Note Some text input methods may not be available in certain language versions of the device.
Use the Hardware Keyboard
Alternately, you can use the QWERTY keyboard to enter information. To use the QWERTY keyboard, slide the screen panel to the left to reveal the keyboard.
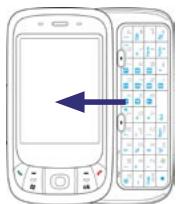
natural_image
Illustration of a mobile phone with a left-side arrow pointing to the screen (no text or symbols present)![@ Q ! W ? E / R T # 1 Y 2 U 3 I O ( ) P - A " S % D - F + G 4 H 5 J 6 K = L Del Cap Shift ' Z & X : C * V 7 B 8 N 9 M PgUp ↑ ● : [OK] Sym tab a u 0 . 1 ← PgDn ↓ →](/content/2025/01/129759/images/81ae84bd8edeaf778720b4d8ade477767b1d7c1ba0b86824fdf6b856f7303ccc.jpg)
• To type lowercase letters, press the keys using your thumbs or fingers.
- To use all uppercase letters, press first, then press Cap Shift. To change back to all lowercase letters, press these buttons again.
• To use a single uppercase letter, press Cap Shift and then press the corresponding key.
- To enter a number or symbol (labeled in blue color), press □ and then press the corresponding key.
• To open the Symbol Pad, press □ and then press Sym Tab.
- Press the Left/Right SOFT KEY (☐) to perform the command shown in the label above the key.
- Press _OK^(0) to verify your data entries or exit the program in use.
- Press ☐ to open the Start menu.
- Press the arrow keys 1 for directional movement.
- To type accented characters (like á, ã, ç, ê, í, ó, ü, etc), press the letter key first and then, hold and at the same time press the space bar several times until you find the correct character you need.
12. Status Indicators
The Today screen displays important information, such as upcoming appointments and status indicators. Following are some of the status icons that you may see on your device:
| Icon | Description |
 | New e-mail or text messages; SMS notification of voice mail. |
| [6497] | New multimedia (MMS) message. |
| [2078] | New MSN message. |
| [1771] | There are more notifications. Tap the icon to view all. |
| [2440] | Voice call in progress. |
| [4510] | Call on hold. |
| [1448] | Calls are forwarded. |
| [6377] | Missed call. |
| [6042] | Dialing while no SIM card is inserted. |
| [6284] | Speakerphone on. |
| [6190] | Maximum signal strength. |
| [6796] | No signal. |
| [6284] | Phone is turned off. |
| [6284] | No phone service. |
Icon Description

Searching for phone service.

GPRS available.

GPRS connecting.

GPRS in use.

EDGE available.

EDGE connecting.

EDGE in use.

Roaming.

Connection is active.

Connection is not active.

Synchronization in progress.

ActiveSync notification.

Synchronization error.

Wi-Fi function enabled, but device not connected to a wireless network yet.

Wireless network(s) detected.

Connecting to wireless network (arrows moving); connected to wireless network.
| Icon | Description |
| (024-05) | Synchronizing via Wi-Fi. |
| | (024W01) | Battery is fully charged. |
| | (025-04) | Battery power is very low. |
| | (TACT) | Battery charging. |
| | (CH83) | Sound on. |
| | (CA673) | Sound off. |
| | (CH22) | Vibration mode. |
| | (A89-0) | Alarm. |
| | (TLE83) | No SIM card inserted. |
| | (DAWW05) | Device is locked. |
| | (D88-0) | Device is unlocked. |
| | (DY500) | Bluetooth headset detected. |
| | (D25-0) | GPRS Monitor currently active. |
| | (ST88) | Sprite Backup notification. |
| | (DKWAC) | Serial USB connection active. |
Note
The USB to PC (☐) icon appears on the Today Screen when your device is connected to your computer and you enable a serial USB connection between them. For more information about USB to PC, refer to the user manual.
13. Customizing Your Pocket PC Phone
You can customize the look and feel of your device and set the time and date according to the current time zone.
Customize the Today screen
- Tap Start > Settings > Personal tab > Today.
- On the Appearance tab, select the desired theme for the background of the Today screen.
- On the Items tab, select the items you want to appear on the Today screen.
Customize the Start Menu
- Tap Start > Settings > Personal tab > Menus.
- Select the check boxes of the items you want to appear in the Start menu. You can select up to seven items.
Set the time and date
- Tap Start > Settings > System tab > Clock & Alarms.
- Select the correct time zone and change the date or time.
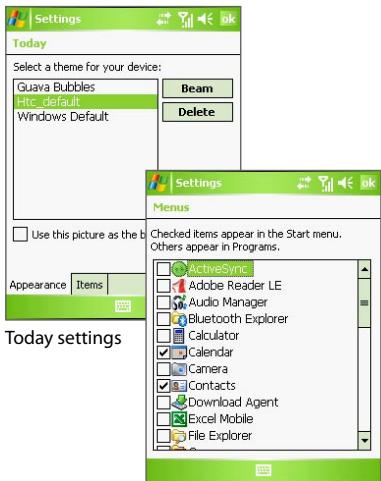
Menu settings
14. Securing Your Pocket PC Phone
There are two kinds of security on your device. You can protect your SIM card from unauthorized use by assigning a PIN (Personal Identification Number). Additionally, you can prevent unauthorized access to any part of the device by using password protection.
Protect your SIM card with a PIN
- Tap Start > Settings > Personal tab > Phone.
- On the Phone tab, tap Require PIN when phone is used. To change the PIN at any time, tap Change PIN.
Protect your device with a password
- Tap Start > Settings > Personal tab > Lock.
- Select the Prompt if device unused for check box, and in the box to the right, select how long your device must be idle before a password is required. In the Password type box, select the type of password you would like to use. Enter the password and confirm it.
- On the Hint tab, enter a phrase that will help you remember your password, but doesn't allow others to guess your password. The hint will be displayed after the wrong password is entered four times.
- Tap OK. The next time your device is turned on, you will be prompted to enter your password.
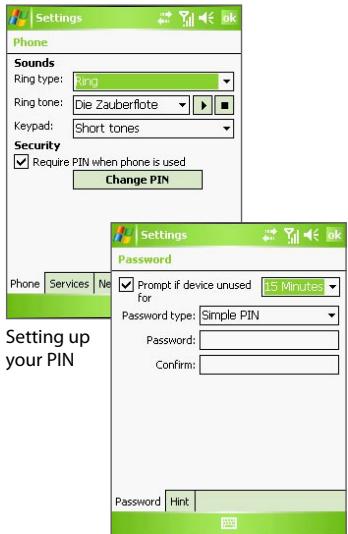
Setting up password
15. More Information
For more instructions, refer to the User Manual or contact your local dealer for assistance.
- Pocket PC Phone
- Quick Start Guide
- Contents
- What's in the Box?
- The Pocket PC Phone
- 7 B
- Getting Ready
- Install the SIM card
- Install the microSD card
- Charge the battery
- Check the battery power
- Turn on your Pocket PC Phone
- Making a Call
- The Phone screen
- Make a voice call
- Synchronizing Outlook Information
- PC requirement to run ActiveSync 4.x
- Setting Up E-mail Accounts
- Set up e-mail accounts using E-mail Setup Wizard
- Set up Outlook e-mail
- Set up a POP3/IMAP4 e-mail account
- Sending a Message
- Compose and send a message
- Browsing the Internet
- Use Internet Explorer Mobile
- Using the Camera
- Launch the camera
- Capture a still image
- Capture a video clip
- Using Pictures & Videos
- View pictures
- Play GIF animation files
- Play videos
- Entering Information
- Icon Input method
- Use the Hardware Keyboard
- Status Indicators
- Icon Description
- Note
- Customizing Your Pocket PC Phone
- Customize the Today screen
- Customize the Start Menu
- Set the time and date
- Securing Your Pocket PC Phone
- Protect your SIM card with a PIN
- Protect your device with a password
- More Information
Marque : HTC
Modèle : 4350
Catégorie : Téléphone mobile