VW-VMS2E - Microphone PANASONIC - Notice d'utilisation et mode d'emploi gratuit
Retrouvez gratuitement la notice de l'appareil VW-VMS2E PANASONIC au format PDF.

Questions des utilisateurs sur VW-VMS2E PANASONIC
0 question sur cet appareil. Repondez a celles que vous connaissez ou posez la votre.
Poser une nouvelle question sur cet appareil
Téléchargez la notice de votre Microphone au format PDF gratuitement ! Retrouvez votre notice VW-VMS2E - PANASONIC et reprennez votre appareil électronique en main. Sur cette page sont publiés tous les documents nécessaires à l'utilisation de votre appareil VW-VMS2E de la marque PANASONIC.
MODE D'EMPLOI VW-VMS2E PANASONIC
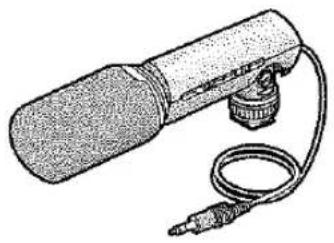
natural_image
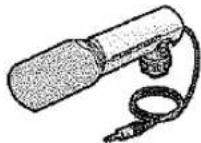
Illustration of a microphone with attached cable (no text or symbols)Operating Instructions
Bedienungsanleitung
Mode d'emploi
Instrucciones de funcionamiento
Istruzioni per l'uso
Before use, please read these instructions completely.
VQT8662
ENGLISH
CONTENTS
Included Items 4
Features 4
Names of Parts 6
Using the Microphone 8
Notes on Use 16
Frequency Response and Directionality Pattern
Diagrams 20
Specifications 22
DEUTSCH
INHALT
Mitgeliefertes Zubehör 4
Merkmale 4
Anordnung der Bauteile 6
Gebrauch des Mikrofons 8
Hinweise zum Gebrauch 16
Diagramme zu Frequenzgang und Richteigenschaft .... 20
Technische Daten 22
ENGLISH
Included Items
① Stereo Microphone
② Battery
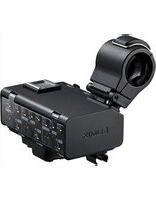
Features
This compact, lightweight stereo microphone can be switched to record sound in either stereo or monaural. It is designed for use with a video camera equipped with a microphone socket or which uses an Output Terminal Box equipped with a microphone socket.
1 VW-VMS2
② AAA,UM-4,R03

DEUTSCH
Mitgeliefertes Zubehör
① Stereo-Mikrofon
② Batterie
Merkmale
Dieses kompakte und leichte Stereo-Mikrofon kann zwischen stereophoner und monauraler Tonaufnahme umgeschaltet werden. Es ist auf den Einsatz mit einem Camerarecorder ausgelegt, der entweder über eine Mikrofonbuchse verfügt oder eine Anschlussbox verwendet, die mit einer Mikrofonbuchse ausgestattet ist.
ENGLISH
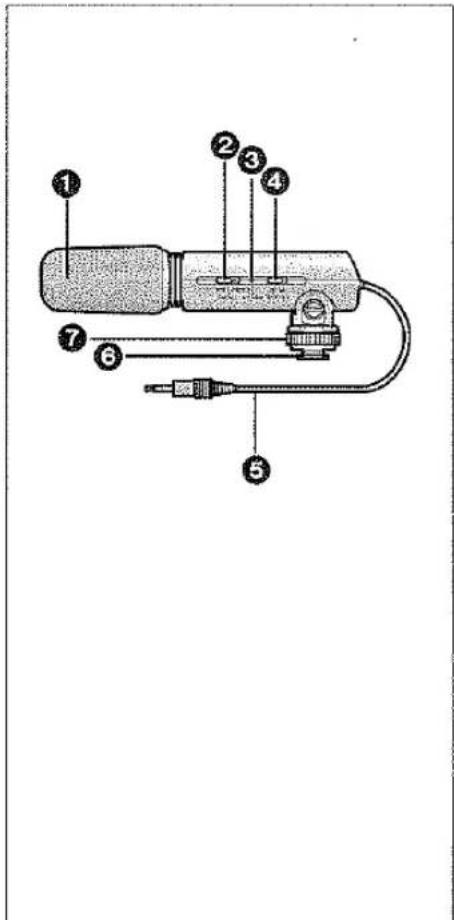
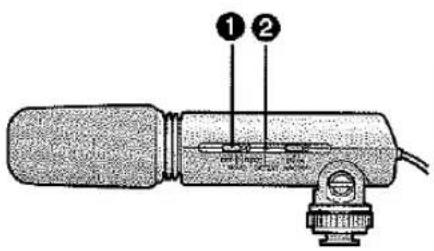
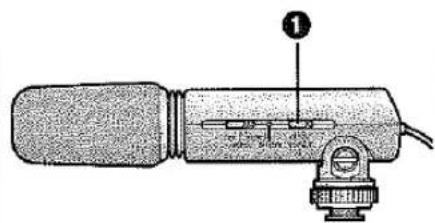
■Names of Parts
① Wind Shield (Microphone condenser)
② Off/On Mode Selector Switch [OFF/MONO/STEREO]
③ Battery Check Lamp [BATTERY]
④ [WIND CUT OFF/ON] Switch
⑤ Stereo Mini-Plug Cord
6 Shoe
7 Shoe Lock
DEUTSCH
■Anordnung der Bauteile
① Windschirm (Mikrofonkondensator)
② Aus/Ein- und Modus-Wahlschalter [OFF/MONO/STEREO]
③ Batterieprüflampe [BATTERY]
④ [WIND CUT OFF/ON]-Schalter
⑤ Stereo-Ministeckerkabel
6 Aufsteckschuh
⑦ Schuharretierung
ENGLISH
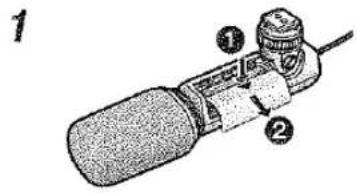
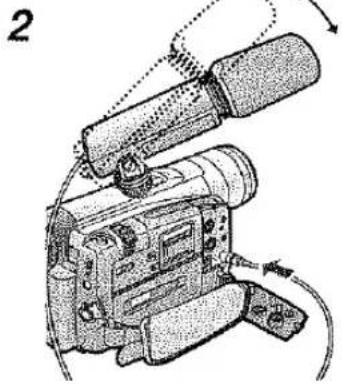
■Using the Microphone Inserting the Battery into the Microphone
1 Remove the battery cover from the microphone. (Press the [▽] mark on the cover in the direction of arrow ① and slide the cover in the direction of arrow ②.)
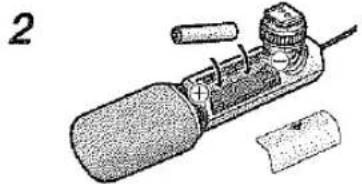
2 Insert the Battery with the (−) end first as shown in the figure. (Be sure to insert the Battery with the (−) and (+) ends facing the proper directions.)
3 Replace the battery cover.
- When the battery is exhausted, purchase a new "AAA", "UM-4" or "R03" type battery and insert it in the same way as explained above. - Do not short-circuit the battery. - Remove the Battery if you will not use the microphone for one month or longer.
natural_image
Illustration of a handheld electronic device with a cylindrical component and attached wires (no text or symbols visible)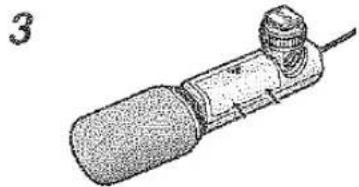
natural_image
Illustration of a mechanical tool or device with a cylindrical head and threaded shaft, no visible text or symbols.DEUTSCH
■ Gebrauch des Mikrofons Einlegen der Batterie
1 Den Batteriefachdeckel vom Mikrofon entfernen. (Dazu die Markierung [ ] auf dem Batteriefachdeckel in Richtung von Pfeil ① drücken und den Deckel in Richtung von Pfeil ② abschieben.)
2 Die Batterie wie in der Abbildung gezeigt mit dem Minuspol (--) zuerst in das Batteriefach einlegen. (Beim Einlegen die Polaritätsmarkierungen (--) und (+) im Inneren des Batteriefachs beachten.)
3 Den Batteriefachdeckel wieder anbringen.
- Wenn die Batterie erschöpft ist, eine neue vom Typ „AAA“, „UM-4“ oder „R03“ kaufen und sie wie oben beschrieben einsetzen. - Die Batterie nicht kurzschließen. - Die Batterie entfernen, wenn das Mikrofon einen Monat oder länger nicht verwendet werden soll.
ENGLISH
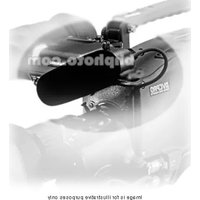
Attaching the Microphone to a Video Camera
1 Attach the microphone to the video camera shoe.
① Loosen the shoe lock.
② Attach the microphone.
③ Firmly tighten the shoe lock.
- Remove the shoe cover from the video camera.
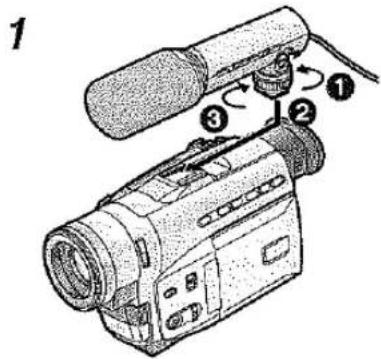
2 Connect the Stereo Mini-Plug Cord to the microphone socket.
You can adjust the microphone angle within the range shown in the figure.
- Hold the shoe lock portion when attaching and removing the microphone.
- Be sure to set the video camera power to [OFF] before connecting the microphone.
*When using a video camera without a shoe, an optional shoe adaptor is needed to attach the microphone. See the shoe adaptor instructions for the attachment method.
natural_image
Illustration of a video camera with attached lens and external cable (no text or symbols)DEUTSCH
Montieren des Mikrofons an einen Camerarecorder
1 Das Mikrofon in den Zubehörschuh des Camerarecorders schieben.
① Die Schuharretierung lösen.
② Das Mikrofon ansetzen.
③ Die Schuharretierung festziehen.
•Die Abdeckung vom Zubehörschuh des Camerarecorders entfernen.
2 Das Stereo-Ministeckerkabel an die Mikrofonbuchse anschließen.
Der Montagewinkel des Mikrofons kann innerhalb des in der Abbildung gezeigten Bereichs justiert werden.
- Beim Ansetzen und Abnehmen des Mikrofons die Schuharretierung festhalten.
•Vor dem Anschließen des Mikrofons darauf achten, die Spannungsversorgung des Camerarecorders auszuschalten.
*Bei Verwendung eines Camerarecorders ohne Zubehörschuh ist ein separat erhältlicher Schuhadapter erforderlich. Einzelheiten zur Montage des Mikrofons sind der Gebrauchsanweisung des Schuhadapters zu entnehmen.
ENGLISH
Changing the Off/On Mode Selector Switch
Off/On Mode Selector Switch [OFF/MONO/STEREO] ①
[OFF]: Turn off the microphone power.
[MONO]: Records sound in front of the video camera in monaural.
[STEREO]: Records sound in a wide area in stereo.
- Although you can change the setting of the Off/On Mode Selector Switch while recording, the sound of the switch being changed may be recorded. Pause your recording before changing the setting of this switch.
Battery Check Lamp [BATTERY] ②
- When the Off/On Mode Selector Switch is changed from [OFF] to [MONO] or [STEREO], the Battery Check Lamp [BATTERY] will light temporarily if there is still plenty of power in the battery. If the Battery Check Lamp [BATTERY] does not light temporarily, replace the battery with a new one.
DEUTSCH
Einstellungen des Aus/Ein- und Modus-Wahlschalters
Aus/Ein- und Modus-Wahlschalter [OFF/MONO/STEREO] ①
[OFF]: Zum Ausschalten des Mikrofons
[MONO]: Für monaurale Aufnahme von Schall direkt vor dem Camerarecorder (Kugelcharakteristik)
[STEREO]: Für stereophone Tonaufnahme innerhalb eines breiten Bereichs (Richtcharakteristik)
• Die Einstellung des Aus/Ein- und Modus-Wahlschalters kann zwar während einer Aufnahme geändert werden, doch wird das Geräusch der Schalterverstellung dabei u.U. mit aufgezeichnet. Daher empfiehlt es sich, den Camerarecorder vor einer Verstellung dieses Schalters auf Aufnahmepause umzuschalten.
Batterieprüflampe [BATTERY] ②
- Wenn die Einstellung des Aus/Ein- und Modus-Wahlschalters von [OFF] auf [MONO] oder [STEREO] geändert wird, leuchtet die Batterieprüflampe [BATTERY] vorübergehend auf, sofern die Restspannung der Batterie für Aufnahmen ausreicht, Falls die Batterieprüflampe [BATTERY] nicht aufleuchtet, ist die Batterie erschöpft und muss ausgewechselt werden.
ENGLISH
Changing the [WIND CUT OFF/ON] Switch
[WIND CUT OFF/ON] switch 1
This microphone is equipped with a wind shield that is designed to cut down wind noise, but when the wind is so strong that even the wind shield is not adequate to keep down the noise, set the [WIND CUT OFF/ON] switch to [ON] to further reduce the wind noise.
[OFF]: The microphone should usually be used with this position.
[ON]: Set the [WIND CUT OFF/ON] switch to this position to reduce wind noise or bass noise.
- Although you can change the setting of the [WIND CUT OFF/ON] switch while recording, the sound of the switch being changed may be recorded. Pause your recording before changing the setting of this switch.
DEUTSCH
Einstellungen des [WIND CUT OFF/ON]-Schalters
[WIND CUT OFF/ON] -Schalter 1
Dieses Mikrofon ist mit einem Windschirm ausgestattet, der Störschall unterdrückt. Wenn der Wind jedoch so stark ist, dass der Windschirm den Störschall nicht ausreichend reduzieren kann, sollte der [WIND CUT OFF/ON]-Schalter auf [ON] eingestellt werden.
[OFF]: Normalerweise diese Einstellung verwenden.
[ON]: Diese Einstellung wählen, um Störschall oder tieffrequente Geräusche zu reduzieren.
•Die Einstellung des [WIND CUT OFF/ON]-Schalters kann zwar während einer Aufnahme geändert werden, doch wird das Geräusch der Schalterverstellung dabei u.U. mit aufgezeichnet. Daher empfiehlt es sich, den Camerarecorder vor einer Verstellung dieses Schalters auf Aufnahmepause umzuschalten.
ENGLISH
Notes on Use
- Do not apply strong mechanical shocks to the microphone.
- Do not use the microphone in the rain or snow or in dusty places.
- Wipe away any dirt on the microphone with a dry, soft cloth. If the microphone is extremely dirty, wipe away the dirt using a well wrung-out cloth moistened with kitchen detergent that has been diluted with water, then wipe the microphone dry with a dry cloth.
- Do not use benzene, thinner or other solvents as this may degrade the outer case or fade the printing.
- When using a chemically treated cloth, be sure to read and follow the instructions.
- Do not expose the microphone to insecticides or volatile substances.
DEUTSCH
Hinweise zum Gebrauch
- Schützen Sie das Mikrofon vor starken Erschütterungen.
- Verwenden Sie das Mikrofon nicht im Freien, wenn es regnet oder schneit, oder an sehr staubigen Orten.
- Zum Entfernen von Schmutzflecken reiben Sie das Mikrofon mit einem weichen, trockenen Tuch ab. Bei hartnäckiger Verschmutzung verwenden Sie ein Tuch, das mit einer neutralen Seifenlösung angefeuchtet und gut ausgewrungen ist. Anschließend reiben Sie das Mikrofon mit einem weichen Tuch trocken.
- Verwenden Sie auf keinen Fall Waschbenzin, Farbverdünner oder andere Lösungsmittel zum Reinigen, da diese das Gehäuse anlösen und zu einem Abblättern der Beschriftung führen können.
- Bei Verwendung eines chemisch behandelten Reinigungstuchs lesen Sie bitte die Anweisungen des Herstellers.
- Setzen Sie das Mikrofon weder Insektiziden noch leichtflüchtigen Substanzen aus.
ENGLISH
Notes on Use (cont.)
- Do not store the microphone in hot (approximately 60 °C or more) or humid (approximately 80 % or more) places. In particular, do not leave the microphone inside a car in mid summer or near heating equipment.
- A dirty plug may result in faulty contact. Be sure to wipe the plug clean before connecting the microphone.
- Do not connect or disconnect the stereo mini-plug with the video camera turned on.
- Avoid use near radio towers or high voltage lines if at all possible, as the effects of the radio waves or high voltages may cause the sound to deteriorate.
- Do not use a Ni-Cd battery.
DEUTSCH
■Hinweise zum Gebrauch (Fortsetzung)
- Vermeiden Sie eine Aufbewahrung des Mikrofons an einem sehr heißen (mehr als ca. 60 °C) oder feuchten (mehr als ca. 80 % relative Feuchte) Ort. Lassen Sie das Mikrofon auf keinen Fall im Sommer in einem geparkten Fahrzeug zurück und bringen Sie es nicht in die Nähe von Heizgeräten.
- Ein verschmutzter Stecker kann die Kontaktwirkung beeinträchtigen. Achten Sie vor dem Anschließen des Mikrofons darauf, den Stecker zu reinigen.
- Schließen Sie das Stereo-Ministeckerkabel auf keinen Fall bei eingeschaltetem Camerarecorder an die Mikrofonbuchse an.
- Vermeiden Sie möglichst einen Gebrauch des Mikrofons in der Nähe von Sendemasten und Hochspannungsleitungen, da die Tonqualität durch HF-Wellen und Hochspannungsquellen in der Nähe beeinträchtigt werden kann.
- Verwenden Sie auf keinen Fall einen Ni-Cd-Akku zur Spannungsversorgung dieses Mikrofons.
ENGLISH
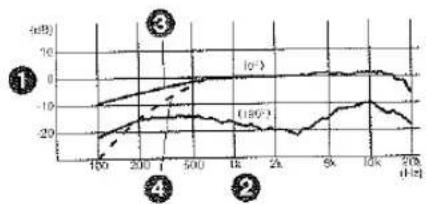
Frequency Response and Directionality Pattern Diagrams
Ⓐ Frequency Response
① Response
② Frequency
③ Wind Cut Off
④ Wind Cut On
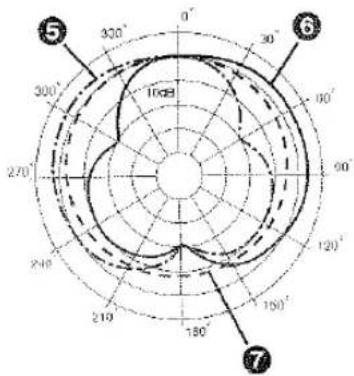
⑧ Directionality Pattern
5 Stereo(left)
⑥ Stereo(right)
7 Monaural
A
line
| Time (h) | l₀° (dB) | l₁₆° (dB) | |---|---|---| | 100 | -12 | -20 | | 200 | -8 | -15 | | 500 | -4 | -12 | | 1k | 0 | -10 | | 2k | 2 | -8 | | 5k | 4 | -6 | | 10k | 6 | -4 | | 20k | 8 | -2 | The chart displays a line graph with three labeled points (①, ②, ③) indicating different time intervals or categories. The y-axis is labeled in dB.B
DEUTSCH
■Diagramme zu Frequenzgang und Richteigenschaft
Ⓐ Frequenzgang
Charakteristik
② Frequenz
③ Windminderung: Ein
④ Windminderung: Aus
⑧ Richteigenschaft
⑤ Stereo (links)
⑥ Stereo (rechts)
7 Mono
ENGLISH
Specifications
| Power source: | 1.5 V (one R03-size dry cell battery) |
| Power consumption: | 1 mA or less |
Model: Electret condensor type microphone
Directionality characteristics: Unidirectional (stereo), nondirectional (monaural)
Frequency response: 100 Hz to 20,000 Hz
Sensitivity: -47 dB (0 dB = 1 V/Pa, 1 kHz)
Output impedance: 600 Ω
S/N ratio: 67 dB or more Cord: a3.5 stereo mini-plug cord (length 300 mm) Switches: Off/On Mode Selector Switch [OFF/MONO/STEREO] [WIND CUT OFF/ON] switch
External dimensions: 158 (D) x 59 (H) x 46 (W) mm (without cord, bushing)
Mass: Approx. 80 g (including battery)
Recommended operating temperature: 0 °C - 40 °C
Allowable relative humidity: 35% - 80%
Continuous operating time: Approx. 600 hours (at 20 °C)
DEUTSCH
Technische Daten
| Spannungsquelle: | 1,5 V (eine Mikrozelle,Größe R03) |
| Leistungsaufnahme: | 1 mA max. |
Ausführung: Elektretkondensator-Mikrolon
Richtwirkung: Richtcharakteristik (Stereo) Kugelcharakteristik (Mono)
Frequenzgang: 100 Hz bis 20.000 kHz
Empfindlichkeit: -47 dB (0 dB = 1 V/Pa, 1 kHz)
Ausgangsimpedanz: 60
Fremdspannungsabstand: 67 dB oder besser
Kabel: 3,5-mm-Stereo-Ministeckerkabel (Länge 300 mm)
Schalter: Aus/Ein- und Modus-Wahlschalter [OFF/MONO/STEREO] [WIND CUT OFF/ON] Schalter
Außenabmessungen: 158 (T) x 59 (H) x 46 (B) mm (ausschließlich Kabel und Muffle)
Masse: ca. 80 g (einschließlich Batterie)
Zulässiger Betriebstemperaturbereich: 0 °C bis 40 °C
Zulässiger Luftfeuchtigkeitsbereich: 35 % bis 80 %
Dauerbetriebszeit: ca. 600 Std. (bei 20 °C)

Printed in Japan
VQT8662

S0300Tm0
Matsushita Electric Industrial Co., Ltd.
Central P.O. Box 288, Osaka 530-91, Japan