
55KC3BB - Four VEDETTE - Notice d'utilisation et mode d'emploi gratuit
Retrouvez gratuitement la notice de l'appareil 55KC3BB VEDETTE au format PDF.

| Type de produit | Four encastrable |
| Marque | VEDETTE |
| Modèle | 55KC3BB |
| Couleur | Acier inoxydable (Stainless Steel) |
| Dimensions (H x L x P) | 596 x 596 x 562 mm |
| Volume du four | Environ 70 L (estimation) |
| Alimentation électrique | 230 V ~ 50 Hz |
| Puissance absorbée totale | 2,15 kW (four chaleur tournante) / 2,135 kW (gril + ventilation) |
| Type de cuisson | Chaleur tournante, gril ventilé |
| Fonctions principales | Cuisson chaleur tournante, gril, décongélation, éclairage du four |
| Minuterie | Horloge numérique avec programmateur automatique (départ/arrêt différé) |
| Positions des grilles | 4 niveaux (avec cadres latéraux) |
| Température maximale | Environ 240 °C (estimation d'après le tableau de cuisson) |
| Accessoires fournis | Lèchefrite, 2 grilles métalliques, 2 cadres latéraux |
| Éclairage intérieur | Ampoule 15 W - 230 V (remplaçable) |
| Nettoyage | Nettoyage manuel : chiffon humide, nettoyant pour émail vitrifié ; possibilité de kits catalytiques (option) |
| Sécurité | Mise à la terre obligatoire, double pôle d'arrêt, porte à double vitrage, signal sonore de fin de cuisson |
| Installation | Encastré ou sous plan, nécessite ventilation ; dimensions du logement : H 585-595 mm, L 560 mm, P 550 mm |
| Service après-vente | Caremark : 01942 815311, garantie 12 mois |
| Origine | Fabriqué par Homark (sous licence VEDETTE) |
FOIRE AUX QUESTIONS - 55KC3BB VEDETTE
Questions des utilisateurs sur 55KC3BB VEDETTE
0 question sur cet appareil. Repondez a celles que vous connaissez ou posez la votre.
Poser une nouvelle question sur cet appareil
Téléchargez la notice de votre Four au format PDF gratuitement ! Retrouvez votre notice 55KC3BB - VEDETTE et reprennez votre appareil électronique en main. Sur cette page sont publiés tous les documents nécessaires à l'utilisation de votre appareil 55KC3BB de la marque VEDETTE.
MODE D'EMPLOI 55KC3BB VEDETTE
HOMARK
FAN OVEN
Model No's:
Stainless Steel
05~703105A
99536961-00
12/96
ELECTRICAL SUPPLY TO YOUR OVEN
WARNING! THIS APPLIANCE MUST BE EARTHED.
This appliance must be connected by a competent person, using fixed wiring via a DOUBLE POLE SWITCHED FUSED SPUR OUTLET.
We recommend that the appliance is connected by a qualified electrician, who is a member of the N.I.C.E.I.C. and who will comply with the I.E.E. and local regulations.
The wires in the mains lead are coloured in accordance with the following code: Green & Yellow = Earth, Blue = Neutral, Brown = Live.
As the colours of the wires in the mains lead for the appliance, may not correspond with the coloured markings identifying the terminals in your spur box, proceed as follows:
1) The wire which is coloured green and yellow must be connected to the terminal marked E (Earth) or coloured Green.
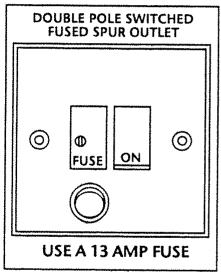
Fig. 1
2) The wire which is coloured blue must be connected to the terminal marked N (Neutral), or coloured Black.
3) The wire which is coloured brown must be connected to the terminal marked L (Live), or coloured Red.
HOW TO INSTALL YOUR OVEN
You will need the following housing area to fit your oven correctly.
| Dimensions (mm) | Oven | Housing |
| Height | 596 | 585 Built in 595 Built under |
| Width | 596 | 560 |
| Depth | 562 | 550 (min) |
The oven is designed to fit into a cabinet of 600mm width. The oven can be built in or built under the kitchen units, but you must ensure that it is properly ventilated.
In the diagram the oven is ventilated by means of the space in the top of the kitchen cabinet. There are many other methods of ventilating your oven. Consult a qualified engineer for advice. If the oven is being installed into a built under housing unit ensure that the front rail at the top of the housing unit is NOT installed as it could restrict ventilation. Handle the housing unit carefully prior to installation.
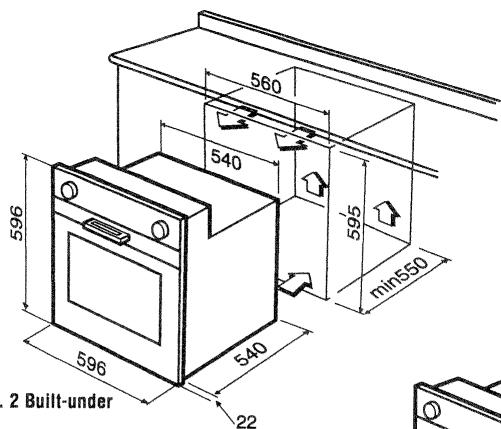
Lift the oven into position on the shelf, taking care NOT to lift it by the door handle. If you lower the oven door, you will see 4 screw holes, 2 on each side of the oven. The oven should then be secured to the housing by fitting screws into these holes. Remember the housing should not be free standing but be secured to the wall and/or adjacent fittings.
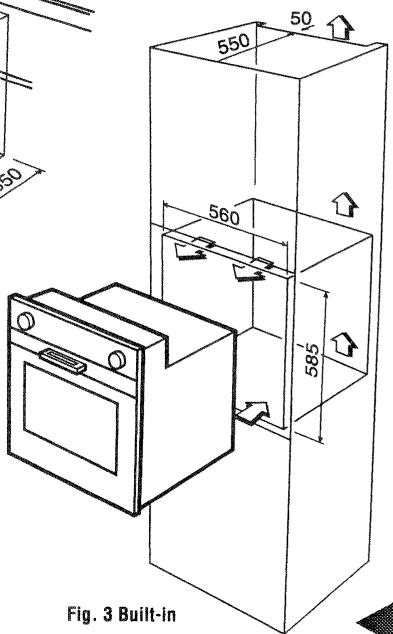
Fig. 3 Built-in
HOW TO USE YOUR OVEN
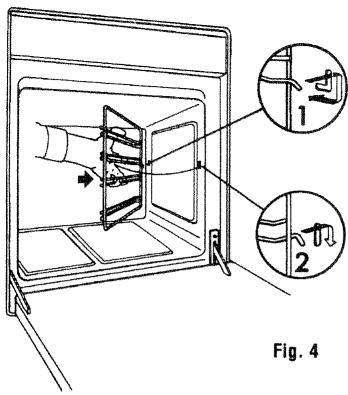
Fig. 4
You will find the following items delivered with your oven; grill pan and handle, 2 wire side frames, 2 shelves, instruction booklet and guarantee card.
The rating plate can be found on the bottom right hand side of the inner door.
Before using the oven for the first time we recommend that you clean it with soapy water, rinse carefully and heat for 30 minutes at maximum temperature. A slightly unpleasant smell may be produced, caused by grease remaining on the oven elements from the production process.
DO NOT CLEAN THE OVEN WHEN IT IS SWITCHED ON.
Attach the side frames as indicated in fig. 4.
NOTE: The door glass of this appliance may become hot during use and may be a danger to small children.
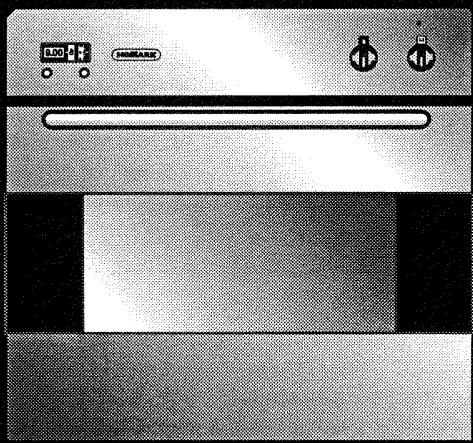
CONTROL PANEL
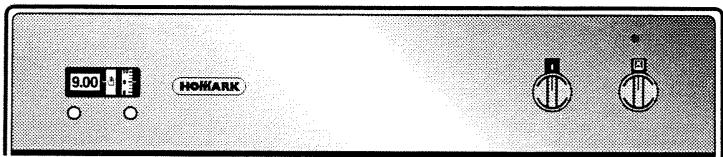
Fig. 5 F G H
F. Digital Clock and Automatic Timer
C
D


A This knob adjusts the time of day on the clock.
B This knob controls the programming -sets the start of cooking and the length of cooking time.
C Clock dial.
D Dial indicating the length of cooking time.
E Dial indicating the start of cooking time.
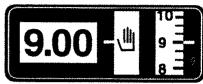
Using your automatic timer: Setting the time of day
Gently turn the knob A until the correct hours and minutes are displayed on dial
C. The clock is now set.
Setting the timer to manual
Ensure that the time on dial E is the same as the time of day displayed on dial C. If not, proceed as follows:
Turn the outer section of knob B clockwise until the symbol is selected on dial D.
- Turn the inner section of the knob clockwise until the correct time is selected on dial E.
Setting the timer to start and stop cooking (fully automatic)
The cooking start time can be set along with the length of cooking time for fully automatic cooking. Proceed as follows:
Turn the outer section of knob B clockwise until the length of cooking time is displayed on dial D (up to 31/2 hours).
- Turn the inner section of knob B clockwise until the time that you want cooking to start is displayed on dial E.
The oven will begin cooking at the start time set for the length of time set and switch off when the cooking time is over. An audible signal will be heard before the oven switches off. This can be stopped by turning the outer section B until the symbol appears on dial D.
Setting the timer to stop cooking (semi-automatic)
Using this mode the oven can be switched on normally but set to switch off automatically at the required time. Proceed as follows:
Turn the outer section of knob B clockwise until the length of cooking time is displayed on dial D (up to 31/2 hours).
- Select the function and temperature required.
The oven will operate immediately and switch off when cooking time is over. An audible signal will be heard before the oven switches off. This can be stopped by turning the outer section of knob B until the symbol appears on dial D.
On completion of cooking, always remember to set the oven controls back to the 'off' positions and turn the outer section of knob B to the symbol. Ensure that the time on dial E matches the time on dial C.
G. Temperature Selector
The light above this dial will illuminate when the oven or grill is switched on and turns off when the oven or grill reaches the correct temperature.
The light will cycle on and off during cooking in line with the oven/grill temperature.
H. Function Selector

The oven light is switched on.

Fan oven - use in conjunction with the temperature selector. It is advisable to pre-heat the oven for at least five minutes. When the fan is turned on and the temperature control is set to 0^ , the oven can be used for defrosting food.

Grill - use in conjunction with the temperature selector. The temperature can be varied depending on the food being cooked. This oven has fan assisted grilling so therefore the fan will be on at the same time as the grill element.
GRILL WITH THE DOOR CLOSED.
Before using the grill, pre-heat for about 5 minutes. Position the grill pan on the highest shelf position and check continually as the food may easily burn.
Note: It is recommended that you do not grill for longer than 30 minutes at any one time.
COOKING WITH A FAN OVEN
The fan is situated on the back wall of the oven. The heating element encircles the fan, and the fan forces this heat into the oven, through the sidewalls, creating a more even temperature than a conventional oven. The moving hot air surrounds the food and penetrates it more quickly than in a conventional oven. The oven can be filled with foods all requiring the same cooking temperature. Subtract 10 minutes per hour for every dish requiring a conventional cooking time of more than 1 hour, and reduce the heat by 10 - 20^ ; the hotter the oven, the more the heat can be reduced.
Generally, it is not essential to pre-heat a fan oven. However, pre-heating for 5 minutes ensures the best results.
When the fan is turned on and the temperature control set is at 0^ , the oven can be used for defrosting food. This is ideal for gelatine based dishes and softening ice cream - a microwave oven is much too strong for these dishes. Proving yeast based dishes is also speeded up this way. If the oven door has been opened, the fan oven quickly regains its temperature once the door is closed.
RECOMMENDED COOKING TEMPERATURES
| Food | °C | °F | Gas Mark | Shelf Position* | Cooking Time (approx) |
| CAKES | |||||
| Victoria sandwich | 190 | 375 | 5 | 2 or 3 | 20-25 mins |
| Small cakes/buns | 190 | 375 | 5 | 1 and 2 | 15-20 mins |
| Madeira cake | 180 | 350 | 4 | 2 or 3 | 20 mins |
| Fruit cake | 170 | 325 | 3 | 3 | 13/4 hours |
| Rich fruit cake | 150 | 300 | 2 | 3 or 4 | 21/2 hours |
| Scones | 224-240 | 425-475 | 8-9 | 2 | 8-10 mins |
| PASTRY | |||||
| Puff | 225-240 | 425-475 | 8-9 | 2 | 10-20 mins |
| Short crust | 200 | 400 | 6 | 2 | 20-30 mins |
| Plate tarts | 200-210 | 400-410 | 6 | 1 or 2 | 30-35 mins |
| Quiche and flans | 200-210 | 400-410 | 6 | 1 or 2 | 40-45 mins |
| YEAST | |||||
| Bread loaf | 220-230 | 425-450 | 7-8 | 2 | 35-55 mins |
| Bread rolls | 220 | 425 | 7 | 1 or 2 | 15-20 mins |
| Pizza dough | 230 | 450 | 8 | 2 | 20 mins |
| ROAST MEAT | |||||
| Beef - Medium | 190 | 375 | 5 | 2 or 3 | 20 mins/lb + 20 mins |
| Lamb | 190 | 375 | 5 | 2 or 3 | 25-30 mins/lb +25 mins |
| Pork | 190-200 | 375-400 | 5-6 | 2 or 3 | 30 mins/lb + 30 mins |
| Veal | 190 | 375 | 5 | 2 or 3 | 30 mins/lb + 30 mins |
| Chicken | 190 | 375 | 5 | 2 or 3 | 16-20 mins/lb + 20 mins |
| Turkey up to 10lb | 180 | 350 | 4 | 2 or 3 | 18-20 mins/lb + 20 mins |
| Stews/casseroles | 150-170 | 300-325 | 2-3 | 2 or 3 | 11/2 - 2 hours |
N.B. For fan ovens reduce the temperature by 10 - 20^ .For any dish taking one hour or over to cook, reduce the cooking time by 10 minutes per hour.
- Shelf positions have been counted from the top of the oven to the base. A fan oven creates more even temperature throughout, therefore the shelf positions are not as critical.
CLEANING YOUR OVEN
The inside of the oven can be easily cleaned with a damp cloth and oven cleaner (oven cleaners should be recommended for use on vitreous enamel).
As a safety measure, before you start cleaning the oven, make sure the electrical supply is switched off. You should clean the oven when it is cold. Do
not leave acid or alkaline residues (lemon juice, vinegar, salt, tomato, etc) on the enamelled surfaces. Avoid abrasive cleaning products on the painted parts.
The stainless steel parts can be cleaned with a soft cloth and hot soapy water. Dry the oven with a cloth after washing to avoid smearing.
SELF CLEANING LINER KITS
We have available as an optional extra, self cleaning catalytic liner kits which clean the oven for you. They work by absorbing oil splashes and food particles, then vaporizing them when the temperature rises above 200^ .
Instructions for use: If after cooking very fatty meals, the oven is still dirty, re-heat
it empty, to the maximum temperature for about 20-30 minutes.
They should not be washed or cleaned with water or detergents. Wipe them regularly with a damp cloth. Liners are available from Caremark, telephone 01942-815311.
CHANGING THE OVEN CAVITY LIGHT BULB
If the oven light fails:
- Turn off the oven by switching the oven selector to 0, switch off at the cooker point.
- When the oven is cool, reach back and upwards inside the oven, the bulb is in the top left corner.
- Unscrew the light glass cover, replace the bulb with a new one of the same specification and screw the cover back until it is hand tight.
NOTE: Oven bulb replacement is not covered by your guarantee.
Other bulbs cannot be changed by yourself and should be replaced by a qualified electrical engineer. Bulbs other than the oven bulb are covered by the guarantee.
IMPORTANT!
WARNING - OVENS GET HOT. KEEP CHILDREN AWAY FROM THIS APPLIANCE.
IF YOUR OVEN IS NOT WORKING
Check the following points:
- Check the fuse.
- Check that the autotimer is set to manual - and the times are
synchronised.
- If your appliance is still not working call Caremark 01942 815311.
TECHNICAL INFORMATION
Light 15 Watt - 230V
Voltage 230V
Total absorbed power
Fan Oven 2.15kW
Grill & Fan 2.135kW
APPLIANCE SERVICING
Proof of Purchase - Caremark require you to produce your receipt when they call to service a guarantee item. Attach your receipt to this page and keep the guide in a safe place. Caremark provide a quality and effective aftercare programme to cover all your servicing needs. Caremark is owned and solely operated by Homark, enabling us to offer the Caremark pledge:- Our direct telephone number -0942 815311, covers all queries and servicing needs nationwide. - Fully trained telephone operators take your calls and specifically trained engineers repair your appliance. - A Caremark Engineer will
respond to your call within three working days and will have the spare parts required to complete most jobs on the first visit.
When ringing for service, our staff will require the following information:
- Your name, address, postcode and telephone number.
- The model number and colour of your appliance - see the front of the guide.
- Date, place and proof of purchase.
- Clear and concise details of the fault.
GUARANTEE
You will find a reply paid guarantee card with this guide. Please complete and return this card immediately. Proof of purchase is required for service under the guarantee. Caremark are authorised to repair or replace
free of charge any defect attributable to faulty material or workmanship used in manufacture, provided that such defect appears within 12 months from the date of sale to the original purchaser, provided that:
- The domestic purchaser notifies Caremark promptly of any defect.
used for normal domestic purposes only on mainland Britain, Jersey, Guernsey, Isle of Man, Isle of Wight, Northern and Southern Ireland. - The appliance is installed and used only in accordance with the manufacturer's instructions enclosed with the appliance and
- The guarantee does not apply:
DIRECT LINE SERVICE NUMBER 01942 815311
i) If the appliance is repaired or modified by any person other than an authorised Caremark Engineer.
ii) To second hand appliances, or those used commercially or in communal establishments.
The rights and benefits under this guarantee are additional to the statutory rights of the
domestic purchaser whose rights are not affected by this guarantee.
Once the Guarantee has Expired - Homark offer an extended guarantee scheme after the original 12 months until the unit is 5 years old. Full details will be sent on receipt of your guarantee card.
- HOMARK
- FAN OVEN
- ELECTRICAL SUPPLY TO YOUR OVEN
- WARNING! THIS APPLIANCE MUST BE EARTHED.
- HOW TO INSTALL YOUR OVEN
- HOW TO USE YOUR OVEN
- DO NOT CLEAN THE OVEN WHEN IT IS SWITCHED ON.
- CONTROL PANEL
- Digital Clock and Automatic Timer
- Using your automatic timer: Setting the time of day
- Setting the timer to manual
- Setting the timer to start and stop cooking (fully automatic)
- Setting the timer to stop cooking (semi-automatic)
- Temperature Selector
- Function Selector
- COOKING WITH A FAN OVEN
- CLEANING YOUR OVEN
- SELF CLEANING LINER KITS
- CHANGING THE OVEN CAVITY LIGHT BULB
- If the oven light fails:
- IF YOUR OVEN IS NOT WORKING
- Check the following points:
- TECHNICAL INFORMATION
- APPLIANCE SERVICING
- GUARANTEE
- DIRECT LINE SERVICE NUMBER 01942 815311
Marque : VEDETTE
Modèle : 55KC3BB
Catégorie : Four