
UT371 - Odomètre Uni-T - Notice d'utilisation et mode d'emploi gratuit
Retrouvez gratuitement la notice de l'appareil UT371 Uni-T au format PDF.


| Type de produit | Odomètre laser |
| Marque | Uni-T |
| Modèle | UT371 |
| Plage de mesure | 0,05 m à 40 m |
| Précision | ±2 mm |
| Unités de mesure | m, ft, in |
| Fonctions principales | Mesure de distance, calcul de surface et volume, mesure indirecte (Pythagore), mémorisation des valeurs |
| Alimentation | 2 piles AAA (1,5 V) |
| Autonomie | Environ 10 000 mesures |
| Dimensions | 120 mm × 55 mm × 30 mm |
| Poids | Environ 100 g (avec piles) |
| Affichage | Écran LCD rétroéclairé |
| Classe laser | Classe 2, longueur d'onde 635 nm, puissance < 1 mW |
| Température de fonctionnement | 0 °C à 40 °C |
| Entretien et nettoyage | Nettoyer avec un chiffon doux et sec. Ne pas utiliser de solvants. |
| Sécurité | Ne pas regarder directement le faisceau laser. Éviter toute exposition oculaire. |
| Pièces détachées et réparabilité | Piles remplaçables. Pas de pièces détachées disponibles. Réparation par le fabricant recommandée. |
| Informations générales | Appareil de mesure de distance portable, idéal pour les professionnels du bâtiment et les bricoleurs. |
FOIRE AUX QUESTIONS - UT371 Uni-T
Questions des utilisateurs sur UT371 Uni-T
0 question sur cet appareil. Repondez a celles que vous connaissez ou posez la votre.
Poser une nouvelle question sur cet appareil
Téléchargez la notice de votre Odomètre au format PDF gratuitement ! Retrouvez votre notice UT371 - Uni-T et reprennez votre appareil électronique en main. Sur cette page sont publiés tous les documents nécessaires à l'utilisation de votre appareil UT371 de la marque Uni-T.
MODE D'EMPLOI UT371 Uni-T
UT371/372 Operating Manual

Tachometer
Overview
This Operating Manual covers safety information related to the Tachometer. Please read the relevant information carefully and observe all the Warnings and Notes strictly.
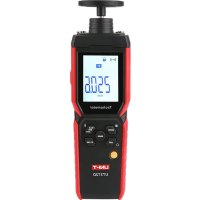
Model UT371/UT372 is a stable, safe and reliable digital non - contact Tachometer. This Tachometer can measure RPM and counts. RPM range is 10 \~ 99999 while counts range is 0 \~ 99999.
Unpacking Inspection
Open the package case and take out the Meter. Check the following items carefully for any missing or damaged part:
| Item | Description | Qty |
| 1 | English Operating Manual | 1 piece |
| 2 | Reflecting Tape | 10 pieces |
| 3 | USB Interface Cable (UT372 only) | 1piece |
| 4 | Software(UT372 only) | 1 piece |
| 5 | 1.5V Battery (LR6) | 4 pieces |
In the event you find any missing or damaged item, please contact your dealer immediately.
Safety Information
This Meter complies with IEC61010-031 and IEC61326 standards as well as Pollution Degree 2 requirement
Use the Meter only as specified in this operating manual, otherwise the protection provided by the Meter may be impaired.
In this manual, a Warning identifies conditions and actions that pose hazards to the user, or may damage the Meter or the equipment under test.
A Note identifies the information that user should pay attention to.
Warning
- Before using the Meter inspect the case. Do not use the Meter if it is damaged or the case (or part of the case) is removed. Look for cracks or missing plastic.
- Do not use or store the Meter in an environment of high temperature, humidity, explosive, inflammable and strong magnetic field. The performance of the Meter may deteriorate after dampened.
- Do not point laser directly at eye.
- Replace the battery as soon as the battery indicator 📄 appears. When the battery is between 4.5V \~4.8V, the battery indicator 📄 appears. When the battery is between 4.3V \~4.5V, battery indicator 📄 linking, the Meter will be turned off after 1 minute.
- When opening the battery door, make sure the Meter is powered off.
- When servicing the Meter, use only the replacement parts with the same model or identical electrical specifications.
- The internal circuit of the Meter shall not be altered at will to avoid damage of the Meter and any accident.
- Soft cloth and mild detergent should be used to clean the surface of the Meter when servicing. No abrasive and solvent should be used to prevent the surface of the Meter from corrosion, damage and accident.
- Turn the Meter off when it is not in use and take out the battery when not using for a long time.
- Constantly check the battery as it may leak when it has been using for some time, replace the battery as soon as leaking appears. A leaking battery will damage the Meter.
International Electrical Symbols
| Warning. Refer to the Operating Manual | |
| Low Battery Indication | |
| CE | Conforms to Standards of European Union |
The Meter Structure (See Figure 1)
① Tachometer Light Source.
② LCD Display.
③ USB Port (UT372 only)
④ Housing
⑤ Functional Buttons

Functional Buttons
The table below offers information about the functional button operations.
| Button | Operation Performed |
| ON/OFF | Press once to turn the meter on.Press and hold for 1 second to turn it off.When measuring RPM and Counts, press once to enter the Hold mode. Press it again to exit hold mode. |
| R/C | When measuring RPM and Counts, press it to toggle between RPM and Counts feature.Press and hold for 1 minute to enter setup feature, the LCD displays USB. After that, each pressing steps through LED / SR / AOFF / CLK / settings, then exits the setup and accesses RPM or count. You could press ON/OFF button to exit setup mode and return to normal measurement mode at any time. |
| M/M/A | Press this button to choose Max./Min./Average/Zeroin/Setting options.Under Tach measurement mode, press MM/IA button to select MAX/MIN/AVE and normal measurements.After entering USB/LED/SR/AOFF/CLK mode, press this button to set to 0/ 1 and adjust the time. |
Setup
A. USB
Press R/C button to select USB feature after turning on the Meter. Then press M/M/A button to set to 0 or 1.0 represents disabling USB and 1 for enabling USB.
B. LED
Press R/C button to select LED feature after turning on the Meter. Then press M/M/A button to set to 0 or 1.0 represents disabling LED laser and 1 for enabling the laser.
C. SR (Sampling Rate)
Press R/C button to select SR feature after turning on the Meter. Then press M/M/A button to adjust within 005 \~ 255. Press and hold M/M/A button to access quick setting.
D. AOFF
Press R/C button to select AOFF feature after turning on the Meter. Then M/M/A press button to set to 0 or 1.0 represents disabling auto power off and 1 for enabling the function.
With the function enabled, the meter will automatically power off if buttons are inactive for 10minutes. Press ON/OFF again to wake up the meter.
E. CLK
Press R/C button to select CLK feature after turning on the Meter. Then press M/M/A button to set to 0 or 1. 0 is for h:m time format and 1 for m:s format.
Display Symbols (see figure 2)

Figure 2
| Number | Meaning |
| 1 | Unit of Tachometer |
| 2 | Unit of Counts |
| 3 | Time |
| 4 | The battery is low. |
| 5 | Indicator of Sleep Mode |
| 6 | Measurement of RPM and Counts |
| 7 | Data Hold is on |
| 8 | Display of Maximum reading |
| 9 | Display of Minimum reading |
| 10 | Display of Average reading |
| 11 | USB is on |
| 12 | Display of Measurement reading |
Measurement Operation
Warning
- To reserve battery, the USB feature will be automatically off when the Meter is restarted. The other setting remains unchanged.
- The Time will be off after the HOLD feature is enabled. The time will be on again after existing HOLD mode.
A. RPM Measurement (See Figure 3)
Warning
- Do not point laser directly at eyes.
- To avoid the rotating object touching the meter and cause any injury or damage to the meter during the measurement, please keep the meter more than 50mm away from the tested target.
To carry out RPM measuremnet, follow the following procedure:
- Attach a piece of reflecting tape to the object under test
- Position the meter firmly on desired location. Hold the meter and keep its light source 50\~200mm away from the object under test.
- Press ON/OFF button, the Meter is default to enter the RPM measurement mode. Point the Tachometer light source to reflective tape, The deviation from the ideal right-angle should not be greater than 30°.
- The LCD displays the RPM reading.
Note:
- When measuring RPM, the LCD displays "0.0000" if there is no signal within 7 seconds.
- When the RPM is greater than 99999, the LCD displays OL.
B. Counts
Self-lighted Counts (See Figure 4)
- Position the meter firmly on desired location. Hold the meter and keep its light source 50\~200mm away from the targets.
- Press the ON/OFF button
- Press the R/C button to select Count mode.
- Point he Tachometer light source to the objects under count. The deviation from the ideal right-angle should not be greater than 30°.
- The LED scans the objects under count, counts the number and displays the total value.
Note:
- The object under count must be reflective, otherwise Counts feature cannot be used
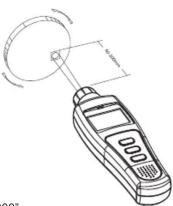
Figure 3

Figure 4
Receiving Light Source Outside (See Figure 5)
-
Position the meter firmly on desired location. Hold the meter and keep its light source 50\~200mm away from the targets. The deviation from the ideal right-angle pointing should not be greater than 30°.
-
Locate the Meter, objects under counts and light source as shown in Figure 5
- Press ON/OFF button
- Turn the LED off, refer to page 9 point B.
- Then press R/C button to select Counts mode.
- When the objects under count pass between the meter and light source, the meter count the number and display the total value.
Note:
- Under the count mode, when the total count
the Meter displays OL and hold the data - Press ON/OFF to re-start Counting.
C. Data Transferring and USB (UT372 Only, See Figure 6)
Connect the meter to PC with use of USB cable. See Figure 6.

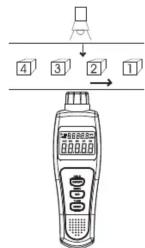
Figure 5
Specifications
A. General Specifications
● Display: 5 digits LCD display, Maximum display 99999.
● Overloading. Display OL
● Low Battery Indication: F
● Low Battery Indication: Display ■
● Sampling Rate: Adjustable from 5r
● Sensor Type: Photo diode and laser tube
● Measurement Distance: 50mm \~ 200mm
- Drop Test: one meter
● Power: 4pcs x 1.5V batteries (AA)
● Dimensions: 184 x 56 x 34mm
- Dimensions: 184 x 56 x 34mm
- Weight: Approximate 100g (excluding battery)
B. Environmental Requirements
- For indoor use only
- Altitude: 2000m
● Temperature and humidity:
* Operating:
0°C\~30°C(85%R.H)
30°C\~40°C (5%R.H)
40°C\~50°C ( 45%R.H)
* Storage:
-20°C\~+60°C(85%R.H)
● Safety/ Compliances: IEC61010-031, IEC61326, IEC 61010-1
pollution degree 2.
• Certification: CE
Accuracy Specifications
Accuracy: (a% reading + b digits), calibration per year.
Operating temperature: 23°C±5°C
Operating humidity: ≤80%RH
Temperature Coefficient: 0.1 x (accuracy) /°C
A. RPM
| Range | Resolution Accuracy | |
| 10~99.999 r/min | 0.001 r/min | ±(0.04%+2) |
| 100~999.99 r/min | 0.01 r/min | |
| 1000~9999.9 r/min | 0.1 r/min | |
| 10000~99999 r/min | 1 r/min | |
B. Counts
| Range | Resolution | Max. Input Frequency |
| 0~99999 | 1 digit | 10kHz, Pulse Width 5% |
MAINTENANCE
This section provides basic maintenance information including battery replacement instruction.

Warning
Do not attempt to repair or service your Meter unless you are qualified to do so and have the relevant calibration, performance test, and service information.
Do not attempt to open the back housing to avoid damaging the Meter or affecting the accuracy.
A. General Service
- Periodically wipe the case with a damp cloth and mild detergent. Do not use abrasives or solvents.
● Turn the Meter power off when it is not in use
● Take out the battery when it is not using for a long time. - Do not use or store the Meter in a place of humidity, high temperature, explosive, inflammable and strong magnetic field.
B. Replacing the Battery (See Figure 7)
1. Press ON/OFF to turn the Meter off.
2. Turn the Meter's front case down.
3. Remove the screw from the battery door, and separate the battery door from the case bottom.
4. Take out the old batteries and replace
with 4 x 1.5V battery (AA)
5. Rejoin the case bottom and the battery
compartment, and reinstall the screw.
* END *
This operating manual is subject to change without notice.
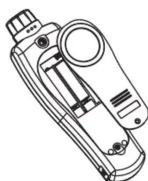
Figure 7
UNI-T
UNI-TREND TECHNOLOGY (CHINA) CO., LTD.
No6, Gong Ye Bei 1st Road,
Songshan Lake National High-Tech Industrial
Development Zone, Dongguan City, Guangdong Province, China
Guangdong Province, China Tel: (86-769) 8572 3888
http://www.uni-trend.com
(No text)
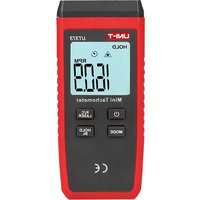
Marque : Uni-T
Modèle : UT371
Catégorie : Odomètre