
X30 - Vidéoprojecteur 3M - Notice d'utilisation et mode d'emploi gratuit
Retrouvez gratuitement la notice de l'appareil X30 3M au format PDF.


| Type de produit | Projecteur LCD |
| Marque | 3M |
| Modèle | X30 |
| Technologie d'affichage | LCD 3 panneaux, 786 432 pixels (1024 x 768) |
| Lampes | UHP 210 W |
| Haut-parleur intégré | 16 W |
| Alimentation | AC 100-120 V / 3,7 A ou AC 220-240 V / 1,8 A |
| Consommation électrique | 330 W |
| Dimensions (L x H x P) | 317 x 98 x 288 mm (sans parties saillantes) |
| Poids | Environ 3,6 kg |
| Objectif | Zoom, f = 19 ~ 23 mm |
| Entrées vidéo | COMPUTER IN1/IN2 (D-sub 15), VIDEO (RCA), S-VIDEO (mini DIN 4 broches), COMPOSANT (Y, Cb/Pb, Cr/Pr RCA x3) |
| Sorties | MONITOR OUT (D-sub 15), AUDIO OUT (RCA x2) |
| Autres ports | USB type B, RS-232C (CONTROL) |
| Correction trapézoïdale | Verticale automatique et manuelle |
| Fonctions spéciales | Mode économique, miroir, zoom numérique, gel d'image, écran noir, recherche automatique du signal |
| Nettoyage et entretien | Nettoyage du filtre à air et de l'objectif, remplacement de la lampe |
| Pièces détachées | Lampe de rechange (type spécifié), jeu de filtres (réf. 78-8138-1041-9) |
| Sécurité | Protection contre les surchauffes, arrêt automatique, verrouillage des touches, détecteur de transition |
| Température de fonctionnement | 5 °C à 35 °C |
FOIRE AUX QUESTIONS - X30 3M
Questions des utilisateurs sur X30 3M
0 question sur cet appareil. Repondez a celles que vous connaissez ou posez la votre.
Poser une nouvelle question sur cet appareil
Téléchargez la notice de votre Vidéoprojecteur au format PDF gratuitement ! Retrouvez votre notice X30 - 3M et reprennez votre appareil électronique en main. Sur cette page sont publiés tous les documents nécessaires à l'utilisation de votre appareil X30 de la marque 3M.
MODE D'EMPLOI X30 3M
3M
Projecteur numérique X30
Guide de l'utilisateur

Merci d'avoir acheté ce projecteur.
⚠ AVERTISSEMENT ▶ Avant d'utiliser ce produit, veuillez lire tous les manuels de ce produit. Assurez-vous de lire d'abord la « Garantie du produit et guide de sécurité ». Après les avoir lus, conservez-les dans un endroit sûr pour référence future.
À propos de ce manuel
Divers symboles sont utilisés dans ce manuel. La signification de ces symboles est décrite ci-dessous.
AVERTISSEMENT
Ce symbole indique des informations qui, si elles sont ignorées, pourraient éventuellement entraîner des blessures corporelles, voire la mort, en raison d'une mauvaise manipulation.
ATTENTION
Ce symbole indique des informations qui, si elles sont ignorées, pourraient éventuellement entraîner des blessures corporelles ou des dommages matériels en raison d'une mauvaise manipulation.
REMARQUE Cette entrée signale un risque de provoquer des problèmes.
Veuillez vous référer aux pages indiquées après ce symbole.
NOTE • Les informations contenues dans ce manuel sont sujettes à modification sans préavis.
- Le fabricant décline toute responsabilité en cas d'erreurs éventuelles dans ce manuel.
La reproduction, le transfert ou la copie de tout ou partie de ce document n'est pas autorisée sans le consentement écrit exprès.
Reconnaissance des marques
- Mac® est une marque déposée d'Apple Inc.
- Windows® est une marque déposée de Microsoft Corporation aux États-Unis et/ou dans d'autres pays. • VESA et DDC sont des marques de la Video Electronics Standard Association. Toutes les autres marques sont la propriété de leurs détenteurs respectifs.
Sommaire
À propos de ce manuel....1
Sommaire 2
Caractéristiques du projecteur.....3
Préparations .... 3 Vérification du contenu de l'emballage ... 3
Nomenclature ..... 4
Projecteur 4
Panneau de commande 5
Panneau arrière
Télécommande . 6
Installation 7
Disposition 7
Connexion de vos appareils ..... 9
Connexion de l'alimentation électrique .....
Utilisation de la barre et de la fente de sécurité . . . .
Télécommande ..... 1
Installation des piles....12
À propos du signal de la télécommande . . .
Changement de la fréquence du signal de la télécommande . . 13
Utilisation comme souris et clavier simples pour PC . . 13
Mise sous/hors tension 14
Mise sous tension ..... 1
Mise hors tension ..... 1
Fonctionnement 15
Réglage du volume ..... 15
Coupure temporaire du son.....15
Sélection d'un signal d'entrée.....15
Recherche d'un signal d'entrée ..... 17
Sélection d'un format d'image ..... 17
Réglage du pied du projecteur . . 18
Réglage du zoom et de la mise au point. . . . . 18
Utilisation de la fonction de réglage automatique. . . 19
Réglage de la position . . . . . . . . . 19
Correction des distorsions trapézoïdales..20
Utilisation de la fonction zoom. . . . . . . 20
Gel temporaire de l'écran . . . . 21
Masquage temporaire de l'écran . . 2
Utilisation de la fonction menu ..... 2:
MENU FACILE....24
FORMAT, CORRECTION TRAPÈZE AUTO (EXÉCUTER),
CORRECTION TRAPÈZE, MODE IMAGE, MODE ÉCO,
MIROIR, RÉINITIALISATION, TEMPS DE FILTRE, LANGUE,
MENU AVANCÉ, SORTIE
Menu IMAGE ..... 26
LUMINOSITÉ, CONTRASTE, GAMMA,
TEMPÉRATURE DE COULEUR, COULEUR, TEINTE, NETTETÉ,
IRIS ACTIF, MA MÉMOIRE
Menu IMAGE 29
FORMAT, SURBALAYAGE, POSITION V, POSITION H,
PHASE H, TAILLE H, EXÉCUTION RÉGLAGE AUTO
Menu ENTRÉE ..... 31
PROGRESSIF, RÉDUCTION DE BRUIT VIDÉO, ESPACE COLORIMÉTRIQUE,
COMPOSANT, FORMAT VIDÉO, ENTRÉE ORDINATEUR,
VERROU DE TRAME, RÉSOLUTION
Menu RÉGLAGE 34
CORRECTION TRAPÈZE AUTO (EXÉCUTER), CORRECTION TRAPÈZE,
Mode éco, MIROIR, MODE VEILLE,
SORTIE MONITEUR
Menu AUDIO 36
VOLUME, HAUT-PARLEUR, SOURCE AUDIO
Menu ÉCRAN....37
LANGUE, POSITION DU MENU, VIDE,
DÉMARRAGE, MyScreen, Verrouillage MyScreen,
MESSAGE, NOM DE LA SOURCE, MODÈLE, C.C.
Menu OPTION 42
RECHERCHE AUTO, CORRECTION TRAPÈZE AUTO,
MISE SOUS TENSION DIRECTE, ARRÊT AUTO, TEMPS DE LAMPE,
TEMPS DE FILTRE, MA TOUCHE, MA SOURCE,
SERVICE
Menu SÉCURITÉ ..... 4 7
SÉCURITÉ, CHANGEMENT DE MOT DE PASSE,
MyScreen PASSWORD, PIN LOCK,
DÉTECTEUR DE TRANSITION, MOT DE PASSE MY TEXT,
AFFICHAGE MY TEXT, ÉCRITURE MY TEXT
Maintenance 53
Remplacement de la lampe 53
Nettoyage et remplacement du filtre à air . . 55
Autres entretiens....57
Dépannage .....58
Messages associés ..... 58
Concernant les voyants ..... 59
Arrêt du projecteur ..... 60
Réinitialisation de tous les réglages....60
Phénomènes pouvant être facilement
confondus avec des défauts de la machine. . 61
Spécifications 64
Technique (anglais uniquement)
(Veuillez consulter la fin de ce livre, bien que ce soit uniquement en anglais.)
Caractéristiques du projecteur
Le projecteur vous offre une large gamme d'utilisations grâce aux caractéristiques suivantes.
√ Ce projecteur dispose d'une variété de ports d'entrée/sortie qui couvrent tous les scénarios professionnels. √ Ce projecteur réalise une grande image projetée, même dans un espace restreint. √ Le nouveau système de filtre à double couche est conçu pour fonctionner plus longtemps et nécessite moins de maintenance. √ Le haut-parleur intégré de 16 W peut fournir un volume sonore suffisant dans un grand espace comme une salle de classe, sans haut-parleurs externes.
Préparatifs
Vérification du contenu de l'emballage
Votre projecteur doit être livré avec les articles ci-dessous. Vérifiez que tous les articles sont inclus. Contactez immédiatement votre revendeur si des articles manquent.
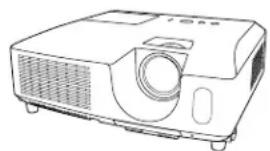
Projecteur
Guide de l'utilisateur
Guide de garantie et de sécurité du produit
Guide de démarrage rapide
Télécommande (avec deux piles AA)
Cache d'objectif
Cordon d'alimentation
Câble VGA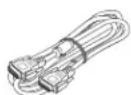
Étiquette de sécurité
NOTE : Conservez les matériaux d'emballage d'origine pour un futur réexpédition. Assurez-vous d'utiliser les matériaux d'emballage d'origine lors du déplacement du projecteur. Soyez particulièrement prudent avec l'objectif.
Nomenclature
Projecteur
(1) Volet de la lampe (53) L'unité de lampe se trouve à l'intérieur. (2) Bague de mise au point (18) (3) Bague de zoom (18) (4) Panneau de commande (5) (5) Boutons de relevage (x 2) (18) (6) Pieds de relevage (x 2) (18) (7) Capteur de télécommande (12) (8) Objectif (57) (9) Ouvertures d'admission d'air (10) Cache du filtre (55) Le filtre à air et l'ouverture d'admission se trouvent à l'intérieur. (11) Haut-parleur (36) (12) Ouverture d'évacuation (13) AC IN (entrée secteur) (11) (14) Panneau arrière (5) (15) Barre de sécurité (11) (16) Fente de sécurité (11)
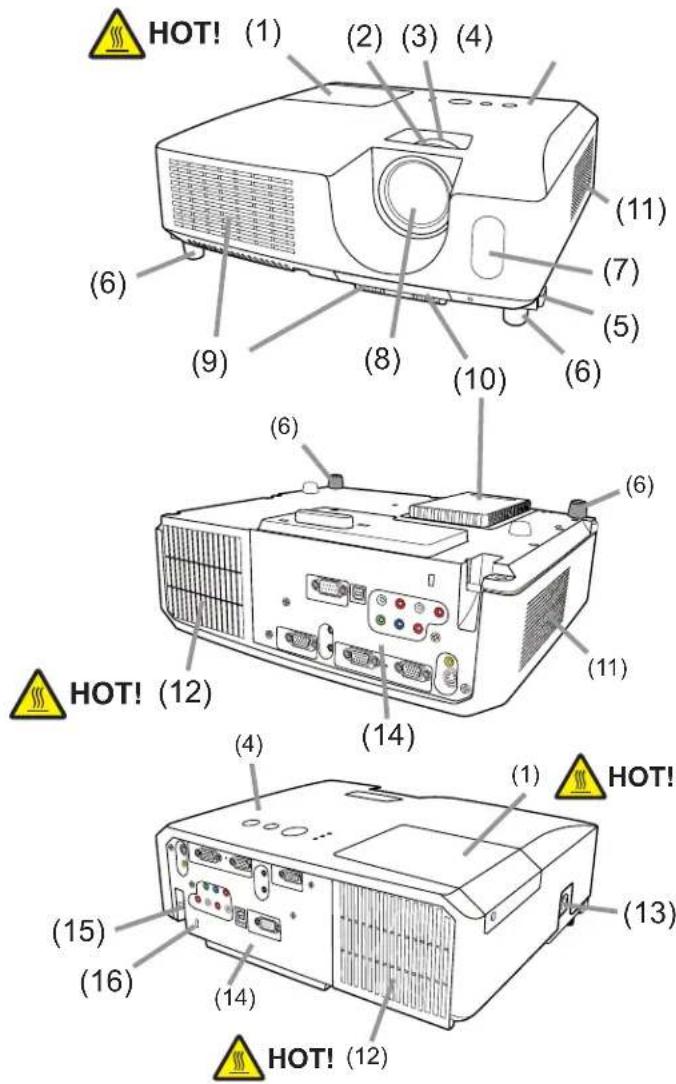
⚠ AVERTISSEMENT ▶ CHAUD ! : Ne touchez pas autour du volet de la lampe et des ouvertures d'évacuation pendant ou juste après l'utilisation, car c'est trop chaud.
▶ Ne regardez pas dans l'objectif ou les ouvertures lorsque la lampe est allumée, car la lumière intense est nocive pour les yeux. ▶ Ne manipulez pas les boutons de relevage sans tenir le projecteur, car il pourrait tomber.
⚠️ ATTENTION ▶ Maintenez une ventilation normale pour éviter que le projecteur ne chauffe. Ne couvrez pas, ne bloquez pas et n'obstruez pas les ouvertures. Ne placez rien qui pourrait coller ou être aspiré par les ouvertures, autour des ouvertures d'admission. Nettoyez périodiquement le filtre à air.
▶ N'utilisez pas la barre de sécurité et la fente pour empêcher le projecteur de tomber, car ils ne sont pas conçus à cet effet.
Panneau de commande
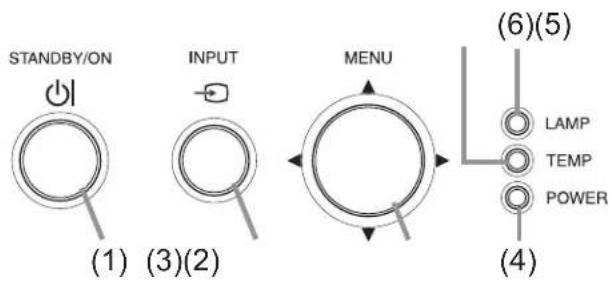
(1) Bouton STANDBY/ON (14) (2) Bouton INPUT (15, 22) (3) Bouton MENU (22) Il se compose de quatre boutons de curseur. (4) Voyant POWER (11, 14, 59) (5) Voyant TEMP (59) (6) Voyant LAMP (59)
Panneau arrière (9)
(1) Port AUDIO IN1 (2) Port AUDIO IN2 (3) Port COMPUTER IN1 (4) Port COMPUTER IN2 (5) Port MONITOR OUT (6) Interrupteur d'arrêt (60) (7) Port CONTROL
(8) Port USB (13) (9) Ports COMPONENT (Y, Cb/Pb, Cr/Pr) (10) Port VIDEO (11) Port S-VIDEO (12) Ports AUDIO IN3 (R, L) (13) Ports AUDIO OUT (R, L)
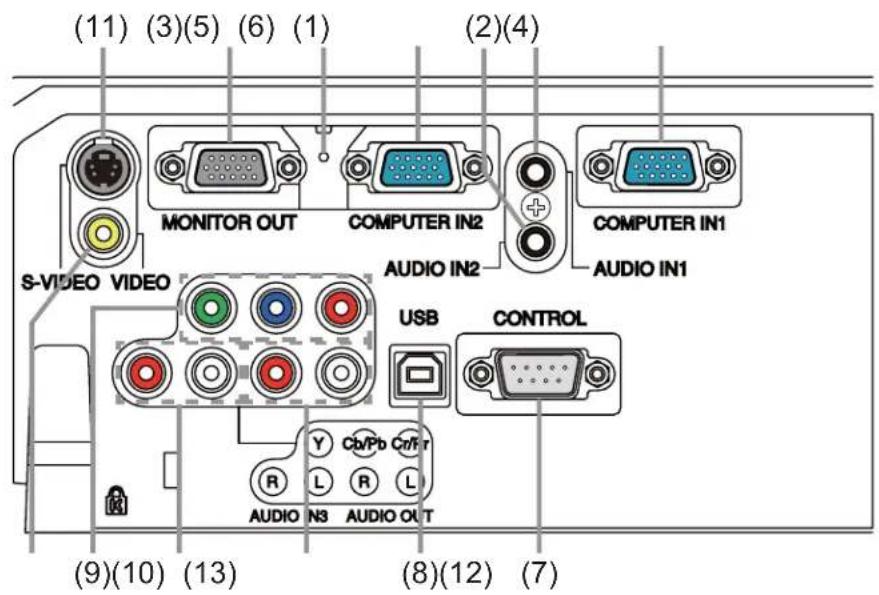
⚠️ ATTENTION ▶ Utilisez l'interrupteur d'arrêt uniquement lorsque le projecteur ne s'éteint pas par la procédure normale, car appuyer sur cet interrupteur arrête le fonctionnement du projecteur sans le refroidir.
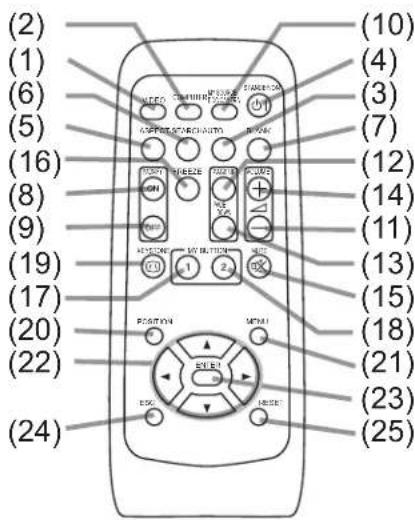
Télécommande
(1) Bouton VIDEO (16) (2) Bouton COMPUTER (16) (3) Bouton SEARCH (17) (4) Bouton STANDBY/ON (14) (5) Bouton ASPECT (17) (6) Bouton AUTO (19) (7) Bouton BLANK (21) (8) Bouton MAGNIFY - ON (20) (9) Bouton MAGNIFY - OFF (13, 20) (10) Bouton MY SOURCE/DOC.CAMERA (16, 44) (11) Bouton VOLUME - (13, 15) (12) Bouton PAGE UP (13) (13) Bouton PAGE DOWN (13) (14) Bouton VOLUME + (15) (15) Bouton MUTE (15) (16) Bouton FREEZE (21) (17) Bouton MY BUTTON - 1 (44) (18) Bouton MY BUTTON - 2 (44) (19) Bouton KEYSTONE (20) (20) Bouton POSITION (19, 20, 23) (21) Bouton MENU (22) (22) Boutons curseur ▲/▼/◄/► (13, 22) (23) Bouton ENTER (13, 22) (24) Bouton ESC (13, 22) (25) Bouton RESET (13, 22) (26) Cache-piles (12)
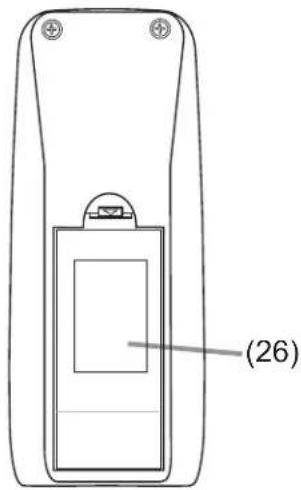
Dos de la télécommande
Installation
Installez le projecteur en fonction de l'environnement et de la manière dont il sera utilisé.
Disposition
Reportez-vous aux illustrations et aux tableaux ci-dessous pour déterminer la taille de l'écran et la distance de projection.
Les valeurs indiquées dans le tableau sont calculées pour un écran pleine taille : 1024 x 768
① Taille de l'écran (diagonale) b Distance de projection (±10%)
c1, c2 Hauteur de l'écran (±10%)
Sur une surface horizontale
Suspendu au plafond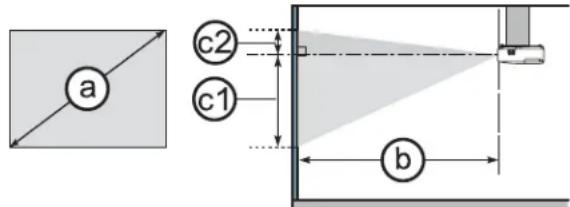
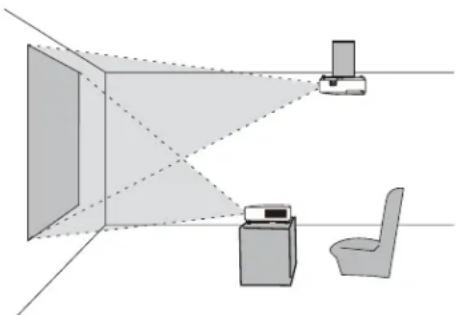
- Laissez un espace de 30 cm ou plus entre les côtés du projecteur et d'autres objets tels que les murs.
- Pour une installation dans un état spécial tel qu'un montage au plafond, les accessoires de montage spécifiés et un service peuvent être nécessaires.
Avant d'installer le projecteur, consultez votre revendeur pour votre installation.
| aScreen size (diagonal) | 4:3 screen 16:9 screen | ||||||||||||||||
| bProjection distance | c1Screen height | c2Screen height | bProjection distance | c1Screen height | c2Screen height | ||||||||||||
| min. max. min. max. | |||||||||||||||||
| type (inch) | m m | inch m | inch cm | inch | cm inch | m inch | m inch | ch cm | inch cm | inch | |||||||
| 30 | 0.8 | 0.9 | 34 | 1.0 | 41 | 41 | 16 | 5 | 2 | 1.0 | 38 | 1.1 | 45 | 39 | 15 | -1 | 0 |
| 40 | 1.0 | 1.2 | 46 | 1.4 | 55 | 55 | 22 | 6 | 2 | 1.3 | 51 | 1.5 | 60 | 51 | 20 | -2 | -1 |
| 50 | 1.3 | 1.5 | 58 | 1.8 | 69 | 69 | 27 | 8 | 3 | 1.6 | 64 | 1.9 | 76 | 64 | 25 | -2 | -1 |
| 60 | 1.5 | 1.8 | 70 | 2.1 | 83 | 82 | 32 | 9 | 4 | 1.9 | 77 | 2.3 | 91 | 77 | 30 | -2 | -1 |
| 70 | 1.8 | 2.1 | 82 | 2.5 | 97 | 96 | 38 | 11 | 4 | 2.3 | 89 | 2.7 | 106 | 90 | 35 | -3 | -1 |
| 80 | 2.0 | 2.4 | 94 | 2.8 | 112 | 110 | 43 | 12 | 5 | 2.6 | 102 | 3.1 | 122 | 103 | 41 | -3 | -1 |
| 90 | 2.3 | 2.7 | 106 | 3.2 | 126 | 123 | 49 | 14 | 5 | 2.9 | 115 | 3.5 | 137 | 116 | 46 | -4 | -1 |
| 100 | 2.5 | 3.0 | 118 | 3.6 | 140 | 137 | 54 | 15 | 6 | 3.3 | 128 | 3.9 | 153 | 129 | 51 | -4 | -2 |
| 120 | 3.0 | 3.6 | 142 | 4.3 | 168 | 165 | 65 | 18 | 7 | 3.9 | 154 | 4.7 | 183 | 154 | 61 | -5 | -2 |
| 150 | 3.8 | 4.5 | 177 | 5.3 | 211 | 206 | 81 | 23 | 9 | 4.9 | 193 | 5.8 | 229 | 193 | 76 | -6 | -2 |
| 200 | 5.1 | 6.0 | 237 | 7.1 | 281 | 274 | 108 | 30 | 12 | 6.6 | 258 | 7.8 | 306 | 257 | 101 | -8 | -3 |
| 250 | 6.4 | 7.5 | 297 | 8.9 | 352 | 343 | 135 | 38 | 15 | 8.2 | 323 | 9.7 | 383 | 322 | 127 | -10 | -4 |
| 300 | 7.6 | 9.0 | 356 | 10.7 | 422 | 411 | 162 | 46 | 18 | 9.9 | 388 | 11.7 | 460 | 386 | 152 | -12 | -5 |
Disposition (suite)
⚠ AVERTISSEMENT ▶ Placez le projecteur dans une position horizontale stable. S'il tombe ou est renversé, il pourrait causer des blessures et/ou des dommages au projecteur. L'utilisation d'un projecteur endommagé pourrait alors entraîner un incendie et/ou une électrocution.
- Ne placez pas le projecteur sur une surface instable, inclinée ou vibrante, comme un support branlant ou incliné.
- Ne placez pas le projecteur sur le côté, à l'avant ou à l'arrière.
- Consultez votre revendeur avant toute installation spéciale, comme une suspension au plafond ou ailleurs.
▶ Placez le projecteur dans un endroit frais et assurez une ventilation suffisante. La température élevée du projecteur pourrait provoquer un incendie, des brûlures et/ou un dysfonctionnement du projecteur.
- Ne bouchez pas, ne bloquez pas et ne couvrez pas les évents du projecteur.
- Laissez un espace de 30 cm ou plus entre les côtés du projecteur et d'autres objets tels que des murs.
- Ne placez pas le projecteur sur un objet métallique ou sur une surface peu résistante à la chaleur.
- Ne placez pas le projecteur sur un tapis, des coussins ou de la literie.
- Ne placez pas le projecteur en plein soleil ou à proximité d'objets chauds tels que des radiateurs.
- Ne placez rien près de l'objectif ou des évents du projecteur, ni sur le dessus du projecteur.
- Ne placez rien qui pourrait être aspiré ou coller aux évents situés sous le projecteur. Ce projecteur possède également des évents d'admission sous la base.
▶ Ne placez pas le projecteur dans un endroit où il pourrait être mouillé. Mouiller le projecteur ou y introduire du liquide pourrait provoquer un incendie, une électrocution et/ou un dysfonctionnement du projecteur.
- Ne placez pas le projecteur dans une salle de bain ou à l'extérieur.
- Ne placez rien contenant du liquide à proximité du projecteur.
▶ Utilisez uniquement les accessoires de montage spécifiés par le fabricant et confiez l'installation et le retrait du projecteur avec les accessoires de montage au personnel de service.
- Lisez et conservez la garantie produit et le guide de sécurité des accessoires de montage utilisés.
⚠️ ATTENTION ▶ Évitez de placer le projecteur dans un endroit enfumé, humide ou poussiéreux.
Placer le projecteur dans de tels endroits pourrait provoquer un incendie, un choc électrique et/ou un dysfonctionnement du projecteur.
- Ne placez pas le projecteur à proximité d'humidificateurs, d'espaces fumeurs ou d'une cuisine.
▶ Positionnez le projecteur de manière à empêcher la lumière de frapper directement le capteur de télécommande du projecteur.
Connexion de vos appareils
Assurez-vous de lire les manuels des appareils avant de les connecter au projecteur. Assurez-vous que tous les appareils sont adaptés à la connexion avec ce produit et préparez les câbles nécessaires. Reportez-vous aux illustrations suivantes pour les connecter. Pour envoyer un signal vidéo composant au port COMPUTER IN1/2, veuillez consulter la description de l'élément COMPUTER IN du menu INPUT (32).
![graph TD A["PCMonitor"] --> B["RGB IN"] A --> C["AUDIO OUT"] A --> D["RGB OUT"] A --> E["AUDIO OUT"] A --> F["RGB OUT"] A --> G["USB"] A --> H["RS-232C"] A --> I["Computer IN1"] A --> J["COMPUTER IN2"] A --> K["MONITOR OUT"] A --> L["AUDIO IN2"] A --> M["COMPUTER IN1"] A --> N["VIDEO"] A --> O["CONT…](/content/2026/06/1245137/images/4583d57a08954fdc1ccdfbd4a6270fbed743b49246de4105c80775d23491a4bf.jpg)
⚠ AVERTISSEMENT ▶ Ne démontez pas et ne modifiez pas le projecteur et les accessoires.
▶ Veillez à ne pas endommager les câbles et n'utilisez pas de câbles endommagés.
⚠️ ATTENTION ▶ Éteignez tous les appareils et débranchez leurs cordons d'alimentation avant de les connecter au projecteur. Connecter un appareil sous tension au projecteur peut générer des bruits extrêmement forts ou d'autres anomalies pouvant entraîner un dysfonctionnement ou des dommages à l'appareil et au projecteur.
▶ Utilisez des accessoires appropriés ou des câbles désignés. Demandez à votre revendeur quels sont les câbles non fournis qui peuvent nécessiter une longueur spécifique ou une ferrite selon les réglementations. Pour les câbles avec une ferrite à une seule extrémité, connectez l'extrémité avec la ferrite au projecteur. ▶ Assurez-vous que les appareils sont connectés aux bons ports. Une connexion incorrecte peut entraîner un dysfonctionnement ou des dommages à l'appareil et au projecteur.
REMARQUE ▶ Utilisez des câbles avec des fiches droites, et non en forme de L, car les ports d'entrée du projecteur sont encastrés.
Connexion de vos appareils (suite)
REMARQUE • Assurez-vous de lire les manuels des appareils avant de les connecter au projecteur, et assurez-vous que tous les appareils sont adaptés à la connexion avec ce produit. Avant de connecter à un PC, vérifiez le niveau du signal, la synchronisation du signal et la résolution.
- Certains signaux peuvent nécessiter un adaptateur pour être transmis à ce projecteur.
- Certains PC disposent de plusieurs modes d'affichage qui peuvent inclure des signaux non pris en charge par ce projecteur.
- Bien que le projecteur puisse afficher des signaux avec une résolution allant jusqu'à UXGA (1600X1200), le signal sera converti à la résolution de la dalle du projecteur avant d'être affiché. Les meilleures performances d'affichage seront obtenues si les résolutions du signal d'entrée et de la dalle du projecteur sont identiques.
- Lors du branchement, assurez-vous que la forme du connecteur du câble correspond au port à connecter. Et veillez à serrer les vis des connecteurs à vis.
- Lors du branchement d'un ordinateur portable au projecteur, assurez-vous d'activer la sortie RVB externe du PC. (Réglez l'ordinateur portable sur l'affichage CRT ou sur l'affichage simultané LCD et CRT.) Pour plus de détails sur la procédure, veuillez vous référer au manuel d'instructions de l'ordinateur portable correspondant.
- Lorsque la résolution de l'image est modifiée sur un PC en fonction d'une entrée, la fonction d'ajustement automatique peut prendre du temps et peut ne pas se terminer. Dans ce cas, il se peut que vous ne puissiez pas voir une case à cocher pour sélectionner "Oui/Non" pour la nouvelle résolution sous Windows. La résolution reviendra alors à la résolution d'origine. Il est recommandé d'utiliser un autre moniteur CRT ou LCD pour changer la résolution.
- Dans certains cas, ce projecteur peut ne pas afficher une image correcte ou afficher une image à l'écran. Par exemple, l'ajustement automatique peut ne pas fonctionner correctement avec certains signaux d'entrée. Un signal d'entrée à synchronisation composite ou à synchronisation sur G peut perturber ce projecteur, de sorte que le projecteur peut ne pas afficher une image correcte.
À propos de la fonction Plug-and-Play
Plug-and-Play est un système composé d'un PC, de son système d'exploitation et de périphériques (c'est-à-dire des dispositifs d'affichage). Ce projecteur est compatible VESA DDC 2B. La fonction Plug-and-Play peut être utilisée en connectant ce projecteur à un PC compatible VESA DDC (canal de données d'affichage).
• Profitez de cette fonctionnalité en connectant un câble d'ordinateur au port COMPUTER IN1 (compatible DDC 2B). La fonction Plug-and-Play peut ne pas fonctionner correctement si un autre type de connexion est tenté.
- Veuillez utiliser les pilotes standard de votre PC car ce projecteur est un moniteur Plug-and-Play.
Connexion de l'alimentation électrique
- Insérez le connecteur du cordon d'alimentation dans l'entrée AC (prise d'alimentation) du projecteur.
- Branchez fermement la fiche du cordon d'alimentation dans la prise de courant. Quelques secondes après la connexion de l'alimentation, le témoin POWER s'allume en orange fixe.
N'oubliez pas que lorsque la fonction DIRECT ON est activée (42), la connexion de l'alimentation électrique allume le projecteur.
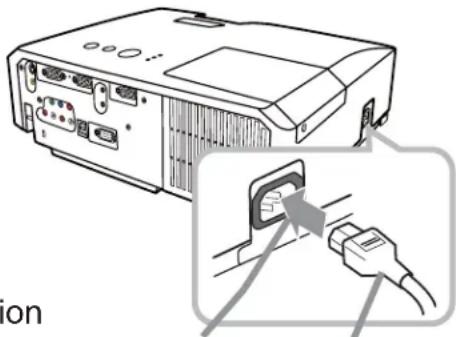
Cordon d'alimentation CA
⚠ AVERTISSEMENT ▶ Veuillez faire preuve d'une prudence particulière lors du branchement du cordon d'alimentation, car des connexions incorrectes ou défectueuses peuvent entraîner un incendie et/ou une décharge électrique.
- Utilisez uniquement le cordon d'alimentation fourni avec le projecteur. S'il est endommagé, consultez votre revendeur pour en obtenir un nouveau.
- Branchez le cordon d'alimentation uniquement sur une prise dont la tension correspond à celle du cordon. La prise doit être proche du projecteur et facilement accessible. Retirez le cordon d'alimentation pour une séparation complète.
- Ne modifiez jamais le cordon d'alimentation.
Utilisation de la barre et de la fente de sécurité
Une chaîne ou un câble antivol commercial d'un diamètre maximal de 10 mm peut être fixé à la barre de sécurité du projecteur.
Ce produit dispose également d'une fente de sécurité pour le verrou Kensington.
Pour plus de détails, consultez le manuel de l'outil de sécurité.
Chaîne ou câble antivol

⚠ AVERTISSEMENT ▶ N'utilisez pas la barre et la fente de sécurité pour empêcher le projecteur de tomber, car elles ne sont pas conçues à cet effet. ⚠ ATTENTION ▶ Ne placez pas de chaîne ou de câble antivol près des évents d'échappement. Ils peuvent devenir très chauds.
REMARQUE • La barre et la fente de sécurité ne constituent pas des mesures antivol complètes. Elles sont destinées à être utilisées comme mesure antivol supplémentaire.
Télécommande
Installation des piles
Veuillez insérer les piles dans la télécommande avant de l'utiliser. Si la télécommande commence à mal fonctionner, essayez de remplacer les piles. Si vous n'utilisez pas la télécommande pendant une longue période, retirez les piles de la télécommande et rangez-les dans un endroit sûr.
- Tenez la partie crochet du couvercle du compartiment à piles et retirez-le.
- Alignez et insérez les deux piles AA (HITACHI MAXELL, réf. LR6 ou R6P) en respectant les bornes plus et moins indiquées sur la télécommande.
- Replacez le couvercle du compartiment à piles dans le sens de la flèche et enclenchez-le.
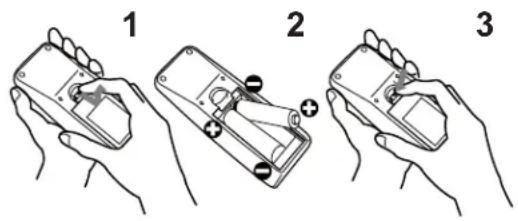
⚠ AVERTISSEMENT ▶ Manipulez toujours les piles avec précaution et utilisez-les uniquement comme indiqué. Une utilisation inappropriée peut entraîner une explosion, une fissure ou une fuite des piles, ce qui pourrait provoquer un incendie, des blessures et/ou une pollution de l'environnement.
- Utilisez uniquement les piles spécifiées. N'utilisez pas de piles de types différents en même temps. Ne mélangez pas une pile neuve avec une pile usagée.
- Assurez-vous que les bornes plus et moins sont correctement alignées lors de l'insertion des piles.
- Tenez les piles hors de portée des enfants et des animaux.
- Ne rechargez pas, ne court-circuitez pas, ne soudez pas et ne démontez pas les piles.
- Ne jetez pas les piles au feu ou dans l'eau. Conservez les piles dans un endroit sombre, frais et sec.
- Si vous observez une fuite de pile, essuyez la fuite puis remplacez la pile. Si la fuite entre en contact avec votre corps ou vos vêtements, rincez abondamment à l'eau immédiatement.
- Respectez les lois locales concernant l'élimination des piles.
À propos du signal de la télécommande
La télécommande fonctionne avec le capteur de télécommande du projecteur. Ce projecteur dispose d'un capteur de télécommande sur la face avant. Le capteur détecte le signal dans la plage suivante lorsque le capteur est actif :
60 degrés (30 degrés à gauche et à droite du capteur) dans un rayon d'environ 3 mètres.

REMARQUE • Le signal de la télécommande réfléchi par l'écran ou une autre surface peut être utilisé. S'il est difficile d'envoyer le signal directement au capteur, essayez de le faire réfléchir.
- La télécommande utilise la lumière infrarouge pour envoyer des signaux au projecteur (LED de classe 1). Assurez-vous donc d'utiliser la télécommande dans une zone sans obstacles qui pourraient bloquer le signal vers le projecteur.
- La télécommande peut ne pas fonctionner correctement si une lumière forte (comme la lumière directe du soleil) ou une lumière provenant d'une source très proche (comme une lampe fluorescente à onduleur) éclaire le capteur de télécommande du projecteur. Ajustez la position du projecteur pour éviter ces lumières.
Changement de la fréquence du signal de la télécommande
La télécommande fournie offre deux choix de fréquence de signal : Mode 1 : NORMAL et Mode 2 : HIGH. Si la télécommande ne fonctionne pas correctement, essayez de changer la fréquence du signal. Pour régler le mode, maintenez enfoncée la combinaison de deux boutons listés ci-dessous simultanément pendant environ 3 secondes.
(1) Régler sur Mode 1 : NORMAL... boutons VOLUME - et RESET (2) Régler sur Mode 2 : HIGH... boutons MAGNIFY OFF et ESC
N'oubliez pas que l'option REMOTE FREQ. dans l'élément SERVICE du menu OPTION (46) du projecteur à contrôler doit être réglée sur le même mode que la télécommande.
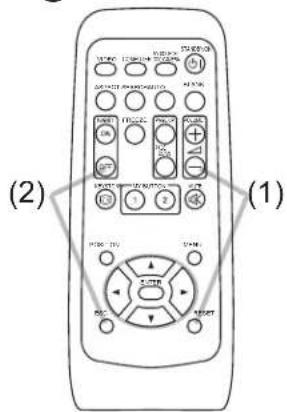
Utilisation comme souris et clavier PC simples
La télécommande fournie fonctionne comme une souris et un clavier simples du PC, lorsque le port USB (type B) du projecteur est connecté au port USB (type A) du PC via un câble de souris.
(1) Touche PAGE UP : appuyez sur le bouton PAGE UP. (2) Touche PAGE DOWN : appuyez sur le bouton PAGE DOWN. (3) Bouton gauche de la souris : appuyez sur le bouton ENTER. (4) Déplacer le pointeur : utilisez les boutons curseur ▲, ▼, ◀ et ▶. (5) Touche ESC : appuyez sur le bouton ESC. (6) Bouton droit de la souris : appuyez sur le bouton RESET.
⚠ AVERTISSEMENT ▶ Une utilisation inappropriée de la fonction souris et clavier simples pourrait endommager votre équipement. Pendant l'utilisation de cette fonction, connectez ce produit uniquement à un PC. Assurez-vous de consulter les manuels de votre PC avant de connecter ce produit au PC.
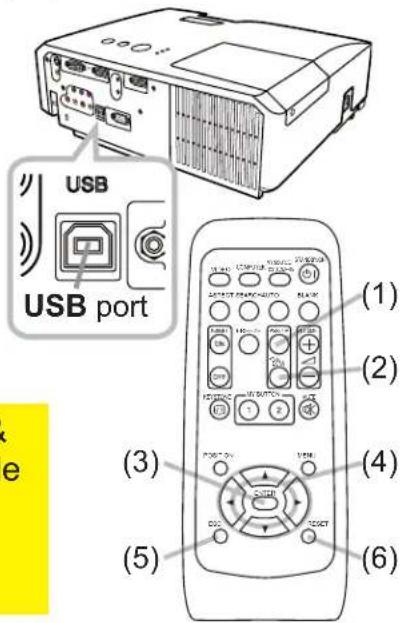
REMARQUE • Si la fonction souris et clavier simples de ce produit ne fonctionne pas correctement, vérifiez les points suivants.
- Lorsqu'un câble USB connecte ce projecteur à un PC équipé d'un dispositif de pointage intégré (par exemple une boule de commande) comme un PC portable, ouvrez le menu de configuration du BIOS, puis sélectionnez la souris externe et désactivez le dispositif de pointage intégré, car le dispositif de pointage intégré peut avoir la priorité sur cette fonction.
- Windows 95 OSR 2.1 ou version ultérieure est requis pour cette fonction. De plus, cette fonction peut ne pas fonctionner selon la configuration du PC et les pilotes de souris. Cette fonction fonctionne avec les PC capables de faire fonctionner une souris ou un clavier USB générique.
- Vous ne pouvez pas faire des choses comme appuyer sur deux boutons en même temps (par exemple, appuyer sur deux boutons simultanément pour déplacer le pointeur de la souris en diagonale).
- Cette fonction n'est activée que lorsque le projecteur fonctionne correctement. Cette fonction n'est pas disponible pendant le préchauffage de la lampe (l'indicateur POWER clignote en vert), et pendant le réglage du volume et de l'affichage, la correction trapézoïdale, le zoom sur l'écran, l'utilisation de la fonction BLANK, ou l'affichage du menu à l'écran.
Mise sous/hors tension
Mise sous tension
- Assurez-vous que le cordon d'alimentation est fermement et correctement connecté au projecteur et à la prise de courant.
- Assurez-vous que l'indicateur POWER est orange fixe (59). Retirez ensuite le cache de l'objectif.
- Appuyez sur le bouton STANDBY/ON du projecteur ou de la télécommande.
La lampe du projecteur s'allume et l'indicateur POWER
commence à clignoter en vert. Lorsque l'alimentation est
complètement allumée, l'indicateur arrête de clignoter et s'allume en vert fixe (59).

Pour afficher l'image, sélectionnez un signal d'entrée conformément à la section "Sélection d'un signal d'entrée" (15).
Mise hors tension
- Appuyez sur le bouton STANDBY/ON du projecteur ou de la télécommande. Le message "Power off?" apparaît à l'écran pendant environ 5 secondes. 2 Appuyez à nouveau sur le bouton STANDBY/ON pendant que le message est affiché.
- La lampe du projecteur s'éteint et l'indicateur POWER commence à clignoter en orange. Ensuite, l'indicateur POWER arrête de clignoter et s'allume en orange fixe lorsque le refroidissement de la lampe est terminé (59).
- Fixez le cache de l'objectif après que le témoin POWER s'allume en orange fixe.
N'allumez pas le projecteur pendant environ 10 minutes ou plus après l'avoir éteint. Le rallumer trop tôt pourrait réduire la durée de vie de certains composants consommables du projecteur.
⚠ AVERTISSEMENT ▶ Une lumière intense est émise lorsque le projecteur est allumé. Ne regardez pas dans l'objectif du projecteur et ne regardez pas à l'intérieur du projecteur par ses ouvertures.
▶ Ne touchez pas autour de la porte de la lampe et des évents d'échappement pendant ou juste après l'utilisation, car ils sont très chauds.
REMARQUE • Allumez/éteignez l'appareil dans le bon ordre. Allumez le projecteur avant les périphériques connectés.
- Ce projecteur dispose d'une fonction qui permet de l'allumer/éteindre automatiquement. Reportez-vous aux éléments DIRECT ON (42) et AUTO OFF (43) du menu OPTION.
- Utilisez l'interrupteur d'arrêt (60) uniquement lorsque le projecteur ne s'éteint pas par la procédure normale.
Fonctionnement
Réglage du volume
Bouton VOLUME +/-
- Utilisez les boutons VOLUME +/VOLUME - pour régler le volume. Une boîte de dialogue apparaîtra à l'écran pour vous aider à régler le volume. Si vous ne faites rien, la boîte de dialogue disparaîtra automatiquement après quelques secondes.

- Lorsque est sélectionné pour le port d'entrée d'image actuel, le réglage du volume est désactivé. Voir l'élément AUDIO SOURCE du menu AUDIO (36).
- Lorsque le projecteur est en mode veille, le volume peut être réglé si ✗ n'est pas sélectionné pour AUDIO OUT STANDBY et que NORMAL est sélectionné pour STANDBY MODE dans le menu SETUP (35).
Coupure temporaire du son
Bouton MUTE
1. Appuyez sur le bouton MUTE de la télécommande.
Une boîte de dialogue apparaîtra à l'écran pour indiquer que le son a été coupé.
Pour rétablir le son, appuyez sur le bouton MUTE, VOLUME + ou VOLUME -. Même si vous ne faites rien, la boîte de dialogue disparaîtra automatiquement après quelques secondes.

- Lorsque ✗ est sélectionné pour le port d'entrée d'image actuel, le son est toujours coupé. Veuillez consulter la rubrique AUDIO SOURCE du menu AUDIO (36).
- Le sous-titrage codé (C.C.) est automatiquement activé lorsque le son est coupé et qu'un signal d'entrée contenant des sous-titres codés est reçu. Cette fonction n'est disponible que lorsque le signal est NTSC pour VIDEO ou S-VIDEO, ou 480i@60 pour COMPONENT, COMPUTER IN1 ou COMPUTER IN2, et lorsque AUTO est sélectionné pour DISPLAY dans le menu C.C. sous le menu SCREEN (41).
Sélection d'un signal d'entrée
1. Appuyez sur le bouton INPUT du projecteur.
Chaque fois que vous appuyez sur ce bouton, le projecteur commute son port d'entrée depuis le port actuel comme ci-dessous.
→ COMPUTER IN 1 → COMPUTER IN 2 VIDEO ← S-VIDEO ← COMPONENT (Y, Cb/Pb, Cr/Pr)
- Lorsque ON est sélectionné pour l'élément AUTO SEARCH du menu OPTION (42), le projecteur vérifie les ports dans l'ordre ci-dessus de manière répétée jusqu'à ce qu'un signal d'entrée soit détecté.

(suite à la page suivante)
Sélection d'un signal d'entrée (suite)
- Appuyez sur le bouton COMPUTER de la télécommande. Chaque fois que vous appuyez sur ce bouton, le projecteur commute son port d'entrée depuis le port actuel comme ci-dessous.
![graph LR A["→ COMPUTER IN 1 → COMPUTER IN 2"] --> B[" "]](/content/2026/06/1245137/images/640da945992ba18a4093de91fb913833b9261997a79a16cf5cb1bd419b48b08d.jpg)
- Lorsque ON est sélectionné pour l'élément AUTO SEARCH du menu OPTION, le projecteur vérifie chaque port séquentiellement jusqu'à ce qu'un signal d'entrée soit détecté (42). Si le bouton COMPUTER est enfoncé alors que le port VIDEO, S-VIDEO ou COMPONENT est sélectionné, le projecteur vérifiera d'abord le port COMPUTER IN1.
- Appuyez sur le bouton VIDEO de la télécommande. Chaque fois que vous appuyez sur ce bouton, le projecteur commute son port d'entrée depuis le port actuel comme ci-dessous.
COMPOSANT (Y, Cb/Pb, Cr/Pr) → S-VIDEO → VIDEO
- Lorsque l'option AUTO SEARCH est réglée sur ON dans le menu OPTION, le projecteur vérifiera chaque port séquentiellement jusqu'à ce qu'un signal d'entrée soit détecté (42). Si le bouton VIDEO est pressé alors que le port COMPUTER IN1 ou COMPUTER IN2 est sélectionné, le projecteur vérifiera d'abord le port COMPONENT.
- Appuyez sur le bouton MY SOURCE / DOC. CAMERA de la télécommande. Le signal d'entrée changera vers le signal que vous avez défini comme MY SOURCE (44).
- Cette fonction peut également être utilisée pour une caméra document. Sélectionnez le port d'entrée auquel la caméra document est connectée.
Bouton COMPUTER
Bouton VIDEO
Bouton MY SOURCE / DOC. CAMERA
Recherche d'un signal d'entrée
1 Appuyez sur le bouton SEARCH de la télécommande.
Le projecteur commencera à vérifier ses ports d'entrée dans l'ordre ci-dessous pour trouver un signal d'entrée.
Lorsqu'une entrée est trouvée, le projecteur arrête la recherche et affiche l'image. Si aucun signal n'est trouvé, le projecteur revient à l'état sélectionné avant l'opération.
![graph LR A["→ COMPUTER IN 1 → COMPUTER IN 2"] --> B["VIDEO ← S-VIDEO ← COMPONENT (Y, Cb/Pb, Cr/Pr) ←"]](/content/2026/06/1245137/images/1d76e433d34f8d443fc35ae0198ed6c26446c948989ef25d66ab93886aa02138.jpg)
Bouton SEARCH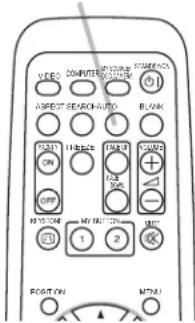
- Lorsque l'option AUTO SEARCH est réglée sur ON dans le menu OPTION (42), le projecteur continuera de vérifier les ports dans l'ordre ci-dessus de manière répétée jusqu'à ce qu'un signal d'entrée soit détecté.
Sélection d'un format d'image
1 Appuyez sur le bouton ASPECT de la télécommande.
Chaque fois que vous appuyez sur le bouton, le projecteur change de mode pour le format d'image.
○ Pour un signal d'ordinateur

○ Pour un signal vidéo, un signal S-vidéo ou un signal vidéo composant

Bouton ASPECT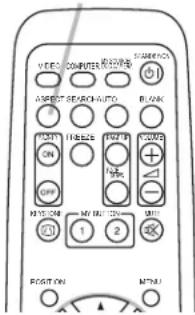
○ Pour aucun signal
4:3 (fixe)
- Le bouton ASPECT ne fonctionne pas lorsqu'aucun signal approprié n'est entré.
- Le mode NORMAL conserve le réglage du format d'image d'origine.
Réglage du pied élévateur du projecteur
Lorsque l'endroit où placer le projecteur est légèrement inégal à gauche ou à droite, utilisez les pieds élévateurs pour placer le projecteur horizontalement.
L'utilisation des pieds peut également incliner le projecteur afin de projeter à un angle approprié vers l'écran, en élevant le côté avant du projecteur dans une limite de 14 degrés.

Ce projecteur dispose de 2 pieds élévateurs et de 2 boutons élévateurs. Un pied élévateur est réglable en appuyant sur le bouton élévateur du même côté.
- En tenant le projecteur, appuyez sur les boutons élévateurs pour desserrer les pieds élévateurs.
- Positionnez le côté avant du projecteur à la hauteur souhaitée.
- Relâchez les boutons élévateurs pour verrouiller les pieds élévateurs.
- Après vous être assuré que les pieds élévateurs sont verrouillés, posez doucement le projecteur.
- Si nécessaire, les pieds élévateurs peuvent être tournés manuellement pour effectuer des réglages plus précis. Tenez le projecteur lorsque vous tournez les pieds.
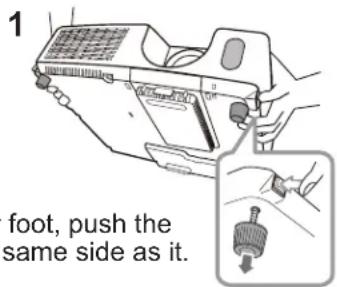
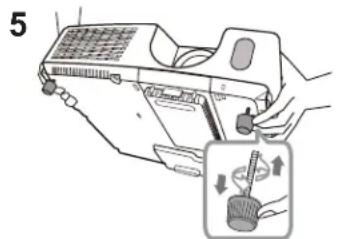
Pour un réglage fin, tournez le pied. Pour desserrer un pied élévateur, appuyez sur le bouton élévateur du même côté que celui-ci.
⚠ ATTENTION ▶ Ne manipulez pas les boutons élévateurs sans tenir le projecteur, car le projecteur pourrait tomber.
▶ N'inclinez pas le projecteur au-delà de 14 degrés vers l'avant en utilisant les pieds réglables. Une inclinaison dépassant cette limite pourrait provoquer un dysfonctionnement ou réduire la durée de vie des consommables ou du projecteur lui-même.
Réglage du zoom et de la mise au point
- Utilisez la bague de zoom pour ajuster la taille de l'écran.
- Utilisez la bague de mise au point pour régler la netteté de l'image.

Utilisation de la fonction de réglage automatique
1 Appuyez sur le bouton AUTO de la télécommande.
- Appuyer sur ce bouton effectue les opérations suivantes.
○ Pour un signal d'ordinateur
La position verticale, la position horizontale et la phase horizontale seront automatiquement ajustées. Assurez-vous que la fenêtre de l'application est réglée à sa taille maximale avant d'utiliser cette fonction. Une image sombre peut encore être mal ajustée. Utilisez une image claire lors du réglage.
Bouton AUTO
○ Pour un signal vidéo et un signal S-vidéo
Le format vidéo le mieux adapté au signal d'entrée respectif sera sélectionné automatiquement. Cette fonction n'est disponible que lorsque AUTO est sélectionné pour l'élément FORMAT VIDÉO dans le menu ENTRÉE (☐32). La position verticale et la position horizontale seront automatiquement définies par défaut.
○ Pour un signal vidéo composant
La position verticale, la position horizontale et la phase horizontale seront automatiquement définies par défaut.
- L'opération de réglage automatique prend environ 10 secondes. Veuillez également noter qu'elle peut ne pas fonctionner correctement avec certains signaux d'entrée.
- Lorsque cette fonction est exécutée pour un signal vidéo, un élément supplémentaire tel qu'une ligne peut apparaître à l'extérieur de l'image.
- Lorsque cette fonction est exécutée pour un signal informatique, un cadre noir peut être affiché sur le bord de l'écran, selon le modèle de PC.
- Les éléments réglés par cette fonction peuvent varier lorsque FIN ou DÉSACTIVÉ est sélectionné pour l'élément RÉGLAGE AUTO de l'élément SERVICE dans le menu OPTION (45).
Réglage de la position
- Appuyez sur le bouton POSITION de la télécommande lorsqu'aucun menu n'est affiché.
L'indication "POSITION" apparaîtra à l'écran.
- Utilisez les boutons curseur ▲/▼/◄/► pour régler la position de l'image. Pour réinitialiser l'opération, appuyez sur le bouton RESET de la télécommande pendant l'opération.
Pour terminer cette opération, appuyez à nouveau sur le bouton POSITION. Même si vous ne faites rien, la boîte de dialogue disparaîtra automatiquement après quelques secondes.
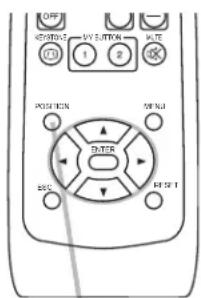
Bouton POSITION
- Lorsque cette fonction est exécutée sur un signal vidéo, un signal vidéo S ou un signal vidéo composant, une image telle qu'une ligne supplémentaire peut apparaître à l'extérieur de l'image.
- Lorsque cette fonction est exécutée sur un signal vidéo, un signal vidéo S ou un signal vidéo composant, la plage de ce réglage dépend du réglage SURBALAYAGE dans le menu IMAGE (29). Il n'est pas possible de régler lorsque SURBALAYAGE est réglé sur 10.
Si le bouton POSITION est enfoncé alors qu'un menu est affiché à l'écran, l'image affichée ne change pas de position mais le menu se déplace.
Correction des distorsions trapézoïdales
- Appuyez sur le bouton KEYSTONE de la télécommande. Une boîte de dialogue apparaîtra à l'écran pour vous aider à corriger la distorsion.
- Utilisez les curseurs ▲/▼ pour sélectionner le mode AUTO ou MANUEL, puis appuyez sur le bouton ▶ pour effectuer l'opération suivante.
(1) AUTO exécute la correction automatique du trapèze vertical. (2) MANUEL affiche une boîte de dialogue pour la correction du trapèze. Utilisez les boutons ◀/▶ pour l'ajustement.
Pour fermer la boîte de dialogue et terminer cette opération, appuyez à nouveau sur le bouton KEYSTONE. Même si vous ne faites rien, la boîte de dialogue disparaîtra automatiquement après quelques secondes.
Bouton KEYSTONE

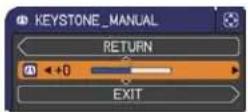
- La plage de réglage de cette fonction varie selon les entrées. Pour certaines entrées, cette fonction peut ne pas fonctionner correctement.
- Lorsque V:INVERT ou H&V:INVERT est sélectionné pour l'élément MIROIR dans le menu CONFIGURATION, si l'écran du projecteur est incliné ou incliné vers le bas, la correction automatique du trapèze vertical peut ne pas fonctionner correctement.
- Lorsque le réglage du zoom est réglé sur TELE (téléobjectif), cette fonction peut être excessive. Cette fonction doit être utilisée lorsque le réglage du zoom est réglé sur grand angle (WIDE) autant que possible.
- Lorsque le projecteur est placé à niveau (environ ±3°), la correction automatique de la distorsion trapézoïdale peut ne pas fonctionner.
- Lorsque le projecteur est incliné à près de ±30 degrés ou plus, cette fonction peut ne pas fonctionner correctement.
- Cette fonction sera indisponible lorsque le détecteur de transition est activé (50).
Utilisation de la fonction Zoom
1 Appuyez sur le bouton ON de MAGNIFY de la télécommande.
L'indication « MAGNIFY » apparaîtra à l'écran et le projecteur passera en mode MAGNIFY. Lorsque le bouton ON de MAGNIFY est enfoncé pour la première fois après le démarrage du projecteur, l'image sera agrandie deux fois. L'indication disparaîtra après quelques secondes si aucune opération n'est effectuée.
2 Utilisez les boutons curseur ▲/▼ pour régler le niveau de zoom.
- Pour déplacer la zone de zoom, appuyez sur le bouton POSITION en mode
MAGNIFY, puis utilisez les boutons curseur ▲/▼/◄/► pour déplacer la zone. Pour finaliser la zone de zoom, appuyez à nouveau sur le bouton POSITION.
Pour quitter le mode MAGNIFY et restaurer l'écran normal, appuyez sur le bouton OFF de MAGNIFY de la télécommande.
Bouton MAGNIFY ON/OFF
- Le projecteur quitte automatiquement le mode MAGNIFY lorsque le signal d'entrée est modifié ou lorsque les conditions d'affichage changent.
- En mode MAGNIFY, la distorsion trapézoïdale peut varier ; elle sera restaurée lorsque le projecteur quittera le mode MAGNIFY.
REMARQUE • Le niveau de zoom peut être réglé finement. Observez attentivement l'écran pour trouver le niveau souhaité.
Gel temporaire de l'image
1 Appuyez sur le bouton FREEZE de la télécommande.
L'indication « FREEZE » apparaîtra à l'écran (cependant, l'indication n'apparaîtra pas si OFF est sélectionné pour l'élément MESSAGE dans le menu SCREEN (39)), et le projecteur passera en mode FREEZE, où l'image est figée.
Pour quitter le mode FREEZE et restaurer l'écran normal, appuyez à nouveau sur le bouton FREEZE.
Bouton FREEZE
- Le projecteur quitte automatiquement le mode FREEZE lorsque certaines touches de commande sont enfoncées.
- Si le projecteur continue de projeter une image fixe pendant une longue période, la dalle LCD risque de subir une brûlure d'écran. Ne laissez pas le projecteur en mode FREEZE trop longtemps.
- Les images peuvent sembler dégradées lorsque cette fonction est utilisée, mais il ne s'agit pas d'un dysfonctionnement.
Masquage temporaire de l'écran
1 Appuyez sur la touche BLANK de la télécommande.
L'écran BLANK s'affiche à la place de l'écran du signal d'entrée. Reportez-vous à l'élément BLANK du menu SCREEN (37).
Pour quitter l'écran BLANK et revenir à l'écran du signal d'entrée, appuyez à nouveau sur la touche BLANK.
- Le projecteur quitte automatiquement le mode BLANK lorsque certaines touches de commande sont enfoncées.
Bouton BLANK
⚠️ ATTENTION ▶ Si vous souhaitez obtenir un écran vide alors que la lampe du projecteur est allumée, utilisez l'une des méthodes ci-dessous.
- Utilisez le cache-objectif fourni.
- Utilisez la fonction BLANK ci-dessus.
Toute autre action peut endommager le projecteur.
REMARQUE • Le son n'est pas lié à la fonction d'écran BLANK. Si nécessaire, réglez le volume ou coupez le son d'abord. Pour afficher l'écran BLANK et couper le son en même temps, utilisez la fonction AV MUTE (44).
Utilisation de la fonction menu
Ce projecteur dispose des menus suivants :
PICTURE, IMAGE, INPUT, SETUP, AUDIO, SCREEN, OPTION, SECURITY et EASY MENU.
Le menu EASY MENU regroupe les fonctions les plus utilisées, tandis que les autres menus sont classés par fonction et regroupés dans le menu ADVANCED MENU.
Chacun de ces menus s'utilise de la même manière. Lorsque le projecteur affiche un menu, la touche MENU du projecteur fonctionne comme les touches curseur. Les opérations de base de ces menus sont les suivantes.


- Pour ouvrir le menu, appuyez sur la touche MENU. Le dernier menu utilisé (EASY ou ADVANCED) s'affiche. Le menu EASY MENU s'affiche en priorité juste après la mise sous tension.
2 Dans le menu EASY MENU
(1) Utilisez les touches curseur ▲/▼ pour sélectionner un élément à régler. Si vous souhaitez passer au menu ADVANCED MENU, sélectionnez ADVANCED MENU. (2) Utilisez les touches curseur ◀/▶ pour régler l'élément.
Dans le menu ADVANCED MENU
(1) Utilisez les touches curseur ▲/▼ pour sélectionner un menu. Si vous souhaitez passer au menu EASY MENU, sélectionnez EASY MENU.
Les éléments du menu apparaissent sur le côté droit.
(2) Appuyez sur la touche curseur ▶ ou sur la touche ENTER pour déplacer le curseur vers le côté droit. Utilisez ensuite les touches


▲/▼ pour sélectionner un élément à régler, puis appuyez sur la touche curseur ▶ ou sur la touche ENTER pour continuer. Le menu de réglage ou la boîte de dialogue de l'élément sélectionné s'affiche.
(3) Utilisez les touches comme indiqué à l'écran (OSD) pour régler l'élément.
(suite à la page suivante)
Utilisation de la fonction menu (suite)
- Pour fermer le MENU, appuyez à nouveau sur la touche MENU ou sélectionnez EXIT puis appuyez sur la touche curseur ▶ ou sur la touche ENTER. Même si vous ne faites rien, la boîte de dialogue disparaîtra automatiquement après environ 30 secondes.
- Si vous souhaitez déplacer la position du menu, utilisez les touches curseur après avoir appuyé sur la touche POSITION.
- Certaines fonctions ne peuvent pas être exécutées lorsqu'un certain port d'entrée est sélectionné, ou lorsqu'un certain signal d'entrée est affiché.
- Lorsque vous souhaitez réinitialiser l'opération, appuyez sur la touche RESET de la télécommande pendant l'opération. Notez que certains éléments (par exemple LANGUE, VOLUME) ne peuvent pas être réinitialisés.
- Dans le MENU AVANCÉ, lorsque vous souhaitez revenir à l'affichage précédent, appuyez sur la touche curseur ◀ ou sur la touche ESC de la télécommande.
Indication dans l'OSD (affichage à l'écran)

La signification des mots généraux sur l'OSD est la suivante.
| Indication Meaning | |
| EXIT | Selecting this word finishes the OSD menu. It's the same as pressing the MENU button. |
| RETURN Selecting this word returns the menu to the previous menu. | |
| CANCEL or NO | Selecting this word cancels the operation in the present menu and returns to the previous menu. |
| OK or YES | Selecting this word executes the prepared function or shifts the menu to the next menu. |
MENU FACILE
À partir du MENU FACILE, les éléments indiqués dans le tableau ci-dessous peuvent être exécutés.
Sélectionnez un élément à l'aide des touches curseur ▲/▼. Puis exécutez-le conformément au tableau suivant.

| Item Description | |||
| ASPECT | Using the ◀/► buttons switches the mode for aspect ratio. See the ASPECT item in IMAGE menu (29). | ||
| AUTO KEYSTONE(EXECUTE) | Using the ► button executes the auto keystone function. See the AUTO KEYSTONE (EXECUTE) item in SETUP menu (34). | ||
| KEYSTONE | Using the ◀/► buttons corrects the vertical keystone distortion. See the KEYSTONE item in SETUP menu (34). | ||
| PICTURE MODE | Using the ◀/► buttons switches the picture mode. The picture modes are combinations of GAMMA and COLOR TEMP settings. Choose a suitable mode according to the projected source. | ||
| GAMMA COLOR TEMP | |||
| NORMAL 1 DEFAULT | 2 MID | ||
| CINEMA 2 DEFAULT | 3 LOW | ||
| DYNAMIC 3 DEFAULT | 1 HIGH | ||
| BOARD(BLACK) 4 DEFAULT | 4 Hi-BRIGHT-1 | ||
| BOARD(GREEN) 4 DEFAULT | 5 Hi-BRIGHT-2 | ||
| WHITEBOARD 5 DEFAULT | 2 MID | ||
| DAYTIME 6 DEFAULT | 6 Hi-BRIGHT-3 | ||
| When the combination of GAMMA and COLOR TEMP differs from pre-assigned modes above, the display on the menu for the PICTURE MODE is “CUSTOM”. Please refer to the GAMMA and COLOR TEMP (26, 27) items in PICTURE menu.Lines or other noise might appear on the screen when this function is operated, but it is not a malfunction. | |||
(suite à la page suivante)
| Item Description | |
| ECO MODE | Using the ◀/► buttons turns off/on the eco mode.See the ECO MODE item in SETUP menu (34). |
| MIRROR | Using the ◀/► buttons switches the mode for mirror status.See the MIRROR item in SETUP menu (35). |
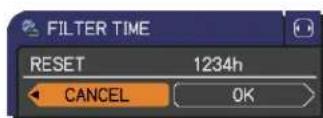
| RESET | Performing this item resets all of the EASY MENU items except the FILTER TIME and LANGUAGE.A dialog is displayed for confirmation. Selecting the OK using the ►button performs resetting. |
| FILTER TIME | The usage time of the air filter is shown in the menu.Performing this item resets the filter time which counts usage time of the air filter.A dialog is displayed for confirmation. Selecting the OK using the ►button performs resetting.See the FILTER TIME item in OPTION menu (43). |
| LANGUAGE | Using the ◀/► buttons changes the display language.See the LANGUAGE item in SCREEN menu (37). |
| ADVANCED MENU | Press the ► or ENTER button to use the menu of PICTURE, IMAGE, INPUT, SETUP, AUDIO, SCREEN, OPTION or SECURITY. |
| EXIT Press the | ◄ or ENTER button to finish the OSD menu. |
Menu IMAGE
À partir du menu IMAGE, les éléments indiqués dans le tableau ci-dessous peuvent être exécutés.
Sélectionnez un élément à l'aide des boutons curseur ▲/▼, puis appuyez sur le bouton curseur ▶ ou sur le bouton ENTER pour exécuter l'élément. Ensuite, procédez selon le tableau suivant.
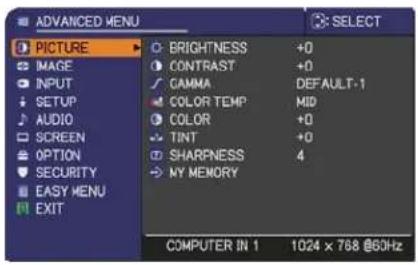
| Item Description | |
| BRIGHTNESS | Using the ◀/► buttons adjusts the brightness. Dark ⇔ Light |
| CONTRAST | Using the ◀/► buttons adjusts the contrast. Weak ⇔ Strong |
| GAMMA | Using the ▲/▼ buttons switches the gamma mode. 1 DEFAULT ⇔ 1 CUSTOM ⇔ 2 DEFAULT ⇔ 2 CUSTOM ⇔ 3 DEFAULT6 CUSTOM 3 CUSTOM6 DEFAULT ⇔ 5 CUSTOM ⇔ 5 DEFAULT ⇔ 4 CUSTOM ⇔ 4 DEFAULTTo adjust CUSTOMSelecting a mode whose name includes CUSTOM and then pressing the ► button or the ENTER button displays a dialog to aid you in adjusting the mode.This function is useful when you want to change the brightness of particular tones.Choose an item using the ◀/► buttons, and adjust the level using the ▲/▼ buttons.You can display a test pattern for checking the effect of your adjustment by pressing the ENTER button.Each time you press the ENTER button, the pattern changes as below.No pattern ⇒ Gray scale of 9 steps  Ramp ⇔ Gray scale of 15 stepsThe eight equalizing bars correspond to eight tone levels of the test pattern (Gray scale of 9 steps) except the darkest in the left end. If you want to adjust the 2nd tone from left end on the test pattern, use the equalizing adjustment bar “1”. The darkest tone at the left end of the test pattern cannot be controlled with any of equalizing adjustment bar.• Lines or other noise might appear on the screen when this function is operated, but it is not a malfunction. Ramp ⇔ Gray scale of 15 stepsThe eight equalizing bars correspond to eight tone levels of the test pattern (Gray scale of 9 steps) except the darkest in the left end. If you want to adjust the 2nd tone from left end on the test pattern, use the equalizing adjustment bar “1”. The darkest tone at the left end of the test pattern cannot be controlled with any of equalizing adjustment bar.• Lines or other noise might appear on the screen when this function is operated, but it is not a malfunction.  |
(suite à la page suivante)
| Item Description | |
| COLOR TEMP | Using the ▲/▼ buttons switches the color temperature mode.1 HIGH ⇔ 1 CUSTOM ⇔ 2 MID ⇔ 2 CUSTOM6 CUSTOM 3 LOW6 Hi-BRIGHT-3 3 CUSTOM5 CUSTOM ⇔ 5 Hi-BRIGHT-2 ⇔ 4 CUSTOM ⇔ 4 Hi-BRIGHT-1To adjust CUSTOMSelecting a mode whose name includes CUSTOM and then pressing the ▶ button or the ENTER button displays a dialog to aid you in adjusting the OFFSET and GAIN of the selected mode.OFFSET adjustments change the color intensity on the whole tones of the test pattern.GAIN adjustments mainly affect color intensity on the brighter tones of the test pattern.Choose an item using the ◀/▶ buttons, and adjust the level using the ▲/▼ buttons.You can display a test pattern for checking the effect of your adjustment by pressing the ENTER button.Each time you press the ENTER button, the pattern changes as below.No pattern ⇒ Gray scale of 9 steps →Ramp ⇔ Gray scale of 15 steps• Lines or other noise might appear on the screen when this function is operated, but it is not a malfunction.  |
| COLOR | Using the ◀/▶ buttons adjusts the strength of whole color.Weak ⇔ Strong• This item can be selected only for a video, s-video and component video signal. |
| TINT | Using the ◀/▶ buttons adjusts the tint.Reddish ⇔ Greenish• This item can be selected only for a video, s-video and component video signal. |
| SHARPNESS | Using the ◀/▶ buttons adjusts the sharpness.Weak ⇔ Strong• There may be some noise and/or the screen may flicker for a moment when an adjustment is made. This is not a malfunction. |
| Item Description | ||
| ACTIVE IRIS | Using the ▲/▼ cursor buttons changes the active iris control mode.PRESENTATION ⇔ THEATER ⇔ OFFPRESENTATION: The active iris displays the best presentation image for both bright and dark scenes.THEATER: The active iris displays the best theater image for both bright and dark scenes.OFF: The active iris is always open.• The screen may flicker when the PRESENTATION or THEATER modes are selected. If this occurs select OFF. |  |
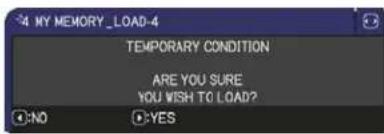
| MY MEMORY | This projector has 4 memories for adjustment data (for all the items of the PICTURE menu).Selecting a function using the ▲/▼ buttons and pressing the ▶ or ENTER button performs each function.SAVE-1 ⇔ SAVE-2 ⇔ SAVE-3 ⇔ SAVE-4LOAD-4 ⇔ LOAD-3 ⇔ LOAD-2 ⇔ LOAD-1SAVE-1, SAVE-2, SAVE-3, SAVE-4Performing a SAVE function saves the current adjustment data into the memory linked in the number included in the function's name.Remember that the current data being stored of a memory will be lost by saving new data into the memory.LOAD-1, LOAD-2, LOAD-3, LOAD-4Performing a LOAD function loads the data from the memory linked in the number included in the function's name, and adjusts the picture automatically depending on the data.The LOAD functions whose linked memory has no data are skipped.Remember that the current adjusted condition will be lost by loading data. If you want to keep the current adjustment, please save it before performing a LOAD function.There may be some noise and the screen may flicker for a moment when loading data. This is not malfunction.You can perform the LOAD function using MY BUTTONs. Please see MY BUTTON item in OPTION menu (44). | |
Menu IMAGE
À partir du menu IMAGE, les éléments indiqués dans le tableau ci-dessous peuvent être exécutés.
Sélectionnez un élément à l'aide des boutons curseur ▲/▼, puis appuyez sur le bouton curseur ▶ ou sur le bouton ENTER pour exécuter l'élément. Ensuite, procédez selon le tableau suivant.
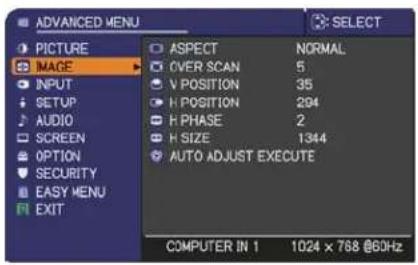
| Item Description | |
| ASPECT | Using the ▲/▼ buttons switches the mode for aspect ratio.For a computer signalNORMAL ⇔ 4:3 ⇔ 16:9 ⇔ 16:10For a video signal, s-video signal or component video signal4:3 ⇔ 16:9 ⇔ 14:9For no signal4:3 (fixed)The NORMAL mode keeps the original aspect ratio of the signal. |
| OVER SCAN | Using the ◀/► buttons adjusts the over-scan ratio.Small (It magnifies picture) ⇔ Large (It reduces picture)This item can be selected only for a video, s-video and component video signal.When this adjustment is too large, certain degradation may appear at the frame area of the picture. In such a case, please adjust small. |
| V POSITION | Using the ◀/► buttons adjusts the vertical position.Down ⇔ UpOver-adjusting the vertical position may cause noise to appear on the screen. If this occurs, please reset the vertical position to the default setting. Pressing the RESET button when the V POSITION is selected will reset the V POSITION to the default setting.When this function is performed on a video signal, s-video signal, or component video signal, the range of this adjustment depends on OVER SCAN (above) setting. It is not possible to adjust when OVER SCAN is set to 10. |
| H POSITION | Using the ◀/► buttons adjusts the horizontal position.Left ⇔ RightOver-adjusting the horizontal position may cause noise to appear on the screen. If this occurs, please reset the horizontal position to the default setting. Pressing the RESET button when the H POSITION is selected will reset the H POSITION to the default setting.When this function is performed on a video signal, s-video signal, or component video signal, the range of this adjustment depends on OVER SCAN (above) setting. It is not possible to adjust when OVER SCAN is set to 10. |
| Item Description | |
| H PHASE | Using the ◀/► buttons adjusts the horizontal phase to eliminate flicker.Right ⇔ LeftThis item can be selected only for a computer signal or a component video signal. |
| H SIZE | Using the ◀/► buttons adjusts the horizontal size.Small ⇔ LargeThis item can be selected only for a computer signal.When this adjustment is excessive, the picture may not be displayed correctly. In such a case, please reset the adjustment by pressing the RESET button on the remote control during this operation.Images might appear degraded when this function is operated, but it is not a malfunction. |
| AUTO ADJUST EXECUTE | Selecting this item performs the automatic adjustment feature.For a computer signalThe vertical position, the horizontal position and the horizontal phase will be automatically adjusted.Make sure that the application window is set to its maximum size prior to attempting to use this feature. A dark picture may still be incorrectly adjusted. Use a bright picture when adjusting.For a video signal and s-video signalThe video format best suited for the respective input signal will be selected automatically. This function is available only when the AUTO is selected for the VIDEO FORMAT item in the INPUT menu (32). The vertical position and horizontal position will be automatically set to the default.For a component video signalThe vertical position, horizontal position and horizontal phase will be automatically set to the default.The automatic adjustment operation requires approx. 10 seconds. Also please note that it may not function correctly with some input.When this function is performed for a video signal, a certain extra such as a line may appear outside a picture.When this function is performed for a computer signal, a black frame may be displayed on the edge of the screen, depending on the PC model.The items adjusted by this function may vary when the FINE or DISABLE is selected for the AUTO ADJUST item of the SERVICE item in the OPTION menu (45). |
Menu ENTRÉE
À partir du menu ENTRÉE, les éléments indiqués dans le tableau ci-dessous peuvent être exécutés.
Sélectionnez un élément à l'aide des boutons curseur ▲/▼, puis appuyez sur le bouton curseur ▶ ou sur le bouton ENTER pour exécuter l'élément. Ensuite, procédez selon le tableau suivant.
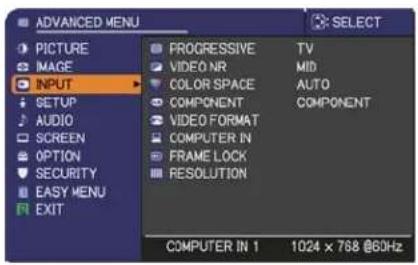
| Item Description | |
| PROGRESSIVE | Using the ▲/▼ buttons switches the progress mode.TV ⇔ FILM ⇔ OFFThis function is performed only for a video signal, s-video signal or component video signal of 480i@60 or 576i@50.When TV or FILM is selected, the screen image will be sharp. FILM adapts to the 2-3 Pull-Down conversion system. But these may cause a certain defect (for example, jagged line) of the picture for a quick moving object. In such a case, please select OFF, even though the screen image may lose sharpness. |
| VIDEO NR | Using the ▲/▼ buttons switches the noise reduction mode.HIGH ⇔ MID ⇔ LOWThis function is performed only for a video signal, s-video signal or component video signal of 480i@60 or 576i@50.When this function is excessive, it may cause a certain degradation of the picture. |
| COLOR SPACE | Using the ▲/▼ buttons switches the mode for color space.AUTO ⇔ RGB ⇔ SMPTE240 ⇔ REC709 ⇔ REC601This item can be selected only for a computer signal or a component video signal (except SCART RGB).The AUTO mode automatically selects the optimum mode.The AUTO operation may not work well at some signals. In such a case, it might be good to select a suitable mode except AUTO. |
| COMPONENT | Using the ▲/▼ buttons switches the function of the COMPONENT(Y, Cb/Pb, Cr/Pr) port.COMPONENT ⇔ SCART RGBWhen the SCART RGB is selected, the COMPONENT (Y, Cb/Pb, Cr/Pr) and VIDEO ports will function as a SCART RGB port.A SCART adapter or SCART cable is required for a SCART RGB input to the projector. For details, contact your dealer. |
| Item Description | |
| VIDEO FORMAT | The video format for S-VIDEO port and VIDEO port can be set.(1) Use the ▲/▼ buttons to select the input port.S-VIDEO ⇔ VIDEO(2) Using the ◀/► button switches the mode for video format.AUTO ⇔ NTSC ⇔ PAL ⇔ SECAMN-PAL ⇔ M-PAL ⇔ NTSC4.43 ↗This item is performed only for a video signal from theVIDEO port or theS-VIDEO port.The AUTO mode automatically selects the optimum mode.The AUTO operation may not work well for some signals. If the picture becomes unstable (e.g. an irregular picture, lack of color), please select the mode according to the input signal. |
| COMPUTER IN | The computer input signal type for COMPUTER IN1 and IN2 ports can be set.(1) Use the ▲/▼ buttons to select the COMPUTER IN port to be set.COMPUTER IN1 ⇔ COMPUTER IN2(2) Use the ◀/► buttons to select the computer input signal type.AUTO ⇔ SYNC ON G OFFSelecting the AUTO mode allows you to input a sync on G signal or component video signal from the port. Please refer to “Operator's Guide TECHNICAL” for the connection of component video input toCOMPUTER IN1/2 port.In the AUTO mode, the picture may be distorted with certain input signals. In such a case, remove the signal connector so that no signal is received and select the SYNC ON G OFF, and then reconnect the signal. |
| FRAME LOCK | Set the frame lock function on/off for each port.(1) Use the ▲/▼ buttons to select the input ports.COMPUTER IN1 ⇔ COMPUTER IN2(2) Use the ◀/► buttons to turn the frame lock function on/off.ON ⇔ OFFThis item can be performed only on a signal with a vertical frequency of 49Hz to 51Hz, 59 to 61 Hz.When ON is selected, moving pictures are displayed more smoothly.This function may cause a certain degradation of the picture. In such a case, please select OFF. |
(suite à la page suivante)
| Item Description | |
| RESOLUTION | The resolution for the COMPUTER IN1 and COMPUTER IN2 input signals can be set on this projector.(1) In the INPUT menu select the RESOLUTION using the ▲/▼ buttons and press the ▶ button.The RESOLUTION menu will be displayed.(2) In the RESOLUTION menu select the resolution you wish to display using the ▲/▼ buttons.Selecting AUTO will set a resolution appropriate to the input signal.(3) Pressing the ▶ or ENTER button when selecting a STANDARD resolution will automatically adjust the horizontal and vertical positions, clock phase and horizontal size.The INPUT_INFORMATION dialog will be displayed.(4) To set a custom resolution use the ▲/▼ buttons to select the CUSTOM and the RESOLUTION_CUSTOM box will be displayed.Set the horizontal (HORZ) and vertical (VERT) resolutions using the ▲/▼/◄/► buttons.This function is may not support all resolutions.(5) Move the cursor to OK on screen and press the ▶ or ENTER button. The message "ARE YOU SURE YOU WISH TO CHANGE RESOLUTION?" appears. To save the setting, press the ▶ button.The horizontal and vertical positions, clock phase and horizontal size will be automatically adjusted.After the INPUT_INFORMATION dialog has displayed for a few seconds, the screen will return to the RESOLUTION menu displaying the changed resolution.(6) To revert back to the previous resolution without saving changes, move the cursor to CANCEL on screen and press the ◀ or ENTER button.The screen will then return to the RESOLUTION menu displaying the previous resolution.• For some pictures, this function may not work well. |
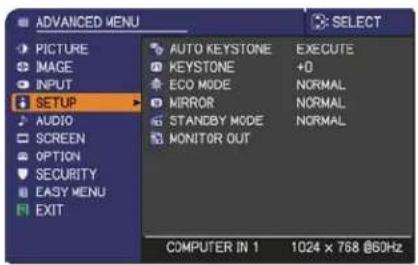
Menu RÉGLAGE
À partir du menu RÉGLAGE, les éléments indiqués dans le tableau ci-dessous peuvent être exécutés.
Sélectionnez un élément à l'aide des boutons curseur ▲/▼, puis appuyez sur le bouton curseur ▶ ou sur le bouton ENTER pour exécuter l'élément. Ensuite, procédez selon le tableau suivant.
| Item Description | |
| AUTO KEYSTONE(EXECUTE) | Selecting this item performs the Automatic keystone distortion correction. Projector automatically corrects vertical keystone distortion due to the (forward/backward) setup angle by itself. This function will be executed only once when selected in the menu. When the slant of the projector is changed, execute this function again.The adjustable range of this function will vary among inputs. For some input, this function may not work well.When V:INVERT or H&V:INVERT is selected to the MIRROR item in the SETUP menu, if the projector screen is inclined or angled downward, this function may not work correctly.When the zoom adjustment is set to the TELE (telephoto focus), this function may be excessive. This function should be used when the zoom adjustment is set to the full WIDE (wide-angle focus) whenever possible.When the projector is placed on the level (about ±3°), this function may not work.When the projector is inclined to near ±30 degree or over, this function may not work well.This function will be unavailable when the Transition Detector is on(50). |
| KEYSTONE | Using the ◀/► buttons corrects the vertical keystone distortion.Shrink the bottom of the image ⇔ Shrink the top of the imageThe adjustable range of this function will vary among inputs. For some input, this function may not work well.When the zoom adjustment is set to the TELE (telephoto focus), this function may be excessive. This function should be used when the zoom adjustment is set to the full WIDE (wide-angle focus) whenever possible.This function will be unavailable when the Transition Detector is on(50). |
| ECO MODE | Using the ▲/▼ buttons turns off/on the eco mode.NORMAL ⇔ ECOWhen the ECO is selected, acoustic noise and screen brightness are reduced. |
(suite à la page suivante)
| Item Description | |
| MIRROR | Using the▲/▼buttons switches the mode for mirror status.    NORMAL ⇔ H:INVERT ⇔ V:INVERT ⇔ H&V:INVERTIf the Transition Detector is on and MIRROR status is changed, TRANSITION DETECTOR ON alarm (50) will be displayed when projector is restarted after the AC power is turned off. NORMAL ⇔ H:INVERT ⇔ V:INVERT ⇔ H&V:INVERTIf the Transition Detector is on and MIRROR status is changed, TRANSITION DETECTOR ON alarm (50) will be displayed when projector is restarted after the AC power is turned off. |
| STANDBY MODE | Using▲/▼buttons switches the standby mode setting between NORMAL and SAVING.NORMAL ⇔ SAVINGWhen SAVING is selected, the power consumption in the standby mode is lowered with some functional restriction as below:·When SAVING is selected, the RS-232C communication control is disabled except to turn the projector on while the projector is in the standby mode.·When SAVING is selected, AUDIO OUT STANDBY setting of AUDIO SOURCE (36) is invalid, and no signal is output from AUDIO OUT ports in the standby mode. |
| MONITOR OUT | The combination of a picture shown on screen and output from the MONITOR OUT port can be arranged in the menu.The picture coming into the port selected in the (2) is output to the MONITOR OUT port while an image from the port chosen in the (1) is on screen.(1) Choose a picture input port using▲/▼buttons.COMPUTER IN1 ⇔ COMPUTER IN2STANDBYCOMPONENTVIDEO ⇔ S-VIDEO ⇔ (Y, Cb/Pb, Cr/Pr)Choose STANDBY, to select the output signal from the MONITOR OUT port in the standby mode. STANDBY settings can be selected individually for NORMAL or SAVING, which is selected in the STANDBY MODE (above).(2) Select one of theCOMPUTER INports using◄/►buttons.Choosing the COMPUTER IN1 allows the following choice.COMPUTER IN1 ⇔ OFFChoosing the COMPUTER IN2 allows the following choice.COMPUTER IN2 ⇔ OFFChoosing other input or STANDBY allows the following choice.COMPUTER IN1 ⇔ COMPUTER IN2 ⇔ OFFOFF disables theMONITOR OUTport.·Initial settings for STANDBY are the following: COMPUTER IN1 when NORMAL is selected in STANDBY MODE; and OFF when SAVING is selected in STANDBY MODE. |
Menu AUDIO
À partir du menu AUDIO, les éléments indiqués dans le tableau ci-dessous peuvent être exécutés. Sélectionnez un élément à l'aide des boutons de curseur ▲/▼, puis appuyez sur le bouton de curseur ▶ ou sur le bouton ENTER pour exécuter l'élément. Ensuite, procédez selon le tableau suivant.

| Item Description | |
| VOLUME | Using the ◀/► buttons adjusts the volume.High ⇔ Low |
| SPEAKER | Using the ▲/▼ buttons turns on/off the built-in speaker.ON ⇔ OFFWhen OFF is selected, the built-in speaker does not work. |
| AUDIO SOURCE | The combination of a picture and audio input port can be arranged in the menu.The audio coming into the port selected in the (2) is output while an image from the port chosen in the (1) is on screen.(1) Choose a picture input port using the ▲/▼ buttons.COMPUTER IN1 ⇔ COMPUTER IN2↓↓ AUDIO OUT STANDBY ↑↓COMPONENT↓↓VIDEO ⇔ S-VIDEO ⇔ (Y, Cb/Pb, Cr/Pr)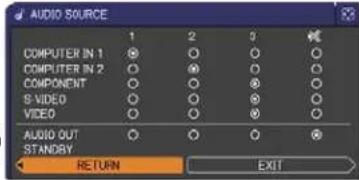 Choose AUDIO OUT STANDBY, to select the audio output to the AUDIO OUT ports in the standby mode. The built-in speaker does not work in the standby mode.While RETURN is selected, pressing the ◀ button returns to the previous menu.(2) Select one of the AUDIO IN ports using ◀/► buttonsAUDIO IN1 ⇔ AUDIO IN2 ⇔ AUDIO IN3 ⇔ ✗↑↓↓↓↓↓↓↓↓↓↓↓↓↓↓↓↓↓↓↓↓↓↓↓↓↓↓↓↓↓↓↓↓↓↓↓↓↓↓↓↓↓↓↓↓↓↓↓↓↓↓↓↓↓↓↓↓↓↓↓↓↓↓↓↓↓↓↓↓↓↓↓↓↓↓↓↓↓↓↓↓↓↓↓↓↓↓↓↓↓↓↓↓↓↓↓↓↓↓↓↓ ↓disables the audio output.C.C. (Closed Caption) is automatically activated when ×is selected and an input signal containing C.C. is received. This function is available only when the signal is NTSC for VIDEO or S-VIDEO, or 480i@60 for COMPONENT, COMPUTER IN1 or COMPUTER IN2, and when AUTO is selected for DISPLAY in the C.C. menu under the SCREEN menu (41). Choose AUDIO OUT STANDBY, to select the audio output to the AUDIO OUT ports in the standby mode. The built-in speaker does not work in the standby mode.While RETURN is selected, pressing the ◀ button returns to the previous menu.(2) Select one of the AUDIO IN ports using ◀/► buttonsAUDIO IN1 ⇔ AUDIO IN2 ⇔ AUDIO IN3 ⇔ ✗↑↓↓↓↓↓↓↓↓↓↓↓↓↓↓↓↓↓↓↓↓↓↓↓↓↓↓↓↓↓↓↓↓↓↓↓↓↓↓↓↓↓↓↓↓↓↓↓↓↓↓↓↓↓↓↓↓↓↓↓↓↓↓↓↓↓↓↓↓↓↓↓↓↓↓↓↓↓↓↓↓↓↓↓↓↓↓↓↓↓↓↓↓↓↓↓↓↓↓↓↓ ↓disables the audio output.C.C. (Closed Caption) is automatically activated when ×is selected and an input signal containing C.C. is received. This function is available only when the signal is NTSC for VIDEO or S-VIDEO, or 480i@60 for COMPONENT, COMPUTER IN1 or COMPUTER IN2, and when AUTO is selected for DISPLAY in the C.C. menu under the SCREEN menu (41). |
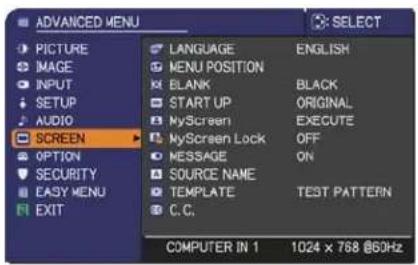
Menu SCREEN
À partir du menu SCREEN, les éléments indiqués dans le tableau ci-dessous peuvent être exécutés.
Sélectionnez un élément à l'aide des boutons de curseur ▲/▼, puis appuyez sur le bouton de curseur ▶ ou sur le bouton ENTER pour exécuter l'élément. Ensuite, procédez selon le tableau suivant.
| Item Description | |
| LANGUAGE | Using the ▲/▼/◄/► buttons switches the OSD (On Screen Display) language.ENGLISH ⇔ FRANÇAIS ⇔ DEUTSCH ⇔ ESPAÑOL↑ ...... (shown in the LANGUAGE dialog) ...... ↑Press the ENTER or INPUT button to save the language setting. |
| MENU POSITION | Using the ▲/▼/◄/► buttons adjusts the menu position.To quit the operation, press the MENU button on the remote control or keep no operation for about 10 seconds. |
| BLANK | Using the ▲/▼ buttons switches the mode for the blank screen.The blank screen is a screen for the temporarily blanking feature (21). It is displayed by pressing the BLANK button on the remote control.MyScreen ⇔ ORIGINAL ⇔ BLUE ⇔ WHITE ⇔ BLACK↑MyScreen : Screen can be registered by the MyScreen item (38).ORIGINAL : Screen preset as the standard screen.BLUE, WHITE, BLACK : Plain screens in each color.• To avoid remaining as an afterimage, the MyScreen or ORIGINAL screen will change to the plain black screen after several minutes. |
| START UP | Using the ▲/▼ buttons switches the mode for the start-up screen.The start-up screen is a screen displayed when no signal or an unsuitable signal is detected.MyScreen ⇔ ORIGINAL ⇔ OFF↑MyScreen : Screen can be registered by the MyScreen item (38).ORIGINAL : Screen preset as the standard screen.OFF : Plain black screen.• To avoid remaining as an afterimage, the MyScreen or ORIGINAL screen will change to the BLANK screen (21) after several minutes. If also the BLANK screen is the MyScreen or ORIGINAL, the plain black screen is instead used.• When the ON is selected to the MyScreen PASSWORD item in the SECURITY menu (48), the START UP is fixed to MyScreen. |
(suite à la page suivante)
| Item Description | |
| MyScreen | This item allows you to capture an image for use as a MyScreen image which can be used as the BLANK screen and START UP screen. Display the image you want to capture before executing the following procedure.Selecting this item displays a dialog titled “MyScreen”. It will ask you if  you start capturing an image from the current screen.Please wait for the target image to be displayed, and press the ENTER or INPUT button when the image is displayed. The image will freeze and the frame for capturing will appear.To stop performing, press the RESET button on the remote control.Using the ▲/▼/◄/► buttons adjusts the frame position.Please move the frame to the position of the image which you want to use. The frame may not be able to be moved for some input signals.To start registration, press the ENTER or INPUT button on the remote control.To restore the screen and return to the previous dialog, press the RESET button on the remote control.Registration takes several minutes.When the registration is completed, the registered screen and the following message is displayed for several seconds:“MyScreen registration is finished.”If the registration failed, the following message is displayed:“A capturing error has occurred. Please try again.”This function cannot be selected when the ON is selected to the MyScreen Lock item (39).This function cannot be selected when the ON is selected to the MyScreen PASSWORD item in SECURITY menu (48). you start capturing an image from the current screen.Please wait for the target image to be displayed, and press the ENTER or INPUT button when the image is displayed. The image will freeze and the frame for capturing will appear.To stop performing, press the RESET button on the remote control.Using the ▲/▼/◄/► buttons adjusts the frame position.Please move the frame to the position of the image which you want to use. The frame may not be able to be moved for some input signals.To start registration, press the ENTER or INPUT button on the remote control.To restore the screen and return to the previous dialog, press the RESET button on the remote control.Registration takes several minutes.When the registration is completed, the registered screen and the following message is displayed for several seconds:“MyScreen registration is finished.”If the registration failed, the following message is displayed:“A capturing error has occurred. Please try again.”This function cannot be selected when the ON is selected to the MyScreen Lock item (39).This function cannot be selected when the ON is selected to the MyScreen PASSWORD item in SECURITY menu (48). |
| Item Description | |
| MyScreen Lock | Using the ▲/▼ buttons turns on/off the MyScreen lock function.ON ⇔ OFFWhen the ON is selected, the item MyScreen is locked. Use this function for protecting the current MyScreen.• This function cannot be selected when the ON is selected to the MyScreen PASSWORD item in SECURITY menu (48). |
| MESSAGE | Using the ▲/▼ buttons turns on/off the message function.ON ⇔ OFFWhen the ON is selected, the following message function works."AUTO IN PROGRESS" while automatically adjusting"NO INPUT IS DETECTED""SYNC IS OUT OF RANGE""INVALID SCAN FREQ.""Searching...." while searching for the input"Detecting...." while an input signal is detectedThe indication of the input signal displayed by changingThe indication of the aspect ratio displayed by changingThe indication of the PICTURE MODE displayed by changingThe indication of the ACTIVE IRIS displayed by changingThe indication of the MY MEMORY displayed by changingThe indication of "FREEZE" and "II" while freezing the screen by pressing the FREEZE button.The indication of the TEMPLATE displayed by changing.• When the OFF is selected, please remember if the picture is frozen. Do not mistake freezing for a malfunction (21). |
| Item Description | |
| SOURCE NAME | Each input port for this projector can have a name applied to it.(1) Use the ▲/▼ buttons on the SCREEN menu to select SOURCE NAME and press the ▶ or ENTER button.The SOURCE NAME menu will be displayed.(2) Use the ▲/▼ buttons on the SOURCE NAME menu to select the port to be named and press the ▶ button. Right side of the menu is blank until a name is specified.The SOURCE NAME dialog will be displayed.(3) The current name will be displayed on the first line. Use the ▲/▼/◄/► buttons and the ENTER or INPUT button to select and enter characters. To erase 1 character at one time, press the RESET button or press the ◀ and INPUT button at the same time. Also if you move the cursor to DELETE or ALL CLEAR on screen and press the ENTER or INPUT button, 1 character or all characters will be erased. The name can be a maximum of 16 characters.(4) To change an already inserted character, press the ▲ button to move the cursor to the first line, and use the ◀/► buttons to move the cursor on the character to be changed.After pressing the ENTER or INPUT button, the character is selected. Then, follow the same procedure as described at the item (3) above.(5) To finish entering text, move the cursor to the OK on screen and press the ►, ENTER or INPUT button. To revert to the previous name without saving changes, move the cursor to the CANCEL on screen and press the ◀, ENTER or INPUT button. |
| TEMPLATE | Using the ▲/▼ buttons switches the mode for the template screen. Press the ► button to display the selected template, and press the ◀ button to close the displayed screen.The last selected template is displayed when the MY BUTTON allocated to the TEMPLATE function is pressed (44).⇨ TEST PATTERN ⇔ DOT-LINE1↔DOT-LINE4 ⇔ DOT-LINE3 ⇔ DOT-LINE2 |
| C.C.(Closed Caption) | The C.C. is the function that displays a transcript or dialog of the audio portion of a video, files or other presentation or other relevant sounds. It is required to have NTSC format video or 480i@60 format component video source supporting C.C. feature to utilize this function.It may not work properly, depending on equipment or signal source.In this case, please turn off the Closed Caption. |
| DISPLAYSelect Closed Caption DISPLAY setting from following options using ▲/▼ buttons.AUTO ⇔ ON ⇔ OFFAUTO: Closed Caption automatically displays when the volume is muted.ON: Closed Caption is on.OFF: Closed Caption is off.The caption is not displayed when the OSD menu is active.The Closed Caption is the function to display the dialogue, narration, and / or sound effects of a television program or other video sources. The Closed Caption availability is depending upon broadcaster and/or content. | |
| MODESelect Closed Caption MODE setting from following options using ▲/▼ buttons.CAPTIONS ⇔ TEXTCAPTIONS: Display Closed Caption.TEXT: Display Text data, which is for additional information such as news reports or a TV program guide. The information covers the entire screen. Not all of the C.C. program has Text information. | |
| CHANNELSelect Closed Caption CHANNEL from following options using ▲/▼ buttons.1 ⇔ 2 ⇔ 3 ⇔ 41: Channel 1, primary channel / language2: Channel 23: Channel 34: Channel 4The channel data may vary, depending on the content. Some channel might be used for secondary language or empty. | |
Menu OPTION
À partir du menu OPTION, les éléments indiqués dans le tableau ci-dessous peuvent être exécutés.
Sélectionnez un élément à l'aide des boutons de curseur ▲/▼, puis appuyez sur le bouton de curseur ▶ ou sur le bouton ENTER pour exécuter l'élément, à l'exception des éléments LAMP TIME et FILTER TIME. Ensuite, procédez selon le tableau suivant.

| Item Description | |
| AUTO SEARCH | Using the ▲/▼ buttons turns on/off the automatic signal search function.ON ⇔ OFFWhen the ON is selected, detecting no signal automatically cycles through input ports in the following order. The search is started from the current port. Then when an input is found, the projector will stop searching and display the image.→ COMPUTER IN1 ⇒ COMPUTER IN2VIDEO ⇔ S-VIDEO ⇔ COMPONENT (Y, Cb/Cr, Cr/Pr)← |
| AUTO KEYSTONE | Using the ▲/▼ buttons turns on/off the automatic keystone function.ON ⇔ OFFON: Automatic keystone distortion correction will be executed whenever changing the slant of the projector.OFF: This function is disabled. Please execute the AUTO KEYSTONE (EXECUTE) in the SETUP menu for automatic keystone distortion correction.When the projector is suspended from the ceiling this feature will not function properly so select the OFF.This function will be unavailable when the Transition Detector is on (50). |
| DIRECT ON | Using the ▲/▼ buttons turns on/off the DIRECT ON function.ON ⇔ OFFWhen set to the ON, the lamp in projector will be automatically turned on without the usual procedure (14), only when the projector is supplied with the power after the power was cut while the lamp was on.This function does not work as long as the power has been supplied to the projector while the lamp is off.After turning the lamp on by the DIRECT ON function, if neither input nor operation is detected for about 30 minutes, the projector is turned off, even though the AUTO OFF function (43) is disabled. |
(suite à la page suivante)
| Item Description | |
| AUTO OFF | Using the ▲/▼ buttons adjusts the time to count down to automatically turn the projector off.Long (max. 99 minutes) ⇔ Short (min. 0 minute = DISABLE)  When the time is set to 0, the projector is not turned off automatically.When the time is set to 1 to 99, and when the passed time with no-signal or an unsuitable signal reaches at the set time, the projector lamp will be turned off.If one of the projector's buttons or the remote control buttons is pressed or one of the commands (except get commands) is transmitted to theCONTROL port during the corresponding time, projector will not be turned off.Please refer to the section “Turning off the power” (14). When the time is set to 0, the projector is not turned off automatically.When the time is set to 1 to 99, and when the passed time with no-signal or an unsuitable signal reaches at the set time, the projector lamp will be turned off.If one of the projector's buttons or the remote control buttons is pressed or one of the commands (except get commands) is transmitted to theCONTROL port during the corresponding time, projector will not be turned off.Please refer to the section “Turning off the power” (14). |
| LAMP TIME | The lamp time is the usage time of the lamp, counted after the last resetting. It is shown in the OPTION menu.Pressing theRESETbutton on the remote control or the ► button of the projector displays a dialog.To reset the lamp time, select the OK using the ► button.CANCEL ⇒ OKPlease reset the lamp time only when you have replaced the lamp, for a suitable indication about the lamp.For the lamp replacement, see the section "Replacing the lamp" (53, 54). |
| FILTER TIME | The filter time is the usage time of the air filter, counted after the last resetting. It is shown in the OPTION menu.Pressing theRESETbutton on the remote control or the ► button of the projector displays a dialog.To reset the filter time, select the OK using the ► button.CANCEL ⇒ OKPlease reset the filter time only when you have cleaned or replaced the air filter, for a suitable indication about the air filter.For the air filter cleaning, see the section “Cleaning and replacing the air filter” (55, 56). |
| MY BUTTON | This item is to assign one of the following functions toMY BUTTON 1/2 on the remote control (6).(1) Use the ▲/▼ buttons on the MY BUTTON menu to select a MY BUTTON - (1/2) and press the ▶ button to display the MY BUTTON setup dialog.(2) Then using the ▲/▼/◄/► buttons sets one of the following functions to the chosen button. Press theENTER or INPUT button to save the setting.COMPUTER IN1: Sets port toCOMPUTER IN1.COMPUTER IN2: Sets port toCOMPUTER IN2.COMPONENT: Sets port toCOMPONENT (Y, Cb/Pb, Cr/Pr).S-VIDEO: Sets port toS-VIDEO.VIDEO: Sets port toVIDEO.INFORMATION: Displays the INPUT_INFORMATION (46) or the SYSTEM_INFORMATION or nothing.AUTO KEYSTONE : Performs automatic keystone distortion correction (34).MY MEMORY: Loads one of adjustment data stored (28).When more than one data are saved, the adjustment changes every time theMY BUTTONis pressed.When no data is saved in memory, thedialog "No saved data" appears.When the current adjustment is notsaved to memory, the dialog as shown inthe right appears.If you want to keep the current adjustment, please press the ► button to exit. Otherwise loading a data will overwrite the current adjusted condition.ACTIVE IRIS: Changes the active iris mode.PICTURE MODE: Changes the PICTURE MODE (24).FILTER RESET: Displays the filter time reset confirmation dialogue (43).TEMPLATE: Makes the template pattern selected to the TEMPLATE item (40) appear or disappear.AV MUTE: Turns the picture and audio on/off. |
| MY SOURCE | Using ▲/▼ buttons selects the picture input port to be selected with pressing theMY SOURCE/DOC.CAMERAbutton on the remote control.Select the picture input that is connected with a document camera.COMPUTER IN1 ⇔ COMPUTER IN2 ⇔VIDEO ⇔ S-VIDEO ⇔ COMPONENT |
| Item Description | ||
| SERVICE | Selecting this item displays the SERVICE menu.Select an item using the ▲/▼ buttons, and press the ▶ button or the ENTER button on the remote control to execute the item. |  |
| FAN SPEEDUsing the ▲/▼ buttons switches the rotation speed of the cooling fans. The HIGH is the mode for use at highlands etc. Note that the projector is noisier when the HIGH is selected.HIGH ⇔ NORMAL | ||
| AUTO ADJUSTUsing the ▲/▼ buttons to select one of the mode. When the DISABLE is selected, the automatic adjustment feature is disabled.FINE ⇔ FAST ⇔ DISABLEFINE: Finer tuning including H.SIZE adjustment.FAST: Faster tuning, setting H.SIZE to prearranged data for the input signal.· Depending on conditions, such as input image, signal cable to the projector, environment around the projector, etc., the automatic adjustment may not work correctly. In such a case, please choose DISABLE to disable the automatic adjustment, and make adjustment manually. | ||
| GHOST1. Select a color element of ghost using the ◀/▶ buttons.2. Adjust the selected element using the ▲/▼ buttons to disappear ghost. | [IMAGE] | |
| FILTER MESSAGEUse the ▲/▼ button to set the timer for notifying by the message when to replace the filter unit100h ⇔ 200h ⇔ 500h ⇔ 1000h ⇔ 2000h ⇔ 5000h ⇔ OFFAfter choosing an item except OFF, the message “REMINDER ***HRS PASSED .....” will appear after the timer reaches the interval time set by this feature ( [IMAGE]When the OFF is chosen, the message will not appear. Utilize this feature to keep the air filter clean, setting the suitable time according to your environment of this projector.· Please take care of the filter unit periodically, even if there is no message. If the air filter becomes to be blocked by dust or other matter, the internal temperature will rise, which could cause malfunction, or reduce the lifetime of the projector.· Please be careful with the operating environment of the projector and the condition of the filter unit. | ||
| Item Description | ||
| SERVICE(continued) | KEY LOCKUsing the ▲/▼ buttons turns on/off the key lock feature. When ON is selected, the buttons on the projector except the STANDBY/ON button are locked.ON ⇔ OFFPlease use this function to prevent tampering or accidental operation. This function does not have any effect on the remote control. | |
REMOTE FREQ.(1) Use the ▲/▼ button to change the projector's remote sensor frequency setting (4).1:NORMAL ⇔ 2:HIGH  (2) Use the ◀/► button to change the projector's remote sensor on or off.ON ⇔ OFFThe factory default setting is for both 1:NORMAL and 2:HIGH to be on. If the remote control does not function correctly, disable either of them (13).It's not possible to disable both options at the same time. (2) Use the ◀/► button to change the projector's remote sensor on or off.ON ⇔ OFFThe factory default setting is for both 1:NORMAL and 2:HIGH to be on. If the remote control does not function correctly, disable either of them (13).It's not possible to disable both options at the same time. | ||
INFORMATIONSelecting this item displays a dialog titled "INPUT_INFORMATION". It shows the information about the current input.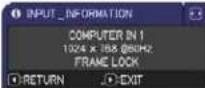 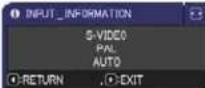 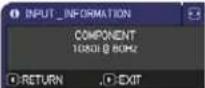 The "FRAME LOCK" message on the dialog means the frame lock function is working.The "SCART RGB" message means the COMPONENT port is working as a SCART RGB input port. Please refer to the COMPONENT item in INPUT menu (31).This item can't be selected for no signal and sync out.When the MY TEXT DISPLAY is set to ON, the MY TEXT is displayed together with the input information in the INPUT INFORMATION box (52). The "FRAME LOCK" message on the dialog means the frame lock function is working.The "SCART RGB" message means the COMPONENT port is working as a SCART RGB input port. Please refer to the COMPONENT item in INPUT menu (31).This item can't be selected for no signal and sync out.When the MY TEXT DISPLAY is set to ON, the MY TEXT is displayed together with the input information in the INPUT INFORMATION box (52). | ||
| FACTORY RESETSelecting OK using the ► button performs this function. By this function, all the items in all of menus will collectively return to the initial setting. Note that the items LAMP TIME, FILTER TIME, LANGUAGE, FILTER MESSAGE and SECURITY settings are not reset.CANCEL ⇒ OK | ||
Menu SECURITY
Ce projecteur est équipé de fonctions de sécurité. À partir du menu SECURITY, les éléments indiqués dans le tableau ci-dessous peuvent être exécutés.
Pour utiliser le menu SECURITY : une inscription de l'utilisateur est requise avant d'utiliser les fonctions de sécurité.

Entrer dans le menu SECURITY
- Utilisez les boutons ▲/▼ du menu SECURITY pour sélectionner ENTER PASSWORD, puis appuyez sur le bouton ▶. La boîte ENTER PASSWORD s'affichera.
- Utilisez les boutons ▲/▼/◄/► pour saisir le mot de passe enregistré. Le mot de passe par défaut en usine est 5678. Ce mot de passe peut être modifié (voir ci-dessous). Déplacez le curseur vers le côté droit de la boîte ENTER PASSWORD et appuyez sur le bouton ► pour afficher le menu SECURITY.
- Il est fortement recommandé de modifier le mot de passe par défaut dès que possible.
- Si un mot de passe incorrect est saisi, la zone ENTER PASSWORD s'affiche à nouveau. Si un mot de passe incorrect est saisi 3 fois, le projecteur s'éteint. Ensuite, le projecteur s'éteindra à chaque fois qu'un mot de passe incorrect sera saisi.
- Les éléments indiqués dans le tableau ci-dessous peuvent être effectués.
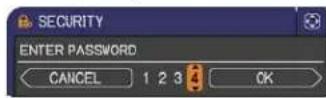
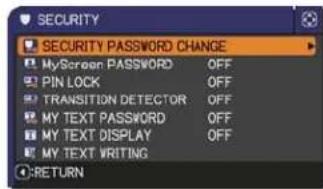
Si vous avez oublié votre mot de passe
(1) Pendant que la zone ENTER PASSWORD est affichée, maintenez enfoncé le bouton RESET de la télécommande pendant environ 3 secondes, ou maintenez enfoncé le bouton INPUT pendant 3 secondes tout en appuyant sur le bouton ▶ du projecteur. (2) Le code de demande à 10 chiffres s'affiche. Contactez votre revendeur avec ce code. Votre mot de passe vous sera envoyé après confirmation de vos informations d'enregistrement utilisateur.
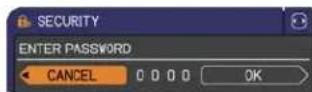

- Si aucune touche n'est enfoncée pendant environ 55 secondes alors que le code de demande est affiché, le menu se ferme. Si nécessaire, répétez la procédure à partir de (1).
| Item Description | |
| SECURITY PASSWORD CHANGE | (1) Use the ▲/▼ buttons on the SECURITY menu to select SECURITY PASSWORD CHANGE and press the ▶ button to display the ENTER NEW PASSWORD box.(2) Use the ▲/▼/◄/► buttons to enter the new password.(3) Move the cursor to the right side of the ENTER NEW PASSWORD box and press the ► button to display the NEW PASSWORD AGAIN box, enter the same password again.(4) Move the cursor to the right side of the NEW PASSWORD AGAIN box and press the ► button and the NOTE NEW PASSWORD box will be displayed for about 30 seconds, please make note of the password during this time.Pressing the ENTER button on the remote control or ► button on the projector will close the NOTE NEW PASSWORD box.· Please do not forget your password.[IMAGE] |
| Item Description | |
| MyScreen PASSWORD | The MyScreen PASSWORD function can be used to prohibit access to the MyScreen function and prevent the currently registered MyScreen image from being overwritten.1 Turning on the MyScreen PASSWORD1-1 Use the ▲/▼ buttons on the SECURITY menu to select MyScreen PASSWORD and press the ▶ button to display the MyScreen PASSWORD on/off menu. 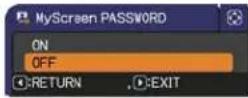 1-2 Use the ▲/▼ buttons on the MyScreen PASSWORD on/off menu to select ON.The ENTER NEW PASSWORD box (small) will be displayed. 1-2 Use the ▲/▼ buttons on the MyScreen PASSWORD on/off menu to select ON.The ENTER NEW PASSWORD box (small) will be displayed.  1-3 Use the ▲/▼/◄/► buttons to enter the password. Move the cursor to the right side of the ENTER NEW PASSWORD box (small) and press the ► button to display the NEW PASSWORD AGAIN box, enter the same PASSWORD again. 1-3 Use the ▲/▼/◄/► buttons to enter the password. Move the cursor to the right side of the ENTER NEW PASSWORD box (small) and press the ► button to display the NEW PASSWORD AGAIN box, enter the same PASSWORD again.  1-4 Move the cursor to the right side of the NEW PASSWORD AGAIN box and press the ► button to display the NOTE NEW PASSWORD box for about 30 seconds, please make note of the password during this time.Pressing the ENTER button on the remote control or ► button on the projector will return to MyScreen PASSWORD on/off menu.When a password is set for MyScreen:· The MyScreen registration function (and menu) will be unavailable.· The MyScreen Lock menu will be unavailable.· The START UP setting will be locked on MyScreen (and the menu will be unavailable).Turning the MyScreen PASSWORD off will allow normal operation of these functions.· Please do not forget your MyScreen PASSWORD.2 Turning off the MyScreen PASSWORD2-1 Follow the procedure in 1-1 to display the MyScreen PASSWORD on/off menu.2-2 Select OFF to display the ENTER PASSWORD box (large). Enter the registered password and the screen will return to the MyScreen PASSWORD on/off menu.If an incorrect PASSWORD is input, the menu will close. If necessary, repeat the process from 2-1.3 If you have forgotten your password3-1 Follow the procedure in 1-1 to display the MyScreen PASSWORD on/off menu.3-2 Select OFF to display the ENTER PASSWORD box (large). The 10 digit Inquiring Code will be displayed inside the box.3-3 Contact your dealer with the 10 digit Inquiring Code. Your password will be sent after your user registration information is confirmed. 1-4 Move the cursor to the right side of the NEW PASSWORD AGAIN box and press the ► button to display the NOTE NEW PASSWORD box for about 30 seconds, please make note of the password during this time.Pressing the ENTER button on the remote control or ► button on the projector will return to MyScreen PASSWORD on/off menu.When a password is set for MyScreen:· The MyScreen registration function (and menu) will be unavailable.· The MyScreen Lock menu will be unavailable.· The START UP setting will be locked on MyScreen (and the menu will be unavailable).Turning the MyScreen PASSWORD off will allow normal operation of these functions.· Please do not forget your MyScreen PASSWORD.2 Turning off the MyScreen PASSWORD2-1 Follow the procedure in 1-1 to display the MyScreen PASSWORD on/off menu.2-2 Select OFF to display the ENTER PASSWORD box (large). Enter the registered password and the screen will return to the MyScreen PASSWORD on/off menu.If an incorrect PASSWORD is input, the menu will close. If necessary, repeat the process from 2-1.3 If you have forgotten your password3-1 Follow the procedure in 1-1 to display the MyScreen PASSWORD on/off menu.3-2 Select OFF to display the ENTER PASSWORD box (large). The 10 digit Inquiring Code will be displayed inside the box.3-3 Contact your dealer with the 10 digit Inquiring Code. Your password will be sent after your user registration information is confirmed. |
(suite à la page suivante)
| Item Description | |
| PIN LOCK | PIN LOCK is a function which prevents the projector from being used unless a registered Code is input.1 Turning on the PIN LOCK1-1 Use the ▲/▼ buttons on the SECURITY menu to select PIN LOCK and press the ▶ button or the ENTER button to display the PIN LOCK on/off menu.1-2 Use the ▲/▼ buttons on the PIN LOCK on/off menu to select ON and the Enter PIN Code box will be displayed.1-3 Input a 4 part PIN code using the ▲/▼/◄/►, COMPUTER or INPUT button.The PIN Code again box will appear. Reenter the same PIN code. This will complete the PIN code registration.If there is no key input for about 55 seconds while the Enter PIN Code box or the PIN Code again box is displayed, the menu will close. If necessary, repeat the process from 1-1.Afterwards, anytime the projector is restarted after AC power is turned off the Enter PIN Code box will be displayed. Enter the registered PIN code. The projector can be used after entering the registered PIN code. If an incorrect PIN code is input, the Enter PIN code box will be displayed again. If an incorrect PIN Code is input 3 times, the projector will turn off. Afterwards the projector will turn off every time an incorrect PIN code is input. The projector will also turn off if there is no key input for about 5 minutes while the Enter PIN code box is displayed.This function will activate only when the projector is started after AC power is turned off.Please do not forget your PIN code.2 Turning off the PIN LOCK2-1 Follow the procedure in 1-1 to display the PIN LOCK on/off menu.2-2 Use the ▲/▼ buttons to select OFF and the Enter PIN Code box will be displayed.Enter the registered PIN code to turn the PIN LOCK function off.If an incorrect PIN Code is input 3 times, the menu will close.3 If you have forgotten your PIN Code3-1 While the Enter PIN Code box is displayed, press and hold the RESET button for three seconds or press and hold the INPUT button for 3 seconds while pressing the ▶ button on the projector.The 10 digit Inquiring Code will be displayed.If there is no key input for about 5 minutes while the Inquiring Code is displayed, the projector will turn off.3-2 Contact your dealer with the 10 digit Inquiring Code. Your PIN Code will be sent after your user registration information is confirmed. |
Article Description
| TRANSITION DETECTOR | If this function is set to ON when the vertical angle of the projector or MIRROR setting at which the projector is turned on is different than the previously recorded, the TRANSITION DETECTOR ON alarm will be displayed and the projector will not display the input signal. • To display the signal again, set this function OFF. • After about 5 minutes of displaying the TRANSITION DETECTOR ON alarm, the lamp will turn off. • Keystone adjustment feature has been prohibited as long as the Transition Detector function is on.1 Turning on the TRANSITION DETECTOR1-1 Use the ▲/▼ buttons on the SECURITY menu to select TRANSITION DETECTOR and press the ▶ or the ENTER button to display the TRANSITION DETECTOR on/off menu.1-2 Use the ▲/▼ buttons on the TRANSITION DETECTOR on/off menu to select ON. Select ON and the current angle and MIRROR setting will be recorded. The ENTER NEW PASSWORD box (small) will be displayed.1-3 Use the ▲/▼/◄/► buttons to enter a password. Move the cursor to the right side of the ENTER NEW PASSWORD box (small) and press the ► button to display the NEW PASSWORD AGAIN box, enter the same password again.1-4 Move the cursor to the right side of the NEW PASSWORD AGAIN box and press the ► button to display the NOTE NEW PASSWORD box for about 30 seconds, please make note of the password during this time.Pressing the ENTER button on the remote control or the ► button on the projector will return to the TRANSITION DETECTOR on/off menu. • Please do not forget your TRANSITION DETECTOR password. • This function will activate only when the projector is started after turning off the AC power. • This feature may not function properly if the projector is not in a stable position when ON is selected.2 Turning off the TRANSITION DETECTOR2-1 Follow the procedure in 1-1 to display the TRANSITION DETECTOR on/off menu.2-2 Select OFF to display the ENTER PASSWORD box (large). Enter the registered password and the screen will return to the TRANSITION DETECTOR on/off menu.If an incorrect password is input, the menu will close. If necessary, repeat the process from 2-1.3 If you have forgotten your password3-1 Follow the procedure in 1-1 to display the TRANSITION DETECTOR on/off menu.3-2 Select OFF to display the ENTER PASSWORD box (large). The 10 digit Inquiring Code will be displayed inside the box.3-3 Contact your dealer with the 10 digit Inquiring Code. Your password will be sent after your user registration information is confirmed. | 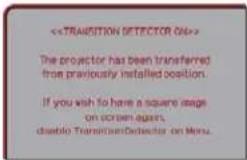 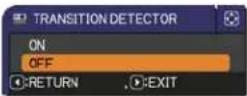  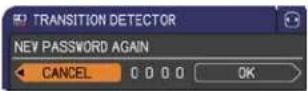 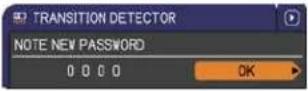 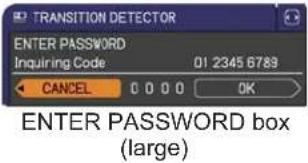 |
| Item Description | |
| MY TEXT PASSWORD | The MY TEXT PASSWORD function can prevent the MY TEXT from being overwritten. When the password is set for the MY TEXT;• The MY TEXT DISPLAY menu will be unavailable, which can prohibit changing the DISPLAY setting.• The MY TEXT WRITING menu will be unavailable, which can prevent the MY TEXT from being overwritten.1 Turning on the MY TEXT PASSWORD1-1 Use the ▲/▼ buttons on the SECURITY menu to select the MY TEXT PASSWORD and press the ► button to display the MY TEXT PASSWORD on/off menu.  1-2 Use the ▲/▼ buttons on the MY TEXT PASSWORD on/off menu to select ON. The ENTER NEW PASSWORD box (small) will be displayed. 1-2 Use the ▲/▼ buttons on the MY TEXT PASSWORD on/off menu to select ON. The ENTER NEW PASSWORD box (small) will be displayed.  1-3 Use the ▲/▼/◄/► buttons to enter the password. Move the cursor to the right side of the ENTER NEW PASSWORD box (small) and press the ► button to display the NEW PASSWORD AGAIN box, and then enter the same password again. 1-3 Use the ▲/▼/◄/► buttons to enter the password. Move the cursor to the right side of the ENTER NEW PASSWORD box (small) and press the ► button to display the NEW PASSWORD AGAIN box, and then enter the same password again.  1-4 Move the cursor to the right side of the NEW PASSWORD AGAIN box and press ► button to display the NOTE NEW PASSWORD box for about 30 seconds, then please make note of the password during this time. 1-4 Move the cursor to the right side of the NEW PASSWORD AGAIN box and press ► button to display the NOTE NEW PASSWORD box for about 30 seconds, then please make note of the password during this time. 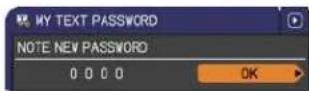 Pressing the ENTER button on the remote control or ► button on the projector will return to the MY TEXT PASSWORD on/off menu.2 Turning off the MY TEXT PASSWORD2-1 Follow the procedure in 1-1 to display the MY TEXT PASSWORD on/off menu.2-2 Select OFF to display the ENTER PASSWORD box (large). Enter the registered password and the screen will return to the MY TEXT PASSWORD on/off menu.If an incorrect password is input, the menu will close. If necessary, repeat the process from 2-1[IMAGE]3 If you have forgotten your password3-1 Follow the procedure in 1-1 to display the MY TEXT PASSWORD on/off menu.3-2 Select OFF to display the ENTER PASSWORD box (large). The 10 digit inquiring code will be displayed inside the box.3-3 Contact your dealer with the 10 digit inquiring code. Your password will be sent after your user registration information is confirmed. Pressing the ENTER button on the remote control or ► button on the projector will return to the MY TEXT PASSWORD on/off menu.2 Turning off the MY TEXT PASSWORD2-1 Follow the procedure in 1-1 to display the MY TEXT PASSWORD on/off menu.2-2 Select OFF to display the ENTER PASSWORD box (large). Enter the registered password and the screen will return to the MY TEXT PASSWORD on/off menu.If an incorrect password is input, the menu will close. If necessary, repeat the process from 2-1[IMAGE]3 If you have forgotten your password3-1 Follow the procedure in 1-1 to display the MY TEXT PASSWORD on/off menu.3-2 Select OFF to display the ENTER PASSWORD box (large). The 10 digit inquiring code will be displayed inside the box.3-3 Contact your dealer with the 10 digit inquiring code. Your password will be sent after your user registration information is confirmed. |
| Item Description | ||
| MY TEXT DISPLAY | (1) Use the ▲/▼ buttons on the SECURITY menu to select the MY TEXT DISPLAY and press the ▶ button to display the MY TEXT DISPLAY on/off menu. | 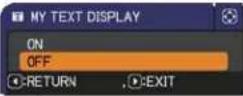 |
| (2) Use the ▲/▼ buttons on the MY TEXT DISPLAY on/off menu to select on or off.ON ⇔ OFFWhen it is set ON, the MY TEXT will be displayed on the START UP screen and the INPUT___INFORMATION when the INFORMATION on the SERVICE menu is chosen.This function is available only when the MY TEXT PASSWORD function is set to the OFF. |  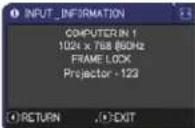 | |
| MY TEXT WRITING | (1) Use the ▲/▼ buttons on the SECURITY menu to select the MY TEXT WRITING and press the ▶ button. The MY TEXT WRITING dialog will be displayed.(2) The current MY TEXT will be displayed on the first 3 lines. If not yet written, the lines will be blank.Use the ▲/▼/◄/► buttons and the ENTER or INPUT button to select and enter characters. To erase 1 character at one time, press the RESET button or press the ◀ and INPUT button at the same time. Also if you move the cursor to DELETE or ALL CLEAR on screen and press the ENTER or INPUT button, 1 character or all characters will be erased. The MY TEXT can be input up to 24 characters on each line.(3) To change an already inserted character, press the ▲/▼ button to move the cursor to one of the first 3 lines, and use the ◀/► buttons to move the cursor on the character to be changed.After pressing the ENTER or INPUT button, the character is selected. Then, follow the same procedure as described at the item (2) above.(4) To finish entering text, move the cursor to the OK on screen and press the ►, ENTER or INPUT button. To revert to the previous MY TEXT without saving changes, move the cursor to the CANCEL on screen and press the ◀, ENTER or INPUT button.The MY TEXT WRITING function is available only when the MY TEXT PASSWORD function is set to OFF. | 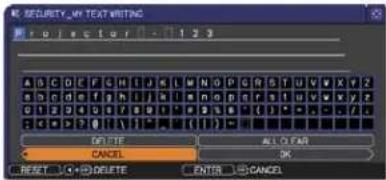 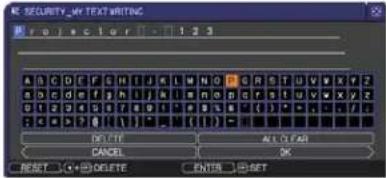  |
Maintenance
Remplacement de la lampe
Une lampe a une durée de vie limitée. L'utilisation de la lampe pendant de longues périodes peut rendre les images plus sombres ou la qualité des couleurs médiocre. Notez que chaque lampe a une durée de vie différente, et certaines peuvent éclater ou griller peu de temps après leur mise en service.
Il est recommandé de préparer une nouvelle lampe et de la remplacer rapidement. Pour préparer une nouvelle lampe, contactez votre revendeur et indiquez le numéro de type de la lampe.
Numéro de type : 78-6972-0008-3 (DT01025)
Remplacement de la lampe
- Éteignez le projecteur et débranchez le cordon d'alimentation. Laissez le projecteur refroidir pendant au moins 45 minutes.
- Préparez une nouvelle lampe. Si le projecteur est monté au plafond, ou si la lampe est cassée, demandez également au revendeur de remplacer la lampe.

Si vous effectuez le remplacement vous-même, suivez la procédure suivante.
- Desserrez la vis (marquée par une flèche) du volet de la lampe, puis faites glisser et soulevez le volet de la lampe sur le côté pour le retirer.
- Desserrez les 3 vis (marquées par une flèche) de la lampe, puis soulevez lentement la lampe par les poignées. Ne desserrez jamais d'autres vis.
- Insérez la nouvelle lampe, puis resserrez fermement les 3 vis de la lampe desserrées à l'étape précédente pour la verrouiller en place.
- Tout en assemblant les parties d'emboîtement du volet de la lampe et du projecteur, faites glisser le volet de la lampe en place. Puis fixez fermement la vis du volet de la lampe.
- Allumez le projecteur et réinitialisez le temps de lampe à l'aide de l'élément LAMP TIME du menu OPTION.
(1) Appuyez sur le bouton MENU pour afficher un menu.
(2) Pointez sur ADVANCED MENU dans le menu à l'aide des boutons ▼/▲, puis appuyez sur le bouton ▶.
(3) Pointez sur OPTION dans la colonne de gauche du menu à l'aide des boutons ▼/▲, puis appuyez sur le bouton ▶.
(4) Pointez sur LAMP TIME à l'aide des boutons ▼/▲, puis appuyez sur le bouton ▶. Une boîte de dialogue apparaîtra.
(5) Appuyez sur le bouton ▶ pour sélectionner "OK" dans la boîte de dialogue. Cela réinitialise le temps de la lampe.


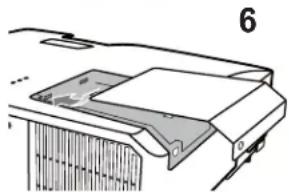
⚠️ ATTENTION ▶ Ne touchez pas l'intérieur du projecteur lorsque la lampe est retirée.
REMARQUE • Ne réinitialisez le temps de la lampe que lorsque vous avez remplacé la lampe, pour une indication appropriée concernant la lampe.
Remplacement de la lampe (suite)
Avertissement concernant la lampe

HAUTE TENSION

HAUTE TEMPÉRATURE

HAUTE PRESSION
⚠ AVERTISSEMENT ▶ Le projecteur utilise une lampe au verre à mercure haute pression. La lampe peut se briser avec un bruit fort, ou griller, si elle est secouée ou rayée, manipulée chaude, ou usée avec le temps. Notez que chaque lampe a une durée de vie différente, et certaines peuvent éclater ou griller peu après le début de leur utilisation. De plus, lorsque l'ampoule éclate, il est possible que des éclats de verre volent dans le boîtier de la lampe, et que du gaz contenant du mercure s'échappe par les évents du projecteur.
▶ À propos de l'élimination de la lampe : Ce produit contient une lampe au mercure ; ne la jetez pas à la poubelle. Éliminez-la conformément aux lois environnementales.
- Pour le recyclage de la lampe, consultez www.lamprecycle.org (aux États-Unis).
- Pour l'élimination du produit, consultez votre agence gouvernementale locale ou www.eiae.org (aux États-Unis) ou www.epsc.ca (au Canada).
Pour plus d'informations, appelez votre revendeur.

Débranchez la prise de la prise de courant
- Si la lampe se brise (elle fera un bruit fort), débranchez le cordon d'alimentation de la prise, et assurez-vous de demander une lampe de remplacement à votre revendeur local. Notez que les éclats de verre pourraient endommager l'intérieur du projecteur ou causer des blessures lors de la manipulation, alors ne tentez pas de nettoyer le projecteur ou de remplacer la lampe vous-même.
- Si la lampe venait à se briser (elle fera un bruit fort en se brisant), ventilez bien la pièce et veillez à ne pas respirer le gaz qui sort des évents du projecteur, ni à le mettre dans les yeux ou la bouche.
- Avant de remplacer la lampe, éteignez le projecteur et débranchez le cordon d'alimentation, puis attendez au moins 45 minutes que la lampe refroidisse suffisamment. Manipuler la lampe lorsqu'elle est chaude peut provoquer des brûlures et endommager la lampe.

- Ne dévissez jamais les vis autres que celles désignées (marquées par une flèche).
- N'ouvrez pas le volet de la lampe lorsque le projecteur est suspendu au plafond. C'est dangereux, car si l'ampoule de la lampe est cassée, les débris tomberont à l'ouverture du volet. De plus, travailler en hauteur est dangereux ; demandez à votre revendeur local de remplacer la lampe, même si l'ampoule n'est pas cassée.
- N'utilisez pas le projecteur avec le volet de la lampe retiré. Lors du remplacement de la lampe, assurez-vous que les vis sont bien serrées. Des vis desserrées pourraient entraîner des dommages ou des blessures.

- Utilisez uniquement la lampe du type spécifié. - Si la lampe se brise peu après sa première utilisation, il est possible qu'il y ait des problèmes électriques ailleurs que dans la lampe. Si cela se produit, consultez votre revendeur local ou un représentant du service après-vente.
- Manipulez avec précaution : des chocs ou des rayures pourraient faire éclater l'ampoule de la lampe pendant son utilisation. - L'utilisation de la lampe pendant de longues périodes peut l'assombrir, l'empêcher de s'allumer ou la faire éclater. Lorsque les images semblent sombres ou que la teinte des couleurs est mauvaise, remplacez la lampe dès que possible. N'utilisez pas de lampes anciennes (usagées) ; cela peut provoquer une rupture.
Nettoyage et remplacement du filtre à air
Le bloc filtre à air de ce projecteur se compose d'un couvercle de filtre, de deux types de filtres et d'un cadre de filtre. Le nouveau système de grands filtres doubles est conçu pour fonctionner plus longtemps. Cependant, veuillez le vérifier et le nettoyer périodiquement pour maintenir la ventilation nécessaire au fonctionnement normal du projecteur.
Lorsque les indicateurs ou un message vous invitent à nettoyer le filtre à air, faites-le dès que possible. Remplacez les filtres lorsqu'ils sont endommagés ou trop encrassés. Pour préparer de nouveaux filtres, contactez votre revendeur et indiquez le numéro de type suivant.
Numéro de type : 78-8138-1041-9 (MU06481 (jeu de filtres))
Lorsque vous remplacez la lampe, remplacez également le filtre à air. Un filtre à air du type spécifié sera fourni avec une lampe de remplacement pour ce projecteur.
- Éteignez le projecteur et débranchez le cordon d'alimentation. Laissez le projecteur refroidir suffisamment.
- Utilisez un aspirateur sur et autour du couvercle du filtre.
- Tout en soutenant le projecteur d'une main, utilisez l'autre main pour tirer le couvercle du filtre vers l'avant dans le sens de la flèche.
- Utilisez un aspirateur pour la grille de ventilation du projecteur et le côté extérieur du bloc de filtre.
- Retirez les filtres tout en maintenant le couvercle du filtre.
- Utilisez un aspirateur sur les deux côtés des filtres. Lorsque vous aspirez le filtre à mailles fines, maintenez-le pour qu'il ne soit pas aspiré. Si les filtres sont endommagés ou très encrassés, remplacez-les par des neufs.
- Remettez les filtres dans le couvercle du filtre. Placez d'abord le filtre à mailles grossières dans le couvercle du filtre. Ensuite, placez le filtre à mailles fines sur le filtre à mailles grossières, en tournant son côté cousu vers le haut.
- Remettez le bloc de filtre dans le projecteur.
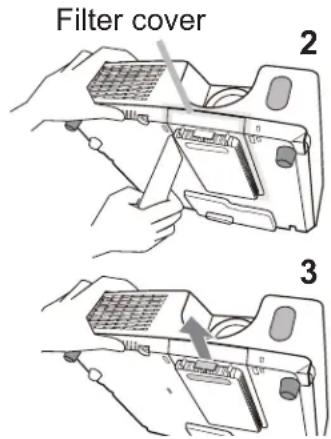
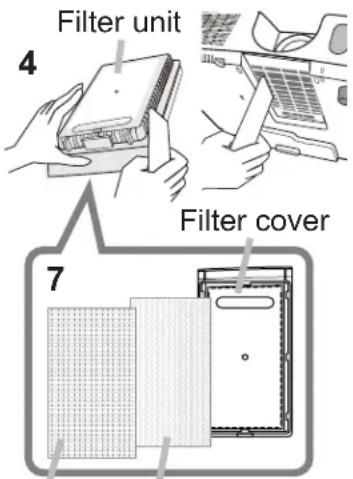
Filtre (à mailles grossières)
Filtre (à mailles fines)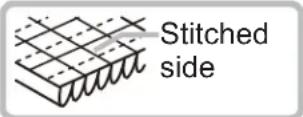
Nettoyage et remplacement du filtre à air (suite)
9. Allumez le projecteur et réinitialisez le temps de filtre à l'aide de l'élément FILTER TIME du MENU FACILE.
(1) Appuyez sur le bouton MENU pour afficher un menu. (2) Pointez sur FILTER TIME à l'aide des boutons ▼/▲, puis appuyez sur le bouton ▶. Une boîte de dialogue apparaîtra. (3) Appuyez sur le bouton ▶ pour sélectionner "OK" dans la boîte de dialogue. Cela réinitialise le temps de filtre.
⚠ AVERTISSEMENT ▶ Avant de vous occuper du filtre à air, assurez-vous que le câble d'alimentation n'est pas branché, puis laissez le projecteur refroidir suffisamment. S'occuper du filtre à air lorsque le projecteur est à haute température pourrait provoquer un choc électrique, une brûlure ou un dysfonctionnement du projecteur.
▶ Utilisez uniquement le filtre à air du type spécifié. N'utilisez pas le projecteur sans le filtre à air ou le couvercle du filtre. Cela pourrait provoquer un incendie ou un dysfonctionnement du projecteur. ▶ Nettoyez le filtre à air périodiquement. Si le filtre à air est obstrué par de la poussière ou autre, les températures internes augmentent et pourraient provoquer un incendie, une brûlure ou un dysfonctionnement du projecteur.
REMARQUE • Veuillez remplacer le filtre à air lorsqu'il est endommagé ou trop encrassé.
- Lorsque vous remplacez la lampe du projecteur, veuillez remplacer le filtre à air. Un filtre à air du type spécifié sera fourni avec une lampe de remplacement pour ce projecteur.
- Veuillez réinitialiser le temps de filtre uniquement lorsque vous avez nettoyé ou remplacé le filtre à air, pour une indication appropriée concernant le filtre à air.
- Le projecteur peut afficher un message tel que "VÉRIFIEZ LE FLUX D'AIR" ou s'éteindre, pour empêcher l'augmentation de la température interne.
Autres soins
Intérieur du projecteur
Afin d'assurer une utilisation sûre de votre projecteur, faites-le nettoyer et inspecter par votre revendeur environ une fois par an.
Entretien de l'objectif
Si l'objectif est rayé, sale ou embué, cela peut entraîner une détérioration de la qualité d'affichage. Veuillez prendre soin de l'objectif en manipulant avec précaution.
- Éteignez le projecteur et débranchez le cordon d'alimentation. Laissez le projecteur refroidir suffisamment.
- Après vous être assuré que le projecteur est suffisamment refroidi, essuyez délicatement l'objectif avec un chiffon de nettoyage pour lentilles disponible dans le commerce. Ne touchez pas l'objectif directement avec les mains.
Entretien du boîtier et de la télécommande
Un entretien incorrect peut avoir des effets néfastes tels qu'une décoloration, un écaillage de la peinture, etc.
- Éteignez le projecteur et débranchez le cordon d'alimentation. Laissez le projecteur refroidir suffisamment.
- Après vous être assuré que le projecteur est suffisamment refroidi, essuyez délicatement avec de la gaze ou un chiffon doux. Si le projecteur est très sale, trempez un chiffon doux dans de l'eau ou un nettoyant neutre dilué dans de l'eau, essorez-le bien, puis essuyez délicatement. Ensuite, essuyez délicatement avec un chiffon doux et sec.
⚠ AVERTISSEMENT ▶ Avant tout entretien, assurez-vous que le cordon d'alimentation est débranché, puis laissez le projecteur refroidir suffisamment. Un entretien à haute température du projecteur pourrait provoquer des brûlures et/ou un dysfonctionnement du projecteur.
▶ Ne tentez jamais d'entretenir l'intérieur du projecteur vous-même. Cela est dangereux. ▶ Évitez de mouiller le projecteur ou d'insérer des liquides dans le projecteur. Cela pourrait entraîner un incendie, un choc électrique et/ou un dysfonctionnement du projecteur. - Ne placez pas d'objets contenant de l'eau, des nettoyants ou des produits chimiques à proximité du projecteur. - N'utilisez pas d'aérosols ou de sprays.
⚠️ ATTENTION ▶ Veuillez entretenir correctement le projecteur conformément aux instructions suivantes. Un entretien incorrect pourrait non seulement causer des blessures, mais aussi avoir des effets néfastes tels qu'une décoloration, un écaillage de la peinture, etc.
▶ N'utilisez pas de nettoyants ou de produits chimiques autres que ceux spécifiés dans ce manuel.
▶ Ne pas polir ni essuyer avec des objets durs.
Dépannage
Si un fonctionnement anormal se produit, arrêtez immédiatement d'utiliser le projecteur.
⚠ AVERTISSEMENT ▶ N'utilisez jamais le projecteur si des anomalies telles que fumée, odeur étrange, bruit excessif, boîtier, éléments ou câbles endommagés, pénétration de liquides ou de corps étrangers, etc. se produisent. Dans ce cas, débranchez immédiatement la fiche d'alimentation de la prise de courant. Après vous être assuré que la fumée ou l'odeur a cessé, contactez votre revendeur ou votre société de service.
Si un problème survient avec le projecteur, les vérifications et mesures suivantes sont recommandées avant de demander une réparation.
Si cela ne résout pas le problème, veuillez contacter votre revendeur ou votre société de service. Ils vous indiqueront les conditions de garantie applicables.
Messages associés
Lorsqu'un message apparaît, vérifiez-le et traitez-le conformément au tableau suivant. Bien que ces messages disparaissent automatiquement après quelques minutes, ils réapparaîtront à chaque mise sous tension.
| Message Description | |
 | There is no input signal.Please confirm the signal input connection, and the status of the signal source. |
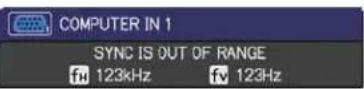 | The horizontal or vertical frequency of the input signal is not within the specified range.Please confirm the specs for your projector or the signal source specs. |
 | An improper signal is input.Please confirm the specs for your projector or the signal source specs. |
 | The internal temperature is rising.Please turn the power off, and allow the projector to cool down at least 20 minutes. After having confirmed the following items, please turn the power ON again.Is there blockage of the air passage aperture?Is the air filter dirty?Does the peripheral temperature exceed 35°C?If the same indication is displayed after the remedy, please set FAN SPEED of the SERVICE item in the OPTION menu to HIGH. |
 | A note of precaution when cleaning the air filter.Please immediately turn the power off, and clean or change the air filter referring to the “Cleaning and replacing the air filter” section of this manual. After you have cleaned or changed the air filter, please be sure to reset the filter timer (43). |
Concernant les voyants
Lorsque le fonctionnement des voyants LAMP, TEMP et POWER diffère de l'habitude, vérifiez et traitez-le conformément au tableau suivant.
| POWER indicator | LAMP indicator | TEMP indicator | Description |
| Lighting In Orange | Turned off | Turned off | The projector is in a standby state. Please refer to the section “Power on/off”. |
| Blinking In Green | Turned off | Turned off | The projector is warming up. Please wait. |
| Lighting In Green | Turned off | Turned off | The projector is in an on state. Ordinary operations may be performed. |
| Blinking In Orange | Turned off | Turned off | The projector is cooling down. Please wait. |
| Blinking In Red | (discretionary) | (discretionary) | The projector is cooling down. A certain error has been detected. Please wait until POWER indicator finishes blinking, and then perform the proper measure using the item descriptions below. |
| Blinking In Red or Lighting In Red | Lighting In Red | Turned off | The lamp does not light, and there is a possibility that interior portion has become heated. Please turn the power off, and allow the projector to cool down at least 20 minutes. After the projector has sufficiently cooled down, please make confirmation of the following items, and then turn the power on again. • Is there blockage of the air passage aperture? • Is the air filter dirty? • Does the peripheral temperature exceed 35°C? If the same indication is displayed after the remedy, please change the lamp referring to the section “Replacing the lamp”. |
| Blinking In Red or Lighting In Red | Blinking In Red | Turned off | The lamp door has not been properly fixed. Please turn the power off, and allow the projector to cool down at least 45 minutes. After the projector has sufficiently cooled down, please make confirmation of the attachment state of the lamp door. After performing any needed maintenance, turn the power on again. If the same indication is displayed after the remedy, please contact your dealer or service company. |
| Blinking In Red or Lighting In Red | Turned off | Blinking In Red | The cooling fan is not operating. Please turn the power off, and allow the projector to cool down at least 20 minutes. After the projector has sufficiently cooled down, please make confirmation that no foreign matter has become caught in the fan, etc., and then turn the power on again. If the same indication is displayed after the remedy, please contact your dealer or service company. |
Concernant les voyants (suite)
| POWER indicator | LAMP indicator | TEMP indicator | Description |
| BlinkingIn RedorLightingIn Red | Turned off | LightingIn Red | There is a possibility that the interior portion has become heated.Please turn the power off, and allow the projector to cool down at least 20 minutes. After the projector has sufficiently cooled down, please make confirmation of the following items, and then turn the power on again.Is there blockage of the air passage aperture?Is the air filter dirty?Does the peripheral temperature exceed 35°C?If the same indication is displayed after the remedy, please set FAN SPEED of SERVICE item in OPTION menu to HIGH (45). |
| LightingIn Green | Simultaneous blinking in Red | It is time to clean the air filter.Please immediately turn the power off, and clean or change the air filter referring to the section “Cleaning and replacing the air filter”. After cleaning or changing the air filter, please be sure to reset the filter timer. After the remedy, reset the power to ON. | |
| LightingIn Green | Alternative blinking in Red | There is a possibility that the interior portion has become overcooled.Please use the unit within the usage temperature parameters (5°C to 35°C).After the treatment, reset the power to ON. | |
REMARQUE • Lorsque l'intérieur du projecteur a surchauffé, par mesure de sécurité, le projecteur s'éteint automatiquement et les voyants peuvent également s'éteindre. Dans ce cas, débranchez le cordon d'alimentation et attendez au moins 45 minutes. Après que le projecteur a suffisamment refroidi, vérifiez l'état de fixation de la lampe et du couvercle de la lampe, puis rallumez-le.
Arrêt du projecteur
Uniquement si le projecteur ne peut pas être éteint par la procédure habituelle (14), appuyez sur l'interrupteur d'arrêt avec une épingle ou un objet similaire, puis débranchez la fiche d'alimentation de la prise de courant. Avant de le rallumer, attendez au moins 10 minutes pour que le projecteur refroidisse suffisamment.
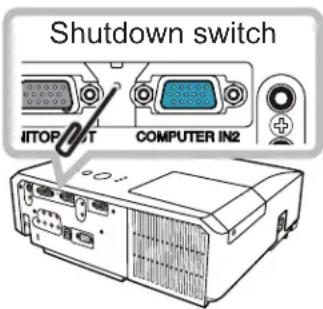
Réinitialisation de tous les paramètres
Lorsqu'il est difficile de corriger certains mauvais réglages, la fonction RÉINITIALISATION D'USINE de l'élément SERVICE du menu OPTION (46) peut réinitialiser tous les paramètres (sauf LANGUE, TEMPS DE FILTRE, TEMPS DE LAMPE, MESSAGE DE FILTRE et paramètres de SÉCURITÉ, etc.) aux valeurs par défaut d'usine.
Phénomènes pouvant être facilement confondus avec des défauts de la machine
À propos des phénomènes confondus avec un défaut de la machine, vérifiez et traitez-les selon le tableau suivant.
| Phenomenon Cases not involving a machine defect | Reference page | |
| Power does not come on. | The electrical power cord is not plugged in.Correctly connect the power cord. | 11 |
| The main power source has been interrupted during operation such as by a power outage (blackout), etc.Please disconnect the power plug from the power outlet, and allow the projector to cool down at least 10 minutes, then turn the power on again. | 11, 14 | |
| Either there is no lamp and/or lamp door, or either of these has not been properly fixed.Please turn the power off and disconnect the power plug from the power outlet, and allow the projector to cool down at least 45 minutes. After the projector has sufficiently cooled down, please make confirmation of the attachment state of the lamp and lamp door, and then turn the power on again. | 53, 54 | |
| Neither sounds nor pictures are outputted. | The signal cables are not correctly connected.Correctly connect the connection cables. | 9 |
| Signal source does not correctly work.Correctly set up the signal source device by referring to the manual of the source device. | - | |
| The input changeover settings are mismatched.Select the input signal, and correct the settings. | 15, 16 | |
| The BLANK function for pictures and the MUTE function for sounds are working.AV MUTE may be active.Refer to the item “Sound does not come out” and “No pictures are displayed” on the next page to turn off the MUTE and BLANK functions. | 15, 21, 44 | |
| Sound does not come out. | The signal cables are not correctly connected.Correctly connect the audio cables. | 9 |
| The MUTE function is working.Restore the sound pressing MUTE or VOLUME +/- button on the remote control. | 15 | |
| The volume is adjusted to an extremely low level.Adjust the volume to a higher level using the menu function or the remote control. | 15 | |
| The AUDIO SOURCE/SPEAKER setting is not correct.Correctly set the AUDIO SOURCE/SPEAKER in AUDIO menu. | 36 | |
| No pictures are displayed. | The lens cover is attached.Remove the lens cover. | 3 |
| The signal cables are not correctly connected.Correctly connect the connection cables. | 9 | |
| The brightness is adjusted to an extremely low level.Adjust BRIGHTNESS to a higher level using the menu function. | 26 | |
| The computer cannot detect the projector as a plug and play monitor.Make sure that the computer can detect a plug and play monitor using another plug and play monitor. | 10 | |
| The BLANK screen is displayed.Press BLANK button on the remote control. | 21 | |
| Video screen display freezes. | The FREEZE function is working.Press FREEZE button to restore the screen to normal. | 21 |
| Colors have a faded-out appearance, or Color tone is poor. | Color settings are not correctly adjusted.Perform picture adjustments by changing the COLOR TEMP, COLOR, TINT and/or COLOR SPACE settings, using the menu functions. | 27, 31 |
| COLOR SPACE setting is not suitable.Change the COLOR SPACE setting to AUTO, RGB, SMPTE240, REC709 or REC601. | 31 | |
| Pictures appear dark. | The brightness and/or contrast are adjusted to an extremely low level.Adjust BRIGHTNESS and/or CONTRAST settings to a higher level using the menu function. | 26 |
| The ECO MODE function is working.Select NORMAL for the ECO MODE item in the SETUP menu. | 34 | |
| The lamp is approaching the end of its product lifetime.Replace the lamp. | 53, 54 | |
| Pictures appear blurry. | Either the focus and/or horizontal phase settings are not properly adjusted.Adjust the focus using the focus ring, and/or H PHASE using the menu function. | 18, 30 |
| The lens is dirty or misty.Clean the lens referring to the section “Caring for the lens”. | 57 | |
| RS-232C does not work. | The SAVING function is working.Select NORMAL for STANDBY MODE item in the SETUP menu. | 35 |
REMARQUE • Bien que des points lumineux ou sombres puissent apparaître à l'écran, cela est une caractéristique unique des écrans à cristaux liquides, et cela ne constitue ni n'implique un défaut de la machine.
Spécifications
Spécification
| Item Specification | |
| Product name=Liquid crystal projector | |
| Liquid Crystal Panel=786,432 pixels (1024 horizontal x 768 vertical) | |
| Lens=Zoom lens, f = 19 ~ 23 mm (approximately) | |
| Lamp=210W UHP | |
| Speaker=16W | |
| Power supply=AC 100-120V/3.7A, AC220-240V/1.8A | |
| Power consumption=330 W | |
| Temperature range=5 ~ 35°C (Operating) | |
| Size | 317 (W) x 98 (H) x 288 (D) mm* Not including protruding parts. Please refer to the following figure. |
| Weight (mass)=approx. 3.6kg | |
| Ports | Computer input portCOMPUTER IN1 ....D-sub 15 pin mini x1COMPUTER IN2 ....D-sub 15 pin mini x1Computer output portMONITOR OUT ....D-sub 15 pin mini x1Video input portY, Cb/Pb, Cr/Pr (Component video) ....RCA x3S-VIDEO....mini DIN 4 pin x1VIDEO ....RCA x1Audio input/output portAUDIO IN1....Stereo mini x1AUDIO IN2....Stereo mini x1AUDIO IN3 (R, L)....RCA x2AUDIO OUT (R, L)....RCA x2OthersUSB ....USB-B x1CONTROL ....D-sub 9 pin x1 |
Spécifications (suite)

[unité : mm]
Avis important
Projecteur numérique 3M™ X30
Toutes les déclarations, informations techniques et recommandations relatives aux produits 3M sont basées sur des informations jugées fiables, mais leur exactitude ou exhaustivité n'est pas garantie. Avant d'utiliser ce produit, vous devez l'évaluer et déterminer s'il convient à votre application prévue. Vous assumez tous les risques et responsabilités associés à une telle utilisation. Toute déclaration relative au produit qui n'est pas contenue dans la publication actuelle de 3M, ou toute déclaration contraire contenue dans votre bon de commande, n'aura aucun effet, sauf accord écrit exprès d'un dirigeant autorisé de 3M.
Garantie
3M garantit que lorsque le produit 3M est utilisé conformément à la déclaration d'utilisation prévue de 3M (www.3M.com/meetings), il fonctionnera de manière satisfaisante pendant la durée de garantie indiquée dans le manuel du produit 3M applicable en vigueur au moment de l'achat. Les garanties énoncées dans les manuels de produits 3M applicables sont exclusives et remplacent toutes les garanties ou conditions expresses ou implicites, y compris toute garantie implicite de qualité marchande ou d'adéquation à un usage particulier, ou toute pratique industrielle, coutume ou usage commercial.


http://www.3m.com/meetings courriel : meetings@mmm.com
3M Austin Center
Bâtiment A145-5N-01
6801 River Place Blvd.
Austin, TX 78726-9000
3M Canada
C.P. 5757
London, Ontario
N6A 4T1
3M Mexico, S.A. de C.V.
Apartado Postal 14-139
Mexico, D.F. 07000
Mexique
3M Europe
Boulevard de l'Oise
95006 Cerge Pontoise Cedex
France
Litho in China
© 3M 2009
78-6971-1501-8 Rev. A



- M
- PROJECTEUR NUMÉRIQUE X
- GUIDE DE L'UTILISATEUR
- À PROPOS DE CE MANUEL
- AVERTISSEMENT
- ATTENTION
- RECONNAISSANCE DES MARQUES
- SOMMAIRE
- CARACTÉRISTIQUES DU PROJECTEUR
- PRÉPARATIONS .... 3 VÉRIFICATION DU CONTENU DE L'EMBALLAGE
- NOMENCLATURE
- INSTALLATION
- TÉLÉCOMMANDE
- MISE SOUS/HORS TENSION
- FONCTIONNEMENT
- MENU FACILE
- MENU IMAGE
- MENU ENTRÉE
- MENU RÉGLAGE
- MENU AUDIO
- MENU ÉCRAN
- MENU OPTION
- MENU SÉCURITÉ
- MAINTENANCE
- DÉPANNAGE
- SPÉCIFICATIONS
- TECHNIQUE (ANGLAIS UNIQUEMENT)
- PRÉPARATIFS
- VÉRIFICATION DU CONTENU DE L'EMBALLAGE
- PROJECTEUR
- PANNEAU DE COMMANDE
- PANNEAU ARRIÈRE (9)
- DISPOSITION
- DISPOSITION (SUITE)
- CONNEXION DE VOS APPAREILS
- CONNEXION DE VOS APPAREILS (SUITE)
- À PROPOS DE LA FONCTION PLUG-AND-PLAY
- CONNEXION DE L'ALIMENTATION ÉLECTRIQUE
- UTILISATION DE LA BARRE ET DE LA FENTE DE SÉCURITÉ
- INSTALLATION DES PILES
- À PROPOS DU SIGNAL DE LA TÉLÉCOMMANDE
- CHANGEMENT DE LA FRÉQUENCE DU SIGNAL DE LA TÉLÉCOMMANDE
- UTILISATION COMME SOURIS ET CLAVIER PC SIMPLES
- MISE SOUS TENSION
- MISE HORS TENSION
- RÉGLAGE DU VOLUME
- COUPURE TEMPORAIRE DU SON
- SÉLECTION D'UN SIGNAL D'ENTRÉE
- SÉLECTION D'UN SIGNAL D'ENTRÉE (SUITE)
- RECHERCHE D'UN SIGNAL D'ENTRÉE
- APPUYEZ SUR LE BOUTON SEARCH DE LA TÉLÉCOMMANDE
- SÉLECTION D'UN FORMAT D'IMAGE
- APPUYEZ SUR LE BOUTON ASPECT DE LA TÉLÉCOMMANDE
- ○ POUR UN SIGNAL D'ORDINATEUR
- ○ POUR UN SIGNAL VIDÉO, UN SIGNAL S-VIDÉO OU UN SIGNAL VIDÉO COMPOSANT
- ○ POUR AUCUN SIGNAL
- RÉGLAGE DU PIED ÉLÉVATEUR DU PROJECTEUR
- RÉGLAGE DU ZOOM ET DE LA MISE AU POINT
- UTILISATION DE LA FONCTION DE RÉGLAGE AUTOMATIQUE
- APPUYEZ SUR LE BOUTON AUTO DE LA TÉLÉCOMMANDE
- ○ POUR UN SIGNAL VIDÉO ET UN SIGNAL S-VIDÉO
- ○ POUR UN SIGNAL VIDÉO COMPOSANT
- RÉGLAGE DE LA POSITION
- CORRECTION DES DISTORSIONS TRAPÉZOÏDALES
- UTILISATION DE LA FONCTION ZOOM
- GEL TEMPORAIRE DE L'IMAGE
- APPUYEZ SUR LE BOUTON FREEZE DE LA TÉLÉCOMMANDE
- MASQUAGE TEMPORAIRE DE L'ÉCRAN
- APPUYEZ SUR LA TOUCHE BLANK DE LA TÉLÉCOMMANDE
- ⚠️ ATTENTION ▶ SI VOUS SOUHAITEZ OBTENIR UN ÉCRAN VIDE ALORS QUE LA LAMPE DU PROJECTEUR EST ALLUMÉE, UTILISEZ L'UNE DES MÉTHODES CI-DESSOUS
- UTILISATION DE LA FONCTION MENU
- DANS LE MENU EASY MENU
- DANS LE MENU ADVANCED MENU
- UTILISATION DE LA FONCTION MENU (SUITE)
- INDICATION DANS L'OSD (AFFICHAGE À L'ÉCRAN)
- MENU SCREEN
- MENU SECURITY
- ENTRER DANS LE MENU SECURITY
- SI VOUS AVEZ OUBLIÉ VOTRE MOT DE PASSE
- ARTICLE DESCRIPTION
- REMPLACEMENT DE LA LAMPE
- REMPLACEMENT DE LA LAMPE (SUITE)
- AVERTISSEMENT CONCERNANT LA LAMPE
- HAUTE TENSION
- HAUTE TEMPÉRATURE
- HAUTE PRESSION
- NETTOYAGE ET REMPLACEMENT DU FILTRE À AIR
- NUMÉRO DE TYPE : 78-8138-1041-9 (MU06481 (JEU DE FILTRES))
- NETTOYAGE ET REMPLACEMENT DU FILTRE À AIR (SUITE)
- ALLUMEZ LE PROJECTEUR ET RÉINITIALISEZ LE TEMPS DE FILTRE À L'AIDE DE L'ÉLÉMENT FILTER TIME DU MENU FACILE
- AUTRES SOINS
- INTÉRIEUR DU PROJECTEUR
- ENTRETIEN DE L'OBJECTIF
- ENTRETIEN DU BOÎTIER ET DE LA TÉLÉCOMMANDE
- MESSAGES ASSOCIÉS
- CONCERNANT LES VOYANTS
- ARRÊT DU PROJECTEUR
- RÉINITIALISATION DE TOUS LES PARAMÈTRES
- PHÉNOMÈNES POUVANT ÊTRE FACILEMENT CONFONDUS AVEC DES DÉFAUTS DE LA MACHINE
- SPÉCIFICATIONS (SUITE)
- AVIS IMPORTANT
- GARANTIE
Marque : 3M
Modèle : X30
Catégorie : Vidéoprojecteur