
F-208RDS - Radio PIONEER - Notice d'utilisation et mode d'emploi gratuit
Retrouvez gratuitement la notice de l'appareil F-208RDS PIONEER au format PDF.

| Type de produit | Tuner FM/AM numérique à synthétiseur |
| Marque | PIONEER |
| Modèle | F-208RDS |
| Dimensions (L x H x P) | 420 x 78 x 287 mm |
| Poids (sans emballage) | 2.7 kg |
| Alimentation | CA 230 V, 50/60 Hz |
| Consommation électrique | 10 W (veille 1 W) |
| Gammes de fréquences FM | 87.5 MHz à 108 MHz |
| Gammes de fréquences AM (PO) | 531 kHz à 1 602 kHz (pas 9 kHz) |
| Gammes de fréquences AM (GO) | 153 kHz à 281 kHz |
| Sensibilité FM (mono) | 14.2 dBf (1.4 μV/75 Ω) |
| Rapport signal/bruit FM | 76 dB (mono), 73 dB (stéréo) |
| Sélectivité FM | 70 dB (±400 kHz) |
| Séparation stéréo FM | 40 dB (1 kHz) |
| Réponse en fréquence FM | ±1 dB (30 Hz à 15 kHz) |
| Sortie audio (niveau/impédance) | FM : 1.0 V/1 kΩ ; AM : 224 mV/1 kΩ |
| Fonctions RDS | PS, PTY, RT, EON, recherche PTY |
| Mémorisation des stations | 30 stations (3 classes de 10) |
| Nom de station manuel | Jusqu'à 4 caractères |
| Atténuateur RF (RF ATT) | Oui, pour signaux FM forts |
| Mode multiplex (MPX) | Auto/Mono |
| Accord direct | Par touches numériques |
| Antennes fournies | FM T-type, AM cadre, cordons audio et de contrôle |
| Entretien | Chiffon doux sec ou légèrement humide (détergent neutre dilué) |
| Sécurité | Ne pas exposer à la pluie ni à l'humidité ; débrancher avant entretien |
| Pièces détachées / réparabilité | Consulter un centre de service agréé PIONEER |
FOIRE AUX QUESTIONS - F-208RDS PIONEER
Questions des utilisateurs sur F-208RDS PIONEER
0 question sur cet appareil. Repondez a celles que vous connaissez ou posez la votre.
Poser une nouvelle question sur cet appareil
Téléchargez la notice de votre Radio au format PDF gratuitement ! Retrouvez votre notice F-208RDS - PIONEER et reprennez votre appareil électronique en main. Sur cette page sont publiés tous les documents nécessaires à l'utilisation de votre appareil F-208RDS de la marque PIONEER.
MODE D'EMPLOI F-208RDS PIONEER
FM/AM DIGITAL-SYNTHESIZER TUNER
F-208RDS
Operating Instructions
Thank you for buying this PIONEER product.
Please read through these operating instructions so you will know how to operate your model properly. After you have finished reading the instructions, put them away in a safe place for future reference.
In some countries or regions, the shape of the power plug and power outlet may sometimes differ from that shown in the explanatory drawings. However, the method of connecting and operating the unit is the same.
WARNING: TO PREVENT FIRE OR SHOCK HAZARD,DO NOT EXPOSE THIS APPLIANCE TO RAIN OR MOISTURE.
This product complies with the Low voltage Directive (73/23/ EEC),EMC Directives (89/336/EEC,92/31/EEC) and CE Marking Directive (93/68/EEC).
THE POWER SWITCH IS SECONDARY CONNECTED AND THEREFORE DOES NOT SEPARATE THE UNIT FROM MAINS POWER IN STANDBY POSITION.
IMPORTANT

The lightning flash with arrowhead symbol, within an equilateral triangle, is intended to alert the user to the presence of uninsulated "dangerous voltage" within the product's enclosure that may be of sufficient magnitude to constitute a risk of electric shock to persons.
CAUTION
RISK OF ELECTRIC SHOCK DO NOT OPEN
CAUTION:
TO PREVENT THE RISK OF ELECTRIC SHOCK, DO NOT REMOVE COVER (OR BACK). NO USER-SERVICEABLE PARTS INSIDE. REFER SERVICING TO QUALIFIED SERVICE PERSONNEL.

The exclamation point within an equilateral triangle is intended to alert the user to the presence of important operating and maintenance (servicing) instructions in the literature accompanying the appliance.
IMPORTANT
FOR USE IN THE UNITED KINGDOM
The wires in this mains lead are coloured in accordance with the following code :
blue: neutral
brown:live
If the plug provided is unsuitable for your socket outlets, the plug must be cut off and a suitable plug fitted.
The cut-off plug should be disposed of and must not be inserted into any 13 amp socket as this can result in electric shock. The plug or adaptor or the distribution panel should be provided with 5 amp fuse. As the colours of the wires in the mains lead of this appliance may not correspond with coloured markings identifying the terminals in your plug, proceed as follows:
The wire which is coloured blue must be connected to the terminal which is marked with the letter N or coloured black. The wire which is coloured brown must be connected to the terminal which is marked with the letter L or coloured red.
Do not connect either wire to the earth terminal of a three pin plug.
NOTE
After replacing or changing a fuse, the fuse cover in the plug must be replaced with a fuse cover which corresponds to the colour of the insert in the base of the plug or the word that is embossed on the base of the plug, and the appliance must not be used without a fuse cover. If lost, replacement fuse covers can be obtained from your dealer.
Only 5 A fuses approved by B.S.I. or A.S.T.A. to B.S. 1362 should be used.
INSTALLATION
Location
Install the tuner in a well-ventilated location where it will not be exposed to high temperatures or humidity.
Do not install the tuner in a location which is exposed to direct rays of the sun, or near hot appliances or radiators. Excessive heat can adversely affect the cabinet and internal components. Installation of the tuner in a damp or dusty environment may result in a malfunction or accident. (Also avoid installation near cookers, etc., where the tuner may be exposed to smoke, steam, or heat.)
Condensation
When this unit is brought into a warm room from previously cold surroundings or when the room temperature rises sharply, condensation may from inside, and the unit may not be able to attain its full performance. In this case, allow the unit to stand for about an hour or raise the room temperature gradually.
Power-cord Caution
Handle the power cord by the plug. Do not pull out the plug by tugging the cord and never touch the power cord when your hands are wet as this could cause a short circuit or electric shock. Do not place the unit, a piece of furniture, etc., on the power cord, or pinch the cord. Never make a knot in the cord or tie it with other cords. The power cords should be routed such that they are not likely to be stepped on. A damaged power cord can cause fire or give you an electrical shock. Check the power cord once in a while. When you find it damaged, ask your nearest PIONEER authorized service center or your dealer for a replacement.
Maintenance of External Surfaces
- Use a polishing cloth or dry cloth to wipe off dust and dirt.
- When the surfaces are very dirty, wipe with a soft cloth dipped in some neutral cleanser diluted five or six times with water, and wrung out well, and then wipe again with a dry cloth. Do not use furniture wax or cleaners.
- Never use thinners, benzine, insecticide sprays or other chemicals on or near this unit, since these will corrode the surfaces.
CONTENTS
INSTALLATION 2
FEATURES 3
CHECKING THE ACCESSORIES 3
CONNECTIONS 4
Antenna Connections 5
FRONT PANEL FACILITIES 6
BASIC TUNING OPERATIONS 8
Auto and Manual Tuning 8
Direct Access Tuning 9
PRESETTING STATIONS 10
Preset Stations 10
Preset Station Tuning 10
Manual Station Name Memory 11
RDS (Radio Data System) 12
RDS Data Display 13
EON Setting and Reception 14
Program Type Search (PTY Search) 15
ADDITIONAL DATA 16
TROUBLESHOOTING 18
SPECIFICATIONS 19
FEATURES
RDS (Radio Data System)
This tuner features RDS, offering the convenient features shown below.
- PS (Program Service Name) display
- PTY (Program Type) display
RT (Radio Text) display of up to 64 characters - Broadcast station search by program type (PTY Search)
EON (Enhanced Other Networks)
Presetting RDS stations lets you take full advantage of RDS functions.
EON (Enhanced Other Networks) reception
EON is one RDS function.
Function which switches a frequency automatically when a specified program starts, if it is set as a Traffic Information (TA) or News station in advance.
Random 30-station presetting
A total of 30 FM and AM stations can be preset into the memory circuit.
Manual station name memory
Using up to 4 characters, you can store a name of your choice for preset FM/AM broadcast stations 1 to 30.
RF ATT
A built-in attenuator (RF ATT) can be switched on or off for proper reception of strong boradcast stations.
Energy-saving design
This unit is designed to use minimal electricity when power is switched OFF (during Standby).
Regarding the value of the power consumption in standby mode, refer to "SPECIFICATIONS" on page 19.
CHECKING THE ACCESSORIES
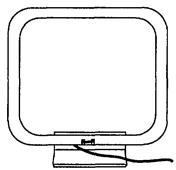
AM loop antenna
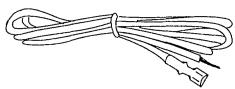
FM T-type antenna
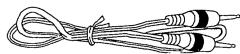
Audio cord
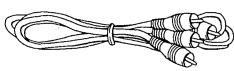
Control cord
CONNECTIONS
Before making or changing the connections, switch off the power switch and disconnect the power cord from the AC outlet.
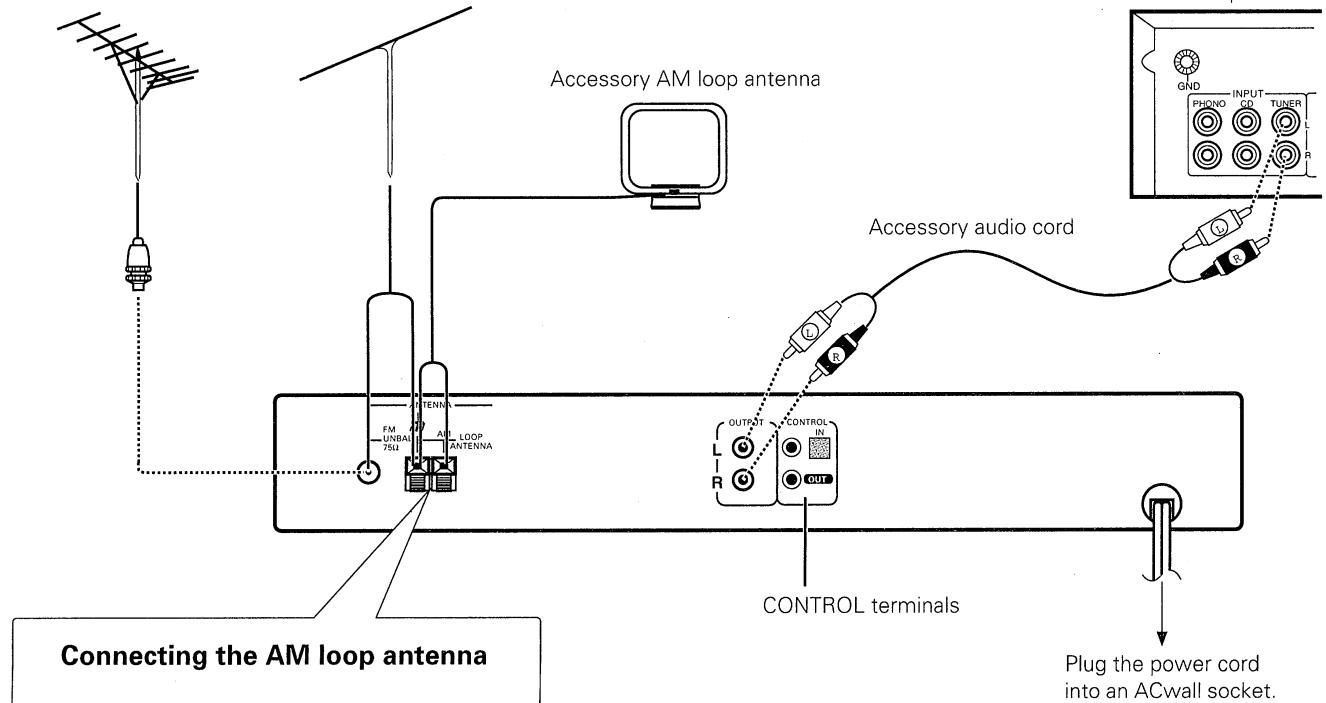
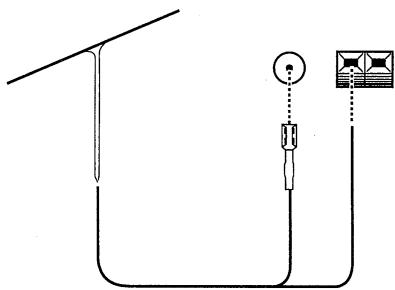
Outdoor FM antenna
Accessory FM T-type antenna
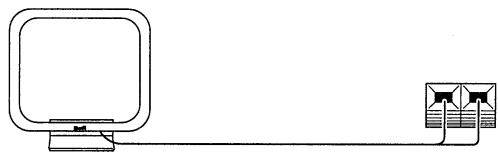
Connecting the AM loop antenna
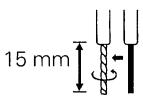

- Strip and twist the ends of the wires.
- With tabs beneath connector down, insert wires
from loop antenna. - Pull up tabs to close the connection.
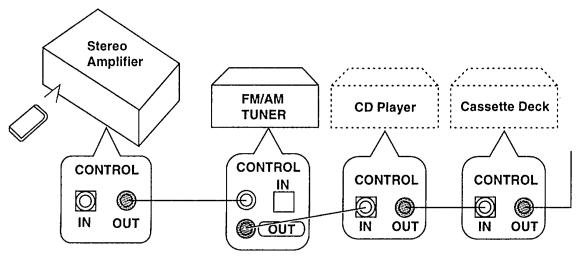
CONTROL terminals
When using together with a Pioneer component bearing the mark, connect the CONTROL IN terminal on the rear panel of the tuner to the CONTROL OUT terminal on the component using the supplied control cord. This will enable the tuner to be controlled from a distance with the remote control unit supplied with the component.
When this feature is not used, connection is not necessary.
- For instructions regarding connection and operation, please refer to the operating instructions of your stereo component.
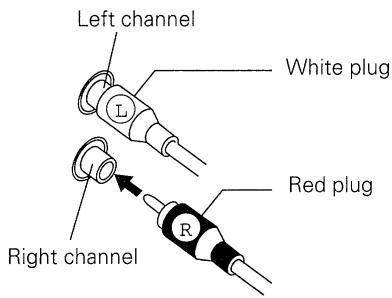
Pin plug connecting cord
- Connect the white plug to the white terminal (L) and the red plug to the red terminal (R).
- Make sure that the connections are secure.
Antenna ground
NOTE:
The (signal earth) helps reduce noise when an antenna is connected. It is not a safety earth.
CAUTION:
Never make the ground connection to a gas pipe as sparks can cause the gas ignite.
Antenna Connections
Radio reception is not possible unless the antenna is properly connected.
The strength of broadcast signals varies from one area to another. Signal propagation is especially poor in metropolitan areas, where there are many tall buildings, and also in mountainous areas. Proper antenna installation is vital to good reception.
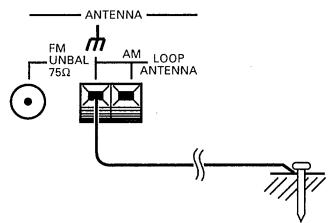
AM ANTENNA
The AM loop antenna supplied with the tuner should be connected to the AM antenna terminals. The antenna should be placed at a distance from the tuner, and should not be allowed to touch metallic objects. Avoid placing it near CD players, personal computers, television sets, and other devices generating radio frequencies.
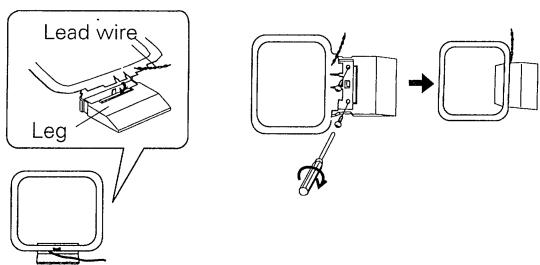
Setting up the AM loop antenna
- Insert the clip on the bottom of the antenna into the groove on the leg.
- Place the antenna on a level surface and rotate it to locate the orientation that yields the best reception.
- To permanently affix the antenna, screw the leg to a wall or post before assembling (affixing the antenna in the direction that gives the best reception).
AM loop antenna connection
The accessory AM loop antenna must be connected to ensure proper reception.
External AM antenna
Indoor AM antenna
Provide a vinyl-coated wire (5 to 6 meters long). Secure one end to the AM terminal marked "AM LOOP ANTENNA" and the other end to a wall or other high location.
Outdoor AM antenna
If reception is still poor even when a lead antenna has been stretched out indoors, stretch out a vinyl-coated wire and secure it outdoors.
Connecting the external AM antenna
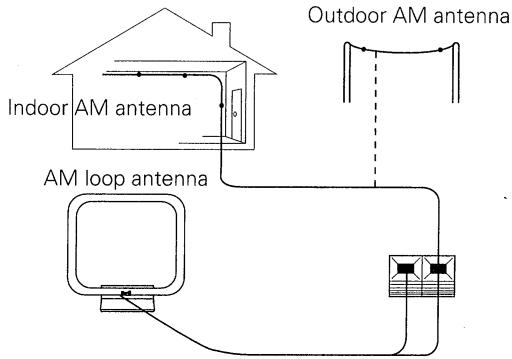
NOTE:
Do not detach the AM loop antenna when using an external AM antenna.
FM ANTENNA
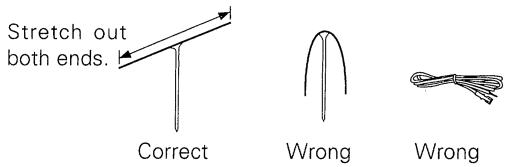
FM T-type antenna attachment
Connect the accessory FM T-type antenna to the FM terminals. Stretch the antenna out to its full length, and affix it to a wall, etc. The accessory FM T-type antenna must be connected to ensure proper reception.
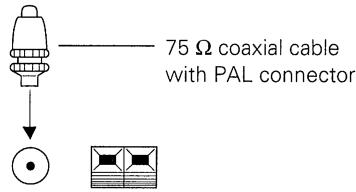
Outdoor external FM antenna installation
Use an external antenna when the signals from the station are weak and cannot be picked up by the accessory T-type FM antenna, or when the sound heard is accompanied by too much noise.
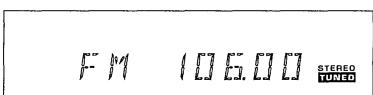
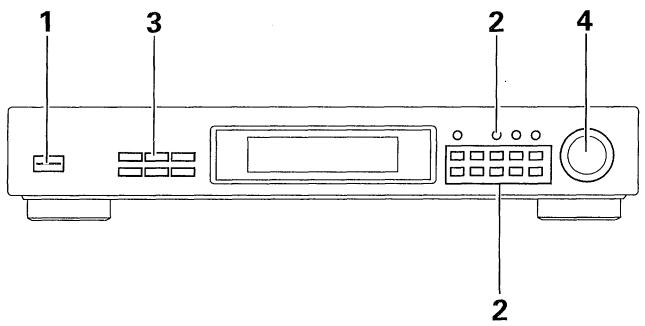
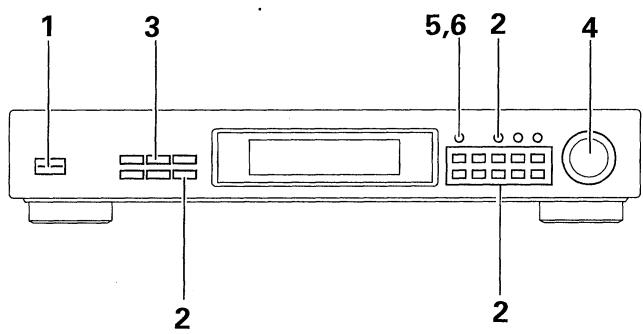
FRONT PANEL FACILITIES
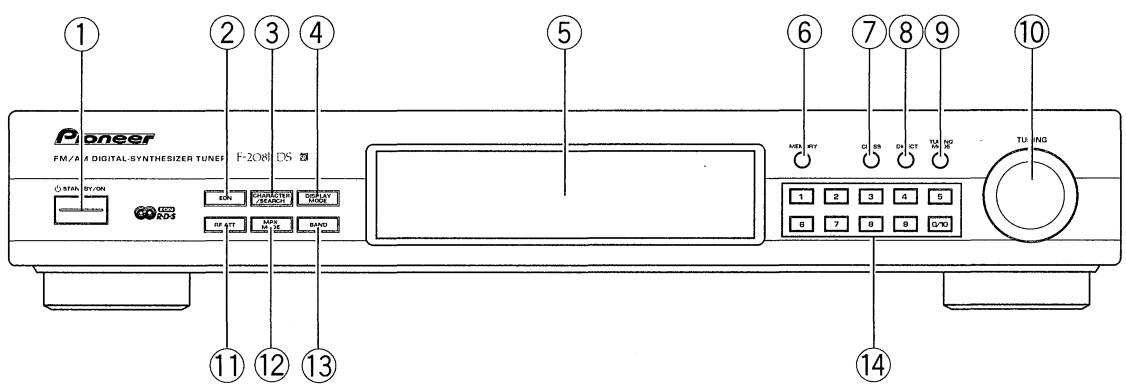
① STANDBY/ON switch
This is the switch for electric power.
ON . When set to ON position, power is supplied and the unit becomes operational.
STANDBY ....... When set to STANDBY position, the main power flow is cut and the unit is no longer fully operational. A minute flow of power feeds the unit to maintain operation readiness.
NOTES:
- The memory will be backed up so long as the power cord is unplugged.
- If the power cord is unplugged, the memory will be retained for several days.
- When not using the unit for a long period, disconnect the power cord.
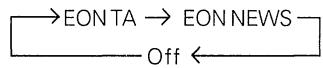
② EON button
Use this to select the desired EON mode. (see page 14)
Each time you press the button, the mode changes as follows.
(3) CHARACTER/SEARCH button
When in the Preset Station Tuning mode:
You can use it to input station names manually. (see page 11)
During FM reception:
You can use it to perform Program Type Search. (see page 15)
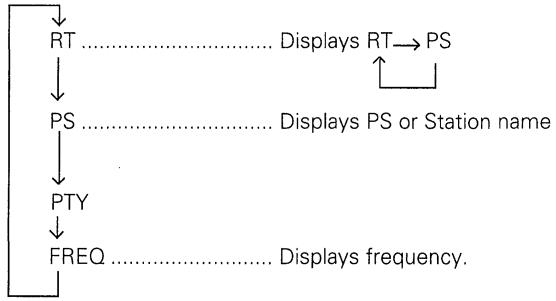
④ DISPLAY MODE button
During FM reception, Use this to switch between display modes. Each time you press it, the display changes as follows.
When receiving AM, valid only when the station name is memorized.
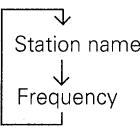
When no station name is memorized, the DISPLAY MODE button becomes invalid.
⑤ Operating Display
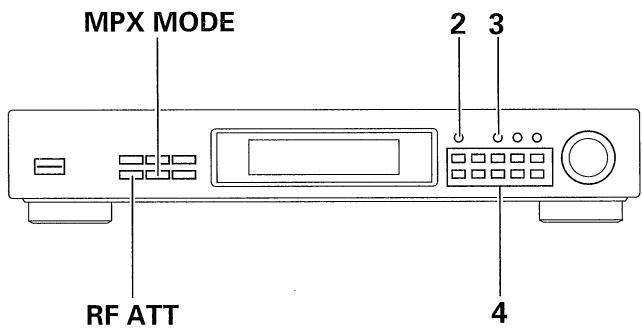
⑥ MEMORY button
Use to preset stations. This is also used for FM or AM broadcast manual station name character selection and for Program Type Search.
⑦CLASS button
Use to switch between preset memory classes A to C. In each class, 10 stations can be memorized using the STATION CALL buttons, enabling a total of 30 stations to be memorized.
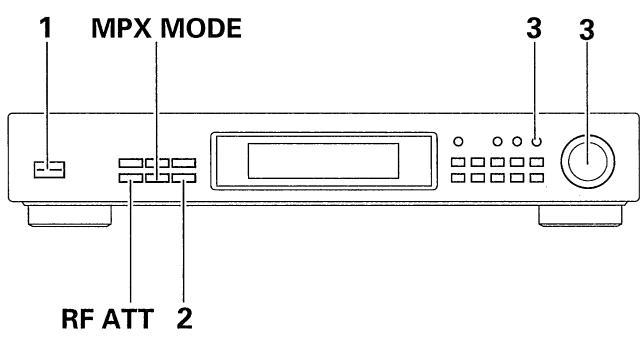
⑧ DIRECT button
When this button is pressed, the STATION CALL buttons function as ten-key number buttons for direct input of the desired reception frequency. Press again to cancel this mode.
⑨ TUNING MODE button
Each time you press this button, the TUNING knob's function changes as follows.

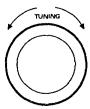
⑩ TUNING knob
Use for tuning. To raise the frequency, turn in a clockwise direction; to lower the frequency, turn counterclockwise.
AM : For MW, frequency changes in 9 kHz steps. For LW, frequency changes in 1 kHz steps.
FM : Frequency changes in 50kHz steps.
In the station name input mode, PTY search mode, the TUNING knob is used to select characters and program types. When presetting a station or selecting a preset station, you can also turn this knob to select a desired station number.
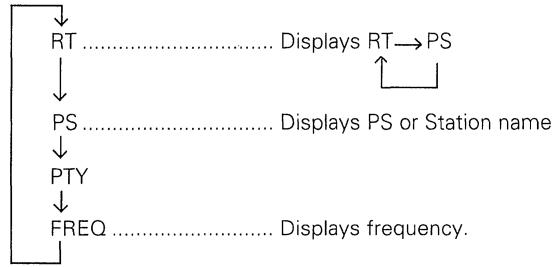
⑪ RF ATT button
Set this button to on when receiving strong FM signals (nearby stations) to reduce sound distortion. (RF ATT indicator lights.) Normally, this button should be set to off. This button does not affect AM reception.
NOTE:
This button's status is preset for each station in station memory.
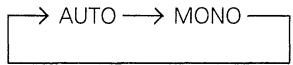
12 MPX (multiplex) MODE button
Mode changes as follows each time this button is pressed.
This button does not affect AM reception.
AUTO:
"AUTO" is not displayed.
Normally leave in this mode for reception. When a stereo FM broadcast is received, it will be automatically reproduced in stereo sound and the STEREO indicator lights up.
MONO:
MONO indicator lights up.
To receive stereo broadcasts in monaural.
If there is too much noise during stereo reception of a weak signal, you can reduce the level of noise by switching to MONO.
NOTES:
- This button's status is preset for each station in station memory.
- When the signal level is too weak for reception, sound output is automatically muted. If sound is muted when the selected mode is AUTO, switching to MONO lets you hear the broadcast.
⑬ BAND button
The button is used to select either FM or AM reception. The bands change alternately as follows, each time this button is pressed.

14 STATION CALL buttons
Use these buttons to preset stations and to receive the already preset stations.
These are also used when performing direct access tuning.
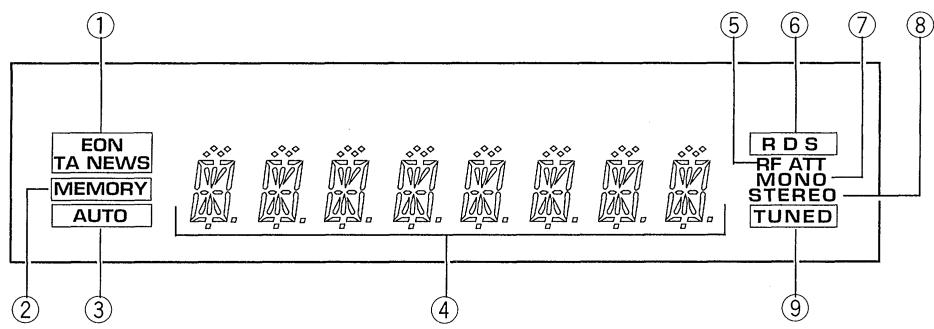
Operating Display
① EON(TA/NEWS) indicator
Lights during EON Standby. Flashes during EON reception.
② MEMORY indicator
Lights when presetting stations.
③ AUTO indicator
Lights during auto tuning mode.
④ Frequency and character display section
Band and frequency data is displayed.
During FM reception, the display changes as follows each time the DISPLAY MODE button is pressed.
⑤ RF ATT indicator
Stays lit while RF ATT button is on.
⑥RDS indicator
Lights when an RDS broadcast is received.
⑦ MONO indicator
Stays lit while MPX MODE button is set to MONO.
⑧STEREO indicator
Lights up when a stereo broadcast is received (the indicator does not light when the MPX MODE button is set to MONO).
⑨ TUNED indicator
Lights when a broadcast is received.
BASIC TUNING OPERATIONS
The following steps show you how to tune in FM and AM radio broadcasts using "Auto and Manual Tuning". If you already know the exact frequency of the station you want, see "Direct Access Tuning" on the following page.
Auto and Manual Tuning
1. Turn the STANDBY/ON switch ON.
2. Press the desired BAND button.
Each time you press the button, the band changes as follows.

3. Tuning into the frequency of a desired station.
Press the TUNING MODE button to select the tuning mode. Each time you press this button, the tuning mode changes as follows.

Tune into desired frequency with the TUNING knob.
- During auto tuning, the AUTO indicator in the display lights. No indicator lights during manual tuning. During preset station tuning, the station number or station name is displayed.
4. To receive another station in the same band, repeat step 3. To receive a station in the other band, repeat steps 2 and 3.
5. Adjust the volume and tone of the stereo amplifier.
[Manual tuning mode]
To raise the frequency, turn clockwise; to lower the frequency, turn counterclockwise.
- Step change in the following way. FM: 50kHz, AM: 9kHz (MW), 1kHz (LW).
[Auto tuning mode]
To tune into a frequency higher than the one indicated, turn the TUNING knob clockwise. To tune into a frequency lower than the one indicated, turn the TUNING knob counterclockwise; release when the frequency indication starts changing. The frequency display changes, and tuning automatically stops when a frequency that can be received is found. To search for another station, turn the TUNING knob once more.
NOTES:
(On auto tuning)
- Because of the high sensitivity of this unit, it may automatically stop even at very weak overseas stations. The same can happen with aggregate radio noise emitted in cities.
- During reception of an AM broadcast, auto tuning of only strong local stations is possible by changing the direction of the loop antenna or folding it down. After tuning, move the loop antenna back to its previous position.
- Tune extremely weak stations with manual tuning.
- If the radio waves of available stereo stations are weaker than a certain level, the auto tuning may not function for these stations.
(When receiving FM broadcasts)
- If there is distortion because the radio signal is too strong, press the RF attenuator (RF ATT) button to light the RF ATT indicator.
- If there is too much noise during reception of an FM stereo broadcast, press the MPX MODE button to light the MONO indicator. Switching to monaural reception results in clearer reception.
The TUNED Indicator
When the TUNED indicator is not lit, reception is not possible even if the tuning frequency is correct. This is because the antenna terminal input is too weak. Check whether the antenna cable is firmly connected. If it is, consult your nearest dealer and install an outdoor antenna.
Last station memory
- When the STANDBY/ON switch is pressed to turn the power on, the last station received before the power was turned off will be received again.
- When the power is ON and the BAND button is pressed, the last station received on that band will be received again.
Direct Access Tuning
When you know the frequency of the desired station, the frequency can be input directly using the STATION CALL buttons in the following way.
- Turn the STANDBY/ON switch ON.
- Select the desired band with the BAND button.
- Press the DIRECT button.
- Input the desired station frequency using the STATION CALL buttons.
To cancel frequency input
Direct access is canceled when the DIRECT button is pressed again. Under the following conditions, direct access is canceled and the unit returns to the condition in effect before direct access was selected:
① If there is no key input for approximately five seconds after the DIRECT button is pressed.
② If more than approximately five seconds elapse between number inputs.
NOTES:
- Always input the frequency to the last digit.
After performing direct access and inputting the frequency, any discrepancy is corrected (for example, FM 100.01 MHz FM 100.00 MHz), so the MEMORY button does not immediately function after the final digit has been input. To memorize a station frequency, first confirm that "MEMORY" is lit on the display before pressing the STATION CALL button.
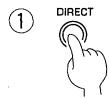
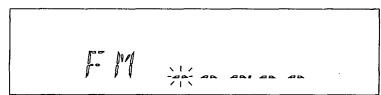
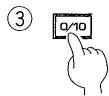
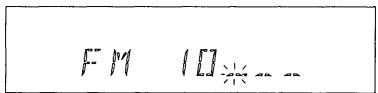
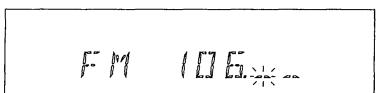
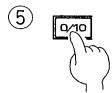
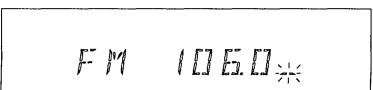
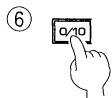
To receive FM 106.00 MHz.
① Press the DIRECT button.
| ② Press | 1 |
| ③ Press | 0/10 |
| ④ Press | 6 |
| ⑤ Press | 0/10 |
| ⑥ Press | 0/10 |

PRESETTING STATIONS
Preset Stations
10 stations can be preset in each of the 3 classes, for a total of 30 station presets.
CLASS A: 1 to 0 CH
CLASS B: 1 to 0 CH
CLASS C: 1 to 0 CH
Preset stations to take full advantage of this tuner's basic performance capabilities.
1. Tune in the desired station.
For details concerning tuning, refer to "BASIC TUNING OPERATIONS" on page 8 and 9.
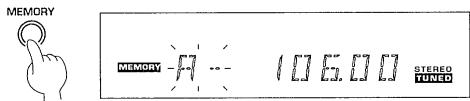
2. Press the MEMORY button.
- The MEMORY indicator will light for several seconds.
- Memory storage is not possible once the indicator goes off. In this case, press the MEMORY button again.
- If the button is pressed again while the indicator is lit up, the memory function will be canceled.
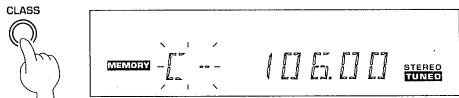
3. Select the desired class (A to C) with the CLASS button.
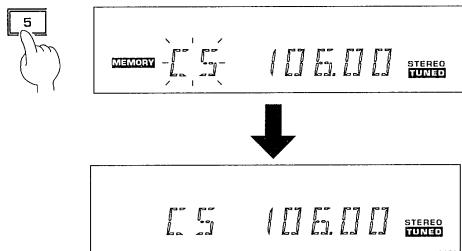
4. While the MEMORY indicator is lit, press the desired STATION CALL button.
Pressing a STATION CALL button causes the MEMORY indicator to go out and the station to be preset.
A station is preset (memorized) a few seconds after pressing the STATION CALL button.
5. Repeat procedure 1 to 4 to memorize other stations.
NOTES:
- You can also store MPX MODE and RF ATT settings in memory.
- If a station is memorized with the STATION CALL buttons at a position where a station is already memorized, the previous contents are erased and the new data is stored in memory.
- If preset stations get erased, repeat the preset procedure from the beginning.
Preseting an FM 106.00 MHz station into Class C with station no. (CH) 5.
2.
3.
4.
Preset Station Tuning

1. Select the class number with the CLASS button.
2. Press the STATION CALL button to select the desired preset.
NOTES:
- The contents of preset memory will be retained for several days, even if the tuner's power cord is unplugged.
- If a preset station has been erased, preset it again.
Manual Station Name Memory
Using up to 4 characters, you can store a name of your choice for preset FM/AM broadcast stations 1 to 30. Even if PS data is already received using RDS, an FM or AM broadcast can still be memorized. In this case, the memorized name takes priority over the PS data name.
- Turn the STANDBY/ON switch ON.
- Select the desired broadcast station with the CLASS button and STATION CALL button.
- Press the CHARACTER/SEARCH button once to select the Station name input mode.
"INPUT" lights in the display, and the mode switches to manual memory.
- While "INPUT" is displayed, turn the TUNING knob clockwise or counterclockwise to input a desired character.
Enter characters in the following way:
① The first character in the display changes while you turn the TUNING knob. Select a character as desired. (see page 17)
② When you have selected your desired character, press the MEMORY button. This enters the first character and awaits input of the next character for memorization.
Repeat this procedure until all four characters have been entered.
NOTES:
- If you perform no operations within about 5 seconds after "INPUT" is displayed, the display returns to frequency indications.
- Even if the station name contains less than four characters, always input a space and repeat steps 4 (1) and 4 (2).
- When you want to change a memorized station name, after selecting a desired broadcast station, register the new name using steps 2 to 4.
For greater convenience, record memorized station names in the STATION CALL button "memo" on page 17.
When erasing a memorized station name, use the following procedure.
① Perform the steps 1 to 3 of "Manual Station Name Memory".
② While "INPUT" is displayed, turn the TUNING knob clockwise or counterclockwise to display a space.
③Press the MEMORY button. (One space is input.)
④ Repeat the step ③ three more times to input four space. (The space lies between "@" and "A".)

2.

3.

H
98.00
STEREO TUNED
4.
①
INFUT
RDS
ST5P50

②
中
RDS
STEREO TUNED
After entering the fourth character...

MEST
ROG
STEREO
TUNED
RDS (Radio Data System)
In the RDS system, FM broadcast stations transmit information such as station name and program type in addition to standard audio signals. This unit receives the following data, displays the three data, RT, PS, PTY, and provides the functions, EON and Program Type Search.
RT (Radio Text) data
A message transmitted from the broadcast station using a maximum of 64 characters.
PS (Program Service Name) data
This refers to the broadcast station name transmitted by an FM broadcast station.
PTY (Program Type) data
This refers to the type of program being broadcast by a particular station at a given time. For details concerning types of PTY data, refer to "The 29 PTY data titles transmitted" on page 16.
EON (Enhanced Other Networks) reception
Function that allows you to set the receiver to switch to a frequency automatically when a program featuring traffic information or news is being broadcast. It cannot be used in areas that EON information is not transmitted and when FM broadcast stations do not transmit PTY data.
When the broadcast ends, it returns to the original frequency.
Program Type Search (PTY Search)
You can select a desired program type, and perform Program Type Search for preset stations broadcasting that kind of program.
NOTE:
An RDS broadcast may be automatically interrupted by an emergency program. During reception of an emergency program, "ALARM" flashes in the display. When reception of the emergency program ends, reception of the program you were listening to before the interruption resumes.
PI (Program Identification)
This information consists of a code enabling the tuner to distinguish between countries or areas in which the same program is transmitted, and the identification of the program itself. The code is not intended for direct display and is assigned to each individual radio program to enable it to be distinguished from all other programs.
- PI code registration and deletion
To use the EON function, receivable RDS stations must be programmed in the tuner.When you program RDS stations in this tuner, PI codes are simultaneously memorized.
When the PI code is programmed and the same program (PI code) is preset using a different frequency, this function will only operate the most recently set station regardless of the reception state.
When presetting new frequencies due to relocation to another area, etc., it is necessary to delete registered PI codes.
To erase PI codes, perform the following procedure.
- Press the EON button for two seconds or more.
"ERASE PI" will be displayed. - Within 5 seconds, press the MEMORY button.
NOTE:
After erasing PI codes, preset stations once more to make the most of basic RDS performance capabilities.
RDS Data Display
During FM broadcast reception, you can view various kinds of RDS data transmitted by the FM station by performing the procedures below.

1. Turn the STANDBY/ON switch ON.
2. Select FM with the BAND button.
If the received broadcast transmits RDS data, the RDS indicator lights and automatically displays the mode data.
3. Press the DISPLAY MODE button and the display changes.
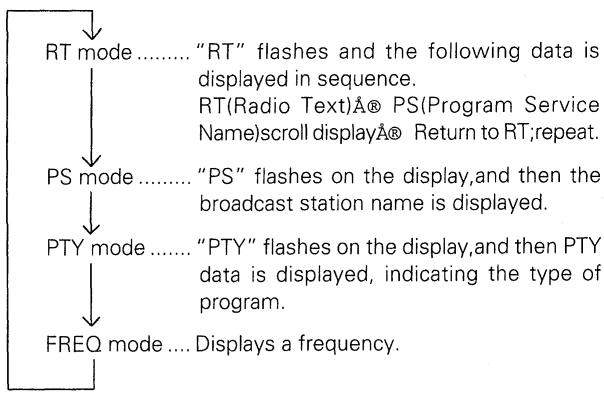
NOTES:
- If there is noise during RT scroll display when in the RT mode, some characters may temporarily be incorrectly displayed.
- In the RT mode, when no RT data is transmitted, "NO DATA" is displayed. In this case, it will automatically switch to the PS mode after a few seconds.
- During RDS broadcast reception in the PTY mode, "NO TYPE" data may be displayed. In this case, it will automatically switch to the PS mode after a few seconds.
- When RDS data is incorrectly displayed due to reception of an excessively strong signal, and RDS data is incorrectly displayed, use the RF ATT button to achieve the best reception sound. After that, RDS data may be displayed.
- Depending on the broadcast station, numerous program station names (PS) may be transmitted in succession. In this case, when you switch to the RT mode, only some of the PS data will be displayed, so switch to the PS mode.
- When the RDS indicator is not lit, and you are in the RT mode, only station names stored in memory manually, if any, will be displayed.
3.

F
ROB STEREO TUNED

F
BOS STEREO TUNED

1
F:M
RO9 STEREO TUNED

F
AOD STEREO TUNED

[1]
E99 STEREO TUNED
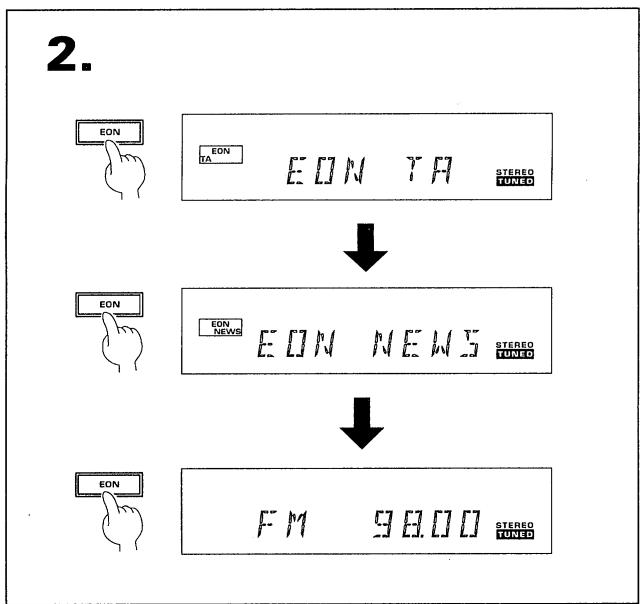
EON Setting and Reception
If you select EON TA or EON NEWS, the tuner automatically receives traffic information and news broadcasts by other networks as soon as the transmissions begin.

1. Receive the desired FM station.
2. Press the EON button and select the mode.
Use this to select the desired EON mode. Each time you press the button, the mode changes as follows.
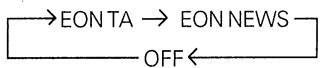
After selecting an EON mode, the EON indicator lights and the tuner switches to EON reception standby.
NOTES:
- The EON mode is cancelled if you switch to AM reception during setting EON. It starts once more when you return to FM reception.
- Simultaneous request waiting for Traffic Information (TA) and News programs is not possible.
- You cannot operate the MEMORY and CHARACTER/SEARCH buttons while the EON MODE indicator lights.
When an EON transmission is received during standby
If a program is transmitted, and it's a selected EON mode program, the tuner automatically switches to the station transmitting it. During EON reception, "EON" and the surrounding border continue to flash in the display.
NOTES:
- During EON reception, buttons other than the EON button, DISPLAY MODE button, RF ATT button, MPX MODE button and STANDBY/ON switch do not operate.
- If you want to listen to another station during EON reception, first press the EON button to cancel EON reception, and then tune to the desired station.
Program Type Search (PTY Search)
You can search for FM broadcasts of a desired program type (PTY).
- Turn the STANDBY/ON switch ON.
- Select a FM station with the BAND button, or with the CLASS button and STATION CALL button.
- Press the CHARACTER/SEARCH button to indicate "SEARCH" in the display.
When selecting a station with Preset Station Tuning, if you press this button once, "INPUT" is displayed. If you press it twice, "SEARCH" is displayed.
- Select the desired program type using the TUNING knob.
- When your desired program type is displayed, press the MEMORY button.
Search begins.
Search through preset stations while station number and frequency indications are displayed. When a station transmitting the desired program type is found, it is received for 5 seconds while display indications flash.
- To listen to a broadcast received when performing search, press the MEMORY button during reception of that program.
If you do not press the MEMORY button during this time, search continues. When search has been completed, "FINISH" lights in the display, and reception of the program you were listening to before you performed search resumes.
NOTES:
- If search does not find a station broadcasting the desired program type, "NO PTY" lights in the display, search ends, and reception of the program you were listening to before you performed search resumes.
- To enjoy this function, you must first preset RDS broadcast stations in this tuner.

3.
SEHR
ROS STEREOTUNED
4.
L月与X
209 STEREOTUNED

5
[3] 日飞55
ROB STEREO TUNED

开后 与马与口
10.9 STEREOTUNED

6.
月6 99.50
ROB
STEREO TUNED
ADDITIONAL DATA
The 29 PTY data titles transmitted
NEW5
News: Short accounts of facts, events and publicly expressed views, reportage and actuality.
AFFAIRS
Current affairs: Topical program expanding or enlarging upon the news, generally in a different presentation style or concept, including debate, or analysis.
INFO
Information: Program's purpose is to impart advice in the widest sense.
SPORT
Sport: Program concerned with any aspect of sport.
EUCAT
Education: Program intended primarily to educate, of which the formal element is fundamental.
J R M A
Drama: All radio plays and serials.
CULTURE
Culture: Programs concerned with any aspect of National or Regional culture, including language, theatre, etc.
SCIENCE
Science: Programs about the natural sciences and technology.
VARIEI
Varied: Used for mainly speech-based programs usually of light-entertainment nature, not covered by other categories. Examples include quiz shows, panel games, and personal interviews.
PDP M
Pop Music: Commercial music, which would generally be considered to be of current popular appeal, often featuring current or recent record sales charts.
ROCK M
Rock Music: Contemporary modern music, usually written and performed by young musicians.
M. O. R. M
M.O.R. Music: (Middle of the Road Music) Common term to describe music considered to be "easy-listening", as opposed to Pop, Rock or Classical. Music in this category is often but not always, vocal and usually of short duration.
LIGHTM
Light classical: Classical Music for general, rather than specialist appreciation. Examples of music in this category are instrumental music, and vocal or choral works.
CLASSICS
Serious classical: Performances of major orchestral works, symphonies, chamber music etc., and including Grand Opera.
OTHERM
Other music: Musical styles not fitting into any of the other categories. Particularly used for specialist music of which Rhythm & Blues and Reggae are examples.
WEATHER
Weather: Weather reports and forecasts and Meteorological information.
FINANCE
Finance: Stock Market reports, commerce, trading etc.
CHILIREN
Children's programs: For programs targeted at a young audience, primarily for entertainment and interest, rather than where the objective is to educate.
SOCIAL A
Social Affairs: Programs about people and things that influence individuals or groups. Includes sociology, history, geography, psychology and society.
RELIGION
Religion: Any aspect of beliefs and faiths, involving a God or Gods, the nature of existence, and ethics.
PHONE IN
Phone In: Involving members of the public expressing their views either by phone or at a public forum.
TRRVE L
Travel: Features and programs concerned with travel to near and far destinations, package tours and travel ideas and opportunities. Not for use of Announcements about problems, delays, or roadworks affecting immediate travel where TP/TA should be used.
LEISURE
Leisure: Programs concerned with recreational activities in which the listener might participate. Examples include Gardening, Fishing, Antique collecting, Cooking, Food & Wine etc.
JHZZ
Jazz Music: Polyphonic, syncopated music characterised by improvisation.
COUNTRY
Country Music: Songs which originate from, or continue the musical tradition of the American Southern States. Characterised by a straightforward melody and narrative story line.
NATION M
National Music: Current Popular Music of the Nation or region in that country's language, as opposed to International 'Pop' which is usually U.S. or U.K. inspired and in English.
OL I E S
Oldies Music: Music from the so-called "golden age" of popular music.
FOLK M
Folk Music: Music which has its roots in the musical culture of a particular nation, usually played on acoustic instruments. The narrative or story may be based on historical events or people.
JOCUMENT
Documentary: Program concerned with factual matters, presented in an investigative style.
STATION CALL button "memo"
It is recommended that you make a note of the preset stations.
| STATION No. | 1 | 2 | 3 | 4 | 5 | 6 | 7 | 8 | 9 | 10 | |
| CLASS A | |||||||||||
| Station Name | |||||||||||
| Frequency | |||||||||||
| CLASS B | |||||||||||
| Station Name | |||||||||||
| Frequency | |||||||||||
| CLASS C | |||||||||||
| Station Name | |||||||||||
| Frequency | |||||||||||
Character display used for station name input:
| Character | A | B | C | D | E | F | G | H | I | J | K | L | M | N | O | P | |
| Display indications | [] | [] | [] | [] | [] | [] | [] | [] | [] | [] | [] | [] | [] | [] | [] | [] | |
| Character | Q | R | S | T | U | V | W | X | Y | Z | [ | \ | ] | _ | ! | 0 | 1 |
| Display indications | [] | [] | [] | [] | [] | [] | [] | [] | [] | [] | [] | [ | . | ] | _ | [] | [] |
| Character | 2 | 3 | 4 | 5 | 6 | 7 | 8 | 9 | " | % | & | ' | ( | ) | * | + | . |
| Display indications | [] | [] | [] | [] | [] | [] | [] | [] | [] | [] | [] | [] | [ | . | ] | * | [] |
| Character | - | . | / | : | = | ? | @ | ||||||||||
| Display indications | -- | _ | / | - | -- | ! | [] | ||||||||||
NOTE:
This unit converts lower case characters transmitted by broadcast station to upper case characters.
TROUBLESHOOTING
Incorrect operations are often mistaken for trouble and malfunctions. If you think that there is something wrong with this component, check the points below. Sometimes the trouble may lie in another component. Investigate the other components and electrical appliances being used. If the trouble cannot be rectified even after exercising the checks listed below, ask your nearest PIONEER authorized service center or your dealer to carry out repair work.
| Symptom | Cause | Remedy |
| No power | ● Has the power cord been disconnected? | ● Reconnect the power cord. |
| No sound | ● Have any of the output cords been disconnected or incorrectly connected?● Has the antenna been disconnected or are the connections loose?● Was the power cord unplugged for several days (preset station has been lost?)● Are the signals weak and reception poor?● Even though the signal is weak, the RF ATT is on. | ● Connect them properly to the TUNER terminals on the amplifier.● Connect the antenna properly.● Preset the stations once again.● Set the MPX MODE button to MONO (the broadcast will be received in monaural).● Set the RF ATT to off. |
| Noise | ● Is the station properly tuned in to the correct frequency?● Has the antenna been disconnected or is the connection loose?● Even though the signal is weak, the RF ATT is on. | ● Tune in the station correctly.● Connect the antenna properly.● Set the RF ATT to off. |
| Sound distortion | On the FM band● The T-type FM antenna has not been extended,or it is not properly orientated.● Are the signals weak and reception poor?● Even though the signal is weak,the RF ATT is on.● Static from other appliances (or automobiles) or multipath reflection (radio waves reflected off mountains and tall buildings,hence not received directly).On the AM band● Poor positioning of the AM loop antenna.● The supplied AM loop antenna is in contact with the unit.● Are the signals weak and reception poor?● Noise from other electrical appliances (fluorescent light/motors). | ● Extend both ends fully,and face it in the direction giving the best reception.● Replace the supplied T-type FM antenna with an outdoor antenna.● Set the MPX MODE button to MONO (the broadcast will be received in monaural).● Set the RF ATT to off.● Try changing the antenna location. If you are using an outdoor antenna, move it away from the street.● Change antenna direction, and set it in the position giving the best reception.● Move the loop antenna away from the unit.● Install and connect an external AM antenna and ground the unit.● Turn off the noise-generating equipment, or move it away. |
| FM stereo broadcasts not received in stereo | ● Antenna input is insufficient because of weak broadcast signals.● The unit is not correctly tuned to the frequency of the broadcast station.● MPX MODE button is set to MONO. | ● Use a multi-element FM antenna.● Tune in the correct frequency.● Set MPX MODE button to AUTO. |
Abnormal functioning of this unit may be caused by static electricity, or other external interference. To restore normal operation, turn the power off and then on again, or unplug the AC power cord and then plug it in again.
SPECIFICATIONS
FM Tuner Section
Frequency Range 87.5 MHz to 108 MHz
Usable Sensitivity
NORMAL ........ Mono: 14.2 dBf, IHF(1.4 μ V/75 Ω).
50 dB Quieting Sensitivity
NORMAL ........ Mono: 22.2 dBf, IHF (3.5 μV / 75 Ω)
Stereo: 38.6 dBf, IHF (23.3 μV / 75 Ω)
Sensitivity (DIN)
NORMAL Mono: 1.0 V / 75
Stereo: 50 V / 75
Signal-to-Noise Ratio ....... Mono: 76 dB (at 85 dBf)
Stereo: 73 dB (at 85 dBf)
Signal-to-Noise Ratio (DIN) ....... Mono: 64 dB
Stereo: 60 dB
Distortion Mono: 0.4% (1 kHz)
Stereo: 1.0% (1 kHz)
Alternate Channel Selectivity 70 dB (±400 kHz)
Stereo Separation 40 dB (1 kHz)
Frequency Response ± 1 dB (30 Hz to 15 kHz)
Image Response Ratio 80 dB
IF Response Ratio 90 dB
Antenna Input 75Ω unbalanced
AM (MW) Tuner Section
Frequency Range 531 kHz to 1,602 kHz (Step 9 kHz)
Sensitivity (IHF, Loop antenna) 350 μV/m
Selectivity 33 dB(±9 kHz)
Signal-to-Noise Ratio 51 dB
Image Response Ratio 35 dB
IF Response Ratio 51 dB
Antenna . Loop Antenna
AM (LW) Tuner Section
Frequency Range 153 kHz to 281 kHz
Sensitivity (IHF, Loop antenna) 1,000 V/m
Selectivity 30 dB
Signal-to-Noise Ratio 51 dB
Image Response Ratio 30 dB
IF Response Ratio 51 dB
Antenna. Loop Antenna
Audio Section
Output (Level/Impedance)
FM (100 % MOD) 1.0 V / 1k Ω
AM (30 % MOD) 224 mV / 1kΩ
Miscellaneous
Power Requirements AC 230 Volts\~, 50 / 60Hz
Power Consumption 10 W
Power Consumption in standby mode 1 W
Dimensions 420 (W) x 78 (H) x 287 (D) mm
Weight (without package) 2.7 kg
Furnished Parts
FM T-type antenna 1
AM Loop antenna 1
Audio cord 1
Control cord 1
Operating Instructions 1
Warranty card. 1
NOTE:
Specifications and design are subject to possible modifications without notice, due to improvements.
Published by Pioneer Electronic Corporation.
Copyright © 1999 Pioneer Electronic Corporation.
All rights reserved.
PIONEER ELECTRONIC CORPORATION
4-1, Meguro 1-Chome, Meguro-ku, Tokyo 153-8654, Japan
PIONEER ELECTRONICS [USA] INC. P.O. BOX 1540, Long Beach, California 90801-1540
PIONEER ELECTRONICS OF CANADA, INC. 300 Allstate Parkway, Markham, Ontario L3R OP2, Canada
PIONEER ELECTRONIC [EUROPE] N.V. Haven 1087, Keetberglaan 1, 9120 Melsele, Belgium TEL: 03/570.05.11
PIONEER ELECTRONICS AUSTRALIA PTY. LTD. 178-184 Boundary Road, Braeside, Victoria 3195, Australia, TEL: [03] 9586-6300
PIONEER ELECTRONICS DE MEXICO S.A. DE C.V. San Lorenzo Num 1009 3er piso Desp. 302 Col. Del Valle, Mexico D.F. C.P. 03100 TEL: 5-688-52-90
<99C00ZX0T00>
- FM/AM DIGITAL-SYNTHESIZER TUNER
- F-208RDS
- Operating Instructions
- WARNING: TO PREVENT FIRE OR SHOCK HAZARD,DO NOT EXPOSE THIS APPLIANCE TO RAIN OR MOISTURE.
- IMPORTANT
- CAUTION
- RISK OF ELECTRIC SHOCK DO NOT OPEN
- FOR USE IN THE UNITED KINGDOM
- INSTALLATION
- Location
- Install the tuner in a well-ventilated location where it will not be exposed to high temperatures or humidity.
- Condensation
- Power-cord Caution
- Maintenance of External Surfaces
- CONTENTS
- FEATURES
- RDS (Radio Data System)
- EON (Enhanced Other Networks) reception
- Random 30-station presetting
- Manual station name memory
- RF ATT
- Energy-saving design
- CHECKING THE ACCESSORIES
- CONNECTIONS
- Connecting the AM loop antenna
- CONTROL terminals
- Pin plug connecting cord
- Antenna ground
- NOTE:
- CAUTION:
- Antenna Connections
- Radio reception is not possible unless the antenna is properly connected.
- AM ANTENNA
- Setting up the AM loop antenna
- AM loop antenna connection
- External AM antenna
- Indoor AM antenna
- Outdoor AM antenna
- Connecting the external AM antenna
- FM ANTENNA
- FM T-type antenna attachment
- Outdoor external FM antenna installation
- FRONT PANEL FACILITIES
- ① STANDBY/ON switch
- NOTES:
- ② EON button
- CHARACTER/SEARCH button
- ④ DISPLAY MODE button
- ⑤ Operating Display
- ⑥ MEMORY button
- ⑦CLASS button
- ⑧ DIRECT button
- ⑨ TUNING MODE button
- ⑩ TUNING knob
- ⑪ RF ATT button
- MPX (multiplex) MODE button
- AUTO:
- MONO:
- ⑬ BAND button
- STATION CALL buttons
- ① EON(TA/NEWS) indicator
- ② MEMORY indicator
- ③ AUTO indicator
- ④ Frequency and character display section
- ⑤ RF ATT indicator
- ⑥RDS indicator
- ⑦ MONO indicator
- ⑧STEREO indicator
- ⑨ TUNED indicator
- BASIC TUNING OPERATIONS
- Auto and Manual Tuning
- Turn the STANDBY/ON switch ON.
- Press the desired BAND button.
- Tuning into the frequency of a desired station.
- To receive another station in the same band, repeat step 3. To receive a station in the other band, repeat steps 2 and 3.
- Adjust the volume and tone of the stereo amplifier.
- [Manual tuning mode]
- [Auto tuning mode]
- (On auto tuning)
- (When receiving FM broadcasts)
- The TUNED Indicator
- Last station memory
- Direct Access Tuning
- To cancel frequency input
- To receive FM 106.00 MHz.
- PRESETTING STATIONS
- Preset Stations
- Tune in the desired station.
- Press the MEMORY button.
- Select the desired class (A to C) with the CLASS button.
- While the MEMORY indicator is lit, press the desired STATION CALL button.
- Repeat procedure 1 to 4 to memorize other stations.
- Preseting an FM 106.00 MHz station into Class C with station no. (CH) 5.
- Preset Station Tuning
- Select the class number with the CLASS button.
- Press the STATION CALL button to select the desired preset.
- When erasing a memorized station name, use the following procedure.
- RT (Radio Text) data
- PS (Program Service Name) data
- PTY (Program Type) data
- Program Type Search (PTY Search)
- PI (Program Identification)
- - PI code registration and deletion
- RDS Data Display
- Select FM with the BAND button.
- Press the DISPLAY MODE button and the display changes.
- 3.
- EON Setting and Reception
- Receive the desired FM station.
- Press the EON button and select the mode.
- When an EON transmission is received during standby
- ADDITIONAL DATA
- The 29 PTY data titles transmitted
- STATION CALL button "memo"
- Character display used for station name input:
- TROUBLESHOOTING
- SPECIFICATIONS
- FM Tuner Section
- AM (MW) Tuner Section
- AM (LW) Tuner Section
- Audio Section
- Miscellaneous
- Furnished Parts
Marque : PIONEER
Modèle : F-208RDS
Catégorie : Radio