
EMQ1 - Interface audio YAMAHA - Notice d'utilisation et mode d'emploi gratuit
Retrouvez gratuitement la notice de l'appareil EMQ1 YAMAHA au format PDF.

| Type de produit | Enregistreur de disque MIDI |
| Marque | YAMAHA |
| Modèle | EMQ1 |
| Alimentation | Adaptateur secteur Yamaha PA-4/PA-40 ou PA-5 (non inclus) |
| Connectivité MIDI | 1 entrée MIDI, 2 sorties MIDI (OUT1 et OUT2) |
| Support de stockage | Disque Quick Disk 2,8 pouces |
| Capacité mémoire interne | Environ 6000 notes |
| Nombre de chansons | Jusqu'à 9 chansons |
| Fonctions d'enregistrement | Enregistrement en temps réel, Overdub, Merge |
| Fonctions de lecture | Lecture avec avance rapide, retour rapide, pause, changement de vitesse (32% à 280%) |
| Fonctions avancées | Transfert de données en bloc (Bulk Data Dump), réception de données MIDI |
| Affichage | Affichage numérique à 3 chiffres pour numéro de chanson, mémoire libre, position de lecture |
| Entretien et nettoyage | Nettoyer avec un chiffon doux et sec. Ne pas utiliser de solvants. |
| Précautions d'usage | Éviter l'exposition au soleil, à la chaleur, à l'humidité, à la poussière et aux vibrations. Ne pas placer l'adaptateur sur l'appareil. |
| Accessoires inclus | 2 supports, 2 plaques de montage, 3 vis (notice non incluse) |
| Adaptateur requis | PA-4 (USA : PA-40) ou PA-5 |
| Compatibilité | Claviers MIDI et modules sonores de la série EM |
| Horloge | Interne ou externe (MIDI Clock) |
FOIRE AUX QUESTIONS - EMQ1 YAMAHA
Questions des utilisateurs sur EMQ1 YAMAHA
0 question sur cet appareil. Repondez a celles que vous connaissez ou posez la votre.
Poser une nouvelle question sur cet appareil
Téléchargez la notice de votre Interface audio au format PDF gratuitement ! Retrouvez votre notice EMQ1 - YAMAHA et reprennez votre appareil électronique en main. Sur cette page sont publiés tous les documents nécessaires à l'utilisation de votre appareil EMQ1 de la marque YAMAHA.
MODE D'EMPLOI EMQ1 YAMAHA
DISK RECOORDER
EMQ-1
USER'S GUIDE
BEDIENUNGSPANLEITUNG
MANUEL DE L'UTILISATEUR
MANUAL DE INSTRUCCIONES
Thank you for purchasing a Yamaha Disk Recorder EMQ-1.
The Disk Recorder EMQ-1 is a totally new type of performance recording device, utilizing the very latest in Yamaha's exclusive digital technology. Capable of recording and playback of MIDI-compatible SINGLE KEYBOARD instruments, this EMQ-1 lets you save the recorded data onto a 2.8" Quick Disk.
Main Features of EMQ-1
Realtime recording of performances
Over dubbing
-
Changing the playback speed
-
Bulk Data Dump
This User's Guide has been designed to help you make proper use of the outstanding features of the EMQ-1. Be sure to read it carefully before using your EMQ-1.
Contents
Page
1 The Power Supply 1
2 Description of Parts 2
3 EMQ-1 Quick Reference 3
4 Recording 5
5Playback 7
Page
6 Saving/Loading Data 9
7 MIDI Control 10
■ Error Messages and Specifications 12
Possible Operating Errors 13
Before Playing
To be sure you are using your EMQ-1 under optimum conditions, pay attention to the following precautions.

- - - Choosing a Place for Your EMQ-1
Your EMQ-1 will be damaged if used in any of the places below, so be sure to avoid doing so:
- Places exposed to direct sunlight, such as near a window, or extremely hot places near a source of heat.
- Places of particularly low temperatures.
- Places exposed to excessive humidity or dust.
- Places exposed to vibrations.
- Make sure to install EMQ-1 on a level surface, and never use it in a tilted status (it may result in disk errors).

- Never Apply Unnecessary Force
Strong impact or unnecessary force will damage the unit, so take care never to drop the unit nor place heavy objects on top of it.

The Power Supply
After you are finished using the unit, always turn OFF its POWER switch and disconnect the power adaptor.

- - - Cleaning the Outer Case
If the unit requires cleaning, wipe it off with a soft, dry cloth. Never use thinners, benzines, or other similar solvents; their use will damage the outer case of the unit.

- Connection with Other Devices
Before connecting the unit with another device such as a SINGLE KEYBOARD instrument, make sure to turn OFF the POWER switches of both devices.

The Protective Card
This unit comes with a protective card inserted in its disk insertion slot to protect the unit's interior. Before using the unit, remove the protective card.
If you do not plan to use the unit for an extended period or wish to transport it, be sure to re-insert the protective card.
CAUTION: Do not place the power adaptor on top of EMQ-1.
1 The Power Supply
The EMQ-1 is designed to use a separately available Yamaha Power Adaptor as its power supply. Be sure to read the following precautions carefully to ensure proper connection of the power supply.
Using EMQ-1 alone
Always use the Yamaha Power Adaptor PA-4 (in the U.S., PA-40) or PA-5. The use of another adaptor will damage the EMQ-1 and is thus extremely dangerous.
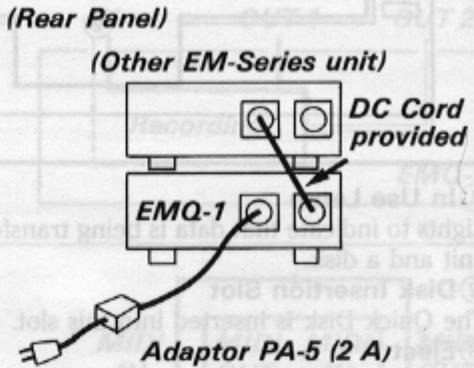
Using EMQ-1 concurrently with another EM-Series unit
When using EMQ-1 together with another EM-Series unit (such as an AWM Sound Expander EMT-10), always use the Yamaha Power Adaptor PA-5. If the total maximum current of both EM-Series units is within the range of the adaptor's rated power (2 A), the units can be supplied with power by one PA-5.
Perform connection as shown on the right. Use the DC cord provided to connect the DC OUT jack of one unit to the DC IN jack of the other unit.
Concurrent use of 3 or more units
One PA-5 can be used to supply power to three EM-Series units, depending on the types of units involved. (Power cannot be supplied if the combination results in a total maximum current that exceeds the 2 A rated current of PA-5.) If you wish to use a single PA-5 adaptor, make sure to choose a combination of units for which the total maximum current does not exceed 2 A (2000 mA).
[Combination Example 1]
![YAMAHA EMQ1 - [Combination Example 1] - 1](/content/2025/01/114603/images/f38b9d7c8a8ea9d68ce22534f50894584bf89960a2d07ab72346128c1d3d7f24.jpg)
In the above case, 2 A (2000 mA) is not exceeded so three units can be used with a single PA-5.
[Combination Example 2]
![YAMAHA EMQ1 - [Combination Example 2] - 1](/content/2025/01/114603/images/5f5fd6504b7da1889e4c9687f2662733f3c6fa1ab2e0bf0273ad2af663e650f9.jpg)
In this case, 2A (2000 mA) is exceeded, so you will need to use two adaptors.
NOTE: DC OUT DC IN jack connections should be made only between EM-series Expander Modules. Do not use an EM-series DC OUT jack to power other equipment.
Installing the Holders and Mounting Plates
- The EMQ-1 comes supplied with two holders and two mounting plates. If you will be placing the EMQ-1 on top of a Clavinova or other keyboard with top-mounted speakers, the holders and mounting plates raise the EMQ-1 to prevent obstruction of the speaker. Attach one of the mounting plates to the five grooves on one of the holders. Then attach the mounting plate to the grooves on one side of the EMQ-1. For added stability, secure the bottom panel of EMQ-1 to the holder by inserting the three screws provided through the holes in the holder and tightening them. There is no corresponding hole in the bottom panel for one of the holder's four holes. Because a screw cannot be inserted in that hole, mount the EMQ-1 by inserting screws into only three holes and leave the fourth hole open.
- To mount an EM-series device on top of another, use only the mounting plates to connect the grooves of the upper and lower units.

2 Description of Parts
■FrontPanel
YAMAHADISKRECORDEREMQ-1
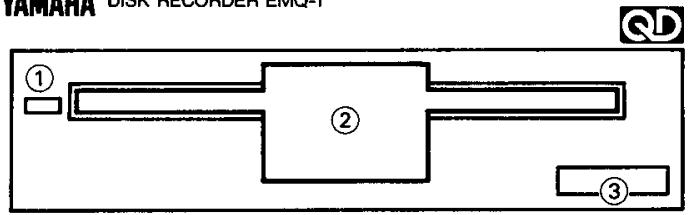
①In Use Lamp
Lights to indicate that data is being transferred between the unit and a disk.
② Disk Insertion Slot
The Quick Disk is inserted into this slot.
③ Eject
Press this button to eject the disk.
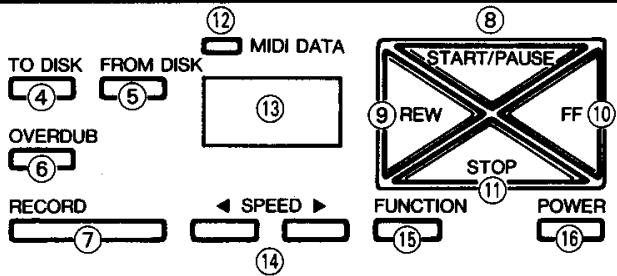
④TO DISK
Press this button to transfer data from the unit to a disk.
⑤FROM DISK
Press this button to recall data from a disk to the unit.
⑥ OVERDUB
Press this button to dub new data onto the data already recorded at the unit.
⑦RECORD
Press this button to record data from an external source.
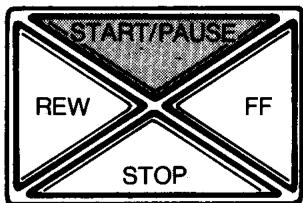
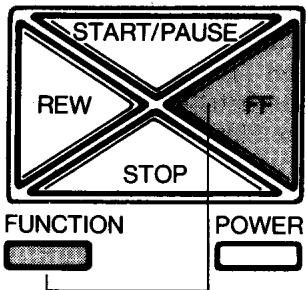
⑧START/PAUSE
Press this button to start recording or playback, or to temporarily stop playback.
⑨REW
During Play or Pause mode, press this button to return quickly through previous data.
Rear Panel
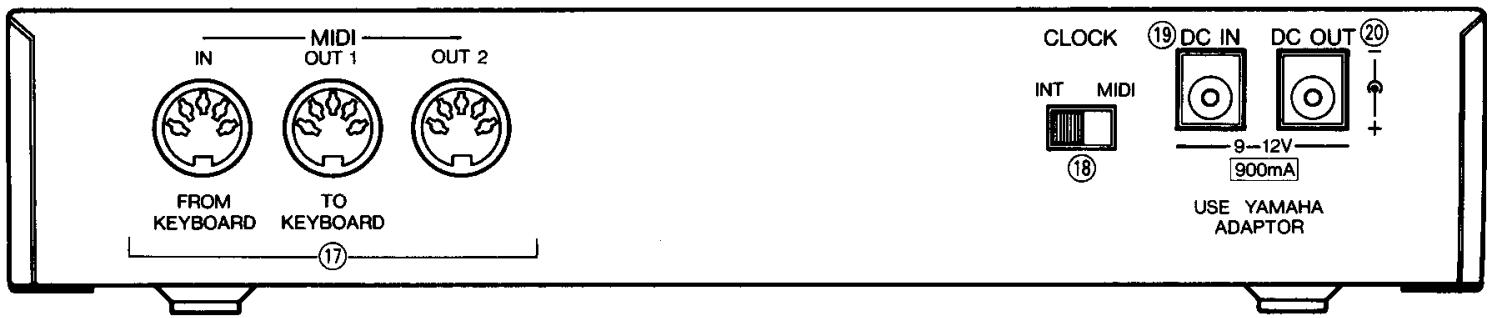
⑦MIDI jacks
Input or output Performance data and other types of MIDI signals.
18 CLOCK
Selects whether EMQ-1 will operate according to its internal clock or an external MIDI clock.
⑩FF
During Play or Pause mode, press this button to advance quickly through the data.
STOP
Press this button to stop recording or playback.
12MIDI DATA Lamp
Lights when MIDI signals have been received.
⑬ Display
Shows the Song Number, amount of vacant memory, Playback Position, and so on.
⑭ SPEED
Control the playback speed.
15FUNCTION
A multifunctional button that is used together with other buttons to select a Song Number, set the Expanded Function mode, and so on.
16 POWER switch
Turns the power to ON or OFF.
19DC IN jack
Connect the power adaptor (PA-4/PA-40/PA-5) to this jack.
20 DC OUT jack
Supplies power to another device.
3 EMQ-1 Quick Reference
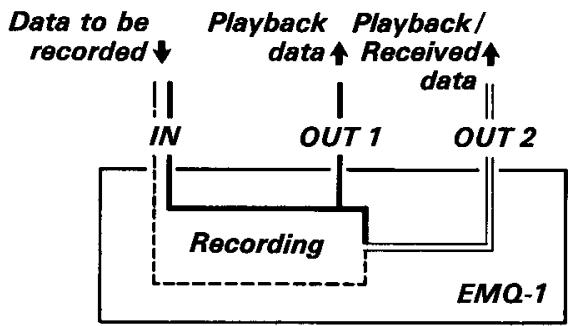
The MIDI Jacks
EMQ-1 is provided with three MIDI jacks.
① MIDI IN : Inputs the MIDI signals from a keyboard. (FROM KEYBOARD)
②MIDI OUT 1: Outputs the MIDI signals recorded at EMQ-1. (TO KEYBOARD)
③MIDI OUT 2: Simultaneously outputs the recorded data and the MIDI signals that were input to MIDI IN to a peripheral device (such as a Sound Expander).
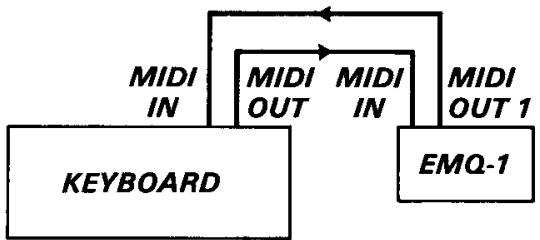
■Sample Connection with a Keyboard
Basically, any SINGLE KEYBOARD provided with MIDI jacks can be connected.
For details, carefully read the description on keyboards to confirm which data can be transmitted and received.
- You can record a keyboard performance, then play back that performance while playing along on the keyboard.
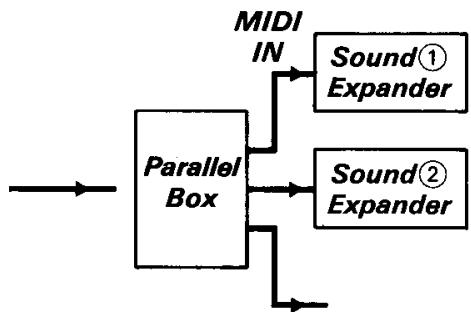
Using a Sound Expander, Etc.
If you use sound expanders (such as EMT-10), you can enjoy an ensemble sound using the voice of the keyboard plus other voices. If connection is performed as shown in the figure below, the performance you play on the keyboard is simultaneously sounded at sound expanders ① and ② as well as at the keyboard.
With this connection, you can also use the Overdub function of EMQ-1 to sound separate parts from individual sound expanders. First, set the Send Channel of the keyboard to a different Channel Number for each part, then perform Overdub recording to EMQ-1. Next, set the Receive Channels of the sound expanders to match the Send Channels of the recorded parts, then perform playback at EMQ-1.
NOTE: For the connections within the box indicated by a broken line, you can use a parallel box as shown on the right to connect the units so that the data is grouped by channel.

STEP1
Getting Ready to Perform
First, use the two MIDI cables to perform connection according to the "Sample Connection with a Keyboard" on the previous page.
Connect the power adaptor (PA-4/PA-40/PA-5) to DC IN of EMQ-1.
Next, turn ON the POWER switch of the keyboard and EMQ-1.
Set the keyboard to the status in which it can produce sounds.
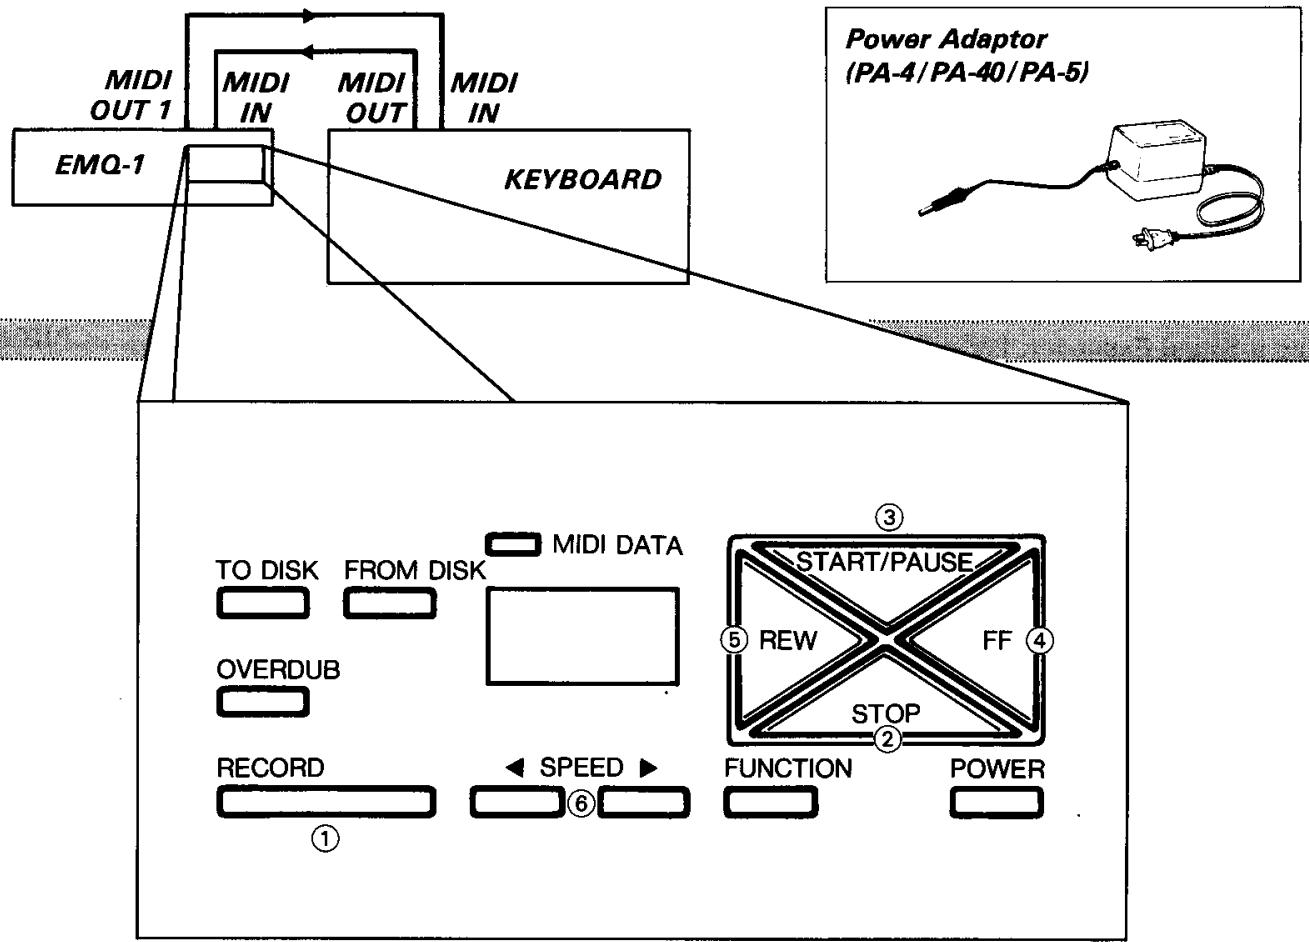
STEP2:
Recording
Press the RECORD button ①.
Perform on the keyboard. Recording is started automatically.
Press the STOP button ② to stop the recording.
STEP3
Playback
Press the START button ③ to start the playback.
TrypressingtheFFbutton ④
Next, try pressing the REW button ⑤.
Try pressing the SPEED buttons ⑥ to speed up or slow down the playback.
4 Recording
- Up to nine songs can be internally recorded to EMQ-1 (the data of approximately 6000 notes). Each song is referred to by a "Song Number" which can be specified for recording or playback.
- If you record onto a previously recorded Song, the new data will replace the former data. If you wish to dub new data onto previously recorded data, use the Overhub function.
- EMQ-1 receives the MIDI signals of all Channels from 1 to 16 (in OMNI ON/POLY mode). And it directly sends the received MIDI signals without change.
How to Record
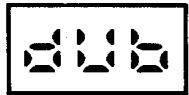
Press the START/PAUSE button while holding down the FUNCTION button to select a Song Number.
Each operation increments the Song Number by one. You can also decrease the Song Number by pressing the STOP button while holding down the FUNCTION button.
[Sample Display]
![YAMAHA EMQ1 - [Sample Display] - 1](/content/2025/01/114603/images/651d18c97d076095f1eb93a7e05e7c5ae99223645d2eb9d0ae74995ac8115b93.jpg)
Specify the starting position for recording in this manner.
- When the POWER switch is turned ON, Song Number 1 is automatically specified.
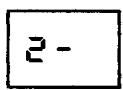
- The “-” in the [n - ] display indicates that Song Number n was previously recorded. The “- - ” in the [n - - ] display indicates that the previously recorded Song also contains Overdub data and can be used in a Merge operation as described on the next page.
- To prevent the loss of your previously recorded data, be sure to select a Song Number that does not appear as [n - ] or [n - - ] .
![YAMAHA EMQ1 - [Sample Display] - 2](/content/2025/01/114603/images/1c8065f8af263cca94560d6e048cd09b477b51873ef9b7ac30111f4264a353ee.jpg)
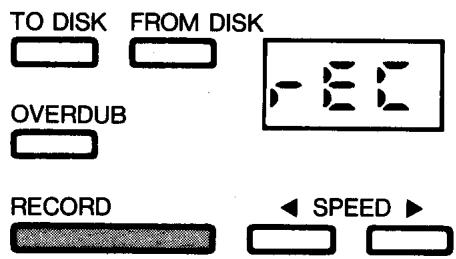
Press the RECORD button.
When the RECORD button is pressed, the unit enters Record Standby mode, and the display alternately shows [r C] and [r × x] . [r × x] indicates the percentage of the EMQ-1 internal memory which is vacant. (x = percentage)
- At this time, you can also receive the panel settings of the keyboard.
- The bulk data of a PortaTone or similar instrument can also be received and recorded. The display at this time shows [r]. For details on performing a Bulk Data Dump operation, refer to the User's Guide for the keyboard you are using.
- If the STOP button is pressed in Record Standby mode, the Standby mode is cancelled. In case you unintentionally select a previously recorded Song Number, you can use the STOP button to prevent that data from being overwritten.
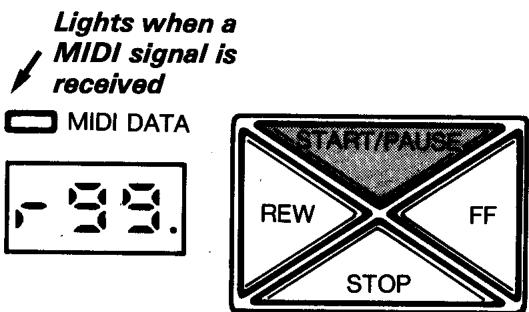
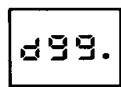
Start recording by playing the keyboard or pressing the START/PAUSE button.
When you play the keyboard or press the START/PAUSE button, recording is started, the flashing [rE C] remains lit, then changes to display the percentage of the EMQ-1 internal memory that is vacant.

- Even after unintentionally pressing the START/PAUSE button, if you press the STOP button without recording any data, you can prevent the previously recorded data from being erased.
- The "." appearing in the [r99.] display flashes in quarter-note units according to the tempo set by the SPEEDD buttons.
- Once recording is started, the first time you press the START/PAUSE button, EMQ-1 records its own Rhythm Start data and simultaneously outputs it from MIDI OUT. When the START/PAUSE button is pressed again, the Rhythm Stop data is recorded and output. The Rhythm Start/Stop data is alternately output using the START/PAUSE button in this manner.
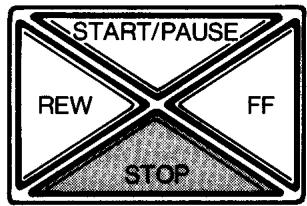
Press the STOP button to stop recording.
When the STOP button is pressed, recording is stopped and the display shows [n - ] to indicate that recording has been performed for the specified Song Number.
- If you press the Rhythm STOP button at the keyboard panel before pressing the EMQ-1 STOP button, that Rhythm STOP data is recorded. When external MIDI Clock is selected, this operation can also be used to stop recording.
How to Overdub
Select a Song Number.
Select a previously recorded Song Number [n-].
- If you wish to sound the dubbed parts from separate sound expanders, change the Send Channels of the keyboard accordingly before overdubbing the parts.
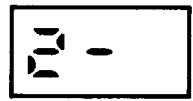
Press the OVERDUB button.
When the OVERDUB button is pressed, the display alternately shows [d b] and [d × x] . [d × x] indicates the percentage of the memory that is vacant. (xx = percentage)
TO DISK FROM DISK

FROM DISK
OVERDUB

Start overdubbing by playing the keyboard or pressing the START/PAUSE button.
The previously recorded data is played back (because the recorded data is sent from MIDI OUT 1 to the keyboard), and the data of your current performance is recorded.

Flashes

Vacant area = 99%


Vacant area = 98%
Press the STOP button to stop the overdubbing.
MERGE
When Overdub is completed, the previously recorded data and the recently recorded data are recorded onto separate tracks. If you wish to perform further overdubbing for these data, you must combine these two data onto one track and leave the other track empty. This is called a "Merge" operation."
[Merge Operation]
Press OVERDUB while holding down FUNCTION.
![YAMAHA EMQ1 - [Merge Operation] - 1](/content/2025/01/114603/images/c15b223a86beb2cb389bbc58481c946807bb2715c53ba4c35c4264b50dc96fbe.jpg)
- As shown on the right, perform a multi-part recording by repeating the Overdub and Merge operations.
- When the amount of vacant memory drops to 6% or less, you will be unable to perform further Merge operations.
① Recorded data (CH 1)
② Overdubbed data (CH 2)
③ Merged data (① + ②)
④ Overdubbed data (CH 3)
(5) Merged data (③ + ④)
![YAMAHA EMQ1 - [Merge Operation] - 2](/content/2025/01/114603/images/8635a2bcbf8ad95812665398f5224d61741a772c2bb93e2c2ab299051242b0d2.jpg)
![YAMAHA EMQ1 - [Merge Operation] - 3](/content/2025/01/114603/images/1bc50bb5c257224db966620c5167f21cabe3b0e827dec9e79d5afc622b2747d6.jpg)
![YAMAHA EMQ1 - [Merge Operation] - 4](/content/2025/01/114603/images/8a0fcd081bc7772a113881d01f6d43b56661179281ef1023eaa5930d344f9a4b.jpg)
![YAMAHA EMQ1 - [Merge Operation] - 5](/content/2025/01/114603/images/6dc0d343ed8d666ca493d90884c72903c98eaffe45d27aadbff4eb0851a149f6.jpg)
![YAMAHA EMQ1 - [Merge Operation] - 6](/content/2025/01/114603/images/bcca7ff98f1b7d7de32269fae43c2cb18dcafcb10b8b28aeea3bc1ac72f7f9f5.jpg)
5 |Playback
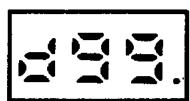
- During the playback of a recorded song, the display shows the current position within that song and shows [P 9 9] at the end of the song.
How to Play Back
Select a Song Number.
Select a Song Number using the same procedure for recording. The display will show the recorded Song Number as [n - ] or [n - ] .
If necessary, specify the Playback Start position.
- When the FF button is pressed, you are advanced quickly through the data of one song, and the fast forward speed quickens about one second after you begin to press the FF button. The display shows the current position as a percentage, and the fast forward operation stops at [P 99].


- If you press FF button while holding down FUNCTION, you can advance in increment of 20% .
- When the REW button is pressed, the Song position is moved back quickly through the data of one song, and the reverse speed quickens about one second after you begin to press the REW button. The display shows the current position as a percentage, and the reverse operation stops at [P00]. The REW button cannot operate from the [n - ] status.
- When you press the REW and START buttons simultaneously, EMQ-1 enters Play Standby mode. You can start playback from this mode by receiving a MIDI signal (Note Number, etc.). In Play Standby mode, the display flashes [P L y ] and you can perform any operations possible in Stop mode.


Fast forward operation in 20% increments
Press the START/PAUSE button. (In Play Standby mode, playback can also be started by playing the keys of the keyboard.)
Playback is started from the specified position, and the display shows the position currently being played back.
- While sending an Exclusive Message, such as bulk data, the display shows [PLY] in a continuously lit status.
- During playback, you can also perform the fast forward and reverse operations.
[Procedure]
- While the FF button is being pressed, the data is fast forwarded while being played back. When you release the button, normal playback is resumed from that position.
- While the REW button is being pressed, you are quickly moved back through the data. When the button is released, playback is resumed from that position.
![YAMAHA EMQ1 - [Procedure] - 1](/content/2025/01/114603/images/47632a6d34a506f545a8c43be18989f6e013392cd5fee156703f6353f73e6cca.jpg)
![YAMAHA EMQ1 - [Procedure] - 2](/content/2025/01/114603/images/b0ca9fd1f681013bf0caf484401c21ee3c875c7da5d83b1b72517f259689484b.jpg)
![YAMAHA EMQ1 - [Procedure] - 3](/content/2025/01/114603/images/5d9e01a1f555286dc5009328ac5681fb5067c8a7e205867b16777f47abf12752.jpg)
![YAMAHA EMQ1 - [Procedure] - 4](/content/2025/01/114603/images/d54a0d9b82a96eb4c6185b1caeb8703260fbd90709d712a28d7f0abec54ab23f.jpg)
![YAMAHA EMQ1 - [Procedure] - 5](/content/2025/01/114603/images/4597d963d2b5fd120e96b0218a7c2a8ca5f8b39f59adb9fddf1331a147735092.jpg)
![YAMAHA EMQ1 - [Procedure] - 6](/content/2025/01/114603/images/ee7d49accde16bbde891590c8f10ae1ad1d7638b2cf93121fd78b953c3efcec1.jpg)
FUNCTION
![YAMAHA EMQ1 - [Procedure] - 7](/content/2025/01/114603/images/63ca823324bfe0d886e0bf8d4b9aa7d9b75ea45ff027b75b7f5684fb5a12061c.jpg)
POWER
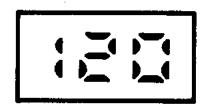
Try changing the playback speed during playback.
Pressing the button speeds up the playback speed, and pressing the slows it down. The first time you press either button, the current speed is displayed. After that, pressing these buttons allows you to change the speed and the displayed speed changes accordingly. Several seconds after the button is released, the display resumes its usual status. The minimum speed is [32] and the maximum speed is [280]. If both and are pressed simultaneously, the speed is set to [120].
- The playback speed can be changed in Stop mode, Play Standby mode or Pause mode.


ED


FUNCTION

POWER
Press the STOP button to stop playback.
When the STOP button is pressed, the display automatically returns to [n- of one song is completed, the display similarly returns automatically to [n-
] or [n - - ] . When the playback of all the data ] or [n - - ]
- EMQ-1
- Main Features of EMQ-1
- Contents
- Page
- Before Playing
- - - - Choosing a Place for Your EMQ-1
- - Never Apply Unnecessary Force
- The Power Supply
- - - - Cleaning the Outer Case
- - Connection with Other Devices
- The Protective Card
- The Power Supply
- Using EMQ-1 alone
- Using EMQ-1 concurrently with another EM-Series unit
- Concurrent use of 3 or more units
- [Combination Example 1]
- [Combination Example 2]
- Installing the Holders and Mounting Plates
- Description of Parts
- ■FrontPanel
- Rear Panel
- EMQ-1 Quick Reference
- The MIDI Jacks
- ■Sample Connection with a Keyboard
- Using a Sound Expander, Etc.
- Recording
- How to Record
- Press the START/PAUSE button while holding down the FUNCTION button to select a Song Number.
- [Sample Display]
- Press the RECORD button.
- Start recording by playing the keyboard or pressing the START/PAUSE button.
- Press the STOP button to stop recording.
- How to Overdub
- Select a Song Number.
- Press the OVERDUB button.
- Start overdubbing by playing the keyboard or pressing the START/PAUSE button.
- Press the STOP button to stop the overdubbing.
- MERGE
- [Merge Operation]
- |Playback
- How to Play Back
- If necessary, specify the Playback Start position.
- Press the START/PAUSE button. (In Play Standby mode, playback can also be started by playing the keys of the keyboard.)
- [Procedure]
- Try changing the playback speed during playback.
- Press the STOP button to stop playback.
Marque : YAMAHA
Modèle : EMQ1
Catégorie : Interface audio