
AUTODOPPLER - Effets audio YAMAHA - Notice d'utilisation et mode d'emploi gratuit
Retrouvez gratuitement la notice de l'appareil AUTODOPPLER YAMAHA au format PDF.

| Type de produit | Logiciel d'effets audio ADD-ON EFFECTS |
| Marque | YAMAHA |
| Modèle | AUTODOPPLER |
| Catégorie | Effets audio |
| Technologie utilisée | iSSP (Interactive Spatial Sound Processor) |
| Effet simulé | Effet Doppler avec mouvement de source sonore |
| Paramètres réglables | Chemin, vitesse, orientation, courbure, points de départ et de transit |
| Compatibilité | Consoles numériques YAMAHA et Studio Manager |
| Installation | Via le guide d'installation ADD-ON EFFECTS |
| Utilisation | Rappel et édition via console ou Studio Manager |
| Nombre de pages de la notice | 4 |
| Langue de la notice | Français (traduction disponible) |
FOIRE AUX QUESTIONS - AUTODOPPLER YAMAHA
Questions des utilisateurs sur AUTODOPPLER YAMAHA
0 question sur cet appareil. Repondez a celles que vous connaissez ou posez la votre.
Poser une nouvelle question sur cet appareil
Téléchargez la notice de votre Effets audio au format PDF gratuitement ! Retrouvez votre notice AUTODOPPLER - YAMAHA et reprennez votre appareil électronique en main. Sur cette page sont publiés tous les documents nécessaires à l'utilisation de votre appareil AUTODOPPLER de la marque YAMAHA.
MODE D'EMPLOI AUTODOPPLER YAMAHA
AUTO DOPPLER
Owner's Manual
ADD-ON EFFECTS
What Are ADD-ON EFFECTS?
ADD-ON EFFECTS are software packages that let you add on and use high level effect programs in your digital console or similar device.
What is Auto Doppler?
Auto Doppler is one of the effects programs that can be used with ADD-ON EFFECTS.
It simulates a Doppler effect as a sound source is moved.
The volume, orientation, and pitch will change according to settings you make for the path and speed of the sound source.
iSSP
What is the Interactive Spatial Sound Processor (iSSP)?
iSSP is a technology that combines a geometric sound simulator that attenuates sound according to an estimate of the sound reflection that accompanies the shape of a room, taking into consideration the direction of the sound source and the room's surface materials with multi-channel signal processor technology that uses information about the position of the sound source to perform distance attenuation based on the balance and delay/filter for each output channel.
This iSSP technology is used in Auto Doppler.
Special Notices
- Copying of the commercially available music sequence data and/or digital audio files is strictly prohibited except for your personal use.
- The software and this Owner's Manual are exclusive copyrights of Yamaha Corporation.
- Copying of the software or reproduction of this manual in whole or in part by any means is expressly forbidden without the written consent of the manufacturer.
- Yamaha makes no representations or warranties with regard to the use of the software and documentation and cannot be held responsible for the results of the use of this manual and the software.
The screen displays as illustrated in this Owner's Manual are for instructional purposes, and may appear somewhat different from the screens which appear on your computer.
The company names and product names in this Owner's Manual are the trademarks or registered trademarks of their respective companies.
Installing Auto Doppler
See the ADD-ON EFFECTS Installation Guide for more information on installing Auto Doppler.
Using Auto Doppler
As with other effects, you can recall and edit the Auto Doppler program on the console or in Studio Manager.
The basic operation is as follows:
1 Select one of the internal effects processors.
2 Patch the signal to and from the currently selected effects processor.
3 Locate the Effects Library page.
4 Select and recall Auto Doppler.
FNOTE When you recall the program, all effects processor outputs will be muted temporarily.
5 Locate the Effects Edit page.
6 Set the parameters. (See the "Part Names and Functions" on page 3 for more information on Auto Doppler parameters.)
The procedure for recalling and editing Auto Doppler varies depending on the console you are using.
Refer to the Owner's Manual that came with your console for more information.
Editing Parameters in Studio Manager
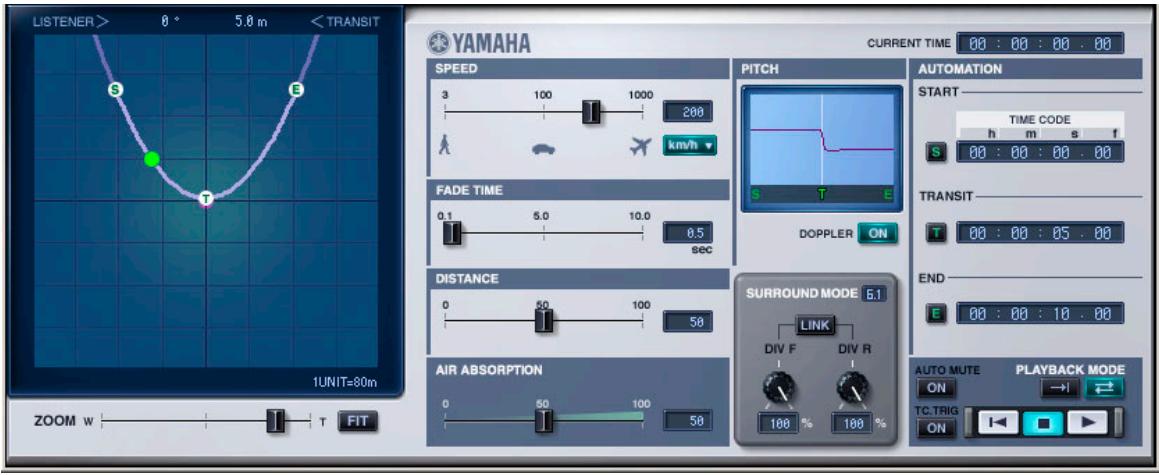
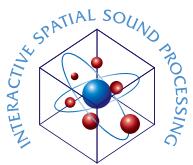
In Studio Manager, editable parameters appear in both the Auto Doppler window and the Generic Editor window.
The Auto Doppler window enables you to edit Auto Doppler specific parameters, and the Generic Editor window enables you to edit parameters common to Auto Doppler and other Effects.
Refer to the Studio Manager Owner's Manual for your console for more information on the Generic Editor window.
Studio Manager Generic Editor window
Part Names and Functions
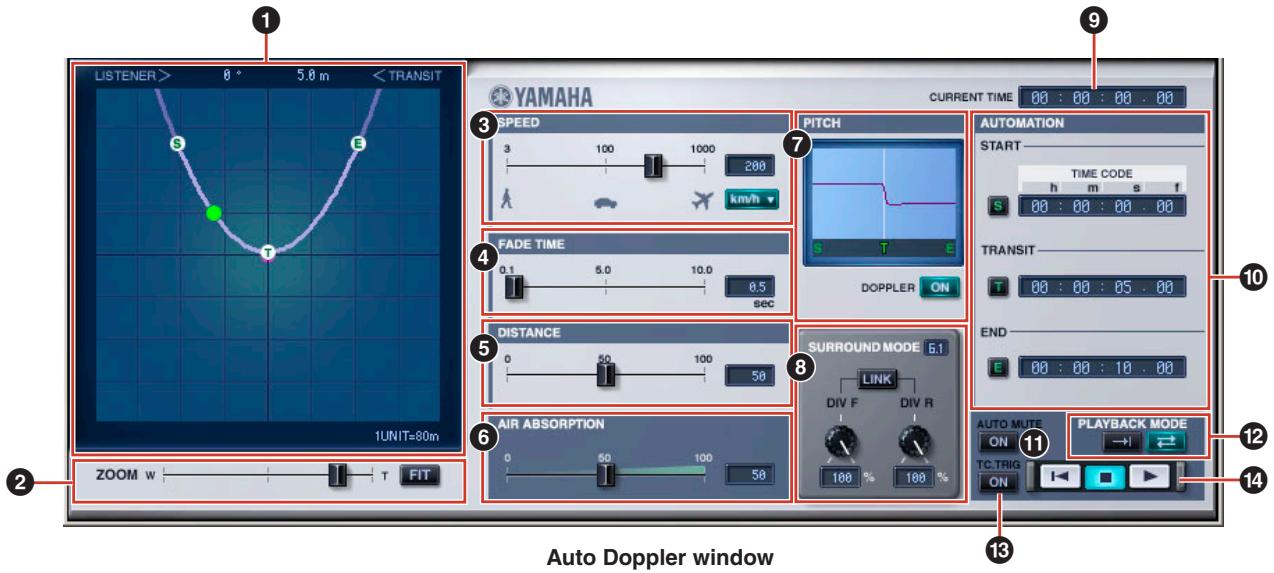
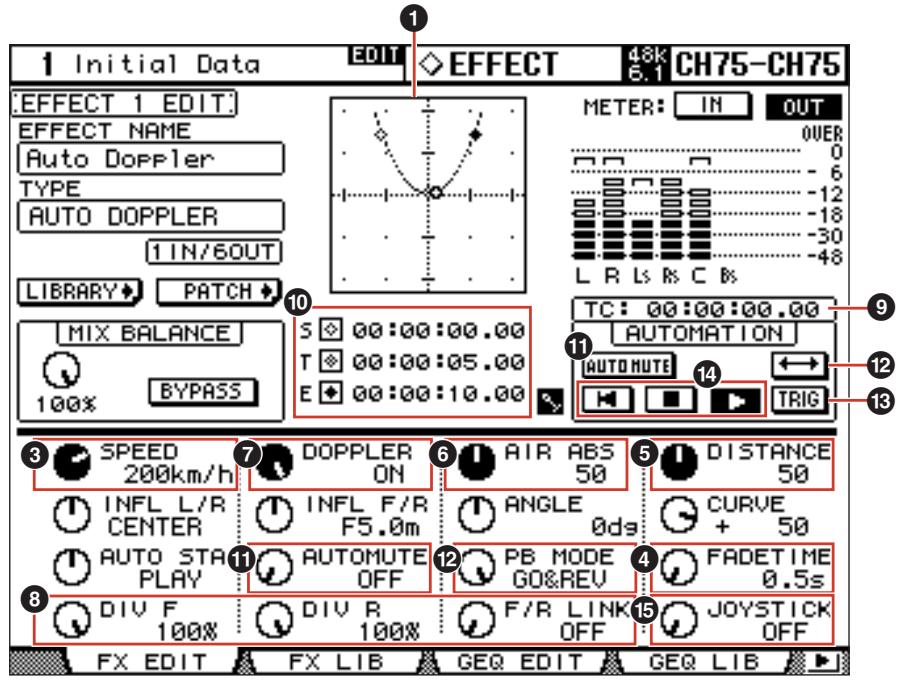
Console display
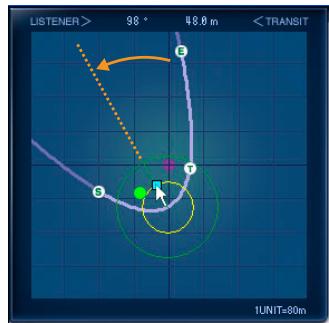
Position View
In Auto Doppler, the listening point is the center point in this view, and is displayed in purple. The path of the sound source is displayed as a curve.

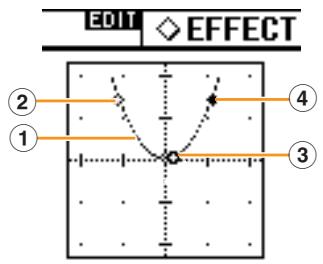
① Path
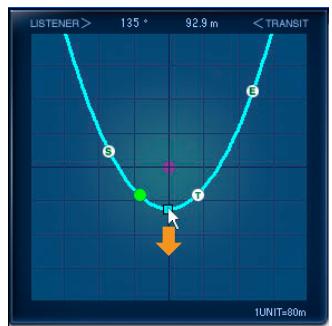


Path Movement
In the Auto Doppler window, you can move the path by using the mouse to drag the control handle the center of the path line, or by holding down the button on the mouse and pressing the arrow keys on the keyboard.
You can also move the path using the [INFL L/R] and [INFL F/R] knobs in the Generic Editor window and console.
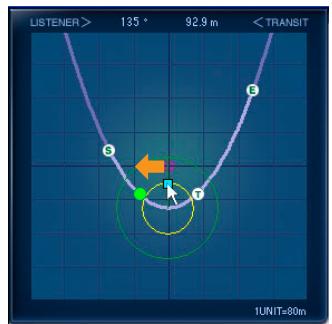
Curve Orientation
In the Auto Doppler window, you can change the orientation of the curve by dragging the points or using the arrow keys as shown in the diagram.
The curve orientation can also be adjusted using the [ANGLE] knob in the Generic Editor window and console.

Curve Steepness
In the Auto Doppler window, you can change the steepness of the curve by dragging the points or using the arrow keys as shown in the diagram.
The steepness of the curve can also be adjusted using the [CURVE] knob in the Generic Editor window and console.
② Start Point (S)
This is the beginning position for sound source movement.
The start point is not edited directly. Instead it is determined by the time difference between the Start and the Transit Timecode, along with the Speed.
③ Transit Point (T)
This is the location on the path that is closest to the listening point.
The Transit Point cannot be edited directly. Instead it is determined by the path.
- AUTO DOPPLER
- Owner's Manual
- ADD-ON EFFECTS
- What Are ADD-ON EFFECTS?
- What is Auto Doppler?
- What is the Interactive Spatial Sound Processor (iSSP)?
- Special Notices
- Installing Auto Doppler
- Using Auto Doppler
- Editing Parameters in Studio Manager
- Part Names and Functions
- Position View
- ① Path
- Path Movement
- Curve Orientation
- Curve Steepness
- ② Start Point (S)
- ③ Transit Point (T)
Marque : YAMAHA
Modèle : AUTODOPPLER
Catégorie : Effets audio