
ROG XONAR PHOEBUS - Carte son ASUS - Notice d'utilisation et mode d'emploi gratuit
Retrouvez gratuitement la notice de l'appareil ROG XONAR PHOEBUS ASUS au format PDF.
| Intitulé | Détails |
|---|---|
| Type de produit | Carte son interne |
| Caractéristiques techniques principales | DAC 7.1, support du son surround, échantillonnage jusqu'à 192 kHz, 24 bits |
| Alimentation électrique | Alimentation par le port PCI Express |
| Dimensions approximatives | Standard PCIe, dimensions non spécifiées |
| Poids | Non spécifié |
| Compatibilités | Compatible avec Windows 7, 8, 8.1, 10 |
| Fonctions principales | Amélioration de la qualité audio, effets sonores personnalisables, interface utilisateur intuitive |
| Entretien et nettoyage | Nettoyer avec un chiffon sec, éviter l'humidité |
| Pièces détachées et réparabilité | Réparabilité limitée, pièces spécifiques disponibles via le support ASUS |
| Sécurité | Utiliser dans un environnement sec, éviter les surtensions |
| Informations générales | Idéale pour les gamers et les audiophiles, offre une expérience sonore immersive |
FOIRE AUX QUESTIONS - ROG XONAR PHOEBUS ASUS
Questions des utilisateurs sur ROG XONAR PHOEBUS ASUS
0 question sur cet appareil. Repondez a celles que vous connaissez ou posez la votre.
Poser une nouvelle question sur cet appareil
Téléchargez la notice de votre Carte son au format PDF gratuitement ! Retrouvez votre notice ROG XONAR PHOEBUS - ASUS et reprennez votre appareil électronique en main. Sur cette page sont publiés tous les documents nécessaires à l'utilisation de votre appareil ROG XONAR PHOEBUS de la marque ASUS.
MODE D'EMPLOI ROG XONAR PHOEBUS ASUS
1. Introduction
1.1 Package Contents
• Xonar™ Phoebus 7.1 Channel PCI Express Audio Card
• Phoebus Control Box
- Driver CD
• S/PDIF TOSLINK optical adaptor x1
• ATX 4P-to-6P Power Cable x1
- Quick Start Guide
1.2 System Requirements
• One PCI Express 1.0 (or higher) compatible slot for the audio card
- 6-pin peripheral power cable connector from your computer's power supply unit (PSU)
• Microsoft® Windows® Vista/Win 7 (32/64bit) / XP(32/64bit) / MCE2005
- Intel® Pentium® 4 1.4GHz or AMD Athlon 1400 CPU or faster CPU
• More than 256 MB system memory
• More than 60 MB available storage space for driver installation
• CD-ROM drive (or DVD-ROM drive) for software installation
- High-quality headphones, powered analog speakers, or a Dolby Digital decoder, to enjoy the audio card's high fidelity
1.3
General Specification
| Items | Description |
| Audio Performance | |
| Output Signal-to-Noise Ratio (A-Weighted) | 118dB for Front channel of Line-out112dB for other channels of Line-out110dB for Headphone-out with 600ohm load |
| Input Signal-to-Noise Ratio (A-Weighted): | 118dB |
| Output Total Harmonic Distortion + Noise at 1kHz (-3dB) : | 0.00039% (-108dB) for Front channel of Line-out0.00063% (-102dB) for other channels of Line-out0.0019% (-94dB) for Headphone-out with 600ohm load |
| Input Total Harmonic Distortion + Noise at 1kHz (-3dB) : | 0.0003% (-110dB) for Line-in |
| Frequency Response (-3dB, 24-bit/96kHz format): | < 10Hz to 46KHz |
| Output / Input Full-Scale Voltage | 2 Vrms (5.65 Vp-p) |
| Headphone Output Full-Scale Voltage | Up to 6.8 Vrms (supports headphones with up to 600ohms impedance) |
| Bus Compatibility | |
| PCI Express | - PCI Express Rev.1.0a specification compatible- Max. full 2.5Gbps bandwidth per direction and optimized latency for high-definition audio processing- Compatible with x1, x4, x8, x16 PCI Express slots |
| Main Chipset | |
| Audio Processor | ASUS CM8888 HDT High-Definition Sound Processor (Max. 192KHz / 24bit) |
| 24-bit D-A Converter of Digital Sources | Texas Instruments PCM1796 * 1 for Front-Out (123dB SNR, Max. 192kHz/24bit)Cirrus-Logic CS4362A * 1 for other 6 channels (114dB SNR, Max. 192kHz/24bit) |
| High Fidelity Headphone Amplifier | Texas Instruments 6120A2*1 (120dB SNR, -117dB THD+N @ Vcc±12V, RL=600Ω, f=1kHz) |
| 24-bit A-D Converter for Analog Inputs | Cirrus-Logic CS5381* 1 (120dB SNR, Max. 192kHz/24bit) |
| Sample Rate and Resolution | |
| Analog Playback Sample Rate and Resolution | 44.1K/48K/88.2K/96K/176.4K/192KHz @ 16/24bit |
| Analog Recording Sample Rate and Resolution | 44.1K/48K/88.2K/96K/176.4K/192KHz @ 16/24bit |
| S/PDIF Digital Output | 44.1K/48K/88.2K/96K/176.4K/192KHz @ 16/24bit, Dolby Digital |
(continued on the next page)
| Items | Description |
| I/O Ports | |
| Analog Output Jack | 3.5mm jack * 1 (Headphone out) |
| Analog Input Jack | 3.5mm jack * 1 (Shared by Line-In / Mic-In) |
| Digital S/PDIF Output | High-bandwidth TOS-Link combo port supports 192KHz/24bit |
| Other line-level analog input (for TV Tuner or CD-ROM): | Aux-In (4-pin header on the card) |
| Driver Features | |
| Operation System | Windows Vista / Win 7(32/64bit) / XP(32/64bit) / MCE2005 |
| Dolby® Digital Live | Dolby Digital Live encodes any audio signal on PC in real-time to Dolby Digital (AC3) 5.1 surround sounds to your home theater environment through one single S/PDIF connection |
| Dolby® Headphone | Dolby Headphone technology allows users to listen to music, watch movies, or play games with the dramatic 5.1-channel surround or realistic 3D spacious effects through any set of stereo headphones. |
| Dolby® Virtual Speaker | Dolby Virtual Speaker technology simulates a highly realistic 5.1-speaker surround sound listening environment from as few as two speakers. |
| Dolby® Pro-Logic IIxx | Dolby Pro-Logic IIx is the well-known technology to process any native stereo or 5.1-channel audio into a 7.1-channel output, creating a seamless, natural surround soundfield. |
| DirectSound3D Game EXtensions 3.0 | GX 3.0 supports EAX gaming sound effects and DirectSound 3D hardware enhanced functions for more games on Windows Vista/Win 7 & XP. (DirectX/ DirectSound 3D compatible) |
| Smart Volume NormalizerTM | Normalizes the volume of all audio sources into a constant level and also enhances your 3D sound listening range and advantages in gaming |
| FlexBassTM | Professional Bass Management / Enhancement system |
| Xear 3DTM Virtual Speaker Shifter | Virtual 7.1 speaker positioning |
| Other Effects | 10-band Equalier / 27 Environment Effects |
| ASIO 2.0 Driver Support: | Supports 44.1K/48K/88.2K/96K/176.4K/192KHz @16/24bit with very low latency |
2. About Hardware
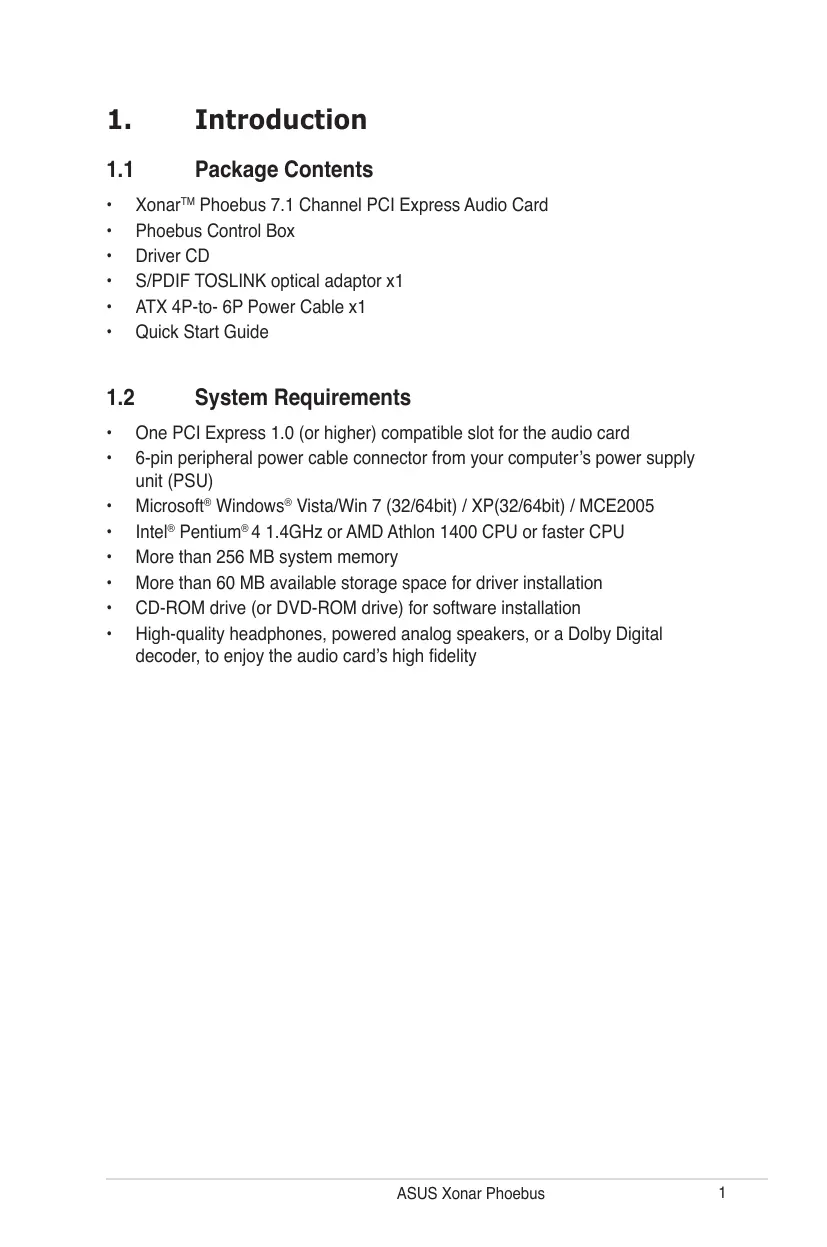
2.1 Xonar Phoebus Audio Processing Card

| No | Item | Description |
| 1 | Microphone Input Port | Connect your external PC microphone to this 3.5mm jack for voice input. Built-in high-quality Microphone pre-amplifier. |
| 2 | Headphone Output Port | Connect your headphones to this jack. |
| 3 | Box Link | Connect the Xonar Phoebus Control Box to this 2.5mm port. |
| 4 | Line Input Port | Connect analog devices like MP3 players, CD players, music synthesizers, and other line-level sound sources to this 3.5mm jack for audio recording or processing. |
| 5 | Front Output Port | For 2 channel speaker systems, connects to the front left / right input on the powered speakers. |
| 6 | Center/Subwoofer Out Port | Connect to the center / subwoofer input on 5.1/7.1 powered analog speakers. |
| 7 | Rear Output Port | Connect to the back surround input on 7.1 powered analog speakers. |
| 8 | S/PDIF Output / Side Out port | Digital output jack. Connect to an external digital decoder or digital speaker systems, Home Theater systems, AV receivers for outputting digital audio including PCM, Dolby Digital, DTS, WMA-Pro, etc. Connect to the surround channel input on 5.1 powered analog speakers. |
| 9 | Aux Input Header | 4-pin header. Usually connects to the Analog Audio output of TV tuner card or other sound source inside your PC system. (To monitor your TV tuner card's audio from this Aux-In, you must enable the “monitor” function for Aux-In in the Xonar Audio Center software's recording mixer.) |
| 10 | S/PDIF Out Header | Connects to the graphics card with HDMI support. |
| 11 | Power connector | Connects to the 6-pin power cable of your power supply unit. |
| 12 | PCI Express Bus Golden Fingers | Inserts into the PCI Express slot on your motherboard. |
3. Installing the Xonar Hardware
3.1 Preparing Your Computer

Before you proceed with the following installation steps, it's recommended that you disable your onboard audio device in your BIOS settings, or uninstall any other sound cards on your PC. (For BIOS setting or uninstallation of other sound cards, refer to the user manuals of your motherboard and sound card)
- Power OFF the computer, the monitor, and all other peripheral devices connected to your computer.
- Unplug the computer power cord from your computer and power outlet.
- Touch the metal back or side panel of the computer to avoid static electricity.
- Remove the chassis cover.
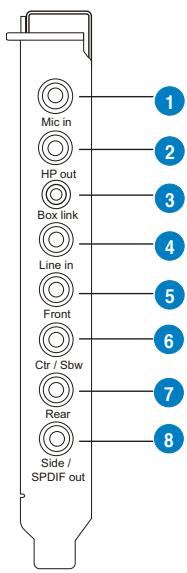
- Remove the metal bracket from an available PCIE slot for the Xonar Phoebus audio card.
natural_image
Isometric diagram of a mechanical assembly with layered components and a tool (no text or symbols)3.2 Installing the Audio Processing Card
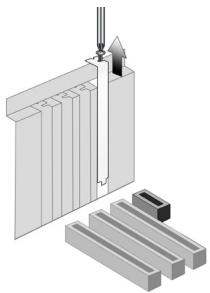
- Face the bracket of the Xonar Phoebus audio card toward the back panel of your computer and insert the audio card gently into an available PCI Express slot. Make sure it's completely inserted into the PCI Express slot. (Warning! Do not force the audio card into the slot. Make sure that the gold pins of the card's PCI Express connector are aligned with the motherboard's PCI Express connector before you insert the card into the PCI Express slot. If it does not fit properly, gently remove it and try again.)
natural_image
Technical line drawing of a mechanical assembly with a blue arrow indicating motion or force (no text or symbols)- Secure the audio card bracket to the back of your computer with the screw that you removed. Refer to section 3.1.
- Connect the power cable of your power supply to the power connector on the Xonar Phoebus audio card.
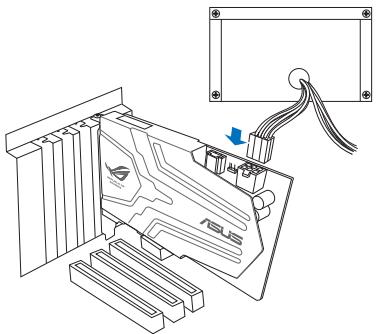

The PCI Express high-quality audio card requires additional power from your computer. If the power cable is not connected properly, the audio card will not work at all.
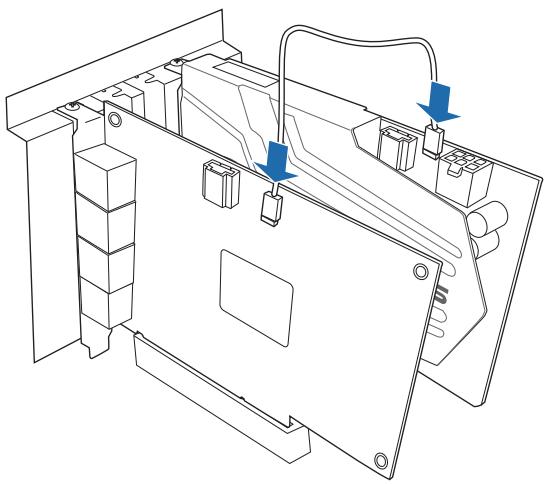
3.3 Connecting TV tuner card
If you have a traditional PCI or PCI Express TV tuner card on your PC, you may need to connect it to the audio card to send the tuner card's sound to your PC speakers.
- Secure the PCI/PCI Express TV tuner card and screw it into the back-panel.
- Connect the audio output header from the TV tuner card to the Aux-In header of the audio card, as shown in the figure below.

For optimum TV audio quality, Xonar uses ADC recording to digitize the signal and loops it back to DAC playback. Please select Aux-In as the recording source in the Xonar Audio Center's recording mixer and enable the monitoring button to pass this signal to the audio output. Using this setup, you can even turn on sound effects such as Pro-Logic IIx to expand the stereo TV audio to 5.1 or 7.1 channel surround sound. TV audio on your PC will become even better than on your TV set!
natural_image
Technical line drawing of an electronic device internal structure with no visible text or symbols4. Installing Software
4.1 Installing the Audio Card Driver
- After you have installed your audio card, turn on your computer. Windows automatically detects your audio card and searches for device drivers. When prompted for the audio drivers, click the Cancel.
- Insert the Support CD into the optical drive. If Windows® AutoPlay mode is enabled in your system, the setup starts automatically. If not, double-click the setup.exe from your Support CD.
- Follow the onscreen instructions to finish the installation.

The version and content of the support CD are subject to change without notice.
4.2 Uninstalling or Reinstalling Software
4.2.1 Uninstalling Software
- Click Start -> Settings -> Control Panel.
- Double-click the Add/Remove Programs icon.
- Click the Change or Remove Programs button.
- Select each program you would like to remove, and then click the Add/Remove (or Change/Remove) button.
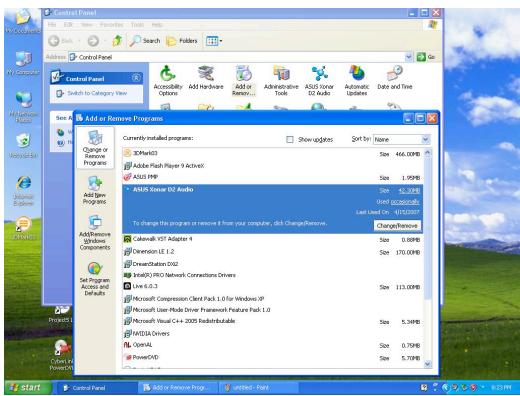
-
In the InstallShield Wizard dialog box, select the Remove option.
-
Restart your computer when prompted.
4.2.2 Reinstalling Software
To reinstall the Xonar Phoebus card driver:
- Before reinstalling any software, it's recommended to uninstall the existing software first.
- After finishing the uninstallation of the software, please follow the installation process again to reinstall the same or updated software.
5. Connecting Speakers and Peripherals
5.1 Connecting to Phoebus Control Box
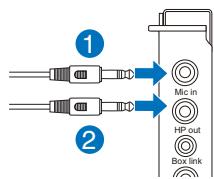
5.1.1 Connecting Phoebus Box
| No | Item | Description |
| 1 | Microphone Input Port | Connect the microphone's 3.5mm plug from the Phoebus Control Box into this Mic-In port for voice communication, recording or karaoke. |
| 2 | Headphone Port | The headphone port has a built-in high-quality amplifier to drive headphones. Connect the Phoebus Control box directly to this port. |
| 3 | Box Link Port | Connect the Phoebus Control box directly to this port. |
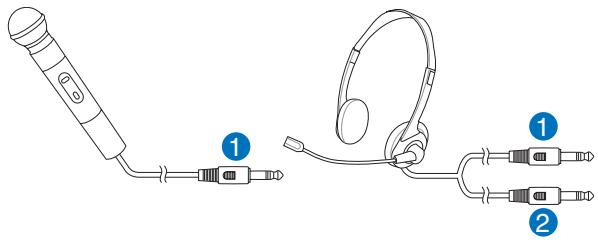
5.1.2 Connecting Phoebus Box with external headphone and microphone
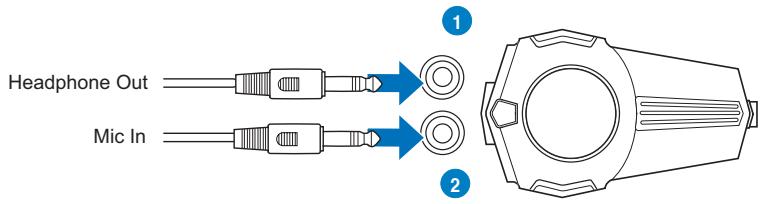
| No | Item | Description |
| 1 | Headphone Port | Connect headphone to headphone port on Phoebus Control box |
| 2 | Microphone Input Port | Connect microphone's 3.5mm plug to Phoebus Control Box Mic-In port. |
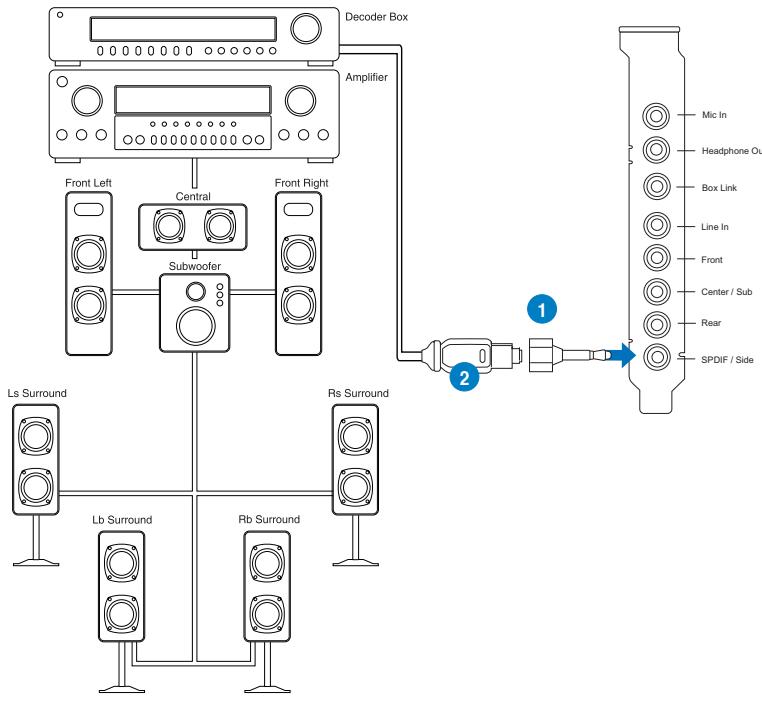
5.2 Connecting Digital Speaker Systems (Home Theater)
Xonar Phoebus makes playback through your home theater system possible, creating an impressive surround sound experience. A single digital cable connection can carry high-quality digital audio from any of your PC audio sources to any digital speakers or AV Receivers.
flowchart
graph TD
    A["Speaker"] --> B["Front Left"]
    A --> C["Central"]
    A --> D["Subwoofer"]
    A --> E["Rb Surround"]
    A --> F["Lb Surround"]
    A --> G["Rs Surround"]
    H["Decoder Box"] --> I["Amplifier"]
    J["SpaDIF / Side"] --> K["1"]
    L["Mic In"] --> K
    M["Headphone Ou"] --> K
    N["Box Link"] --> K
    O["Line In"] --> K
    P["Front"] --> K
    Q["Center / Sub"] --> K
    R["Rear"] --> K
    S["1"] --> T["2"]
| No | Item | Description |
| 1 | Optical adapter | Plug the optical TOSLINK adapter into the S/PDIF-Out connector. |
| 2 | Optical cable | Connect your decoder's S/PDIF-In port to the optical adapter with the TOSLINK optical cable. |
5.3 Connecting stereo headphones
5.3.1 Connecting stereo headphones
Connecting stereo hadphones
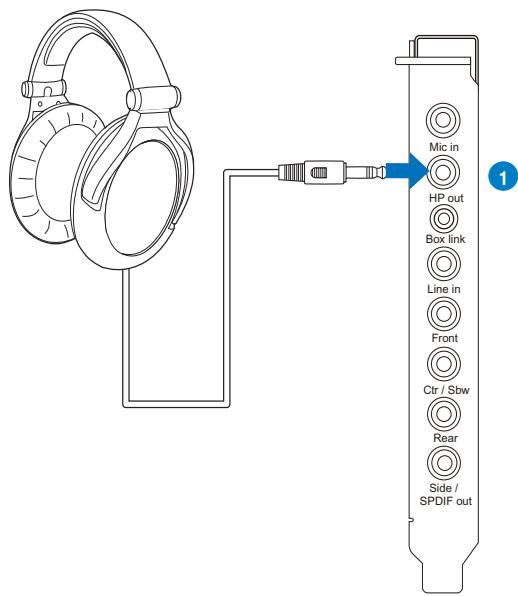
| No | Item | Description |
| 1 | Headphone Out Port | The Headphone Out Port has a built-in high-quality amplifier to drive headphones. Please connect your stereo headphones directly to this jack. |
Connecting 5.1 channel hadphones
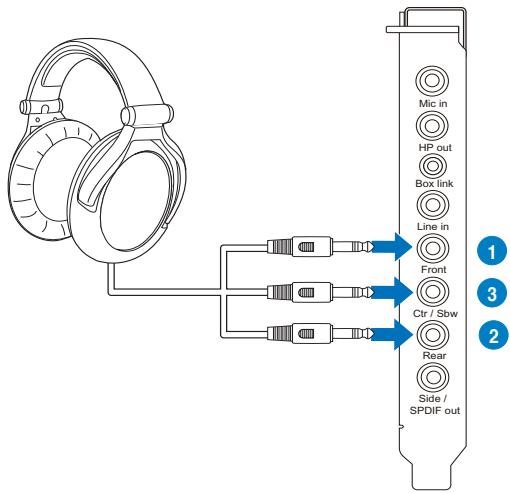
| No | Item | Description |
| 1 | Front Out | Connect the front-channel 3.5mm plug of your 5.1 headphones into this jack. |
| 2 | Back Surround Out | Connects to the Back Surround input port with the mini-jack cable. |
| 3 | Center/Subwoofer Out | Connect the Center/Bass-channel 3.5mm plug of your 5.1 headphone into this jack. |
5.4 Connecting Analog Speaker Systems
5.4.1 Connecting Analog Power Amplifier
| No | Item | Description |
| 1 | Front Out | Connects to the “left front” and “right front” input ports of the analog amplifier with the mini-jack to RCA cable. |
| 2 | Back Surround Out | Connects to the Back Surround input port with the mini-jack cable. |
| 3 | Center/Subwoofer | Connects to the “Center” and “subwoofer” input ports of the analog amplifier with the mini-jack to RCA cable. |
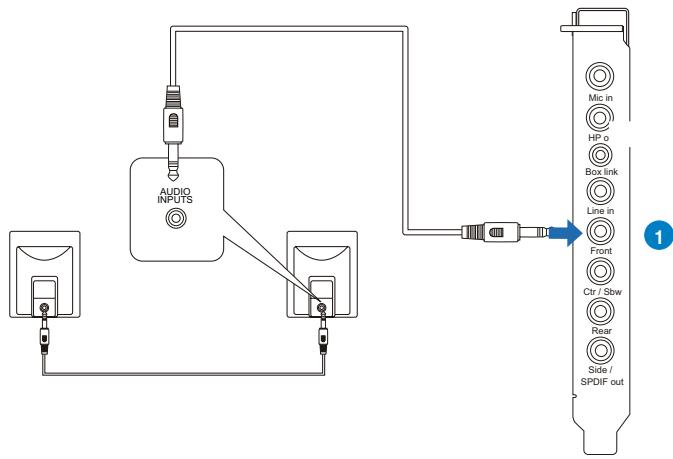
5.4.2 Connecting 2/2.1 Channel Speakers
2 Speakers
flowchart
graph TD
    A["Audio INPUTS"] --> B["Microphone"]
    A --> C["Microphone with USB cable"]
    B --> D["CD/SPDIF out"]
    C --> D
    E["Line in"] --> D
    F["Front"] --> D
    G["Rear"] --> D
    H["Box Link"] --> D
    I["Mic in"] --> D
    J["HP o"] --> D
    K["Line in"] --> D
| No | Item | Description |
| 1 | Front Out Port | Connect the 2 channel speaker set's 3.5mm plug into this Front Out jack. |
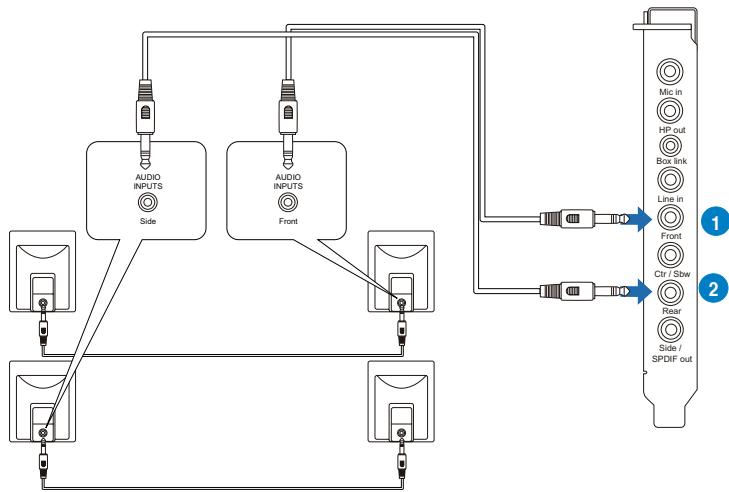
4 Speakers
flowchart
graph TD
    A["Audio INPUTS Side"] --> B["Audio INPUTS Front"]
    C["Audio INPUTS Side"] --> D["Audio INPUTS Front"]
    E["Audio INPUTS Side"] --> F["Audio INPUTS Front"]
    G["Audio INPUTS Side"] --> H["Audio INPUTS Front"]
    I["Audio INPUTS Side"] --> J["Audio INPUTS Front"]
    K["Audio INPUTS Side"] --> L["Audio INPUTS Front"]
    M["Audio INPUTS Side"] --> N["Audio INPUTS Front"]
    O["Audio INPUTS Side"] --> P["Audio INPUTS Front"]
    Q["Audio INPUTS Side"] --> R["Audio INPUTS Front"]
    S["Audio INPUTS Side"] --> T["Audio INPUTS Front"]
    U["Audio INPUTS Side"] --> V["Audio INPUTS Front"]
    W["Audio INPUTS Side"] --> X["Audio INPUTS Front"]
    Y["Audio INPUTS Side"] --> Z["Audio INPUTS Front"]
    AA["Audio INPUTS Side"] --> AB["Audio INPUTS Front"]
    AC["Audio INPUTS Side"] --> AD["Audio INPUTS Front"]
    AE["Audio INPUTS Side"] --> AF["Audio INPUTS Front"]
    AG["Audio INPUTS Side"] --> AH["Audio INPUTS Front"]
    AI["Audio INPUTS Side"] --> AJ["Audio INPUTS Front"]
    AK["Audio INPUTS Side"] --> AL["Audio INPUTS Front"]
    AM["Audio INPUTS Side"] --> AN["Audio INPUTS Front"]
    AO["Audio INPUTS Side"] --> AP["Audio INPUTS Front"]
    AQ["Audio INPUTS Side"] --> AR["Audio INPUTS Front"]
    AS["Audio INPUTS Side"] --> AT["Audio INPUTS Front"]
    AU["Audio INPUTS Side"] --> AV["Audio INPUTS Front"]
    AW["Audio INPUTS Side"] --> AX["Audio INPUTS Front"]
    AY["Line in Front"] --> AZ["Line in SPDF out"]
    BA["Ctr / Stw"] --> BB["Rear"]
    BC["Mic in HP out Box ink"] --> BD["Line in Front"]
    BE["Ctr / Stw"] --> BF["Rear"]
    BG["Side / SPDF out"] --> BH["Line in SPDF out"]
| No | Item | Description |
| 1 | Front Out | Connects to the Front input port of the 4/4.1 speakers with the mini-jack cable. |
| 2 | Back Surround Out | Connects to the Back Surround input port with the mini-jack cable. |
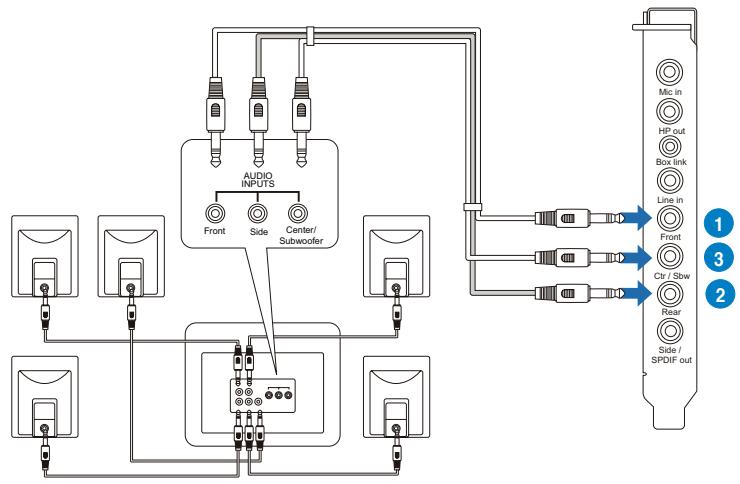
5.1 Speakers
flowchart
graph TD
    A["Audio Inputs"] --> B["Front"]
    A --> C["Side"]
    A --> D["Center/ Subwoofer"]
    B --> E["Output 1: Mic in"]
    C --> F["Output 2: HP out"]
    D --> G["Output 3: Box link"]
    D --> H["Output 4: Line in"]
    D --> I["Output 5: Front"]
    D --> J["Output 6: Ctr / Sbw"]
    D --> K["Output 7: Rear"]
    D --> L["Output 8: Side / SPDIF out"]
| No | Item | Description |
| 1 | Front Out | Connects to the Front input port of the 5.1 speakers with the mini-jack cable. |
| 2 | Back Surround Out | Connects to the Back Surround input port with the mini-jack cable. |
| 3 | Center/Subwoofer | Connects to the Center/Subwoofer input port of the 5.1 speakers with the mini-jack cable.. |
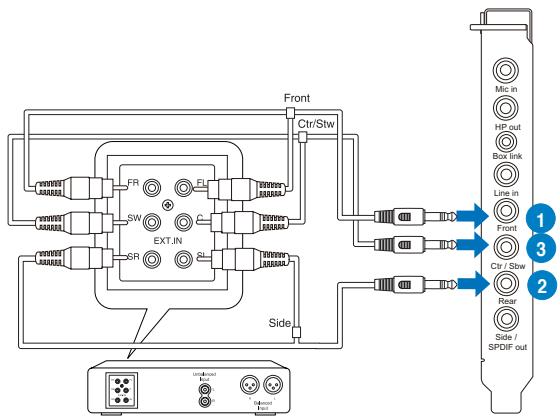
Connecting 7.1 channel speakers
7.1 speakers

flowchart
graph TD
    A["Input"] --> B["AUDIO INPUTS"]
    B --> C["Side"]
    C --> D["Audio INPUTS"]
    D --> E["Front"]
    E --> F["Subwoofer"]
    F --> G["Center/"]
    G --> H["Audio INPUTS"]
    H --> I["Side"]
    I --> J["Audio INPUTS"]
    J --> K["Back to Audio Input"]
    K --> L["Output 1: Mic in"]
    K --> M["Output 2: HP out"]
    K --> N["Output 3: Box link"]
    K --> O["Output 4: Front"]
    K --> P["Output 5: Ctr / Sbw"]
    K --> Q["Output 6: Rear"]
    K --> R["Output 7: Side / SPDIF out"]
| No | Item | Description |
| 1 | Front Out | Connects to the Front input port of the 7.1 speakers with the mini-jack cable. |
| 2 | Side Surround Out | Connects to the Surround input port of the 7.1 speakers with the mini-jack cable. |
| 3 | Back Surround Out | Connects to the Back Surround input port of the 7.1 speakers with the mini-jack cable. |
| 4 | Center/Subwoofer | Connects to the Center/Subwoofer input port of the 7.1 speakers with the mini-jack cable. |
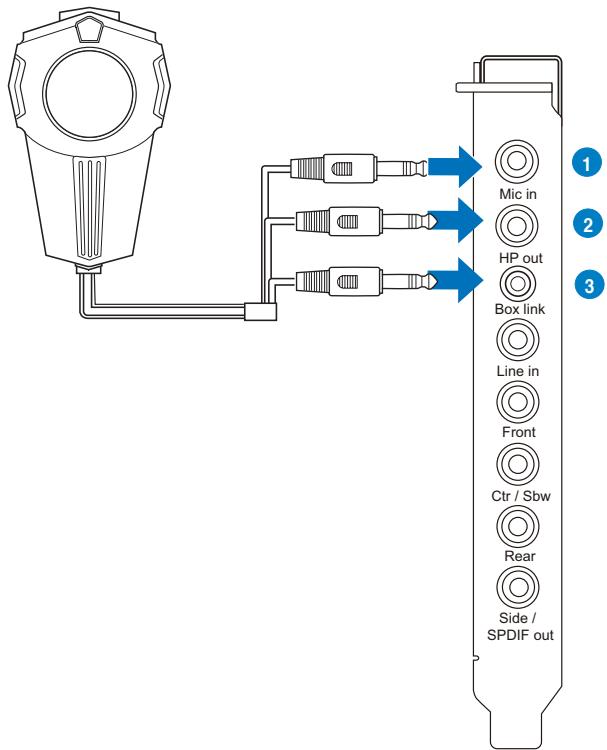
5.5 Connecting Microphone
| No | Item | Description |
| 1 | Microphone Input Port | Connect the microphone’s 3.5mm plug into this Mic-In port for voice communication, recording, or karaoke. |
| 2 | Headphone Port | The headphone port has a built-in high-quality amplifier to drive headphones. Connect your stereo headphones directly to this jack. |
5.6 Connecting Line-In audio sources
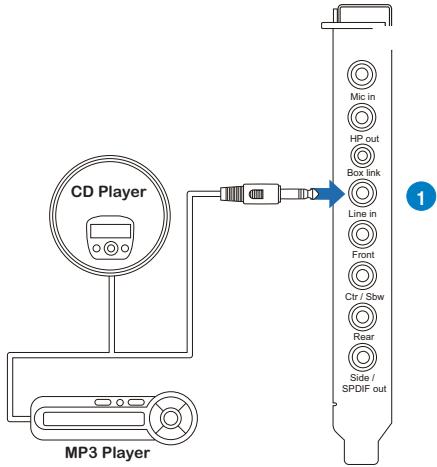
| No | Item | Description |
| 1 | Line Input Jack | Connect the 3.5mm plug of the CD/MP3 Player or any other Line level analog audio sources into this Line-In jack for sound recording. |
6. Xonar Phoebus Driver Guide
6.1 Introduction to the Xonar Phoebus Audio Center GUI
- After finishing the driver installation and rebooting your computer, you will find the Xonar Phoebus Audio Center's icon in the system tray on the bottom right-hand corner of the screen. Double click this icon to open the Xonar Audio Center utility.


If the icon could not be found in the system tray, go to the Windows Control Panel and double click the "Xonar Phoebus Audio Center" icon.
6.1.1 Function Pop-up Menu
Xear Audio Center provides several sound effects. There is a pop menu for each output / input device and you can enter the sound effect page to enjoy music, movie and gaming.
To open the pop-up menu:
- Double-click the left button of the mouse on the Device icon.
- Left-click the mouse on the Device icon.
6.1.2 Audio Status Panel
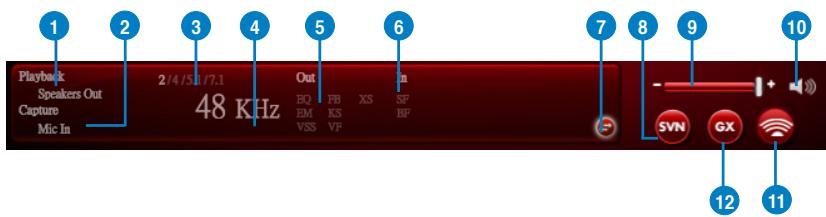
| No | Item | Description |
| 1 | Playback (Speaker Out) | Indicates the output default device. |
| 2 | Capture (Mic In) | Indicates the input default device. |
| 3 | Speaker Numbers | Indicates the speaker numbers for Speaker device only. |
| 4 | Sample Rate | Indicates the sample rate of playback sources. |
| 5 | Audio Output effect indicator | Indicates the playback sound effect status.Abbreviation of Sound effect:EQ: EqualizerEM: Environment EffectsVSS: 7.1 Virtual Speaker ShifterFB: Flex Bass IIKS: Xear SingFX for key shiftingVF: Xear SingFX for vocal fadingXS: Xear Surround |
| 6 | In effect indicator | Indicates the playback sound effect status.Abbreviation of Sound effect:SF: Xear SingFX for microphone echoSF: Xear SingFX for Magic Voice |
| 7 | Switch to Profile Panel button | Click to switch the status bar to the Profile panel. |
| 8 | Smart Volume Normalizer (SVN) (Vista / XP only) | Click to enable the SVN function. SVN is abbreviated from Smart Volume Normalization, which normalizes the volume of all audio sources into a constant level and also enhances your 3D sound listening range and advantages in gaming. |
| 9 | Volume Adjust | Click to increase or decrease volume. |
| 10 | Mute / Unmute | Click to mute or unmute a device. |
| 11 | SonarMax | Click to enable SonarMax with amplified 3D/2D sounds. |
| 12 | GX | Click to enable GX 2.0. |
6.1.3 Profile Panel
This profile panel for sound effect contains a preset mode and a user-defined mode.
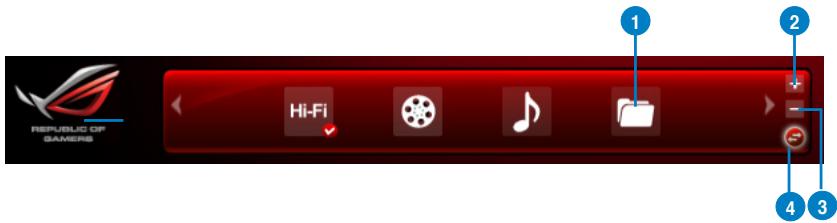
| No | Item | Description |
| 1 | Profile Mode | Click to select the presets in profile mode. |
| 2 | Add Profile | Adjust specific sound effects (EQ, EM etc...) settings and click “+” to create a user-defined mode. |
| 3 | Delete Profile | Click to delete a user-defined mode. |
| 4 | Switch Button | Click to switch between the Profile panel and Audio Status Panel. |
6.2 Speaker Function Introduction

Click the device icon on the right side to open the pop-up menu.
6.2.1 Dolby® Home Theater (Windows® 7 Only)
Function Introduction


- The following items will be replaced by Dolby® Home Theater V4 under Windows® 7 Operating System.
- 7.1 Virtual Speaker Shifter
- 10-Band Equalizer
- Refer to Dolby’s official manual for Dolby® Home Theater V4 functions.
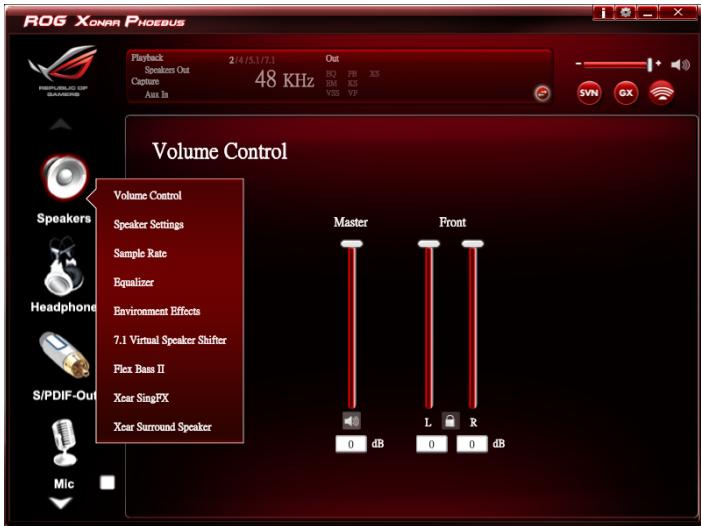
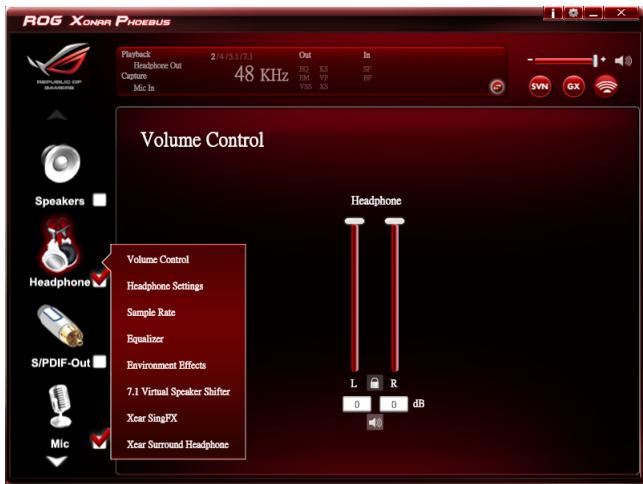
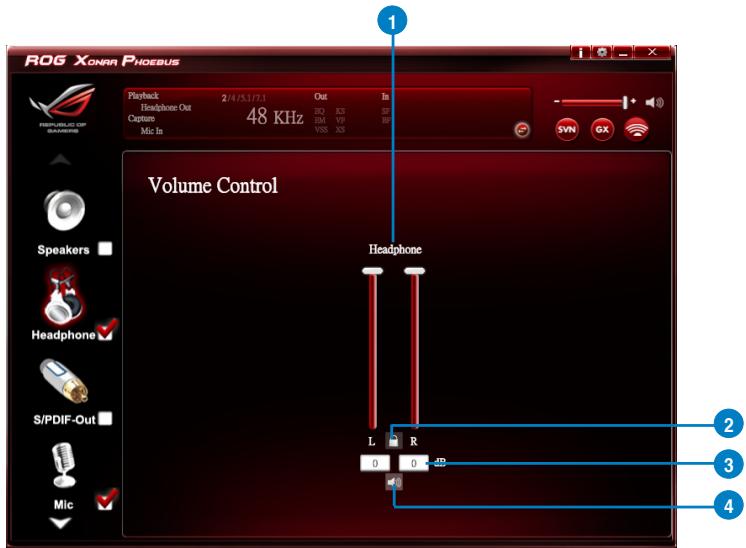
6.2.2 Volume Control
Function Introduction
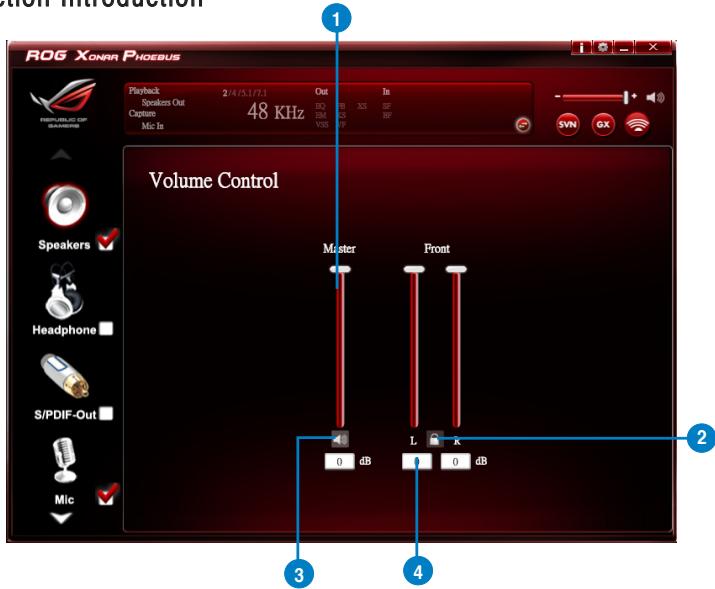
The function allows you to control the volume of the Speaker.
| No | Item | Description |
| 1 | Volume Control bar | Master – Adjust the volume level for all channels. Front - Adjust the volume level for the front channel. |
| 2 | Left/ Right Channel Lock | Click to lock the left / right channel to sync L/R channel. |
| 3 | Mute / Un-mute | Click to mute or ummute all channels. |
| 4 | dB Input Area | Key in a dB value in this field to set the volume level. |
6.2.3 Speaker Setting
Function Introduction
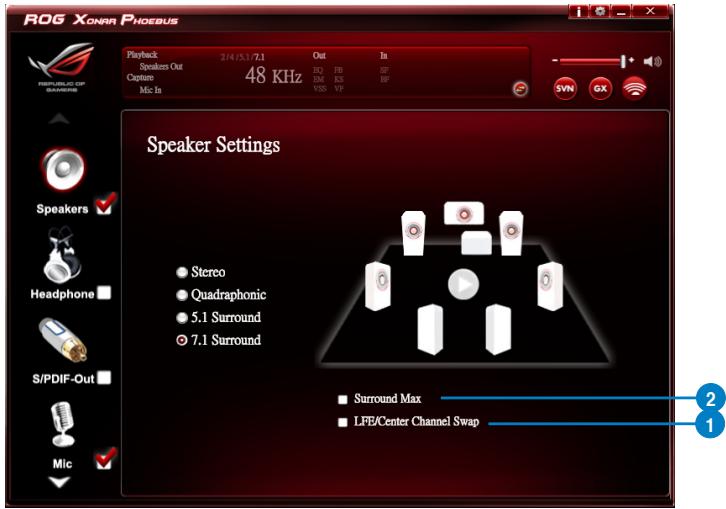
This function allows you to set the speaker numbers (stereo, quadraphonic, 5.1 surround, 7.1 surround).
| No | Item | Description |
| 1 | LFE / Center Channel Swap | When enabled, the function can swap the audio stream between Center/LFE. (Available for 5.1 and above) |
| 2 | Surround Max | When enabled, the function allows the stereo to have the benefits of multi-surround effects. |
6.2.4 Sample Rate
Function Introduction
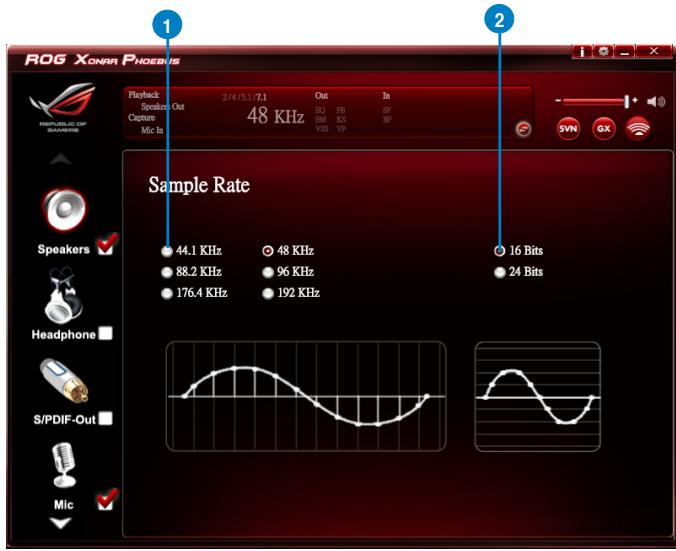
This function allows you to set the sample rate for the Speaker.
| No | Item | Description |
| 1 | Sample Rate button | 44.1 KHz - set the playback sample rate to 44.1K48 KHz - set the playback sample rate to 48K88.2 KHz - set the playback sample rate to 88.2K96 KHz - set the playback sample rate to 96K176.4 KHz - set the playback sample rate to 176K192 KHz - set the playback sample rate to 192K |
| 2 | Bit Depth button | 16bit - set the playback bit depth to 16bit24bit - set the playback bit depth to 24bit |
6.2.5 Equalizer
Function Introduction
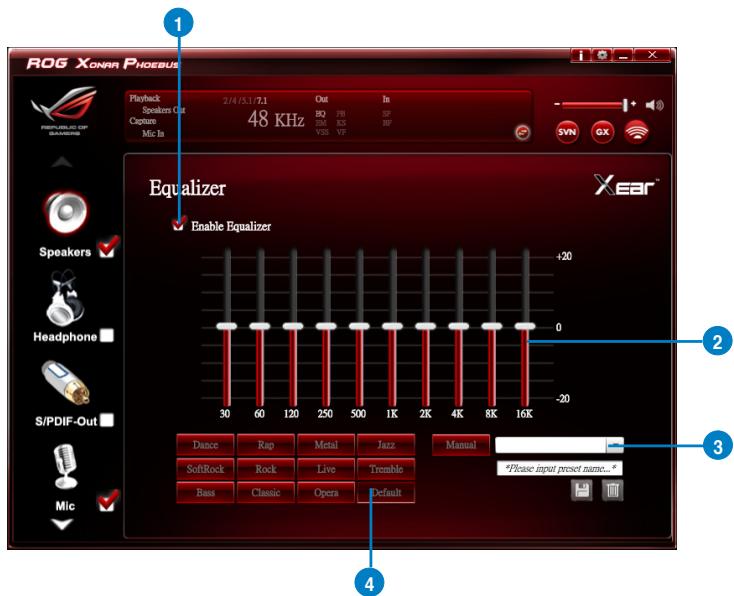
This 10-band EQ function allows you to adjust the EQ band manually and create customized preset items or click to select a preset EQ mode.
| No | Item | Description |
| 1 | EQ enable/disable switch | Click to enable / disable EQ. |
| 2 | EQ band controller | Change the gain setting for each band (30/ 60/ 120/ 250/ 500/ 1K/ 2K/ 4K/ 8K/ 16K). |
| 3 | Manual mode | Change the gain setting for each band, key in a name in the input field and then clicksaveto add your new setting. New setting will appear in the Manual Mode List. Clicktrashto delete settings. |
| 4 | Preset mode | Select a preset mode for equalizer that is designed accordingly. There are 12 preset modes such as Bass, Treble, Live, Rock, Jazz, etc. |
6.2.6 Environment Effect
Function Introduction
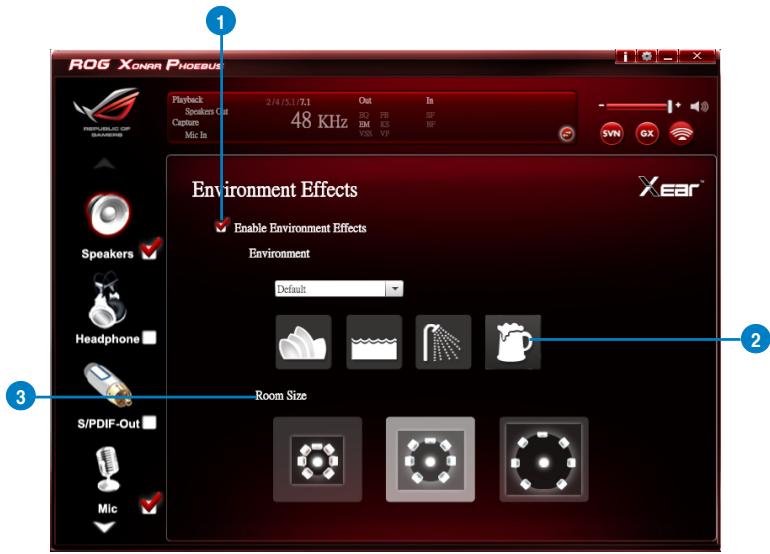
This function provides 28 special environment emulations for different sound reflections and revweberation.
| No | Item | Description |
| 1 | Environment Effect enable/disable switch | Click on the check box to enable / disable Environment Effect. |
| 2 | Environment Effect mode | Click on an Environment Effect button or drop the dropdown list to choose an Environment Effect. |
| 3 | Room Size | Change the Room Size icon to simulate a larger or smaller space. |
6.2.7 7.1 Virtual Speaker Shifter
Function Introduction
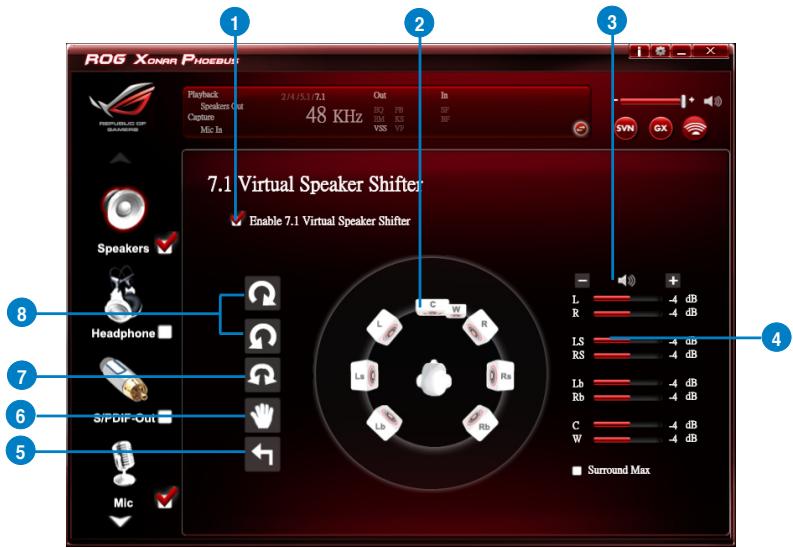
| No | Item | Description |
| 1 | 7.1 Virtual speaker shifter enable/disable switch | Click on the check box to enable / disable 7.1 Virtual Speaker to simulate the speaker direction and distance. |
| 2 | Virtual Speaker (L/R/Ls/Rs/Lb/Rb/C/W) | Each virtual speaker virtualizes one channel of the 7.1 channel speakers in the real world. |
| 3 | Volume Control | Each virtual speaker virtualizes one channel of the 7.1 channel speakers in the real world. |
| 4 | Volume indicator | Indicate the volume of each channel. |
| 5 | Reset | Reset the location of virtual speakers / virtual listener to default. |
| 6 | Manual Shifting (Free Moving Mode) | Use the pointer to click and drag to move the location of individual virtual speakers. |
| 7 | Manually Rotation Mode | Use mouse to rotate the virtual speakers on the screen manually. |
| 8 | Auto Rotation Mode | The virtual speakers rotate clockwise or counterclockwise slowly. |
6.2.8 Flex Bass II
Function Introduction
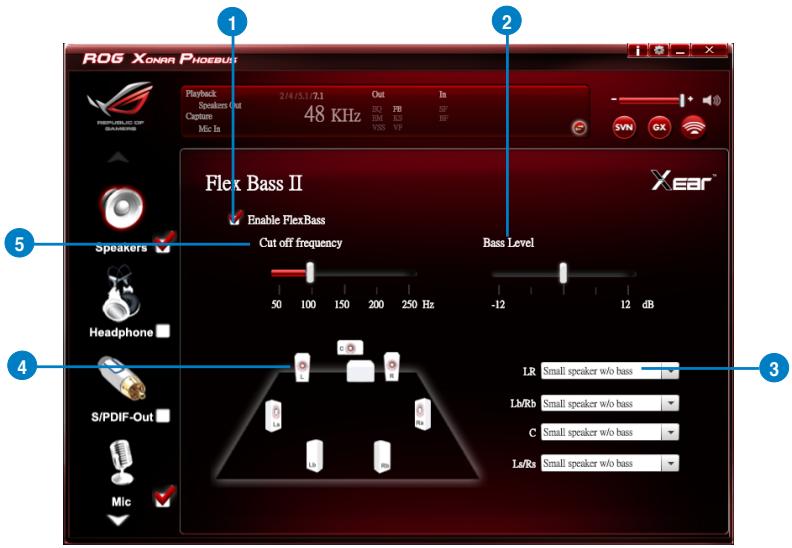
This function allows you to increase / decrease the LFE strength. This function would cut the low frequency band (50\~250Hz) of stereo music content (eg. Mp3, WMA, CD Audio) and transfer to subwoofer or each speaker.
| No | Item | Description |
| 1 | Flex Bass II enable/ disable switch | Click on this check box to enable / disable Flex Bass II. |
| 2 | Bass Level | The bass level range is from -12 to 12dB. |
| 3 | Speaker Size | Small Speaker w/o bassWhen the speaker size is set to small, you can hear the sound resonance more obvious and reverberation from subwoofer. |
| 4 | Speaker Diagram | You can also check the speaker size from this home theater diagram. |
| 5 | Cut Off Frequency | The cut off range of low frequency is from 50Hz to 250Hz. |
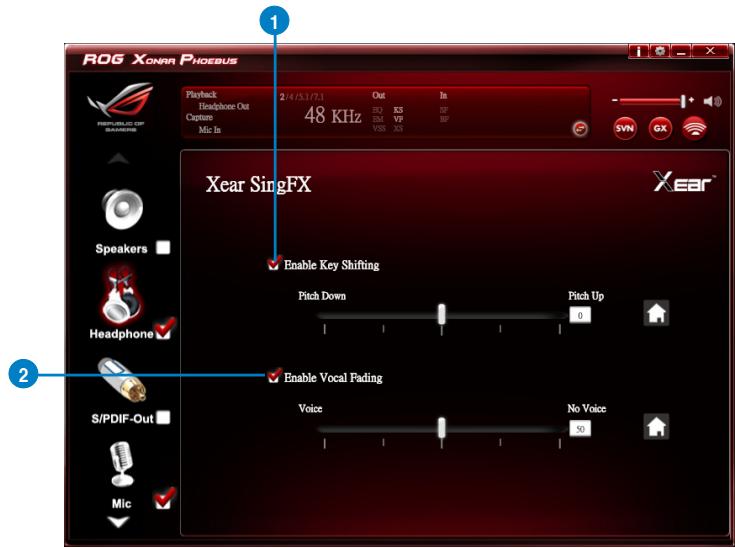
6.2.9 Xear SingFX
Function Introduction
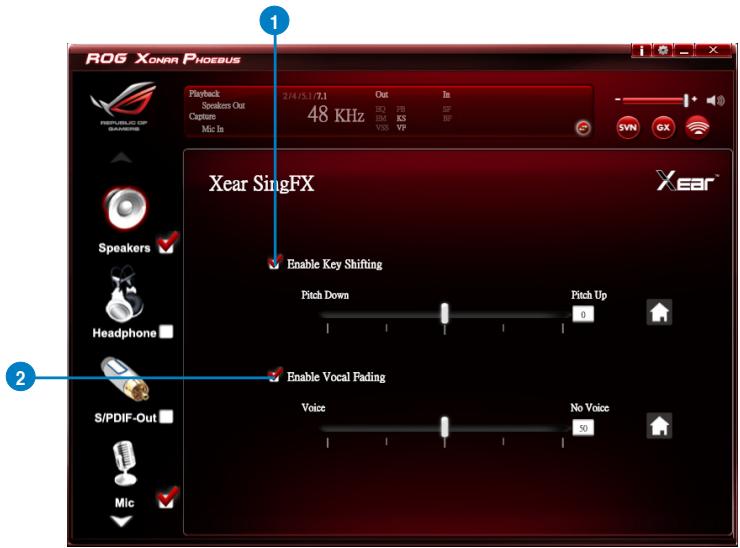
Xear SingFX function provides two features for karaoke applications.
| No | Item | Description |
| 1 | Key Shifting switch | It provides the key change function. There are four steps to shift up or down. Use the slide bar to change the key level. |
| 2 | Vocal Fading | It provides the vocal removing function for any stereo music content (eg. Mp3, WMA and CD). Use the slide bar to change the vocal fading level. |
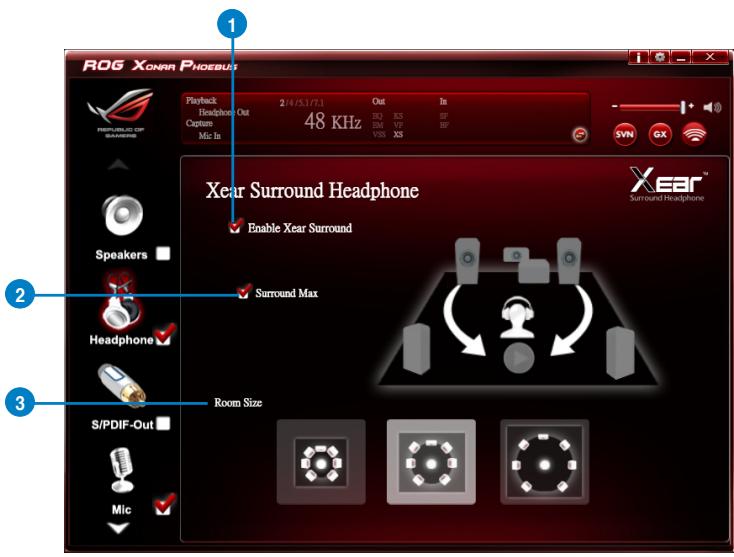
6.2.10 Xear Surround Speaker
Function Introduction
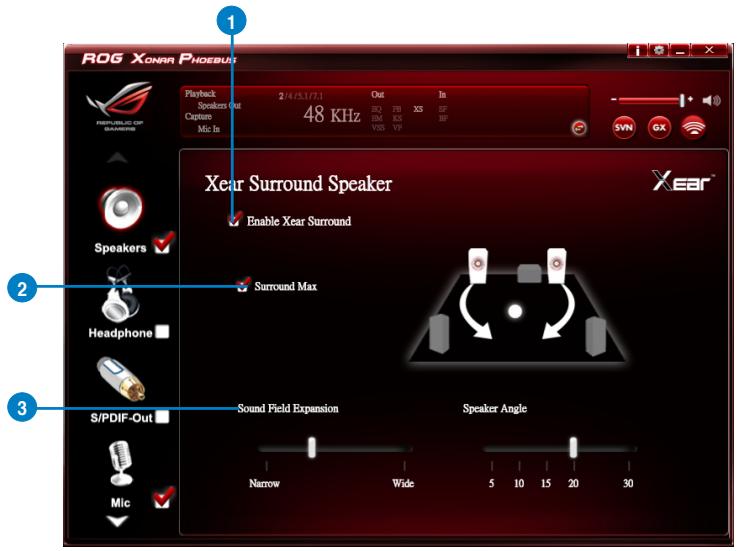
| No | Item | Description |
| 1 | Xear Surround Speaker enable/disable switch | The Xear Surround Speaker allows you to enjoy the multichannel effects on stereo. Click the checkbox to enable or disable it. |
| 2 | Surround Max | Click the checkbox to enable or disenable the Surround Max. |
| 3 | Sound Field Expansion & Speaker Angle | Change to simulate a larger or smaller space. |
6.3 Headphone Function Introduction
Function Introduction

Click the device icon on the right side to open the pop-up menu.
6.3.1 Dolby® Home Theater (Windows® 7 Only)
Function Introduction

- The following items will be replaced by Dolby® Home Theater V4 under Windows® 7 Operating System.
- 7.1 Virtual Speaker Shifter
- 10-Band Equalizer
- Refer to Dolby’s official manual for Dolby® Home Theater V4 functions.
6.3.2 Volume Control
Function Introduction
| No | Item | Description |
| 1 | Volume control bar | Adjust the volume level for all channels. |
| 2 | Left/ Right Channel Lock | Click the lock/ unlock button to lock / unlock the left channel and right channel to sync L/R channel. |
| 3 | dB Input Area | Key in a dB value in this text box to set the volume level. |
| 4 | Mute / Un-mute | Click this button to enable / disable the mute function |
6.3.3 Headphone Settings
Function Introduction
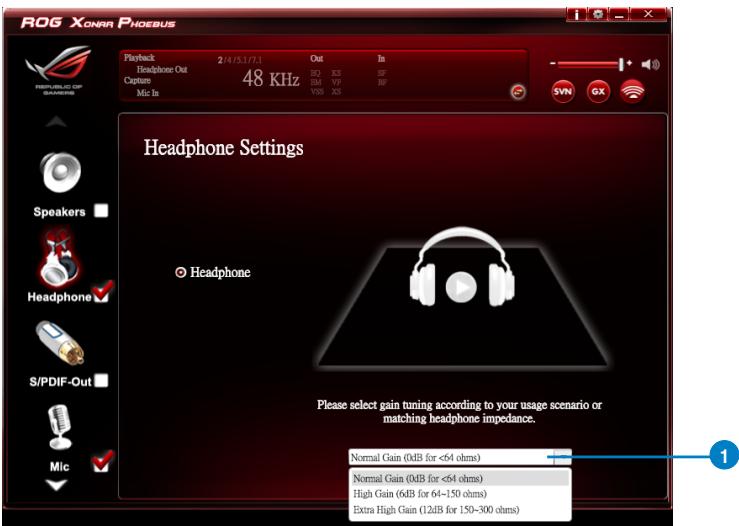

You can set the gain setting based on your headphone impedance.
| No | Item | Description |
| 1 | Normal Gain | 0dB for < 64 ohms |
| High Gain | 6dB for 64 ~150 ohms | |
| Extra High Gain | 12dB for >ohms |
6.3.4 Sample Rate
Function Introduction
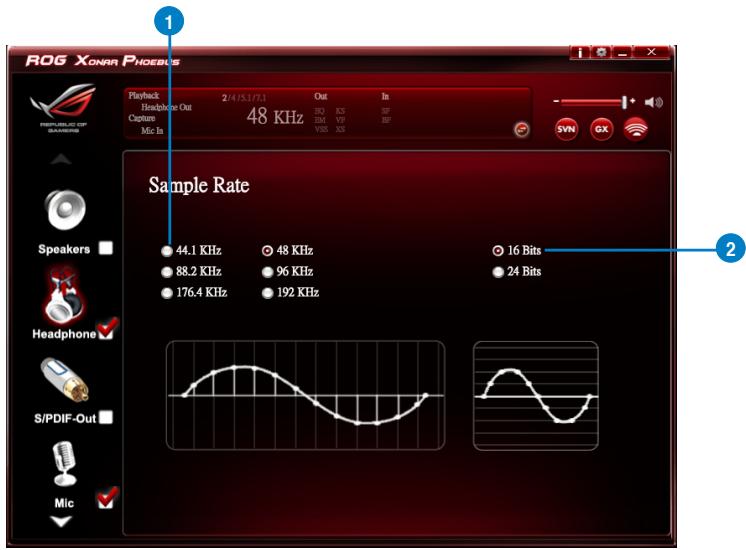
This function page provides a sample rate setting for the headphone device.
| No | Item | Description |
| 1 | Sample Rate button | 44.1 KHz - set the playback sample rate to 44.1K48 KHz - set the playback sample rate to 48K88.2 KHz - set the playback sample rate to 88.2K96 KHz - set the playback sample rate to 96K176.4 KHz - set the playback sample rate to 176K192 KHz - set the playback sample rate to 192K |
| 2 | Bit Depth button | 16bit - set the playback bit depth to 16bit24bit - set the playback bit depth to 24bit |
6.3.5 Equalizer
Function Introduction
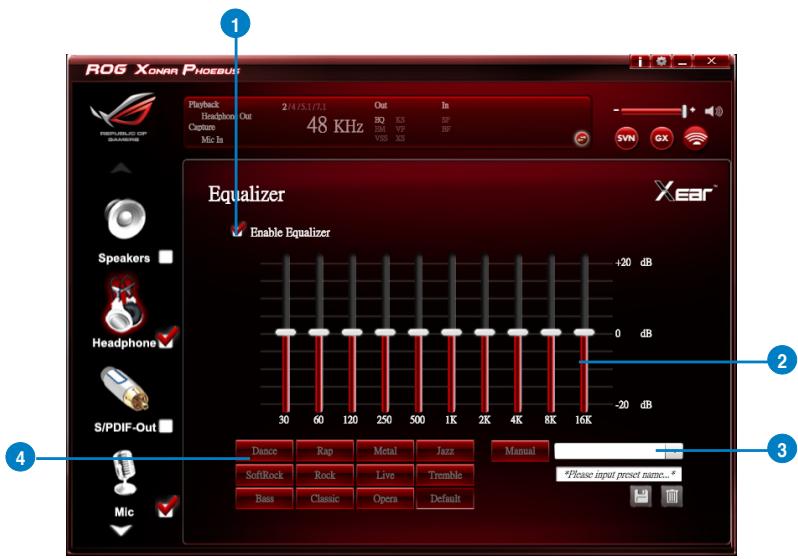
This 10-band EQ function allows you to adjust the EQ band manually and create customized preset items or click to select a preset EQ mode.
| No | Item | Description |
| 1 | EQ enable/disable switch | Click on this check box to enable / disable the Equalizer. |
| 2 | EQ band controller | Change the gain setting for each band (30/ 60/ 120/ 250/ 500/ 1K/ 2K/ 4K/ 8K/ 16K) |
| 3 | Manual mode | Change the gain setting for each band and key in a name in the input field, and then clicksaveto add your new setting. The new setting will appear in the Manual Mode List. Clicktrashto delete settings. |
| 4 | Preset mode | Select a preset mode for equalizer that is designed accordingly. There are 12 preset modes, such as Bass, Treble, Live, Rock, Jazz and so on. |
6.3.6 Environment Effects
Function Introduction
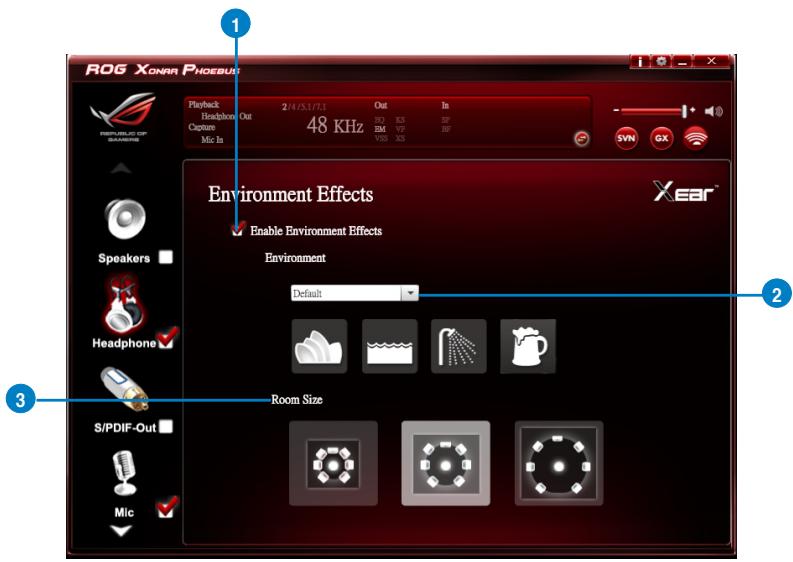
This function provides 28 special environment emulations for you to enjoy different sound reflection and reverberation.
| No | Item | Description |
| 1 | Environment Effect enable/disable switch | Click on this check box to enable / disable the Environment Effects. |
| 2 | Environment Effect mode | Click on an Environment effect button or drop the dropdown list to choose an Environment effect. |
| 3 | Room Size | Change the “Room Size” to simulate a larger or smaller space. |
6.3.7 Virtual Speaker Shifter
Function Introduction
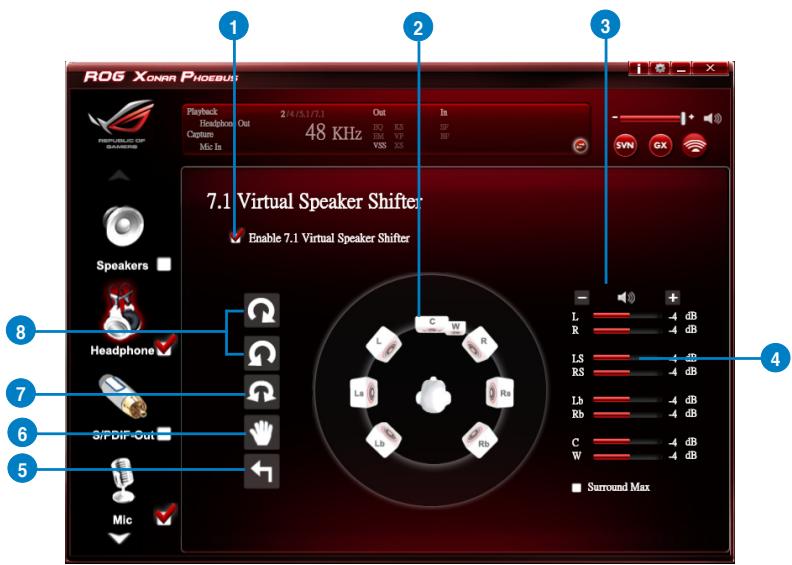
| No | Item | Description |
| 1 | 7.1 Virtual Speaker Shifter enable/disable switch | The 7.1 Virtual Speaker simulates the speaker direction and distance. Click the check box to enable / disable it. |
| 2 | Virtual Speaker (L/R/Ls/Rs/Lb/Rb/C/W) | Each virtual speaker virtualizes one channel of the 7.1 channel speakers in the real world. |
| 3 | Volume Control | Each virtual speaker virtualizes one channel of the 7.1 channel speakers in the real world. |
| 4 | Volume indicator | Indicate the volume of each channel. |
| 5 | Reset | Reset the location of virtual speakers / virtual listener to default. |
| 6 | Manual Shifting (Free Moving Mode) | Use the pointer to click and drag to move the location of individual virtual headphones. |
| 7 | Manually Rotation Mode | Use the mouse to rotate the virtual speakers on the screen manually. |
| 8 | Auto Rotation Mode | The virtual speakers rotate clockwise or counterclockwise slowly. |
6.3.8 Xear SingFX
Function Introduction
The Xear SingFX function provides two features for karaoke applications.
| No | Item | Description |
| 1 | Key Shifting switch | It provides the key change function. There are four steps to shift up or down. Use the slide bar to change the key level. |
| 2 | Vocal Fading | It provides the vocal removing function for any stereo music content (eg. Mp3, WMA and CD). Use the slide bar to change the vocal fading level. |
6.3.9 Xear Surround Headphone
Function Introduction
| No | Item | Description |
| 1 | Xear Surround Headphone enable/disable switch | The Xear Surround Headphone allows you to enjoy multichannel effects on stereo. Click the check box to enable or disable it. |
| 2 | Surround Max | Click the check box to enable or disenable the Surround Max. |
| 3 | Room Size | Change the “Room Size” to simulate a larger or smaller space. |
6.4 S/PDIF Function Introduction
Function Introduction
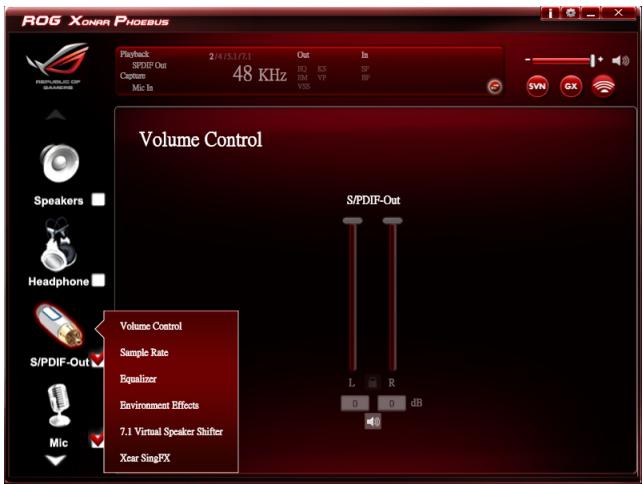

Click the device icon on the right side to open the pop-up menu.
6.4.1 Volume Control
Function Introduction
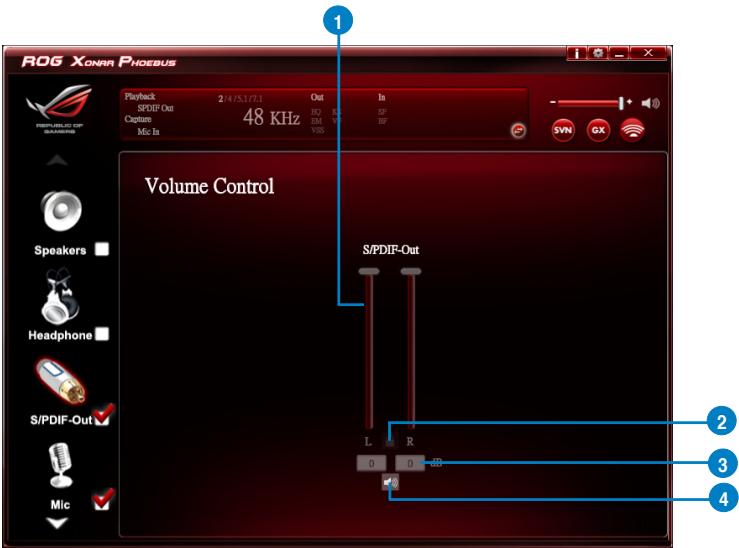
| No | Item | Description |
| 1 | Volume Control bar | Adjust the volume level for all channels. |
| 2 | Left/ Right Channel Lock | Click the lock/ unlock button to lock / unlock the left channel and right channel to sync L/R channel. |
| 3 | dB Input Area | Key in a dB value in this text box to set the volume level. |
| 4 | Mute / Un-mute | Click the button to enable / disable the mute function. |
6.4.2 Sample Rate
Function Introduction
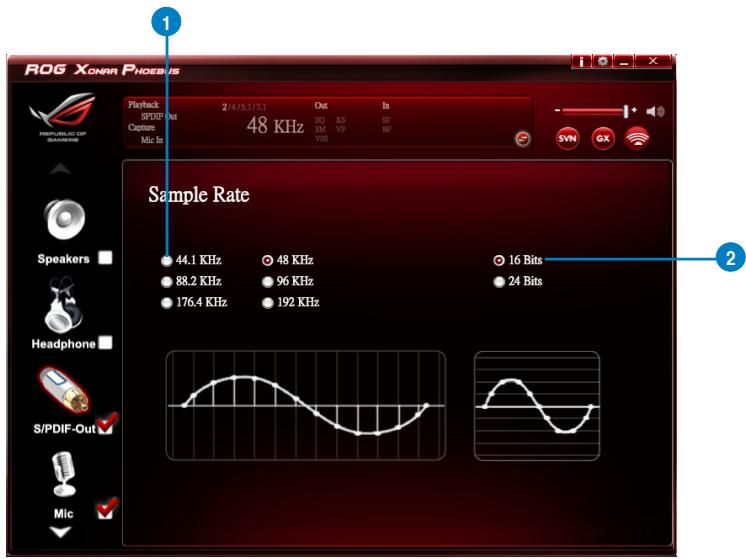
This function allows you to set the sample rate for the S/PDIF device.
| No | Item | Description |
| 1 | Sample Rate button | 44.1 KHz - set the playback sample rate to 44.1K48 KHz - set the playback sample rate to 48K88.2 KHz - set the playback sample rate to 88.2K96 KHz - set the playback sample rate to 96K176.4 KHz - set the playback sample rate to 176K192 KHz - set the playback sample rate to 192K |
| 2 | Bit Depth button | 16bit - set the playback bit depth to 16bit24bit - set the playback bit depth to 24bit |
6.4.3 Equalizer
Function Introduction

The 10-band EQ function allows you to adjust the EQ band manually and create customized preset items or click to select a preset EQ mode.
| No | Item | Description |
| 1 | EQ enable/disable switch | Click on this check box to enable / disable the Equalizer. |
| 2 | EQ band controller | Change the gain setting for each band (30/ 60/ 120/ 250/ 500/ 1K/ 2K/ 4K/ 8K/ 16K) |
| 3 | Manual mode | Change the gain setting for each band and key in a name in the input field, and then clicksaveto add your new setting. The new setting will appear in the Manual Mode List. Clicktrashto delete settings. |
| 4 | Preset mode | Select a preset mode for equalizer that is designed accordingly. There are 12 preset modes, such as Bass, Treble, Live, Rock, Jazz and so on. |
6.4.4 Environment Effects
Function Introduction
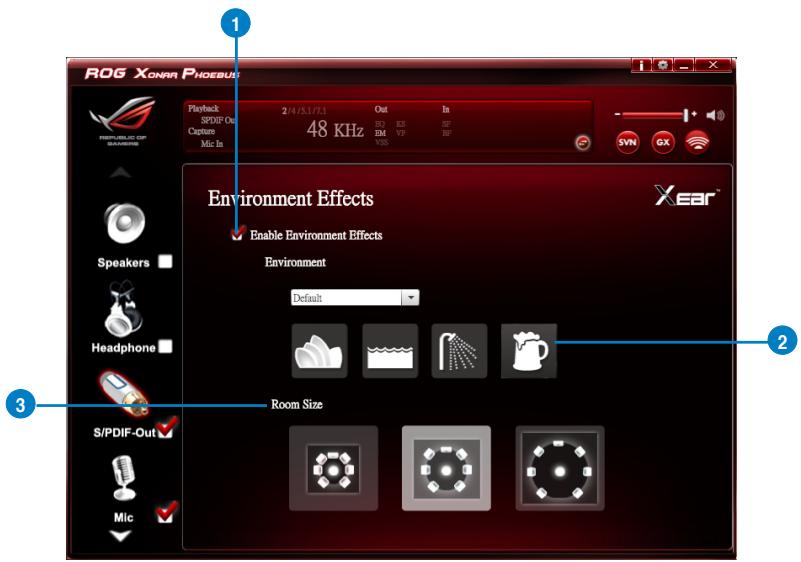
This function provides 28 special environment emulations for you to enjoy different sound reflection and reverberation.
| No | Item | Description |
| 1 | Environment Effect enable/disable switch | Click on this check box to enable / disable the Environment Effects. |
| 2 | Environment Effect mode | Click on an Environment Effect button or drop the dropdown list to choose an Environment Effect. |
| 3 | Room Size | Change the “Room Size” to simulate a larger or smaller space. |
6.4.5 Virtual Speaker Shifter
Function Introduction
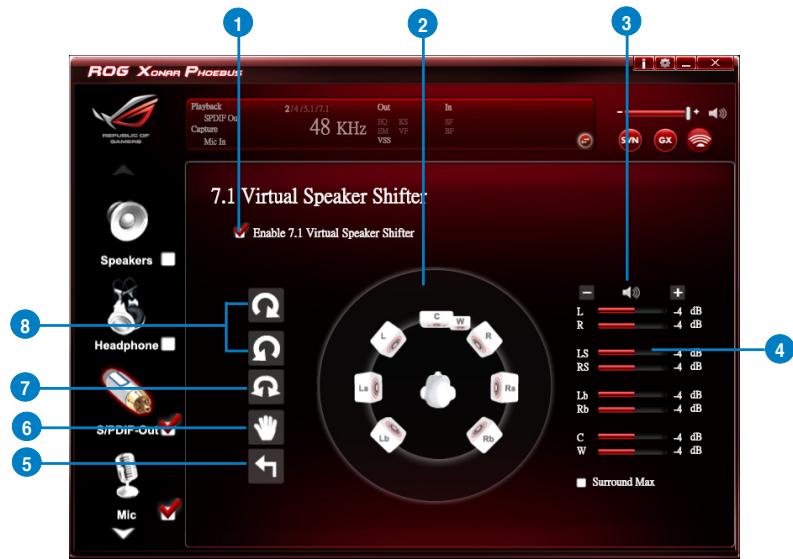
| No | Item | Description |
| 1 | 7.1 Virtual speaker shifter enable/disable switch | The 7.1 Virtual Speaker simulates the speaker direction and distance. Click the check box to enable / disable it. |
| 2 | Virtual Speaker (L/R/Ls/Rs/Lb/Rb/C/W) | Each virtual speaker virtualizes one channel of the 7.1 channel speakers in the real world. |
| 3 | Volume Control | Each virtual speaker virtualizes one channel of the 7.1 channel speakers in the real world. |
| 4 | Volume indicator | Indicate the volume of each channel. |
| 5 | Reset | Reset the location of virtual speakers / virtual listener to default. |
| 6 | Manual Shifting (Free Moving Mode) | Use the pointer to click and drag to move the location of individual virtual headphones. |
| 7 | Manually Rotation Mode | Use the mouse to rotate the virtual speakers on the screen manually. |
| 8 | Auto Rotation Mode | The virtual speakers rotate clockwise or counterclockwise slowly. |
6.4.6 Xear SingFX
Function Introduction
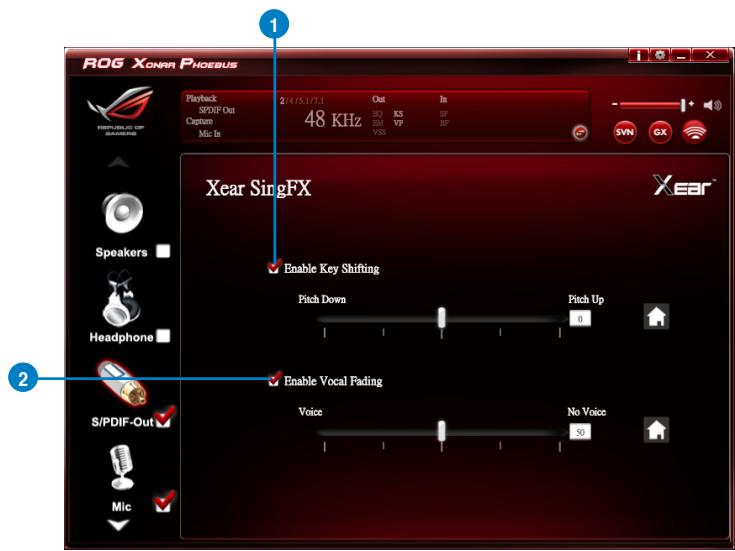
The Xear SingFX function provides two features for karaoke applications.
| No | Item | Description |
| 1 | Key Shifting switch | It provides the key change function. There are four steps to shift up or down. Use the slide bar to change the key level. |
| 2 | Vocal Fading | It provides the vocal removing function for any stereo music content (eg. Mp3, WMA and CD). Use the slide bar to change the vocal fading level. |
6.5 Microphone Function Introduction
Function Introduction
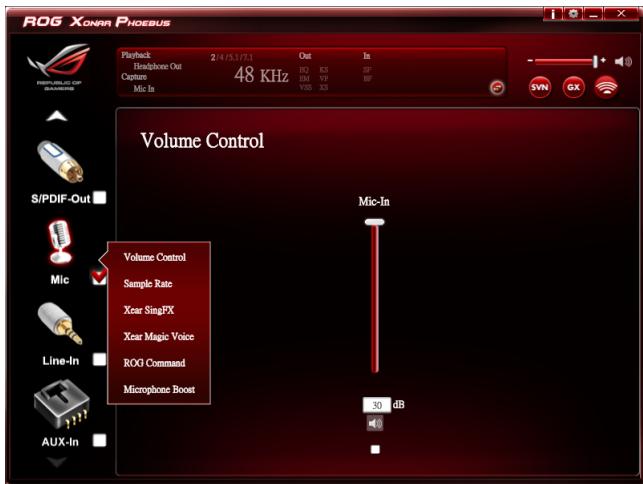

Click the device icon on the right side to open the pop-up menu.
6.5.1 Volume Control
Function Introduction
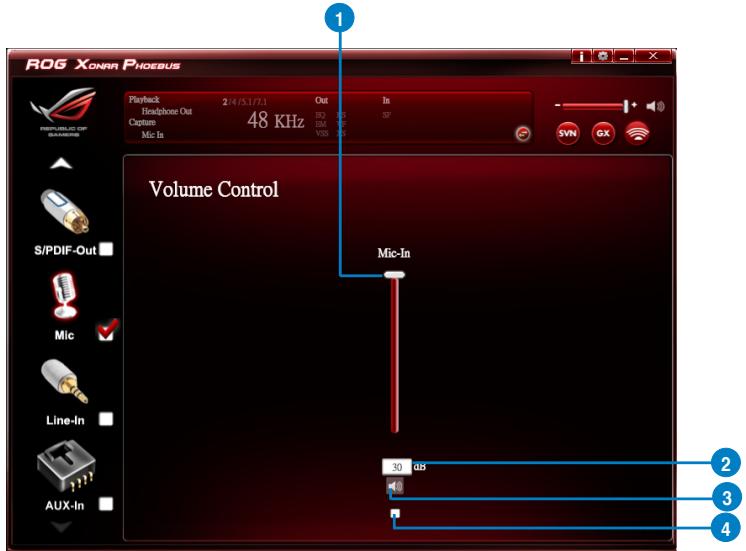
| No | Item | Description |
| 1 | Volume Control bar | Adjust the volume level of all channels. |
| 2 | dB Input Area | Key in a dB value in this text box to set the volume level. |
| 3 | Mute / Un-mute | Click the button to enable / disable the mute function. |
| 4 | Monitor | Click the checkbox to enable monitoring. |
6.5.2 Sample Rate
Function Introduction

This function allows you to set the sample rate for the microphone device.
| No | Item | Description |
| 1 | Sample Rate button | 44.1 KHz - set the playback sample rate to 44.1K48 KHz - set the playback sample rate to 48K96 KHz - set the playback sample rate to 96K192 KHz - set the playback sample rate to 192K |
| 2 | Bit Depth button | 16bit - set the playback bit depth to 16bit24bit - set the playback bit depth to 24bit |
6.5.3 Xear SingFX
Function Introduction
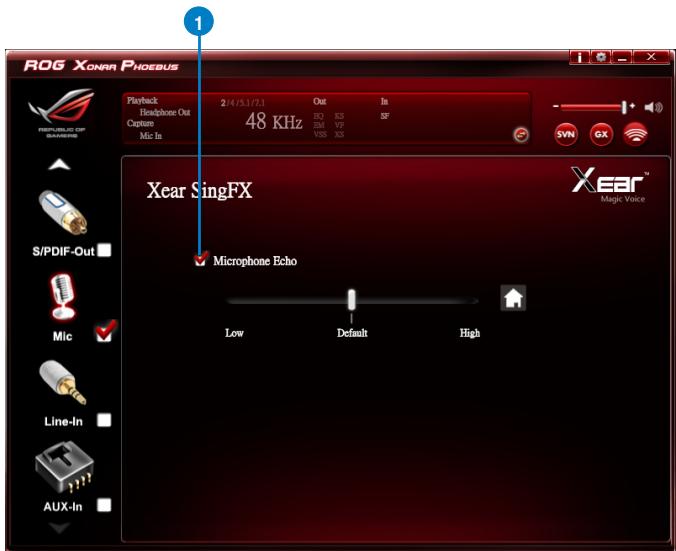
The Xear SingFX function provides two features for karaoke applications.
| No | Item | Description |
| 1 | Microphone Echo | Click the check box to enable / disable the Microphone Echo function. Use the slide bar to adjust the echo level. |
6.5.4 Xear Magic Voice
Function Introduction
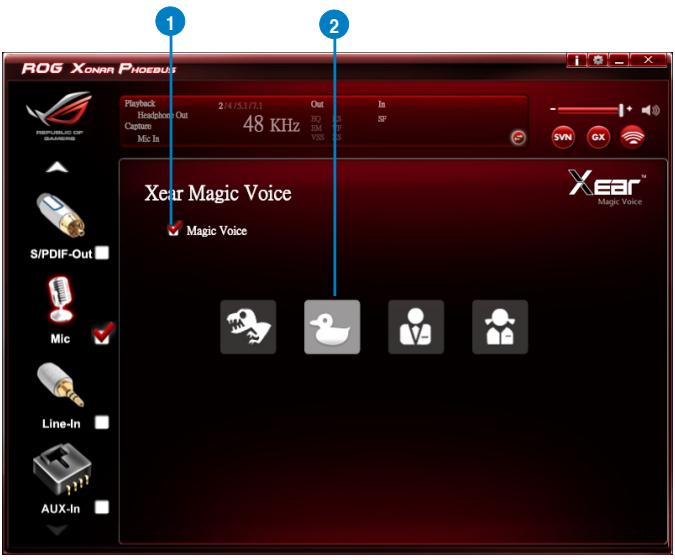
While talking to your friends online (eg.Messenger, VOIP, online game applications), use the “Magic Voice” effects to simulate funny voices.

Choose one type of voice only at one time.
| No | Item | Description |
| 1 | Xear Magic Voice | Click this check box to enable / disable the Microphone Magic Voice function. |
| 2 | Magic Voice mode (Monster/Carton/Male/Female) | Click to choose a magic voice mode. |
6.5.5 ROG Command Beam Forming
Function Introduction
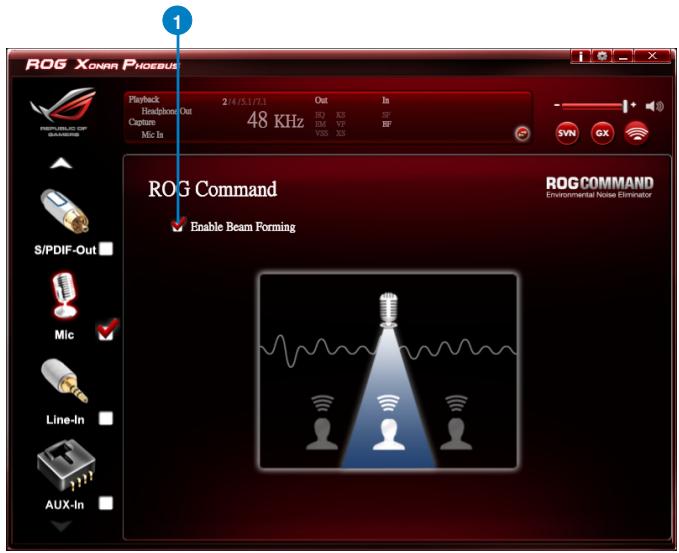

Beam Forming function is available only when the Control Box is connected to the audio card without any other external microphones.
| No | Item | Description |
| 1 | Beaming Forming | Click the check box to enable / disable the Beam Forming function. |
6.5.6 ROG Command ENC (Environmental Noise Cancellation)
Function Introduction
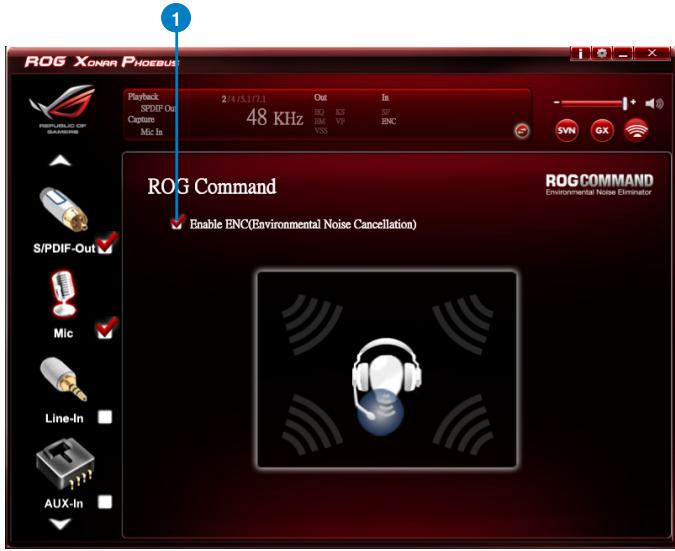

ENC is available only when the Control Box is connected to the audio card with an external microphones.
| No | Item | Description |
| 1 | Environmental Noise Cancellation | Click the check box to enable / disable the Environmental Noise Cancellation function. |
6.5.7 Microphone Boost
Function Introduction
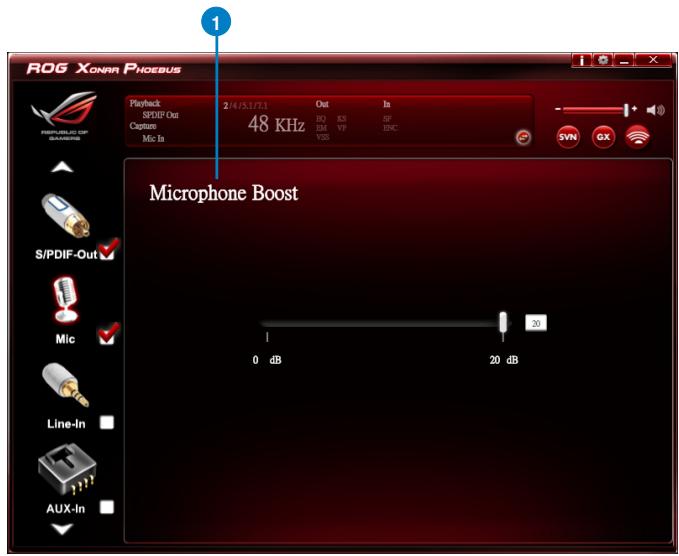
| No | Item | Description |
| 1 | Microphone Boost | Drag the slide bar to boost microphone volume and sensitivity |
6.6
Line-in Device Function Introduction
Function Introduction

Click the device icon on the right side to open the pop-up menu.
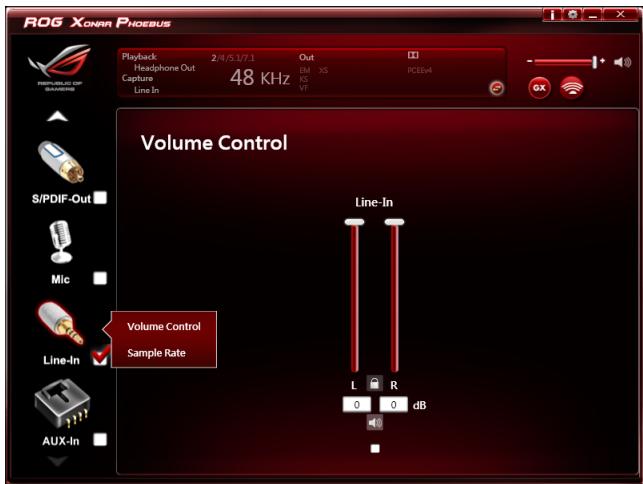
6.6.1 Volume Control
Function Introduction
| No | Item | Description |
| 1 | Volume Control bar | Adjust the volume level of all channels. |
| 2 | Left/ Right Channel Lock | Click the lock/ unlock button to lock / unlock the left channel and right channel to sync L/R channel. |
| 3 | dB Input Area | Key in a dB value in this text box to set the volume level. |
| 4 | Mute / Un-mute | Click the button to enable / disable the mute function. |
| 5 | Monitor | Click the checkbox to enable monitoring. |
6.6.2 Sample Rate
Function Introduction
This function allows you to set the sample rate for the line-in device.
| No | Item | Description |
| 1 | Sample Rate button | 44.1 KHz - set the playback sample rate to 44.1K48 KHz - set the playback sample rate to 48K88.2 KHz - set the playback sample rate to 88.2K96 KHz - set the playback sample rate to 96K176.4 KHz - set the playback sample rate to 176K192 KHz - set the playback sample rate to 192K |
| 2 | Bit Depth button | 16bit - set the playback bit depth to 16bit24bit - set the playback bit depth to 24bit |
6.7 Aux-in Device Function Introduction
Function Introduction


Click the device icon on the right side to open the pop-up menu.
6.7.1 Volume Control
Function Introduction
| No | Item | Description |
| 1 | Volume Control bar | Adjust the volume level for all channels. |
| 2 | Left/ Right Channel Lock | Click the lock/ unlock button to lock / unlock the left channel and right channel to sync L/R channel. |
| 3 | dB Input Area | Key in a dB value in this text box to set the volume level. |
| 4 | Mute / Un-mute | Click the button to enable / disable the mute function. |
| 5 | Monitor | Click the checkbox to enable monitoring. |
6.7.2 Sample Rate
Function Introduction

This function allows you to set the sample rate setting for the aux-in device.
| No | Item | Description |
| 1 | Sample Rate button | 44.1 KHz - set the playback sample rate to 44.1K48 KHz - set the playback sample rate to 48K96 KHz - set the playback sample rate to 96K192 KHz - set the playback sample rate to 192K |
| 2 | Bit Depth button | 16bit - set the playback bit depth to 16bit24bit - set the playback bit depth to 24bit |
6.8 Information Page Introduction
This page lists the driver information and the technologies' trademark logo. You can get both hardware/software details and legal information references here.

Click the device icon on the left side to open the pop-up menu.
6.9 Tray Icon Function Introduction
Open the "CPL Tray Icon Function List" by right-clicking on the tray Icon in the system tray.
- Open: Click the Open item to restore the USB Audio Software CPL.
- Volume Control: Click the Volume Control item to launch the Volume Mixer of Windows OS, which allows you to control the volume of speakers and other audio devices separately.
- Windows Media Player: Click the Windows Media Player item to launch the Microsoft Windows Media Player.
- Sound Recorder: Click the Sound Recorder item to open the Windows Sound recorder.
- Multimedia Properties: Launch the Multimedia Properties page of Windows OS to select the working sample rate & bit rate.
(1) Select the Speakers device and then click the properties button.
(2) Click the Advanced tab and click the dropdown list to open default format support list as shown in the diagram below.
(3) Follow the same step to change the sample rate & bit rate for Microphone device.
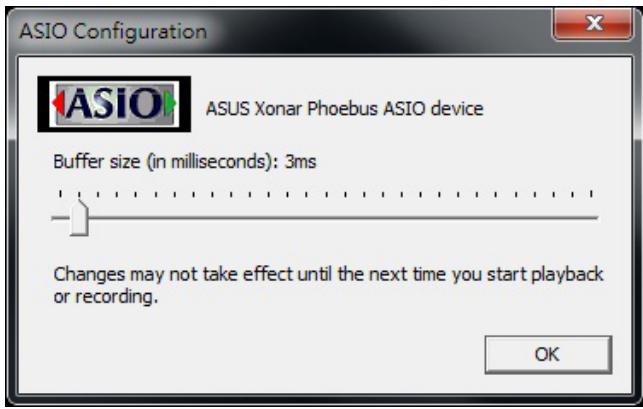
6. Open ASIO: Click to open ASIO.
7. Settings: Click setting to launch the Advanced Settings page as shown below.
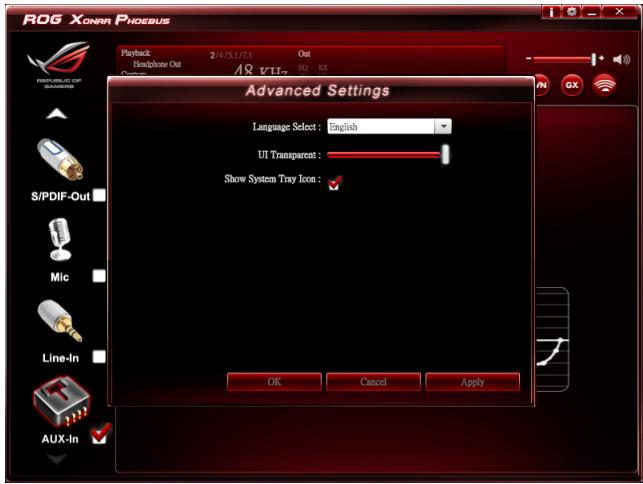
(1) Language Select: Change the UI language.
(2) UI Transparent: Adjust the UI vision of transparent.
(3) Show System Tray Icon: Check Show System Tray Icon box to show the Xear Audio center icon in the system tray.
8. Exit: Click Exit to exit the tray Icon from the system tray.
7. Troubleshooting and FAQs
7.1 Troubleshooting
1: I cannot install the audio card driver in my PC.
Instructions:
(1). Make sure that you have properly plugged the audio card into the PCI Express slot on your motherboard.
(2). Check that the Windows hardware Device Manager has discovered a multimedia audio device. If no device is found, please try scanning for new hardware.
(3). Try to restart your Windows.
(4). Remove the card and plug it into another PCI Express slot.
2: I cannot find the Xonar Phoebus Audio Center.
Instructions:
(1). Make sure you have installed the driver.
(2). Find the Xonar Phoebus Audio Center icon in the system tray on the right bottom of the screen. Double click the icon to launch the Xonar Phoebus Audio Center utility.

(3). If you cannot find the icon in the system tray, go to the Windows Control Panel and double click the "Xonar Phoebus Audio Center" icon to make it visible in the system tray again.
(4). After the driver installation is complete, it's recommended that you reboot your computer to complete the setup. If the icon still doesn't appear, please try installing the driver package again.
3. I can't hear any sound from my analog speakers
Instructions:
(1). The Xonar Phoebus PCI Express audio card needs the power cable to supply additional power in addition to the basic PCI Express bus power. Please double check you have plugged the small 6-pin power plug into the Xonar Phoebus power connector. If you did not plug the internal power, the Xonar Phoebus audio center will remind you a warning message and won't allow your operation when you double click the Xonar Phoebus audio center icon in the system tray.
(2). Please ensure that you have connected speakers properly and have powered on your speakers.
(3). Please ensure that the device master volume or the software player has NOT been muted on the Xonar Phoebus Audio Center.
(4). If you are using Dolby Digital Live encoder through the S/PDIF output, the analog output will be muted to get rid of the interference between your digital speaker system and analog speakers or headphones. Please check if this is the case.
(5). Please go to the sound and audio device of Windows Control Panel to check if the playback default device is set to Xonar Phoebus Audio Device, instead of other onboard AC97 or HDA codec device. If it's not, please set it to Xonar Phoebus Audio Device and restart your applications.
(6). Please try restart your Windows.
4. I can't hear any sound from the S/PDIF output
Instructions:
(1). Please ensure that you have enabled S/PDIF output in the Audio Center GUI (Main page).
(2). Please ensure that you have connected the correct S/PDIF output jack in the card to the decoder's (AV receiver) S/PDIF input jack.
(3). You may need to select the correct input and mode of your decoder or AV receiver. For Dolby Digital or DTS output, you may have to double check that the AV receiver is in that decoding mode.
(4). If you are using 192KHz PCM output, please make sure that your decoder can support 192KHz decoding. Try changing it to 44.1K or 48KHz first.
5. I can't hear audio input (Mic, Line-in, AUX, etc.) from my speakers Instructions:
(1). Please select the correct input as the recording source. If you are using Windows Vista/Win 7, please also go to system audio control panel to see the current default recording/input device is right.
(2). Please remember to turn on the digital monitoring button for that recording source.
6. I can't hear the TV tuner audio from my speakers
Instructions:
(1). If you are using a traditional TV tuner card which has analog audio output, please connect it to the Aux-In header on the audio card
(2). Select Aux as the recording source and remember to turn on the digital monitoring button in the recording mixer page.
(3). If you are using a TV tuner card which has digital audio output instead of analog, please check that the sound is not muted and whether other applications can play normally. If you still have problem, please read the TV tuner card's software user guide.
7.2 FAQ
Q1: Does the Xonar Phoebus support Windows Vista / Win 7?
Answer:
Yes, the Xonar Phoebus driver package does support Windows Vista / Win 7 32/64 bit and most key features are available. In addition, the Xonar Phoebus supports unique GX on Windows Vista / Win 7, which can recover DirectSound 3D hardware and EAX gaming sound effects on Vista / Win 7 for a lot of existing DirectX games.
Q2: Why does the Xonar Phoebus support Dolby technology?
Answer:
Dolby is the ONLY brands and technology recognized by the CE industry and available on a wide range of audio equipment. The Xonar Phoebus includes these features to make your PC a powerful media and entertainment center.
Q3: Does the Xonar Phoebus support EAX on Vista / Win 7?
Answer:
Yes, The Xonar Phoebus can support EAX not only on Windows XP but also on Vista / Win 7 through innovative GX3.0 technology.
Q4: Why do I need Dolby for PC games?
Answer:
(1). Dolby Headphone is available in the latest game consoles, like XBOX360, PS3, and Wii. Dolby can provide the best gaming sound experience and compatibility with home theater or TV systems.
(2). Dolby Headphone is the best 3D sound positioning, spatial modeling and 5.1-channel virtualization technology for regular stereo headphones and speakers.
Q6: Will PCM sound output through S/PDIF be just 2 channels even with different analog output channels?
Answer:
The S/PDIF protocol specification (IEC-60958) can only carry 2-channel PCM data or non-PCM AC3/DTS data. So, when a user selects PCM output for S/PDIF, the Xonar Phoebus audio card will always deliver 2 channel PCM data through the S/PDIF output port. To attain the 5.1 channel surround sound, you can select DDO, which allows the Xonar Phoebus to deliver 5.1 surround sound for DVD movies, and even stereo music.
- Introduction
- Package Contents
- System Requirements
- About Hardware
- Installing the Xonar Hardware
- Preparing Your Computer
- Installing the Audio Processing Card
- Connecting TV tuner card
- Installing Software
- Installing the Audio Card Driver
- Uninstalling or Reinstalling Software
- Uninstalling Software
- Reinstalling Software
- Connecting Speakers and Peripherals
- Connecting to Phoebus Control Box
- Connecting Phoebus Box
- Connecting Phoebus Box with external headphone and microphone
- Connecting Digital Speaker Systems (Home Theater)
- Connecting stereo headphones
- Connecting stereo headphones
- Connecting Analog Speaker Systems
- Connecting Analog Power Amplifier
- Connecting 2/2.1 Channel Speakers
- Connecting 7.1 channel speakers
- speakers
- Connecting Microphone
- Connecting Line-In audio sources
- Xonar Phoebus Driver Guide
- Introduction to the Xonar Phoebus Audio Center GUI
- Function Pop-up Menu
- To open the pop-up menu:
- Audio Status Panel
- Profile Panel
- Speaker Function Introduction
- Dolby® Home Theater (Windows® 7 Only)
- Volume Control
- Speaker Setting
- Sample Rate
- Equalizer
- Environment Effect
- 7.1 Virtual Speaker Shifter
- Flex Bass II
- Xear SingFX
- Xear Surround Speaker
- Headphone Function Introduction
- Dolby® Home Theater (Windows® 7 Only)
- Volume Control
- Headphone Settings
- Function Introduction
- Sample Rate
- Equalizer
- Environment Effects
- Virtual Speaker Shifter
- Xear SingFX
- Xear Surround Headphone
- S/PDIF Function Introduction
- Volume Control
- Sample Rate
- Equalizer
- Environment Effects
- Virtual Speaker Shifter
- Xear SingFX
- Microphone Function Introduction
- Volume Control
- Sample Rate
- Xear SingFX
- Xear Magic Voice
- ROG Command Beam Forming
- ROG Command ENC (Environmental Noise Cancellation)
- Microphone Boost
- 6.6
- Line-in Device Function Introduction
- Volume Control
- Sample Rate
- Aux-in Device Function Introduction
- Volume Control
- Sample Rate
- Information Page Introduction
- Tray Icon Function Introduction
- Open ASIO: Click to open ASIO.
- Settings: Click setting to launch the Advanced Settings page as shown below.
- Exit: Click Exit to exit the tray Icon from the system tray.
- Troubleshooting and FAQs
- Troubleshooting
- 1: I cannot install the audio card driver in my PC.
- Instructions:
- 2: I cannot find the Xonar Phoebus Audio Center.
- I can't hear any sound from my analog speakers
- I can't hear any sound from the S/PDIF output
- I can't hear audio input (Mic, Line-in, AUX, etc.) from my speakers Instructions:
- I can't hear the TV tuner audio from my speakers
- FAQ
- Q1: Does the Xonar Phoebus support Windows Vista / Win 7?
- Answer:
- Q2: Why does the Xonar Phoebus support Dolby technology?
- Q3: Does the Xonar Phoebus support EAX on Vista / Win 7?
- Q4: Why do I need Dolby for PC games?
- Q6: Will PCM sound output through S/PDIF be just 2 channels even with different analog output channels?
Marque : ASUS
Modèle : ROG XONAR PHOEBUS
Catégorie : Carte son