
MOBILE REMOTE CONTROL - Télécommande HP - Notice d'utilisation et mode d'emploi gratuit
Retrouvez gratuitement la notice de l'appareil MOBILE REMOTE CONTROL HP au format PDF.

| Type de produit | Télécommande infrarouge pour ordinateur portable |
| Marque | HP |
| Modèle | Mobile Remote Control |
| Référence | 367174-001 |
| Date de première édition | Novembre 2004 |
| Dimensions approximatives | 10 cm × 4 cm × 0,8 cm |
| Poids approximatif | 20 g (avec pile) |
| Alimentation | 1 pile CR2032 (lithium 3V) |
| Portée infrarouge | Jusqu'à 10 mètres en visibilité directe |
| Systèmes d'exploitation supportés | Microsoft Windows, QuickPlay (sur certains modèles) |
| Fonctions principales | Navigation, contrôle des médias (lecture/pause, avance/retour, volume), mise en veille, gestion de l'affichage, accès aux applications (DVD, musique, photos) |
| Stockage | Dans le logement PC Card de l'ordinateur portable |
| Entretien et nettoyage | Nettoyer avec un chiffon doux et sec. Ne pas utiliser de produits chimiques. |
| Sécurité | Ne pas exposer à des températures extrêmes, à l'humidité ou aux chocs. |
| Pièces détachées et réparabilité | Pile CR2032 remplaçable. Pas d'autres pièces détachées disponibles. |
| Compatibilité | Ordinateurs portables HP équipés d'un récepteur infrarouge et de logiciels compatibles (Windows Media Center, QuickPlay, InterVideo Home Theater) |
FOIRE AUX QUESTIONS - MOBILE REMOTE CONTROL HP
Questions des utilisateurs sur MOBILE REMOTE CONTROL HP
0 question sur cet appareil. Repondez a celles que vous connaissez ou posez la votre.
Poser une nouvelle question sur cet appareil
Téléchargez la notice de votre Télécommande au format PDF gratuitement ! Retrouvez votre notice MOBILE REMOTE CONTROL - HP et reprennez votre appareil électronique en main. Sur cette page sont publiés tous les documents nécessaires à l'utilisation de votre appareil MOBILE REMOTE CONTROL de la marque HP.
MODE D'EMPLOI MOBILE REMOTE CONTROL HP

text_image
hp®invent
Quick Reference Guide
HP Mobile Remote Control
Document Part Number: 367174-001
November 2004
© Copyright 2004 Hewlett-Packard Development Company, L.P.
Microsoft and Windows are U.S. registered trademarks of Microsoft Corporation.
The information contained herein is subject to change without notice. The only warranties for HP products and services are set forth in the express warranty statements accompanying such products and services. Nothing herein should be construed as constituting an additional warranty. HP shall not be liable for technical or editorial errors or omissions contained herein.
Quick Reference Guide
HP Mobile Remote Control
First Edition November 2004
Document Part Number: 367174-001
Contents
Introduction 1
Inserting the Battery.... 1
Storing the HP Mobile Remote Control.... 3
HP Mobile Remote Control Quick Reference ..... 5
HP Mobile Remote Control Component Functions.....11
Introduction
This guide provides information on using your HP Mobile Remote Control. The HP Mobile Remote Control allows easy and comfortable control of the notebook media software from the palm of your hand.
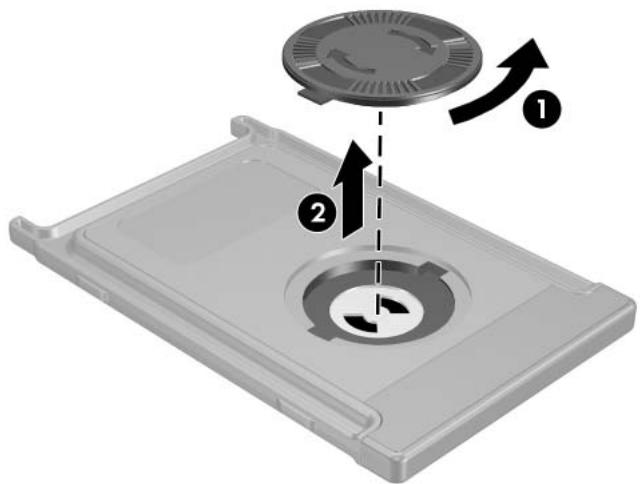
Inserting the Battery
To insert the battery into the HP Mobile Remote Control, complete the following steps:
- On the back of the remote control, turn the battery compartment cover counterclockwise ① and remove it ②.
text_image
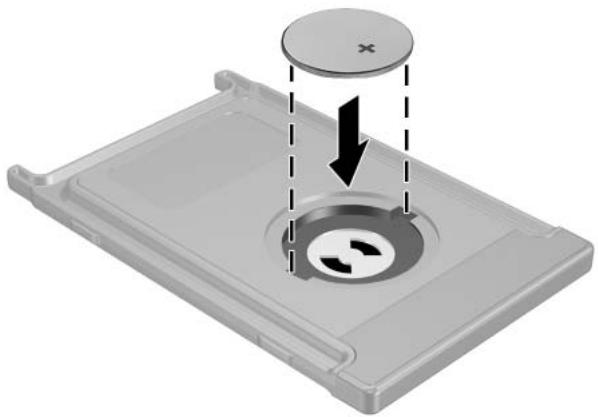
Diagram showing a device with a circular component and two directional arrows labeled 1 and 2, indicating movement or assembly.- With the positive side of the battery facing up, insert the battery into the compartment.
natural_image
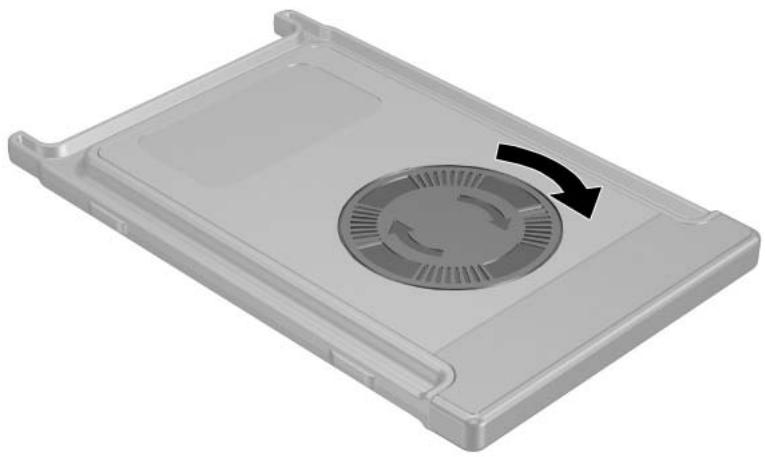
3D diagram of a mechanical component with a circular dial and directional arrows indicating motion or force (no text or symbols)- Insert the tabs on the battery compartment cover into the slots in the battery compartment and turn the cover clockwise to close.
natural_image
3D rendering of a gray plastic electronic device casing with a circular vent and directional arrow indicating rotation (no text or symbols)Storing the HP Mobile Remote Control
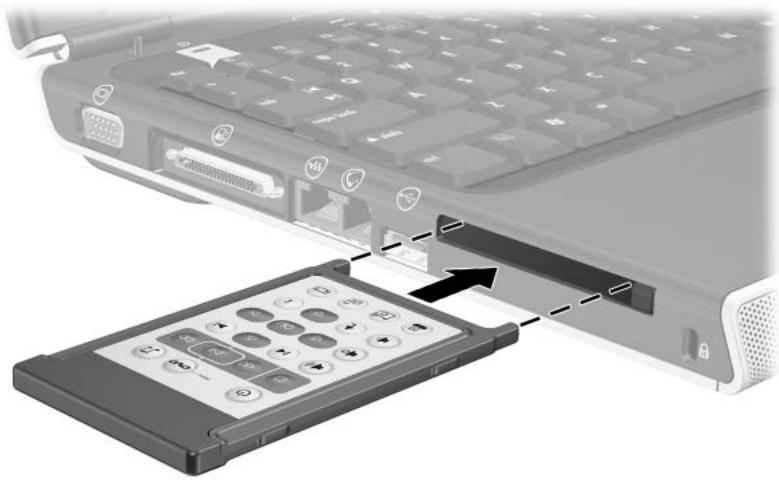
The HP Mobile Remote Control can be stored in the PC Card slot of your notebook for convenience and safety. To store the remote control, remove the PC Card slot blank, and then insert the remote control into the PC Card slot until it is firmly in place.
natural_image
Diagram showing a laptop keyboard with an open remote control panel inserted, no text or symbols presentTo remove the remote control:
-
Press the PC Card slot eject button ① to release the remote control from the PC Card slot.
-
Slide the remote control ② out of the slot.

text_image
Diagram of a computer keyboard showing two labeled components: component 1 and component 2, with arrows pointing to the internal structure.HP Mobile Remote Control Quick Reference

text_image
Menu DVD| Button | Button Function | ||
| When Notebook Is Off | In Microsoft® Windows® | In QuickPlay (select models only) | |
Power | Press to start notebook in Windows. | ■ In Windows, briefly press to initiate Hibernation.■ In Standby, briefly press to resume from Standby into Windows.■ In Hibernation, briefly press to restore from Hibernation into Windows. | Press to turn QuickPlay off. |
| DVD Menu[BYKX] | Press to open QuickPlay DVD mode (select models only). | ■ In Windows, press to open the default Windows DVD player.■ In Standby, press briefly to resume from Standby.■ In Hibernation, press to open QuickPlay DVD mode (select models only).■ When a DVD is playing, press to view the menu of the DVD. | ■ In QuickPlay music mode, press to switch to QuickPlay DVD mode.■ When a DVD is playing, press to view the menu of the DVD. |
(Continued)
| Button | Button Function | ||
| When Notebook Is Off | In Microsoft® Windows® | In QuickPlay (select models only) | |
Music | Press to open QuickPlay music mode (select models only). | ■ In Windows, press to open the default Windows music player.■ In Standby, press briefly to resume from Standby.■ In Hibernation, press to open QuickPlay music mode (select models only). | In QuickPlay DVD mode, press to switch to QuickPlay music mode. |
Stop | None | Press to stop the current media activity, such as playing, rewinding, etc. | Press to stop the current media activity, such as playing, rewinding, etc. |
Rewind | None | Press to rewind selected media. | Press to rewind selected media. |
Play/Pause | None | ■ Disc not playing, press to play the disc.■ Disc playing, press to pause the disc. | ■ Disc not playing, press to play the disc.■ Disc playing, press to pause the disc. |
Fast Forward | None | Press to fast forward selected media. | Press to fast forward selected media. |
(Continued)
| Button | Button Function | ||
| When Notebook Is Off | In Microsoft® Windows® | In QuickPlay (select models only) | |
| Volume Up[GGDS] | None | ■ Press to increase notebook volume. ■ If muted, press to restore notebook volume. | ■ Press to increase notebook volume. ■ If muted, press to restore notebook volume. |
Previous | None | Press to go back to the previous track or chapter. | Press to go back to the previous track or chapter. |
Up | None | Navigation. Press to scroll up. | Navigation. Press to scroll up. |
Next | None | Press to go to the next track or chapter. | Press to go to the next track or chapter. |
Mute | None | ■ Press to mute notebook volume. ■ If muted, press to restore notebook volume. | ■ Press to mute notebook volume. ■ If muted, press to restore notebook volume. |
Left | None | Navigation. Press to scroll left. | Navigation. Press to scroll left. |
Ok | None | Navigation. Press to select an item on the screen. | Navigation. Press to select an item on the screen. |
(Continued)
| Button | Button Function | ||
| When Notebook Is Off | In Microsoft® Windows® | In QuickPlay (select models only) | |
Right | None | Navigation. Press to scroll right. | Navigation. Press to scroll right. |
Volume Down | None | ■ Press to decrease notebook volume. ■ If muted, press to restore notebook volume. | ■ Press to decrease notebook volume. ■ If muted, press to restore notebook volume. |
Back | None | Press to emulate the “back” function of the alt+left arrow command in the active application. | ■ In music mode, press to move up one directory level in the My Music display. ■ In DVD mode, this button is inactive. |
Down | None | Navigation. Press to scroll down. | Navigation. Press to scroll down. |
Information | None | Press to view information about a selected item in an application (if available). | Press to display battery and volume status. If playing a DVD, the DVD title, chapter, and time information is also displayed. |
Print | None | Press to open the print options window of the active application. | None |
(Continued)
| Button | Button Function | ||
| When Notebook Is Off | In Microsoft® Windows® | In QuickPlay (select models only) | |
| Photo [xHCC] | None | Press to open default Windows picture application. | None |
Video  | None | Press to open default Windows media application. | None |
Switch Screens  | None | Press to switch the notebook image between the notebook display and an external display. | Press to switch the notebook image between the notebook display and an external display. |
HP Mobile Remote Control Component Functions
The infrared lens on the remote control links the remote control to the notebook. The link requires a line-of-sight path between the infrared lens on the remote control and the infrared lens on the notebook.
Things to remember:
■ The HP Mobile Remote Control operates within Microsoft® Windows®, QuickPlay (select models only), and InterVideo Home Theater software (select models only). Each button responds according to which application is active.

Refer to the InterVideo Home Theater on-screen help for remote control information.
■ Some remote control buttons perform the same functions as notebook buttons. For example, the DVD button on the remote control and the DVD button on the notebook have the same functions and can be used interchangeably.
■ Some remote control buttons perform the same functions as notebook key combinations. For example, the Information button on the remote control and the fn+end key combination on the notebook have the same function and can be used interchangeably.
■ Other remote control buttons, such as the Photo button, provide functions which are not duplicated by notebook buttons or preset key combinations.