
CA-HM-FOR.004 - Bilradio PIONEER - Gratis bruksanvisning og manual
Finn enhetens veiledning gratis CA-HM-FOR.004 PIONEER i PDF-format.

Brukerspørsmål om CA-HM-FOR.004 PIONEER
0 spørsmål om dette apparatet. Svar på dem du kjenner, eller still ditt eget.
Still et nytt spørsmål om dette apparatet
Last ned instruksjonene for din Bilradio i PDF-format gratis! Finn veiledningen din CA-HM-FOR.004 - PIONEER og ta den elektroniske enheten tilbake i hendene. På denne siden er alle dokumenter som er nødvendige for bruken av enheten din publisert. CA-HM-FOR.004 av merket PIONEER.
BRUKSANVISNING CA-HM-FOR.004 PIONEER
Installation Manual Double DIN Kit

natural_image
Interior view of a car dashboard with a digital display showing a person's photo (no visible text or symbols)- Mount
- air vents
- hazard light switch
to facia plate
Push facia plate on dash board until it snaps in

- Fix facia plate with 2 OEM screws (see arrows)

- Re-install everything in reverse order to finish installation
All installation work must be performed by a qualified professional installer only.
The manufacturer / dealer is not liable for any kind of incidental or indirect damages.
© 12/2010 ALL RIGHTS RESERVED. Technical changes possible. No liability for misprints.

Pioneer
Installation Manual
Double DIN Kit
Part-No.: CA-HM-FOR.004
Colour: Piano-Black
• Ford C-MAX 2010->
Compatible with these double DIN devices
Pioneer Navigation

Double DIN Kit contents
• (1) Facia Plate
• (2) Mounting Bracket right
• (3) Mounting Bracket left
• (4) flat headed screws
Installation Manual Double DIN Kit

natural_image
Interior view of a car dashboard with air conditioners and a central control knob (no visible text or symbols)- Ford C-MAX with OEM radio

natural_image
Close-up of a hand using a screwdriver to adjust the top panel of a car (no visible text or symbols)- Unclip speaker grill at top of dash board carefully

natural_image
Close-up of a hand inserting a grid-patterned device into a car air vent (no visible text or symbols)- Remove speaker grill

natural_image
Close-up of a hand pressing down on a black plastic tray inside a car (no visible text or symbols)- Unclip cover of center console

natural_image
Interior view of a vehicle showing internal components and structural damage (no visible text or symbols)- Dashboard after plastic cut out

natural_image
Close-up of a metallic mechanical component with bolts and wiring, no visible text or symbols- Fix mounting brackets to Double DIN head unit
Connect all required circuit points
Push Double DIN head unit into dash board

natural_image
Close-up of a mechanical device with a screen displaying music player icons (no readable text or symbols)- Fix Double DIN head unit
Installation Manual Double DIN Kit

natural_image
Close-up of a mechanical component with mounting holes and a label (no readable text or symbols)- Remove screws of OEM Radio/CD unit
Remove OEM Radio/CD unit

natural_image
Close-up of a mechanical component with a blue tool inserted, showing internal structure and no visible text or symbols.- Cut away plastic to clear space for Double DIN head unit

natural_image
Close-up of a hand adjusting a black plastic component with a white outline and arrow indicator (no text or symbols visible)
natural_image
Close-up of a mechanical component with layered material and a hand holding a sheet (no visible text or symbols)- Remove plastic

natural_image
Close-up of a hand using a screwdriver to adjust or install a small component on a green vehicle (no visible text or symbols)- Remove screws of center console

natural_image
Close-up of hands installing or adjusting a Sony plastic component on a car (no visible text or symbols)- Unclip cover center console

natural_image
Interior view of a car dashboard with a central control panel and a hand adjusting the lid (no visible text or symbols)- Remove top panel cover
Installation Manual Double DIN Kit

natural_image
Close-up of a white electronic component with red and blue pins, mounted on a mechanical fixture (no visible text or symbols)- Unclip display
natural_image
Close-up of a mechanical tool interacting with a component, no visible text or symbols
natural_image
Close-up of a hand holding a handheld electronic device with a screen, placed on a dark surface (no visible text or symbols)- Remove display

natural_image
Close-up of a car's front bumper with visible plastic components and a hand pointing to the rim (no text or symbols)- Unclip center panel

natural_image
Close-up of a person adjusting a car engine compartment with tools (no visible text or symbols)
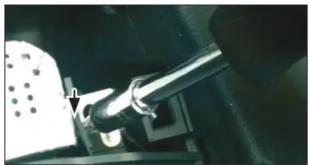
natural_image
Close-up of a hand using a tool to adjust or install a mechanical component, no visible text or symbols- Remove screw (see arrow)

natural_image
Interior view of a car dashboard with control panel and indicator lights (no readable text or symbols)
natural_image
Close-up of a car's front panel with a tool inserted, showing no visible text or symbols on the panel itself.- Remove screws on top of OEM head unit (left and right)

natural_image
Close-up of a car dashboard with a black and white fan grille and control panel (no visible text or symbols)- Unclip air vents Remove air vents


Merke : PIONEER
Modell : CA-HM-FOR.004
Kategori : Bilradio