CA-HM-PSA.002 - Kit voiture PIONEER - Gratis bruksanvisning og manual
Finn enhetens veiledning gratis CA-HM-PSA.002 PIONEER i PDF-format.

Brukerspørsmål om CA-HM-PSA.002 PIONEER
0 spørsmål om dette apparatet. Svar på dem du kjenner, eller still ditt eget.
Still et nytt spørsmål om dette apparatet
Last ned instruksjonene for din Kit voiture i PDF-format gratis! Finn veiledningen din CA-HM-PSA.002 - PIONEER og ta den elektroniske enheten tilbake i hendene. På denne siden er alle dokumenter som er nødvendige for bruken av enheten din publisert. CA-HM-PSA.002 av merket PIONEER.
BRUKSANVISNING CA-HM-PSA.002 PIONEER
9

natural_image
Interior view of a car dashboard with air vent, touchscreen, and control panel (no visible text or symbols)9 This is the final result.
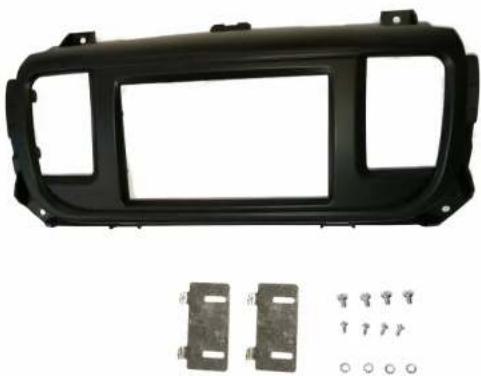
Facia plate installation kit for:
CITROEN/PEUGEOT/TOYOTA
Model: Citroen Jumpy; Citroen SpaceTourer; Peugeot Expert; Peugeot Traveller; Toyota Proace; Toyota Verso;
Year: 2017>
Kit content: double DIN facia plate mounting brackets + screws
Compatibility: Compatible with double DIN device
Customer code: CA-HM-PSA.002
natural_image
Exterior view of a black automotive dashboard frame with two side panels and four small metal bracket seals (no text or symbols visible)INSTALLATION MANUAL
02/2017 ALL RIGHTS RESERVED. Technical changes possible. No liability for misprints. R0
All installation work must be performed by a qualified professional installer only. The manufacturer / dealer is not liable for any kind of incidental or indirect damages.

natural_image
Interior view of a car dashboard with air conditioner, digital display, and control knobs (no visible text or symbols)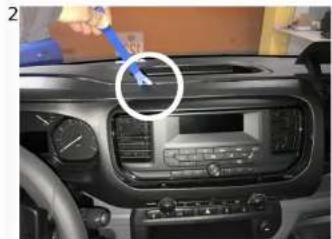
natural_image
Interior view of a car dashboard with a hand holding a tool near the top (no visible text or symbols)
natural_image
Interior view of a car dashboard with illuminated screen and control panel (no visible text or symbols)
natural_image
Interior view of a vehicle's dashboard and engine compartment showing internal components (no visible text or symbols)1 This is the original configuration.
2 Remove the plastic part as shown in the picture.
3 Remove the original display unit from its position by unscrewing the screws as shown in the picture.
4 Remove the original head unit from its position by unscrewing the screws as shown in the picture.
natural_image
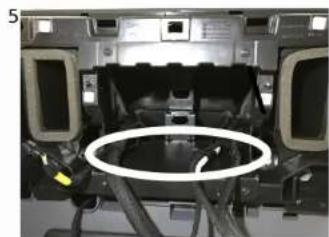
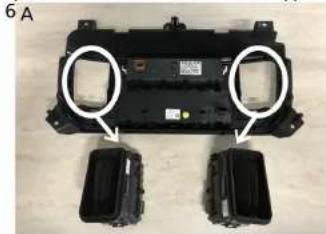
Interior view of a vehicle dashboard with seats and cables, no visible text or symbols6 Remove and save the two air vents (A) from the original facia plate. Take the supplied facia plate and fix the brackets with the supplied screws, two on both sides, (B) as shown in the pictures.
natural_image
Top-down view of a black electronic device casing with two side-mounted modules, no visible text or symbols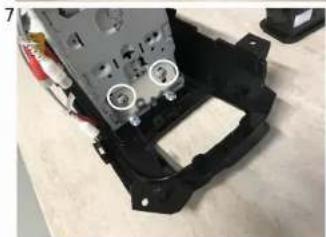
natural_image
Close-up of a mechanical assembly with two white circular annotations pointing to internal components (no visible text or symbols)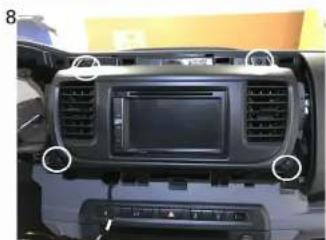
natural_image
Interior view of a car dashboard with air vent grilles and a digital display (no visible text or symbols)5 Unclip the plastic hook that blocks the cables as shown in the picture.

natural_image
Exterior view of a black plastic automotive bracket with two side-mounted battery packs (no text or symbols visible)7 Place and fix with the supplied screws (two on both sides) the aftermarket head-unit to the facia plate. After that, put back in place the air vents as they were previously positioned.
8 Connect all the cables, check the correct operation and fix the facia plate as shown in the picture.