FVX-2000S - Extendeur AV Smart-AVI - Gratis bruksanvisning og manual
Finn enhetens veiledning gratis FVX-2000S Smart-AVI i PDF-format.

Brukerspørsmål om FVX-2000S Smart-AVI
0 spørsmål om dette apparatet. Svar på dem du kjenner, eller still ditt eget.
Still et nytt spørsmål om dette apparatet
Last ned instruksjonene for din Extendeur AV i PDF-format gratis! Finn veiledningen din FVX-2000S - Smart-AVI og ta den elektroniske enheten tilbake i hendene. På denne siden er alle dokumenter som er nødvendige for bruken av enheten din publisert. FVX-2000S av merket Smart-AVI.
BRUKSANVISNING FVX-2000S Smart-AVI
Technical Specifications
| SPECIFICATIONS FVX-2000 |
| Monitors VGA, SVGA, XGA and VESA |
| Video SignalAnalog Signal: Red, Green, Blue,0.7Vp-p/75 ohms positiveResolution - 1600x1200Bandwidth - 200 MHzSync TTL Compatible |
| Keyboard/mouseCPUs - IBM PC, SUN, MAC-ADBKeyboard - PS/2, MAC-ADB, SUNVlouse - PS/2, Wheel MouseSoftware - Independent |
| Power Supply 110 /240 -5VDC-3A |
| Fiber=iber – SC-type0/125μ multimode fiber – 1,400 feet62.5/125μ multimode fiber – 700 feet |
| Size/Weight: (Inches)4.38"(W) x 5.28" (L) x 1.63 (H), 5lbs |
KVM switching
The FVX2000 with local KVM access allows an additional KVM station to be connected to the transmitter. The CPU or KVM switch can easily be operated from the remote or local KVM station not simultaneously. The transmitter is active during boot-up and the connected CPUs video is displayed on both the transmitter and remote KVM stations monitor.
To activate the receiver's KVM station, simply press any key on the KVM stations keyboard. To activate the transmitters KVM station, press any key on the KVM station's keyboard.
© Copyright 2012 SmartAVI, All Rights Reserved
NOTICE
The information contained in this document is subject to change without notice. Smart-AVI makes no warranty of any kind with regard to this material, including but not limited to, implied warranties of merchantability and fitness for any particular purpose.
Smart-AVI will not be liable for errors contained herein or for incidental or consequential damages in connection with the furnishing, performance or use of this material.
No part of this document may be photocopied, reproduced or translated into another language without prior written consent from Smart-AVI.
For more information, visit www.smartavi.com.
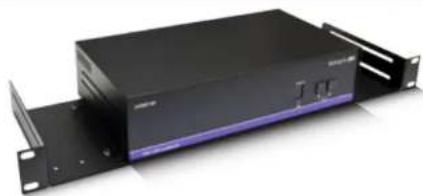
Rack Mountable Option
natural_image
Black server rack unit with attached panel, no visible text or symbolsOur SmartRack is the perfect solution to allow virtually all SmartAVI devices to be custom mounted in a standard 19" server rack. The SmartRack is fully adjustable and can secure/organize several devices.
Smart-AM SMART AUDIO VIDEO INNOVATION
SmartAVI, Inc. / Twitter: smartavi
11651 Vanowen St. North Hollywood, CA 91605
Tel: (818) 503-6200 Fax: (818) 503-6208
http://www.SmartAVI.com
Smart-AM
Smart Audio Video Integration
UserManual
FVX-2000
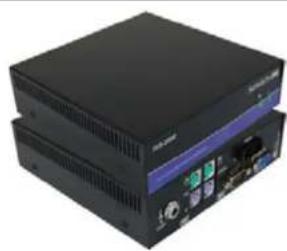
natural_image
Two black electronic devices with ports and indicators, no visible text or symbols on the device surfaces.Extends and share any PC Equipped with XVGA and PS/2 KVM Signals up to 1,400 Feet with Multimode Fibers
www.smartavi.com
Introduction
The FVX-2000 extends any KVM signal, XVGA and PS/2 up to 1400 feet with fiber cable.
Features
• Top Signal Quality at Maximum Extension Over Multimode Fiber (1,400 ft.)
• Superior Image Quality at all Resolutions
• Video Resolutions up to 1600 x 1200 at 60Hz
- Customizable/Programmable DDC Table
• Dual Access/Local Keyboard and Mouse
• Supports PS/2 Keyboard/Mouse
• Supports XVGA
• Supports all PC/AT and PS/2 Keyboards with Full Emulation
- Caps Lock, Num Lock and Scroll Lock are Automatically Saved and Restored
- Fiber Plug Type LC
• Compatible With all Operating Systems
• Compatible With all Major KVM Switches
- Compact Metal Casing
Applications
- Sharing: Sharing is easy access to one server from remote location.
• Security: Safugyards the servers by storing them in a secure and climate controlled environment.
• Saving: Saver equipment costs, physical space and utilities expense.
• Productivity: Productivity productivity by facilitating testing and performance evaluation of software and equipment, on multiple servers.
• Multimedia: Multimedia in multimedia presentations where the presentation information is broadcasted to various KVMs.
Installation Diagram
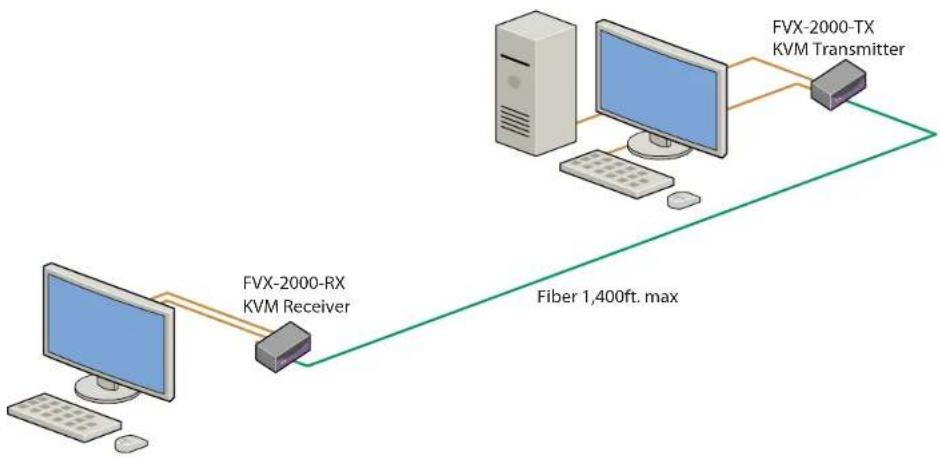
flowchart
graph LR
    A["Computer"] -->|FVX-2000-RX KVM Receiver| B["KVM Receiver"]
    B --> C["FVX-2000-TX KVM Transmitter"]
    C --> D["Fiber 1,400ft. max"]
Installation
- Before installing any SmartAvi products, verify that the computer's XVGA, mouse and keyboard all work properly when connected directly.
- Power off computer and monitor.
- Using compatible cables, connect the XVGA, mouse, keyboard, from the PC to the FVX-TX2000.
- Connect and run 2 SC fiber from the FVX-TX2000 to the FVX-RX2000's location.
- Plug in the XVGA monitor, mouse, keyboard to the FVX-RX2000.
- Connect the power supplies to the transmitter and receiver. The Power Light will be illuminated.
- When the fiber connection is working correctly, the e Link Light will remain steady.
- Turn on the computer and monitor.
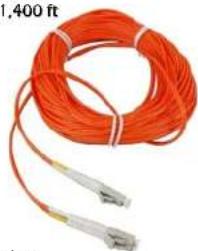
Installing and preparing the Fiber
- Fiber used, SC type
- 62.5μ fiber optic cable, 800 ft.
- 1400μ fiber optic cable, 1,400 ft
SC Fiber
natural_image
Coiled orange fiber with two types of connectors, one extending to 400 ft (no text or symbols visible)Transmitter

Receiver
