DVN-16PRO-S - Bryter Smart-AVI - Gratis bruksanvisning og manual
Finn enhetens veiledning gratis DVN-16PRO-S Smart-AVI i PDF-format.

Brukerspørsmål om DVN-16PRO-S Smart-AVI
0 spørsmål om dette apparatet. Svar på dem du kjenner, eller still ditt eget.
Still et nytt spørsmål om dette apparatet
Last ned instruksjonene for din Bryter i PDF-format gratis! Finn veiledningen din DVN-16PRO-S - Smart-AVI og ta den elektroniske enheten tilbake i hendene. På denne siden er alle dokumenter som er nødvendige for bruken av enheten din publisert. DVN-16PRO-S av merket Smart-AVI.
BRUKSANVISNING DVN-16PRO-S Smart-AVI
TECHNICAL SPECIFICATIONS
| VIDEO | |
| Format DVI-D Single Link | |
| Maximum Pixel Clock 165 MHz | |
| Input Interface (16) DVI-D 29-pin (female) | |
| Output Interface (1) DVI-D 29-pin (female) | |
| Resolution Up to 1920 x 1200 @60Hz | |
| DDC 5 volts p-p(TTL) | |
| Input Equalization Automatic | |
| Input Cable Length Up to 20 ft. | |
| Output Cable Length Up to 20 ft. | |
| AUDIO | |
| Input Interface (16) 3.5 mm | Stereo Audio |
| Output Interface (1) 3.5 mm | Stereo Audio |
| Impedance 600 Ohm | |
| Frequency Response 20 Hz to 20 kHz | |
| Nominal Level 0-1.0 V | |
| Common Mode | Rejection at 60 dB |
| USB | |
| Signal Type | USB 2.0, 1.1, and 1.0 w/ internal hub |
| Input Interface | (16) USB Type B (female) |
| Output Interface | (2) USB Type A (female) for keyboard and mouse emulation;(2) for USB 2.0 Transpar-ent |
| CONTROL | |
| Front Panel | Tactile Switch |
| RS-232 | Via Control @ 115200 bps |
| Hotkeys | Via Keyboard |
| IR | Optional |
TECHNICAL SPECIFICATIONS
| OTHER | |
| Power | External 100-240 VAC/5VDC4A @20W |
| Dimensions | 17" W x 3.5" H x 6.75" D |
| Weight | 10 lbs. |
| Approvals | UL, CE, ROHS Compliant |
| Operating Temp. | 32-131 °F (0-55 °C) |
| Storage Temp. | -4-185 °F (-20-85 °C) |
| Humidity | Up to 95% |
| Emulation | Keyboard and Mouse |
WHAT'S IN THE BOX
| PART NO. | QTY | DESCRIPTION |
| DVN-16PROS | 1 | DVNET-16Pro, 16x1 DVI-D, USB 2.0, Audio Switch |
| Power Supply | 1 | PS5VDC4A |
| User Manual | 1 |

Designed and Manufactured in the USA
800.AVI.2131
Tel: (818) 503-6200 Fax: (818) 503-6208
11651 Vanowen St. North Hollywood, CA 91605
SmartAVI.com
Smart-AM
SMART AUDIO VIDEO INNOVATION
DVNET-16Pro
16-PORT DVI-D, USB AND KVM SWITCH WITH KEYBOARD/MOUSE EMULATION
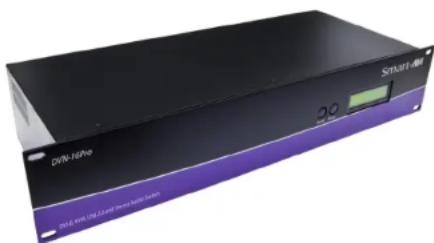
natural_image
Exterior view of a Smart drive unit (no visible text or symbols on body)Control 16 Computers (PC, Mac, or Linux) on one Display Up To 20 Feet Away with Keyboard/Mouse Emulation, Stereo Audio and USB 2.0
USER MANUAL
INTRODUCTION
The DVNET-16Pro is a cross-platform switch capable of sharing a DVI-D monitor, stereo speakers, and USB 2.0 devices between 16 computers. It is RS-232 and infrared compliant, capable of being controlled remotely via third-party software.
FEATURES
- Compatible with Windows, Mac and Linux Operating Systems
• Supports up to 1920x1200 digital video resolution
• Uses universal DVI single-link connectors
• Supports all USB 2.0 Devices (Flash drives, Printers, Cameras, Scanners, etc.)
• Supports USB keyboard and mouse emulation
• Balanced stereo audio output - Front panel tactile switch with LCD display for local control
• Full IR and RS-232 control for remote control - Special Hotkey keyboard sequence to switch independent simultaneous device selection: Flexibility is key to the DVNET-16Pro
DDC LEARNING
The DVN-16P is fully capable of "learning" and remembering what type of display monitor is connected to the unit. Programming the DDC (Display Data Channel) is accomplished using the two buttons located on the front panel.
To enter Learning Mode, simply press both the Scroll and Enter buttons at the same time until the display reads "Menu". By then pressing the Scroll button, you may cycle through the following DDC learning modes.
Learn PC: For PC computers; display up to 1920x1200.
Learn Mac: For Mac computers; display up to 1920x1200.
Learn Screen: To learn the type of display monitor connected to the "OUT" port.
**To select a mode, press the Enter button
INSTALLATION DIAGRAM
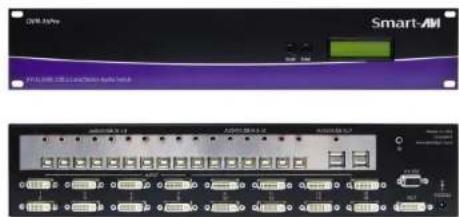
CONNECTING THE DVNET-16Pro
- Ensure that power is disconnected from DVNET-16Pro.
- Connect the DVI cables, USB cables (male-A to male-B), and audio cables from the computers to the respective ports on the DVNET-16Pro.
- Optionally connect RS-232 for control functions.
- Connect the USB keyboard and mouse on the two USB ports on the right (close to the RS-232 port).
Note: The 2 ports on the right are dedicated for keyboard and mouse emulation. The 2 on the left are for other USB peripherals (flash drives, printers, etc.) - Connect the speakers into the Audio Out port located above the USB ports.
- Connect the display monitor the OUT DVI connector on the DVNET-16Pro.
- Power on the DVNET-16Pro.
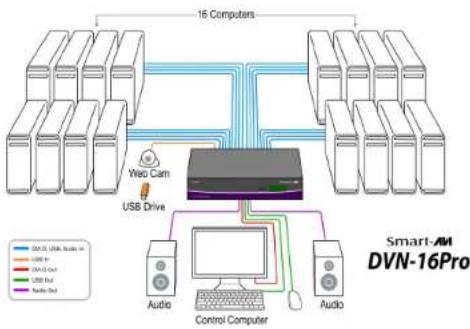
flowchart
graph TD
    A["16 Computers"] --> B["USB Drive"]
    B --> C["Control Computer"]
    C --> D["Audio"]
    C --> E["Audio"]
    style A fill:#f9f,stroke:#333
    style B fill:#ccf,stroke:#333
    style C fill:#cfc,stroke:#333
    style D fill:#fcc,stroke:#333
    style E fill:#cff,stroke:#333
    subgraph Smart-AM DVN-16Pro
        direction TB
        A -->|Blue: 2.0, Orange: 1.0, Red: 0.5, Green: 0.25, Purple: 0.1, Blue: 0.5, Orange: 0.25, Red: 0.1, Green: 0.1, Purple: 0.1
        |
        |
        |
        |
        |
        |
        |
        |
        |
        |
        |
        |
        |
        |
        |
        |
        |
        |
        |
        |
        |
        |
        |
        |
        |
        |
        |
        |
        |
        |
        |
        |
        |
        |
        |
        |
        |
        |
        |
        |
        |
        |
        |
        |
        |
        |
        |
        |
        |
        |
        |
CONTROLLING THE DVNET-16Pro
Front Panel Control
To switch ports using the front panel, press either the Enter button to navigate up and Scroll button for down. DDC learning is also done through the front panel buttons.
RS-232 Control
To switch ports using an RS-232 connection, use a male-to-female serial cable to connect a computer to the RS-232 port of the DVNET-16Pro. Use terminal client software such as the HyperTerminal to connect to the DVNET-16Pro. Make sure to use the standard communication mode of 115200 bps, 8, N, 1.
Hotkey Commands
The Hotkey command is a keyboard sequence used to trigger an action on the DVNET-16Pro through the use of the keyboard connected on the USB port of the DVNET-16Pro. To activate the hotkey sequence, press the CTRL key twice and then enter the desired hotkey commands.
COMMANDS HOTKEYS RS-232 CONTROL
| Switch all devices (KVM, USB 2.0, and Audio) | [CTRL], [CTRL], m, [port #], [ENTER] | '//m[port #][ENTER]' |
| Switch KVM only | [CTRL], [CTRL], c, [port #], [ENTER] | '//c[port #][ENTER]' |
| Switch audio only | [CTRL], [CTRL], a, [port #], [ENTER] | '//a[port #][ENTER]' |
| Reset DVNET-16Pro | [CTRL], [CTRL], r, [ENTER] | '//r[ENTER]' |