
SGT 10.6 A2 - Tekentablet SILVERCREST - Gratis gebruiksaanwijzing en handleiding
Vind de handleiding van het apparaat gratis SGT 10.6 A2 SILVERCREST in PDF-formaat.


| Producttype | Grafisch tablet |
| Model | SGT 10.6 A2 |
| Merk | SilverCrest |
| Actief oppervlak | 10,6 inch (diagonaal) |
| Afmetingen (ongeveer) | 11,8 x 8,2 x 0,4 inch |
| Gewicht | Ongeveer 1,2 pond |
| Voeding | USB-busgevoed (5V, 500mA) |
| Connectiviteit | USB Type-A |
| Pen-technologie | Batterijloze elektromagnetische resonantie |
| Drukgevoeligheidsniveaus | 2048 niveaus |
| Resolutie | 5080 LPI |
| Rapportsnelheid | 133 RPS |
| Sneltoetsen | 6 programmeerbare knoppen |
| Pennenknoppen | 2 zijknoppen (gum bovenop) |
| Compatibiliteit | Windows 7/8/10, Mac OS X 10.8+ |
| Stuurprogramma-ondersteuning | Stuurprogramma-download beschikbaar voor volledige functionaliteit |
| Inbegrepen accessoires | Pen, USB-kabel, stuurprogramma-cd, gebruikershandleiding |
| Oppervlaktetextuur | Matte film voor papierachtig gevoel |
| Reiniging | Gebruik een zachte, droge doek; vermijd vloeistoffen |
| Reparatie/Reserveonderdelen | Neem contact op met SilverCrest-ondersteuning voor reservepennen of -kabels |
| Certificering | CE, FCC |
Veelgestelde vragen - SGT 10.6 A2 SILVERCREST
Gebruikersvragen over SGT 10.6 A2 SILVERCREST
0 vraag over dit apparaat. Beantwoord die u kent of stel uw eigen vraag.
Stel een nieuwe vraag over dit apparaat
Download de handleiding voor uw Tekentablet in PDF-formaat gratis! Vind uw handleiding SGT 10.6 A2 - SILVERCREST en neem uw elektronisch apparaat weer in handen. Op deze pagina staan alle documenten die nodig zijn voor het gebruik van uw apparaat. SGT 10.6 A2 van het merk SILVERCREST.
GEBRUIKSAANWIJZING SGT 10.6 A2 SILVERCREST
Gebruikershandlaiding en service informatie
(2)
Graphics Tablet
Wir werden jetzt der Makrotaste K1 einen Hotkey zuweisen, nämlich den Hotkey (Drucken). — Optionsfeld "Hotkey verwenden" markieren. Dieser Text wird eingeblendet, wenn das Profil "Free Notes" aktiv ist und ...
... wenn Sie im Vorschaubereich des "Macro Key Managers" den Cursor auf der Makrotaste K1 positionieren.
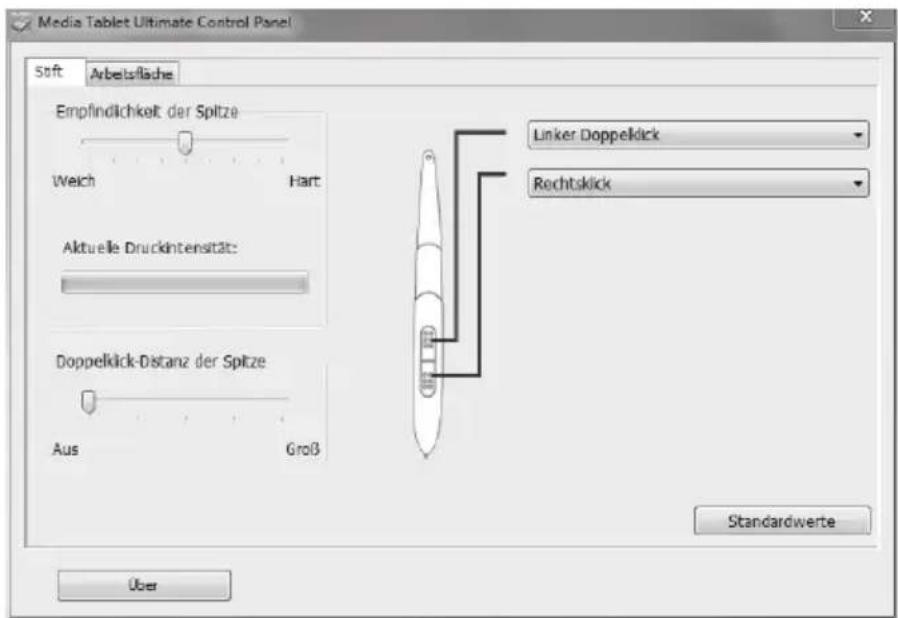
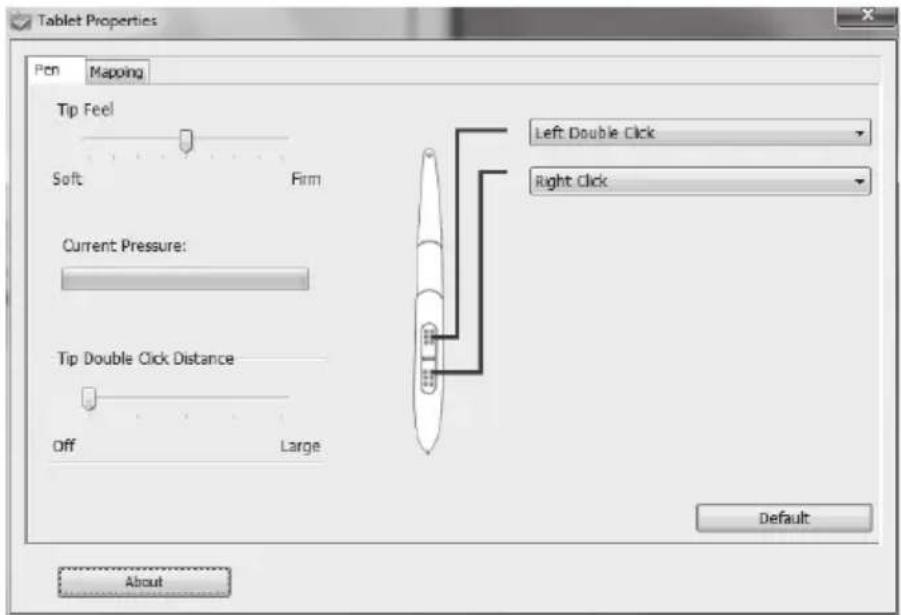
... wenn Sie während der Arbeit mit dem Grafiktablett den Stift auf der Makrotaste K1 positionieren. — Auf die Schaltfläche [Übernehmen] klicken (speichern). Sie können jetzt weitere Makrotasten programmieren, entweder im selben Profil oder in einem anderen, das Sie über das oberste Auswahlfeld auswählen. Wichtig ist nur, dass Sie, nachdem Sie den Befehl vorgegeben haben, auf [Übernehmen] klicken. Es kann immer nur ein Profil aktiviert werden. Funktionen, die Sie in einem zur Zeit "nicht verwendetem" Profil definiert haben, werden nicht ausgeführt. Somit stehen Ihnen ausschließlich die eingerichteten Funktionen der Makrotasten des aktivierten Profils zur Verfügung. Hinweis: Die Funktion der Hotkeys bzw. Links ist nur gegeben, wenn die zugehörige Software des ausgewählten Profils aktiv ist. Um den Stift an Ihre Vorlieben anzupassen, gehen Sie wie folgt vor: Klicken Sie im Infobereich der Windows-Taskleiste mit der rechten Maustaste auf das "Makro Key Manager"-Symbol Klicken Sie im Kontextmenü auf den Menübefehl "Tablet ...". Der Dialog "Media Tablet Ultimate Control Panel" wird geöffnet. Das Register "Stift" ist aktiv. Empfindlichkeit der Spitze: Hier stellen Sie ein, wie stark Sie den Stift auf die Zeichnungsfläche oder auf eine Sensortaste drücken müssen, um einen Klick auszuführen. Aktuelle Druckintensität: Hier wird Ihnen die aktuelle Druckintensität an der Stiftspitze angezeigt. Doppelklick-Distanz der Spitze: Hier können Sie die Doppelklickgeschwindigkeit der Stiftspitze einstellen. Wählen Sie „Aus“, um die eingestellte Doppelklickgeschwindigkeit Ihres Betriebssystems zu verwenden. Stift-Tasten: Hier können Sie vorgeben, welcher Befehl ausgeführt werden soll, wenn Sie auf die entsprechende Taste am digitalen Stift drücken. [Standardwerte] Klicken Sie auf diese Schaltfläche, wenn Sie die Stifteinstellungen wieder auf Standard-Einstellung zurücksetzen möchten. Modus: Hier stellen Sie das Verhalten des digitalen Stiftes ein: Stift (absolut): Die Cursorbewegung stimmt mit der Position des digitalen Stiftes auf dem Grafiktablett überein. Wird der digitale Stift z.B. in der Mitte des Grafiktabletts platziert, springt der Cursor in die Mitte des Bildschirms. Maus (relativ): Die Cursorbewegung wird ähnlich wie beim Arbeiten mit der Maus gesteuert. Monitorbereich: Hier können Sie den Arbeitsbereich des Grafiktabletts einstellen.
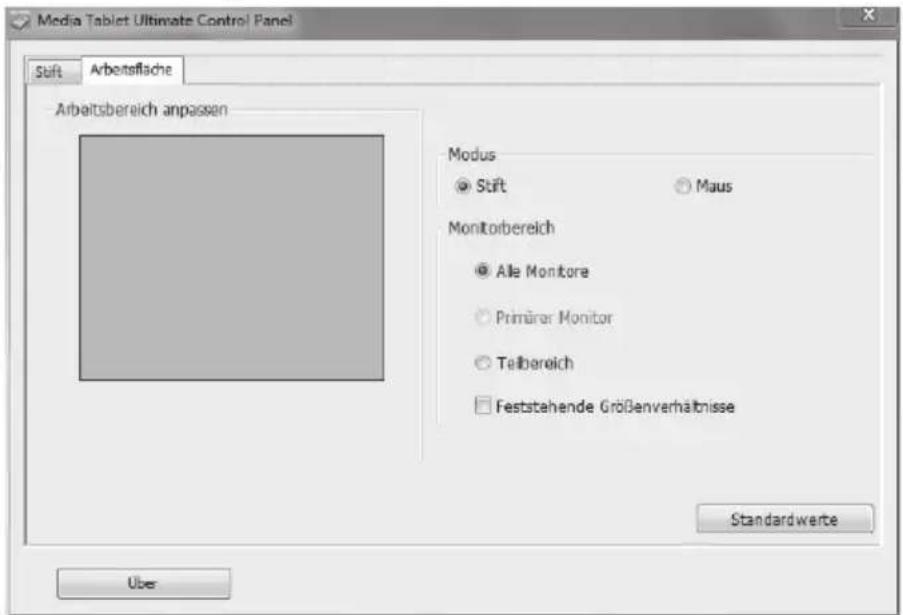
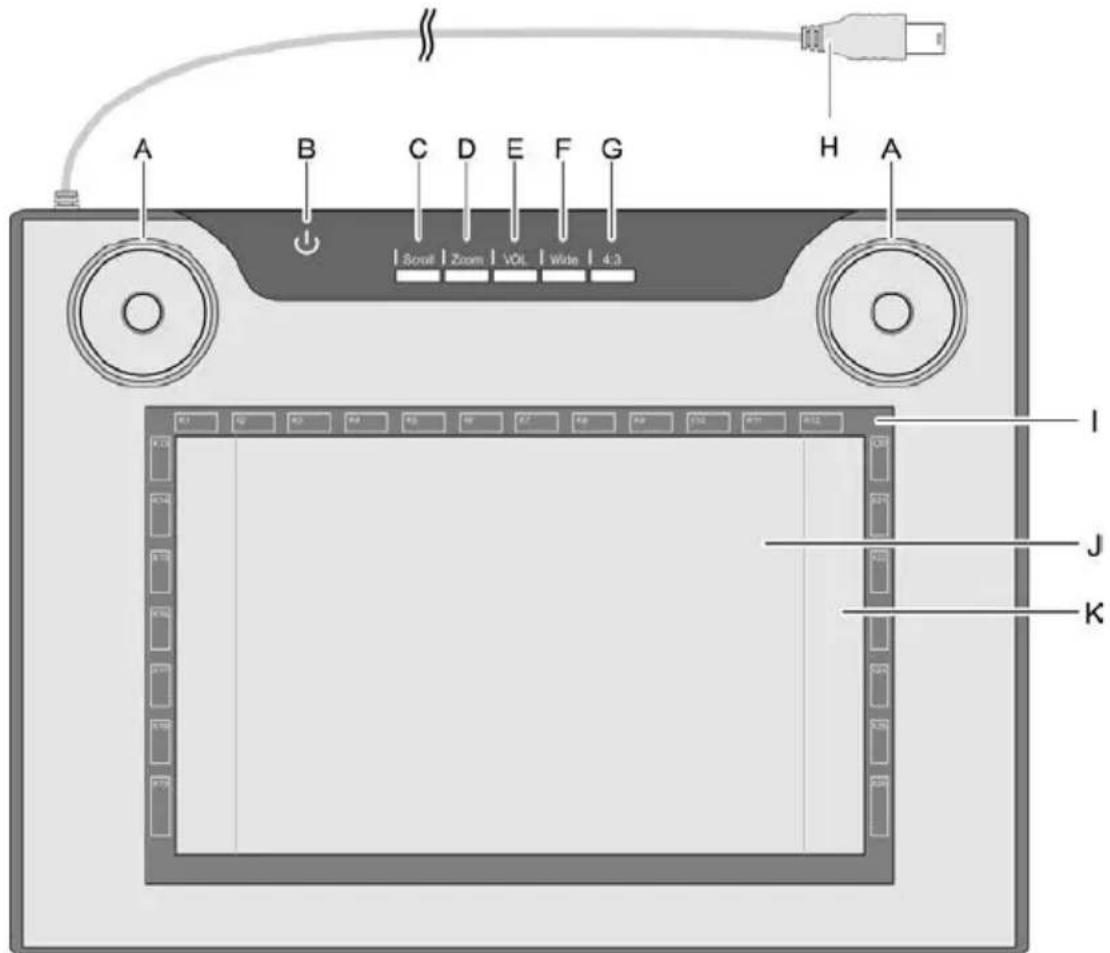
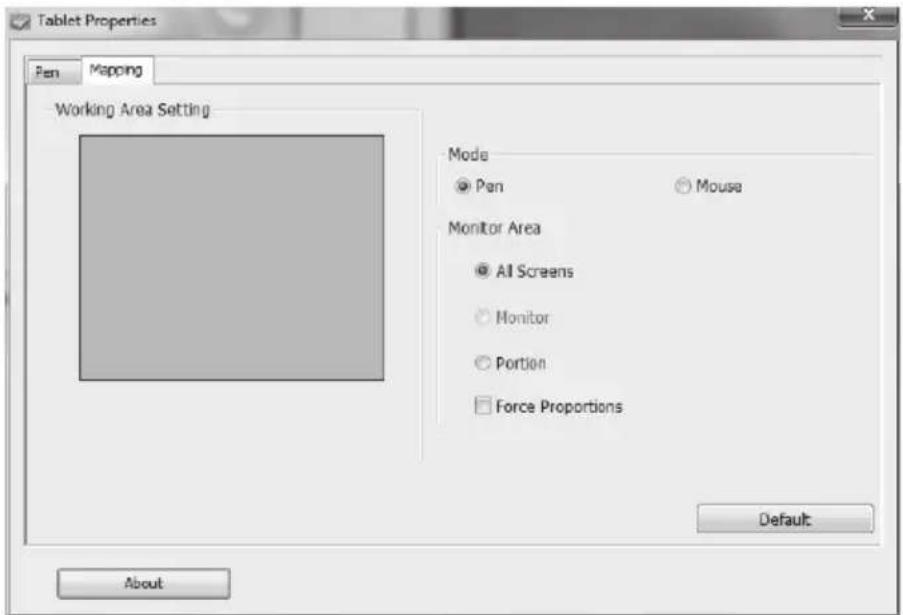
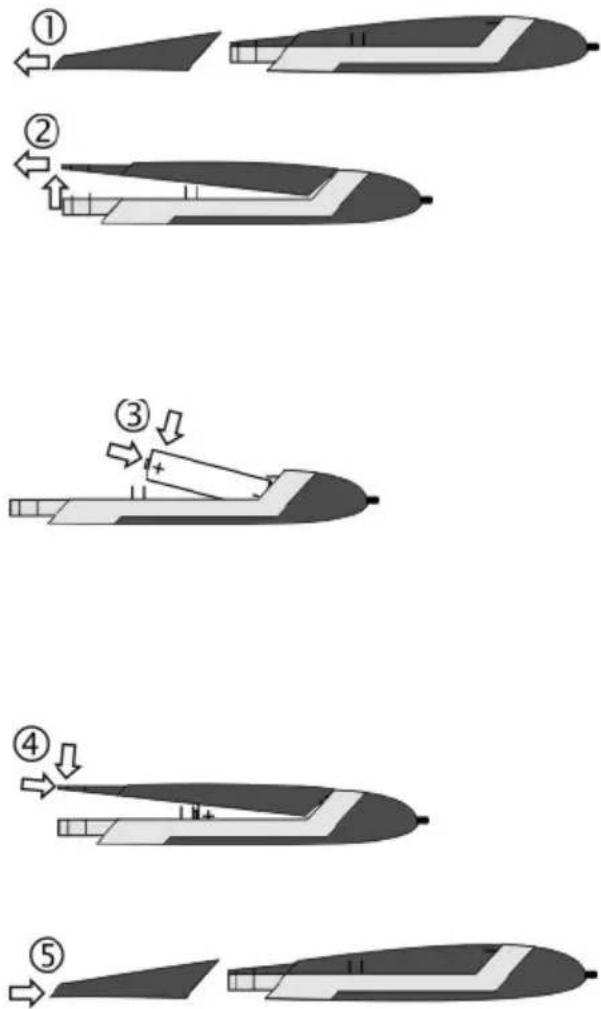
Wenn Sie mehrere Monitore verwenden, wählen Sie hier, ob Sie alle Monitore oder nur den primären Monitor als Arbeitsbereich verwenden möchten. Wählen Sie „Teilbereich“, um nur ein Teil als Arbeitsbereich zu verwenden. Den Teilbereich können Sie dann im Feld „Arbeitsbereich anpassen“ festlegen. Wenn Sie das Kontrollfeld „Feststehende Größenverhältnisse“ markieren, behält der eingestellte Teilbereich immer das richtige Seitenverhältnis. Störungsbeseitigung Zum Wechseln der Batterie gehen Sie bitte wie folgt vor: Stift-Kappe abziehen. Deckel leicht nach oben drücken und nach hinten wegziehen. Nicht zu weit nach oben drücken, da sonst die Laschen vorne am Deckel abbrechen könnten. Batterie immer polrichtig einlegen! Laschen der Kappe vorne in das Unterteil schieben und vorsichtig nach unten drücken, bis der Deckel auf dem Unterteil einrastet. Dabei keine Kraft anwenden. Stiftkappe aufstecken. Denken Sie an den Umweltschutz. Verbrauchte Batterien gehören nicht in den Hausmüll. Sie müssen bei einer Sammelstelle für Altbatterien abgegeben werden. Zum Wechseln der Mine gehen Sie bitte wie folgt vor: Fassen Sie die Mine (O) mit dem Minen-Entferner (Q) und ziehen Sie die Mine aus dem Stift. Stecken Sie eine neue Mine (O) bis zum Anschlag in den Stift. Eine Reparatur ist erforderlich, wenn Flüssigkeit in das Gehäuse-Innere gelangt ist, das Gehäuse beschädigt ist oder nicht mehr funktioniert. Öffnen Sie das Grafiktablett nicht. Überlassen Sie die Reparaturen ausschließlich qualifiziertem Fach-, Service- oder Wartungspersonal! ⚠️ Trennen Sie das Gerät vom Computer, bevor Sie es reinigen. Das Gerät, insbesondere die Zeichenfläche, muss immer sauber sein. Die sichere Funktion des Gerätes ist bei einer verschmutzten Eingabefläche nicht gewährleistet. Reinigen Sie das Gerät bei Verschmutzung mit einem trockenen Tuch, bei hartnäckigen Verschmutzungen mit einem leicht angefeuchteten Tuch. Verwenden Sie keine Lösungsmittel, ätzende oder gasförmige Reinigungsmittel. Es darf keine Feuchtigkeit in das Gerät eindringen. Gemäß der Richtlinie 2002/96/EC über Elektro- und Elektronik-Altgeräte dürfen Elektro- und Elektronik-Altgeräte nicht mehr als kommunale Abfälle entsorgt werden. Bitte entsorgen Sie dieses Produkt zum gegebenen Zeitpunkt ausschließlich an einer lokalen Altgerätesammelstelle in Ihrer Nähe. Mit der ordnungsgemäßen Entsorgung des alten Gerätes vermeiden Sie Umweltschäden und eine Gefährdung der persönlichen Gesundheit. Denken Sie an den Umweltschutz. Verbrauchte Batterien gehören nicht in den Hausmüll. Sie müssen bei einer Sammelstelle für Altbatterien abgegeben werden. Bitte beachten Sie, dass Batterien nur im entladenen Zustand in die Sammelbehälter für Geräte-Altbatterien gegeben werden dürfen, bzw. bei nicht vollständig entladenen Batterien, Vorsorge gegen Kurzschlüsse getroffen werden muss. Dieses Gerät entspricht in vollem Umfang den grundlegenden Anforderungen und den anderen relevanten Vorschriften der EMV-Richtlinie 2004/108/EC. Die Konformitätserklärung finden Sie am Ende dieses Handbuchs. Sehr geehrte Kundin, sehr geehrter Kunde, Sie erhalten auf dieses Gerät 3 Jahre Garantie ab Kaufdatum. Im Falle von Mängeln dieses Produkts stehen Ihnen gegen den Verkäufer des Produkts gesetzliche Rechte zu. Diese gesetzlichen Rechte werden durch unsere im Folgenden dargestellte Garantie nicht eingeschränkt. Die Garantiefrist beginnt mit dem Kaufdatum. Bitte bewahren Sie den original Kassenbon gut auf. Diese Unterlage wird als Nachweis für den Kauf benötigt. Tritt innerhalb von drei Jahren ab dem Kaufdatum dieses Produkts ein Material- oder Fabrikationsfehler auf, wird das Produkt von uns - nach unserer Wahl - für Sie kostenlos repariert oder ersetzt. Die Garantiezeit wird durch die Gewährleistung nicht verlängert. Dies gilt auch für ersetzte und reparierte Teile. Eventuell schon beim Kauf vorhandene Schäden und Mängel müssen sofort nach dem Auspacken gemeldet werden. Nach Ablauf der Garantiezeit anfallende Reparaturen sind kostenpflichtig. Das Gerät wurde nach strengen Qualitätsrichtlinien sorgfältig produziert und vor Anlieferung gewissenhaft geprüft. Die Garantieleistung gilt für Material- oder Fabrikationsfehler. Diese Garantie erstreckt sich nicht auf Produkteile, die normaler Abnutzung ausgesetzt sind und daher als Verschleißteile angesehen werden können oder für Beschädigungen an zerbrechlichen Teilen, z. B. Schalter, Akkus oder die aus Glas gefertigt sind. Diese Garantie verfällt, wenn das Produkt beschädigt, nicht sachgemäß benutzt oder gewartet wurde. Für eine sachgemäße Benutzung des Produkts sind alle in der Bedienungsanleitung aufgeführten Anweisungen genau einzuhalten. Verwendungszwecke und Handlungen, von denen in der Bedienungsanleitung abgeraten oder vor denen gewarnt wird, sind unbedingt zu vermeiden. Das Produkt ist lediglich für den privaten und nicht für den gewerblichen Gebrauch bestimmt. Bei missbräuchlicher und unsachgemäßer Behandlung, Gewaltanwendung und bei Eingriffen, die nicht von unserer autorisierten Service-Niederlassung vorgenommen wurden, erlischt die Garantie. Mit Reparatur oder Austausch des Produkts beginnt kein neuer Garantiezeitraum. Um eine schnelle Bearbeitung Ihres Anliegens zu gewährleisten, folgen Sie bitte den folgenden Hinweisen: - Bitte lesen Sie vor Inbetriebnahme Ihres Produktes sorgfältig die beigefügte Dokumentation bzw. Onlinehilfe. Sollte es mal zu einem Problem kommen, welches auf diese Weise nicht gelöst werden kann, wenden Sie sich bitte an unsere Hotline. - Bitte halten Sie für alle Anfragen den Kassenbon und die Artikelnummer bzw. wenn vorhanden Seriennummer als Nachweis für den Kauf bereit. - Für den Fall, dass eine telefonische Lösung nicht möglich ist, wird durch unsere Hotline in Abhängigkeit der Fehlerursache ein weiterführender Service veranlasst. Telefon: 0049 (0) 211 - 547 69 93 E-Mail: service.DE@targa-online.com Telefon: 0043 (0) 1 - 79 57 60 09 E-Mail: service.AT@targa-online.com Telefon: 0041 (0) 44 - 511 82 91 E-Mail: service.CH@targa-online.com IAN: 75359 Bitte beachten Sie, dass die folgende Anschrift keine Serviceanschrift ist. Kontaktieren Sie zunächst die oben benannte Servicestelle. TARGA GmbH Postfach 22 44 D-59482 Soest www.targa.de Meegeleverde software 38 Minimale systeemeisen....41 Algemene veiligheidsaanwijzingen 42 EMC- en veiligheidsbepalingen 42 Gebruiksomgeving.... 42 Veilig gebruik 42 Stap 1: Batterij van de digitale pen plaatsen 43 Stap 2: Stuurprogramma van de tekentablet en Macro Key Manager installeren .... 44 Stap 3: Tekentablet aansluiten....45 Stap 4: Werkvlak aanpassen aan het beeldschermformaat 46 Stap 5: "Free Notes / Office Ink" installeren....47 Stap 6: "Power Presenter RE II" installeren....48 Stap 7: " CorelDRAW® Essentials OEM " installeren....49 Werken met de functietoetsen en de bedieningsknop.... 52 Werken met de digitale pen (bijvoorbeeld met "Free Notes") 54 Macrotoetsen programmeren....56 Digitale pen aanpassen 60 Batterij in de pen verwisselen....63 Vulling vervangen 63 Afvoeren van oude apparatuur 64 Intel en Pentium zijn geregistreerde handelsmerken van Intel Corporation. USB is geregistreerd handelsmerk van USB Implementers Forum, Inc. Microsoft en Windows zijn geregistreerde handelsmerken van Microsoft Corporation in de Verenigde Staten en/of andere landen. CorelDRAW is een geregistreerd handelsmerk van Corel Corporation Hartelijk bedankt voor de aanschaf van de tekentablet SilverCrest SGT 10.6 A2. Lees onderstaande aanwijzingen grondig door voordat u het apparaat voor de eerste keer gebruikt, zelfs wanneer u ervaren bent in de omgang met elektronische apparatuur. Bewaar deze handleiding goed om er ook later op terug te kunnen vallen. Wanneer u het apparaat doorgeeft, geef dan in ieder geval ook deze handleiding erbij. Dit teken maakt u in het navolgende attent op mogelijke gevaren die van het apparaat uit kunnen gaan en tot persoonlijke of materiële schade kunnen leiden. De tekentablet is een informatietechnologisch apparaat. Het wordt bedoeld gebruikt als het uitsluitend voor het invoeren van afbeeldingen of tekst op een computer wordt benut. Elk ander gebruik geldt als niet doelmatig. De fabrikant aanvaardt geen aansprakelijkheid indien het apparaat ... De tekentablet is uitsluitend bestemd voor huiselijk en privégebruik. Vooral uitgesloten is zakelijk of commercieel gebruik, omdat het onder andere niet geschikt is voor gebruik op beeldschermwerkplekken overeenkomstig de Arbo-wet. Gelieve de nationale voorschriften of wetten van het land van gebruik in acht te nemen. ^1) OEM-versie, mag uitsluitend in combinatie met de gekochte tekentablet worden gebruikt. OEM-versies kunnen qua omvang en uiterlijk van de originele versies verschillen. De licentiebepalingen van software bevatten informatie over de manier waarop u de software mag gebruiken. Daarmee wordt ook meteen een essentieel verschil duidelijk tussen de opvattingen van klant/gebruiker en fabrikant. Terwijl de klant/gebruiker denkt de software te hebben gekocht en er de eigenaar van te zijn, spreken de fabrikanten van de software er alleen over de klant onder bepaalde voorwaarden een "beperkt" gebruiksrecht te verkopen/aan te bieden. Doorgaans mag de software uitsluitend in combinatie met het gekochte systeem worden gebruikt. Verder kan bedrijfsmatig gebruik beperkt zijn. Soms mag de software niet worden gebruikt om machines te besturen of wapens te ontwikkelen. Daarnaast wordt in de bepalingen de aansprakelijkheid van de fabrikant beperkt. Wanneer u het niet volledig eens bent met de licentieovereenkomst, mag u van de fabrikant de betreffende software niet gebruiken. Soms zijn bepaalde bepalingen in de licentieovereenkomst juridisch niet toegestaan. Daarmee kunnen deze punten ongeldig zijn en voor u niet meer bindend zijn. Aan de licentieovereenkomst kan, wanneer u deze niet erkent, een recht op teruggave zijn verbonden. Houd er daarbij rekening mee dat het gaat om een teruggaverecht van de kant van de softwarefabrikant en niet van de hardwarefabrikant. U dient in dat geval contact op te nemen met de fabrikant van de software om van uw teruggaverecht gebruik te maken. Omdat dit systeem als pakket wordt aangeboden, maakt een prijsspecificatie van de afzonderlijke onderdelen en software geen deel uit van de aanbieding. Vergelijkende prijzen kunnen daarmee bewust niet worden bepaald en worden daarom ook niet als verschil vergoed. Tekentablet: A: Bedieningsknop (draaischijf en toets) voor scrollen zoomfunctie en volumeregeling B: Statusweergave
Knippert: geen pen in de buurt
Aan: pen niet geplaatst
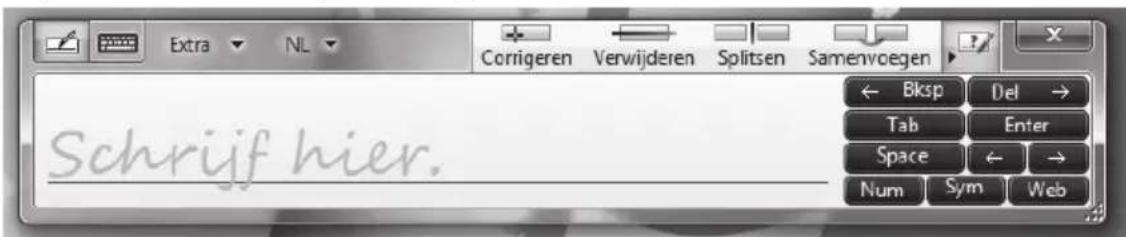
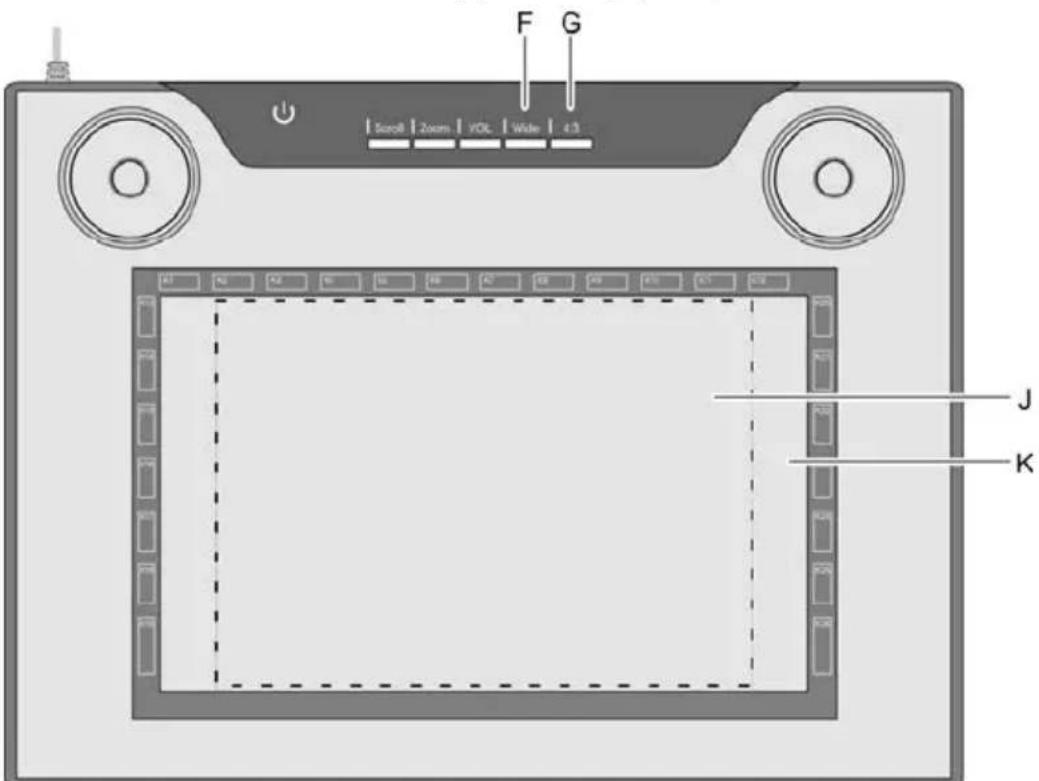
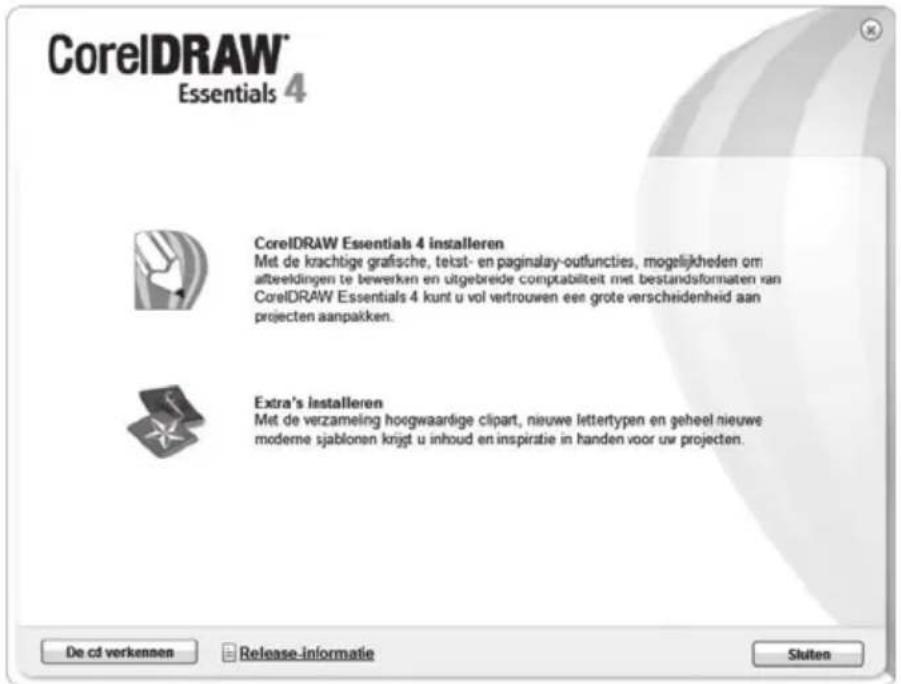
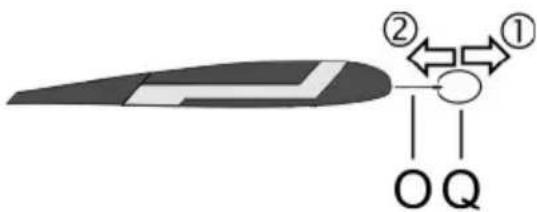
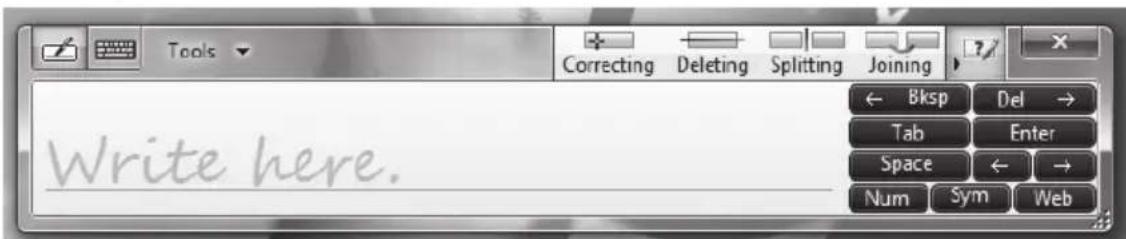
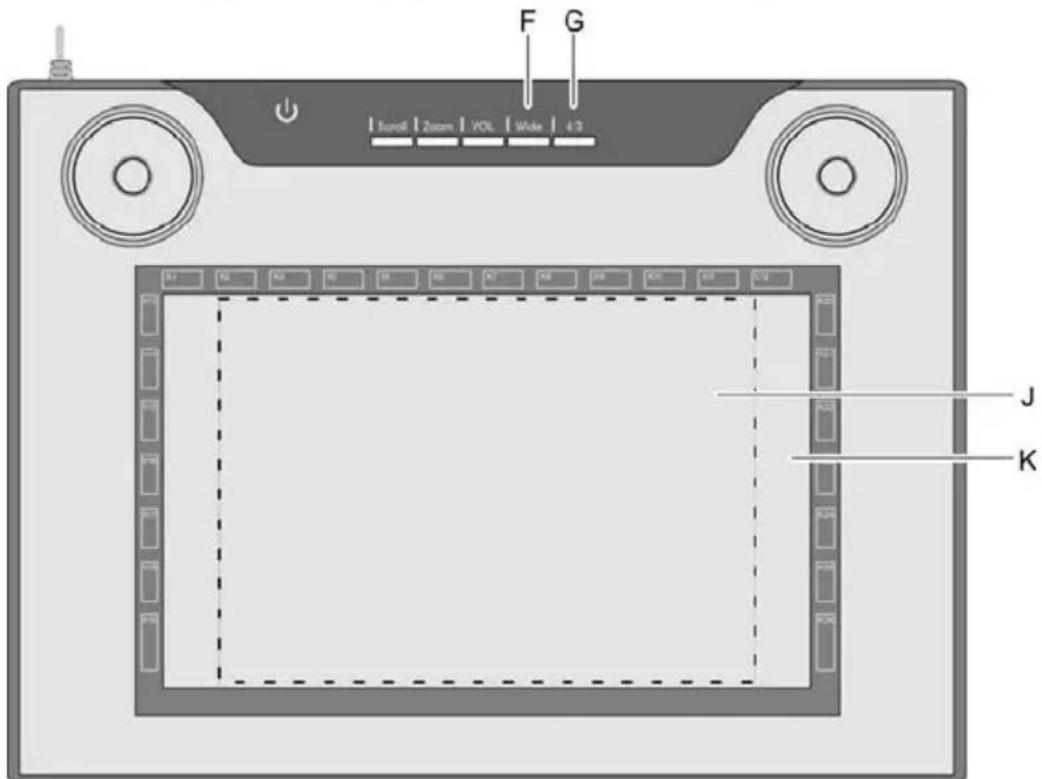
Uit: pen geplaatst C: Scrollfunctie selecteren; LED brandt als functie actief is D: Zoomfunctie selecteren; LED brandt als functie actief is E: Volumeregeling selecteren; LED brandt als functie actief is F: Tekentablet aanpassen aan breedbeeldmonitor (widescreen); LED brandt als functie actief is G: Tekentablet aanpassen aan standaardmonitor (4:3); LED brandt als functie actief is H: USB-aansluitstekker I: Omlijsting met programmeerbare tiptoetsen (macrotoetsen) J: Werkvlak 4:3-formaat (als LED "G" brandt) K: Werkvlak widescreen-formaat (als LED "F" brandt) Pen: L: Achterste pentoets, programmeerbaar (standaard: links dubbelklikken) Aanwijzing: De pen heeft geen aan/uit-knop. Het wordt automatisch ingeschakeld wanneer het zich in de nabijheid van het werkvlak bevindt en gaat uit wanneer het is ervan wordt verwijderd. Technische gegevens Wijzigingen aan het apparaat, die niet door de fabrikant zijn toegestaan, kunnen de overeenstemming met deze richtlijnen en normen teniet doen. Neem de in de handleiding vermelde aanwijzingen in acht om de elektromagnetische compatibiliteit (EMC) te waarborgen. Zet het apparaat niet al te dicht bij hoogfrequente of magnetische storingsbronnen (bijv. tv-toestel, mobiele telefoons, luidsprekers) om storingen te voorkomen. Gebruik alleen een batterij van hetzelfde type en laadvermogen. Plaats de batterij in de juiste richting. Verwijder de batterij wanneer u het apparaat gedurende langere tijd niet gebruikt, omdat deze kan gaan lekken. Huidcontact veroorzaakt chemische brandwonden. Lekkende batterijen dienen om deze reden in ieder geval met zuurbestendige handschoenen te worden verwijderd. De tekentablet ondersteunt u bij het bewerken van afbeeldingen en foto's. U kunt er ook tekeningen en notities op uw computer mee maken, net zoals u dit zou doen op een vel papier. Ga in de hier aangegeven volgorde te werk, zodat u de tekentablet snel en zonder problemen kunt benutten. Bij het plaatsen van de batterij gaat u als volgt te werk: Achterkant van de pen schuiven Afdekking voorzichtig naar boven drukken en naar achteren wegtrekken. Niet te ver naar boven drukken, omdat anders de lipjes vooraan de afdekking af kunnen breken. Batterij altijd in de juiste richting plaatsen! Lipjes aan de voorkant van de afdekking in de pen schuiven en voorzichtig naar beneden drukken, totdat de afdekking vastklikt. Daarbij geen kracht gebruiken. Achterkant terug op de pen schuiven. Windows ^® XP heeft een stuurprogramma nodig, zodat de tekentablet wordt herkend. Vanaf Windows Vista® Home Premium, dus ook onder Windows® 7, is het meestal niet nodig een stuurprogramma te installeren, omdat dit al deel uitmaakt van het besturingssysteem. Wij raden u echter aan toch het stuurprogramma te installeren, omdat u daarmee: U gaat bij de installatie van het stuurprogramma als volgt te werk: Normaal gesproken start het installatieprogramma automatisch. Is dit niet het geval, doe dan het volgende: — Open de (Windows) Explorer (rechtsklikken op [Start] → Menu "Explorer"). Het volgende dialoogvenster verschijnt: [Macro Key Manager (32 & 64 bit)]: Stuurprogramma en Macro Key Manager op een 32/64-bit-besturingssysteem installeren. [Free Notes / Office Ink (32 & 64 bit)]: zie pagina 47. [Power Presenter RE II (32 & 64 bit)]: zie pagina 48. [Exit]: Installatie beëindigen/afbreken. Steek de USB-stekker (H) van de tekentablet in een vrije USB-poort van uw computer. Na korte tijd verschijnt er "Nieuwe hardware gevonden. USB-HDI (Human Device Interface)". Vervolgens verschijnt er een nieuw pictogram in het systeemvak van uw taakbalk De tekentablet werd herkend door uw computer en kan worden gebruikt. Het kan wel eens gebeuren dat de tekentablet niet wordt herkend. Verwijder dan kort de USB-stekker en sluit hem weer aan. Gebruik indien nodig een andere USB-poort op de PC. Tip voor gebruikers van Microsoft® Windows® 7: Microsoft ^® Windows ^® 7 bevat een tablet-invoerpaneel. Hiermee kunt u handgeschreven tekst invoeren. De ingevoerde tekst kunt u in een ander programma invoegen. U vindt het tablet-invoerpaneel aan de linkerrand van het scherm. Ga er met uw pen heen en klik erop om het tablet-invoerpaneel te openen: Hoewel er vroeger vrijwel alleen monitoren in 4:3-formaat bestonden (met een beeldschermverhouding van 4 breed bij 3 hoog), ziet men tegenwoordig steeds meer monitoren in breedbeeldformaat (widescreen). Om ervoor te zorgen dat de tekentablet met beide soorten monitor naar te-vredenheid werkt, kunt u het werkvlak via de toetsen "Wide" (F) en "4:3" (G) aanpassen aan uw beeldschermformaat: Een brandende LED geeft aan welke van de beide functies actief is. Wij raden u aan nu eerst een paar praktische oefeningen met uw nieuwe tekentablet uit te voeren. Open bijvoorbeeld het Windows-programma "Paint" of een ander grafisch programma en maakt u zich vertrouwd in de omgang met pen en tablet. "Free Notes" is een eenvoudig tekenprogramma waarmee u uw creativiteit de vrije loop kunt laten. "Office Ink" is een toepassing voor het maken van handgeschreven notities op de computer. Bij de installatie van "Free Notes / Office Ink" gaat u als volgt te werk: Normaal gesproken start het installatieprogramma automatisch. Is dit niet het geval, doe dan het volgende: — Open de (Windows) Explorer (rechtsklikken op [Start] → Menu "Explorer"). Het volgende dialoogvenster verschijnt: Het installatieprogramma wordt beëindigd. U hoeft uw computer niet opnieuw op te starten. "Power Presenter RE II" is een eenvoudig programma waarmee u uw presentaties kunt bewerken. Bij de installatie van "Power Presenter RE II" gaat u als volgt te werk: Normaal gesproken start het installatieprogramma automatisch. Is dit niet het geval, doe dan het volgende: — Open de (Windows) Explorer (rechtsklikken op [Start] → Menu "Explorer"). Het volgende dialoogvenster verschijnt: Het installatieprogramma wordt beëindigd. U hoeft uw computer niet opnieuw op te starten. Om het programma te starten klikt u op [Windows Start-knop] → "Alle programma's" → "Power Presenter RE II" → "Power Presenter RE II". Aan de onderrand van het beeldscherm vindt u de volgende menubalk, met symbolen voor de desbetreffende functies. Om een idee te krijgen van de beschikbare functies kunt u eerst de muis over de verschillende elementen van de menubalk bewegen. Als u de muis op ieder element even kort stil houdt, verschijnt er een zogenaamde "tooltip" met een nadere uitleg over de functie van het betreffende element. In de meeste gevallen is deze informatie voldoende om de functie van de elementen te begrijpen. "CorelDRAW® Essentials OEM "3 is een uitgebreid softwarepakket voor het maken van illustraties, paginaopmaak en het bewerken van foto's. Het is gebaseerd op de basisfuncties van CorelDRAW® Graphics Suite en bestaat uit de volgende programma's: Corel DRAW® is het bekende vectortekenprogramma waarmee professionele illustraties kunnen worden gemaakt. Corel PHOTO-PAINT® is een zeer uitgebreid grafisch bewerkingsprogramma voor semiprofessioneel gebruik. Het bevat alle hulpmiddelen en filters die nodig zijn voor het bewerken van digitale afbeeldingen. Bij de installatie van "CorelDRAW® Essentials OEM" gaat u als volgt te werk: Normaal gesproken start het installatieprogramma automatisch. Is dit niet het geval, doe dan het volgende: — Open de (Windows) Explorer (rechtsklikken op [Start] → Menu "Explorer"). Het volgende dialoogvenster verschijnt: De installatie begint. Na korte tijd verschijnt de licentieovereenkomst. Tip: Als u het CorelDRAW® Essentials-installatieprogramma na een succesvolle installatie opnieuw uitvoert, verschijnt er een dialoogvenster waarin u kunt kiezen of u .. — het programma wilt wijzigen (bijv. onderdelen toevoegen). Lees de licentieovereenkomst door. Als u akkoord gaat met de voorwaarden, markeer dan het vakje vóór de tekst "Ik ga akkoord met de voorwaarden van de licentieovereenkomst" en klik vervolgens op de nu vrijgegeven knop [Volgende]. Voer in het volgende venster uw gebruikersnaam in. Het serienummer van CorelDRAW® Essentials OEM is al ingevuld. De gekozen configuratie wordt geïnstalleerd. Afhankelijk van uw computer kan dit enkele minuten duren. De voortgang van de installatie wordt weergegeven. Het eerste dialoogvenster verschijnt opnieuw. Tip: Via "Extra's installeren" kunt u extra sjablonen, lettertypen en clipart installeren. De procedure is vergelijkbaar met de voorgaande. We zullen er daarom niet verder op ingaan. Beide bedieningsknoppen (A) hebben dezelfde functie. U kunt de knoppen dus naar believen met de linker- of rechterhand bedienen. Elke bedieningsknop bestaat uit een draaischijf met in het midden een toets. Hieronder zullen we u de grondbeginselen uitleggen voor het werken met de tekentablet aan de hand van "Free Notes". Nadat u Free Notes via [Windows-Start-knop] → "Alle programma's" → "Free Notes & Office Ink"
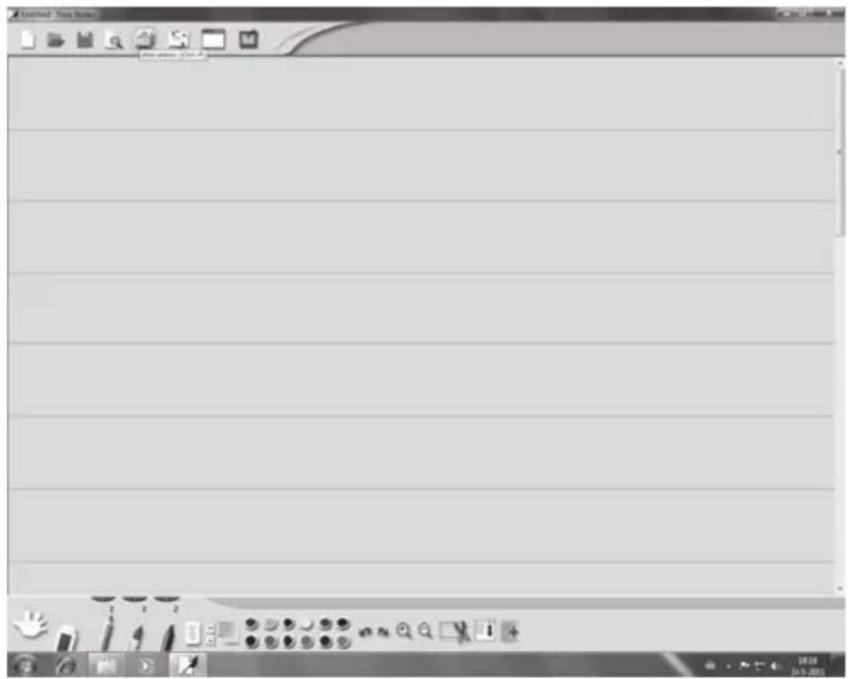
→ "Free Notes" heeft gestart, verschijnt het Free Notes-scherm: Bovenaan het venster vindt u de menubalk met pictogrammen voor functies als "Nieuw bestand", "Bestand openen", "Bestand opslaan", "Afdrukken" enz. Aan de onderkant van het venster vindt u de werkbalk met de voor het tekenen en schetsen benodigde functies. De grote ruimte in het midden is het invoergedeelte, waarop u uw notities of schetsen vastlegt. Tip: Om een idee te krijgen van de beschikbare functies van Free Notes, kunt u eerst de muis over de verschillende elementen van de menubalk en de werkbalk bewegen. Als u de muis op ieder element even kort stil houdt, verschijnt er een zogenaamde "tooltip" met een nadere uitleg over de functie van het betreffende element. In de meeste gevallen is deze informatie voldoende om de functie van de elementen te begrijpen. Als deze tooltip-informatie voor u niet voldoende duidelijk is, zie dan de online help, die via het volgende pictogram op de menubalk te bereiken is: De onderstaande tabel geeft een overzicht van de penfuncties in vergelijking met de gebruikelijke muisfuncties: * Zie hoofdstuk "Digitale pen aanpassen" op pagina 60 U kunt aan een macrotoets (K1 tot K26) een toetsfunctie (hotkey of snel-toets) toewijzen of er een ander programma mee opstarten (bijv. "Bestand opslaan"). Wanneer u dan vervolgens met de pen op een geprogrammeerde macrotoets klikt, wordt deze functie uitgevoerd. De verschillende functies van de macrotoetsen worden beheerd in zogenaamde profielen. Bij de vooraf ingestelde standaardprofielen (XP/2000, Vista, Windows 7, Photoshop Elements, Photolmpact XL SE, Corel Draw) zijn aan sommige macrotoetsen al gangbare functies toegewezen, die niet gewijzigd kunnen worden. Alle andere macrotoetsen kunnen worden vastgelegd en bewerkt. Indien de standaardprofielen niet beantwoorden aan uw vereisten, kunt u zelf vervangende profielen aanmaken. Om macrotoetsen te programmeren gaat u als volgt te werk: pictogram De "Macro Key Manager" wordt gestart. De bediening ervan wordt hieronder aan de hand van een voorbeeld toegelicht. Met de knop [Nieuw] maakt u een nieuw profiel aan. Met de knop [Verwijderen] wordt het in de keuzelijst weergegeven profiel verwijderd, als u het niet meer nodig heeft. Eerst zullen we als voorbeeld een nieuw profiel aanmaken voor het programma "Free Notes". — Klik op de knop [Nieuw]. Het dialoogvenster "Nieuw" verschijnt (zie onder). Het dialoogvenster "Nieuw" zou er in ons voorbeeld zo uit moeten zien. — Sluit het dialoogvenster met [OK]. In het bovenste selectieveld van de "Macro Key Manager" ziet u nu het nieuwe profiel "Free Notes", dat u in stap 3 heeft aangemaakt. Een sneltoets is een door een programma of besturingssysteem vastgelegde toetscombinatie, die een bepaalde functie uitvoert. In Windows-programma's bijvoorbeeld kopieert de toetscombinatie Met koppelen legt u een (snel)koppeling naar een uitvoerbaar bestand. Hiermee wordt er dus een programma gestart. Wanneer u op de knop [...] klikt, verschijnt er een venster waarin u het gewenste programma kunt selecteren. We zullen nu aan de macrotoets K1 een sneltoets toewijzen, en wel de sneltoets (Afdrukken). — Keuzerondje "Sneltoets gebruiken" markeren. De hier ingevulde tekst wordt als tooltip getoond wanneer het profiel "Free Notes" actief is en ... ... wanneer u op de afbeelding van de tablet in de "Macro Key Manager" de cursor op de macrotoets K1 plaatst. ... wanneer u tijdens het werken met de tekentablet de pen op de macrotoets K1 plaatst. — Klik op de knop Bevestigen. U kunt nu nog meer macrotoetsen vastleggen, ofwel in hetzelfde of in een ander uit de bovenste selectielijst geselecteerd profiel. Denkt u er daarbij aan, dat u na het instellen van de functie op [Bevestigen] klikt. Er kan altijd maar één profiel tegelijk actief zijn. Functies die u in een momenteel "niet gebruik" profiel heeft vastgelegd, zullen niet worden uitgevoerd. Er staan u dus uitsluitend de ingestelde functies van de macrotoetsen van het geactiveerde profiel ter beschikking. Aanwijzing: De sneltoetsen of links functioneren alleen als de bij het geselecteerde profiel behorende software actief is. Ga om de pen aan te passen aan uw voorkeuren als volgt te werk: Klik in het systeemvak van de Windows-taakbalk met de rechtermuisknop op het "Macro Key Manager"-pictogram. Klik in het contextmenu op het menupunt "Tablet ...". Het dialoogvenster "Tablet eigenschappen" wordt geopend. Het tabblad "Pen" is actief. Tipgevoel: Hier kunt u instellen hoe hard u de pen op het werkvlak of een tiptoets moet drukken om een klik uit te voeren. Huidige druk: Hier wordt de huidige druk op de pentip weergegeven. Tip dubbele klikafstand: Hier kunt u de dubbelkliksnelheid van de pentip instellen. Selecteer "Uit" om de actuele dubbelkliksnelheid van uw besturingssysteem te gebruiken. Pentoetsen: Hier kunt u instellen welke functie dient te worden uitgevoerd, wanneer u op de betreffende knop op de digitale pen drukt. [Standaard] Klik op deze knop wanneer u de instellingen van de pen weer terug wilt zetten naar de standaardinstellingen. Modus: Hier stelt u de werkwijze van de digitale pen in: Pen (absoluut): De cursorbeweging komt overeen met de positie van de digitale pen op de tekentablet. Als de digitale pen bijvoorbeeld in het midden van de tekentablet wordt geplaatst, springt de cursor naar het midden van het beeldscherm. Muis (relatief): De cursor beweegt zich net als bij het werken met een muis. Monitorgebied: Hier kunt u de werkruimte van de tekentablet instellen. Indien u meerdere monitoren gebruikt, kunt u hier aangeven of u alle monitoren of alleen de primaire monitor als werkruimte wilt gebruiken. Selecteer "Gedeelte" om alleen een gedeelte te gebruiken als werkruimte. U kunt dat gedeelte vervolgens in het veld "Instelling werkruimte" vastleggen. Wanneer u het vakje "Verhoudingen forceren" aanvinkt, behoudt het ingestelde gedeelte altijd de juiste verhoudingen. Storingen verhelpen Voor het verwisselen van de batterij gaat u als volgt te werk: Achterkant van de pen schuiven Afdekking voorzichtig naar boven drukken en naar achteren wegtrekken. Niet te ver naar boven drukken, omdat anders de lipjes vooraan de afdekking af kunnen breken. Batterij altijd in de juiste richting plaatsen! Lipjes aan de voorkant van de afdekking in de pen schuiven en voorzichtig naar beneden drukken, totdat de afdekking vastklikt. Daarbij geen kracht gebruiken. Achterkant terug op de pen schuiven. Denk aan het milieu. Gebruikte batterijen horen niet bij het huisvuil. Deze dienen bij een inzamelpunt voor gebruikte batterijen te worden afgegeven. Voor het verwisselen van de penpunt gaat u als volgt te werk: Pak de penpunt (O) vast met de penpuntverwijderaar (Q) en trek de penpunt uit de pen. Schuif een nieuwe penpunt (O) zover mogelijk de pen in. Reparatie is nodig als er vloeistof in de behuizing terecht is gekomen, als het apparaat is beschadigd of niet naar behoren functioneert. Open de tekentablet niet zelf. Laat reparaties uitsluitend uitvoeren door een vakman resp. door service- of onderhoudspersoneel! Het apparaat, vooral het werkvlak, dient schoon te blijven. Bij een vervuild werkvlak bestaat er geen garantie voor een betrouwbare werking van het apparaat. Reinig het apparaat in geval van vervuiling met een droge doek, bij hardnekkige vervuiling eventueel met een vochtige doek. Gebruik geen oplosmiddelen of bijtende of gasvormige reinigingsmiddelen. Zorg ervoor dat er geen vocht in het apparaat terecht komt. Conform Richtlijn 2002/96/EC betreffende afgedankte elektrische en elektronische apparatuur mag afgedankte elektrische en elektronische apparatuur niet meer als huisafval worden afgevoerd. Voer dit product te zijner tijd uitsluitend af via een lokaal inzamelpunt bij u in de buurt. Door een juiste afvoer van oude apparatuur voorkomt u schade aan het milieu en uw gezondheid. Denk aan het milieu. Gebruikte batterijen horen niet bij het huisvuil. Deze dienen bij een inzamelpunt voor gebruikte batterijen te worden afgegeven. Houdt u er rekening mee dat batterijen alleen in ontladen toestand in de daarvoor bestemde verzamelcontainer mogen worden gedeponeerd, of dat wanneer batterijen niet volledig zijn ontladen, er voorzieningen dienen te worden getroffen om kortsluiting te voorkomen. Dit apparaat voldoet volledig aan de essentiële eisen en relevante voorschriften van de EMC-richtlijn 2004/108/EC. De conformiteitsverklaring vindt u aan het einde van deze handleiding. Geachte klant, U krijgt op dit apparaat 3 jaar garantie vanaf de datum van aankoop. In het geval van gebreken aan dit product heeft u ten opzichte van de verkoper van het product bepaalde wettelijke rechten. Deze wettelijke rechten worden door onze hierna volgende garantie niet beperkt. De garantietermijn begint op de datum van aankoop. Bewaart u de originele kassabon goed. Deze bon is nodig als bewijs van aankoop. Indien er binnen drie jaar vanaf de datum van aankoop van dit product een materiaal- of fabricagefout optreedt, wordt het product door ons - naar ons goeddunken - gratis gerepareerd of vervangen. De garantietermijn wordt door de wettelijke aanspraak bij gebreken niet verlengd. Dit geldt ook voor vervangen en gerepareerde onderdelen. Eventueel reeds bij aankoop aanwezige schade en gebreken dienen onmiddellijk na het uitpakken te worden gemeld. Na afloop van de garantietermijn benodigde reparaties worden alleen tegen betaling uitgevoerd. Het apparaat is zorgvuldig gefabriceerd volgens strenge kwaliteitsrichtlijnen en voor de levering nauwgezet onderzocht. De garantie dekt materiaal- en fabricagefouten. Deze garantie dekt geen onderdelen van het product die onderhevig zijn aan normale slijtage en daardoor kunnen worden beschouwd als slijtbare onderdelen of beschadigingen aan breekbare onderdelen zoals schakelaars, batterijen of onderdelen gemaakt van glas. De garantie vervalt als het product beschadigd, niet doelmatig gebruikt of onderhouden is. Voor een doelmatig gebruik van het product dienen alle in de meegeleverde handleiding opgenomen aanwijzingen strikt te worden nageleefd . Gebruiksdoeleinden en handelingen die in de handleiding worden afgeraden of waarvoor wordt gewaarschuwd, dienen in elk geval te worden vermeden. Het product is uitsluitend bestemd voor privégebruik en niet voor commercieel gebruik. In geval van misbruik of niet doelmatig gebruik, gebruik van geweld of ingrepen die niet zijn uitgevoerd door onze geautoriseerde service-afdeling, komt de garantie te vervallen. Met de reparatie of vervanging van het product begint geen nieuwe garantietermijn. Gelieve voor een snelle verwerking van uw probleem de volgende aanwijzingen in acht te nemen: - In het geval dat een oplossing per telefoon niet mogelijk is, zal onze hotline er afhankelijk van de oorzaak van het probleem voor zorgen dat het probleem op andere wijze wordt opgelost. Telefoon: 020 - 201 39 89 E-Mail: service.NL@targa-online.com Telefoon: 02 - 700 16 43 E-Mail: service.BE@targa-online.com Telefoon: 800 - 24 14 3 E-Mail: service.LU@targa-online.com IAN: 75359 Merk op dat het volgende adres geen service-adres is. Neem eerst contact op met de bovenvermelde service-afdeling. TARGA GmbH Postfach 22 44 D-59482 Soest www.targa.de Supplied software....70 Minimum system requirements....73 General precautions....74 EMC and safety precautions 74 Operating environment/Environmental conditions....74 Operational safety....74 Step 1: Inserting the battery into the digital pen....75 Step 2: Installing the graphics tablet driver and Macro Key Manager....76 Step 3: Connecting the graphics tablet....77 Step 4: Adjusting the active area to the screen format....78 Step 5: Installing "Free Notes / Office Ink" 79 Step 6: Installing "Power Presenter RE II" 80 Step 7: Installing "CorelDRAW® Essentials OEM"....81 Working with the function keys and the control button.... 84 Working with the digital pen (for example when using "Free Notes") 86 Programming macro keys....88 Customising the digital pen....92 Replacing the battery 95 Replacing the pen nib....95 Disposal of old devices 96 Intel and Pentium are registered trademarks of Intel Corporation. USB is a registered trademark of USB Implementers Forum, Inc. Microsoft and Windows are registered trademarks of Microsoft Corporation in the United States of America and/or other countries. CorelDRAW is a registered trademark of Corel Corporation. Thank you for purchasing the SilverCrest graphics tablet SGT 10.6 A2. Before using this device for the first time, please read the following instructions carefully, even if you are familiar with the use of electronic devices. Please keep this manual safe for future reference. If you pass on the device to someone else, be sure to always include these instructions. This symbol in the following text indicates possible hazards resulting from the use of the device that can lead to personal injury or material damage. The graphics tablet is an information technology device. It is used in keeping with its intended purpose when it is used exclusively to enter graphics or texts on a computer. Any other use is not as intended. The manufacturer does not assume any liability if the device ... • is not used as intended. The graphics tablet may only be used indoors and for private purposes. Its use in a company or for commercial purposes is expressly excluded, as it is not designed for use at computer workstations in compliance with the provisions of the German Ordinance for Work with Visual Display Units. Please observe the regulations and laws in the country of use. ^1) The OEM version may only be used with the purchased graphics tablet. The scope and appearance of OEM versions can differ from the original versions. The licence terms of software explain the ways in which you are entitled to use the software. This already touches on a significant difference in the viewpoint of the customer/user and the manufacturer. While the customer/user thinks he has bought the software and thus owns it, the manufacturer of the software only sells/offers its customers a “restricted” right of use under specific circumstances. Ordinarily the software may only be used in conjunction with the purchased system. In addition, use may be restricted for commercial use. Under certain circumstances the software may not be used to control machines or for the development of weapons. The terms also contain restrictions with respect to the liability of the manufacturer. If you do not fully agree with the licence agreement, then according to the manufacturer you are not entitled to use the respective software. Under certain circumstances individual clauses in the licence agreement may be questionable from a legal standpoint. This may mean that these are invalid and are then no longer binding for you. If you do not agree to the licence agreement, you may be entitled to return the software. Please note that this right to return the software concerns the manufacturer of the software, not the manufacturer of the hardware. In this case you should contact the manufacturer of the software to exercise your right to return the software. Since your system was sold at a package price, a price evaluation of individual components and software components is not a part of the offer. Comparison prices are therefore intentionally not specifiable and for this reason the difference can also not be reimbursed. Graphics tablet: A: Control button (rotating control pad and button) for scroll, zoom and volume functions B: Status indicator
Flashing: No pen nearby
On: Pen not on active area
Off: Pen on active area C: Select scroll function; LED lights up when the function is active D: Select zoom function; LED lights up when the function is active E: Select VOL (volume) function; LED lights up when the function is active F: Switch graphics tablet to widescreen mode; LED lights up when the function is active G: Switch graphics tablet to standard screen (4:3) mode; LED lights up when the function is active H: USB connector I: Frame with programmable sensor keys (macro keys) J: Active area in 4:3 format (when LED "G" lights up) K: Active area in widescreen format (when LED "F" lights up) Pen: L: Rear pen button, programmable (default: left double click) Note: The pen does not have an on/off switch. It switches on automatically when it is near the active area and switches off when it is taken away. Technical data In the event of any modification to the device that was not approved by the manufacturer, compliance with these standards is no longer guaranteed. To ensure electromagnetic compatibility (EMC), please pay attention to the instructions in the manual. Keep the device away from high-frequency and magnetic interference sources (e.g. TVs, mobile phones, loudspeakers) to prevent functional faults. Only use a battery of the same type and the same charging capacity. Always ensure correct polarity of the battery. Remove the battery if you will not be using the device for a prolonged period of time, as it can leak. Contact with the skin will cause chemical burns. For this reason it is absolutely essential to remove leaking batteries with acid-resistant protective gloves. The graphics tablet helps you to edit graphics and photos. You can also use the graphics tablet to create drawings and write notes on your computer in the same way as you would using a sheet of paper. Proceed as follows to start using your graphics tablet quickly and easily. To insert batteries proceed as follows: Remove the cap. Push the cover upwards slightly and lift it off. Do not push the cover too far upwards, as the tabs at the front could otherwise break off. Always ensure correct polarity of the battery! Place the tabs of the cover into the front of the bottom section and carefully push down until the cover snaps into place on the bottom section. Do not use any force. Replace the pen cap. Windows ^® XP requires a driver to recognise the graphics tablet. If you are using Windows Vista ^® Home Premium or Windows ^® 7, it is normally not necessary to install a graphics tablet driver, as this is already included in the operating system. However, we recommend installing the driver so that you can: • obtain a higher graphics tablet resolution To install the driver, proceed as follows: The installation wizard normally starts automatically. If it does not start automatically, proceed as follows: — Open the Explorer (right-click on [Start] → "Explorer" menu). The installation dialogue box opens: [Macro Key Manager (32 & 64 bit)]: Install the graphics tablet driver and Macro Key Manager on a 32- or 64 bit operating system. [Free Notes / Office Ink (32 & 64 bit)]: Refer to page 79. [Power Presenter RE II (32 & 64 bit)]: Refer to page 80. [Exit]: Terminate/cancel installation. Insert the USB connector (H) of the graphics tablet into a free USB socket on your computer. The following message then appears after a short time: "Found new hardware – USB HID (Human Interface Device)". A new icon then appears in the system tray of the taskbar The graphics tablet has then been recognised by your computer and can be used. If the graphics tablet is not recognised, remove and reinsert the USB connector. You can also try using a different USB socket on your PC. Information for users of Microsoft® Windows® 7: Microsoft ^® Windows ^® 7 has an ink input field. This enables you to make handwritten entries. The text entered can be used in other programs. The ink input field is found in the margin of the screen. Move the pen over it and click on it to open the ink input field: Today there are an increasing number of widescreen monitors on the market in addition to the conventional monitors which have an aspect ratio of 4:3 (4 units wide and 3 units high). You can change the format of the active area of the graphics tablet to suit your screen size with the buttons "Wide" (F) and "4:3" (G) so that it can work correctly with both monitor versions: An LED lights up to indicate that the function is active. We recommend trying a few practical exercises with your new graphics tablet. Open the Windows "Paint" program, for example, or any another graphics program and get used to the pen and graphics tablet. "Free Notes" is a simple graphics program which you can use to unleash your creative potential. "Office Ink" is a tool for making handwritten notes on the computer. Proceed as follows to install "Free Notes / Office Ink: The installation wizard normally starts automatically. If it does not start automatically, proceed as follows: — Open the Explorer (right-click on [Start] → "Explorer" menu). The installation dialogue box opens: To install "Free Notes" and "Office Ink", click [Free Notes / Office Ink (32 & 64 bit)] in the installation dialogue box. Follow the instructions of the installation wizard. In the last dialogue box click [Finish]. The installation wizard is then closed. It is not necessary to restart your computer. "Power Presenter RE II" is a simple program with which you can edit your presentations. Proceed as follows to install "Power Presenter RE II": The installation wizard normally starts automatically. If it does not start automatically, proceed as follows: — Open the Explorer (right-click on [Start] → "Explorer" menu). The installation dialogue box opens: The installation wizard is then closed. It is not necessary to restart your computer. To start the program click on [Windows Start button] → "All Programs" → "Power Presenter RE II" → "Power Presenter RE II". On the bottom edge of the screen you will find the following menu bar, with icons for the respective commands. You can familiarise yourself with the functions of the elements by hovering the mouse pointer over the icons in the menu bar. After a short time a so-called "tooltip" then appears which provides information on the function of each element. In most cases this information is sufficient to understand the function of each element. "CorelDRAW® Essentials OEM" ^5 is a powerful software package for creating illustrations, page layouts and editing photos. It is based on the basic functions of CorelDRAW® Graphics Suite and comprises the following programs: Corel DRAW ^® is a well known vector graphics program used to create sophisticated illustrations. Corel PHOTO-PAINT ^® is a very powerful image editing program for semi-professional users. It contains all tools and filters required to edit digitised images. To install "CorelDRAW® Essentials OEM" proceed as follows: The installation wizard normally starts automatically. If it does not start automatically, proceed as follows: — Open the Explorer (right-click on [Start] → "Explorer" menu). The start installation dialogue box opens: Installation then starts. After a short time the licence agreement is displayed. Tip: When you open the CorelDRAW® Essentials OEM Installation program after you have already installed the program, a dialogue box opens in which you can select whether you want to ... — modify the program (e.g. add components). Read the licence agreement. If you accept the terms of the agreement, tick the box in front of the text "I accept the terms of the licence agreement" and then click the active button [Next]. Enter your user name in the next dialogue box. The serial number of CorelDRAW® Essentials OEM is already entered. The selected configuration is installed. This takes several minutes depending on your computer's performance. The installation progress is displayed. The start installation dialogue box is then active once more. Tip: You can install additional templates, fonts and clipart with the "Install extras" option. Installation is carried out in a similar manner as described above and is therefore not described in more detail here. Both control buttons (A) have the same function. You can therefore use the control buttons with your left or right hand as you prefer. Each control button comprises a rotating control pad and a central button. The following section describes the basic steps for using the graphics tablet with the "Free Notes" software. After you have started Free Notes by clicking on [Windows Start button] → "All Programs" → "Free Notes & Office Ink" → "Free Notes", the Free Notes screen appears: The menu bar, with icons for commands such as "New file", "Open file", "Save file", "Print" etc. is located at the top of the window. The toolbar with tools for drawing and making sketches is located at the bottom of the window. The active area is between the menu bar and the toolbar. This is where you enter your notes or sketches. Tip: You can familiarise yourself with the functions of the Free Notes elements by hovering the mouse pointer over the icons in the menu bar and the toolbar. After a short pause a so-called "tooltip" then appears which provides information on the function of each element. In most cases this information is sufficient to understand the function of each element. If the tooltip information is insufficient, please read the online help file. This is opened by clicking on the following icon in the menu bar: The following table describes the pen functions and compares these with conventional mouse functions: * See the "Customising the digital pen" section on page 92 You can assign a program start command (e.g. "Save file") or a key combination (hotkey) to a macro key (K1 to K26). If you then click on a programmed macro key with the pen, this command is executed. The macro key commands are managed in so-called profiles. In the featured default profiles (XP/2000, Vista, Windows 7, Photoshop Elements, Photolimpact XL SE, Corel Draw), the macro keys are sometimes assigned standard commands which cannot be changed. All other macro keys can be defined and edited. If the default profiles do not meet your requirements, you can create your own profiles. Proceed as follows to program macro keys: Click the [New] button to create a new profile. Click the [Delete] button to remove the profile shown in the drop down list if you no longer need it. We will now create a new profile for the "Free Notes" program. — Click the [New] button. The "New" dialogue box is opened (see below). The "New" dialogue box should look as shown in the example below: — Close the dialogue box by clicking [OK]. The new profile "Free Notes" which you created in step 3 then appears in the drop down list at the top of the "Macro Key Manager". A "hotkey" is a key combination defined by the program or operating system which executes a certain function. In Windows programs, for example, you can use the key combination A "link" is a reference to an executable file. This link therefore also starts a program. If you click the [...] button, a dialogue box is opened in which you can select the required program. The following section describes how to assign a hotkey, in this case the function (print) to the macro key K1. — Activate the "Use hotkey" radio button. This text is displayed when the "Free Notes" profile is active and ...
... when you position the cursor on the macro key K1 in the preview area of the "Macro Key Manager".
... when you position the pen on the macro key K1 when you are working with the graphics tablet. — Click the [Confirm] button (save). You can then program more macro keys either in the same profile or in a different profile which you can select in the top left drop down list. It is only important that you click [Confirm] when you have specified the command. Only one profile can be activated at one time. Functions which you have defined in a "disabled" profile are not executed. Therefore only the assigned functions of the macro keys of the activated profile are available. Note: The functions of hotkeys and links are only available if the software belonging to the selected profile is active. To customise the pen to your personal preferences, proceed as follows: The "Tablet Properties" dialogue box opens. The "Pen" tab is active. Tip Feel: Here you can set how hard you have to press the pen on the active area or a sensor key to make a click. Current Pressure: The current pressure of the pen tip is shown here. Tip Double Click Distance: Here you can set the double click speed of the pen tip. Select "Off" to use your operating system's preset double click speed. Pen buttons: Here you can specify which command should be executed when you press the respective button on the digital pen. [Default] Click this button if you want to reset the pen to its default settings. Mode: Here you can select the behaviour of the digital pen: Pen (absolute): The cursor movement always matches the position of the digital pen on the graphics tablet. If the digital pen for example is placed in the middle of the graphics tablet, the cursor will move to the middle of the screen. Mouse (relative): Cursor movement is controlled in a manner similar to working with the mouse. Monitor area: Here you can select the working area of the graphics tablet. If you are using more than one monitor you can select here whether you would like to use all monitors or just the primary monitor as the working area. Select "Portion" to only use a portion as the working area. The portion can be defined in the "Working Area Setting" field. If the "Force Proportions" box is ticked, the selected portion retains the correct aspect ratio. Troubleshooting To replace the battery proceed as follows: Remove the cap. Push the cover upwards slightly and lift it off. Do not push the cover too far upwards, as the tabs at the front could otherwise break off. Always ensure correct polarity of the battery! Place the tabs of the cover into the front of the bottom section and carefully push down until the cover snaps into place on the bottom section. Do not use any force. Replace the pen cap. Remember to protect the environment. Used batteries should not be disposed of in domestic waste. They must be taken to a collection point for old batteries. To replace the pen nib proceed as follows: Grip the nib (O) with the nib extractor (Q) and pull the nib out of the pen. Push a new nib (O) as far as possible into the pen. The device must be repaired if fluid has penetrated inside the housing, if the housing is damaged or if it no longer works. ⚠️ Never open the graphics tablet. Any repairs should be carried out exclusively by qualified specialist, service or maintenance personnel. The device must be kept clean at all times, especially the active area. Reliable function of the device is not ensured if the active area is soiled. If soiled, clean the device with a dry cloth, and moisten the cloth slightly to remove stubborn dirt. Do not use any solvents, corrosive or gaseous cleaning agents. Ensure that no moisture penetrates the device. The Waste Electrical and Electronic Equipment Directive (WEEE) 2002/96/EC stipulates that it is no longer permitted to dispose of old electrical and electronic devices as municipal waste. Please only dispose of this product at a collection point for old devices in your area. The correct disposal of old devices in this manner will prevent environmental pollution and human health hazards. Remember to protect the environment. Used batteries should not be disposed of in domestic waste. They must be taken to a collection point for old batteries. Please note that only discharged batteries may be deposited in collection bins for portable batteries. Care must be taken to ensure that batteries that are not fully discharged do not short circuit. This product conforms fully to the basic requirements and other required provisions of the EMC Directive 2004/108/EC. The Declaration of Conformity can be found at the end of this manual. Dear Customer, This device is sold with three years warranty from the date of purchase. In the event of product defects, you have legal rights towards the seller. These statutory rights are not restricted by our warranty as described below. The warranty period commences upon the date of purchase. Please keep the original receipt in a safe place as it is required as proof of purchase. If any material or manufacturing faults occur within three years of purchase of this product, we will repair or replace the product free of charge as we deem appropriate. The warranty period is not extended in the event of a warranty claim. This also applies to replaced and repaired parts. Any damage or defects discovered upon purchase must be reported immediately when the product has been unpacked. Any repairs required after the warranty period will be subject to charge. The device was carefully manufactured in compliance with stringent quality guidelines and subjected to thorough testing before it left the works. The warranty applies to material and manufacturing faults. This warranty does not cover product components which are subject to normal wear and which can therefore be regarded as wearing parts, or damage to fragile components such as switches, rechargeable batteries or components made of glass. This warranty is void if the product is damaged, incorrectly used or serviced. To ensure correct use of the product, always comply fully with all instructions contained in the user manual. The warnings and recommendations in the user manual regarding correct and incorrect use and handling of the product must always be observed and complied with. The product is solely designed for private use and is not suitable for commercial applications. The warranty is rendered void in the event of incorrect handling and misuse, if it is subjected to force, and also if any person other than our authorised service technicians interfere with the device. No new warranty period commences if the product is repaired or replaced. To ensure speedy handling of your complaint, please note the following: Before using your product for the first time, please read the enclosed documentation or online help carefully. Should any problems arise which cannot be solved in this way, please call our hotline. - Always have your receipt, the product article number as well as the serial number (if available) to hand as proof of purchase. - If it is not possible to solve the problem on the phone, our hotline support staff will initiate further servicing procedures depending on the fault. Phone: 0207 - 36 50 744 E-Mail: service.GB@targa-online.com Phone: 01 - 242 15 83 E-Mail: service.IE@targa-online.com Phone: 800 - 62 175 E-Mail: service.MT@targa-online.com Phone: 800 - 92 496 E-Mail: service.CY@targa-online.com IAN: 75359 Please note that the following address is not a service address. First contact the service point stated above. TARGA GmbH Postfach 22 44 D-59482 Soest www.targa.de Address: Targa GmbH Lange Wende 41 59494 Soest, Germany Brand: SilverCrest Product: Graphic tablet with wireless pen Model: SGT 10.6 A2 The product complies with the requirements of the following European directives: 2004/108/EC Electromagnetic Compatibility Compliance was proved by the application of the following standards: EMC: EN 55022: 2006 +A1: 2007 EN 55024: 1998 +A1: 2001 +A2: 2003 Year of CE marking: 2012 Soest, 28th of April 2012 Matthias Klauke, Managing Director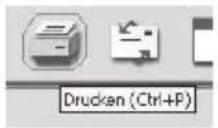

— Kontrollfeld vor "Ctrl" (englisch, entspricht auf einer deutschen Tastatur der Taste "Strg") markieren und im Auswahlfeld das "P" auswählen.
— Im Feld "Tipp" das Wort "Drucken" eingeben.
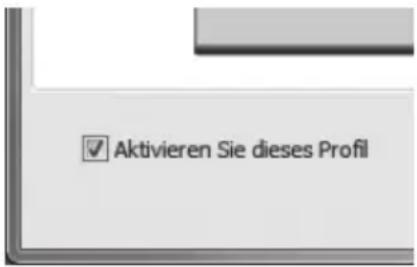
Digitalen Stift anpassen
3. Klicken Sie das Registerfeld "Arbeitsfläche".
Verhalten Mögliche Ursache Behebung Rote LED am Stift leuchtet Stift-Batterie ist schwach Stift-Batterie wechseln (siehe weiter hinten in diesem Kapitel). Statusanzeige auf dem Grafiktablett blinkt, auch wenn der Stift ein paar Millimeter über der Zeichnungsfläche gehalten wird oder dort aufliegt Ein digitaler Stift wurde nicht erkannt: entweder ist die Stift-Batterie leer oder die Stift-Mine defekt Stift-Batterie und/oder Stift-Mine wechseln (siehe weiter hinten in diesem Kapitel). Auf dem Grafiktablett leuchtet keine LED USB-Verbindung nicht vorhanden Kontrollieren Sie die USB-Verbindung.Ziehen Sie den USB-Stecker ab und stecken Sie ihn wieder auf. Verwenden Sie ggf. eine andere USB-Buchse am Computer. Keine Reaktion auf dem Monitor, obwohl der digitale Stift vom Grafiktablett erkannt wird (erkennbar daran, dass die Statusanzeige auf dem Grafiktablett erlischt, sobald der Stift auf der Zeichnungsfläche aufliegt) Grafiktablett-Treiber nicht installiert oder fehlerhaft installiert Grafiktablett-Treiber und Macro Key Manager installieren (siehe Kapitel "Vor der Inbetriebnahme", Schritt 2). Stift-Batterie wechseln
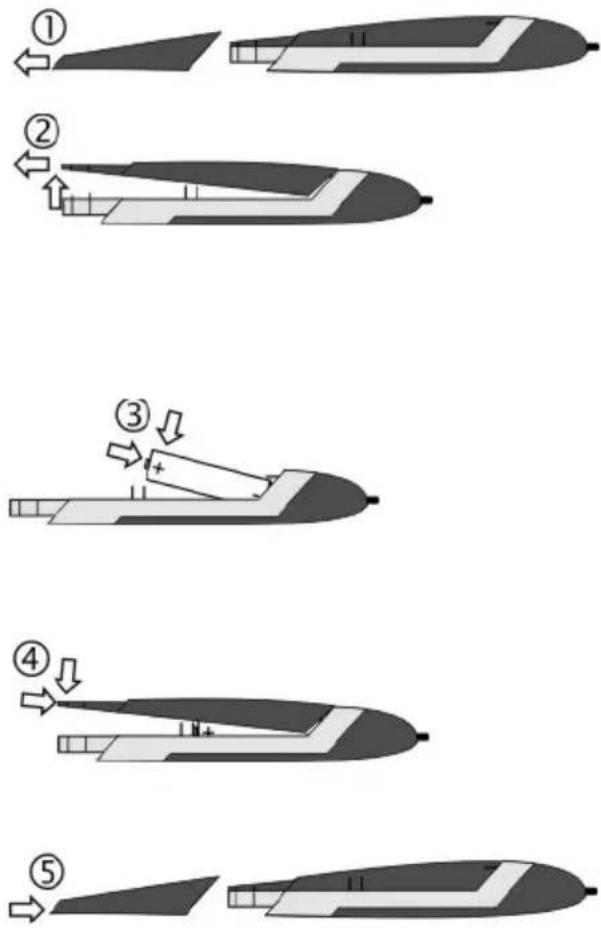
Stift-Mine wechseln
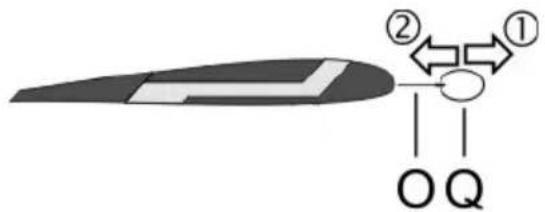
flowchart
graph TD
    A["①"] --> B["O"]
    A --> C["Q"]
    B --> D["②"]
    C --> D
    D --> E["→"]
    style A fill:#f9f,stroke:#333
    style B fill:#ccf,stroke:#333
    style C fill:#cfc,stroke:#333
Wartung / Reinigung
Entsorgung von Altgeräten

Konformitätsvermerke
Hinweise zu Garantie und Serviceabwicklung
Garantie der Targa GmbH
Garantiebedingungen
Garantiezeit und gesetzliche Mängelansprüche
Garantieumfang
Abwicklung im Garantiefall

Service




Hersteller
Inhoudsopgave
Geregistreerde handelsmerken – Registered trademark of – 36
Inleiding 36
Bedoeld gebruik 36
Leveringsomvang.... 37
Licentiebepalingen – licentieovereenkomst 38
Bedieningselementen en aansluitingen 39
Technische gegevens 41
Veiligheidsaanwijzingen 42
Voor de ingebruikname 43
Ingebruikname 52
Configuratie 56
Storingen verhelpen....62
Onderhoud / Reiniging 64
Conformiteit 64
Service en garantie 65
Geregistreerde handelsmerken – Registered trademark of –
Inleiding
Bedoeld gebruik
Leveringsomvang
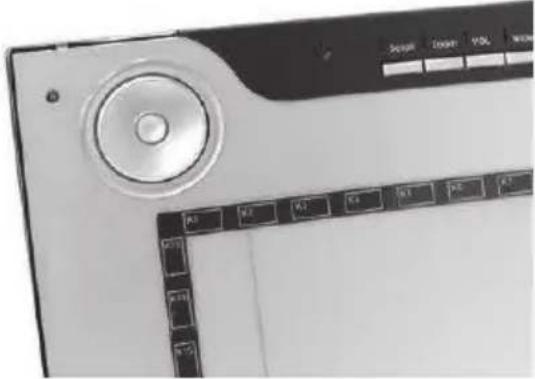
1 x tekentablet SGT 10.6 A2 met USB-aansluiting 
1 x digitale pen met penpunt 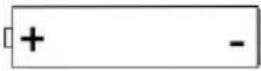
1 x batterij type AAA (1,5 V R03) voor digitale pen 
2 x reservepenpunten voor digitale pen 
1 x vullingverwijderaar 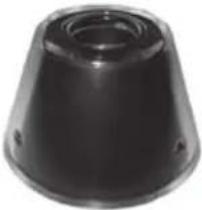
1 x penhouder 
1 x installatie-CD met Macro Key Manager, Free Notes / Office Ink en Power Presenter RE II1 x DVD met CorelDRAW® Essentials OEM 1) 
1 x bedieningshandleiding Meegeleverde software
• Power Presenter RE II is een programma voor het bewerken van presentaties. Licentiebepalingen – licentieovereenkomst
Bedieningselementen en aansluitingen
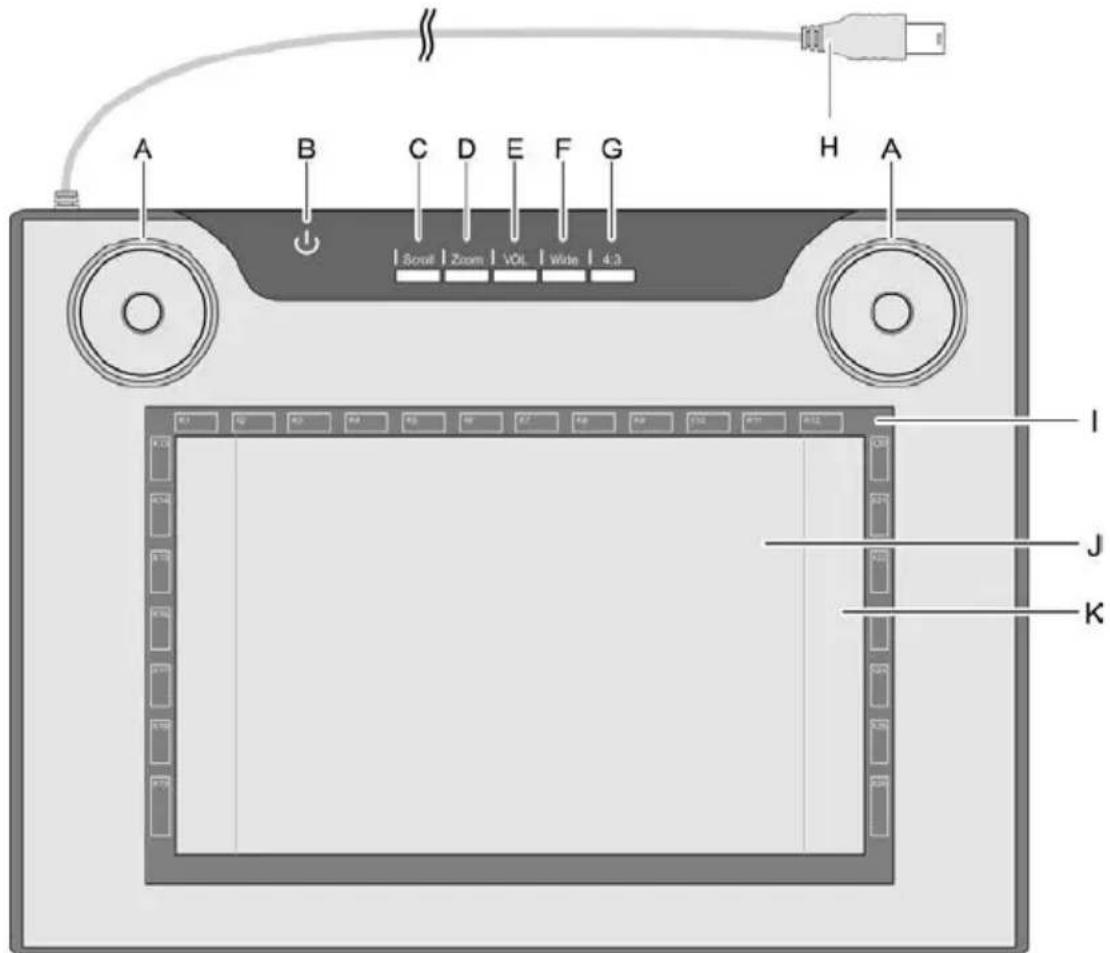
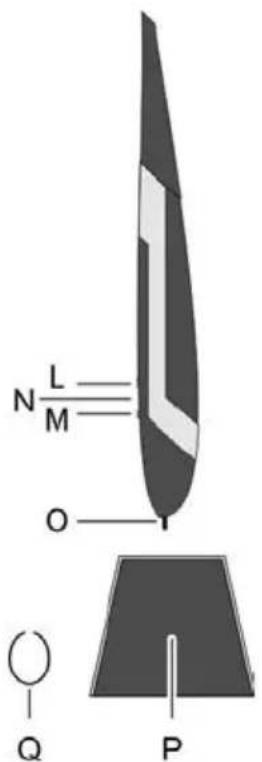
M: Voorste pentoets, programmeerbaar (standaard: rechtsklikken)
N: LED brandt als batterij zwak is
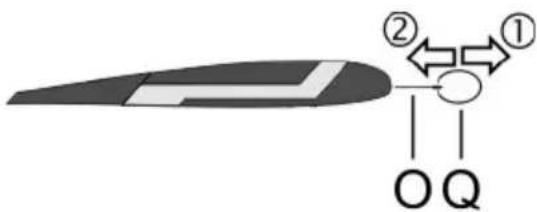
O: Penpunt; overdraagt de commando's op het werkvlak (J,K) of de tiptoetsen (I)
P: Penhouder; beschermt de penpunt als de pen niet wordt gebruikt
Q: Penpuntverwijderaar; hiermee trekt u de penpunt uit de pen, als deze moet worden verwisseld.model SGT 10.6 A2 Technologie Elektromagnetisch AfmetingenTekentabletPen 340 x 19 x 260 mm160 x 14,7 x 17,7 mm gewichtTekentabletPenPenhouder 919 g24 g42 g VoedingTekentabletPen Via USB-aansluiting (DC 5 V = 75 mA)Via batterij (1 x 1,5 V, type AAA) Actief gebied4:3-formaat16:10-formaat 18,4 x 14 cm (7,25" x 5,5")22,9 x 14 cm (9" x 5,5") ResolutieWindows® XPWindows Vista® / Windows® 7 4000 lpi (lines per inch)2000 lpi (met standaard Windows-driver)4000 lpi (met geinstalleerde Silvercrest-driver) Registratiesnelheid 200 rps (reports per second) PenDrukgevoeligheidLeesafstand 1024 stappenmax. 10 mm GebruiksomgevingTemperatuurLuchtvochtigheid 5 - 35 °Cmax. 85 % rel. vochtigheid Minimale systeemeisen
Veiligheidsaanwijzingen
Algemene veiligheidsaanwijzingen
EMC- en veiligheidsbepalingen
Gebruiksomgeving
⚠️ Veilig gebruik
Voor de ingebruikname
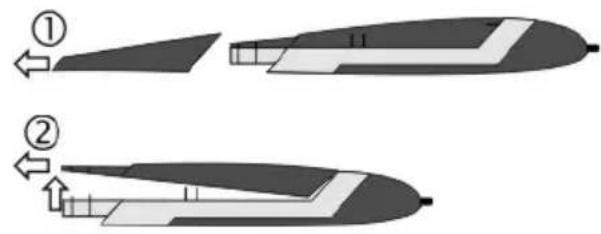
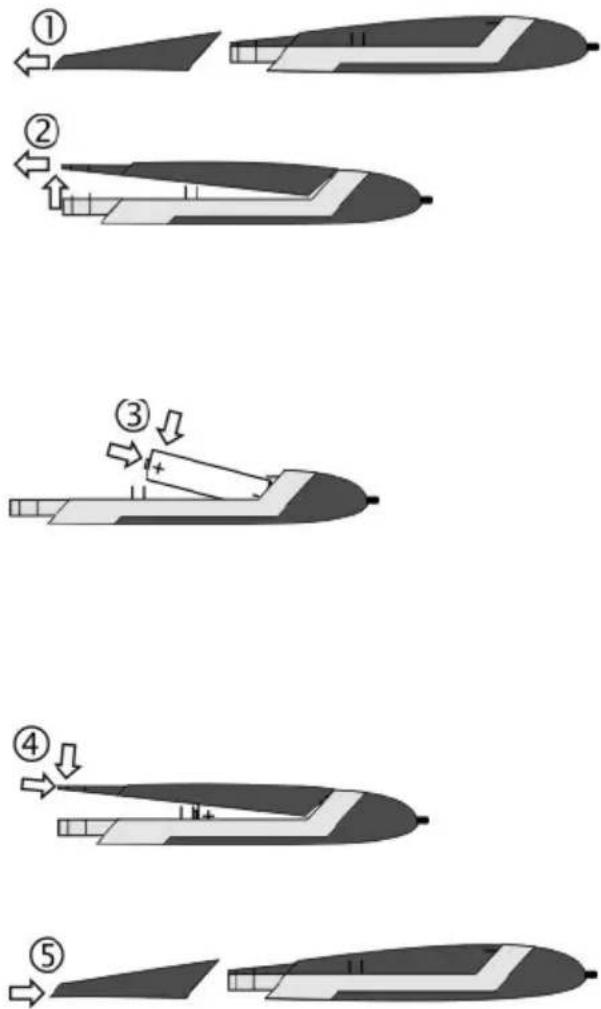
Stap 1: Batterij van de digitale pen plaatsen
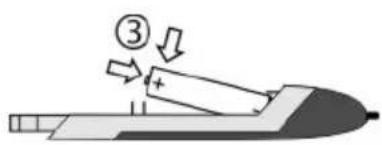
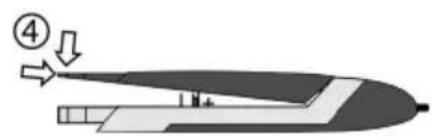
natural_image
Diagram of a missile or aircraft with labeled parts and directional arrows (no text or symbols)

natural_image
Diagram of a boat hull with an arrow indicating direction (no text or symbols)
Stap 2: Stuurprogramma van de tekentablet en Macro Key Manager installeren
• de Macro Key Manager installeert, waarmee u de 26 macrotoetsen kunt programmeren.
— Klik in het overzicht op het symbool van uw CD- of DVD-loopwerk.
— Dubbelklik op het bestand "Setup".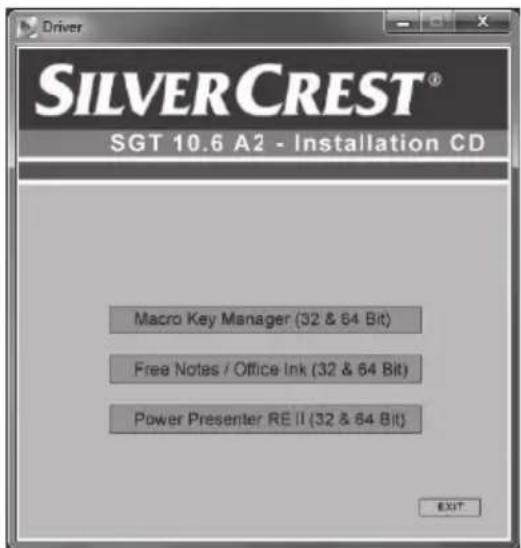
Stap 3: Tekentablet aansluiten
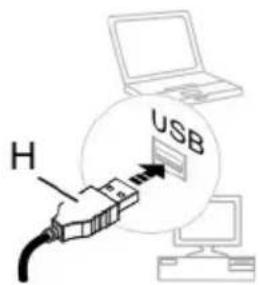

Stap 4: Werkvlak aanpassen aan het beeldschermformaat
Stap 5: "Free Notes / Office Ink" installeren
— Klik in het overzicht op het symbool van uw CD- of DVD-loopwerk.
— Dubbelklik op het bestand "Setup".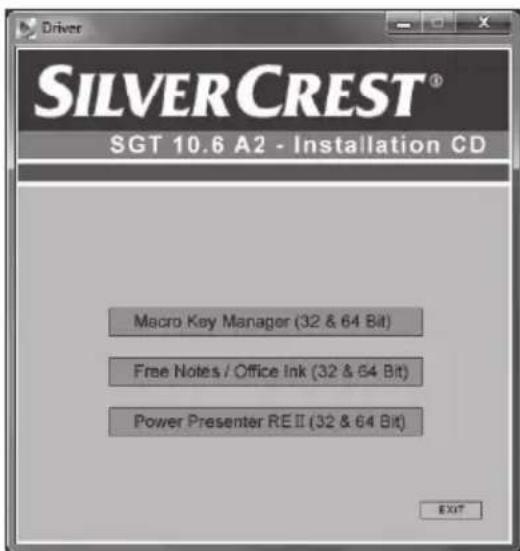
Stap 6: "Power Presenter RE II" installeren
— Klik in het overzicht op het symbool van uw CD- of DVD-loopwerk.
— Dubbelklik op het bestand "Setup".

Stap 7: " CorelDRAW® Essentials OEM " installeren
— Klik in het overzicht op het symbool van uw DVD-loopwerk.
— Dubbelklik op het bestand "Autorun.exe".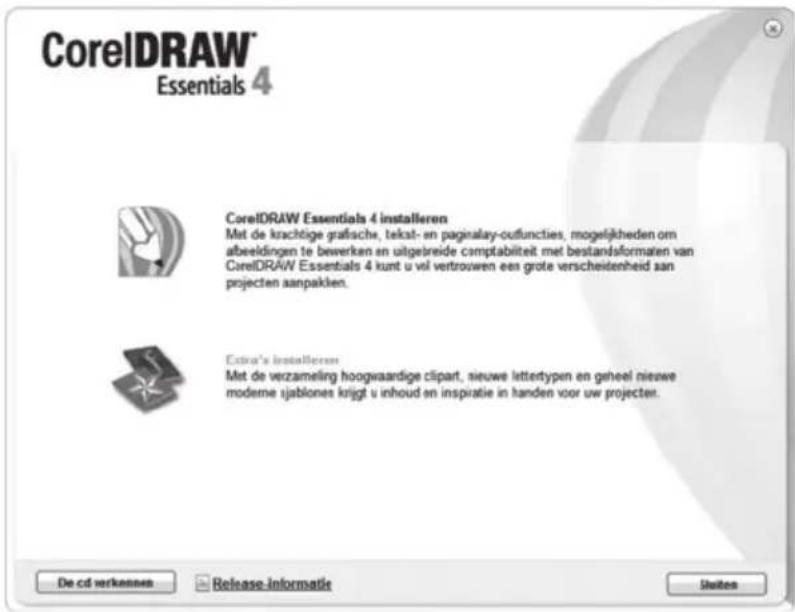
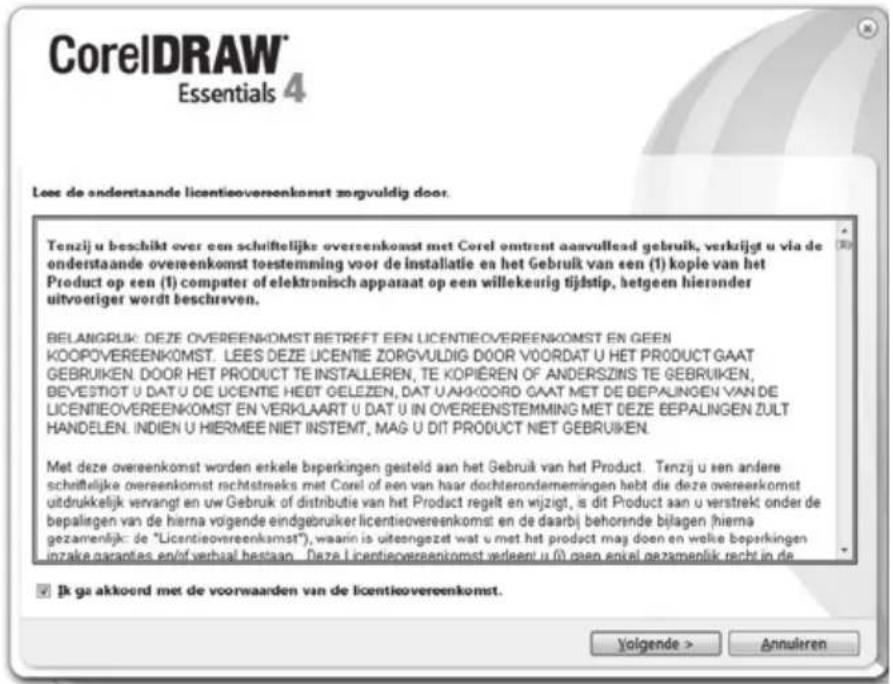
— het programma wilt repareren (als het niet meer naar behoren werkt of er per abuis programmabestanden zijn gewist).
— het programma wilt verwijderen (als u het niet meer wenst te gebruiken en meer plaats op uw harde schijf nodig heeft).
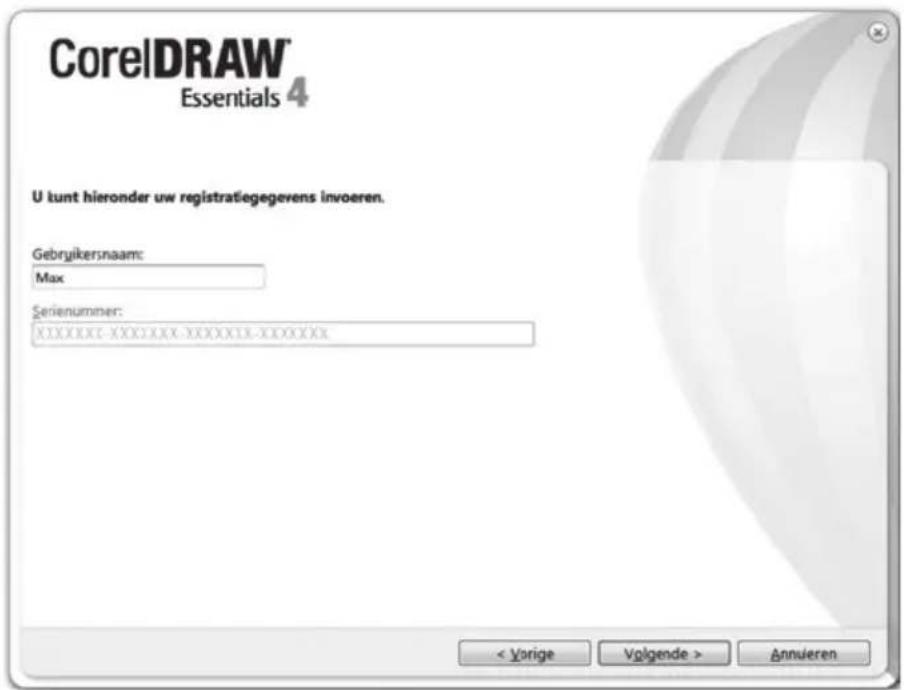
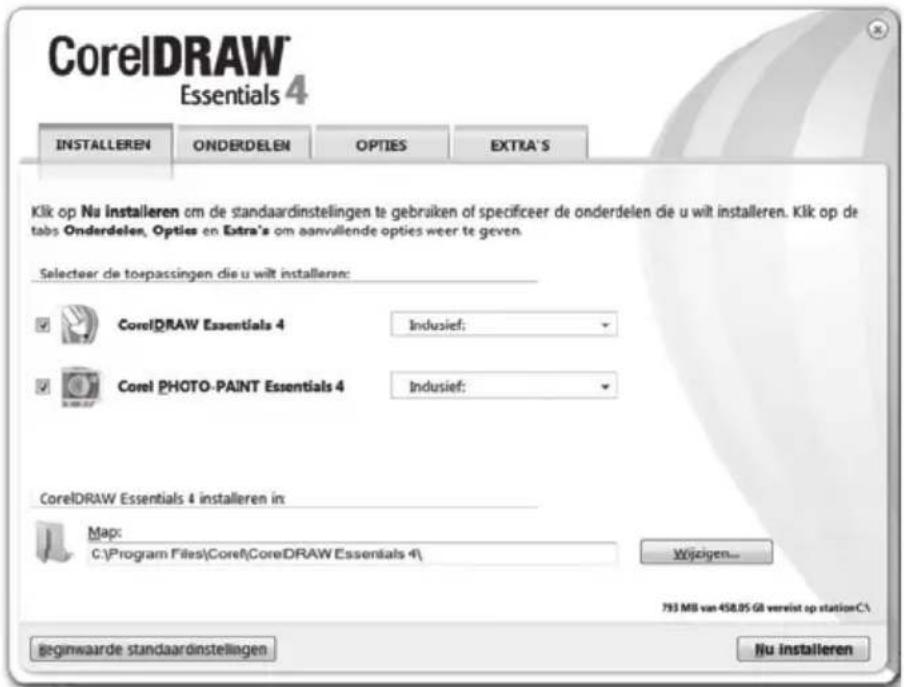
Ingebruikname
Werken met de functietoetsen en de bedieningsknop
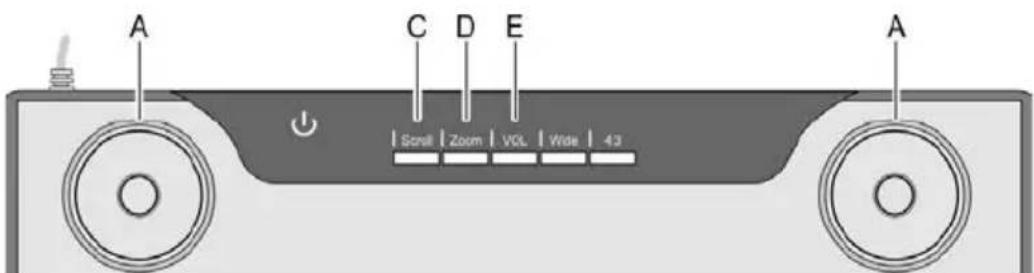
Functietoets Beschrijving, functie, bediening4 "Scroll" (C) Bijvoorbeeld Microsoft® Internet Explorer:Met bedieningsknop (A) de inhoud van het scherm verschuiven (scrollen).Druk op de "Scroll"-toets (C). De bijbehorende LED brandt.Draaiknop gebruiken om de inhoud van het scherm verticaal of horizontaal te scrollen.Druk op de toets in het midden om tussen verticaal en horizontaal scrollen om te schakelen. "Zoom" (D) Bijvoorbeeld Microsoft® Internet Explorer:Met bedieningsknop (A) de weergave op het scherm vergroten of verkleinen (zoomen).Druk op de "Zoom"-toets (D). De bijbehorende LED brandt.Draaiknop met de klok mee draaien om het weergegeven gedeelte te verkleinen (weergavedetails wordt vergroot, inzoomen).Draaiknop tegen de klok in draaien om het weergegeven gedeelte te vergroten (weergavedetails wordt verkleind, uitzoomen).De toets in het midden heeft in dit geval geen functie "VOL" (E) Met bedieningsknop (A) het volume van de luidsprekers regelen.Druk op de "VOL"-toets (E). De bijbehorende LED brandt.Draaiknop met de klok mee draaien om het volume te verhogen.Draaiknop tegen de klok in draaien om het volume te verlagen.Toets indrukken, om het geluid uit en weer aan te zetten. Werken met de digitale pen (bijvoorbeeld met "Free Notes")

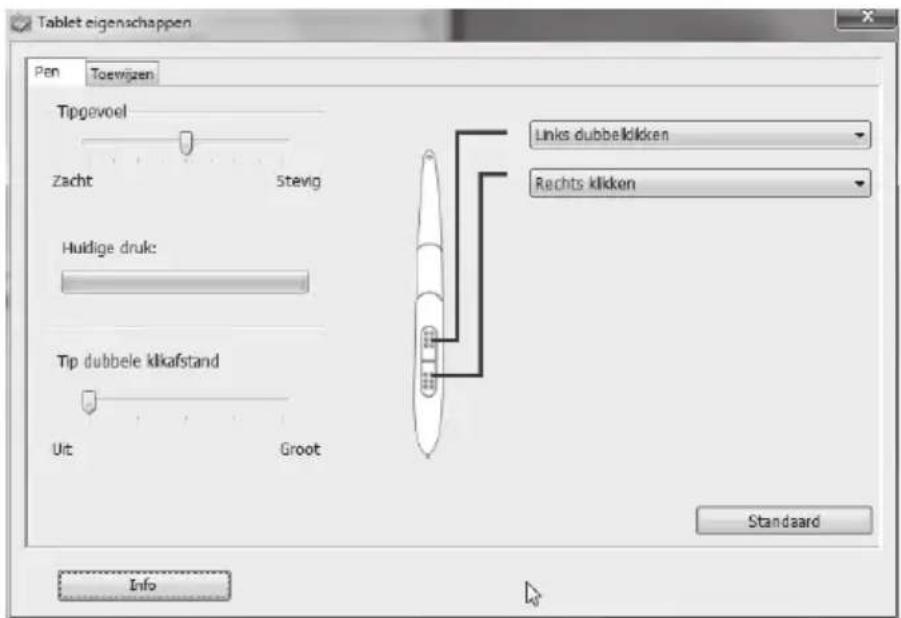
Penfunctie Vergelijkbaremuisfunctie Opmerking Pen niet al te ver boven het werkvlak bewegen, zonder deze aan te raken. Muis verschuiven over uwbureaublad of muismat Muiscursor is zichtbaar enwordt verschoven.Statusweergave op detekentablet brandt. Pen op het werkvlak neerzetten Klik met de linkermuisknop Afhankelijk van het actiewerktuig gaat destatusweergave op detekentablet uit. Neergezette pen over hetwerkvlak bewegen Slepen met ingedruktelinkermuisknop Als er een "pen", "penseel" of"markeerstift" is geselecteerd,lijn tekenen / schrijven.Tip: Als het "penseel" isgeselecteerd, is de lijndikteafhankelijk van deuitgeoefende druk.Pen niet al te hard op hettablet drukken; deze kandaardoor beschadigen. Pen niet al te ver boven hetwerkvlak houden envoorstepentoets(M) indrukken Klik met de rechtermuisknop Programmeerbaar *Windows standaardfunctie: Hetcontextmenu wordt geopend(Binnen Free Notes zijn er geencontextmenu's, probeert u dezefunctie eventueel uit op eenpictogram op uw bureaublad.) Pen niet al te ver boven hetwerkvlak houden enachterstepentoets(L)indrukken Dubbelklik met delinkermuisknop Programmeerbaar * Configuratie
Macrotoetsen programmeren
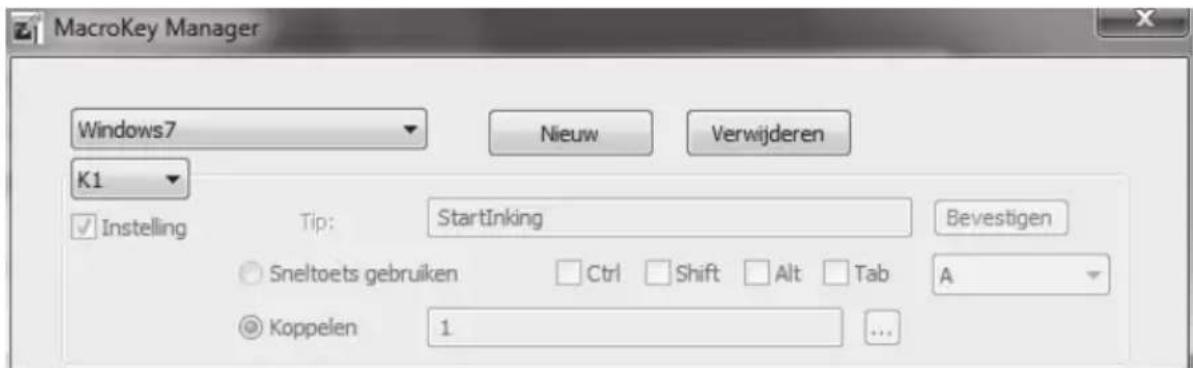
— Voer bij "Bestandsnaam" de naam in van het profiel. Hier dient u de naam van het betreffende programma in te vullen, in ons voorbeeld dus "Free Notes".
— Klik op de knop [...] en selecteer in ons voorbeeld in het erop volgende selectievenster het bestand "HWemail.exe" (dit is het uitvoerbare bestand van het programma "Free Notes"). Op deze manier kunt u profielen aanleggen voor allerlei programma's. Sluit het selectievenster met [OK].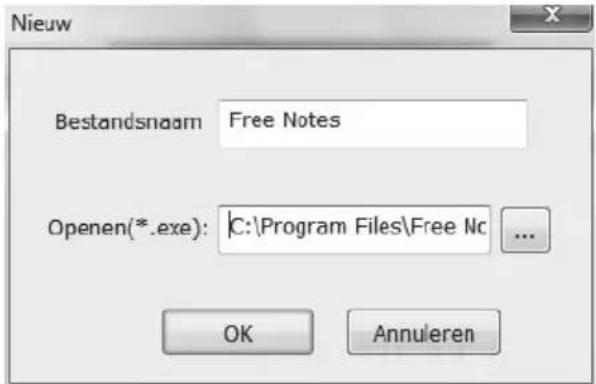
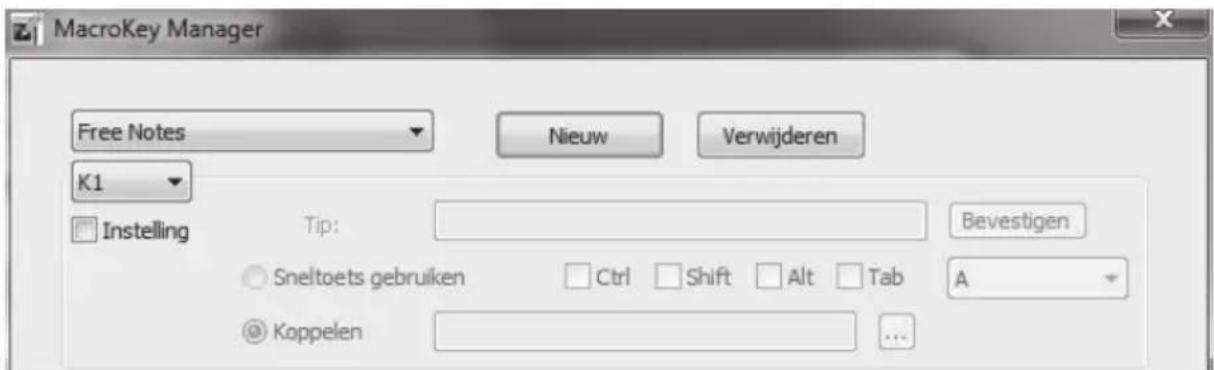
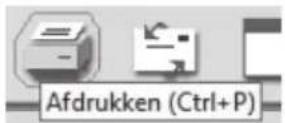

— Vakje bij "Ctrl" markeren en in de selectielijst de letter "P" selecteren.
— In het veld "Tip" het woord "Afdrukken" ingeven.
Digitale pen aanpassen
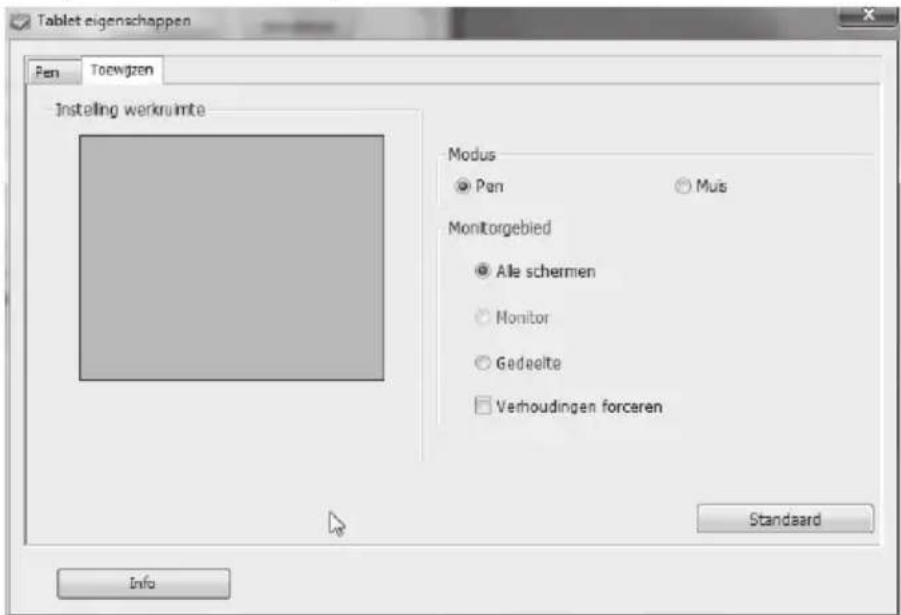
3. Klik op het tabblad "Toewijzen".
Symptoom Mogelijke oorzaak Oplossing Rode LED op de pen brandt Batterij in de pen is zwak Batterij in de pen verwisselen (zie verderop in dit hoofdstuk) Statusweergave op de tekentablet knippert, ook wanneer de pen een paar millimeter boven het werkvlak wordt gehouden of erop wordt geplaatst De digitale pen wordt niet herkend: ofwel is de batterij in de pen leeg of de penpunt defect Batterij en/of penpunt in de pen verwisselen (zie verderop in dit hoofdstuk). Op de tekentablet brandt geen LED. Er bestaat geen USB-verbinding Controleer de USB-verbinding.Verwijder de USB-stekker, wacht kort en sluit deze weer aan. Gebruik indien nodig een andere USB-poort op uw computer. Geen reactie op het beeldscherm, hoewel de digitale pen door de tekentablet wordt herkend (merkbaar aan het feit dat de statusweergave op de tekentablet uitgaat, zodra de pen op het werkvlak wordt geplaatst) Stuurprogramma van de tekentablet niet of niet juist geïnstalleerd Stuurprogramma van de tekentablet en Macro Key Manager installeren (zie hoofdstuk "Voor de ingebruikname", stap 2). Batterij in de pen verwisselen
Vulling vervangen
flowchart
graph TD
    A["Step ①"] --> B["O"]
    A --> C["Q"]
    B --> D["Output"]
    C --> D
    style A fill:#f9f,stroke:#333
    style B fill:#ccf,stroke:#333
    style C fill:#cfc,stroke:#333
Onderhoud / Reiniging
⚠️ Koppel het apparaat voordat u het reinigt los van de computer.Afvoeren van oude apparatuur

Conformiteit
Service en garantie
Garantie van Targa GmbH
Garantievoorwaarden
Garantietermijn en wettelijke aanspraak bij gebreken
Garantiedekking
Afwikkeling van een garantieclaim

Service




Fabrikant
Contents
Registered trademarks.... 68
Introduction...... 68
Intended use 68
Supplied items....69
Licence terms – licence agreement.... 70
Operating elements and connections 71
Technical data 73
Safety instructions....74
Prior to use....75
First use 84
Configuration 88
Troubleshooting 94
Cleaning / maintenance 96
Conformity information....96
Warranty and servicing information 97
Registered trademarks
Introduction
Intended use
- is damaged or modified prior to connection and use.Supplied items
1 x graphics tablet SGT 10.6 A2 with USB socket 
1 x digital pen with nib 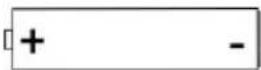
1 x battery type AAA (1.5 V R03) for the digital pen 2 x replacement nibs for the digital pen 1 x nib extractor 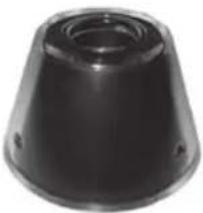
1 x pen stand 1 x installation CD with Macro Key Manager, Free Notes / Office Ink and Power Presenter RE II1 x DVD with CorelDRAW® Essentials OEM 1) 1 x user manual Supplied software
• Power Presenter RE II is a program for editing presentations. Licence terms – licence agreement
Operating elements and connections
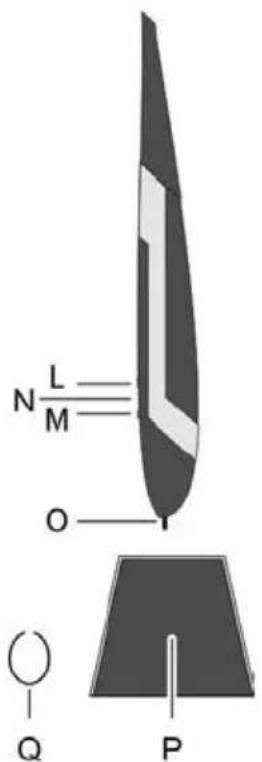
M: Front pen button, programmable (default: right mouse click)
N: LED lights up when the battery is running low
O: Nib; communicates the commands to the active area (J, K) or sensor keys (I)
P: Pen stand; protects the nib when the pen is not in use
Q: Nib extractor; used to pull the nib from the pen when it requires replacement.Model SGT 10.6 A2 Technology Electromagnetic Dimensions Graphics tablet Pen 340 x 19 x 260 mm160 x 14,7 x 17,7 mm Weight Graphics tablet Pen Pen stand 919 g24 g42 g Power supply Graphics tablet Pen Via USB connection (DC 5 V = 75 mA)Battery-powered (1 x 1.5 V, type AAA) Active area 4:3 format 16:10 format 18.4 x 14 cm (7.25" x 5.5")22,9 x 14 cm (9" x 5.5") Resolution Windows® XP Windows Vista® / Windows® 7 4000 lpi (lines per inch)2000 lpi (with Windows default driver)4000 lpi (with installed SilverCrest driver) Report rate 200 rps (reports per second) Pen Pressure levels Reading distance 1024 levels10 mm max. Operating environment Temperature Air humidity 5 to 35 °C85 % rel. air humidity max. Minimum system requirements
• 16-bit colour graphics card with 256 MB RAM (512 MB recommended)
• Colour screen with a resolution of 1024 x 768
• DVD drive for installing the drivers and software Safety instructions
General precautions
EMC and safety precautions
Operating environment/Environmental conditions
⚠️ Operational safety
Prior to use
Step 1: Inserting the battery into the digital pen
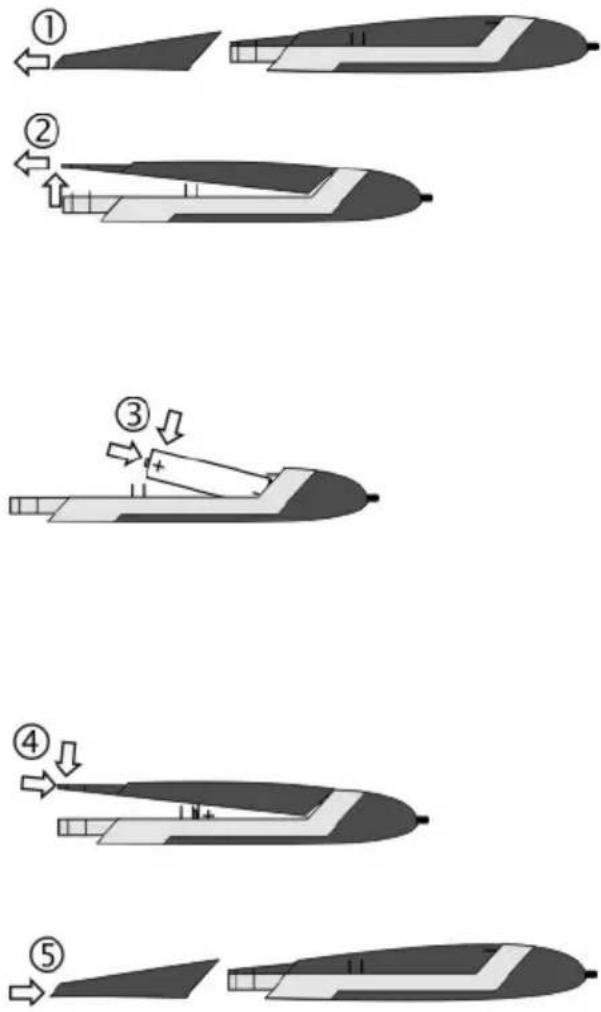
flowchart
graph TD
    A["①"] --> B["②"]
    B --> C["③"]
    C --> D["④"]
    D --> E["⑤"]
Step 2: Installing the graphics tablet driver and Macro Key Manager
• install the Macro Key Manager which you can use to program the 26 macro keys.
— Click the icon of your CD or DVD drive in My Computer.
— Start the installation by double-clicking the "setup" file.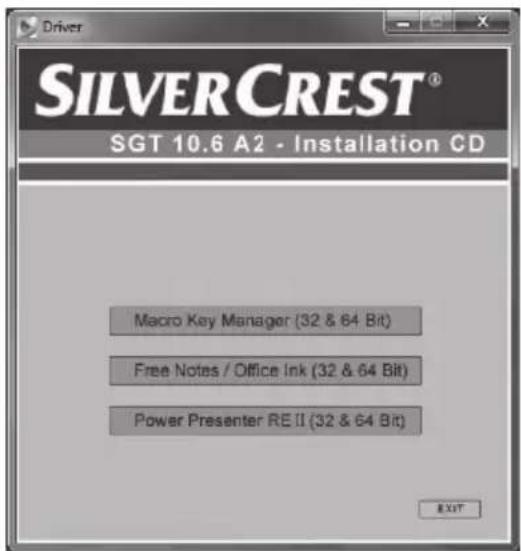
Step 3: Connecting the graphics tablet
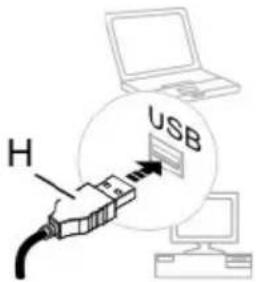
Step 4: Adjusting the active area to the screen format
Step 5: Installing "Free Notes / Office Ink"
— Click the icon of your CD or DVD drive in My Computer.
— Start the installation by double-clicking the "setup" file.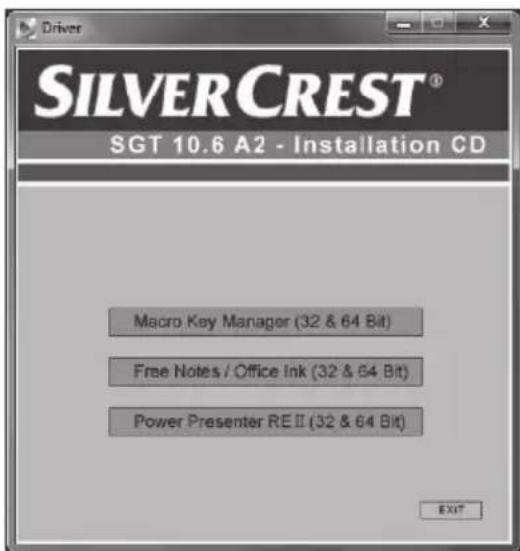
Step 6: Installing "Power Presenter RE II"
— Click the icon of your CD or DVD drive in My Computer.
— Start the installation by double-clicking the "setup" file.

Step 7: Installing "CorelDRAW® Essentials OEM"
— Click on the DVD drive icon in My Computer.
— Start the installation by double-clicking the "autorun.exe" file.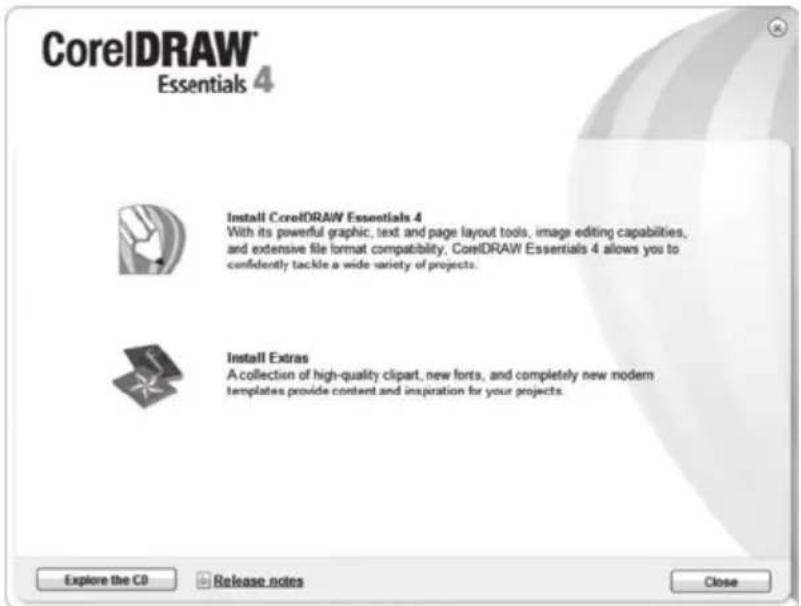
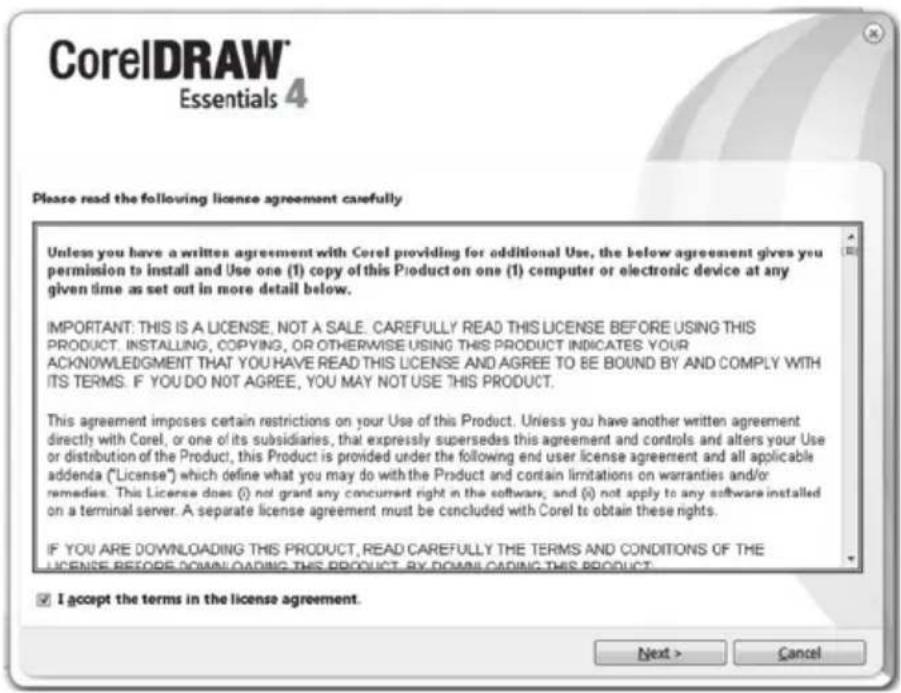
— repair the program (if it does not run correctly or if program files were accidentally deleted).
— uninstall the program (if you do not want to use it any more and need more space on your hard disk).
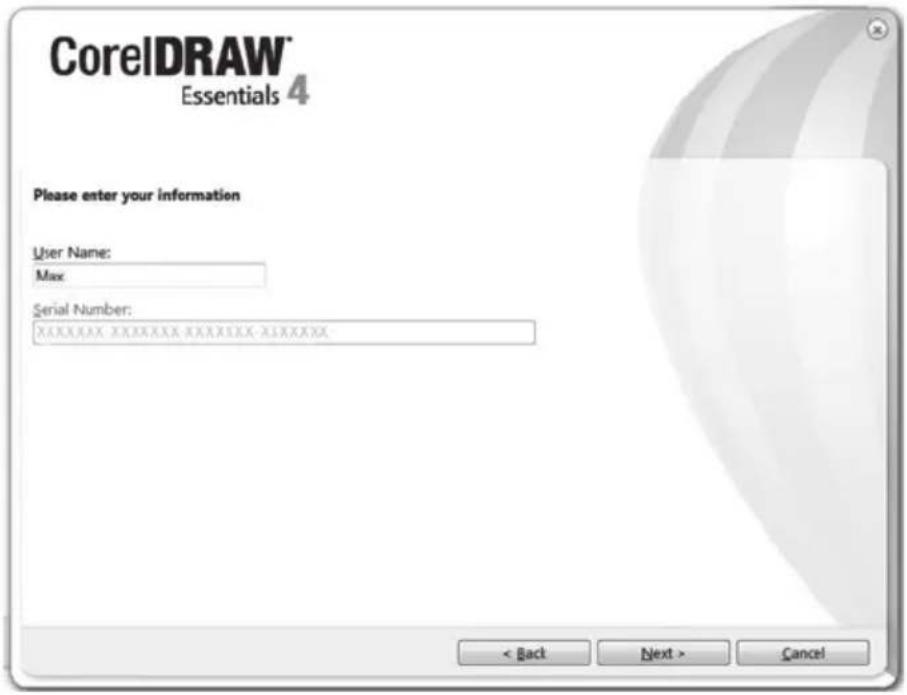
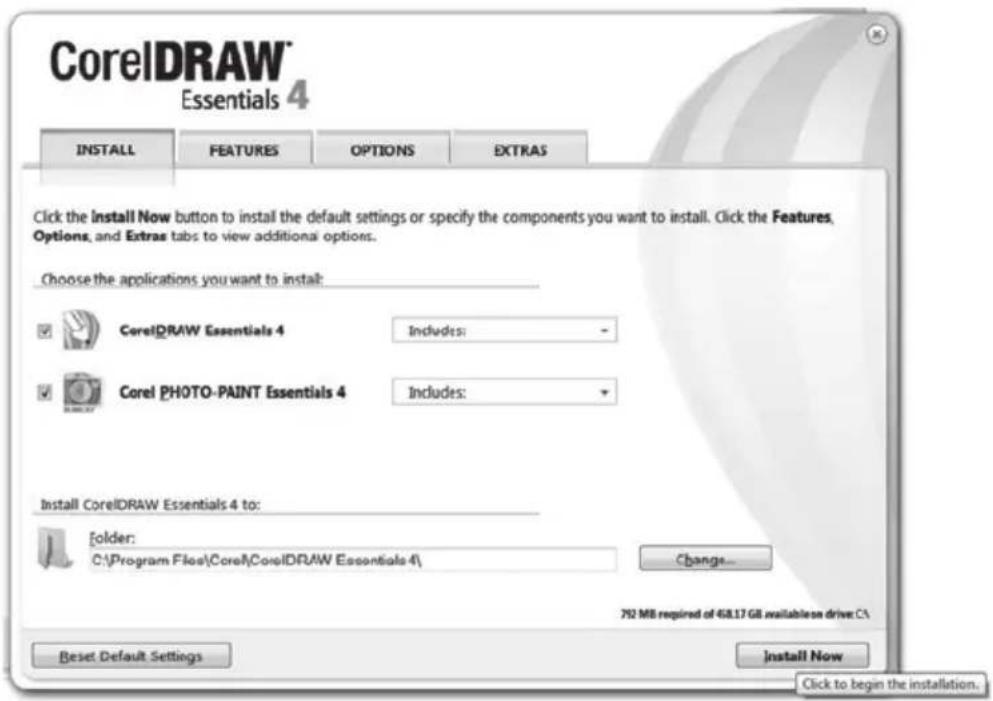
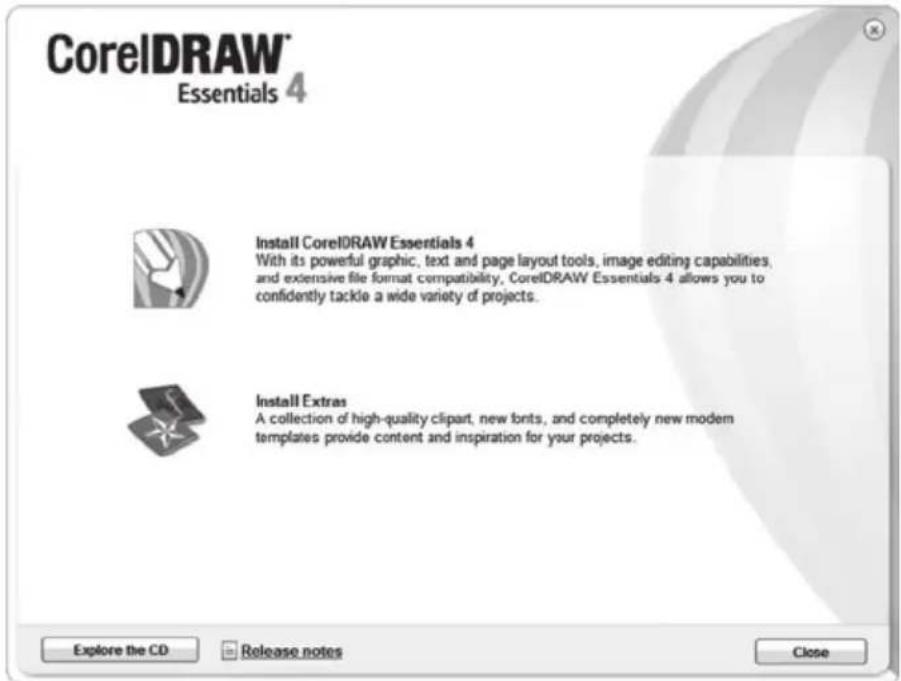
First use
Working with the function keys and the control button
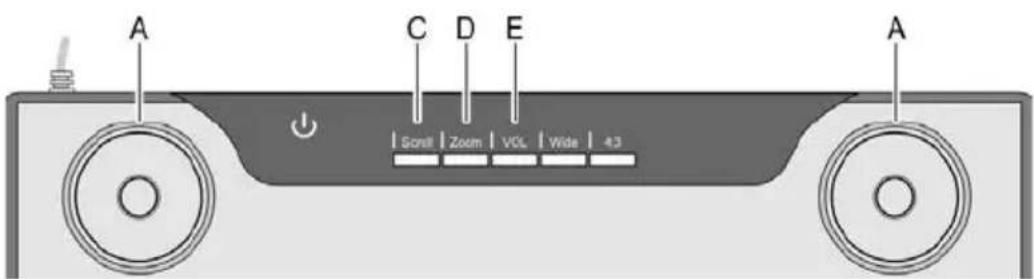
Function key Description, function, operation6 "Scroll" (C) For example using Microsoft® Internet Explorer:Scroll through the screen contents with control button (A).Press the "Scroll" function key (C). The corresponding LED lights up.Turn the control pad to scroll the screen contents either vertically or horizontally.Press the button to switch between horizontal and vertical scrolling. "Zoom" (D) For example using Microsoft® Internet Explorer:Scale the screen contents up or down (zoom) with the control button (A).Press the "Zoom" function key (D). The corresponding LED lights up.Turn the control pad clockwise to select a smaller section of the screen and scale the screen contents up (the view is enlarged).Turn the control pad anti-clockwise to select a larger section of the screen and scale the screen contents down (the view is reduced).The button is not assigned a function. "VOL" (E) Controlling the volume of the speakers with the control button (A).Press the "VOL" function key (E). The corresponding LED lights up.Turn the control pad clockwise to increase the volume.Turn the control pad anti-clockwise to lower the volume.Press the button to turn the sound on and off. Working with the digital pen (for example when using "Free Notes")
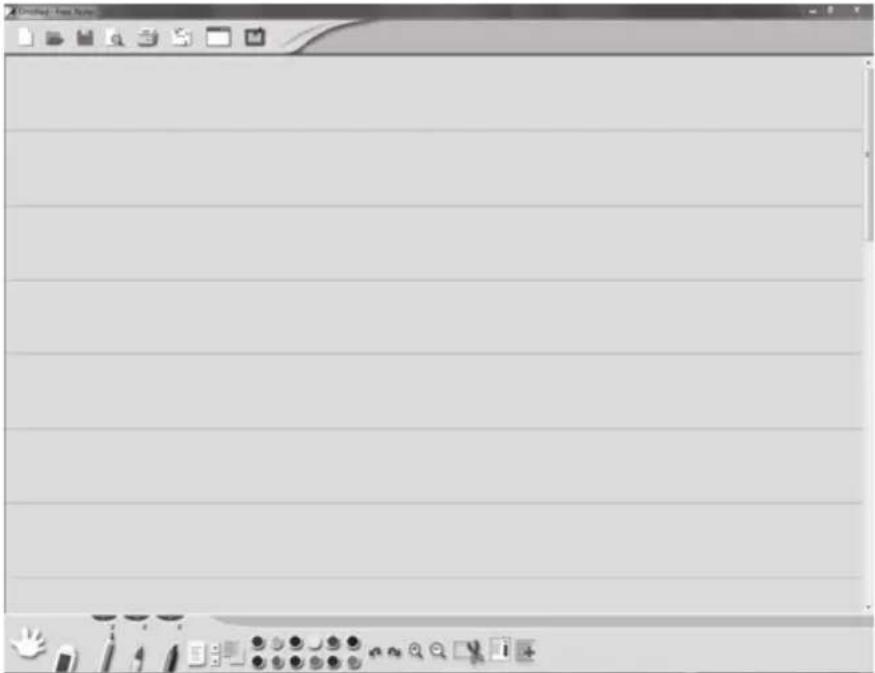
Pen function Comparable mouse function Note Holding the pen just above the surface of the active area without touching it with the pen. Moving the mouse on the mousepad The mouse cursor is visible and is moved.The status indicator ↓ on the graphics tablet. Touching the active area with the pen Left mouse click Depending on the active toolthe light on the graphics tabletstatus indicator ↓ goes out. Dragging the pen over the surface of the active area Dragging the mouse while holding the left mouse button down. If a "pen", "brush" or "marker" is selected, drawing/writing a line.Tip: If you have selected the "brush" tool, the line thickness changes with the pressure of the pen on the pen pad.⚠ Do not press the pen too hard on the graphics tablet as you will damage it. Holding the pen just above the active area and pressing thefront pen button (M) Right mouse click Programmable *Windows default function:Context menu opens(Free Notes does not feature context menus, try this function on an icon on your desktop, for example.) Holding the pen just above the active area and pressing therear pen button (L) Double left mouse click Programmable * Configuration
Programming macro keys
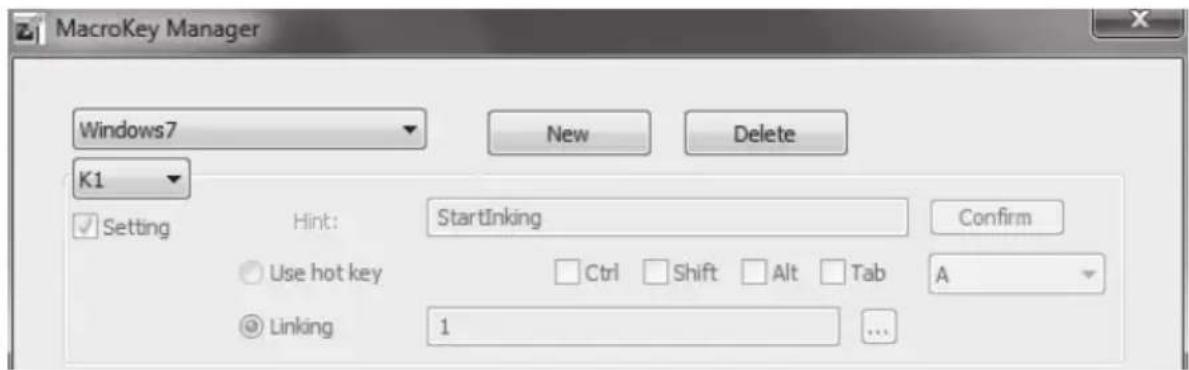
3. Proceed as follows:
— Enter the name of the profile under "File name". Enter the name of the corresponding program here, in this case "Free Notes".
- Click the [...] button and in the selection dialogue box which then opens select the "HWemail.exe" file (this is the executable file of the "Free Notes" program). You can also create profiles for any program in this manner. Close the selection dialogue box by clicking [OK].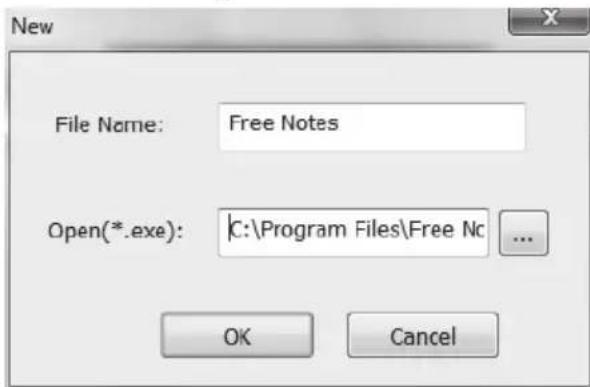
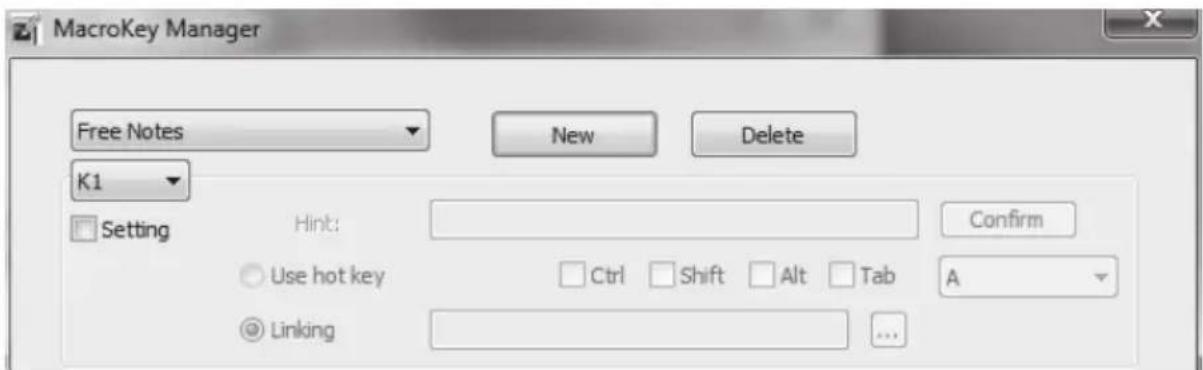
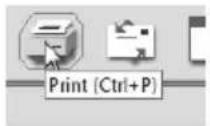
7. Proceed as follows:

— Tick the box in front of "Ctrl" and select "P" in the drop down list.
— In the "Hint" box enter the word "Print".
Customising the digital pen
3. Click the "Mapping" tab.
Problem Possible cause Remedy Red LED on the pen lights up The pen battery is running low Replace the pen battery (see below). The status indicator on the graphics tablet flashes even if the pen is held a few millimetres above the active area or makes contact with the surface No digital pen is detected: either the pen battery is empty or the pen nib is defective. Replace the pen battery and/or the pen nib (see below). No LED lights up on the graphics tablet No USB connection Check the USB connection.Remove and reinsert the USB connector. You can also try using a different USB socket on your computer. No reaction on the screen although the digital pen is detected by the graphics tablet (can be recognised by the fact that the light on the graphics tablet status indicator goes out as soon as the pen makes contact with the active area) Graphics tablet driver installed either incorrectly or not at all Install the graphics tablet driver and Macro Key Manager (refer to the section "Prior to use", step 2). Replacing the battery
Replacing the pen nib
flowchart
graph TD
    A["Step ①"] --> B["O"]
    A --> C["Q"]
    B --> D["Output"]
    C --> D
    style A fill:#f9f,stroke:#333
    style B fill:#ccf,stroke:#333
    style C fill:#cfc,stroke:#333
Cleaning / maintenance
Always disconnect the device from the computer before cleaning it.Disposal of old devices

Conformity information
Warranty and servicing information
Warranty of Targa GmbH
Warranty conditions
Warranty period and legal warranty rights
Scope of warranty
Submitting warranty claims

Service





Manufacturer
CE
EC-Declaration of Conformity
natural_image
Abstract sketch of two curved lines forming a stylized shape (no text or symbols)
- Digitalen Stift anpassen
- Klicken Sie das Registerfeld "Arbeitsfläche".
- Stift-Batterie wechseln
- Stift-Mine wechseln
- Wartung / Reinigung
- Entsorgung von Altgeräten
- Konformitätsvermerke
- Hinweise zu Garantie und Serviceabwicklung
- Garantie der Targa GmbH
- Garantiebedingungen
- Garantiezeit und gesetzliche Mängelansprüche
- Garantieumfang
- Abwicklung im Garantiefall
- Service
- Hersteller
- Inhoudsopgave
- Geregistreerde handelsmerken – Registered trademark of – 36
- Inleiding 36
- Bedoeld gebruik 36
- Leveringsomvang.... 37
- Licentiebepalingen – licentieovereenkomst 38
- Bedieningselementen en aansluitingen 39
- Technische gegevens 41
- Veiligheidsaanwijzingen 42
- Voor de ingebruikname 43
- Ingebruikname 52
- Configuratie 56
- Storingen verhelpen....62
- Onderhoud / Reiniging 64
- Conformiteit 64
- Service en garantie 65
- Geregistreerde handelsmerken – Registered trademark of –
- Inleiding
- Bedoeld gebruik
- Leveringsomvang
- Meegeleverde software
- Licentiebepalingen – licentieovereenkomst
- Bedieningselementen en aansluitingen
- Minimale systeemeisen
- Veiligheidsaanwijzingen
- Algemene veiligheidsaanwijzingen
- EMC- en veiligheidsbepalingen
- Gebruiksomgeving
- ⚠️ Veilig gebruik
- Voor de ingebruikname
- Stap 1: Batterij van de digitale pen plaatsen
- Stap 2: Stuurprogramma van de tekentablet en Macro Key Manager installeren
- Stap 3: Tekentablet aansluiten
- Stap 4: Werkvlak aanpassen aan het beeldschermformaat
- Stap 5: "Free Notes / Office Ink" installeren
- Stap 6: "Power Presenter RE II" installeren
- Stap 7: " CorelDRAW® Essentials OEM " installeren
- Ingebruikname
- Werken met de functietoetsen en de bedieningsknop
- Werken met de digitale pen (bijvoorbeeld met "Free Notes")
- Configuratie
- Macrotoetsen programmeren
- Digitale pen aanpassen
- Klik op het tabblad "Toewijzen".
- Batterij in de pen verwisselen
- Vulling vervangen
- Onderhoud / Reiniging
- Afvoeren van oude apparatuur
- Conformiteit
- Service en garantie
- Garantie van Targa GmbH
- Garantievoorwaarden
- Garantietermijn en wettelijke aanspraak bij gebreken
- Garantiedekking
- Afwikkeling van een garantieclaim
- Fabrikant
- Contents
- Registered trademarks.... 68
- Introduction...... 68
- Intended use 68
- Supplied items....69
- Licence terms – licence agreement.... 70
- Operating elements and connections 71
- Technical data 73
- Safety instructions....74
- Prior to use....75
- First use 84
- Configuration 88
- Troubleshooting 94
- Cleaning / maintenance 96
- Conformity information....96
- Warranty and servicing information 97
- Registered trademarks
- Introduction
- Intended use
- Supplied items
- Supplied software
- Licence terms – licence agreement
- Operating elements and connections
- Minimum system requirements
- Safety instructions
- General precautions
- EMC and safety precautions
- Operating environment/Environmental conditions
- ⚠️ Operational safety
- Prior to use
- Step 1: Inserting the battery into the digital pen
- Step 2: Installing the graphics tablet driver and Macro Key Manager
- Step 3: Connecting the graphics tablet
- Step 4: Adjusting the active area to the screen format
- Step 5: Installing "Free Notes / Office Ink"
- Step 6: Installing "Power Presenter RE II"
- Step 7: Installing "CorelDRAW® Essentials OEM"
- First use
- Working with the function keys and the control button
- Working with the digital pen (for example when using "Free Notes")
- Configuration
- Programming macro keys
- Proceed as follows:
- Proceed as follows:
- Customising the digital pen
- Click the "Mapping" tab.
- Replacing the battery
- Replacing the pen nib
- Cleaning / maintenance
- Disposal of old devices
- Conformity information
- Warranty and servicing information
- Warranty of Targa GmbH
- Warranty conditions
- Warranty period and legal warranty rights
- Scope of warranty
- Submitting warranty claims
- Manufacturer
- CE
- EC-Declaration of Conformity
Merk : SILVERCREST
Model : SGT 10.6 A2
Categorie : Tekentablet