.
- Lorsque l'écran de connexion apparaît, saisissez l'ID de l'administrateur système et le code de sécurité.
- Contactez l'administrateur réseau pour connaître l'ID de l'administrateur système et le code de sécurité (défini sur "7654321" par défaut).
text_image
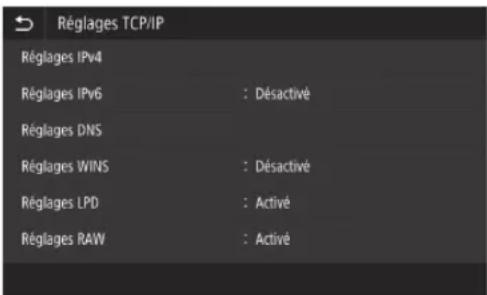
Réglages TCP/IP
Réglages IPv4
Réglages IPv6 : Désactivé
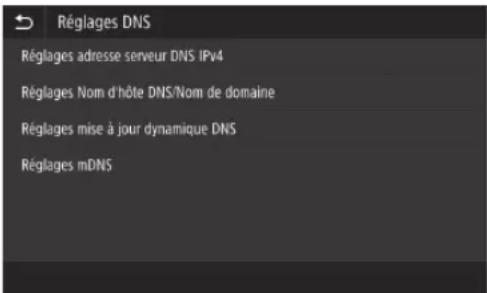
Réglages DNS
Réglages WINS : Désactivé
Réglages LPD : Activé
Réglages RAW : Activé
2 Appuyez sur .
text_image
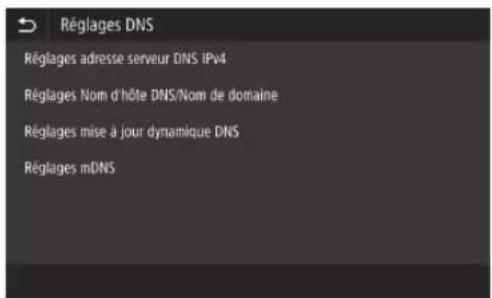
Réglages DNS
Réglages adresse serveur DNS IPv4
Réglages Nom d'hôte DNS/Nom de domaine
Réglages mise à jour dynamique DNS
Réglages mDNS
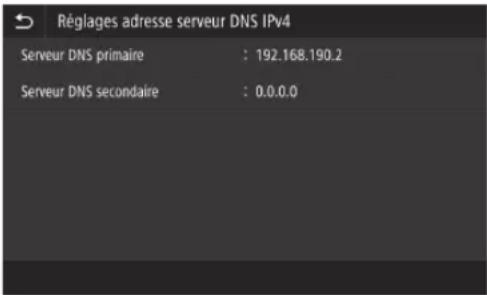
3 Appuyez sur .
text_image
Réglages adresse serveur DNS IPv4
Serveur DNS primaire : 192.168.190.2
Serveur DNS secondaire : 0.0.0.0
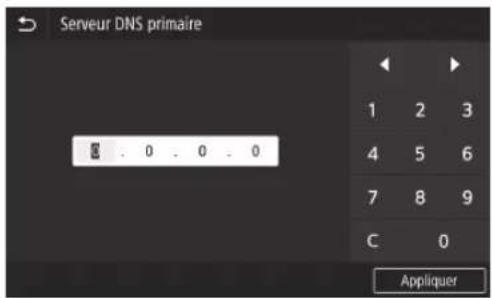
4 Saisissez l'adresse IP du serveur DNS primaire, puis appuyez sur .
- Appuyez sur pour revenir à l'écran précédent.
text_image
Serveur DNS primaire
0 0 0 0
1 2 3
4 5 6
7 8 9
C 0
Appliquer
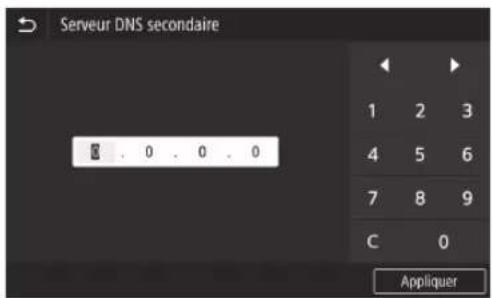
5 Si nécessaire, sélectionnez , puis saisissez l'adresse IP du serveur DNS secondaire.
text_image
Serveur DNS secondaire
0 . 0 . 0 . 0
1 2 3
4 5 6
7 8 9
C 0
Appliquer
6 Définissez les éléments restants le cas échéant. Pour en savoir davantage sur le réglage des infert
- Pour en savoir davantage sur le réglage des informations, reportez-vous au Manuel en ligne.
- Le manuel en ligne décrit comment réaliser les réglages avec l'IU distante. Réalisez les réglages depuis le panneau de commande ou l'IU distante.
text_image
Réglages DNS
Réglages adresse serveur DNS IPv4
Réglages Nom d'hôte DNS/Nom de domaine
Réglages mise à jour dynamique DNS
Réglages mDNS
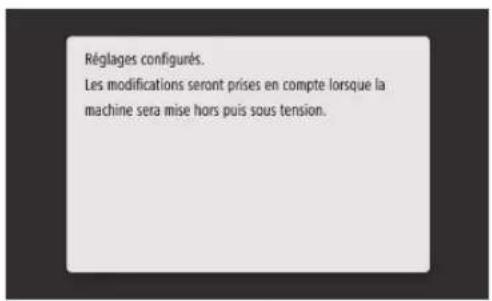
7 Redémarrez l'appareil.
- L'écran affiché à droite apparaît dès que des réglages sont saisis. Si vous effectuez des réglages à plusieurs reprises, redémarrez l'appareil après avoir terminé tous les réglages.
text_image
Réglages configurés.
Les modifications seront prises en compte lorsque la
machine sera mise hors puis sous tension.
Connexion au réseau et au service de suivi distant
Connexion à un réseau avec une adresse IP fixe
Etape 4 Vérification de la connexion
Vérification que l'appareil est connecté correctement
La saisie de l'adresse IP directement sur un ordinateur se trouvant sur le même réseau que l'appareil affiche l'écran de l'IU distante. L'appareil s'est connecté correctement si l'écran de l'IU distante apparaît.
1
Démarrez le navigateur Internet.
2
Dans la barre de saisie de l'adresse, saisissez "http://"/", puis appuyez sur [ENTER] sur le clavier.

text_image
http://192.168.1.20/
3
L'écran de l'IU distante apparaît.
- Si l'écran représenté à droite apparaît, l'appareil s'est connecté correctement.
- Si un écran de l'IU distante n'apparaît pas, reportez-vous au manuel en ligne et vérifiez à nouveau la connexion réseau.
text_image
Conversion
□ Make administration system
□ Create administration system
□ Make command system
□ Make effective general
Use difficulty
□ Can additional process should not complete it within our own database
PDS Release to PC Release
To continue
Utilisation d'un service de suivi distant
Procédez à la connexion à un service de suivi distant et effectuez les réglages. 139
Si vous n'utilisez pas de service de suivi distant
Continuez avec les réglages de la section "Installation du logiciel". →14
Connexion à un service de suivi distant
Procédures préalables à l'utilisation d'un service
Avant d'utiliser un service, les procédures de vérification de la connexion réseau et un test de communication avec le serveur de suivi sont requis.
• Vérification de la connexion réseau
Vérifiez que l'appareil est connecté au réseau. P.34 "Etape 3 Définition d'une adresse IP fixe"
Avant de pouvoir utiliser un service de suivi distant, vérifiez qu'une connexion Internet est disponible.
Utilisation d'un serveur proxy
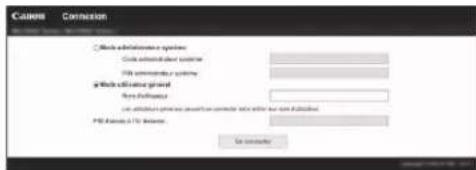
1 Démarrez l'IU distante, puis utilisez le mode administrateur lors de la connexion.
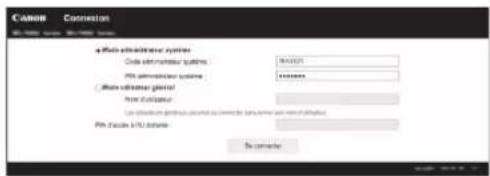
text_image
CAMBR
Connection
a Photo administrative system
Code administrator queries:
Win administrator systems:
Win access key: physical
From database
Last available directory: pcmod by code file name or name of database
Win access key: physical
No computer
2 Dans la page du portail, cliquez sur [Réglages/Enregistrement].

text_image
File selection - Portal
File selection:
Importable to the Web
Importable to the Web
Importable to the Web
Importable to the Web
Importable to the Web
Importable to the Web
Importable to the Web
Importable to the Web
Importable to the Web
Importable to the Web
Importable to the Web
Importable to the Web
Importable to the Web
Importable to the Web
Importable to the Web
Importable to the Web
Importable to the Web
Importable to:
Importable to:
Importable to:
Importable to:
Importable to:
Importable to:
Importable to:
Importable to:
Importable to:
Importable to:
Importable to:
Importable to:
Importable to:
Importable to:
Importable to:
Importable to:
Importable to:
Importable to:
Importable to:
Importable to:
Importable to:
Enter your paper
Enter your paper
Enter your paper
Enter your paper
Enter your paper
Enter your paper
Enter your paper
Enter your paper
Enter your paper
Enter your paper
Enter your paper
Enter your paper
Enter your paper
Enter your paper
Enter your paper
Enter your paper
Enter your paper
Enter your paper
Enter your paper
Enter your paper
Enter your paper
Enter your paper
Enter your paper
Enter your paper
Enter your paper
Enter your paper
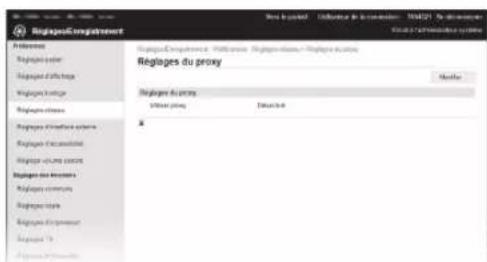
3 Sélectionnez [Réglages réseau] ▶[Réglages du proxy], puis cliquez sur [Modifier].
text_image
RegiageCompensation
RegiageCompliance, Approve, Approve/Unre, Approve Acute
Regiages du proxy
Regiages du proxy
Urban proxy
Extracité
*
Connexion au réseau et au service de suivi distant
Connexion à un service de suivi distant
![CANON WG7450Z - Cochez [Utiliser proxy], puis saisissez les informations requises. - 1](/content/2026/04/666691/images/a15d1a30ca16ed1aa3155cab6563ec83858c84377065b013e770bf921f1fe0d5.jpg)
text_image
Réglages/Enregistrement
Vera la portail Utilisateur de la connexion : 7654321 Se déconnecter
Email à l'administrateur système
Réplèances
Réplèges paper
Réplèges d'affichage
Réplèges horloge
Réplèges réseau
Réplèges d'interface externe
Réplèges d'accessibilité
Réplège volume sonore
Réplèges des fonctions
Réplèges communs
Réplèges copie
Réplèges d'impression
Réplèges TX
Réplèges RX/transfet
Réplèges/Enregistrement : Préférences : Réplèges réseau > Réplèges du proxy > Modifier les réglages du proxy
Modifier les réglages du proxy
Modifez les réglages suivants
OK Annuler
Réglages du proxy
□ Utiliser proxy
Adresse du serveur proxy HTTP :
Numéro de port du serveur proxy HTTP : 80
□ Utiliser proxy dans la même domaine
□ Utiliser authentication proxy
Nom d'utilisateur :
□ Dérfin/Modifier le mot de passe
Mot de passe :
[Utiliser proxy]
Cocher cette option permet d'utiliser le serveur proxy spécifié lorsque l'appareil initie la communication HTTP.
[Adresse du serveur proxy HTTP]
Saisissez l'adresse du serveur proxy à utiliser. Définissez une adresse IP, un nom d'hôte, etc. en fonction de votre environnement.
[Numéro de port du serveur proxy HTTP]
Saisissez le numéro de port du serveur proxy à utiliser.
[Utiliser proxy dans le même domaine]
Cocher cette option permet d'utiliser le serveur proxy spécifié même lorsque l'appareil initie la communication avec un périphérique du même domaine.
[Utiliser authentication proxy]
Pour utiliser l'authentication par un serveur proxy, cochez cette option, puis saisissez le nom d'utilisateur à authentifier dans [Nom d'utilisateur].
[Définir/Modifier le mot de passe]
Pour définir ou modifier le mot de passe lors de l'utilisation de l'authentication proxy, cochez cette option, puis saisissez le nouveau mot de passe dans [Mot de passe].
5 Cliquez sur [OK].
- Test de communication avec le serveur de suivi
Exécutez un test de communication avec le serveur de suivi. L'exécution du test de communication démarre le service de suivi distant.
Test de communication avec le serveur de suivi
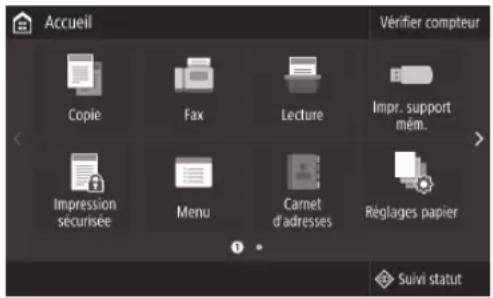
1 Dans l'écran Accueil, appuyez sur .
text_image
Accueil
Verifier compteur
Copie
Fax
Lecture
Impr. support mém.
Impression sécurisée
Menu
Carnet d'adresses
Réglages papier
Suivi statut
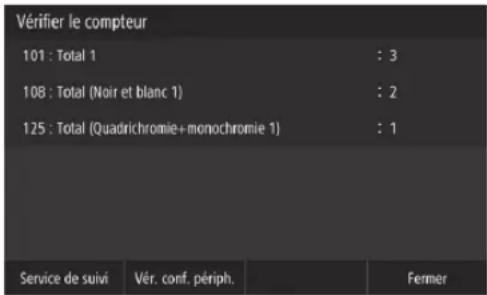
2 Appuyez sur .
text_image
Vérifier le compteur
101 : Total 1 : 3
108 : Total (Noir et blanc 1) : 2
125 : Total (Quadrichromie+monochromie 1) : 1
Service de suivi Vér. conf. périph. Fermer
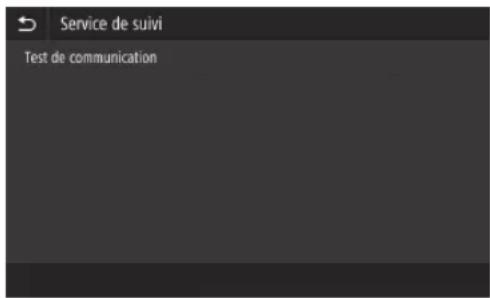
3 Appuyez sur .
text_image
Service de suivi
Test de communication
Connexion au réseau et au service de suivi distant
Connexion à un service de suivi distant
4 Si l'écran représenté à droite apparaît, appuyez sur .
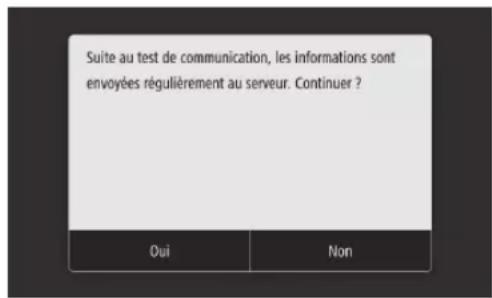
text_image
Suite au test de communication, les informations sont
envoyées régulièrement au serveur. Continuer ?
Oui Non
5 apparaît.
→Le réglage est terminé.
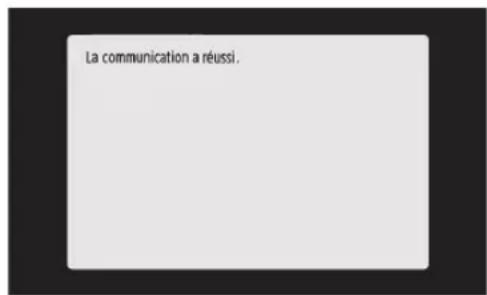
text_image
La communication a réussi.
- Si un message d'erreur apparaît, reportez-vous à la section P.43 "Erreurs possibles et dépannage" et vérifiez les réglages.
- Une fois les réglages terminés, il est recommandé d'imprimer une liste des données d'administrateur et de la conserver avec ce manuel. Notez que le rapport imprimé comporte environ 10 pages.
Sélectionnez
Une fois la connexion établie
Continuez avec les réglages de la section "Installation du logiciel". 1.4
Erreurs possibles et dépannage
Si un message d'erreur apparaît
L'écran d'erreur affiche un code d'erreur. Vérifiez les détails et les solutions pour les codes d'erreur dans le tableau ci-dessous afin de résoudre les problèmes.
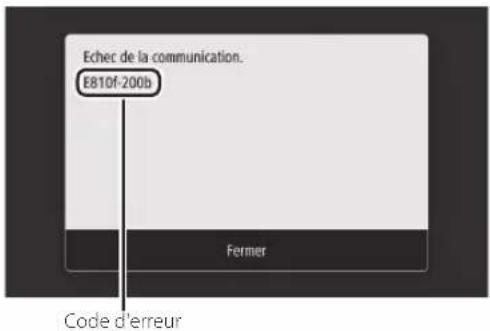
text_image
Echec de la communication.
E810f-200b
Fermer
Code d'erreur
Si une erreur se produit et que son code ne figure pas dans la liste ou si la solution fournie ne résout pas le problème, rendez-vous dans l'endroit où vous avez acheté l'appareil ou demandez de l'aide via la page d'assistance du site Web Canon.
Réglages du serveur proxy
| Code d'erreur Cause Solution | | |
| 8000 200A Erreur | de connexion au service de suivi distant :Echec de la communication TCP/IPAdresse IP de ce périphérique non définie | Pour utiliser un serveur proxy, effectuez les réglages du proxy et vérifiez l'état du serveur proxy. |
| 8000 200B Echec | de la résolution de l'adresse du serveur de suivi distant | Vérifiez que le réseau auquel l'appareil est connecté est un environnement en mesure de se connecter à Internet. |
| 8000 2014 L'adresse définie n'est pas valable et l'appareil ne peut pas se connecter au serveur proxy | | Vérifiez et réinitialisez l'adresse IP/le numéro de port du serveur proxy. |
| 8000 2015 L'adresse du serveur proxy est enregistrée avec le nom d'hôte, mais la connexion au serveur désignée n'est pas possible avec la résolution de noms | | Saisissez le nom d'hôte du serveur proxy et le réglage DNS.Définissez le serveur proxy avec une adresse IP. |
| 8000 201E | Echec de l'authentification au serveur proxy | Vérifiez et réinitialisez le nom d'utilisateur et le mot de passe de connexion au serveur proxy. |
Connexion au réseau et au service de suivi distant
Connexion à un service de suivi distant
Réglage de la date/de l'heure et mise à jour du firmware
| Code d'erreur Cause Solution | | |
| 8000 2028 Erreur de certificat du serveur :La date/l'heure de l'appareil ne sont pas correctesLe certificat racine vers le serveur n'est pas enregistré dans l'appareilL'utilisateur utilise un certificat différent et le fichier du certificat officiel n'est pas enregistré | Définissez la date/l'heure précise dans le périphérique.Si la date/l'heure dans le périphérique sont correctes, mettez-le à jour vers le dernier firmware. |
| 8000 2029 Erreur de vérification de l'URL du certificat du serveur |
| 8000 2046 Certificat du serveur expiré :La date dans le périphérique a dépassé la date d'expiration du certificatLe certificat racine enregistré dans le périphérique est expiréLe certificat racine enregistré en premier lieu par l'utilisateur est utilisé et le fichier du certificat officiel n'est pas enregistré |
Exécution d'un test de communication
| Code d'erreur Cause Solution | | |
| 0000 0003 Aucun | test de programme/communication effectué | Exécutez et terminez le test de communication. |
| 8000 0101 Erreur de réponse du serveur du suivi distant |
| 8000 02078000 0208 | Programme interne incorrect |
| 8000 2000 Autre erreur de communication |
| 8000 0304 Erreur de consommation des signaux pendant le test de communication | Attendez et exécutez à nouveau le test de communication. |
| 8000 2004 | Communication réussie avec le serveur du suivi distant, mais une erreur s'est produite |
| 8000 2047 La réponse du serveur de suivi distant a dépassé le délai imparti |
| 8000 2003 Le test | de communication a été exécuté alors que la connexion au réseau n'était pas encore prête immédiatement après la mise/sous hors tension du périphérique | Après avoir mis le périphérique sous tension, attendez environ 60 secondes avant d'exécuter le test de communication. |
Annexe
Consignes de sécurité importantes
Ce chapitre décrit des consignes de sécurité importantes pour la prévention des blessures des utilisateurs de cet appareil et autres ainsi que des dommages aux biens. Lisez ce chapitre avant d'utiliser l'appareil et suivez les instructions pour l'utiliser correctement. N'effectuez aucune opération non décrite dans ce manuel. Canon ne peut être tenu responsable des dommages résultant d'opérations non décrites dans ce manuel, d'une utilisation incorrecte ou de réparations ou modifications n'ayant pas été effectuées par Canon ou une tierce partie agréée par Canon. Une opération ou une utilisation incorrecte de cet appareil pourrait provoquer des blessures et/ou des dommages nécessitant d'importantes réparations qui pourraient ne pas être couvertes par votre garantie limitée.

AVERTISSEMENT
Indique un avertissement relatif à des opérations qui pourraient provoquer la mort ou des blessures si elles ne sont pas effectuées correctement. Pour utiliser l'appareil en toute sécurité, prétez toujours attention à ces avertissements.

ATTENTION
Indique une précaution relative à des opérations qui pourraient provoquer des blessures si elles ne sont pas effectuées correctement. Pour utiliser l'appareil en toute sécurité, prêtez toujours attention à ces précautions.

IMPORTANT
Indique des exigences et restrictions d'utilisation. Veillez à les lire soigneusement pour utiliser correctement l'appareil et éviter d'endommager l'appareil ou des biens.
Installation
Pour utiliser l'appareil en toute sécurité et sans difficulté, lisez soigneusement les précautions suivantes et installez-le dans un endroit approprié.
AVERTISSEMENT
Ne l'installez pas dans un endroit où un incendie ou un choc électrique pourrait survenir
- Un endroit où les fentes de ventilation sont bloquées (trop proche de murs, lits, canapés, tapis ou objets semblables)
- Un endroit humide ou poussiéreux
- Un endroit exposé à la lumière directe du soleil ou à l'extérieur
- Un endroit soumis à des températures élevées
- Un endroit exposé à des flammes découvertes
- A proximité d'alcool, de diluants pour peinture ou d'autres substances inflammables
Autres avertissements
- Ne branchez pas de câbles non homologués sur cet appareil. Cela pourrait provoquer un incendie ou un choc électrique.
- Ne posez pas de colliers ou autres objets métalliques, ou de récipients remplis de liquide sur l'appareil. Si des corps étrangers entrent en contact avec les parties électriques situées à l'intérieur de l'appareil, cela pourrait provoquer un incendie ou un choc électrique.
- Lors de l'installation et du retrait des accessoires facultatifs, assurez-vous que vous avez coupé le courant et débranché la fiche d'alimentation avant de débrancher tous les câbles d'interface et le câble d'alimentation de l'appareil. Sinon, les câbles d'alimentation ou d'interface pourraient être endommagés et provoquer un incendie ou un choc électrique.
- Si une substance étrangère tombe à l'intérieur de l'appareil, débranchez la fiche d'alimentation de la prise secteur et contactez un distributeur ou un centre de service.
Ne procédez pas à l'installation dans les endroits suivants
L'appareil pourrait tomber et provoquer des blessures.
- Un endroit instable
- Un endroit soumis à des vibrations
ATTENTION
Ne procédez pas à l'installation dans les endroits suivants
Cela pourrait endommager l'appareil.
- Un endroit soumis à des températures et une humidité extrêmes, basses ou élevées
- Un endroit soumis à d'importantes variations de température ou d'humidité
- Un endroit à proximité d'un équipement générant des ondes magnétiques ou électromagnétiques
- Un laboratoire ou un endroit où des réactions chimiques se produisent
- Un endroit exposé à des gaz corrosifs ou toxiques
- Un endroit qui pourrait se déformer sous le poids de l'appareil ou un endroit où l'appareil est susceptible de s'enfoncer (un tapis, etc.)
Supports (uniquement pour les produits disposant de supports)
Ne retirez pas les supports une fois l'appareil installé. Cela peut le faire tomber ou basculer, et provoquer des blessures.
Lors de l'utilisation d'un réseau sans fil (uniquement pour les produits disposant d'une fonction réseau local sans fil)
- Installez l'appareil à une distance de 50 m au maximum du routeur de réseau sans fil.
- Dans la mesure du possible, procédez à l'installation dans un endroit où la communication n'est pas bloquée par des objets perturbateurs. Le signal pourrait être dégradé lorsqu'il traverse des murs ou des sols.
- Tenez l'appareil aussi éloigné que possible des téléphones numériques sans fil, des fours à micro-ondes et des autres équipements émettant des ondes radio.
ATTENTION
Lors de l'utilisateur d'un socle double cassette avec l'imprimante de la série WG7000, suivez les instructions dans le manuel pour fixer correctement l'imprimante au socle double cassette. Utilisez toujours les combinaisons de l'imprimante et du socle double cassette. Série Canon WG7000 : utilisez le Cassette Feeding Unit CF10 de Canon.
L'utilisation d'une combinaison différente d'imprimante et de socle double cassette que celle indiquée ci-dessus, l'utilisation d'un socle double cassette non mentionné ci-dessus ou la fixation incorrecte de l'imprimante au socle double cassette peut être instable et peut provoquer des blessures.
Alimentation
AVERTISSEMENT
- Utilisez uniquement une alimentation conforme aux exigences de tension spécifiées. Sinon, cela pourrait provoquer un incendie ou un choc électrique.
- N'utilisez pas un autre câble d'alimentation que celui fourni, car cela peut provoquer un incendie ou un choc électrique.
- Le câble d'alimentation fourni est destiné à être utilisé avec cet appareil. Ne le branchez pas sur d'autres appareils.
- Vous ne devez pas modifier, tirer, courber excessivement ou effectuer toute autre action susceptible d'endommager le câble d'alimentation. Ne posez pas d'objets lourds sur le câble d'alimentation. Le fait d'endommager le câble d'alimentation pourrait provoquer un incendie ou un choc électrique.
- Ne branchez et ne débranchez pas la fiche d'alimentation avec les mains humides, car cela pourrait provoquer un choc électrique.
- N'utilisez pas de rallonge ou de multiprises avec l'appareil. Cela pourrait provoquer un incendie ou un choc électrique.
- N'enroulez pas le câble d'alimentation et n'y faites pas de nœud, car cela peut provoquer un incendie ou un choc électrique.
- Insérez à fond la fiche d'alimentation dans la prise secteur. Sinon, cela pourrait provoquer un incendie ou un choc électrique.
- Retirez complètement la fiche d'alimentation de la prise secteur lors d'un orage. Sinon, cela pourrait provoquer un incendie, un choc électrique ou endommager l'appareil.
- Assurez-vous que l'alimentation de l'appareil est sûre et que sa tension est stable.
- Tenez le cordon d'alimentation à l'écart de toute source de chaleur. Sinon, le revêtement du câble d'alimentation peut fondre et provoquer un incendie ou un choc électrique.
- Si la partie permettant de brancher le câble d'alimentation est soumise à une pression excessive, cela peut endommager le câble d'alimentation ou les fils situés à l'intérieur de l'appareil peuvent se débrancher. Cela peut provoquer un incendie. Evitez les situations suivantes :
- Brancher et débrancher fréquemment le câble d'alimentation.
- Trébucher sur le câble d'alimentation.
- Le câble d'alimentation est courbé à proximité de la partie permettant de la brancher et une pression continue est appliquée sur la prise de courant ou la partie permettant le branchement.
- Application d'une force excessive sur la fiche d'alimentation.
ATTENTION
- Installez cet appareil à proximité de la prise d'alimentation et laissez suffisamment d'espace autour de la fiche d'alimentation afin de pouvoir la débrancher facilement cas d'urgence.

IMPORTANT
Raccordement de l'alimentation
- Ne branchez pas le câble d'alimentation à un système d'alimentation sans coupure. Cela pourrait provoquer un dysfonctionnement ou endommager l'appareil en cas de panne de courant.
- Si vous branchez cet appareil sur une prise secteur à plusieurs entrées, n'utilisez pas les prises restantes pour raccordez d'autres appareils.
- Ne branchez pas le câble d'alimentation sur la prise de courant CA auxiliaire d'un ordinateur.
Autres précautions
Des perturbations électriques pourraient provoquer un dysfonctionnement ou une perte de données au niveau de cet appareil.
Manipulation
AVERTISSEMENT
- Débranchez immédiatement la fiche d'alimentation de la prise secteur et contactez un distributeur ou un centre de service si l'appareil émet des bruits ou une odeur inhabituels, ou s'il génère de la fumée ou une chaleur excessive. Continuer à l'utiliser dans ces conditions pourrait provoquer un incendie ou un choc électrique.
- Ne démontez et ne modifiez pas cet appareil. Il existe des composants sous haute tension et température élevée à l'intérieur de l'appareil. Leur démontage ou modification pourrait provoquer un incendie ou un choc électrique.
- Placer l'appareil à un endroit où les enfants ne pourront pas entrer en contact avec le câble d'alimentation, avec d'autres câbles ou avec des équipements et des pièces électriques à l'intérieur de l'appareil. Sinon, cela pourrait être à l'origine d'accidents imprévus.
- N'utilisez pas d'aérosols inflammables à proximité de cet appareil. Si des substances inflammables entrent en contact avec les pièces électriques situées à l'intérieur, cela pourrait provoquer un incendie ou un choc électrique.
- Lorsque vous déplacez l'appareil, veillez à couper son alimentation, puis à débrancher la fiche d'alimentation et les câbles d'interface. Sinon, vous pourriez les endommager et provoquer un incendie ou un choc électrique.
- Lors du branchement ou du débranchement d'un câble USB alors que la fiche d'alimentation est branchée sur une prise secteur, ne touchez pas la partie métallique du connecteur car vous pourriez subir un choc électrique.
Si vous utilisez un stimulateur cardiaque
Cet appareil génère un flux magnétique de faible niveau. Si vous utilisez un stimulateur cardiaque et ressentez des anomalies, éloignez-vous de cet appareil et consultez immédiatement votre médecin.
ATTENTION
- Ne posez pas d'objets lourds sur cet appareil, car ils pourraient tomber et provoquer des blessures.
- Pour votre sécurité, débranchez le câble d'alimentation si l'appareil ne doit pas être utilisé pendant une période prolongée.
- Soyez prudent lorsque vous ouvrez et fermez les capots afin d'éviter de vous blesser les mains.
-
Tenez les mains et les vêtements à l'écart des rouleaux de la zone de sortie. Si les rouleaux happent vos vêtements ou vos mains, cela pourrait provoquer des blessures corporelles.
-
Veillez à ne pas laisser tomber d'objets lourds, tels qu'un dictionnaire, sur la vitre. Cela pourrait l'endommager et provoquer des blessures.
- Ne transportez pas l'appareil lorsque le socle double cassette facultatif est en place. Celui-ci peut tomber et causer des blessures.

natural_image
Line drawing of three people assembling or inspecting a large electronic device (no text or symbols visible)
Chargeur
- N'appuyez pas fortement sur le chargeur lorsque vous utilisez la vitre pour effectuer des copies de livres épais. Cela peut endommager la vitre et provoquer des blessures.
- Fermez doucement le chargeur afin d'éviter de vous coincer les mains, car cela peut provoquer des blessures.
- Fermez doucement le chargeur pour éviter que vos mains ne se retrouvent bloquées à l'arrière de celui-ci. Cela peut provoquer des blessures.
Cassette
- N'introduisez pas vos mains dans l'appareil lorsque la cassette est ouverte. Cela peut provoquer des blessures.
Touche Economie d'énergie (uniquement pour les produits disposant d'une touche Economie d'énergie)
- Par mesure de sécurité, appuyez sur Ⓐ (Economie d'énergie) lorsque l'appareil ne sera pas utilisé pendant une longue période (par exemple, la nuit). Placez également l'interrupteur d'alimentation principal sur la position ARRÊT et débranchez le câble d'alimentation par mesure de sécurité lorsque l'appareil ne sera pas utilisé pendant une période prolongée (par exemple, plusieurs jours de vacances consécutifs).
Autres précautions
- Suivez les instructions indiquées sur l'étiquette de précaution apposée sur cet appareil.
- Ne soumettez pas l'appareil à des chocs ou des vibrations violents.
- Ne forcez pas pour ouvrir ou fermer les portes, les couvercles et d'autres parties. Cela peut endommager l'appareil.
- Ne coupez pas l'interrupteur d'alimentation principal et n'ouvrez pas les capots lorsque l'appareil est en cours de fonctionnement. Cela pourrait provoquer des bourrages de papier ou des problèmes de la tête d'impression.
- Utilisez un câble modulaire d'une longueur inférieure à 3 mètres.
- Utilisez un câble USB d'une longueur inférieure à 3 mètres.
Si le bruit du fonctionnement vous inquiète
Selon l'environnement d'utilisation et le mode de fonctionnement, si un bruit lors du fonctionnement est inquiétant, il est recommandé d'installer l'appareil dans un autre endroit que le bureau.
Maintenance et inspections
Nettoyez régulièrement l'appareil. Si de la poussière s'accumule, l'appareil peut ne pas fonctionner correctement. Lors du nettoyage, veillez à respecter les points suivants. En cas de problème pendant le fonctionnement, consultez la section Questions fréquemment posées du manuel en ligne. Si vous ne parvenez pas à résoudre le problème ou si vous estimez qu'une inspection de l'appareil est nécessaire, contactez un distributeur ou un centre de service.
AVERTISSEMENT
- Avant le nettoyage, coupez l'alimentation et débranchez la fiche d'alimentation de la prise secteur. Sinon, cela pourrait provoquer un incendie ou un choc électrique.
- Débranchez périodiquement la fiche d'alimentation et nettoyez-la à l'aide d'un chiffon sec afin d'éliminer la poussière et la saleté. La poussière accumulée peut absorber l'humidité de l'air et provoquer un incendie si elle entre en contact avec l'électricité.
- Utilisez un chiffon humide bien essoré pour nettoyer l'appareil. Trempez les chiffons de nettoyage uniquement dans de l'eau. N'utilisez pas d'alcool, de benzène, de diluant pour peinture ni aucune autre substance inflammable. N'utilisez pas de mouchoirs ou de serviettes en papier. Si ces substances entrent en contact avec les parties électriques à l'intérieur de l'appareil, elles peuvent générer de l'électricité statique ou provoquer un incendie ou un choc électrique.
- Vérifiez régulièrement le câble et la fiche d'alimentation pour rechercher la présence de rouille, de broches tordues, de déchirures ou de cassures, ou une génération de chaleur excessive. L'utilisation d'une fiche ou d'un câble d'alimentation mal entretenu peut provoquer un incendie ou un choc électrique.
ATTENTION
- L'appareil se compose de composants sous haute tension et ayant une température élevée. Le fait d'entrer en contact avec ces composants peut provoquer des brûlures. Ne touchez aucune pièce de l'appareil qui n'est pas indiquée dans le manuel.
- Lors du chargement du papier ou de l'élimination d'un bourrage de papier, veillez à ne pas vous couper avec les bords du papier.
Limitations légales quant à l'utilisation de votre produit et à l'utilisation des images
L'utilisation de votre produit pour lire, imprimer ou reproduire certains documents, ainsi que l'utilisation de ces images lues, imprimées ou autrement reproduites par votre produit, peuvent être interdites par la loi et peut entraîner une responsabilité criminelle et/ou civile. Cette liste est uniquement fournie à titre de guide. Si vous n'êtes pas certain de la légalité de l'utilisation de votre produit pour lire, imprimer ou reproduire un document particulier, et/ou de l'utilisation des images lues, imprimées ou reproduites, vous pouvez consulter à l'avance votre conseiller législatif pour information.
• Papier-monnaie
• Chèques de voyage
• Mandats postaux
• Bons alimentaires
• Certificats de dépôt
- Passeports
• Timbres postaux (annulés ou non)
- Documents d'immigration
• Badges ou insignes d'identification
• Timbres fiscaux internes (annulés ou non)
- Documents de traite ou de l'organisme américain Selective Service
- Obligations ou autres titres de créance
- Chèques ou traites émis par les organismes gouvernementaux
• Certificats d'actions
- Permis de véhicule motorisé et certificats de titres
- Œuvres sous droits d'auteur/œuvre d'art sans autorisation du propriétaire des droits d'auteur
Réparation, prêt ou mise au rebut de l'appareil
Si vous avez saisi des données personnelles, des mots de passe et/ou d'autres informations sensibles dans l'appareil, de telles informations peuvent être stockées dans l'appareil. Lors de l'envoi de l'appareil en réparation, de son prêt ou de sa cession à une autre personne, réinitialisez l'appareil aux réglages par défaut pour supprimer ces informations et éviter à tout tiers d'y accéder. Reportez-vous au Manuel en ligne pour obtenir des informations détaillées à ce sujet.
Têtes d'impression / Cartouches d'encre / Cartouches d'entretien
AVERTISSEMENT
Ne jetez pas les têtes d'impression, les cartouches d'encre et les cartouches d'entretien au feu. Cela peut entraîner une ignition pouvant engendrer des brûlures ou un incendie.
ATTENTION
- Conservez les cartouches d'encre hors de portée des enfants. Si l'encre est accidentellement léchée ou ingérée, rincez la bouche de l'enfant à l'eau claire ou faites-lui boire un ou deux verres d'eau. Si une irritation ou une gène apparaît, rendez-vous immédiatement chez votre médecin.
- N'essayez pas de désassembler ou de modifier la tête d'impression, les cartouches d'encre et les cartouches d'entretien.
- Si l'encre entre en contact avec les yeux, rincez immédiatement à l'eau. Si l'encre entre en contact avec la peau, lavez-vous immédiatement au savon et à l'eau. Si l'irritation des yeux ou de la peau persiste, rendez-vous immédiatement chez votre médecin.
- Après l'impression, ne touchez jamais les contacts électriques d'une tête d'impression. Les parties métalliques peuvent être très chaudes et entraîner des brûlures.
- Evitez de lâcher ou de secouer la tête d'impression, les cartouches d'encre et les cartouches d'entretien.
Encre
Lors de votre première utilisation de l'imprimante Canon après l'installation des cartouches d'encre fournies, l'imprimante remplit les buses de la tête d'impression avec une petite quantité d'encre pour permettre l'impression. C'est pour cette raison que le nombre d'impressions possibles avec les premières cartouches d'encre est inférieur à celui réalisable avec les cartouches d'encre suivantes. Pour éviter l'obstruction des buses à encre et garantir de bons résultats d'impression, l'appareil effectue le nettoyage automatiquement. Pour ce faire, l'appareil tire parfois de l'encre des buses et utilise ainsi une quantité minime d'encre.
- Même avec l'impression en noir et blanc, les encres d'une couleur autre que le noir peuvent être utilisées selon le type de papier utilisé pour l'impression ou selon les réglages du pilote de l'imprimante.
Autres précautions
- Ne retirez pas la tête d'impression inutilement.
- Ne pas imprimer pendant une période prolongée peut provoquer le dessèchement de la tête d'impression et une obstruction. Il est recommandé que l'appareil soit utilisé au moins une fois par mois pour imprimer.
Avis
Attention à chaque symbole et déclaration standard de sécurité
Chaque symbole et déclaration standard de sécurité est valable uniquement pour la tension et la fréquence de chaque pays ou région où ils s'appliquent.
Symboles relatifs à la sécurité
Prise de protection de mise à la terre
ATTENTION : surface chaude. Ne pas toucher.
Pièces mobiles : tenir les parties du corps à distance des pièces mobiles. Tenir les parties du corps à distance de la trajectoire du mouvement.
* Ce symbole peut ne pas apparaître sur votre modèle.
Nom du produit
Les réglementations de sécurité imposent l'enregistrement du nom du produit. Dans certaines régions où ce produit est vendu, il est possible que le ou les noms de produits suivants entre parenthèses () soient déposées plutôt qu'enregistrés.
RMC (Code de modèle réglementaire)
WG7550Z (K10479)
WG7550F (K10478)
WG7550 (K10477)
WG7540 (K10476)
Précautions d'utilisation de ce produit dans les pays ou régions autres que ceux où il a été acheté
Ce produit est destiné à être utilisé dans les pays ou régions où il a été acheté et il ne peut pas être utilisé dans d'autre pays ou régions en raison de leurs législations ou réglementations locales. Notez que Canon décline toute responsabilité en cas de pénalités résultant de l'utilisation de ce produit dans de tels pays ou régions.
A propos des ondes radio
N'utilisez pas de produit près d'un équipement médical. Les ondes radio qu'il émet peuvent perturber le fonctionnement ou les performances de cet équipement médical.
Pour les modèles contenant une batterie au lithium
- Mettez les batteries usagées au rebut
conformément aux réglementations locales.
- Le remplacement de la batterie par un type de batterie incorrect peut entraîner un risque d'explosion.
Renonciation
• A L'EXCEPTION DE LA GARANTIE CHINCLUSE, CANON INC. NE FOURNIT AUCUNE AUTRE GARANTIE QUELCONQUE CONCERNANT CE MATERIEL, EXPLICITE OU IMPLICITE, Y COMPRIS MAIS NON LIMITEE A TOUTE GARANTIE DE COMMERCIALISATION, DE VALEUR COMMERCIALE, D'ADEQUATION A UN USAGE PARTICULIER OU DE CONTREFAÇON. CANON INC. NE POURRA PAS ETRE TENU POUR RESPONSABLE DES DOMMAGES DIRECTS, SECONDAIRES OU INDIRECTS DE QUELQUE NATURE QUE CE SOIT, NI MEME DES PERTES OU DES FRAIS RESULTANT DE L'EMPLOI DE CE MATERIEL.
A propos du présent manuel
Illustrations et écrans utilisés dans le présent manuel
Sauf mention contraire, les illustrations et écrans utilisés dans le présent manuel correspondent au modèle WG7550F.

natural_image
Line drawing of a multi-compartment electronic device with multiple compartments and fuses (no text or symbols)
Socle double cassette (facultatif) fixé
Marques commerciales
- Windows est une marque commerciale ou déposée de Microsoft Corporation aux Etats-Unis et/ou dans d'autres pays.
- Internet Explorer est une marque commerciale ou déposée de Microsoft Corporation aux Etats-Unis et/ou dans d'autres pays.
- Apple, Bonjour, iPad, iPhone, iPod touch, Safari, Mac, macOS et OS X sont des marques commerciales d'Apple Inc., enregistrées aux Etats-Unis et dans d'autres pays.
- iOS est une marque commerciale ou déposée de Cisco aux Etats-Unis et dans d'autres pays. Elle est également utilisée sous licence.
- Google Chrome et Android sont des marques commerciales ou déposées de Google Inc.
Logiciels tiers
Le présent produit Canon ("PRODUIT") comprend des modules logiciels tiers.
L'utilisation et la distribution de ces modules logiciels, notamment les mises à jour de ces modules logiciels (collectivement appelés
"LOGICIELS") sont soumises aux conditions de licence indiquées ci-dessous.
(1) Vous acceptez de vous conformer à toutes les lois, restrictions ou réglementations relatives au contrôle des exportations des pays impliqués, dans le cas où le PRODUIT comprenant les LOGICIELS est expédié, transféré ou exporté dans un pays.
(2) Les détenteurs des droits des LOGICIELS conservent à tous égards, le titre, la propriété et les droits de propriété intellectuelle sur et vis-à-vis des LOGICIELS. Sauf mention contraire expressément spécifiée ici, aucune licence ni aucun droit, explicite ou implicite, ne vous est par la présente transmis ou octroyé par les détenteurs des droits des LOGICIELS, pour n'importe quelle propriété intellectuelle des détenteurs des droits des LOGICIELS.
(3) Vous pouvez utiliser les LOGICIELS uniquement afin d'utiliser le PRODUIT.
(4) Vous ne pouvez pas affecter, octroyer de sous-licence, commercialiser, distribuer ou transférer les LOGICIELS à une tierce partie sans l'accord écrit préalable des détenteurs des droits des LOGICIELS.
(5) Néanmoins, vous pouvez transférer les LOGICIELS uniquement si (a) vous attribuez à un cessionnaire tous vos droits vis-à-vis du PRODUIT et tous les droits et obligations prévus dans les conditions régissant les LOGICIELS et le PRODUIT et si (b) le cessionnaire accepte par écrit de se conformer à ces conditions.
(6) Vous n'êtes pas autorisé à décrypter, décompiler, faire de l'ingénierie inverse sur, désassembler ou réduire le code des LOGICIELS sous une forme lisible par une personne.
(7) Vous n'êtes pas autorisé à modifier, adapter, traduire, louer, louer à bail ou prêter les LOGICIELS ni à créer des travaux dérivés basés sur les LOGICIELS.
(8) Vous n'êtes pas autorisé à supprimer des LOGICIELS du PRODUIT, ni à en faire des copies.
(9) La licence de la partie lisible par un être humain (le code source) des LOGICIELS ne vous est pas octroyée.
Nonobstant les clauses (1) à (9) ci-dessus, le PRODUIT comprend les modules logiciels tiers qui accompagnent les autres conditions de licence. Ces modules logiciels sont soumis à d'autres conditions de licence. Veuillez vous reporter aux autres conditions de licence des modules logiciels tiers décrites dans l'annexe du manuel du PRODUIT correspondant. Ce manuel est disponible sur le site Web http://ij.start.canon.
En utilisant le PRODUIT, il est considéré que vous acceptez toutes les conditions de licence applicables. Si vous n'acceptez pas les conditions de licence, veuillez contacter votre représentant de service.
ACCEPTATION
S'IL N'Y A PAS EU D'ACCEPTATION EXPRESSE PREALABLE, LES CONDITIONS DU PRESENT LOGICIEL TIERS INDIQUEES DANS LES PRESENTES OU DANS LES DISPOSITIONS DE GARANTIE CONNEXES SONT REPUTEES ACCEPTES LORSQUE VOUS UTILISEZ LE PRODUIT DANS LE CADRE D'AU MOINS UN DE CES USAGES PREVUS.
LES CONDITIONS DU PRESENT LOGICIEL TIERS RÉGISSENT L'UTILISATION DE CELUI LIVRE AVEC LE PRODUIT ET TOUTES LES VERSIONS MISES A JOUR DU LOGICIEL TIERS FOURNIES AU TITRE DES CONTRATS DE MAINTENANCE OU D'AUTRES ACCORDS DE SERVICE RELATIFS AU PRODUIT CONCLUS AVEC CANON USA OU CANON CANADA OU LEURS ORGANISMES DE SERVICE AUTORISES RESPECTIFS.
Canon
Business Inkjet WG7000 Series
Inbetriebnahme
DE
Installation des Geräts S. 2
Grundanleitung S. 16
Wenn ein Problem aufgetreten ist S. 20
Verbindung mit Netzwerk und Fernüberwachungsdienst ➤ S. 26
natural_image
Exterior view of a Canon printer with open lid and internal compartments (no visible text or symbols on main body)
Lesen Sie vor der Verwendung dieses Produkts den Abschnitt "Wichtige Sicherheitsvorschriften". S. 45 Bewahren Sie diese Anleitung zur späteren Verwendung an einem sicheren Ort auf.
Die Informationen in diesem Dokument können ohne vorherige Ankündigung geändert werden.

Das Online-Handbuch mit Informationen zu allen Funktionen dieses Geräts finden Sie unter http://ij.start.canon.
Installation des Geräts

Im Lieferumfang des
Geräts enthaltene Teile
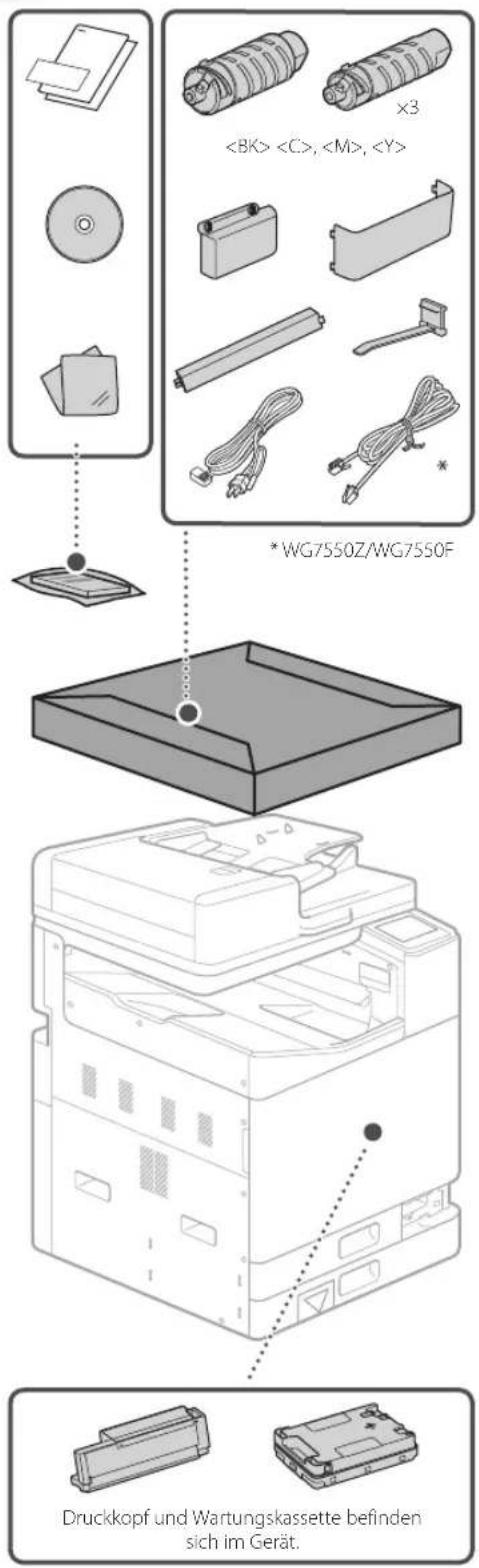
text_image
<8K>, , ,
×3
* WG7550Z/WG7550F
Druckkopf und Wartungskassette befinden sich im Gerät.
Anforderungen für die Installation
Stellen Sie das Gerät auf einer ebenen Fläche mit einem Abstand von mindestens 100 mm um das Gerät herum auf.

text_image
(mm)
590100 535
365
560
100 100
100
349
880
253
Cassette Feeding Unit CF10
VORSICHT!
Die vordere Abdeckung ist verriegelt. Öffnen Sie sie nicht mit Gewalt.
Wenn Sie eine optionale Kassetteneinheit erworben haben
Setzen Sie zunächst die Kassetteneinheit (optional) ein. Die Installationsschritte sind im Handbuch beschrieben, das mit der Kassetteneinheit mitgeliefert wird.
! VORSICHT
- Halten Sie das Gerät niemals an der Unterseite fest, da beim Absetzen des Geräts die Gefahr besteht, dass Ihre Finger eingeklemmt werden.
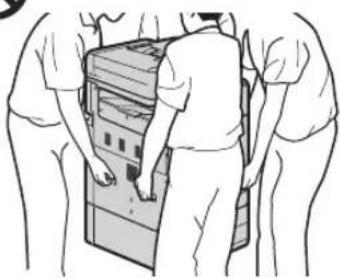
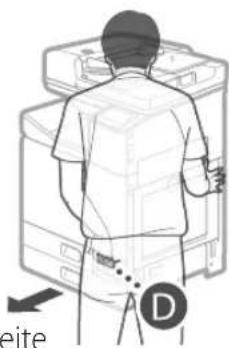
⚠️ Transportieren des Geräts
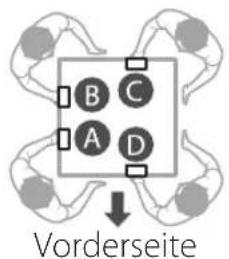
- Vier Personen werden benötigt, um das Gerät zu bewegen. Es befinden sich vier Haltegriffe am Gerät verteilt. Jede Person sollte eine Hand in einen Haltegriff legen und mit der anderen Hand das Gerät beim Anheben stabilisieren. Um Rückenverletzungen zu vermeiden, beugen Sie sich beim Heben nicht vor. Die Positionen der Haltegriffe sind unten dargestellt.
- Halten Sie das Gerät niemals an der Zufuhr (automatische Dokumentenzufuhr), einer Papierkassette usw. fest. Andernfalls kann das Gerät fallen gelassen werden und Verletzungen verursachen.
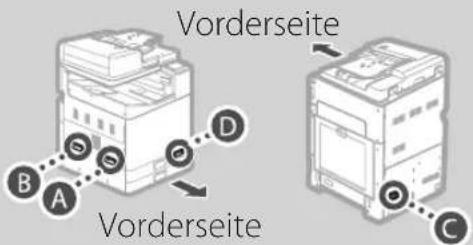
text_image
Vorderseite
B A S D
Vorderseite
C
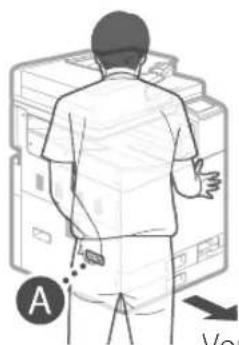
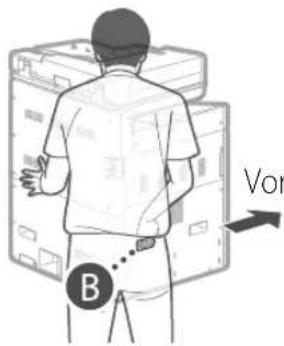
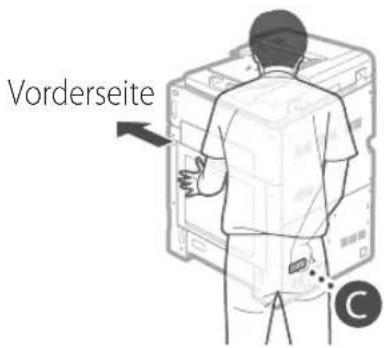
1 Sobald jede Person an einer Ecke des Geräts steht und eine Hand in einem der Handgriffe hat (siehe A bis Dheben Sie das Gerät an, indem Sie sich in die Knie beugen.
text_image
B C
A D
Vorderseite
natural_image
Illustration of a person standing in front of a computer monitor (no text or symbols visible)
Vorderseite
text_image
B
Vor
Vorderseite
text_image
Vorderseite
natural_image
Line drawing of a person standing beside a computer with a 'D' marker, no text or symbols present
Vorderseite
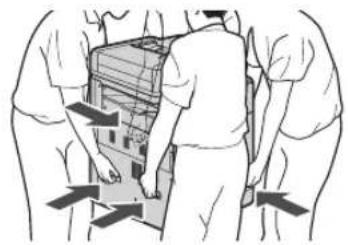
2 Setzen Sie das Gerät ab.
natural_image
Illustration of three people carrying a large mechanical device with directional arrows indicating movement (no text or symbols)
natural_image
Diagram of a printer with a magnified inset showing internal components (no text or symbols)
- Entfernen Sie alle 4 Aufkleber.
Sobald Sie die optionale Kassetteneinheit installiert haben, fahren Sie ab Schritt 4 mit der Installation fort.
natural_image
Diagram of a printer's internal structure with an arrow indicating rotation (no text or symbols)
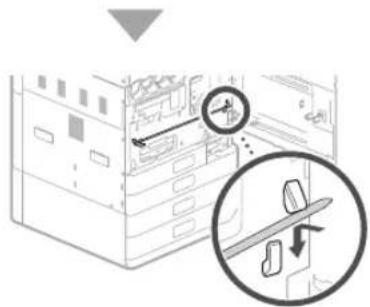
- Entfernen Sie das gesamte Klebeband.

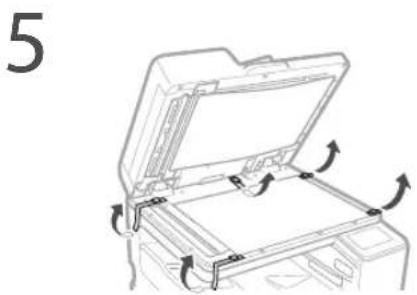
natural_image
Line drawing of an open printer with arrows indicating rotation or movement (no text or symbols)
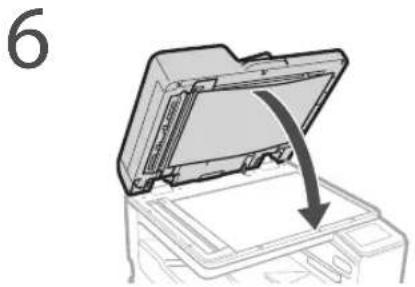
natural_image
Diagram of a printer's open lid with an arrow indicating compression or disassembly (no text or symbols)
- Entfernen Sie das gesamte Klebeband.

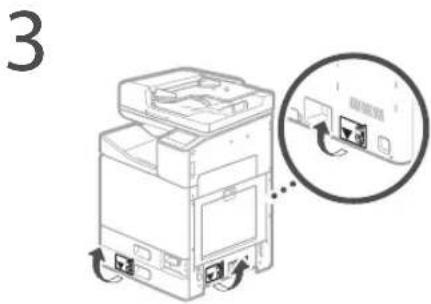
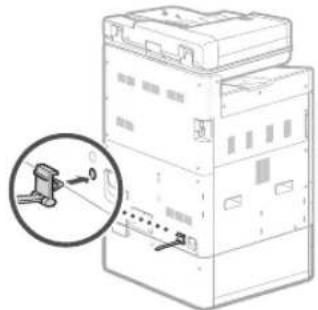
7 Bringen Sie die Klemme und das Stromkabel an und befestigen Sie dann das Stromkabel mit der Klemme.
• Die Form des Stromkabels ist je nach Land oder Region unterschiedlich.
- Je nach Form des mitgelieferten Stromkabels können Sie möglicherweise keine Klemme anbringen. Wenn dies nicht möglich ist, bringen Sie die Klemme nicht an und fahren Sie mit dem nächsten Schritt fort.
natural_image
Diagram of an electrical switchgear with a magnified inset showing the internal components (no text or labels)
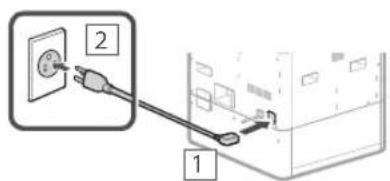
text_image
Diagram showing two connected electrical components with labeled parts 1 and 2, likely illustrating a power or circuit connection.
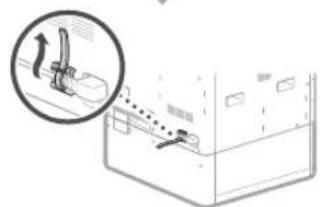
text_image
Diagram showing a hand holding a lever above a container with liquid, annotated with an arrow and dotted line indicating flow or movement.
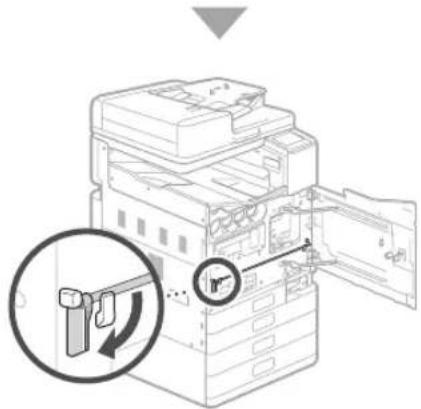
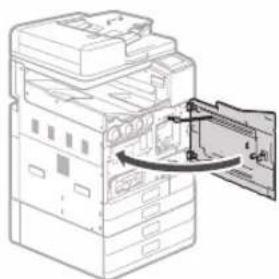
8 Bringen Sie die Schutzabdeckung unten an der rechten Seite des Geräts an.
Kassetteneinheit
(optional) eingebaut

text_image
Diagram showing two printer machines with zoomed-in insets highlighting internal components, likely illustrating a printing or assembly process.
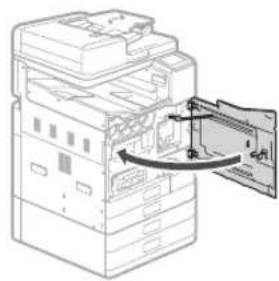
9 Befestigen Sie das Buchablagefach entweder an der linken oder an der Rückseite des Geräts.

text_image
Diagram showing three hand gestures interacting with a server rack, with arrows indicating motion direction.
• Bewahren Sie diese Anleitung hier auf.
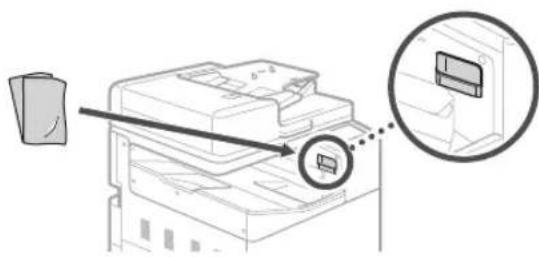
10 Bewahren Sie das Glasreinigungsblatt auf.
natural_image
Diagram of a printer with an arrow pointing to a circular inset showing a device (no text or symbols present)
Bringen Sie nach Einschalten des Geräts die Haltegriffabdeckung an.

Anfangseinstellungen
1 Schalten Sie das Gerät ein.
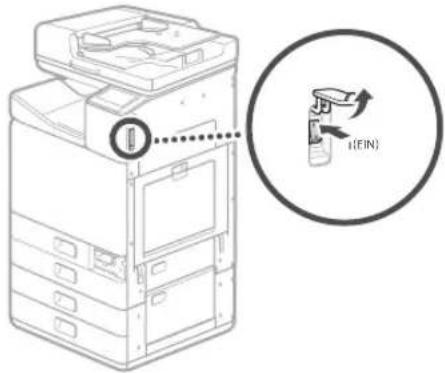
text_image
I(EIN)
HINWEIS
Wenn das Gerät zum ersten Mal eingeschaltet wird, wird eine Installationsanleitung mit einer Reihe von Bildschirmen angezeigt, die Ihnen bei der Installation des Geräts hilft.
Wird die Installationsanleitung nicht angezeigt, ziehen Sie das Online-Handbuch heran.
Näheres finden Sie unter
"Einrichten mithilfe der Installationsanleitung" im Online-Handbuch
2 Legen Sie die Sprache und das Land/die Region fest.

text_image
Language
English
日本語
Français
Español
Deutsch
Italiano
• Folgen Sie den Bildschirmanweisungen.
3 Legen Sie die Zeitzone, das aktuelle Datum und die Uhrzeit fest.
Entfernen des Packmaterials aus dem Inneren des Geräts
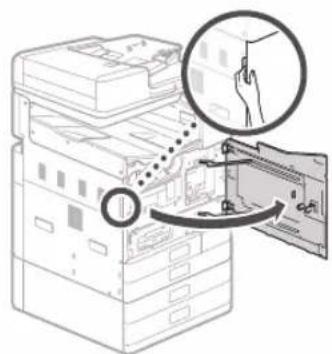
1 Drücken Sie auf dem Bildschirm.
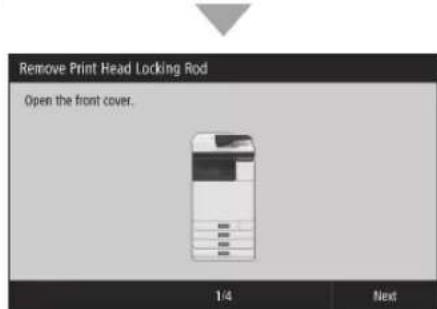
text_image
Remove Print Head Locking Rod
Open the front cover.
1/4 Next
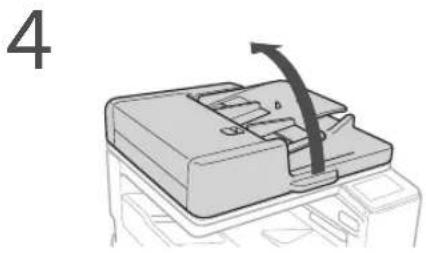
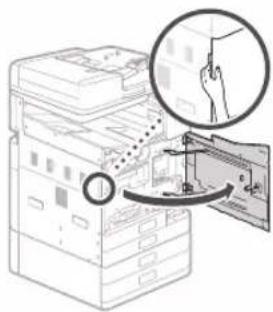
- Öffnen Sie die vordere Abdeckung, bis der Bildschirm angezeigt wird.
2
text_image
Diagram illustrating a hand holding a device next to a server rack, with magnified view showing the process.
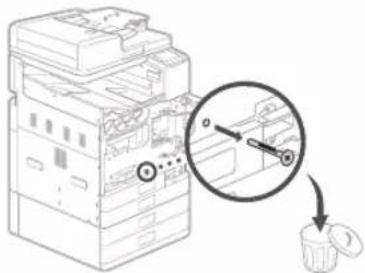
3 Entfernen Sie den Versandsicherungsstift.
text_image
Diagram showing a printer stack with a magnified view of the internal structure and a close-up of the paper's tip.
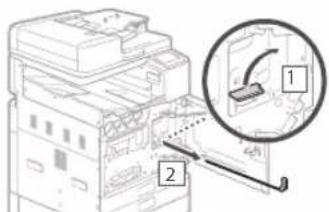
4 Ziehen Sie die Druckkopfverriegelungsstange heraus.
text_image
Technical diagram showing a printer with labeled parts and an inset magnified view of the device's internal structure.
Heben Sie den Hebel (blau) in 1h und ziehen
Sie die Stange vollständig in der unter 2 angegebenen Richtung heraus.
Verbiegen Sie nicht die Stange.
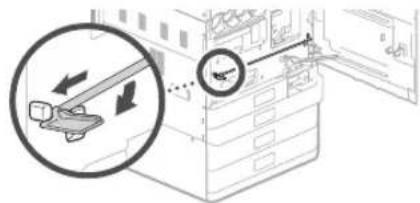
5 Bewahren Sie die Druckkopfverriegelungsstange auf.
text_image
Diagram showing a device with directional arrows and a magnified view of the device's measurement scale.
- Richten Sie das blaue Hebelteil auf sich, drücken Sie dann die Stange nach links und haken Sie sie ein.
text_image
Diagram showing a server rack with a magnified view of the rack and its internal components, including a close-up of the rack.
- Setzen Sie das rechte Ende auf den Haken.
text_image
Diagram of an electronic device with labeled components and a magnified inset showing internal structure and rotation arrow
- Nachdem Sie beide Enden auf den Haken gesetzt haben, drehen Sie den blauen Hebel nach unten, um den Haken zu verriegeln.
Die Druckkopfverriegelungsstange wird für den Transport benötigt. Entsorgen Sie sie daher nicht.
6 Bringen Sie die Haltegriffabdeckung an.

natural_image
Illustration of a server rack with a magnified inset showing a rising trend graph (no text or symbols)
Verwenden Sie zum Befestigen der Schraube eine Münze.

natural_image
Illustration of a printer stack with hand inserting a cable to a rack, showing magnified detail (no text or symbols)
7
natural_image
Line drawing of a server rack with an open door and a hand inserting a cable (no text or symbols)
Setzen Sie als Nächstes die
Tintenbehälter ein.
Einsetzen der Tintenbehälter
1 Drücken Sie auf dem Bildschirm.
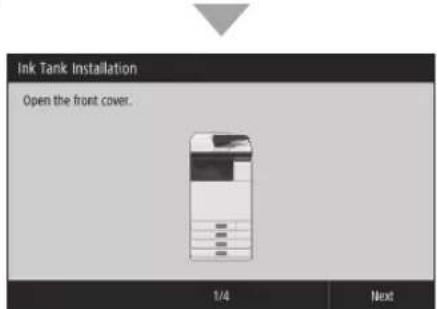
text_image
Ink Tank Installation
Open the front cover.
1/4 Next
- Öffnen Sie die vordere Abdeckung, bis der Bildschirm angezeigt wird.
2
text_image
Diagram illustrating a file transfer or storage operation with labeled components and directional arrows indicating steps.
3
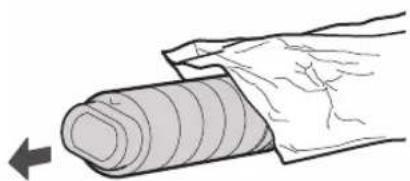
natural_image
Illustration of a hand holding a rolled-up sheet of material, with a black arrow pointing to the left side (no text or symbols)
4
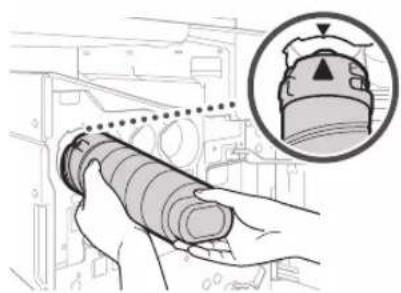
natural_image
Illustration of hands operating a cylindrical mechanical component with a magnified inset showing a top view (no text or symbols)

natural_image
Hand operating a mechanical switch with a magnified inset showing the internal components (no text or symbols visible)
- Drehen Sie den Behälter, bis ein Klicken zu hören ist.
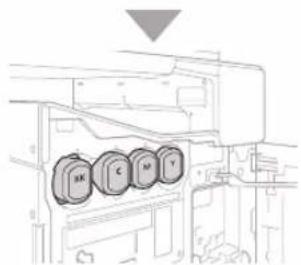
natural_image
Technical line drawing of a mechanical assembly with four circular components (no text or symbols)
- Setzen Sie alle vier Tintenbehälter in die richtigen Einschübe.
5
natural_image
Diagram of a printer's internal structure showing paper feeding into a stack of sheets (no text or labels visible)
HINWEIS
- Der Füllvorgang beginnt und nimmt etwa 40-70 Minuten in Anspruch.
• Die für die Befüllung benötigte Zeit hängt von Ihrer Umgebung ab.
- Schalten Sie das Gerät nicht aus, während Tinte eingefüllt wird.
- Wenn die Befüllung durch Ausschalten des Geräts usw. unterbrochen wird, können zusätzliche Tintenbehälter erforderlich sein.
- Während Tinte eingefüllt wird, können Sie Einstellungen bis "Justieren der Ränder der Kassetteneinheit (optional)" (S. 12) vornehmen.
Als Nächstes konfigurieren Sie das Gerät so, dass es Daten und den PIN für Remote UI sendet.
Konfigurieren Sie das Gerät so, dass es Daten und den PIN für Remote UI sendet
1 Lesen Sie die Meldungen und folgen Sie den Anweisungen auf dem Bildschirm.
Versenden von Daten an Canon
Zur Entwicklung und Vermarktung von Produkten und zur Bereitstellung von Sonderangeboten und -leistungen, die den Anforderungen der Kunden besser entsprechen, bittet Canon darum, auf Ihr Canon-Produkt bezogene Informationen, wie die unten genannten, über das Internet an Canon (oder, wenn Sie Ihr Canon-Produkt in China nutzen, an das rechtlich anerkannte Forschungsunternehmen) zu senden.
Informationen zu Drucker/Scanner/Fax/Informationsgeräten
- Grundlegende Informationen, wie die ID-Nummer des Druckers, Installationsdatum und -uhrzeit, Ländereinstellungen usw.
- Nutzungsverlauf, wie der Typ der installierten Tinte, Tintenverbrauchsinformationen, die Anzahl der Druckseiten, Scanhäufigkeit und Wartungsinformationen usw.
- Papierverbrauchsinformationen, Druckumgebung/-bedingungen, Scanauftragseinstellung und Umfrageergebnisse
- Grundlegende Geräteinformationen, wie der Modellname, BS-Versions-, Sprach- und Anzeigeinformationen usw.
- Gerätetreiber- und Anwendungs-Softwareversionen, Nutzungsverlauf
(einige der Informationen werden je nach Ihrem Modell und/oder der Anwendungs-Software möglicherweise nicht gesendet.)
Wenn Ihr Canon-Produkt gemeinsam verwendet wird, werden die obigen Informationen gesendet, die im gemeinsam verwendeten Produkt erfasst wurden. Wenn Sie zustimmen, senden Sie diese Information an die Benutzer weiter, die das Produkt gemeinsam verwenden, und holen Sie zuvor auch deren Zustimmung ein.
Im Rahmen dieser Erfassung werden keine persönlichen Daten gesendet. Daher sind wir anhand der an uns gesendeten Informationen nicht in der Lage, bestimmte Kunden zu identifizieren.
Aus diesem Grunde können wir keine Anfragen zur Offenlegung von gesendeten Daten beantworten.
Nachdem Sie den Anfragen zugestimmt haben, werden die oben genannten Informationen über das Internet an Canon (oder, wenn Sie Ihr Canon-Produkt in China nutzen, an das rechtlich anerkannte Forschungsunternehmen) gesendet. Die Gebühren für die Internetverbindung gehen zu Ihren Lasten.
Die gesendeten Informationen werden möglicherweise den Konzernunternehmen von Canon bereitgestellt.
2 Stellen Sie den PIN für Remote UI ein.
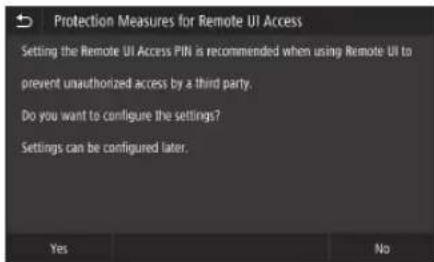
text_image
Protection Measures for Remote UI Access
Setting the Remote UI Access PIN is recommended when using Remote UI to prevent unauthorized access by a third party.
Do you want to configure the settings?
Settings can be configured later.
Yes No
Remote UI
Mit der Remote UI können Sie über ein Netzwerk von einem Webbrowser aus auf das Gerät zuzugreifen, um beispielsweise den Status des Geräts zu überprüfen, Aufträge zu bearbeiten und Einstellungen vorzunehmen. Legen Sie eine PIN für die Remote UI fest, um Ihre Informationen zu schützen.
Verbinden mit einem Computer
Bevor Sie die Konfiguration starten
- Wenn das Gerät mit einem unsicheren Netzwerk verbunden ist, besteht das Risiko, dass Ihre persönlichen Daten offengelegt werden. Treffen Sie Vorkehrungen, um Ihr Netzwerk vor Unbekannten zu schützen.
- Im Lieferumfang des Geräts befindet sich kein Router oder LAN-Kabel. Das müssen Sie selbst bereitstellen.
- Das Gerät kann nicht gleichzeitig mit einem Wired- und einem Wireless-Netzwerk verbunden werden.
Wenn Sie die Installationsanleitung verwenden, erfolgt die Verbindung über DHCP, wobei die IP-Adresse automatisch zugewiesen wird.
Um eine andere IP-Adresse als DHCP zu verwenden, z. B. eine feste IP-Adresse, wählen Sie im Bildschirm "Wireless LAN-Verbindung" und verlassen Sie die Installationsanleitung, ohne eine Verbindung zum Netzwerk herzustellen.
Sobald die Startseite angezeigt wird, gehen Sie zu "Verbinden mit einem Netzwerk mit fester IP-Adresse" 28 und konfigurieren Sie die Einstellungen.
Wählen einer Verbindungsmethode
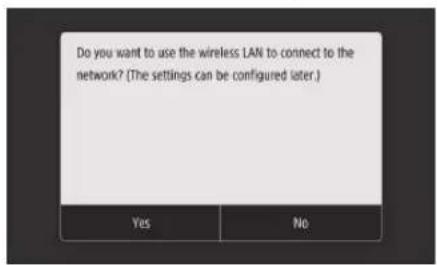
text_image
Do you want to use the wireless LAN to connect to the network? (The settings can be configured later.)
Yes No
- So stellen Sie eine Verbindung über Wireless LAN her: S. 10
- So stellen Sie eine Verbindung über Wired LAN her: S. 11
- So stellen Sie eine Verbindung über USB her: S. 12
Der oben dargestellte Bildschirm wird beim WG7540 nicht angezeigt. Stellen Sie eine Verbindung über Wired LAN oder USB her.

Auch in einer Umgebung ohne Wireless LAN können Sie den Access Point-Modus verwenden, um von Ihrem Mobilgerät aus eine drahtlose Verbindung zum Gerät herzustellen (Direktverbindung). Verlassen Sie die Installationsanleitung, bevor Sie die direkte Verbindung herstellen (WG7550Z/WG7550F/WG7550).
Online-Handbuch
So stellen Sie eine Verbindung über Wireless LAN her
- Bei einer festen IP-Adresse: Wählen Sie und justieren Sie die Ränder. S. 12
- Über DHCP: Fahren Sie mit den folgenden Schritten fort.
1 Drücken Sie auf dem Bildschirm für die Verbindungsmethode.
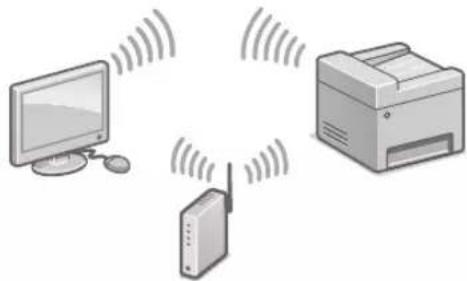
natural_image
Illustration of a printer, network device, and computer with signal waves (no text or symbols)
2 Prüfen Sie, ob Ihr Computer und der Wireless LAN-Router richtig verbunden sind.
3 Überprüfen Sie die Netzwerkeinstellungen im Computer.
4 Notieren Sie den Netzwerknamen (SSID) und das Passwort (Netzwerkschlüssel).
- Prüfen Sie, ob diese Information auf dem Etikett des Routers vorhanden ist. ➞ Online-Handbuch
• Die Installation kann auch über WPS auf kompatiblen Routern erfolgen. ➕ Online-Handbuch
5 Drücken Sie .
- Folgen Sie diesen Anweisungen auf dem unten dargestellten Bildschirm, um den Namen Ihres Netzwerks (SSID) und das Passwort (Netzwerkschlüssel) einzugeben.
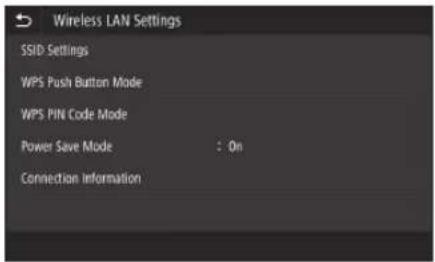
text_image
Wireless LAN Settings
SSID Settings
WPS Push Button Mode
WPS PIN Code Mode
Power Save Mode : On
Connection Information
6 Drücken Sie .
7 Drücken Sie .
8 Wählen Sie den Netzwerknamen (SSID), und drücken Sie dann .
- Geben Sie ein Passwort (Netzwerkschlüssel) ein, und drücken Sie dann
-
Drücken Sie
-
Eine IP-Adresse wird automatisch zugewiesen.
- wird angezeigt.
Justieren Sie als Nächstes den Rand der Kassette Kassetteneinheit (optional).
S.12
So stellen Sie eine Verbindung über Wired LAN her
- Bei einer festen IP-Adresse: Wählen Sie und justieren Sie die Ränder. S. 12
- Über DHCP: Fahren Sie mit den folgenden Schritten fort.
1 Drücken Sie auf dem Bildschirm für die Verbindungsmethode.
natural_image
Illustration of a desktop computer connected to a printer via a cable (no text or symbols)
Im Lieferumfang des Geräts ist kein LAN-Kabel enthalten. Das müssen Sie selbst bereitstellen.
2 Prüfen Sie, ob Ihr Computer und der Router richtig verbunden sind.
3 Überprüfen Sie die Netzwerkeinstellungen im Computer.
4 Schließen Sie das LAN-Kabel an.
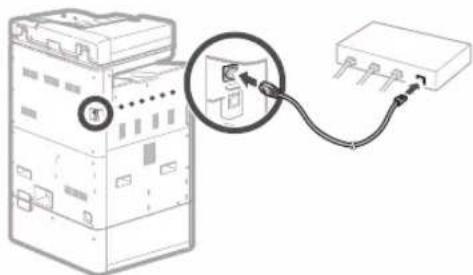
natural_image
Diagram of an electrical switch connected to a terminal block via cable (no text or symbols present)
- Nachdem Sie das Kabel angeschlossen haben, warten Sie einige Minuten (bis die IP-Adresse automatisch eingestellt wurde).
Justieren Sie als Nächstes den Rand der Kassette Kassetteneinheit (optional).
S.12
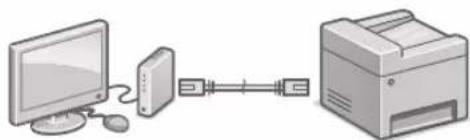
So stellen Sie eine Verbindung über USB her
1 Drücken Sie auf dem Bildschirm für die Verbindungsmethode.

natural_image
Illustration of a desktop computer connected to a printer (no text or symbols present)
- Im Lieferumfang des Geräts befindet sich kein USB-Kabel. Sie müssen dieses selbst bereitstellen.
- Stellen Sie sicher, dass das verwendete USB-Kabel mit der hier dargestellten Kennzeichnung kompatibel ist.
- Schließen Sie das USB-Kabel nicht vor der Installation der Software an. Wenn dies bereits geschehen ist, trennen Sie das USB-Kabel vom Computer, schließen Sie das Dialogfeld, und führen Sie anschließend das Verfahren ab Schritt 1 unter "Installieren der Software" durch "Installieren der Software". S. 14
Justieren Sie als Nächstes den Rand der Kassette Kassetteneinheit (optional).
Justieren der Ränder der Kassetteneinheit (optional)
1 Ziehen Sie Papierkassette 3 heraus, und überprüfen Sie die Werte für Justage Rand.
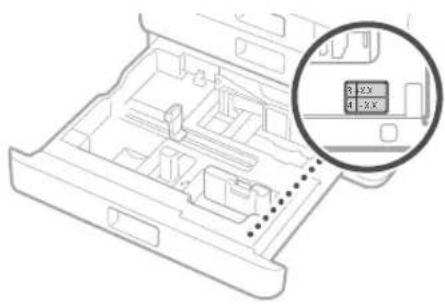
natural_image
Technical line drawing of an internal device casing with a magnified inset showing two labeled slots (3X and 4X) — no text or symbols present.
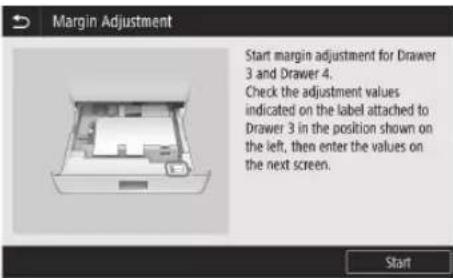
text_image
Margin Adjustment
Start margin adjustment for Drawer 3 and Drawer 4.
Check the adjustment values indicated on the label attached to Drawer 3 in the position shown on the left, then enter the values on the next screen.
Start
2 Geben Sie die Werte für und ein, die Sie in Schritt 1 auf dem Bildschirm überprüft haben.
3 Schieben Sie die Papierkassette wieder in das Gerät.
AVORSICHT
Achten Sie darauf, dass Ihre Finger nicht eingeklemmt werden, wenn Sie die Papierkassette schließen.
Drucken und überprüfen Sie als Nächstes ein Düsen-Prüfmuster.
Drucken und Überprüfen eines Düsen-Prüfmusters
Drucken und überprüfen Sie ein Düsen-Prüfmuster, um den Zustand des Druckkopfes zu kontrollieren. Wenn der Ausdruck Streifen oder Unebenheiten aufweist, führen Sie eine Reinigung durch.
Legen Sie normales Papier (A3, 11x17, LTR oder A4) in die Papierkassette. Es wird empfohlen, mindestens 10 Blätter A3- oder 11x17-Papier einzulegen.
- Bevor Sie fortfahren, muss die Tinte vollständig eingefüllt sein.
- Ein Fortschrittsbalken wird so lange angezeigt, bis die Tinte vollständig gefüllt ist.
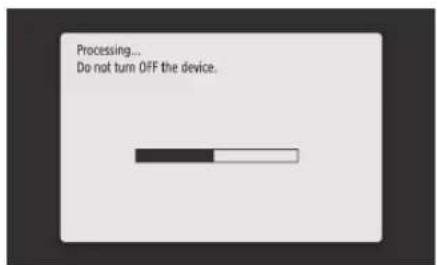
text_image
Processing...
Do not turn OFF the device.
1
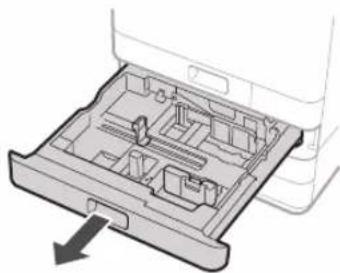
natural_image
Diagram of an open electronic device chassis with internal compartments and a downward arrow indicating motion (no text or symbols)
2
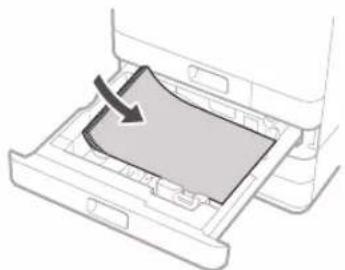
natural_image
Diagram of a printer drawer with a curved cover and arrow indicating compression (no text or symbols)
Legen Sie das Papier so ein, dass die Seitenränder in die Papierführungen passen.
3
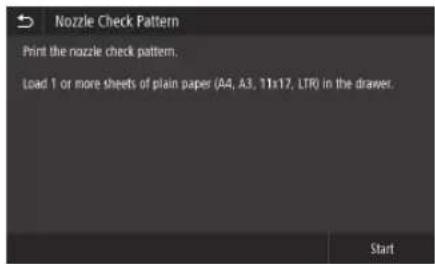
Drücken Sie und drucken Sie ein Muster aus.
text_image
Nozzle Check Pattern
Print the nozzle check pattern.
Load 1 or more sheets of plain paper (A4, A3, 11x17, LTR) in the drawer.
Start
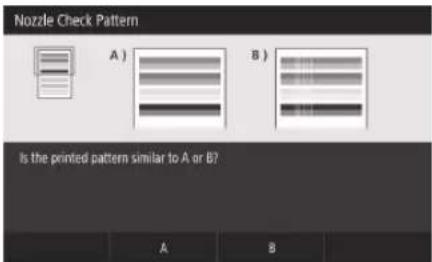
4
text_image
Nozzle Check Pattern
A)
B)
Is the printed pattern similar to A or B?
A B
Wenn der Ausdruck in Ordnung aussieht, drücken Sie , um die Düsenprüfung abzuschließen.
Wenn der Ausdruck Streifen oder Unebenheiten aufweist, drücken Sie , um eine Reinigung durchzuführen.
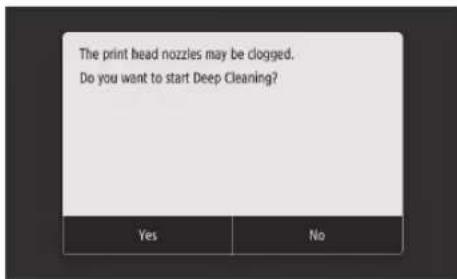
text_image
The print head nozzles may be clogged.
Do you want to start Deep Cleaning?
- Je nach Zustand der Düsen müssen Sie die Überprüfung und Reinigung ggf. mehrmals durchführen.
• Die Einstellungen sind abgeschlossen, sobald die Startseite angezeigt wird.
Weiter mit: Einstellungen der Verbindung zwischen Netzwerk und Fernüberwachungsdienst.
Einstellungen der Verbindung zwischen Netzwerk und Fernüberwachungsdienst
Nachdem Sie die Installationsanleitung verlassen haben, nehmen Sie die Einstellungen zum Herstellen einer Verbindung zwischen einem Netzwerk und einem Fernüberwachungsdienst vor. Die einzustellenden Elemente hängen von der Verbindung und der Servicenutzung ab. Überprüfen Sie die Einstellungen, die für die folgenden Bedingungen gelten.
Bei Verwendung einer festen IP-Adresse
Fahren Sie mit "Verbinden mit einem Netzwerk mit fester IP-Adresse (→ S. 28)" fort.
Bei Verwendung eines Fernüberwachungsdienstes
Definition des Fernüberwachungsdienstes
Es handelt sich um einen Dienst, der den Zustand des Geräts überwacht und mit dem Sie verschiedene Dienste wie den Recovery-Support nutzen können.
Fahren Sie mit "Verbinden mit einem Fernüberwachungsdienst (→ S. 39)" fort.
Andere
In den Fällen müssen Sie keine Einstellungen vornehmen.
Fahren Sie mit "Installieren der Software
(→ S. 14)" fort.
- Beziehen Sie über DHCP automatisch eine IP-Adresse.
- Da nur eine USB-Verbindung verwendet wird, wird keine IP-Adresse festgelegt.
- Ein Fernüberwachungsdienst wird nicht genutzt.
Installieren der Software
• Die hier beschriebenen Verfahren gelten für Windows. Weitere Einzelheiten zum Software-Installationsverfahren finden Sie im Treiber-Handbuch.
- Wenn Sie die Verbindung über USB herstellen möchten, tun Sie dies erst, wenn entsprechende Anweisungen auf dem Installationsbildschirm angezeigt werden. Wenn dies bereits geschehen ist, trennen Sie das USB-Kabel vom Computer, schließen Sie das Dialogfeld, und führen Sie anschließend das folgende Verfahren ab Schritt 1 durch.
- Treiber für macOS sind nicht im Lieferumfang enthalten. Aktuelle Treiber können von der Canon-Website heruntergeladen werden.
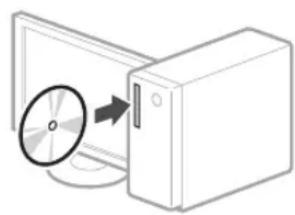
1
natural_image
Diagram showing a CD or DVD disc being inserted into a server tower (no text or symbols present)
2
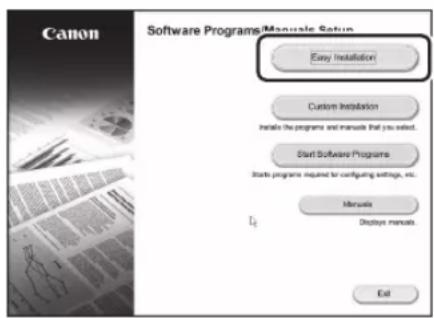
text_image
Canon
Software Programs/Manual Setup
Easy Installation
Custom Installation
Installs the programs and manuals that you select.
Start Software Programs
Starts programs required for configuring settings, etc.
Manuals
Displays manuals.
Exit
Wenn der Bildschirm nicht ordnungsgemäß angezeigt wird, setzen Sie die DVD-ROM erneut ein, oder suchen Sie nach "D:\MInst. exe" auf der Windows-Plattform (in dieser Beschreibung wird davon ausgegangen, dass "D:" die Bezeichnung des DVD-ROM-Laufwerks ist).
Konfigurieren Sie als Nächstes die Faxeinstellungen (WG7550Z/WG7550F)
S.15
Konfigurieren der Faxeinstellungen (WG7550Z/WG7550F)
Wenn sich im Lieferumfang Ihres Geräts kein Telefonkabel befindet, müssen Sie dieses selbst bereitstellen.
Legen Sie die Faxeinstellungen fest (siehe unten).
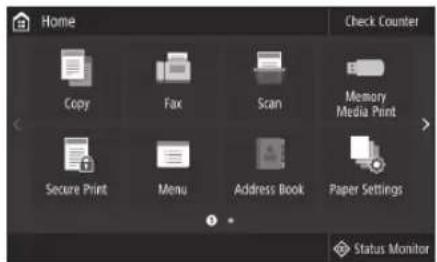
text_image
Home
Check Counter
Copy
Fax
Scan
Memory
Media Print
Secure Print
Menu
Address Book
Paper Settings
Status Monitor
1 Drücken Sie .
2 Drücken Sie .
3 Registrieren Sie die Telefonnummer für das Gerät (Faxnummer) sowie den abgekürzten Benutzernamen (Benutzername).
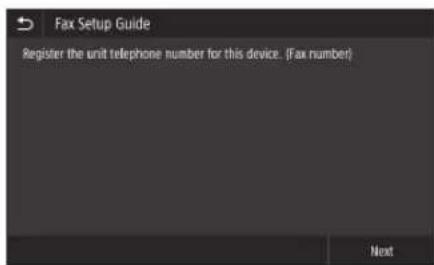
text_image
Fax Setup Guide
Register the unit telephone number for this device. (Fax number)
Next
• Die unten dargestellten Angaben werden als Absenderinformationen auf den oberen Rand des Ausdrucks des Zielgeräts gedruckt.
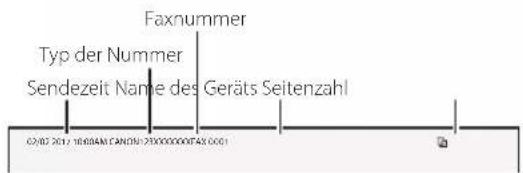
text_image
Faxnummer
Typ der Nummer
Sendzeit Name des Geräts Seitenzahl
02/02/2017 10:00AM CANADA 230000000FAX 0001
4 Stellen Sie den Empfangsmodus ein. Beantworten Sie die Fragen darüber, wie Sie mit der Faxfunktion die besten Einstellungen auswählen.
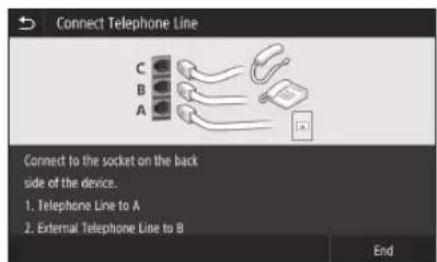
5 Schließen Sie das Gerät an eine Telefonleitung an.
text_image
Connect Telephone Line
C
B
A
Connect to the socket on the back
side of the device.
1. Telephone Line to A
2. External Telephone Line to B
End
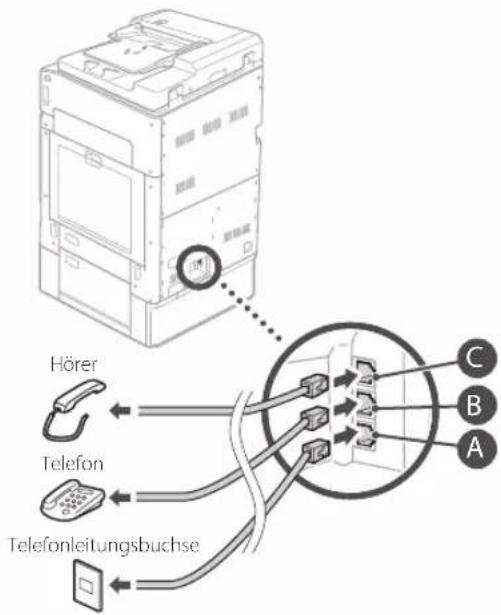
text_image
Hörer
Telefon
Telefonleitungsbuchse
C
B
A
6 Drücken Sie .
7 Drücken Sie .
Installation abgeschlossen.
Ihr Gerät ist nun betriebsbereit.
Einlegen von Originalen
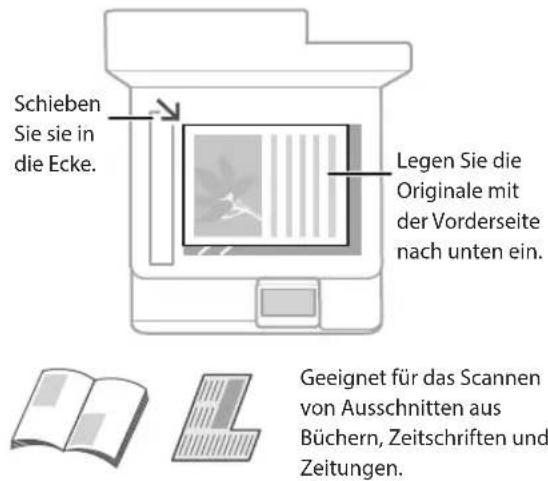
Auf die Glasplatte
text_image
Schieben
Sie sie in
die Ecke.
Legen Sie die
Originale mit
der Vorderseite
nach unten ein.
Geeignet für das Scannen
von Ausschnitten aus
Büchern, Zeitschriften und
Zeitungen.
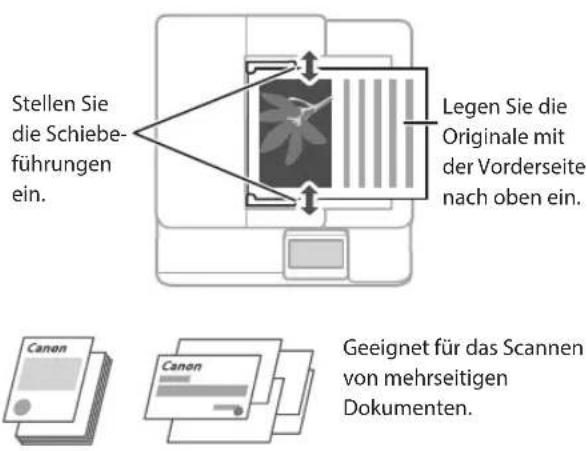
In die Zufuhr
text_image
Stellen Sie die Schiebeführungen ein.
Legen Sie die Originale mit der Vorderseite nach oben ein.
Geeignet für das Scannen von mehrseitigen Dokumenten.
Starten Sie den Vorgang über das Bedienfeld
Gerät
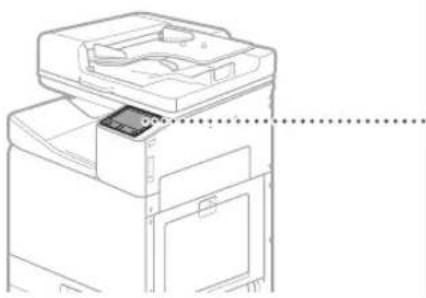
natural_image
Line drawing of a printer with a paper clip and paper holder, no text or symbols present
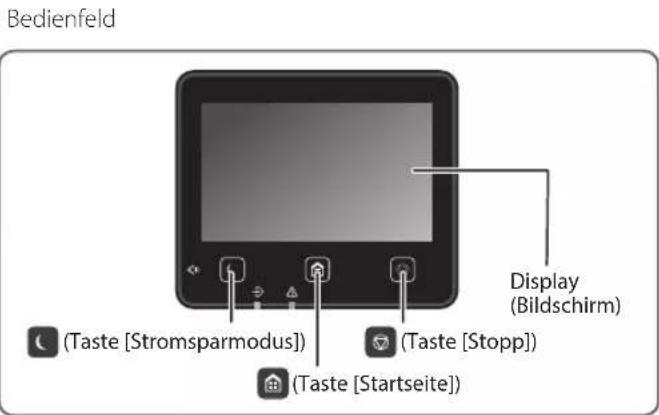
text_image
Bedienfeld
Display
(Bildschirm)
(Taste [Stromsparmodus])
(Taste [Stopp])
(Taste [Startseite])

Drucken
- Öffnen Sie das zu druckende Dokument, und wählen Sie die Druckfunktion der Anwendung aus.
- Wählen Sie den Druckertreiber für das Gerät, und wählen Sie dann [Einstellungen (Preferences)] oder [Eigenschaften (Properties)].
- Legen Sie das Papierformat fest.
- Legen Sie die Papierzufuhr und den Papiertyp fest.
- Passen Sie bei Bedarf die Druckeinstellungen an.
- Wählen Sie [OK].
- Wählen Sie [Drucken (Print)] oder [OK].
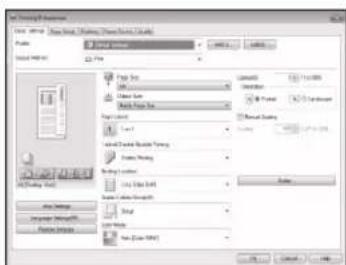
text_image
File Edit View Insert Tools Help (T)
Add
Remove
Export
Export Path
Import Path
Export Path
Export Path
Export Path
Export Path
Export Path
Export Path
Export Path
Export Path
Export Path
Export Path
Export Path
Export Path
Export Path
Export Path
Export Path
Export Path
Export Path
Export Path
Export Path
Export Path
Export Path
Export Path
Export Path
Export Path
Export Path
Export Path
Export Path
Export Path
Export Path
Export Path
Export Path
Export Path
Export Path
ExportPath
ExportPath
ExportPath
ExportPath
ExportPath
ExportPath
ExportPath
ExportPath
ExportPath
ExportPath
ExportPath
ExportPath
ExportPath
ExportPath
ExportPath
ExportPath
ExportPath
ExportPath
ExportPath
ExportPath
ExportPath
ExportPath
ExportPath
ExportPath
ExportPath
ExportPath
ExportPath
ExportPath
ExportPath
ExportPath
ExportPath
ExportPath
ExportPath
ExportPath
Näheres finden Sie unter

"Drucken" im Online-Handbuch

Kopieren
- Legen Sie das Original auf.
- Drücken Sie 📄, und wählen Sie dann .
- Passen Sie bei Bedarf die Kopiereinstellungen an.
- Geben Sie die gewünschte Anzahl an Kopien ein.
- Wählen Sie .
Nützliche
Kopiereinstellungen
auf 1
■weiseitig oder Einseitig
Vergrößern oder Verkleinern
Kopieren von ID-Karten

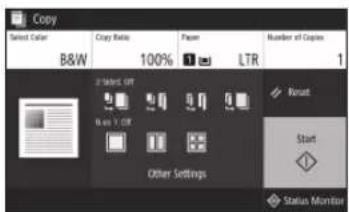
text_image
Copy
Select Color
B&W
100%
Paper
LTR
Number of Copies
2 Select Off
N is 1 Off
Reset
Start
Other Settings
Status Monitor
Näheres finden Sie unter
→"Kopieren" im Online-Handbuch

Scannen
- Legen Sie das Original auf.
- Drücken Sie 📁, und wählen Sie
- Wählen Sie den Scantyp aus, und geben Sie die notwendigen Informationen ein.
- Drücken Sie oder .
Scantypen
Speichern auf dem USB-
Speichergerät
fenden per E-Mail
fenden an Dateiserver
Scannen über einen
Computer
WG Scan Utility

text_image
Scan
Select a scan type.
Computer
USB Memory
E-Mail
F-Box
File
Status Monitor
Näheres finden Sie unter
"Scannen" im Online-Handbuch

Faxen (WG7550Z/WG7550F)
- Legen Sie das Original auf.
- Drücken Sie 📋, und wählen Sie .
- Geben Sie die Zielinformationen ein.
- Passen Sie bei Bedarf die Faxeinstellungen an.
- Wählen Sie .
Nützliche Faxfunktionen
Hundsendung
Speicherempfang
PC-Fax
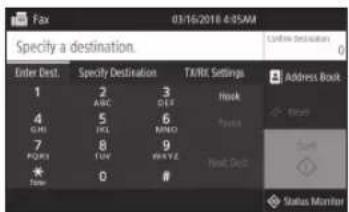
text_image
Fax
03/16/2018 4:5AM
Specify a destination.
Enter Dest. Specify Destination TX/RX Settings
1 2 3 Hook
ABC OER
4 5 6 Focus
GHI HEL MINDI
7 8 9 Next Desk
POMI LIV WAVE
*
Time 0 #
Address Book
Status Monitor
Näheres finden Sie unter
"Fax senden" im Online-Handbuch
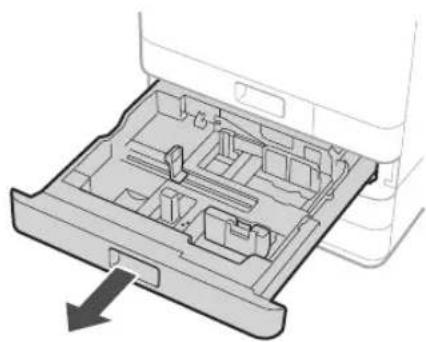
Einlegen von Papier in die Papierkassette
Im Folgenden werden Vorgänge, die für die Papierkassetten 1 und 2 identisch sind, anhand des Beispiels von Kassette 2 beschrieben.
1
natural_image
Diagram of a mechanical device with internal compartments and an arrow indicating direction (no text or symbols)
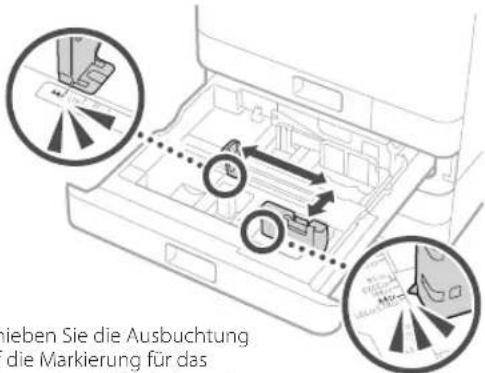
2 Verschieben Sie die hellblauen Knöpfe, um die Position der Papierführungen zu verstellen.
text_image
Nieben Sie die Ausbuchung
die Markierung für das
Schieben Sie die Ausbuchtung auf die Markierung für das entsprechende Papierformat.
3 Fächern Sie den Papierstapel auf, und legen Sie ihn dann ein.
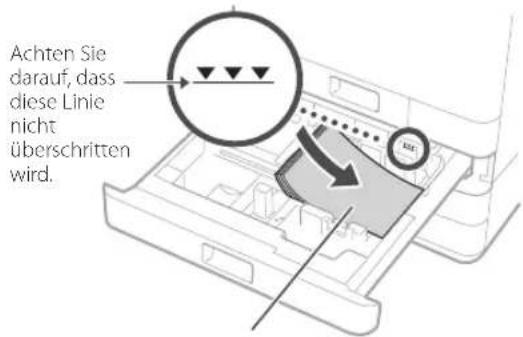
text_image
Achten Sie darauf, dass diese Linie nicht überschritten wird.
Die zu bedruckende Seite nach oben
Legen Sie das Papier so ein, dass die Seitenränder in die Papierführungen passen.
4 Schieben Sie die Papierkassette wieder in das Gerät.
AVORSICHT
Achten Sie darauf, dass Ihre Finger nicht eingeklemmt werden, wenn Sie die Papierkassette schließen.
Falls Sie den Papiertyp geändert haben, ändern Sie die Papiereinstellungen.
1 Drücken Sie und wählen Sie dann .
2 Geben Sie das Format und den Typ des Papiers gemäß der Bildschirmanzeige an.
Einlegen von Papier in die Mehrzweckfach
1
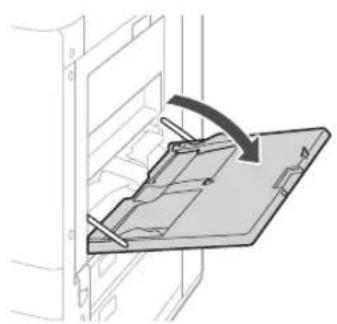
natural_image
Diagram of a mechanical assembly with a clamping device and directional arrow (no text or symbols)
2
Stellen Sie die Position der Papierführungen ein.

text_image
Fachverlängerung
Richten Sie die Papierführungen an den Markierungen für das Papierformat aus.
HINWEIS
Ziehen Sie beim Einlegen von großformatigem Papier die Fachverlängerung heraus.
3
Fächern Sie den Papierstapel auf, glätten Sie die Kanten auf einer ebenen Oberfläche und legen Sie ihn dann ein.
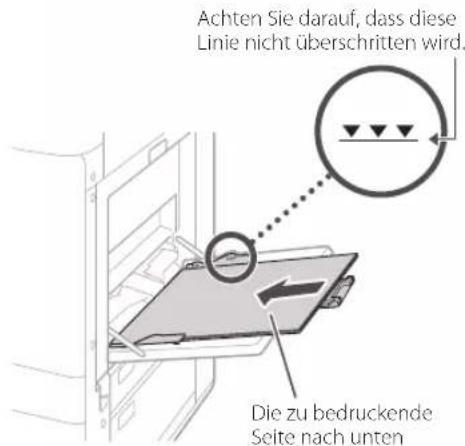
text_image
Achten Sie darauf, dass diese
Linie nicht überschritten wird.
Die zu bedruckende
Seite nach unten
4
Überprüfen Sie das Papierformat und den Papiertyp, und drücken Sie dann auf dem Bildschirm .
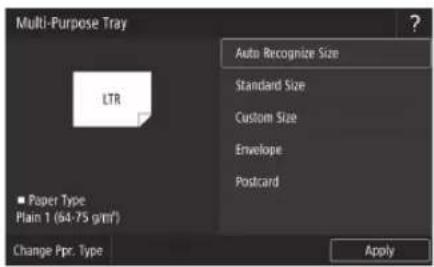
text_image
Multi-Purpose Tray
Auto Recognize Size
Standard Size
Custom Size
Envelope
Postcard
LTR
Paper Type
Plain 1 (64-75 gm/m2)
Change Ppr. Type
Apply
Falls das Papierformat oder der Papiertyp in dem unter Schritt 4 erwähnten Bildschirm nicht dem eingelegten Papier entspricht, ändern Sie die Einstellung manuell.
1
Drücken Sie .
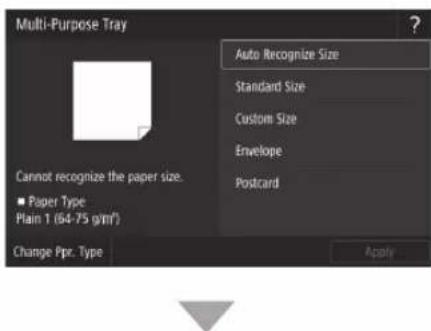
text_image
Multi-Purpose Tray
Cannot recognize the paper size.
■ Paper Type
Plain 1 (64-75 g/m²)
Change Ppr. Type
Auto Recognize Size
Standard Size
Custom Size
Envelope
Postcard
Apply
Legen Sie das Papierformat fest.
2
Drücken Sie .

Legen Sie den Papiertyp fest.
3
Drücken Sie
Wenn ein Problem aufgetreten ist
Prüfen Sie folgende Punkte.
- Ist die Stromversorgung eingeschaltet?
• Befindet sich das Gerät im Schlafmodus?
Wenn weder das Display noch 📁 beleuchtet sind, betätigen Sie den Netzschalter.
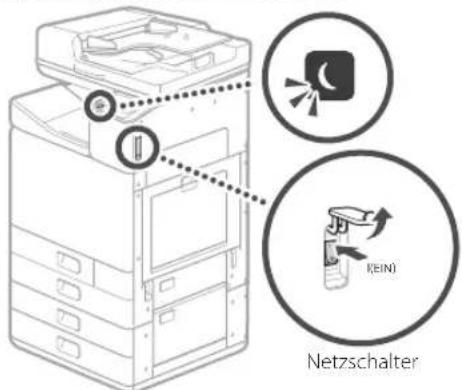
text_image
Netzschalter
- Ist das Stromkabel ordnungsgemäß angeschlossen?
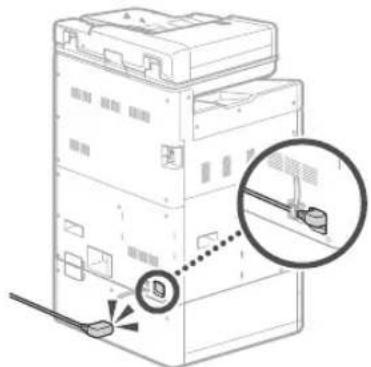
text_image
Diagram showing a server rack with an attached device and a magnified inset highlighting the connection point.
Bleibt das Problem bestehen, ziehen Sie das Online-Handbuch zu Rate.
Papierstau ist aufgetretenDas Gerät rea
Bei einem Papierstau wird ein Bildschirm angezeigt, der dem unten dargestellten ähnelt. Beseitigen Sie den Papierstau gemäß den Anweisungen auf dem Bildschirm.
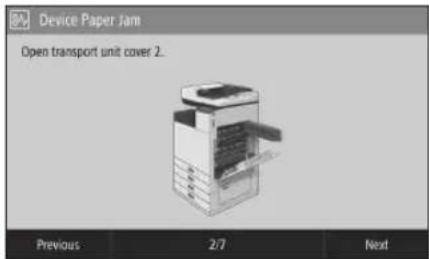
text_image
Device Paper Jam
Open transport unit cover 2...
Previous 2/7 Next
Auswechseln des Verbrauchsmaterials
Tintenbehälter

Original Canon Tintenbehälter
Standard
• Schwarz PGI-7500
• Cyan PGI-7500
• Magenta PGI-7500
• Gelb PGI-7500
Groß
• Schwarz PGI-7500XL
• Cyan PGI-7500XL
• Magenta PGI-7500XL
• Gelb PGI-7500XL
Wartungskassette
• Maintenance Cartridge MC50
Druckergebnis ist nicht zufriedenstellend
Zunächst prüfen
Haben Sie die Papier- und Druckqualität überprüft?
Prüfen Sie, ob die Einstellungen im Bedienfeld des Geräts oder im Druckertreiber mit dem von Ihnen gewünschten Papierformat, dem Papiertyp und der Druckqualität übereinstimmen.
S. 18 "Einlegen von Papier in die Papierkassette"
S. 16 "Drucken"
Wenn die Einstellungen übereinstimmen, erhöhen Sie die Druckqualität "Auflösung", und wiederholen Sie den Druckvorgang. Das Erhöhen der Druckqualität "Auflösung" über das Bedienfeld des Geräts oder den Druckertreiber kann zu besseren Druckergebnissen führen.
HINWEIS
Je nach Einstellungen für , und können Farben heller wiedergegeben werden.
Ausdrucke sind blass/Farben sind anders wiedergegeben/Weiße Schlieren (Linien) erscheinen auf dem Ausdruck
Prüfschritt 1
Haben Sie den Druckkopf auf Verstopfung untersucht?
Drucken Sie ein Düsen-Prüfmuster aus, und führen Sie dann eine Druckkopfreinigung nach Bedarf durch.
S. 22 "Drucken und Überprüfen eines Düsen-Prüfmusters"
Prüfschritt 2
Haben Sie eine Farbkorrektur (alle Papiertypen) durchgeführt?
Führen Sie eine Farbkorrektur (alle Papiertypen) durch.
S. 23 "Durchführen einer Farbkorrektur (alle Papiertypen)"
Prüfschritt 3
Wenn die obigen Verfahren das Problem nicht behoben haben, führen Sie eine Farbkorrektur (Einzelner Papiertyp) durch.
S. 23 "Durchführen einer Farbkorrektur (einzelner Papiertyp)"
Ungleichmäßige Farben oder Farbschlieren
Prüfschritt 1
Haben Sie den Zustand des Druckkopfes überprüft?
Führen Sie eine Druckkopfdiagnose durch.
S. 24 "Durchführen einer Druckkopfdiagnose"
Prüfschritt 2
Wenn die obigen Verfahren das Problem nicht behoben haben, führen Sie eine Farbkorrektur (Einzelner Papiertyp) durch.
S. 23 "Durchführen einer Farbkorrektur (einzelner Papiertyp)"
Falsche Ausrichtung von Farben
Prüfschritt 1
Haben Sie die Position des Druckkopfes angepasst?
Passen Sie die Position des Druckkopfes an, um falsch ausgerichtete Farben zu korrigieren usw.
S. 24 "Ausrichten des Druckkopfes"
Drucken und Überprüfen eines Düsen-Prüfmusters
Kopierergebnis ist nicht zufriedenstellend
Prüfschritt 1
Ist das Original korrekt auf die Glasplatte aufgelegt?
Legen Sie das Original mit der zu scannenden Seite nach unten auf.
S. 16 "Einlegen von Originalen"
Prüfschritt 2
Kopieren Sie ein Original, das am Gerät ausgedruckt wurde?
Wenn Sie ein Original kopieren, das am Gerät ausgedruckt wurde, erzielt der Druckvorgang je nach Originalfoto oder -dokument möglicherweise nicht das gewünschte Ergebnis. Drucken Sie direkt am Gerät oder wenn möglich an einem PC aus.
Prüfschritt 3
Ist der Scanbereich des Dokumenteneinzugs verschmutzt?
Reinigen Sie den Scanbereich des Dokumenteneinzugs.
S. 25 "Reinigen der Scanbereiche des Dokumenteneinzugs"
Indem Sie ein Düsen-Prüfmuster ausdrucken, können Sie das Gerät auf eine Verstopfung des Druckkopfes und Farbabweichungen überprüfen.
Bereiten Sie das folgende Papier vor.
Für Düsen-Prüfmuster:
Papier, das Sie auf Schlieren und Ungleichmäßigkeit prüfen möchten (dünnes Papier, normales Papier, dickes Papier (Karton), recyceltes Papier, mattes Fotopapier)
Größe: A3, 11x17, LTR oder A4
Anzahl von Blättern: 5 oder mehr
Für Anpassung der Druckkopfposition:
Normales Papier (oder recyceltes Papier)
Größe: A3, 11x17, LTR oder A4
Anzahl von Blättern: 1
• Die Verwendung von A3 oder 11x17 wird empfohlen.
-
Legen Sie je ein Blatt für "Düsen-Prüfmuster" und "Anpassung der Druckkopfposition" in unterschiedliche Papierkassetten oder das Mehrzweckfach ein.
Siehe auch S. 18, nehmen Sie auch Papiereinstellungen vor.
-
Drücken Sie 📄, und drücken Sie
-
Drücken Sie ▶ ▶ ▶ Wählen Sie den Papiertyp aus ▶ ▶ .
-
Überprüfen Sie das Düsen-Prüfmuster.
- Befolgen Sie die Anweisungen auf dem Bildschirm zur Reinigung und Ausrichtung des Druckkopfes.
Durchführen einer Farbkorrektur (alle Papiertypen)
Führen Sie eine Farbkorrektur durch.
Bereiten Sie das folgende Papier vor.
Normales Papier (oder recyceltes Papier)
Größe: A3, 11x17, LTR oder A4
Anzahl von Blättern: 2
• Die Verwendung von A3 oder 11x17 wird empfohlen.
- Legen Sie Papier in eine Papierkassette oder das Mehrzweckfach ein.
Siehe S. 18, nehmen Sie auch Papiereinstellungen vor.
-
Drücken Sie 📄, und drücken Sie
-
Drücken Sie ▶<Bildqualität justieren
(Adjust Image Quality)▶▶<Farbkorrektur
(Color Correction)▶▶<Auto (Musterscan)
(Auto (Pattern Scan))>▶ .
- Führen Sie eine Farbkorrektur (alle Papiertypen) durch.
- Befolgen Sie die Anweisungen auf dem Bildschirm.
- Wenn der Scanbereich des Dokumenteneinzugs schmutzig ist, wird die Korrektur möglicherweise nicht einwandfrei durchgeführt.
S. 25 "Reinigen der Scanbereiche des
Dokumenteneinzugs"
Durchführen einer Farbkorrektur (einzelner Papiertyp)
Führen Sie die optimale Farbkorrektur für die einzelnen Papiertypen durch.
Bereiten Sie das folgende Papier vor.
Papier, für das Sie eine Farbkorrektur durchführen möchten (dünnes Papier, normales Papier, dickes Papier (Karton), recyceltes Papier, mattes Fotopapier)
Größe: A3, 11x17, LTR oder A4
Anzahl von Blättern: 2
• Die Verwendung von A3 oder 11x17 wird empfohlen.
- Legen Sie Papier in eine Papierkassette oder das Mehrzweckfach ein.
Siehe S. 18, nehmen Sie auch Papiereinstellungen vor.
-
Drücken Sie 📄, und drücken Sie
-
Drücken Sie ▶<Bildqualität justieren
(Adjust Image Quality)▶▶<Farbkorrektur
(Color Correction)▶▶<Auto (Musterscan)
(Auto (Pattern Scan))>▶.
- Führen Sie eine Farbkorrektur (einzelner Papiertyp) durch.
- Wählen Sie den Papiertyp und befolgen Sie die Anweisungen auf dem Bildschirm.
- Wenn der Scanbereich des Dokumenteneinzugs schmutzig ist, wird die Korrektur möglicherweise nicht einwandfrei durchgeführt.
S. 25 "Reinigen der Scanbereiche des
Dokumenteneinzugs"
Durchführen einer Druckkopfdiagnose
Führen Sie eine Druckkopfdiagnose, Farbdiagnose und Farbausrichtungsdiagnose und beheben Sie etwaige Probleme.
Bereiten Sie das folgende Papier vor.
Normales Papier (oder recyceltes Papier)
Größe: A3, 11x17, LTR oder A4
Anzahl von Blättern: 5
- Möglicherweise benötigen Sie nicht alle 5 Blätter.
• Die Verwendung von A3 oder 11x17 wird empfohlen.
- Bereiten Sie Papier vor, das auf der Vorder- und Rückseite weiß und sauber ist.
-
Bei der Bilddiagnose und -justage wird Tinte verbraucht und Platz in der Wartungskassette benötigt.
-
Legen Sie Papier in eine Papierkassette d
das Mehrzweckfach ein.
Siehe ➞ S. 18, nehmen Sie auch
Papiereinstellungen vor.
-
Drücken Sie 📄, und drücken Sie .
-
Drücken Sie ▶ ▶ ▶ .
-
Befolgen Sie die Anweisungen auf dem Bildschirm.
- Wenn der Scanbereich des Dokumenteneinzugs schmutzig ist, wird die Korrektur möglicherweise nicht einwandfrei durchgeführt.
S. 25 "Reinigen der Scanbereiche des Dokumenteneinzugs"
Ausrichten des Druckkopfes
Passen Sie die Position des Druckkopfes an, um falsch ausgerichtete Farben zu korrigieren usw.
Bereiten Sie das folgende Papier vor.
Normales Papier (oder recyceltes Papier)
Größe: A3, 11x17, LTR oder A4
Anzahl von Blättern: 1
• Die Verwendung von A3 oder 11x17 wird empfohlen.
- Bereiten Sie Papier vor, das auf der Vorder- und Rückseite weiß und sauber ist.
-
Legen Sie Papier in eine Papierkassette oder das Mehrzweckfach ein.
Siehe S. 18, nehmen Sie auch Papiereinstellungen vor.
-
Drücken Sie 📄, und drücken Sie
-
Drücken Sie ▶▶
-
Befolgen Sie die Anweisungen auf dem Bildschirm.
- Wenn der Scanbereich des Dokumenteneinzugs schmutzig ist, wird die Korrektur möglicherweise nicht einwandfrei durchgeführt.
S. 25 "Reinigen der Scanbereiche des Dokumenteneinzugs"
Reinigen der Scanbereiche des Dokumenteneinzugs
Befolgen Sie bei der Reinigung die Schritte auf den Etiketten auf der Zufuhr und an der Innenseite der Glasplatte.
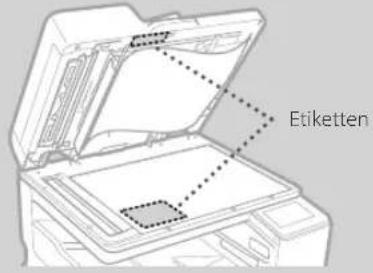
text_image
Etiketten
Verwenden Sie das bereitgestellte Glasreinigungsblatt zum Reinigen der Scanbereiche des Dokumenteneinzugs. Diese Bereiche dürfen nur mit dem bereitgestellten Blatt gereinigt werden.
- Öffnen Sie die Zufuhr und wischen Sie den Scanbereich des Dokumenteneinzugs (langer Glasstreifen) neben der Glasplatte mit dem mitgelieferten Glasreinigungsblatt ab.
VORSICHT!
Verwenden Sie keine Glasreiniger,
alkoholhaltige Lösemittel oder ähnliches, da
durch diese Produkte die
Verfärbungsschutzschicht geschädigt werden
kann.
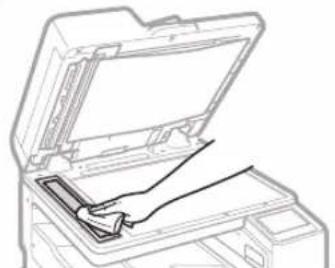
natural_image
Line drawing of a printer's open lid with a hand inserting a clip (no text or symbols)
-
Wischen Sie den Scanbereich des Dokumenteneinzugs (langer Glasstreifen) an der Zufuhr ab.
-
Öffnen Sie die Dokumentenscannerabdeckung und wischen Sie den Scanbereich des Dokumenteneinzugs (langer Glasstreifen) und den gegenüberliegenden Bereich ab.
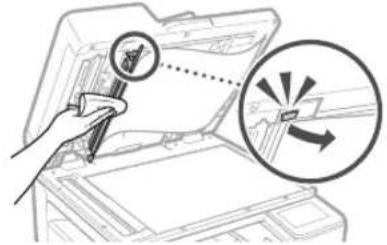
text_image
Diagram illustrating a magnifying tool interacting with a device, with an arrow indicating direction and magnified view.
-
Schließen Sie die Dokumentenscannerabdeckung, bis sie einrastet.
-
Schließen Sie die Zufuhr vorsichtig.
Falls immer noch Schlieren auftreten
Führen Sie eine Reinigung der Zufuhr durch.
-
Drücken Sie 📄 und wählen Sie .
-
Drücken Sie ▶
▶
▶.
Glossar
| IP-Adresse Bei einer TCP/IP-Verbindung eine für die Identifizierung von Geräten auf einem Netzwerk zugewiesene Nummer. IP-Adressen haben entweder das IPv4- oder das IPv6-Format. |
| Subnetzmaske Eine Nummer für die Unterteilung eines Netzwerks bei der Verwendung einer IPv4-Adresse. Der Benutzer kann den Bereich der IP-Adressen, die Geräten zugewiesen werden, begrenzen. |
| Gateway-Adresse Die Adresse eines Geräts, das als Gateway für die Kommunikation zwischen verschiedenen Geräten fungiert. Im Allgemeinen ist ein Router standardmäßig ein Gateway. |
| DNS(Domain Name System) | Ein Dienst, der die Umsetzung von Namen für die Zuordnung von Hostnamen (Domänennamen) zu IP-Adressen über einen Server übernimmt. |
| Port Eine Art Eingang, zu dem, ähnlich wie eine Hausanschrift, eine IP-Adresse führt. Durch die Zuweisung von Portnummer wird die Sicherheit erhöht. |
| Proxy PC, Software etc., die in der Funktion eines Vermittlers die HTTP-Kommunikation mit Geräten außerhalb des Netzwerks übernehmen, überwiegend für das Durchsuchen von Websites etc. Statt direkt mit Einrichtungen außerhalb des Netzwerks zu kommunizieren, wird die Verbindung nach außen über einen Proxy-Server geführt. |
| Router Ein Kommunikationsgerät für die Herstellung von Verbindungen zwischen einem Netzwerk und Geräten. Unterstützt werden Wired- und Wireless-Typen. |
| SSID (Netzwerkname) Kennung eines Access Points bei Verwendung eines Wireless LAN. |
| Passwort (Netzwerkschlüssel) Ein Schlüssel für die Verschlüsselung von Verbindungen zu einem Wireless LAN. Die Definition eines Schlüssels, der einer SSID entspricht, ermöglicht die Herstellung einer Verbindung zu einem Access Point. |
| Firewall Ein System, das unbefugte externe Zugriffe auf ein Netzwerk blockiert und innerhalb eines lokalen Bereichs Angreifer und Eindringlinge in ein Netzwerk abwehrt. |
Beispiel für Netzwerkverbindung
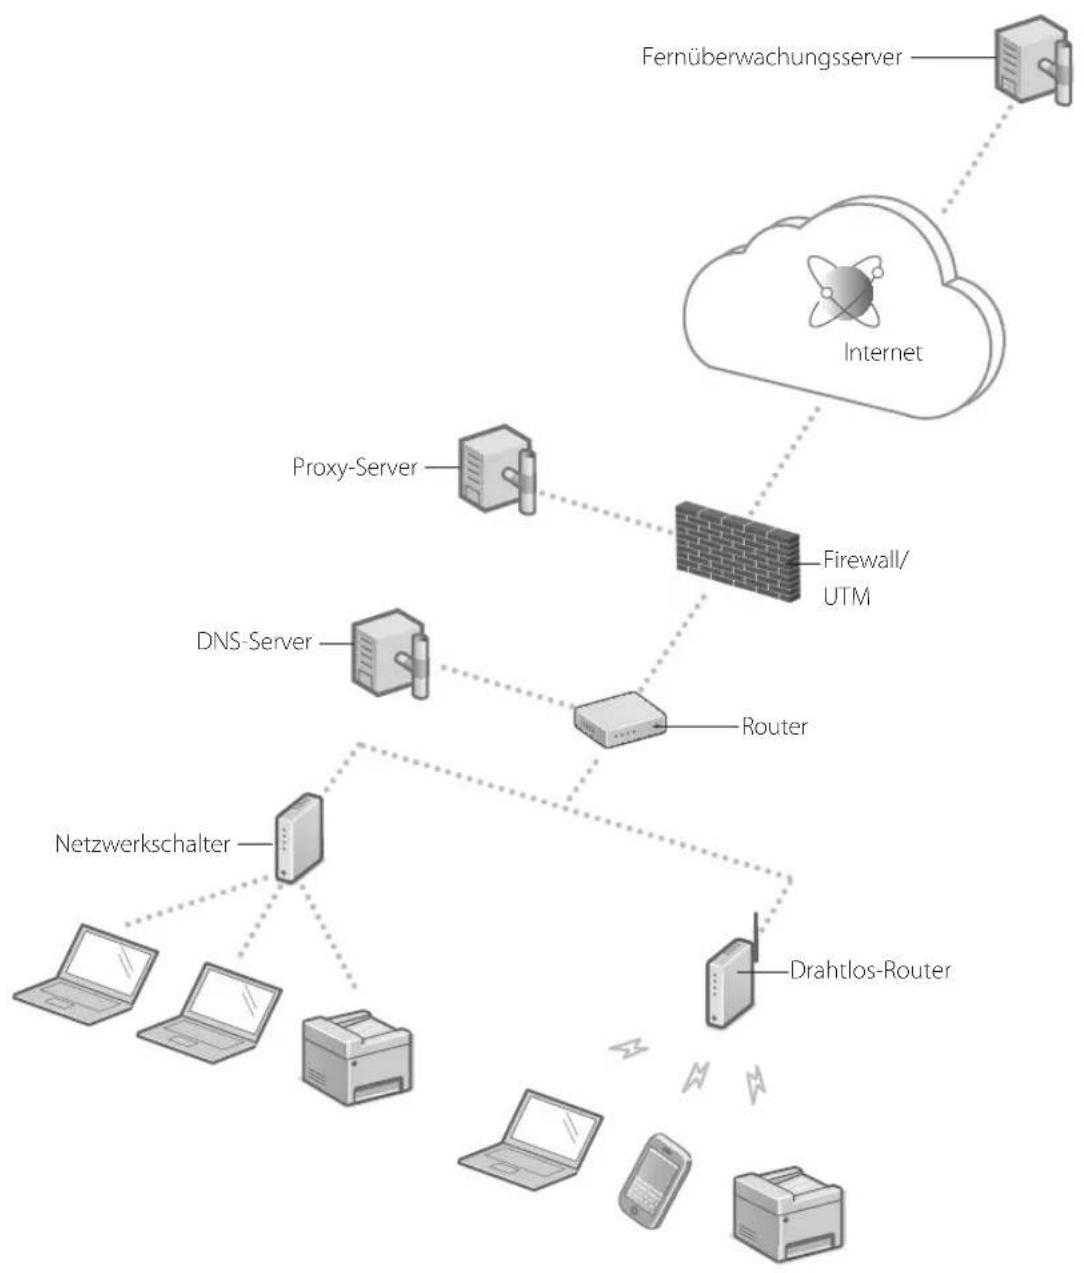
flowchart
graph TD
    A["Fernüberwachungsserver"] --> B["Internet"]
    B --> C["Firewall/UTM"]
    C --> D["Proxy-Server"]
    C --> E["DNS-Server"]
    C --> F["Router"]
    D --> G["Netzwerkschalter"]
    E --> H["Drahtlos-Router"]
    G --> I["Laptop"]
    G --> J["Laptop"]
    G --> K["Printer"]
    H --> L["Laptop"]
    H --> M["Phone"]
Verbinden mit einem Netzwerk mit fester IP-Adresse
Schritt 1 Netzwerkumgebung prüfen
Bevor Sie mit einer festen IP-Adresse eine Verbindung zu einem Netzwerk herstellen, müssen Sie die Netzwerkumgebung überprüfen. Gehen Sie die folgende Liste durch, und prüfen Sie vorab, welche Informationen benötigt werden.
| Erforderliche Angaben Anmerkungen | |
| Herstellung einer Verbindung zu einem Netzwerk (IPv4) mit einer festen IP-Adresse |
| IP-Adresse (die IP-Adresse des Geräts) | |
| Subnetzmaske | |
| Gateway-Adresse | |
| Herstellung einer Verbindung über ein Wireless LAN |
| SSID für Wireless Router | |
| Netzwerkschlüssel | |
| DNS-Einstellung* |
| Primäre DNS-Serveradresse | |
| Sekundäre DNS-Serveradresse | |
| Proxy-Einstellung* |
| HTTP-Adresse Proxy-Server | |
| HTTP-Portnummer Proxy-Server | |
| Benutzername für Proxy-Authentifizierung | |
| Passwort für Proxy-Authentifizierung | |
* Erforderlich bei der Verwendung von DNS-Einstellungen oder Proxy-Einstellungen.
Schritt 2 Verbindung zu einem Wired LAN/Wireless LAN herstellen Verbinden über Wired LAN
Im Lieferumfang des Geräts ist kein LAN-Kabel enthalten. Das müssen Sie selbst bereitstellen.
1 Drücken Sie auf der Startseite .
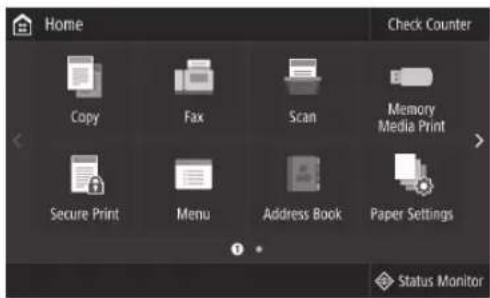
text_image
Home
Check Counter
Copy
Fax
Scan
Memory
Media Print
Secure Print
Menu
Address Book
Paper Settings
Status Monitor
2 Wählen Sie ▶▶.
Erfragen Sie beim Netzwerkadministrator die Systemmanager-ID und den Sicherheitscode (standardmäßig eingestellt auf "7654321").
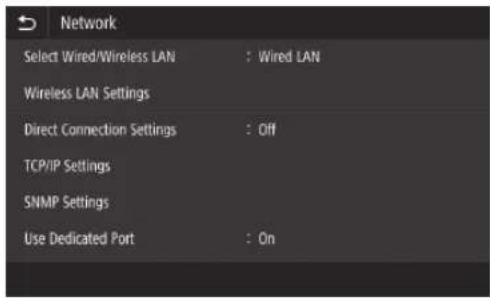
text_image
Network
Select Wired/Wireless LAN : Wired LAN
Wireless LAN Settings
Direct Connection Settings : Off
TCP/IP Settings
SNMP Settings
Use Dedicated Port : On
3 Drücken Sie im Bildschirm auf .
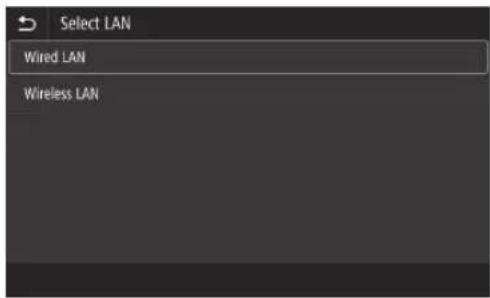
text_image
Select LAN
Wired LAN
Wireless LAN
4 Schließen Sie das LAN-Kabel an.
- Verbinden Sie Gerät und Router mit dem LAN-Kabel.
- Drücken Sie den Stecker fest in den Anschluss, bis ein Klicken zu hören ist.
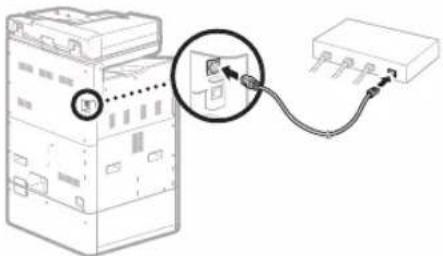
natural_image
Diagram of an electronic device with a cable and connector, showing no text or symbols
Wenn die Verbindung hergestellt ist, fahren Sie mit der Einstellung einer festen IP-Adresse fort. ➕S. 34 "Schritt 3 Feste IP-Adresse einstellen"
Verbindung mit Netzwerk und Fernüberwachungsdienst
Verbinden mit einem Netzwerk mit fester IP-Adresse
Verbinden über Wireless LAN
Schließen Sie das LAN-Kabel nicht am Gerät an.
Manuelle Herstellung einer Verbindung über ein Wireless LAN durch Auswahl eines Access Points
Benötigt werden "SSID (Netzwerkname)" und "Netzwerkschlüssel (Passwort)". Diese Informationen können vorab anhand der Liste S. 28 ermittelt oder beim Netzwerkadministrator erfragt werden.
1 Drücken Sie auf der Startseite .
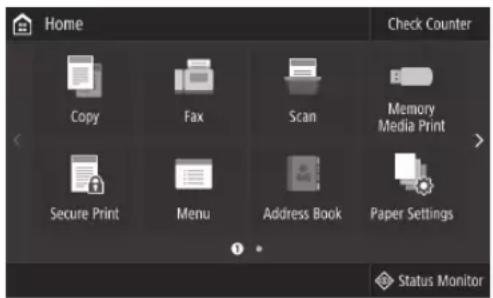
text_image
Home
Check Counter
Copy
Fax
Scan
Memory Media Print
Secure Print
Menu
Address Book
Paper Settings
Status Monitor
2 Wählen Sie ▶<Netzwerk (Network), und drücken Sie dann <Wired/Wireless LAN wählen (Select Wired/Wireless LAN).
Erfragen Sie beim Netzwerkadministrator die Systemmanager-ID und den Sicherheitscode (standardmäßig eingestellt auf "7654321").
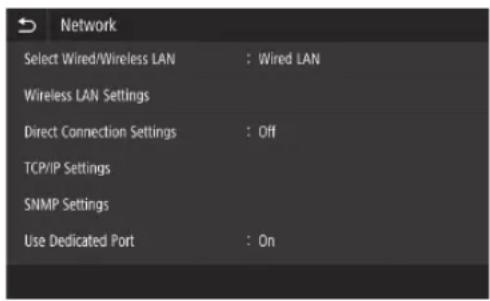
text_image
Network
Select Wired/Wireless LAN : Wired LAN
Wireless LAN Settings
Direct Connection Settings : Off
TCP/IP Settings
SNMP Settings
Use Dedicated Port : On
3 Drücken Sie im Bildschirm auf .
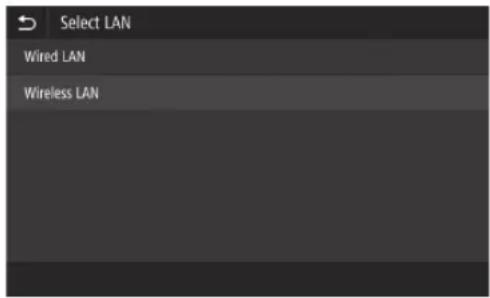
text_image
Select LAN
Wired LAN
Wireless LAN
4 Drücken Sie im Bildschirm auf .
- Wenn angezeigt wird, drücken Sie .
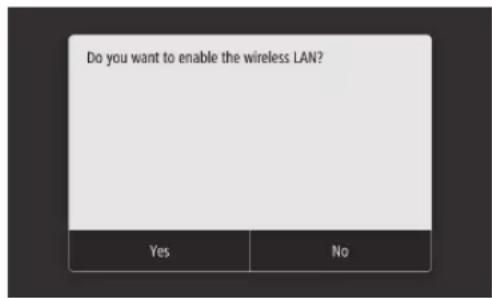
text_image
Do you want to enable the wireless LAN?
Yes No
5 Prüfen Sie die Meldung, und drücken Sie dann .

text_image
For more information, refer to the manual.
OK
6 Drücken Sie .
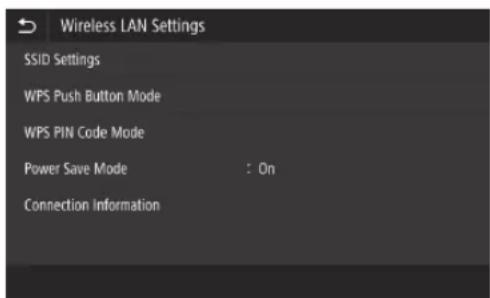
text_image
Wireless LAN Settings
SSID Settings
WPS Push Button Mode
WPS PIN Code Mode
Power Save Mode : On
Connection Information
7 Drücken Sie .
- Das Gerät sucht nach einem Wireless Router, zu dem es eine Verbindung herstellen kann.
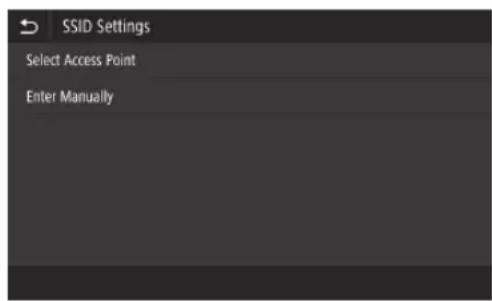
text_image
SSID Settings
Select Access Point
Enter Manually
Wenn eine Meldung erscheint, dass der Access Point nicht gefunden werden kann, schlagen Sie weitere Informationen im Online-Handbuch nach und versuchen nochmals, den Access Point zu finden.
Verbindung mit Netzwerk und Fernüberwachungsdienst
Verbinden mit einem Netzwerk mit fester IP-Adresse
8 Markieren Sie den Wireless Router, zu dem Sie eine Verbindung herstellen wollen.
- Wählen Sie das Gerät aus, dem die zuvor notierte SSID entspricht, und drücken Sie .

text_image
Select Access Point
Yd AccessPoint_01 WPA - PSK 6
Yd AccessPoint_02 WPA2 - PSK 6
Yd AccessPoint_03 WEP 2
Yd AccessPoint_04 WPA - PSK 1
Yd AccessPoint_05 WPA2 - PSK 2
Yd AccessPoint_06 WEP 10
Details Next
9 Geben Sie den zuvor notierten Netzwerkschlüssel ein.
- Geben Sie den Netzwerkschlüssel ein, und drücken Sie dann .
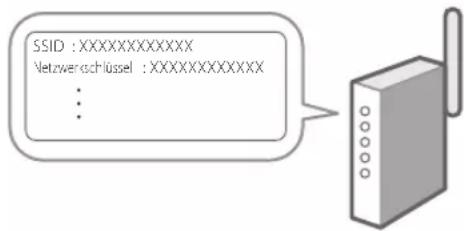
text_image
SSID :XXXXXXXXXXXX
Netzweenschlüssel :XXXXXXXXXXXX
: :
10 Drücken Sie .
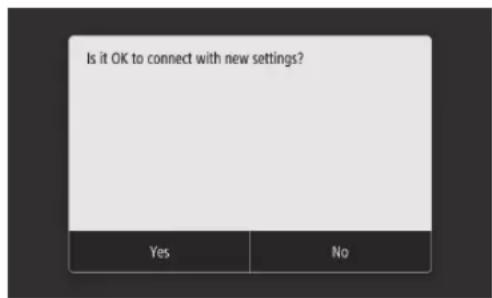
text_image
Is it OK to connect with new settings?
Yes No
Wenn eine Fehlermeldung angezeigt wird, während Sie Einstellungen konfigurieren, wählen Sie , prüfen, ob Sie den richtigen Netzwerkschlüssel verwenden, und beginnen dann wieder bei Schritt 4.
11 Wenn angezeigt wird, drücken Sie .
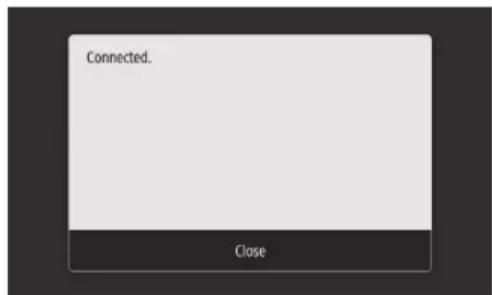
text_image
Connected.
Close
Wenn die Verbindung hergestellt ist, fahren Sie mit der Einstellung einer festen IP-Adresse fort. S. 34 "Schritt 3 Feste IP-Adresse einstellen"
Tastendrückmethode
Die Einstellungen können mit der Tastendrückmethode vorgenommen werden, wenn unten dargestellte Markierung auf der Verpackung des Wireless Routers erscheint oder wenn die Taste auf dem Gerät vorhanden ist.

Modus WPS PIN-Code
Nicht alle WPS-fähigen Router unterstützen die Tastendrückmethode, sondern verlangen einen PIN-Code, bevor Einstellungen eingegeben werden können. Den WPS PIN-Code finden entweder auf dem Verpackungskarton oder im Bedienungshandbuch.
Wenn der Router für die WEP-Authentifizierung konfiguriert ist, ist eine Verbindung über WPS unter Umständen nicht möglich.
Wenn Sie bestimmte Sicherheitseinstellungen wie beispielsweise Authentifizierung und Verschlüsselung gesondert eingeben wollen, können Sie SSID und Netzwerkschlüssel manuell einstellen.
Verbindung mit Netzwerk und Fernüberwachungsdienst
Verbinden mit einem Netzwerk mit fester IP-Adresse
Schritt 3 Feste IP-Adresse einstellen Einstellen einer IPv4-Adresse
Eine IPv4-Adresse kann automatisch über das DHCP-Protokoll mit "Auto erfassen" oder manuell mit "Manuell erfassen" eingestellt werden. Für die Eingabe einer festen IP-Adresse wählen Sie "Manuell erfassen".
- Für die Einstellung einer festen IP-Adresse benötigen Sie sowohl eine "IP-Adresse" als auch eine "Subnetzmaske" und eine "Gateway-Adresse". Je nach Konfiguration Ihres Netzwerks sind darüber hinaus möglicherweise noch weitere Angaben notwendig. Erkundigen Sie sich beim Netzwerkadministrator, was genau Sie brauchen.
- Erläuterungen zur Einstellung einer IPv6-Adresse finden Sie im Online-Handbuch.
1 Drücken Sie auf der Startseite
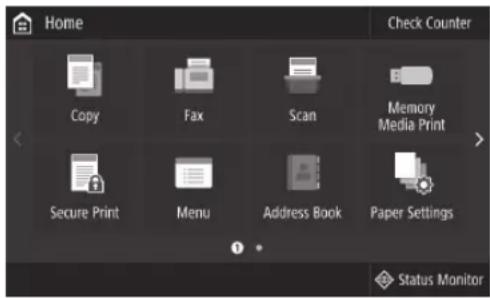
text_image
Home
Check Counter
Copy
Fax
Scan
Memory Media Print
Secure Print
Menu
Address Book
Paper Settings
Status Monitor
2 Wählen Sie ▶.
- Wenn der Anmeldebildschirm erscheint, geben Sie die Systemmanager-ID und den Sicherheitscode ein.
- Erfragen Sie beim Netzwerkadministrator die Systemmanager-ID und den Sicherheitscode (standardmäßig eingestellt auf "7654321").
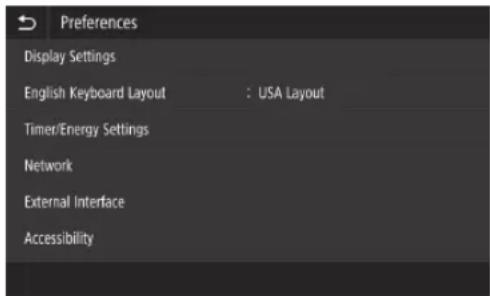
text_image
Preferences
Display Settings
English Keyboard Layout : USA Layout
Timer/Energy Settings
Network
External Interface
Accessibility
3 Wählen Sie ▶
▶.
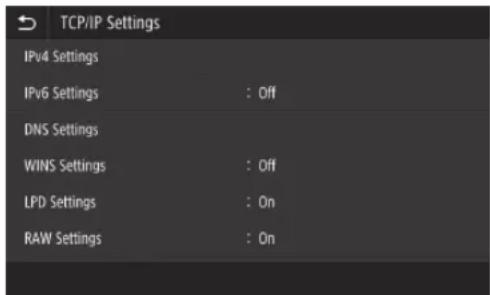
text_image
TCP/IP Settings
IPv4 Settings
IPv6 Settings : Off
DNS Settings
WINS Settings : Off
LPD Settings : On
RAW Settings : On
4 Drücken Sie im Bildschirm auf und dann in auf ▶.
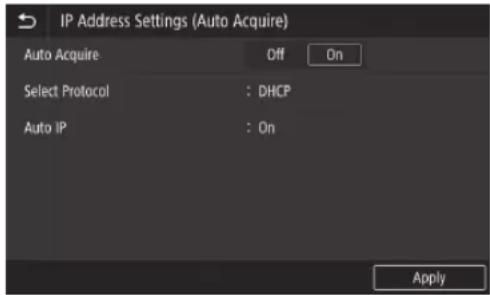
text_image
IP Address Settings (Auto Acquire)
Auto Acquire Off On
Select Protocol : DHCP
Auto IP : On
Apply
Wenn Sie eine DHCP-Verbindung benutzen wollen, setzen Sie auf und auf .
5 Drücken Sie .
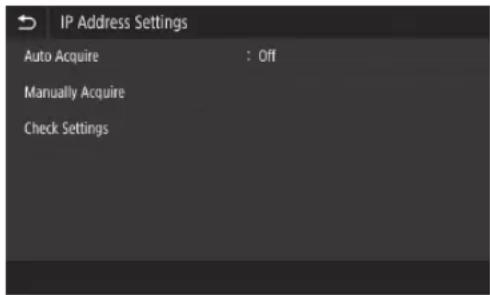
text_image
IP Address Settings
Auto Acquire : Off
Manually Acquire
Check Settings
Bevor Sie drücken können, müssen Sie in Schritt 4 auf setzen.
6 Geben Sie die , die und die ein, und drücken Sie dann .
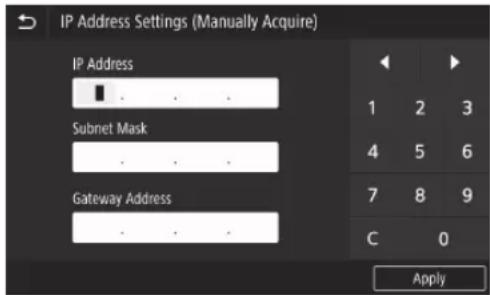
text_image
IP Address Settings (Manually Acquire)
IP Address
1 2 3
Subnet Mask
4 5 6
Gateway Address
7 8 9
C 0
Apply
7 Führen Sie einen Neustart des Geräts durch.
- Schalten Sie das Gerät aus, warten Sie 10 Sekunden, und schalten Sie es wieder ein.
text_image
Settings configured.
Changes will be effective after the main power is turned
OFF and ON.
Verbindung mit Netzwerk und Fernüberwachungsdienst
Verbinden mit einem Netzwerk mit fester IP-Adresse
Einstellen des DNS
Das DNS (Domain Name System) enthält Informationen für die Zuordnung von Hostnamen zu IP-Adressen. Wenn die IP-Adresse automatisch beschafft wird, werden auch die benötigten DNS-Informationen automatisch eingestellt. Wenn Sie dagegen die IP-Adresse manuell eingeben, müssen auch die DNS-Informationen manuell eingegeben werden.
Ob Sie das DNS einstellen müssen oder nicht, hängt von der Konfiguration des Netzwerks ab. Erkundigen Sie sich beim Netzwerkadministrator, ob in Ihrer Umgebung das DNS eingestellt werden muss, und wenn ja, welche Informationen Sie hierzu benötigen.
1 Wählen Sie