
SMARTPHONE MD 96580 - Smartphone MEDION - Gratis gebruiksaanwijzing en handleiding
Vind de handleiding van het apparaat gratis SMARTPHONE MD 96580 MEDION in PDF-formaat.

| Producttype | Smartphone |
| Merk | MEDION |
| Model | MD 96580 |
| Batterij | Verwijderbaar, Lithium-ion |
| SIM-kaarttype | Standaard SIM-kaart |
| Geheugenkaarttype | Micro SD/T-Flash (FAT12/FAT16) |
| Connectiviteit | Bluetooth, FM-radio, 3,5 mm koptelefoonaansluiting, USB |
| Hoofdfuncties | Bellen, sms'en, Contacten, MP3-speler, FM-radio, Spraakrecorder, Agenda, Rekenmachine, Spelletjes, Bluetooth |
| Beveiliging | SIM-pincode, Bluetooth-wachtwoord |
| Specifiek absorptietempo (SAR) | 0,554 W/kg (10g) |
| Onderhoud en reiniging | Niet blootstellen aan water, goedgekeurde accessoires gebruiken, geen ongeautoriseerde reparaties uitvoeren |
| Algemene informatie | Elektronisch apparaat, recyclebaar, niet bij het huisvuil gooien |
Veelgestelde vragen - SMARTPHONE MD 96580 MEDION
Gebruikersvragen over SMARTPHONE MD 96580 MEDION
0 vraag over dit apparaat. Beantwoord die u kent of stel uw eigen vraag.
Stel een nieuwe vraag over dit apparaat
Download de handleiding voor uw Smartphone in PDF-formaat gratis! Vind uw handleiding SMARTPHONE MD 96580 - MEDION en neem uw elektronisch apparaat weer in handen. Op deze pagina staan alle documenten die nodig zijn voor het gebruik van uw apparaat. SMARTPHONE MD 96580 van het merk MEDION.
GEBRUIKSAANWIJZING SMARTPHONE MD 96580 MEDION
Contents
Your handset 4
Displayicon 7
Getting started. 9
Installing the battery. 9
Installing a memory card and the SIM card 11
Charging the battery. 13
Turning your phone on/off 14
Power on 14
Power off 15
Using your Phone 16
Keypad shortcuts 16
Instandbymode. 16
*&#keyfunctionlist. 17
Basic functions 18oring a phonebook entry 24
Storing a phonebook entry from the menu. 24
Storing a phonebook entry in standby mode 24
Searching for a phonebook entry 25
Send data using Bluetooth technology 26
Pairing 26
Visibility 27
Rename 28
Service List. 28
Delete devices 29
Download data with Bluetooth technology. 29
Send data with Bluetooth technology 30
Security 30
Select default save location 30
Select prefer player 31
Adjust microphone volume. 31
Send phone book entries 32
Send a phone book entry. 32
Send my business card. 32
Exchange business card 33
Connecting a headset 33
For your safety. 34
Playing Music 18honebook entry from the menu. 24
Storing a phonebook entry in standby mode 24
Searching for a phonebook entry 25
Send data using Bluetooth technology 26
Pairing 26
Visibility 27
Rename 28
Service List. 28
Delete devices 29
Download data with Bluetooth technology. 29
Send data with Bluetooth technology 30
Security 30
Select default save location 30
Select prefer player 31
Adjust microphone volume. 31
Send phone book entries 32
Send a phone book entry. 32
Send my business card. 32
Exchange business card 33
Connecting a headset 33
For your safety. 34
Listening to the Radio 18onebook entry in standby mode 24
Searching for a phonebook entry 25
Send data using Bluetooth technology 26
Pairing 26
Visibility 27
Rename 28
Service List. 28
Delete devices 29
Download data with Bluetooth technology. 29
Send data with Bluetooth technology 30
Security 30
Select default save location 30
Select prefer player 31
Adjust microphone volume. 31
Send phone book entries 32
Send a phone book entry. 32
Send my business card. 32
Exchange business card 33
Connecting a headset 33
For your safety. 34
Making a call. 18
Answering or rejecting a call 19
Turning off the Speaker. 19
Adjusting Volume During a call 19
Redialing a number 19
Main menu 20elete devices 29
Download data with Bluetooth technology. 29
Send data with Bluetooth technology 30
Security 30
Select default save location 30
Select prefer player 31
Adjust microphone volume. 31
Send phone book entries 32
Send a phone book entry. 32
Send my business card. 32
Exchange business card 33
Connecting a headset 33
For your safety. 34
Setting up Time & Date 23
Setting time 23
Setting date 23
Setting date format. 23
Storing a phonebook entry 24
Storing a phonebook entry from the menu. 24
Storing a phonebook entry in standby mode 24
Searching for a phonebook entry 25
Send data using Bluetooth technology 26
Pairing 26
Visibility 27
Rename 28
Service List. 28
Delete devices 29
Download data with Bluetooth technology. 29
Send data with Bluetooth technology 30
Security 30
Select default save location 30
Select prefer player 31
Adjust microphone volume. 31
Send phone book entries 32
Send a phone book entry. 32
Send my business card. 32
Exchange business card 33
Connecting a headset 33
For your safety. 34
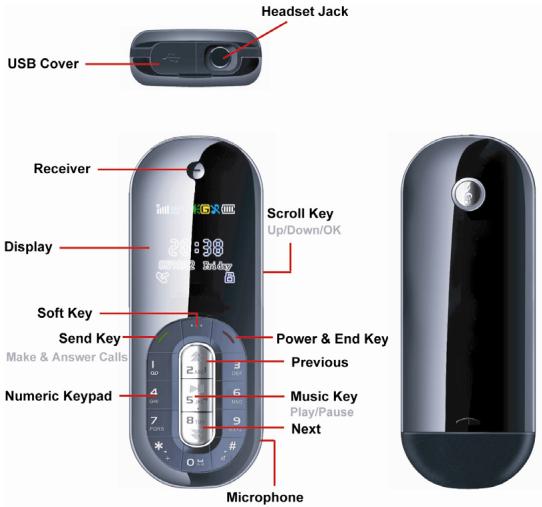
Your handsetull, Low battery, Low battery warning
Message inboxfull
New message. The icon disappears after the new messages are read.
Silence mode. In standby, press and hold # key to turn on or off the speaker.
Roam indicator.
Alarm on. The icon disappears after the alarms are turned off.
Vibration on.
Earphone is connected and detected.
Airplane mode
Call forward
Call history
Keypad unlocked
Keypad locked
Voicemail indicator.
Standby mode

Main menu (FM Radio)
Scroll key. The icon disappears after the alarms are turned off.
Vibration on.
Earphone is connected and detected.
Airplane mode
Call forward
Call history
Keypad unlocked
Keypad locked
Voicemail indicator.
n.
Earphone is connected and detected.
Airplane mode
Call forward
Call history
Keypad unlocked
Keypad locked
Voicemail indicator.
Scroll up and down to move through menu options, or to increase / decrease the volume.
Keypad locked
Voicemail indicator.
|
|
Back to the previous menuply gentle pressure to the rear case of the phone, slide up the cover until the position mark on the right side aligned with the one on the phone body. Then take off the cover.

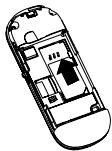
2. With the metal contacts facing into the phone clip the battery in place, positioning the bottom of the battery first.

3. Place the rear cover with the position mark aligning with the one on your phone body. Replace the rear cover, by sliding it back onto the phone until it clips in place.

OK, preview or open the option menuphone, slide up the cover until the position mark on the right side aligned with the one on the phone body. Then take off the cover.

2. With the metal contacts facing into the phone clip the battery in place, positioning the bottom of the battery first.

3. Place the rear cover with the position mark aligning with the one on your phone body. Replace the rear cover, by sliding it back onto the phone until it clips in place.

End or reject callstil the position mark on the right side aligned with the one on the phone body. Then take off the cover.

2. With the metal contacts facing into the phone clip the battery in place, positioning the bottom of the battery first.

3. Place the rear cover with the position mark aligning with the one on your phone body. Replace the rear cover, by sliding it back onto the phone until it clips in place.

he position mark on the right side aligned with the one on the phone body. Then take off the cover.

2. With the metal contacts facing into the phone clip the battery in place, positioning the bottom of the battery first.

3. Place the rear cover with the position mark aligning with the one on your phone body. Replace the rear cover, by sliding it back onto the phone until it clips in place.

In standby mode, push up to open SMS menu. on the phone body. Then take off the cover.

2. With the metal contacts facing into the phone clip the battery in place, positioning the bottom of the battery first.

3. Place the rear cover with the position mark aligning with the one on your phone body. Replace the rear cover, by sliding it back onto the phone until it clips in place.

Exit to standby mode (In Music player and FM radio interface)2bd5c7b72f71ad4a89bb11fe0e10f4195c5e08f6e93c2a01b95.jpg)
2. With the metal contacts facing into the phone clip the battery in place, positioning the bottom of the battery first.

3. Place the rear cover with the position mark aligning with the one on your phone body. Replace the rear cover, by sliding it back onto the phone until it clips in place.

f71ad4a89bb11fe0e10f4195c5e08f6e93c2a01b95.jpg)
2. With the metal contacts facing into the phone clip the battery in place, positioning the bottom of the battery first.

3. Place the rear cover with the position mark aligning with the one on your phone body. Replace the rear cover, by sliding it back onto the phone until it clips in place.

Lock or unlock the keypad with # key (In Music player and FM radio interface)o the phone clip the battery in place, positioning the bottom of the battery first.

3. Place the rear cover with the position mark aligning with the one on your phone body. Replace the rear cover, by sliding it back onto the phone until it clips in place.

phone clip the battery in place, positioning the bottom of the battery first.

3. Place the rear cover with the position mark aligning with the one on your phone body. Replace the rear cover, by sliding it back onto the phone until it clips in place.

In standby mode, push down to open the main menu.e battery first.

3. Place the rear cover with the position mark aligning with the one on your phone body. Replace the rear cover, by sliding it back onto the phone until it clips in place.

In standby mode, open the shortcut menu.683c9f46aff4850cb872e2c095b6b90ed666a4e610bc.jpg)
3. Place the rear cover with the position mark aligning with the one on your phone body. Replace the rear cover, by sliding it back onto the phone until it clips in place.

ff4850cb872e2c095b6b90ed666a4e610bc.jpg)
3. Place the rear cover with the position mark aligning with the one on your phone body. Replace the rear cover, by sliding it back onto the phone until it clips in place.

Exit to standby mode (Except in Music player and FM radio interface)sition mark aligning with the one on your phone body. Replace the rear cover, by sliding it back onto the phone until it clips in place.

n mark aligning with the one on your phone body. Replace the rear cover, by sliding it back onto the phone until it clips in place.

In standby mode, press to open the contact list.rear cover, by sliding it back onto the phone until it clips in place.

r, by sliding it back onto the phone until it clips in place.

ding it back onto the phone until it clips in place.

ack onto the phone until it clips in place.

nto the phone until it clips in place.

he phone until it clips in place.

Display iconr the alarms are turned off.
Vibration on.
Earphone is connected and detected.
Airplane mode
Call forward
Call history
Keypad unlocked
Keypad locked
Voicemail indicator.
Signal strength indicator. Vertical bars show the strength of the network connection.
Strong signal, Weak signal, No signal
Battery level indicator
Battery full, Low battery, Low battery warning
Message inboxfull
New message. The icon disappears after the new messages are read.
Silence mode. In standby, press and hold # key to turn on or off the speaker.
Roam indicator.
Alarm on. The icon disappears after the alarms are turned off.
Vibration on.
Earphone is connected and detected.
Airplane mode
Call forward
Call history
Keypad unlocked
Keypad locked
Voicemail indicator.
Getting startedend or scratch your memory card or SIM card.
Avoid exposing your memory card and SIM card to static electricity, water or dirt.
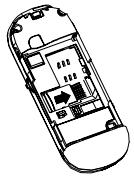
As the memory card fits beneath the SIM card, please ensure that the memory card is fitted first.
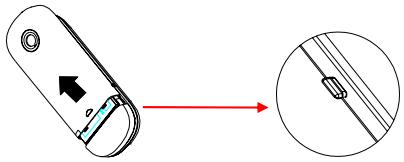
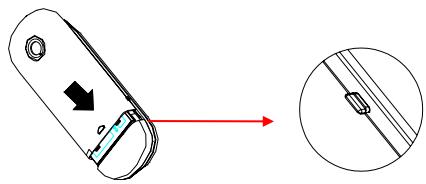
1. With your phone back upward, apply gentle pressure to the rear case of the phone, slide up the cover until the position mark on the right side aligned with the one on the phone body. Then take off the cover. Slide the memory card into the memory card holder with the metal contacts facing down into the phone body.

Installing the batteryAvoid exposing your memory card and SIM card to static electricity, water or dirt.
As the memory card fits beneath the SIM card, please ensure that the memory card is fitted first.
1. With your phone back upward, apply gentle pressure to the rear case of the phone, slide up the cover until the position mark on the right side aligned with the one on the phone body. Then take off the cover. Slide the memory card into the memory card holder with the metal contacts facing down into the phone body.

- With your phone back upward, apply gentle pressure to the rear case of the phone, slide up the cover until the position mark on the right side aligned with the one on the phone body. Then take off the cover.
- With the metal contacts facing into the phone clip the battery in place, positioning the bottom of the battery first.
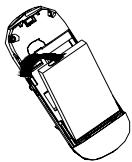
- Place the rear cover with the position mark aligning with the one on your phone body. Replace the rear cover, by sliding it back onto the phone until it clips in place.
Installing a memory card and the SIM cardtent of the memory card.
Only Micro SD/T-Flash card can be used on your phone. It is recommended to use the brands such as SanDisk, Kingston, KingMAX, ihope, TwinMos and pqi.
2. Slide the SIM card into the SIM card holder with the metal contacts facing down.

Warning:d can be used on your phone. It is recommended to use the brands such as SanDisk, Kingston, KingMAX, ihope, TwinMos and pqi.
2. Slide the SIM card into the SIM card holder with the metal contacts facing down.

Do not bend or scratch your memory card or SIM card.
Avoid exposing your memory card and SIM card to static electricity, water or dirt.
As the memory card fits beneath the SIM card, please ensure that the memory card is fitted first.
- With your phone back upward, apply gentle pressure to the rear case of the phone, slide up the cover until the position mark on the right side aligned with the one on the phone body. Then take off the cover. Slide the memory card into the memory card holder with the metal contacts facing down into the phone body.
Note:performance of your phone's battery, please charge the battery fully before using it for the first time (Approx. 12 hours), using the method described below. Please note: some batteries require several full charge/discharge cycles to reach their best performance.
1. Make sure the battery has been installed properly before charging.
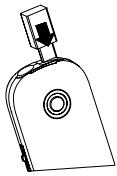
2. Open the protective USB cover and plug the travel charger into the USB connector.
3. Plug the other end of the travel charger into the electrical outlet.

If you need to format your memory card, please use formats FAT12 or FAT16.
If file formats other than FAT12 or FAT16 are used the phone may not be able to read the content of the memory card.
Only Micro SD/T-Flash card can be used on your phone. It is recommended to use the brands such as SanDisk, Kingston, KingMAX, ihope, TwinMos and pqi.
- Slide the SIM card into the SIM card holder with the metal contacts facing down.
Charging the batterye a few minutes for your phone to display a visible charging indication if the battery is fully discharged.
The phone will be charged from your PC when it is connected with the USB cable, however it will take a longer time to charge than when charging with the travel charger.
Warning:or your phone to display a visible charging indication if the battery is fully discharged.
The phone will be charged from your PC when it is connected with the USB cable, however it will take a longer time to charge than when charging with the travel charger.
To avoid damaging the phone, please do not remove the battery when the phone is charging.
To ensure the best performance of your phone's battery, please charge the battery fully before using it for the first time (Approx. 12 hours), using the method described below. Please note: some batteries require several full charge/discharge cycles to reach their best performance.
- Make sure the battery has been installed properly before charging.
- Open the protective USB cover and plug the travel charger into the USB connector.
- Plug the other end of the travel charger into the electrical outlet.
Tips:he Power key for 2 seconds to turn your phone on. Your phone will display the power on animation and enter standby mode.
2. If necessary, enter your SIM card PIN code (displayed as \*\*\*\* to unlock the SIM card.
3. Please refer to Other settings>
It may take a few seconds for your phone to display a visible charging indication if your phone is switched off.
Your phone can be used while charging.
It may take a few minutes for your phone to display a visible charging indication if the battery is fully discharged.
The phone will be charged from your PC when it is connected with the USB cable, however it will take a longer time to charge than when charging with the travel charger.
Turning your phone on/off at the bottom of the phone body.
Contact with the antenna affects call quality and may cause the phone to operate at a higher power level than otherwise needed. Not touching the antenna area during a phone call optimizes the antenna performance and the talktime of your phone.

Power on antenna at the bottom of the phone body.
Contact with the antenna affects call quality and may cause the phone to operate at a higher power level than otherwise needed. Not touching the antenna area during a phone call optimizes the antenna performance and the talktime of your phone.

Tip: antenna affects call quality and may cause the phone to operate at a higher power level than otherwise needed. Not touching the antenna area during a phone call optimizes the antenna performance and the talktime of your phone.

When switched on, your phone is busy searching the network. Some functions may NOT work properly in the first few seconds.
-
Press and hold the Power key for 2 seconds to turn your phone on. Your phone will display the power on animation and enter standby mode.
-
If necessary, enter your SIM card PIN code (displayed as **** to unlock the SIM card.
- Please refer to Other settings>Security setting>PIN code in the user manual to get more information on the PIN code.
Power off
Press and hold the Power key for 2 seconds to turn your phone off.
Your phone will display power off animation.
Tip
Your phone has a built-in antenna at the bottom of the phone body.
Contact with the antenna affects call quality and may cause the phone to operate at a higher power level than otherwise needed. Not touching the antenna area during a phone call optimizes the antenna performance and the talktime of your phone.

Using your Phone
From the main menu, select MP3 Player, press the Dial key or Scroll key.
Keypad shortcutsess the Dial key or Scroll key.
In standby mode
Scroll key press the Dial key or Scroll key.
UpDial key or Scroll key.
To open SMS.y.
h1 id="note-2">Downte To open the main menu. as an aerial for the FM radio, so you must have the headset connected.
n aerial for the FM radio, so you must have the headset connected.
PressM radio, so you must have the headset connected.
To open Names list.e headset connected.
dset connected.
Soft keyid="making-a-call"> Pressall"> To open shortcut menu:
Profiles
Mass storage
Record
Memo headset lead works as an aerial for the FM radio, so you must have the headset connected.
set lead works as an aerial for the FM radio, so you must have the headset connected.
Dial keyaerial for the FM radio, so you must have the headset connected.
Press FM radio, so you must have the headset connected.
To open Mobile>Call record>All calls.
Press the * or # key to switch between Dialled, Missed and Received calls. headset connected.
set connected.
onnected.
- & # key function list
number and press the Dial key (Dial).
Or select a number in the Phone book contact list and press the Dial key (Call).
*keyress the Dial key (Dial).
Or select a number in the Phone book contact list and press the Dial key (Call).
#printey (Dial).
Or select a number in the Phone book contact list and press the Dial key (Call).
ial).
Or select a number in the Phone book contact list and press the Dial key (Call).
In standby mode the Phone book contact list and press the Dial key (Call).
Press and hold to enter the ‘+’ for international dialing.="answering-or-rejecting-a-call"> Press and hold to turn the loud speaker on or off.allh1> Name listy (Ans) to answer an incoming call.
Press the Power key (Reject) to end or reject a call.
Press to page up.ress the Power key (Reject) to end or reject a call.
Press to page down.ject a call.
a call.
Call historyoff-the-speaker">he-speaker"> Calendarff the Speaker Press to go to last month.This silences the phone's loudspeaker, so it will not ring, or give message alerts and the MP3 can only be played through the headset.
Press to go to next month.ll not ring, or give message alerts and the MP3 can only be played through the headset.
t ring, or give message alerts and the MP3 can only be played through the headset.
Memoessage alerts and the MP3 can only be played through the headset.
e alerts and the MP3 can only be played through the headset.
Create SMSn only be played through the headset.
Press to enter the punctuation; Press to select letter group forward.> Press to switch entry method; Press to select letter group backward.ase or decrease earpiece volume.
r decrease earpiece volume.
Music playume.
Press to switch the equalizeraling a number Press to switch the play mode.ress the Dial key to enter the All calls list.
Select the number you want by the Scroll key, then press the Dial key.
the Dial key to enter the All calls list.
Select the number you want by the Scroll key, then press the Dial key.
ial key to enter the All calls list.
Select the number you want by the Scroll key, then press the Dial key.
Basic functionstact list and press the Dial key (Call).
Playing Musicl">
From the main menu, select MP3 Player, press the Dial key or Scroll key.
Listening to the Radio
From the main menu, select FM radio, press the Dial key or Scroll key.
Note key. This silences the phone's loudspeaker, so it will not ring, or give message alerts and the MP3 can only be played through the headset.
The headset lead works as an aerial for the FM radio, so you must have the headset connected.
Making a callcrease or decrease earpiece volume.
Input the phone number and press the Dial key (Dial).
Or select a number in the Phone book contact list and press the Dial key (Call).
Answering or rejecting a cally.
Press the Dial key (Ans) to answer an incoming call.
Press the Power key (Reject) to end or reject a call.
Turning off the Speaker keypad unlocked):
Push the Scroll key down to enter main menu and scroll through the menu icons, press the Scroll key or Dial key to select and open the menu when the relevant icon is displayed on the screen.
Press and hold the # key. This silences the phone's loudspeaker, so it will not ring, or give message alerts and the MP3 can only be played through the headset.
Adjusting Volume During a callu icons, press the Scroll key or Dial key to select and open the menu when the relevant icon is displayed on the screen.
Push the Scroll key up or down to increase or decrease earpiece volume.
Redialing a number& Date
In standby mode, press the Dial key to enter the All calls list.
Select the number you want by the Scroll key, then press the Dial key.
Notee>
You can press the * key or # key to switch to the Dialled, Received or Missed lists.
Main menu
2. Enter the date you need, then press the Dial key (OK) or Scroll key to save the date setting. (e.g. If the date would be Mar 15^th 2005, please enter 1-5-0-3-2-0-0-5)
In standby mode (with keypad unlocked):
Push the Scroll key down to enter main menu and scroll through the menu icons, press the Scroll key or Dial key to select and open the menu when the relevant icon is displayed on the screen.
1、Time> 2、ormat.
2. Select the format you want, and then press the Dial key (Option) or Scroll key to save the date format setting.
3、. Select the format you want, and then press the Dial key (Option) or Scroll key to save the date format setting.
ect the format you want, and then press the Dial key (Option) or Scroll key to save the date format setting.
MP3 player, and then press the Dial key (Option) or Scroll key to save the date format setting.
FM radiothe Dial key (Option) or Scroll key to save the date format setting.
Mobileption) or Scroll key to save the date format setting.
) or Scroll key to save the date format setting.
1. Play backgrounde format setting.
1. Play backgroundstoring-a-phonebook-entry"> 1. Phone booktry">Storing a phonebook entry 2. Play list 2. Choose Stn.a-phonebook-entry-from-the-menu"> 2. Messagesom-the-menu">e-menu"> 3. Skin settingsntry from the menu 3. Name Stn.1> 3. Call recordnu, select Mobile>elect Mobile> 4. Player settings.
2. Enter the contact name and press the Dial key to save.
3. Select a group for the current entry. Press the Dial key (Select) or Scroll key.
4. Enter the phone number you want. Then press the Dial key (Save) or Scroll key.
5. Select a number type, Press the Dial key (Save) or Scroll key.
6. Three phone numbers can be added into each entry. To add more numbers, select Add number and press the Scroll key and redo step 4 and step 5 above.
4. Delete Stn.ct name and press the Dial key to save.
3. Select a group for the current entry. Press the Dial key (Select) or Scroll key.
4. Enter the phone number you want. Then press the Dial key (Save) or Scroll key.
5. Select a number type, Press the Dial key (Save) or Scroll key.
6. Three phone numbers can be added into each entry. To add more numbers, select Add number and press the Scroll key and redo step 4 and step 5 above.
4. Servicese Dial key to save.
3. Select a group for the current entry. Press the Dial key (Select) or Scroll key.
4. Enter the phone number you want. Then press the Dial key (Save) or Scroll key.
5. Select a number type, Press the Dial key (Save) or Scroll key.
6. Three phone numbers can be added into each entry. To add more numbers, select Add number and press the Scroll key and redo step 4 and step 5 above.
l key to save.
3. Select a group for the current entry. Press the Dial key (Select) or Scroll key.
4. Enter the phone number you want. Then press the Dial key (Save) or Scroll key.
5. Select a number type, Press the Dial key (Save) or Scroll key.
6. Three phone numbers can be added into each entry. To add more numbers, select Add number and press the Scroll key and redo step 4 and step 5 above.
.
3. Select a group for the current entry. Press the Dial key (Select) or Scroll key.
4. Enter the phone number you want. Then press the Dial key (Save) or Scroll key.
5. Select a number type, Press the Dial key (Save) or Scroll key.
6. Three phone numbers can be added into each entry. To add more numbers, select Add number and press the Scroll key and redo step 4 and step 5 above.
5. Manual tuningr the current entry. Press the Dial key (Select) or Scroll key.
4. Enter the phone number you want. Then press the Dial key (Save) or Scroll key.
5. Select a number type, Press the Dial key (Save) or Scroll key.
6. Three phone numbers can be added into each entry. To add more numbers, select Add number and press the Scroll key and redo step 4 and step 5 above.
rent entry. Press the Dial key (Select) or Scroll key.
4. Enter the phone number you want. Then press the Dial key (Save) or Scroll key.
5. Select a number type, Press the Dial key (Save) or Scroll key.
6. Three phone numbers can be added into each entry. To add more numbers, select Add number and press the Scroll key and redo step 4 and step 5 above.
entry. Press the Dial key (Select) or Scroll key.
4. Enter the phone number you want. Then press the Dial key (Save) or Scroll key.
5. Select a number type, Press the Dial key (Save) or Scroll key.
6. Three phone numbers can be added into each entry. To add more numbers, select Add number and press the Scroll key and redo step 4 and step 5 above.
the Dial key (Select) or Scroll key.
4. Enter the phone number you want. Then press the Dial key (Save) or Scroll key.
5. Select a number type, Press the Dial key (Save) or Scroll key.
6. Three phone numbers can be added into each entry. To add more numbers, select Add number and press the Scroll key and redo step 4 and step 5 above.
6. Auto tuningr Scroll key.
4. Enter the phone number you want. Then press the Dial key (Save) or Scroll key.
5. Select a number type, Press the Dial key (Save) or Scroll key.
6. Three phone numbers can be added into each entry. To add more numbers, select Add number and press the Scroll key and redo step 4 and step 5 above.
key.
4. Enter the phone number you want. Then press the Dial key (Save) or Scroll key.
5. Select a number type, Press the Dial key (Save) or Scroll key.
6. Three phone numbers can be added into each entry. To add more numbers, select Add number and press the Scroll key and redo step 4 and step 5 above.
4. Enter the phone number you want. Then press the Dial key (Save) or Scroll key.
5. Select a number type, Press the Dial key (Save) or Scroll key.
6. Three phone numbers can be added into each entry. To add more numbers, select Add number and press the Scroll key and redo step 4 and step 5 above.
he phone number you want. Then press the Dial key (Save) or Scroll key.
5. Select a number type, Press the Dial key (Save) or Scroll key.
6. Three phone numbers can be added into each entry. To add more numbers, select Add number and press the Scroll key and redo step 4 and step 5 above.
7. Set frequency Then press the Dial key (Save) or Scroll key.
5. Select a number type, Press the Dial key (Save) or Scroll key.
6. Three phone numbers can be added into each entry. To add more numbers, select Add number and press the Scroll key and redo step 4 and step 5 above.
ss the Dial key (Save) or Scroll key.
5. Select a number type, Press the Dial key (Save) or Scroll key.
6. Three phone numbers can be added into each entry. To add more numbers, select Add number and press the Scroll key and redo step 4 and step 5 above.
e Dial key (Save) or Scroll key.
5. Select a number type, Press the Dial key (Save) or Scroll key.
6. Three phone numbers can be added into each entry. To add more numbers, select Add number and press the Scroll key and redo step 4 and step 5 above.
ave) or Scroll key.
5. Select a number type, Press the Dial key (Save) or Scroll key.
6. Three phone numbers can be added into each entry. To add more numbers, select Add number and press the Scroll key and redo step 4 and step 5 above.
8. Search all
5. Select a number type, Press the Dial key (Save) or Scroll key.
6. Three phone numbers can be added into each entry. To add more numbers, select Add number and press the Scroll key and redo step 4 and step 5 above.
t a number type, Press the Dial key (Save) or Scroll key.
6. Three phone numbers can be added into each entry. To add more numbers, select Add number and press the Scroll key and redo step 4 and step 5 above.
umber type, Press the Dial key (Save) or Scroll key.
6. Three phone numbers can be added into each entry. To add more numbers, select Add number and press the Scroll key and redo step 4 and step 5 above.
4、ss the Dial key (Save) or Scroll key.
6. Three phone numbers can be added into each entry. To add more numbers, select Add number and press the Scroll key and redo step 4 and step 5 above.
5、 key (Save) or Scroll key.
6. Three phone numbers can be added into each entry. To add more numbers, select Add number and press the Scroll key and redo step 4 and step 5 above.
6、 or Scroll key.
6. Three phone numbers can be added into each entry. To add more numbers, select Add number and press the Scroll key and redo step 4 and step 5 above.
croll key.
6. Three phone numbers can be added into each entry. To add more numbers, select Add number and press the Scroll key and redo step 4 and step 5 above.
Settingse phone numbers can be added into each entry. To add more numbers, select Add number and press the Scroll key and redo step 4 and step 5 above.
Profilesan be added into each entry. To add more numbers, select Add number and press the Scroll key and redo step 4 and step 5 above.
File manager entry. To add more numbers, select Add number and press the Scroll key and redo step 4 and step 5 above.
y. To add more numbers, select Add number and press the Scroll key and redo step 4 and step 5 above.
1. Phones, select Add number and press the Scroll key and redo step 4 and step 5 above.
1. Normaler and press the Scroll key and redo step 4 and step 5 above.
1. File viewer key and redo step 4 and step 5 above.
and redo step 4 and step 5 above.
2. Date & Timee.
2. Meeting-a-phonebook-entry-in-standby-mode"> 2. Status-in-standby-mode">tandby-mode"> 3. Call a phonebook entry in standby mode 3. Outdoorin standby mode 3. Format1>. In standby mode, input a phone number, then press the Scroll key to enter Option menu> 4. Networkt a phone number, then press the Scroll key to enter Option menu> 4. Carr, then press the Scroll key to enter Option menu> ress the Scroll key to enter Option menu>the Scroll key to enter Option menu> 5. SecurityOption menu> 5. VIPe.
2. If adding a new phone number to an existing entry, select To existing to enter phone book list.
3. Select the entry you want, then press the Dial key (Select) to save the new number.
4. If creating a new entry, select New entry.
If adding a new phone number to an existing entry, select To existing to enter phone book list.
3. Select the entry you want, then press the Dial key (Select) to save the new number.
4. If creating a new entry, select New entry.
ding a new phone number to an existing entry, select To existing to enter phone book list.
3. Select the entry you want, then press the Dial key (Select) to save the new number.
4. If creating a new entry, select New entry.
6. Reset settingsexisting entry, select To existing to enter phone book list.
3. Select the entry you want, then press the Dial key (Select) to save the new number.
4. If creating a new entry, select New entry.
6. Headsetect To existing to enter phone book list.
3. Select the entry you want, then press the Dial key (Select) to save the new number.
4. If creating a new entry, select New entry.
isting to enter phone book list.
3. Select the entry you want, then press the Dial key (Select) to save the new number.
4. If creating a new entry, select New entry.
g to enter phone book list.
3. Select the entry you want, then press the Dial key (Select) to save the new number.
4. If creating a new entry, select New entry.
7、e book list.
3. Select the entry you want, then press the Dial key (Select) to save the new number.
4. If creating a new entry, select New entry.
8、.
3. Select the entry you want, then press the Dial key (Select) to save the new number.
4. If creating a new entry, select New entry.
9、ect the entry you want, then press the Dial key (Select) to save the new number.
4. If creating a new entry, select New entry.
he entry you want, then press the Dial key (Select) to save the new number.
4. If creating a new entry, select New entry.
Agendathen press the Dial key (Select) to save the new number.
4. If creating a new entry, select New entry.
Tools Dial key (Select) to save the new number.
4. If creating a new entry, select New entry.
Gamelect) to save the new number.
4. If creating a new entry, select New entry.
to save the new number.
4. If creating a new entry, select New entry.
1. Alarmer.
4. If creating a new entry, select New entry.
1. Voice recorderw entry, select New entry.
OK, preview or open the option menuphone, slide up the cover until the position mark on the right side aligned with the one on the phone body. Then take off the cover.

2. With the metal contacts facing into the phone clip the battery in place, positioning the bottom of the battery first.

3. Place the rear cover with the position mark aligning with the one on your phone body. Replace the rear cover, by sliding it back onto the phone until it clips in place.

End or reject callstil the position mark on the right side aligned with the one on the phone body. Then take off the cover.

2. With the metal contacts facing into the phone clip the battery in place, positioning the bottom of the battery first.

3. Place the rear cover with the position mark aligning with the one on your phone body. Replace the rear cover, by sliding it back onto the phone until it clips in place.

he position mark on the right side aligned with the one on the phone body. Then take off the cover.

2. With the metal contacts facing into the phone clip the battery in place, positioning the bottom of the battery first.

3. Place the rear cover with the position mark aligning with the one on your phone body. Replace the rear cover, by sliding it back onto the phone until it clips in place.

In standby mode, push up to open SMS menu. on the phone body. Then take off the cover.

2. With the metal contacts facing into the phone clip the battery in place, positioning the bottom of the battery first.

3. Place the rear cover with the position mark aligning with the one on your phone body. Replace the rear cover, by sliding it back onto the phone until it clips in place.

Exit to standby mode (In Music player and FM radio interface)2bd5c7b72f71ad4a89bb11fe0e10f4195c5e08f6e93c2a01b95.jpg)
2. With the metal contacts facing into the phone clip the battery in place, positioning the bottom of the battery first.

3. Place the rear cover with the position mark aligning with the one on your phone body. Replace the rear cover, by sliding it back onto the phone until it clips in place.

f71ad4a89bb11fe0e10f4195c5e08f6e93c2a01b95.jpg)
2. With the metal contacts facing into the phone clip the battery in place, positioning the bottom of the battery first.

3. Place the rear cover with the position mark aligning with the one on your phone body. Replace the rear cover, by sliding it back onto the phone until it clips in place.

Lock or unlock the keypad with # key (In Music player and FM radio interface)o the phone clip the battery in place, positioning the bottom of the battery first.

3. Place the rear cover with the position mark aligning with the one on your phone body. Replace the rear cover, by sliding it back onto the phone until it clips in place.

phone clip the battery in place, positioning the bottom of the battery first.

3. Place the rear cover with the position mark aligning with the one on your phone body. Replace the rear cover, by sliding it back onto the phone until it clips in place.

In standby mode, push down to open the main menu.e battery first.

3. Place the rear cover with the position mark aligning with the one on your phone body. Replace the rear cover, by sliding it back onto the phone until it clips in place.

In standby mode, open the shortcut menu.683c9f46aff4850cb872e2c095b6b90ed666a4e610bc.jpg)
3. Place the rear cover with the position mark aligning with the one on your phone body. Replace the rear cover, by sliding it back onto the phone until it clips in place.

ff4850cb872e2c095b6b90ed666a4e610bc.jpg)
3. Place the rear cover with the position mark aligning with the one on your phone body. Replace the rear cover, by sliding it back onto the phone until it clips in place.

Exit to standby mode (Except in Music player and FM radio interface)sition mark aligning with the one on your phone body. Replace the rear cover, by sliding it back onto the phone until it clips in place.

n mark aligning with the one on your phone body. Replace the rear cover, by sliding it back onto the phone until it clips in place.

In standby mode, press to open the contact list.rear cover, by sliding it back onto the phone until it clips in place.

r, by sliding it back onto the phone until it clips in place.

ding it back onto the phone until it clips in place.

ack onto the phone until it clips in place.

nto the phone until it clips in place.

he phone until it clips in place.

Display iconr the alarms are turned off.
Vibration on.
Earphone is connected and detected.
Airplane mode
Call forward
Call history
Keypad unlocked
Keypad locked
Voicemail indicator.
Signal strength indicator. Vertical bars show the strength of the network connection.
Strong signal, Weak signal, No signal
Battery level indicator
Battery full, Low battery, Low battery warning
Message inboxfull
New message. The icon disappears after the new messages are read.
Silence mode. In standby, press and hold # key to turn on or off the speaker.
Roam indicator.
Alarm on. The icon disappears after the alarms are turned off.
Vibration on.
Earphone is connected and detected.
Airplane mode
Call forward
Call history
Keypad unlocked
Keypad locked
Voicemail indicator.
Getting startedend or scratch your memory card or SIM card.
Avoid exposing your memory card and SIM card to static electricity, water or dirt.
As the memory card fits beneath the SIM card, please ensure that the memory card is fitted first.
1. With your phone back upward, apply gentle pressure to the rear case of the phone, slide up the cover until the position mark on the right side aligned with the one on the phone body. Then take off the cover. Slide the memory card into the memory card holder with the metal contacts facing down into the phone body.

Installing the batteryAvoid exposing your memory card and SIM card to static electricity, water or dirt.
As the memory card fits beneath the SIM card, please ensure that the memory card is fitted first.
1. With your phone back upward, apply gentle pressure to the rear case of the phone, slide up the cover until the position mark on the right side aligned with the one on the phone body. Then take off the cover. Slide the memory card into the memory card holder with the metal contacts facing down into the phone body.

- With your phone back upward, apply gentle pressure to the rear case of the phone, slide up the cover until the position mark on the right side aligned with the one on the phone body. Then take off the cover.
- With the metal contacts facing into the phone clip the battery in place, positioning the bottom of the battery first.
- Place the rear cover with the position mark aligning with the one on your phone body. Replace the rear cover, by sliding it back onto the phone until it clips in place.
Installing a memory card and the SIM cardtent of the memory card.
Only Micro SD/T-Flash card can be used on your phone. It is recommended to use the brands such as SanDisk, Kingston, KingMAX, ihope, TwinMos and pqi.
2. Slide the SIM card into the SIM card holder with the metal contacts facing down.

Warning:d can be used on your phone. It is recommended to use the brands such as SanDisk, Kingston, KingMAX, ihope, TwinMos and pqi.
2. Slide the SIM card into the SIM card holder with the metal contacts facing down.

Do not bend or scratch your memory card or SIM card.
Avoid exposing your memory card and SIM card to static electricity, water or dirt.
As the memory card fits beneath the SIM card, please ensure that the memory card is fitted first.
- With your phone back upward, apply gentle pressure to the rear case of the phone, slide up the cover until the position mark on the right side aligned with the one on the phone body. Then take off the cover. Slide the memory card into the memory card holder with the metal contacts facing down into the phone body.
Note:performance of your phone's battery, please charge the battery fully before using it for the first time (Approx. 12 hours), using the method described below. Please note: some batteries require several full charge/discharge cycles to reach their best performance.
1. Make sure the battery has been installed properly before charging.
2. Open the protective USB cover and plug the travel charger into the USB connector.
3. Plug the other end of the travel charger into the electrical outlet.

If you need to format your memory card, please use formats FAT12 or FAT16.
If file formats other than FAT12 or FAT16 are used the phone may not be able to read the content of the memory card.
Only Micro SD/T-Flash card can be used on your phone. It is recommended to use the brands such as SanDisk, Kingston, KingMAX, ihope, TwinMos and pqi.
- Slide the SIM card into the SIM card holder with the metal contacts facing down.
Charging the batterye a few minutes for your phone to display a visible charging indication if the battery is fully discharged.
The phone will be charged from your PC when it is connected with the USB cable, however it will take a longer time to charge than when charging with the travel charger.
Warning:or your phone to display a visible charging indication if the battery is fully discharged.
The phone will be charged from your PC when it is connected with the USB cable, however it will take a longer time to charge than when charging with the travel charger.
To avoid damaging the phone, please do not remove the battery when the phone is charging.
To ensure the best performance of your phone's battery, please charge the battery fully before using it for the first time (Approx. 12 hours), using the method described below. Please note: some batteries require several full charge/discharge cycles to reach their best performance.
- Make sure the battery has been installed properly before charging.
- Open the protective USB cover and plug the travel charger into the USB connector.
- Plug the other end of the travel charger into the electrical outlet.
Tips:he Power key for 2 seconds to turn your phone on. Your phone will display the power on animation and enter standby mode.
2. If necessary, enter your SIM card PIN code (displayed as \*\*\*\* to unlock the SIM card.
3. Please refer to Other settings>
It may take a few seconds for your phone to display a visible charging indication if your phone is switched off.
Your phone can be used while charging.
It may take a few minutes for your phone to display a visible charging indication if the battery is fully discharged.
The phone will be charged from your PC when it is connected with the USB cable, however it will take a longer time to charge than when charging with the travel charger.
Turning your phone on/off at the bottom of the phone body.
Contact with the antenna affects call quality and may cause the phone to operate at a higher power level than otherwise needed. Not touching the antenna area during a phone call optimizes the antenna performance and the talktime of your phone.

Power on antenna at the bottom of the phone body.
Contact with the antenna affects call quality and may cause the phone to operate at a higher power level than otherwise needed. Not touching the antenna area during a phone call optimizes the antenna performance and the talktime of your phone.

Tip: antenna affects call quality and may cause the phone to operate at a higher power level than otherwise needed. Not touching the antenna area during a phone call optimizes the antenna performance and the talktime of your phone.

When switched on, your phone is busy searching the network. Some functions may NOT work properly in the first few seconds.
-
Press and hold the Power key for 2 seconds to turn your phone on. Your phone will display the power on animation and enter standby mode.
-
If necessary, enter your SIM card PIN code (displayed as **** to unlock the SIM card.
- Please refer to Other settings>Security setting>PIN code in the user manual to get more information on the PIN code.
Power off
Press and hold the Power key for 2 seconds to turn your phone off.
Your phone will display power off animation.
Tip
Your phone has a built-in antenna at the bottom of the phone body.
Contact with the antenna affects call quality and may cause the phone to operate at a higher power level than otherwise needed. Not touching the antenna area during a phone call optimizes the antenna performance and the talktime of your phone.
Using your Phone
From the main menu, select MP3 Player, press the Dial key or Scroll key.
Keypad shortcutsess the Dial key or Scroll key.
In standby mode
Scroll key press the Dial key or Scroll key.
UpDial key or Scroll key.
To open SMS.y.
h1 id="note-2">Downte To open the main menu. as an aerial for the FM radio, so you must have the headset connected.
n aerial for the FM radio, so you must have the headset connected.
PressM radio, so you must have the headset connected.
To open Names list.e headset connected.
dset connected.
Soft keyid="making-a-call"> Pressall"> To open shortcut menu:
Profiles
Mass storage
Record
Memo headset lead works as an aerial for the FM radio, so you must have the headset connected.
set lead works as an aerial for the FM radio, so you must have the headset connected.
Dial keyaerial for the FM radio, so you must have the headset connected.
Press FM radio, so you must have the headset connected.
To open Mobile>Call record>All calls.
Press the * or # key to switch between Dialled, Missed and Received calls. headset connected.
set connected.
onnected.
- & # key function list
number and press the Dial key (Dial).
Or select a number in the Phone book contact list and press the Dial key (Call).
*keyress the Dial key (Dial).
Or select a number in the Phone book contact list and press the Dial key (Call).
#printey (Dial).
Or select a number in the Phone book contact list and press the Dial key (Call).
ial).
Or select a number in the Phone book contact list and press the Dial key (Call).
In standby mode the Phone book contact list and press the Dial key (Call).
Press and hold to enter the ‘+’ for international dialing.="answering-or-rejecting-a-call"> Press and hold to turn the loud speaker on or off.allh1> Name listy (Ans) to answer an incoming call.
Press the Power key (Reject) to end or reject a call.
Press to page up.ress the Power key (Reject) to end or reject a call.
Press to page down.ject a call.
a call.
Call historyoff-the-speaker">he-speaker"> Calendarff the Speaker Press to go to last month.This silences the phone's loudspeaker, so it will not ring, or give message alerts and the MP3 can only be played through the headset.
Press to go to next month.ll not ring, or give message alerts and the MP3 can only be played through the headset.
t ring, or give message alerts and the MP3 can only be played through the headset.
Memoessage alerts and the MP3 can only be played through the headset.
e alerts and the MP3 can only be played through the headset.
Create SMSn only be played through the headset.
Press to enter the punctuation; Press to select letter group forward.> Press to switch entry method; Press to select letter group backward.ase or decrease earpiece volume.
r decrease earpiece volume.
Music playume.
Press to switch the equalizeraling a number Press to switch the play mode.ress the Dial key to enter the All calls list.
Select the number you want by the Scroll key, then press the Dial key.
the Dial key to enter the All calls list.
Select the number you want by the Scroll key, then press the Dial key.
ial key to enter the All calls list.
Select the number you want by the Scroll key, then press the Dial key.
Basic functionstact list and press the Dial key (Call).
Playing Musicl">
From the main menu, select MP3 Player, press the Dial key or Scroll key.
Listening to the Radio
From the main menu, select FM radio, press the Dial key or Scroll key.
Note key. This silences the phone's loudspeaker, so it will not ring, or give message alerts and the MP3 can only be played through the headset.
The headset lead works as an aerial for the FM radio, so you must have the headset connected.
Making a callcrease or decrease earpiece volume.
Input the phone number and press the Dial key (Dial).
Or select a number in the Phone book contact list and press the Dial key (Call).
Answering or rejecting a cally.
Press the Dial key (Ans) to answer an incoming call.
Press the Power key (Reject) to end or reject a call.
Turning off the Speaker keypad unlocked):
Push the Scroll key down to enter main menu and scroll through the menu icons, press the Scroll key or Dial key to select and open the menu when the relevant icon is displayed on the screen.
Press and hold the # key. This silences the phone's loudspeaker, so it will not ring, or give message alerts and the MP3 can only be played through the headset.
Adjusting Volume During a callu icons, press the Scroll key or Dial key to select and open the menu when the relevant icon is displayed on the screen.
Push the Scroll key up or down to increase or decrease earpiece volume.
Redialing a number& Date
In standby mode, press the Dial key to enter the All calls list.
Select the number you want by the Scroll key, then press the Dial key.
Notee>
You can press the * key or # key to switch to the Dialled, Received or Missed lists.
Main menu
2. Enter the date you need, then press the Dial key (OK) or Scroll key to save the date setting. (e.g. If the date would be Mar 15^th 2005, please enter 1-5-0-3-2-0-0-5)
In standby mode (with keypad unlocked):
Push the Scroll key down to enter main menu and scroll through the menu icons, press the Scroll key or Dial key to select and open the menu when the relevant icon is displayed on the screen.
1、Time> 2、ormat.
2. Select the format you want, and then press the Dial key (Option) or Scroll key to save the date format setting.
3、. Select the format you want, and then press the Dial key (Option) or Scroll key to save the date format setting.
ect the format you want, and then press the Dial key (Option) or Scroll key to save the date format setting.
MP3 player, and then press the Dial key (Option) or Scroll key to save the date format setting.
FM radiothe Dial key (Option) or Scroll key to save the date format setting.
Mobileption) or Scroll key to save the date format setting.
) or Scroll key to save the date format setting.
1. Play backgrounde format setting.
1. Play backgroundstoring-a-phonebook-entry"> 1. Phone booktry">Storing a phonebook entry 2. Play list 2. Choose Stn.a-phonebook-entry-from-the-menu"> 2. Messagesom-the-menu">e-menu"> 3. Skin settingsntry from the menu 3. Name Stn.1> 3. Call recordnu, select Mobile>elect Mobile> 4. Player settings.
2. Enter the contact name and press the Dial key to save.
3. Select a group for the current entry. Press the Dial key (Select) or Scroll key.
4. Enter the phone number you want. Then press the Dial key (Save) or Scroll key.
5. Select a number type, Press the Dial key (Save) or Scroll key.
6. Three phone numbers can be added into each entry. To add more numbers, select Add number and press the Scroll key and redo step 4 and step 5 above.
4. Delete Stn.ct name and press the Dial key to save.
3. Select a group for the current entry. Press the Dial key (Select) or Scroll key.
4. Enter the phone number you want. Then press the Dial key (Save) or Scroll key.
5. Select a number type, Press the Dial key (Save) or Scroll key.
6. Three phone numbers can be added into each entry. To add more numbers, select Add number and press the Scroll key and redo step 4 and step 5 above.
4. Servicese Dial key to save.
3. Select a group for the current entry. Press the Dial key (Select) or Scroll key.
4. Enter the phone number you want. Then press the Dial key (Save) or Scroll key.
5. Select a number type, Press the Dial key (Save) or Scroll key.
6. Three phone numbers can be added into each entry. To add more numbers, select Add number and press the Scroll key and redo step 4 and step 5 above.
l key to save.
3. Select a group for the current entry. Press the Dial key (Select) or Scroll key.
4. Enter the phone number you want. Then press the Dial key (Save) or Scroll key.
5. Select a number type, Press the Dial key (Save) or Scroll key.
6. Three phone numbers can be added into each entry. To add more numbers, select Add number and press the Scroll key and redo step 4 and step 5 above.
.
3. Select a group for the current entry. Press the Dial key (Select) or Scroll key.
4. Enter the phone number you want. Then press the Dial key (Save) or Scroll key.
5. Select a number type, Press the Dial key (Save) or Scroll key.
6. Three phone numbers can be added into each entry. To add more numbers, select Add number and press the Scroll key and redo step 4 and step 5 above.
5. Manual tuningr the current entry. Press the Dial key (Select) or Scroll key.
4. Enter the phone number you want. Then press the Dial key (Save) or Scroll key.
5. Select a number type, Press the Dial key (Save) or Scroll key.
6. Three phone numbers can be added into each entry. To add more numbers, select Add number and press the Scroll key and redo step 4 and step 5 above.
rent entry. Press the Dial key (Select) or Scroll key.
4. Enter the phone number you want. Then press the Dial key (Save) or Scroll key.
5. Select a number type, Press the Dial key (Save) or Scroll key.
6. Three phone numbers can be added into each entry. To add more numbers, select Add number and press the Scroll key and redo step 4 and step 5 above.
entry. Press the Dial key (Select) or Scroll key.
4. Enter the phone number you want. Then press the Dial key (Save) or Scroll key.
5. Select a number type, Press the Dial key (Save) or Scroll key.
6. Three phone numbers can be added into each entry. To add more numbers, select Add number and press the Scroll key and redo step 4 and step 5 above.
the Dial key (Select) or Scroll key.
4. Enter the phone number you want. Then press the Dial key (Save) or Scroll key.
5. Select a number type, Press the Dial key (Save) or Scroll key.
6. Three phone numbers can be added into each entry. To add more numbers, select Add number and press the Scroll key and redo step 4 and step 5 above.
6. Auto tuningr Scroll key.
4. Enter the phone number you want. Then press the Dial key (Save) or Scroll key.
5. Select a number type, Press the Dial key (Save) or Scroll key.
6. Three phone numbers can be added into each entry. To add more numbers, select Add number and press the Scroll key and redo step 4 and step 5 above.
key.
4. Enter the phone number you want. Then press the Dial key (Save) or Scroll key.
5. Select a number type, Press the Dial key (Save) or Scroll key.
6. Three phone numbers can be added into each entry. To add more numbers, select Add number and press the Scroll key and redo step 4 and step 5 above.
4. Enter the phone number you want. Then press the Dial key (Save) or Scroll key.
5. Select a number type, Press the Dial key (Save) or Scroll key.
6. Three phone numbers can be added into each entry. To add more numbers, select Add number and press the Scroll key and redo step 4 and step 5 above.
he phone number you want. Then press the Dial key (Save) or Scroll key.
5. Select a number type, Press the Dial key (Save) or Scroll key.
6. Three phone numbers can be added into each entry. To add more numbers, select Add number and press the Scroll key and redo step 4 and step 5 above.
7. Set frequency Then press the Dial key (Save) or Scroll key.
5. Select a number type, Press the Dial key (Save) or Scroll key.
6. Three phone numbers can be added into each entry. To add more numbers, select Add number and press the Scroll key and redo step 4 and step 5 above.
ss the Dial key (Save) or Scroll key.
5. Select a number type, Press the Dial key (Save) or Scroll key.
6. Three phone numbers can be added into each entry. To add more numbers, select Add number and press the Scroll key and redo step 4 and step 5 above.
e Dial key (Save) or Scroll key.
5. Select a number type, Press the Dial key (Save) or Scroll key.
6. Three phone numbers can be added into each entry. To add more numbers, select Add number and press the Scroll key and redo step 4 and step 5 above.
ave) or Scroll key.
5. Select a number type, Press the Dial key (Save) or Scroll key.
6. Three phone numbers can be added into each entry. To add more numbers, select Add number and press the Scroll key and redo step 4 and step 5 above.
8. Search all
5. Select a number type, Press the Dial key (Save) or Scroll key.
6. Three phone numbers can be added into each entry. To add more numbers, select Add number and press the Scroll key and redo step 4 and step 5 above.
t a number type, Press the Dial key (Save) or Scroll key.
6. Three phone numbers can be added into each entry. To add more numbers, select Add number and press the Scroll key and redo step 4 and step 5 above.
umber type, Press the Dial key (Save) or Scroll key.
6. Three phone numbers can be added into each entry. To add more numbers, select Add number and press the Scroll key and redo step 4 and step 5 above.
4、ss the Dial key (Save) or Scroll key.
6. Three phone numbers can be added into each entry. To add more numbers, select Add number and press the Scroll key and redo step 4 and step 5 above.
5、 key (Save) or Scroll key.
6. Three phone numbers can be added into each entry. To add more numbers, select Add number and press the Scroll key and redo step 4 and step 5 above.
6、 or Scroll key.
6. Three phone numbers can be added into each entry. To add more numbers, select Add number and press the Scroll key and redo step 4 and step 5 above.
croll key.
6. Three phone numbers can be added into each entry. To add more numbers, select Add number and press the Scroll key and redo step 4 and step 5 above.
Settingse phone numbers can be added into each entry. To add more numbers, select Add number and press the Scroll key and redo step 4 and step 5 above.
Profilesan be added into each entry. To add more numbers, select Add number and press the Scroll key and redo step 4 and step 5 above.
File manager entry. To add more numbers, select Add number and press the Scroll key and redo step 4 and step 5 above.
y. To add more numbers, select Add number and press the Scroll key and redo step 4 and step 5 above.
1. Phones, select Add number and press the Scroll key and redo step 4 and step 5 above.
1. Normaler and press the Scroll key and redo step 4 and step 5 above.
1. File viewer key and redo step 4 and step 5 above.
and redo step 4 and step 5 above.
2. Date & Timee.
2. Meeting-a-phonebook-entry-in-standby-mode"> 2. Status-in-standby-mode">tandby-mode"> 3. Call a phonebook entry in standby mode 3. Outdoorin standby mode 3. Format1>. In standby mode, input a phone number, then press the Scroll key to enter Option menu> 4. Networkt a phone number, then press the Scroll key to enter Option menu> 4. Carr, then press the Scroll key to enter Option menu> ress the Scroll key to enter Option menu>the Scroll key to enter Option menu> 5. SecurityOption menu> 5. VIPe.
2. If adding a new phone number to an existing entry, select To existing to enter phone book list.
3. Select the entry you want, then press the Dial key (Select) to save the new number.
4. If creating a new entry, select New entry.
If adding a new phone number to an existing entry, select To existing to enter phone book list.
3. Select the entry you want, then press the Dial key (Select) to save the new number.
4. If creating a new entry, select New entry.
ding a new phone number to an existing entry, select To existing to enter phone book list.
3. Select the entry you want, then press the Dial key (Select) to save the new number.
4. If creating a new entry, select New entry.
6. Reset settingsexisting entry, select To existing to enter phone book list.
3. Select the entry you want, then press the Dial key (Select) to save the new number.
4. If creating a new entry, select New entry.
6. Headsetect To existing to enter phone book list.
3. Select the entry you want, then press the Dial key (Select) to save the new number.
4. If creating a new entry, select New entry.
isting to enter phone book list.
3. Select the entry you want, then press the Dial key (Select) to save the new number.
4. If creating a new entry, select New entry.
g to enter phone book list.
3. Select the entry you want, then press the Dial key (Select) to save the new number.
4. If creating a new entry, select New entry.
7、e book list.
3. Select the entry you want, then press the Dial key (Select) to save the new number.
4. If creating a new entry, select New entry.
8、.
3. Select the entry you want, then press the Dial key (Select) to save the new number.
4. If creating a new entry, select New entry.
9、ect the entry you want, then press the Dial key (Select) to save the new number.
4. If creating a new entry, select New entry.
he entry you want, then press the Dial key (Select) to save the new number.
4. If creating a new entry, select New entry.
Agendathen press the Dial key (Select) to save the new number.
4. If creating a new entry, select New entry.
Tools Dial key (Select) to save the new number.
4. If creating a new entry, select New entry.
Gamelect) to save the new number.
4. If creating a new entry, select New entry.
to save the new number.
4. If creating a new entry, select New entry.
1. Alarmer.
4. If creating a new entry, select New entry.
1. Voice recorderw entry, select New entry.
nto the phone until it clips in place.

he phone until it clips in place.

Display iconr the alarms are turned off.
Vibration on.
Earphone is connected and detected.
Airplane mode
Call forward
Call history
Keypad unlocked
Keypad locked
Voicemail indicator.
Display iconr the alarms are turned off.
Vibration on.
Earphone is connected and detected.
Airplane mode
Call forward
Call history
Keypad unlocked
Keypad locked
Voicemail indicator.
Signal strength indicator. Vertical bars show the strength of the network connection.
Strong signal, Weak signal, No signal
Battery level indicator
Battery full, Low battery, Low battery warning
Message inboxfull
New message. The icon disappears after the new messages are read.
Silence mode. In standby, press and hold # key to turn on or off the speaker.
Roam indicator.
Alarm on. The icon disappears after the alarms are turned off.
Vibration on.
Earphone is connected and detected.
Airplane mode
Call forward
Call history
Keypad unlocked
Keypad locked
Voicemail indicator.
Getting startedend or scratch your memory card or SIM card.
Avoid exposing your memory card and SIM card to static electricity, water or dirt.
As the memory card fits beneath the SIM card, please ensure that the memory card is fitted first.
1. With your phone back upward, apply gentle pressure to the rear case of the phone, slide up the cover until the position mark on the right side aligned with the one on the phone body. Then take off the cover. Slide the memory card into the memory card holder with the metal contacts facing down into the phone body.

Installing the batteryAvoid exposing your memory card and SIM card to static electricity, water or dirt.
As the memory card fits beneath the SIM card, please ensure that the memory card is fitted first.
1. With your phone back upward, apply gentle pressure to the rear case of the phone, slide up the cover until the position mark on the right side aligned with the one on the phone body. Then take off the cover. Slide the memory card into the memory card holder with the metal contacts facing down into the phone body.

- With your phone back upward, apply gentle pressure to the rear case of the phone, slide up the cover until the position mark on the right side aligned with the one on the phone body. Then take off the cover.
- With your phone back upward, apply gentle pressure to the rear case of the phone, slide up the cover until the position mark on the right side aligned with the one on the phone body. Then take off the cover.
- With the metal contacts facing into the phone clip the battery in place, positioning the bottom of the battery first.
- Place the rear cover with the position mark aligning with the one on your phone body. Replace the rear cover, by sliding it back onto the phone until it clips in place.
Installing a memory card and the SIM cardtent of the memory card.
Only Micro SD/T-Flash card can be used on your phone. It is recommended to use the brands such as SanDisk, Kingston, KingMAX, ihope, TwinMos and pqi.
2. Slide the SIM card into the SIM card holder with the metal contacts facing down.

Warning:d can be used on your phone. It is recommended to use the brands such as SanDisk, Kingston, KingMAX, ihope, TwinMos and pqi.
2. Slide the SIM card into the SIM card holder with the metal contacts facing down.

Warning:d can be used on your phone. It is recommended to use the brands such as SanDisk, Kingston, KingMAX, ihope, TwinMos and pqi.
2. Slide the SIM card into the SIM card holder with the metal contacts facing down.

Do not bend or scratch your memory card or SIM card.
Avoid exposing your memory card and SIM card to static electricity, water or dirt.
As the memory card fits beneath the SIM card, please ensure that the memory card is fitted first.
- With your phone back upward, apply gentle pressure to the rear case of the phone, slide up the cover until the position mark on the right side aligned with the one on the phone body. Then take off the cover. Slide the memory card into the memory card holder with the metal contacts facing down into the phone body.
Note:performance of your phone's battery, please charge the battery fully before using it for the first time (Approx. 12 hours), using the method described below. Please note: some batteries require several full charge/discharge cycles to reach their best performance.
1. Make sure the battery has been installed properly before charging.
2. Open the protective USB cover and plug the travel charger into the USB connector.
3. Plug the other end of the travel charger into the electrical outlet.

If you need to format your memory card, please use formats FAT12 or FAT16.
If file formats other than FAT12 or FAT16 are used the phone may not be able to read the content of the memory card.
Only Micro SD/T-Flash card can be used on your phone. It is recommended to use the brands such as SanDisk, Kingston, KingMAX, ihope, TwinMos and pqi.
- Slide the SIM card into the SIM card holder with the metal contacts facing down.
Charging the batterye a few minutes for your phone to display a visible charging indication if the battery is fully discharged.
The phone will be charged from your PC when it is connected with the USB cable, however it will take a longer time to charge than when charging with the travel charger.
Warning:or your phone to display a visible charging indication if the battery is fully discharged.
The phone will be charged from your PC when it is connected with the USB cable, however it will take a longer time to charge than when charging with the travel charger.
Warning:or your phone to display a visible charging indication if the battery is fully discharged.
The phone will be charged from your PC when it is connected with the USB cable, however it will take a longer time to charge than when charging with the travel charger.
To avoid damaging the phone, please do not remove the battery when the phone is charging.
To ensure the best performance of your phone's battery, please charge the battery fully before using it for the first time (Approx. 12 hours), using the method described below. Please note: some batteries require several full charge/discharge cycles to reach their best performance.
- Make sure the battery has been installed properly before charging.
- Open the protective USB cover and plug the travel charger into the USB connector.
- Plug the other end of the travel charger into the electrical outlet.
Tips:he Power key for 2 seconds to turn your phone on. Your phone will display the power on animation and enter standby mode. 2. If necessary, enter your SIM card PIN code (displayed as \*\*\*\* to unlock the SIM card. 3. Please refer to Other settings>
It may take a few seconds for your phone to display a visible charging indication if your phone is switched off.
Your phone can be used while charging.
It may take a few minutes for your phone to display a visible charging indication if the battery is fully discharged.
The phone will be charged from your PC when it is connected with the USB cable, however it will take a longer time to charge than when charging with the travel charger.
Turning your phone on/off at the bottom of the phone body.
Contact with the antenna affects call quality and may cause the phone to operate at a higher power level than otherwise needed. Not touching the antenna area during a phone call optimizes the antenna performance and the talktime of your phone.

Power on antenna at the bottom of the phone body.
Contact with the antenna affects call quality and may cause the phone to operate at a higher power level than otherwise needed. Not touching the antenna area during a phone call optimizes the antenna performance and the talktime of your phone.

Tip: antenna affects call quality and may cause the phone to operate at a higher power level than otherwise needed. Not touching the antenna area during a phone call optimizes the antenna performance and the talktime of your phone.

Tip: antenna affects call quality and may cause the phone to operate at a higher power level than otherwise needed. Not touching the antenna area during a phone call optimizes the antenna performance and the talktime of your phone.

When switched on, your phone is busy searching the network. Some functions may NOT work properly in the first few seconds.
-
Press and hold the Power key for 2 seconds to turn your phone on. Your phone will display the power on animation and enter standby mode.
-
If necessary, enter your SIM card PIN code (displayed as **** to unlock the SIM card.
- Please refer to Other settings>Security setting>PIN code in the user manual to get more information on the PIN code.
Power off
Press and hold the Power key for 2 seconds to turn your phone off.
Your phone will display power off animation.
Tip
Your phone has a built-in antenna at the bottom of the phone body.
Contact with the antenna affects call quality and may cause the phone to operate at a higher power level than otherwise needed. Not touching the antenna area during a phone call optimizes the antenna performance and the talktime of your phone.
Using your Phone
From the main menu, select MP3 Player, press the Dial key or Scroll key.
Keypad shortcutsess the Dial key or Scroll key.
In standby mode
Scroll key press the Dial key or Scroll key.
UpDial key or Scroll key.
To open SMS.y.
h1 id="note-2">Downte To open the main menu. as an aerial for the FM radio, so you must have the headset connected.
n aerial for the FM radio, so you must have the headset connected.
PressM radio, so you must have the headset connected.
To open Names list.e headset connected.
dset connected.
Soft keyid="making-a-call"> Pressall"> To open shortcut menu:
Profiles
Mass storage
Record
Memo headset lead works as an aerial for the FM radio, so you must have the headset connected.
set lead works as an aerial for the FM radio, so you must have the headset connected.
Dial keyaerial for the FM radio, so you must have the headset connected.
Press FM radio, so you must have the headset connected.
To open Mobile>Call record>All calls.
Press the * or # key to switch between Dialled, Missed and Received calls. headset connected.
set connected.
onnected.
- & # key function list
number and press the Dial key (Dial).
Or select a number in the Phone book contact list and press the Dial key (Call).
*keyress the Dial key (Dial).
Or select a number in the Phone book contact list and press the Dial key (Call).
#printey (Dial).
Or select a number in the Phone book contact list and press the Dial key (Call).
ial).
Or select a number in the Phone book contact list and press the Dial key (Call).
In standby mode the Phone book contact list and press the Dial key (Call).
Press and hold to enter the ‘+’ for international dialing.="answering-or-rejecting-a-call"> Press and hold to turn the loud speaker on or off.allh1> Name listy (Ans) to answer an incoming call.
Press the Power key (Reject) to end or reject a call.
Press to page up.ress the Power key (Reject) to end or reject a call.
Press to page down.ject a call.
a call.
Call historyoff-the-speaker">he-speaker"> Calendarff the Speaker Press to go to last month.This silences the phone's loudspeaker, so it will not ring, or give message alerts and the MP3 can only be played through the headset.
Press to go to next month.ll not ring, or give message alerts and the MP3 can only be played through the headset.
t ring, or give message alerts and the MP3 can only be played through the headset.
Memoessage alerts and the MP3 can only be played through the headset.
e alerts and the MP3 can only be played through the headset.
Create SMSn only be played through the headset.
Press to enter the punctuation; Press to select letter group forward.> Press to switch entry method; Press to select letter group backward.ase or decrease earpiece volume.
r decrease earpiece volume.
Music playume.
Press to switch the equalizeraling a number Press to switch the play mode.ress the Dial key to enter the All calls list.
Select the number you want by the Scroll key, then press the Dial key.
the Dial key to enter the All calls list.
Select the number you want by the Scroll key, then press the Dial key.
ial key to enter the All calls list.
Select the number you want by the Scroll key, then press the Dial key.
Basic functionstact list and press the Dial key (Call).
Playing Musicl">
From the main menu, select MP3 Player, press the Dial key or Scroll key.
Listening to the Radio
From the main menu, select FM radio, press the Dial key or Scroll key.
Note key. This silences the phone's loudspeaker, so it will not ring, or give message alerts and the MP3 can only be played through the headset.
The headset lead works as an aerial for the FM radio, so you must have the headset connected.
Making a callcrease or decrease earpiece volume.
Input the phone number and press the Dial key (Dial).
Or select a number in the Phone book contact list and press the Dial key (Call).
Answering or rejecting a cally.
Press the Dial key (Ans) to answer an incoming call.
Press the Power key (Reject) to end or reject a call.
Turning off the Speaker keypad unlocked):
Push the Scroll key down to enter main menu and scroll through the menu icons, press the Scroll key or Dial key to select and open the menu when the relevant icon is displayed on the screen.
Press and hold the # key. This silences the phone's loudspeaker, so it will not ring, or give message alerts and the MP3 can only be played through the headset.
Adjusting Volume During a callu icons, press the Scroll key or Dial key to select and open the menu when the relevant icon is displayed on the screen.
Push the Scroll key up or down to increase or decrease earpiece volume.
Redialing a number& Date
In standby mode, press the Dial key to enter the All calls list.
Select the number you want by the Scroll key, then press the Dial key.
Notee>
You can press the * key or # key to switch to the Dialled, Received or Missed lists.
Main menu
2. Enter the date you need, then press the Dial key (OK) or Scroll key to save the date setting. (e.g. If the date would be Mar 15^th 2005, please enter 1-5-0-3-2-0-0-5)
In standby mode (with keypad unlocked):
Push the Scroll key down to enter main menu and scroll through the menu icons, press the Scroll key or Dial key to select and open the menu when the relevant icon is displayed on the screen.
1、Time> 2、ormat.
2. Select the format you want, and then press the Dial key (Option) or Scroll key to save the date format setting.
3、. Select the format you want, and then press the Dial key (Option) or Scroll key to save the date format setting.
ect the format you want, and then press the Dial key (Option) or Scroll key to save the date format setting.
MP3 player, and then press the Dial key (Option) or Scroll key to save the date format setting.
FM radiothe Dial key (Option) or Scroll key to save the date format setting.
Mobileption) or Scroll key to save the date format setting.
) or Scroll key to save the date format setting.
1. Play backgrounde format setting.
1. Play backgroundstoring-a-phonebook-entry"> 1. Phone booktry">Storing a phonebook entry 2. Play list 2. Choose Stn.a-phonebook-entry-from-the-menu"> 2. Messagesom-the-menu">e-menu"> 3. Skin settingsntry from the menu 3. Name Stn.1> 3. Call recordnu, select Mobile>elect Mobile> 4. Player settings.
2. Enter the contact name and press the Dial key to save.
3. Select a group for the current entry. Press the Dial key (Select) or Scroll key.
4. Enter the phone number you want. Then press the Dial key (Save) or Scroll key.
5. Select a number type, Press the Dial key (Save) or Scroll key.
6. Three phone numbers can be added into each entry. To add more numbers, select Add number and press the Scroll key and redo step 4 and step 5 above.
4. Delete Stn.ct name and press the Dial key to save.
3. Select a group for the current entry. Press the Dial key (Select) or Scroll key.
4. Enter the phone number you want. Then press the Dial key (Save) or Scroll key.
5. Select a number type, Press the Dial key (Save) or Scroll key.
6. Three phone numbers can be added into each entry. To add more numbers, select Add number and press the Scroll key and redo step 4 and step 5 above.
4. Servicese Dial key to save.
3. Select a group for the current entry. Press the Dial key (Select) or Scroll key.
4. Enter the phone number you want. Then press the Dial key (Save) or Scroll key.
5. Select a number type, Press the Dial key (Save) or Scroll key.
6. Three phone numbers can be added into each entry. To add more numbers, select Add number and press the Scroll key and redo step 4 and step 5 above.
l key to save.
3. Select a group for the current entry. Press the Dial key (Select) or Scroll key.
4. Enter the phone number you want. Then press the Dial key (Save) or Scroll key.
5. Select a number type, Press the Dial key (Save) or Scroll key.
6. Three phone numbers can be added into each entry. To add more numbers, select Add number and press the Scroll key and redo step 4 and step 5 above.
.
3. Select a group for the current entry. Press the Dial key (Select) or Scroll key.
4. Enter the phone number you want. Then press the Dial key (Save) or Scroll key.
5. Select a number type, Press the Dial key (Save) or Scroll key.
6. Three phone numbers can be added into each entry. To add more numbers, select Add number and press the Scroll key and redo step 4 and step 5 above.
5. Manual tuningr the current entry. Press the Dial key (Select) or Scroll key.
4. Enter the phone number you want. Then press the Dial key (Save) or Scroll key.
5. Select a number type, Press the Dial key (Save) or Scroll key.
6. Three phone numbers can be added into each entry. To add more numbers, select Add number and press the Scroll key and redo step 4 and step 5 above.
rent entry. Press the Dial key (Select) or Scroll key.
4. Enter the phone number you want. Then press the Dial key (Save) or Scroll key.
5. Select a number type, Press the Dial key (Save) or Scroll key.
6. Three phone numbers can be added into each entry. To add more numbers, select Add number and press the Scroll key and redo step 4 and step 5 above.
entry. Press the Dial key (Select) or Scroll key.
4. Enter the phone number you want. Then press the Dial key (Save) or Scroll key.
5. Select a number type, Press the Dial key (Save) or Scroll key.
6. Three phone numbers can be added into each entry. To add more numbers, select Add number and press the Scroll key and redo step 4 and step 5 above.
the Dial key (Select) or Scroll key.
4. Enter the phone number you want. Then press the Dial key (Save) or Scroll key.
5. Select a number type, Press the Dial key (Save) or Scroll key.
6. Three phone numbers can be added into each entry. To add more numbers, select Add number and press the Scroll key and redo step 4 and step 5 above.
6. Auto tuningr Scroll key.
4. Enter the phone number you want. Then press the Dial key (Save) or Scroll key.
5. Select a number type, Press the Dial key (Save) or Scroll key.
6. Three phone numbers can be added into each entry. To add more numbers, select Add number and press the Scroll key and redo step 4 and step 5 above.
key.
4. Enter the phone number you want. Then press the Dial key (Save) or Scroll key.
5. Select a number type, Press the Dial key (Save) or Scroll key.
6. Three phone numbers can be added into each entry. To add more numbers, select Add number and press the Scroll key and redo step 4 and step 5 above.
4. Enter the phone number you want. Then press the Dial key (Save) or Scroll key.
5. Select a number type, Press the Dial key (Save) or Scroll key.
6. Three phone numbers can be added into each entry. To add more numbers, select Add number and press the Scroll key and redo step 4 and step 5 above.
he phone number you want. Then press the Dial key (Save) or Scroll key.
5. Select a number type, Press the Dial key (Save) or Scroll key.
6. Three phone numbers can be added into each entry. To add more numbers, select Add number and press the Scroll key and redo step 4 and step 5 above.
7. Set frequency Then press the Dial key (Save) or Scroll key.
5. Select a number type, Press the Dial key (Save) or Scroll key.
6. Three phone numbers can be added into each entry. To add more numbers, select Add number and press the Scroll key and redo step 4 and step 5 above.
ss the Dial key (Save) or Scroll key.
5. Select a number type, Press the Dial key (Save) or Scroll key.
6. Three phone numbers can be added into each entry. To add more numbers, select Add number and press the Scroll key and redo step 4 and step 5 above.
e Dial key (Save) or Scroll key.
5. Select a number type, Press the Dial key (Save) or Scroll key.
6. Three phone numbers can be added into each entry. To add more numbers, select Add number and press the Scroll key and redo step 4 and step 5 above.
ave) or Scroll key.
5. Select a number type, Press the Dial key (Save) or Scroll key.
6. Three phone numbers can be added into each entry. To add more numbers, select Add number and press the Scroll key and redo step 4 and step 5 above.
8. Search all
5. Select a number type, Press the Dial key (Save) or Scroll key.
6. Three phone numbers can be added into each entry. To add more numbers, select Add number and press the Scroll key and redo step 4 and step 5 above.
t a number type, Press the Dial key (Save) or Scroll key.
6. Three phone numbers can be added into each entry. To add more numbers, select Add number and press the Scroll key and redo step 4 and step 5 above.
umber type, Press the Dial key (Save) or Scroll key.
6. Three phone numbers can be added into each entry. To add more numbers, select Add number and press the Scroll key and redo step 4 and step 5 above.
4、ss the Dial key (Save) or Scroll key.
6. Three phone numbers can be added into each entry. To add more numbers, select Add number and press the Scroll key and redo step 4 and step 5 above.
5、 key (Save) or Scroll key.
6. Three phone numbers can be added into each entry. To add more numbers, select Add number and press the Scroll key and redo step 4 and step 5 above.
6、 or Scroll key.
6. Three phone numbers can be added into each entry. To add more numbers, select Add number and press the Scroll key and redo step 4 and step 5 above.
croll key.
6. Three phone numbers can be added into each entry. To add more numbers, select Add number and press the Scroll key and redo step 4 and step 5 above.
Settingse phone numbers can be added into each entry. To add more numbers, select Add number and press the Scroll key and redo step 4 and step 5 above.
Profilesan be added into each entry. To add more numbers, select Add number and press the Scroll key and redo step 4 and step 5 above.
File manager entry. To add more numbers, select Add number and press the Scroll key and redo step 4 and step 5 above.
y. To add more numbers, select Add number and press the Scroll key and redo step 4 and step 5 above.
1. Phones, select Add number and press the Scroll key and redo step 4 and step 5 above.
1. Normaler and press the Scroll key and redo step 4 and step 5 above.
1. File viewer key and redo step 4 and step 5 above.
and redo step 4 and step 5 above.
2. Date & Timee.
2. Meeting-a-phonebook-entry-in-standby-mode"> 2. Status-in-standby-mode">tandby-mode"> 3. Call a phonebook entry in standby mode 3. Outdoorin standby mode 3. Format1>. In standby mode, input a phone number, then press the Scroll key to enter Option menu> 4. Networkt a phone number, then press the Scroll key to enter Option menu> 4. Carr, then press the Scroll key to enter Option menu> ress the Scroll key to enter Option menu>the Scroll key to enter Option menu> 5. SecurityOption menu> 5. VIPe.
2. If adding a new phone number to an existing entry, select To existing to enter phone book list.
3. Select the entry you want, then press the Dial key (Select) to save the new number.
4. If creating a new entry, select New entry.
If adding a new phone number to an existing entry, select To existing to enter phone book list.
3. Select the entry you want, then press the Dial key (Select) to save the new number.
4. If creating a new entry, select New entry.
ding a new phone number to an existing entry, select To existing to enter phone book list.
3. Select the entry you want, then press the Dial key (Select) to save the new number.
4. If creating a new entry, select New entry.
6. Reset settingsexisting entry, select To existing to enter phone book list.
3. Select the entry you want, then press the Dial key (Select) to save the new number.
4. If creating a new entry, select New entry.
6. Headsetect To existing to enter phone book list.
3. Select the entry you want, then press the Dial key (Select) to save the new number.
4. If creating a new entry, select New entry.
isting to enter phone book list.
3. Select the entry you want, then press the Dial key (Select) to save the new number.
4. If creating a new entry, select New entry.
g to enter phone book list.
3. Select the entry you want, then press the Dial key (Select) to save the new number.
4. If creating a new entry, select New entry.
7、e book list.
3. Select the entry you want, then press the Dial key (Select) to save the new number.
4. If creating a new entry, select New entry.
8、.
3. Select the entry you want, then press the Dial key (Select) to save the new number.
4. If creating a new entry, select New entry.
9、ect the entry you want, then press the Dial key (Select) to save the new number.
4. If creating a new entry, select New entry.
he entry you want, then press the Dial key (Select) to save the new number.
4. If creating a new entry, select New entry.
Agendathen press the Dial key (Select) to save the new number.
4. If creating a new entry, select New entry.
Tools Dial key (Select) to save the new number.
4. If creating a new entry, select New entry.
Gamelect) to save the new number.
4. If creating a new entry, select New entry.
to save the new number.
4. If creating a new entry, select New entry.
1. Alarmer.
4. If creating a new entry, select New entry.
1. Voice recorderw entry, select New entry.
Your phone has a built-in antenna at the bottom of the phone body.
Contact with the antenna affects call quality and may cause the phone to operate at a higher power level than otherwise needed. Not touching the antenna area during a phone call optimizes the antenna performance and the talktime of your phone.
Using your Phone
From the main menu, select MP3 Player, press the Dial key or Scroll key.
Keypad shortcutsess the Dial key or Scroll key.
Keypad shortcutsess the Dial key or Scroll key.
In standby mode
Scroll key press the Dial key or Scroll key.
h1 id="note-2">Downte | To open the main menu. as an aerial for the FM radio, so you must have the headset connected.
| n aerial for the FM radio, so you must have the headset connected.
PressM radio, so you must have the headset connected.
|
dset connected.
Soft keyid="making-a-call"> | Pressall"> | To open shortcut menu:
Profiles
Mass storage
Record
Memo headset lead works as an aerial for the FM radio, so you must have the headset connected.
| set lead works as an aerial for the FM radio, so you must have the headset connected.
Dial keyaerial for the FM radio, so you must have the headset connected.
|
set connected.
|
number and press the Dial key (Dial).
Or select a number in the Phone book contact list and press the Dial key (Call).
ial).
Or select a number in the Phone book contact list and press the Dial key (Call).
In standby mode the Phone book contact list and press the Dial key (Call).
|
|
Press to page up.ress the Power key (Reject) to end or reject a call.
Press to page down.ject a call.
a call.
Call historyoff-the-speaker">he-speaker"> Calendarff the Speaker Press to go to last month.This silences the phone's loudspeaker, so it will not ring, or give message alerts and the MP3 can only be played through the headset.
Press to go to next month.ll not ring, or give message alerts and the MP3 can only be played through the headset.
t ring, or give message alerts and the MP3 can only be played through the headset.
Memoessage alerts and the MP3 can only be played through the headset.
e alerts and the MP3 can only be played through the headset.
Create SMSn only be played through the headset.
Press to enter the punctuation; Press to select letter group forward.> Press to switch entry method; Press to select letter group backward.ase or decrease earpiece volume.
r decrease earpiece volume.
Music playume.
Press to switch the equalizeraling a number Press to switch the play mode.ress the Dial key to enter the All calls list.
Select the number you want by the Scroll key, then press the Dial key.
the Dial key to enter the All calls list.
Select the number you want by the Scroll key, then press the Dial key.
ial key to enter the All calls list.
Select the number you want by the Scroll key, then press the Dial key.
Basic functionstact list and press the Dial key (Call).
Playing Musicl">
From the main menu, select MP3 Player, press the Dial key or Scroll key.
Listening to the Radio
From the main menu, select FM radio, press the Dial key or Scroll key.
Note key. This silences the phone's loudspeaker, so it will not ring, or give message alerts and the MP3 can only be played through the headset.
The headset lead works as an aerial for the FM radio, so you must have the headset connected.
Making a callcrease or decrease earpiece volume.
Input the phone number and press the Dial key (Dial).
Or select a number in the Phone book contact list and press the Dial key (Call).
Answering or rejecting a cally.
Press the Dial key (Ans) to answer an incoming call.
Press the Power key (Reject) to end or reject a call.
Turning off the Speaker keypad unlocked):
Push the Scroll key down to enter main menu and scroll through the menu icons, press the Scroll key or Dial key to select and open the menu when the relevant icon is displayed on the screen.
Press and hold the # key. This silences the phone's loudspeaker, so it will not ring, or give message alerts and the MP3 can only be played through the headset.
Adjusting Volume During a callu icons, press the Scroll key or Dial key to select and open the menu when the relevant icon is displayed on the screen.
Push the Scroll key up or down to increase or decrease earpiece volume.
Redialing a number& Date
In standby mode, press the Dial key to enter the All calls list.
Select the number you want by the Scroll key, then press the Dial key.
Notee>
You can press the * key or # key to switch to the Dialled, Received or Missed lists.
Main menu
2. Enter the date you need, then press the Dial key (OK) or Scroll key to save the date setting. (e.g. If the date would be Mar 15^th 2005, please enter 1-5-0-3-2-0-0-5)
In standby mode (with keypad unlocked):
Push the Scroll key down to enter main menu and scroll through the menu icons, press the Scroll key or Dial key to select and open the menu when the relevant icon is displayed on the screen.
1、Time> 2、ormat.
2. Select the format you want, and then press the Dial key (Option) or Scroll key to save the date format setting.
3、. Select the format you want, and then press the Dial key (Option) or Scroll key to save the date format setting.
ect the format you want, and then press the Dial key (Option) or Scroll key to save the date format setting.
MP3 player, and then press the Dial key (Option) or Scroll key to save the date format setting.
FM radiothe Dial key (Option) or Scroll key to save the date format setting.
Mobileption) or Scroll key to save the date format setting.
) or Scroll key to save the date format setting.
1. Play backgrounde format setting.
1. Play backgroundstoring-a-phonebook-entry"> 1. Phone booktry">Storing a phonebook entry 2. Play list 2. Choose Stn.a-phonebook-entry-from-the-menu"> 2. Messagesom-the-menu">e-menu"> 3. Skin settingsntry from the menu 3. Name Stn.1> 3. Call recordnu, select Mobile>elect Mobile> 4. Player settings.
2. Enter the contact name and press the Dial key to save.
3. Select a group for the current entry. Press the Dial key (Select) or Scroll key.
4. Enter the phone number you want. Then press the Dial key (Save) or Scroll key.
5. Select a number type, Press the Dial key (Save) or Scroll key.
6. Three phone numbers can be added into each entry. To add more numbers, select Add number and press the Scroll key and redo step 4 and step 5 above.
4. Delete Stn.ct name and press the Dial key to save.
3. Select a group for the current entry. Press the Dial key (Select) or Scroll key.
4. Enter the phone number you want. Then press the Dial key (Save) or Scroll key.
5. Select a number type, Press the Dial key (Save) or Scroll key.
6. Three phone numbers can be added into each entry. To add more numbers, select Add number and press the Scroll key and redo step 4 and step 5 above.
4. Servicese Dial key to save.
3. Select a group for the current entry. Press the Dial key (Select) or Scroll key.
4. Enter the phone number you want. Then press the Dial key (Save) or Scroll key.
5. Select a number type, Press the Dial key (Save) or Scroll key.
6. Three phone numbers can be added into each entry. To add more numbers, select Add number and press the Scroll key and redo step 4 and step 5 above.
l key to save.
3. Select a group for the current entry. Press the Dial key (Select) or Scroll key.
4. Enter the phone number you want. Then press the Dial key (Save) or Scroll key.
5. Select a number type, Press the Dial key (Save) or Scroll key.
6. Three phone numbers can be added into each entry. To add more numbers, select Add number and press the Scroll key and redo step 4 and step 5 above.
.
3. Select a group for the current entry. Press the Dial key (Select) or Scroll key.
4. Enter the phone number you want. Then press the Dial key (Save) or Scroll key.
5. Select a number type, Press the Dial key (Save) or Scroll key.
6. Three phone numbers can be added into each entry. To add more numbers, select Add number and press the Scroll key and redo step 4 and step 5 above.
5. Manual tuningr the current entry. Press the Dial key (Select) or Scroll key.
4. Enter the phone number you want. Then press the Dial key (Save) or Scroll key.
5. Select a number type, Press the Dial key (Save) or Scroll key.
6. Three phone numbers can be added into each entry. To add more numbers, select Add number and press the Scroll key and redo step 4 and step 5 above.
rent entry. Press the Dial key (Select) or Scroll key.
4. Enter the phone number you want. Then press the Dial key (Save) or Scroll key.
5. Select a number type, Press the Dial key (Save) or Scroll key.
6. Three phone numbers can be added into each entry. To add more numbers, select Add number and press the Scroll key and redo step 4 and step 5 above.
entry. Press the Dial key (Select) or Scroll key.
4. Enter the phone number you want. Then press the Dial key (Save) or Scroll key.
5. Select a number type, Press the Dial key (Save) or Scroll key.
6. Three phone numbers can be added into each entry. To add more numbers, select Add number and press the Scroll key and redo step 4 and step 5 above.
the Dial key (Select) or Scroll key.
4. Enter the phone number you want. Then press the Dial key (Save) or Scroll key.
5. Select a number type, Press the Dial key (Save) or Scroll key.
6. Three phone numbers can be added into each entry. To add more numbers, select Add number and press the Scroll key and redo step 4 and step 5 above.
6. Auto tuningr Scroll key.
4. Enter the phone number you want. Then press the Dial key (Save) or Scroll key.
5. Select a number type, Press the Dial key (Save) or Scroll key.
6. Three phone numbers can be added into each entry. To add more numbers, select Add number and press the Scroll key and redo step 4 and step 5 above.
key.
4. Enter the phone number you want. Then press the Dial key (Save) or Scroll key.
5. Select a number type, Press the Dial key (Save) or Scroll key.
6. Three phone numbers can be added into each entry. To add more numbers, select Add number and press the Scroll key and redo step 4 and step 5 above.
4. Enter the phone number you want. Then press the Dial key (Save) or Scroll key.
5. Select a number type, Press the Dial key (Save) or Scroll key.
6. Three phone numbers can be added into each entry. To add more numbers, select Add number and press the Scroll key and redo step 4 and step 5 above.
he phone number you want. Then press the Dial key (Save) or Scroll key.
5. Select a number type, Press the Dial key (Save) or Scroll key.
6. Three phone numbers can be added into each entry. To add more numbers, select Add number and press the Scroll key and redo step 4 and step 5 above.
7. Set frequency Then press the Dial key (Save) or Scroll key.
5. Select a number type, Press the Dial key (Save) or Scroll key.
6. Three phone numbers can be added into each entry. To add more numbers, select Add number and press the Scroll key and redo step 4 and step 5 above.
ss the Dial key (Save) or Scroll key.
5. Select a number type, Press the Dial key (Save) or Scroll key.
6. Three phone numbers can be added into each entry. To add more numbers, select Add number and press the Scroll key and redo step 4 and step 5 above.
e Dial key (Save) or Scroll key.
5. Select a number type, Press the Dial key (Save) or Scroll key.
6. Three phone numbers can be added into each entry. To add more numbers, select Add number and press the Scroll key and redo step 4 and step 5 above.
ave) or Scroll key.
5. Select a number type, Press the Dial key (Save) or Scroll key.
6. Three phone numbers can be added into each entry. To add more numbers, select Add number and press the Scroll key and redo step 4 and step 5 above.
8. Search all
5. Select a number type, Press the Dial key (Save) or Scroll key.
6. Three phone numbers can be added into each entry. To add more numbers, select Add number and press the Scroll key and redo step 4 and step 5 above.
t a number type, Press the Dial key (Save) or Scroll key.
6. Three phone numbers can be added into each entry. To add more numbers, select Add number and press the Scroll key and redo step 4 and step 5 above.
umber type, Press the Dial key (Save) or Scroll key.
6. Three phone numbers can be added into each entry. To add more numbers, select Add number and press the Scroll key and redo step 4 and step 5 above.
4、ss the Dial key (Save) or Scroll key.
6. Three phone numbers can be added into each entry. To add more numbers, select Add number and press the Scroll key and redo step 4 and step 5 above.
5、 key (Save) or Scroll key.
6. Three phone numbers can be added into each entry. To add more numbers, select Add number and press the Scroll key and redo step 4 and step 5 above.
6、 or Scroll key.
6. Three phone numbers can be added into each entry. To add more numbers, select Add number and press the Scroll key and redo step 4 and step 5 above.
croll key.
6. Three phone numbers can be added into each entry. To add more numbers, select Add number and press the Scroll key and redo step 4 and step 5 above.
Settingse phone numbers can be added into each entry. To add more numbers, select Add number and press the Scroll key and redo step 4 and step 5 above.
Profilesan be added into each entry. To add more numbers, select Add number and press the Scroll key and redo step 4 and step 5 above.
File manager entry. To add more numbers, select Add number and press the Scroll key and redo step 4 and step 5 above.
y. To add more numbers, select Add number and press the Scroll key and redo step 4 and step 5 above.
1. Phones, select Add number and press the Scroll key and redo step 4 and step 5 above.
1. Normaler and press the Scroll key and redo step 4 and step 5 above.
1. File viewer key and redo step 4 and step 5 above.
and redo step 4 and step 5 above.
2. Date & Timee.
2. Meeting-a-phonebook-entry-in-standby-mode"> 2. Status-in-standby-mode">tandby-mode"> 3. Call a phonebook entry in standby mode 3. Outdoorin standby mode 3. Format1>. In standby mode, input a phone number, then press the Scroll key to enter Option menu> 4. Networkt a phone number, then press the Scroll key to enter Option menu> 4. Carr, then press the Scroll key to enter Option menu> ress the Scroll key to enter Option menu>the Scroll key to enter Option menu> 5. SecurityOption menu> 5. VIPe.
2. If adding a new phone number to an existing entry, select To existing to enter phone book list.
3. Select the entry you want, then press the Dial key (Select) to save the new number.
4. If creating a new entry, select New entry.
If adding a new phone number to an existing entry, select To existing to enter phone book list.
3. Select the entry you want, then press the Dial key (Select) to save the new number.
4. If creating a new entry, select New entry.
ding a new phone number to an existing entry, select To existing to enter phone book list.
3. Select the entry you want, then press the Dial key (Select) to save the new number.
4. If creating a new entry, select New entry.
6. Reset settingsexisting entry, select To existing to enter phone book list.
3. Select the entry you want, then press the Dial key (Select) to save the new number.
4. If creating a new entry, select New entry.
6. Headsetect To existing to enter phone book list.
3. Select the entry you want, then press the Dial key (Select) to save the new number.
4. If creating a new entry, select New entry.
isting to enter phone book list.
3. Select the entry you want, then press the Dial key (Select) to save the new number.
4. If creating a new entry, select New entry.
g to enter phone book list.
3. Select the entry you want, then press the Dial key (Select) to save the new number.
4. If creating a new entry, select New entry.
7、e book list.
3. Select the entry you want, then press the Dial key (Select) to save the new number.
4. If creating a new entry, select New entry.
8、.
3. Select the entry you want, then press the Dial key (Select) to save the new number.
4. If creating a new entry, select New entry.
9、ect the entry you want, then press the Dial key (Select) to save the new number.
4. If creating a new entry, select New entry.
he entry you want, then press the Dial key (Select) to save the new number.
4. If creating a new entry, select New entry.
Agendathen press the Dial key (Select) to save the new number.
4. If creating a new entry, select New entry.
Tools Dial key (Select) to save the new number.
4. If creating a new entry, select New entry.
Gamelect) to save the new number.
4. If creating a new entry, select New entry.
to save the new number.
4. If creating a new entry, select New entry.
1. Alarmer.
4. If creating a new entry, select New entry.
1. Voice recorderw entry, select New entry.
the Dial key to enter the All calls list.
Select the number you want by the Scroll key, then press the Dial key.
ial key to enter the All calls list.
Select the number you want by the Scroll key, then press the Dial key.
Basic functionstact list and press the Dial key (Call).
Playing Musicl">
Basic functionstact list and press the Dial key (Call).
Playing Musicl">
Playing Musicl">
From the main menu, select MP3 Player, press the Dial key or Scroll key.
Listening to the Radio
From the main menu, select FM radio, press the Dial key or Scroll key.
Note key. This silences the phone's loudspeaker, so it will not ring, or give message alerts and the MP3 can only be played through the headset.
The headset lead works as an aerial for the FM radio, so you must have the headset connected.
Making a callcrease or decrease earpiece volume.
Input the phone number and press the Dial key (Dial).
Or select a number in the Phone book contact list and press the Dial key (Call).
Answering or rejecting a cally.
Press the Dial key (Ans) to answer an incoming call.
Press the Power key (Reject) to end or reject a call.
Turning off the Speaker keypad unlocked): Push the Scroll key down to enter main menu and scroll through the menu icons, press the Scroll key or Dial key to select and open the menu when the relevant icon is displayed on the screen.
| 1、Time> | 2、ormat.
2. Select the format you want, and then press the Dial key (Option) or Scroll key to save the date format setting.
ect the format you want, and then press the Dial key (Option) or Scroll key to save the date format setting.
MP3 player, and then press the Dial key (Option) or Scroll key to save the date format setting.
|
) or Scroll key to save the date format setting.
1. Play backgrounde format setting.
|
|