
WorkForce Pro WP-4095 - Nyomtató EPSON - Ingyenes használati útmutató
Találja meg az eszköz kézikönyvét ingyenesen WorkForce Pro WP-4095 EPSON PDF formátumban.

Felhasználói kérdések a következőről WorkForce Pro WP-4095 EPSON
0 kérdés erről a készülékről. Válaszolj azokra, amiket ismersz, vagy tedd fel a sajátod.
Tegyél fel egy új kérdést erről a készülékről
Töltse le az útmutatót a következőhöz Nyomtató PDF formátumban ingyenesen! Találja meg kézikönyvét WorkForce Pro WP-4095 - EPSON és vegye vissza elektronikus eszközét a kezébe. Ezen az oldalon közzé van téve az eszköze használatához szükséges összes dokumentum. WorkForce Pro WP-4095 márka EPSON.
HASZNÁLATI ÚTMUTATÓ WorkForce Pro WP-4095 EPSON
WP-4011/WP-4015/ WP-4025/WP-4090/ WP-4091/WP-4095
User's Guide
NPD4579-00 EN
Copyright and Trademarks
Copyright and Trademarks
No part of this publication may be reproduced, stored in a retrieval system, or transmitted in any form or by any means, electronic, mechanical, photocopying, recording, or otherwise, without the prior written permission of Seiko Epson Corporation. No patent liability is assumed with respect to the use of the information contained herein. Neither is any liability assumed for damages resulting from the use of the information herein. The information contained herein is designed only for use with this Epson product. Epson is not responsible for any use of this information as applied to other products.
Neither Seiko Epson Corporation nor its affiliates shall be liable to the purchaser of this product or third parties for damages, losses, costs, or expenses incurred by the purchaser or third parties as a result of accident, misuse, or abuse of this product or unauthorized modifications, repairs, or alterations to this product, or (excluding the U.S.) failure to strictly comply with Seiko Epson Corporation's operating and maintenance instructions.
Seiko Epson Corporation and its affiliates shall not be liable for any damages or problems arising from the use of any options or any consumable products other than those designated as Original Epson Products or Epson Approved Products by Seiko Epson Corporation.
Seiko Epson Corporation shall not be held liable for any damage resulting from electromagnetic interference that occurs from the use of any interface cables other than those designated as Epson Approved Products by Seiko Epson Corporation.
EPSON® is a registered trademark, and EPSON EXCEED YOUR VISION or EXCEED YOUR VISION is a trademark of Seiko Epson Corporation.
PRINT Image Matching ^™ and the PRINT Image Matching logo are trademarks of Seiko Epson Corporation. Copyright © 2001 Seiko Epson Corporation. All rights reserved.
Intel® is a registered trademark of Intel Corporation.
PowerPC® is a registered trademark of International Business Machines Corporation.
Features Zoran Corporation Integrated Print System (IPS) for print language emulation.
ZORAN
Microsoft®, Windows®, and Windows Vista® are registered trademarks of Microsoft Corporation.
Apple®, Macintosh®, Mac®, Mac OS®, AppleTalk®, Bonjour®, ColorSync®, and TrueType® are registered trademarks of Apple, Inc.
Apple Chancery, Chicago, Geneva, Hoefler Text, Monaco and New York are trademarks or registered trademarks of Apple, Inc.
Monotype is a trademark of Monotype Imaging, Inc. registered in the United States Patent and Trademark Office and may be registered in certain jurisdictions.
Albertus, Arial, Gillsans, Times New Roman and Joanna are trademarks of The Monotype Corporation registered in the United States Patent and Trademark Office and may be registered in certain jurisdictions.
ITC Avant Garde, ITC Bookman, ITC Lubalin, ITC Mona Lisa Recut, ITC Symbol, ITC Zapf-Chancery, and ITC ZapfDingbats are trademarks of International Typeface Corporation registered in the United States Patent and Trademark Office and may be registered in certain jurisdictions.
Copyright and Trademarks
Clarendon, Helvetica, New Century Schoolbook, Optima, Palatino, Stempel Garamond, Times and Univers are registered trademarks of Heidelberger Druckmaschinen AG, which may be registered in certain jurisdictions, exclusively licensed through Linotype Library GmbH, a wholly owned subsidiary of Heidelberger Druckmaschinen AG.
Wingdings is a registered trademark of Microsoft Corporation in the United States and other countries.
Antique Olive is a registered trademark of Marcel Olive and may be registered in certain jurisdictions.
Adobe SansMM, Adobe SerifMM, Carta, and Tekton are registered trademarks of Adobe Systems Incorporated.
Marigold and Oxford are trademarks of AlphaOmega Typography.
Coronet is a registered trademark of Ludlow Type Foundry.
Eurostile is a trademark of Nebiolo.
Bitstream is a registered trademark of Bitstream Inc. registered in the United States Patent and Trademark Office and may be registered in certain jurisdictions.
Swiss is a trademark of Bitstream Inc. registered in the United States Patent and Trademark Office and may be registered in certain jurisdictions.
This product includes RSA BSAFE® Cryptographic software from RSA Security Inc.
RSA, BSAFE are either registered trademarks or trademarks of RSA Security Inc. in the United States and/or other countries.
RSA Security Inc. All rights reserved.

PCL is the registered trademark of Hewlett-Packard Company.
Adobe, the Adobe logo, PostScript3, Adobe Reader, Acrobat, and Photoshop are trademarks of Adobe systems Incorporated, which may be registered in certain jurisdictions.
Copyright © 1987, 1993, 1994 The Regents of the University of California. All rights reserved.
Redistribution and use in source and binary forms, with or without modification, are permitted provided that the following conditions are met:
- Redistributions of source code must retain the above copyright notice, this list of conditions and the following disclaimer.
- Redistributions in binary form must reproduce the above copyright notice, this list of conditions and the following disclaimer in the documentation and/or other materials provided with the distribution.
- Neither the name of the University nor the names of its contributors may be used to endorse or promote products derived from this software without specific prior written permission.
Copyright and Trademarks
THIS SOFTWARE IS PROVIDED BY THE REGENTS AND CONTRIBUTORS "AS IS" AND ANY EXPRESS OR IMPLIED WARRANTIES, INCLUDING, BUT NOT LIMITED TO, THE IMPLIED WARRANTIES OF MERCHANTABILITY AND FITNESS FOR A PARTICULAR PURPOSE ARE DISCLAIMED. IN NO EVENT SHALL THE REGENTS OR CONTRIBUTORS BE LIABLE FOR ANY DIRECT, INDIRECT, INCIDENTAL, SPECIAL, EXEMPLARY, OR CONSEQUENTIAL DAMAGES (INCLUDING, BUT NOT LIMITED TO, PROCUREMENT OF SUBSTITUTE GOODS OR SERVICES; LOSS OF USE, DATA, OR PROFITS; OR BUSINESS INTERRUPTION) HOWEVER CAUSED AND ON ANY THEORY OF LIABILITY, WHETHER IN CONTRACT, STRICT LIABILITY, OR TORT (INCLUDING NEGLIGENCE OR OTHERWISE) ARISING IN ANY WAY OUT OF THE USE OF THIS SOFTWARE, EVEN IF ADVISED OF THE POSSIBILITY OF SUCH DAMAGE.
This code illustrates a sample implementation of the Arcfour algorithm Copyright © April 29, 1997 Kalle Kaukonen. All Rights Reserved.
Redistribution and use in source and binary forms, with or without modification, are permitted provided that this copyright notice and disclaimer are retained.
THIS SOFTWARE IS PROVIDED BY KALLE KAUKONEN AND CONTRIBUTORS "AS IS" AND ANY EXPRESS OR IMPLIED WARRANTIES, INCLUDING, BUT NOT LIMITED TO, THE IMPLIED WARRANTIES OF MERCHANTABILITY AND FITNESS FOR A PARTICULAR PURPOSE ARE DISCLAIMED. IN NO EVENT SHALL KALLE KAUKONEN OR CONTRIBUTORS BE LIABLE FOR ANY DIRECT, INDIRECT, INCIDENTAL, SPECIAL, EXEMPLARY, OR CONSEQUENTIAL DAMAGES (INCLUDING, BUT NOT LIMITED TO, PROCUREMENT OF SUBSTITUTE GOODS OR SERVICES; LOSS OF USE, DATA, OR PROFITS; OR BUSINESS INTERRUPTION) HOWEVER CAUSED AND ON ANY THEORY OF LIABILITY, WHETHER IN CONTRACT, STRICT LIABILITY, OR TORT (INCLUDING NEGLIGENCE OR OTHERWISE) ARISING IN ANY WAY OUT OF THE USE OF THIS SOFTWARE, EVEN IF ADVISED OF THE POSSIBILITY OF SUCH DAMAGE.
General Notice: Other product names used herein are for identification purposes only and may be trademarks of their respective owners. Epson disclaims any and all rights in those marks.
Copyright © 2011 Seiko Epson Corporation. All rights reserved.
Guidelines
Where to Find Information
| Setup Guide (paper) | Provides you with information on setting up the product and installing the software. |
| User's Guide (PDF, this manual) | Provides you with detailed information on the product's functions, optional products, maintenance, troubleshooting, and technical specifications. |
| Network Guide (HTML) | Provides network administrators with information on both the printer driver and network settings. |
Available features for your product
Check what is available for your product.
| WP-4011/WP-4015 | WP-4025 | WP-4090/WP-4091/WP-4095 | |
| √ | √ | √ | |
| Print (PS3/PCL) | - | - | √ |
| Ethernet | √ | √ | √ |
| Wi-Fi | - | √ | - |
Note for WP-4090/WP-4091/WP-4095:
For PS3/PCL models, you need to download the software from the Epson's website. Contact customer support in your region for more details on obtaining the printer driver and system requirements such as supported operating systems.
Illustrations used in this guide
The illustrations in this guide are from a similar product model. Although they may differ from your actual product, the method of operation is the same.
Warnings, Cautions, and Notes
Warnings, Cautions, and Notes in this manual are indicated as below and have the following meaning.

Warnings
must be followed carefully to avoid bodily injury.
Guidelines

Cautions
must be observed to avoid damage to your equipment.
Notes
contain important information and useful tips on the operation of the product.
Safety Instructions
Safety Instructions
Important Safety Instructions
Read all of the instructions in this section before using the product. Also, be sure to follow all warnings and instructions marked on the product.
Setting up the product
Observe the following when setting up the product:
☐ Do not block or cover the vents and openings in the product.
□ Use only the type of power source indicated on the product's label.
☐ Use only the power cord that comes with the product. Use of another cord may result in fire or electric shock.
The product's power cord is for use with the product only. Use with other equipment may result in fire or electric shock.
☐ Be sure your AC power cord meets the relevant local safety standard.
☐ Avoid using outlets on the same circuit as photocopiers or air control systems that regularly switch on and off.
☐ Avoid electrical outlets controlled by wall switches or automatic timers.
☐ Keep the entire computer system away from potential sources of electromagnetic interference, such as loudspeakers or the base units of cordless telephones.
☐ The power-supply cords should be placed to avoid abrasions, cuts, fraying, crimping, and kinking. Do not place objects on top of the power-supply cords and do not allow the power-supply cords to be stepped on or run over. Be particularly careful to keep all the power-supply cords straight at the ends and the points where they enter and leave the transformer.
If you use an extension cord with the product, make sure that the total ampere rating of the devices plugged into the extension cord does not exceed the cord's ampere rating. Also, make sure that the total ampere rating of all devices plugged into the wall outlet does not exceed the wall outlet's ampere rating.
□ Never disassemble, modify, or attempt to repair the power cord, printer unit, scanner unit, or options by yourself, except as specifically explained in the product's guides.
☐ Unplug the product and refer servicing to qualified service personnel under the following conditions: The power cord or plug is damaged; liquid has entered the product; the product has been dropped or the casing damaged; the product does not operate normally or exhibits a distinct change in performance. Do not adjust controls that are not covered by the operating instructions.
☐ If you plan to use the product in Germany, the building installation must be protected by a 10 or 16 amp circuit breaker to provide adequate short-circuit protection and over-current protection for the product.
☐ When connecting the product to a computer or other device with a cable, ensure the correct orientation of the connectors. Each connector has only one correct orientation. Inserting a connector in the wrong orientation may damage both devices connected by the cable.
Safety Instructions
☐ If damage occurs to the plug, replace the cord set or consult a qualified electrician. If there are fuses in the plug, make sure you replace them with fuses of the correct size and rating.
Choosing a place for the product
Observe the following when choosing a place for the product:
Place the product on a flat, stable surface that extends beyond the base of the product in all directions. If you place the product by the wall, leave more than 10 cm between the back of the product and the wall. The product will not operate properly if it is tilted at an angle.
☐ When storing or transporting the product, avoid tilting it, placing it vertically, or turning it upside down; otherwise ink may leak.
☐ Allow spaces behind the product for the cables, and space above the product so that you can fully raise the document cover.
☐ Avoid places subject to rapid changes in temperature and humidity. Also, keep the product away from direct sunlight, strong light, or heat sources.
☐ Do not place or store the product outdoors, near excessive dirt or dust, water, heat sources, or in locations subject to shocks, vibrations, high temperature or humidity. Do not use with wet hands.
Place the product near a wall outlet where the plug can be easily unplugged.
Using the product
Observe the following when using the product:
☐ Do not insert objects through the slots in the product.
☐ Take care not to spill liquid on the product.
☐ Do not put your hand inside the product or touch the ink cartridges during printing.
☐ Do not touch the white flat cable inside the product.
☐ Do not use aerosol products that contain flammable gases inside or around the product. Doing so may cause fire.
☐ Do not move the print head by hand; otherwise, you may damage the product.
□ Always turn the product off using the ⏻ On button. Do not unplug the product or turn off the power at the outlet until the LCD panel has turned off completely.
Before transporting the product, make sure that the print head is in the home (far right) position and the ink cartridges are in place.
Leave the ink cartridges installed. Removing the cartridges can dry out the print head and may prevent the printer from printing.
☐ Be careful not to trap your fingers when closing the scanner unit.
Safety Instructions
☐ If you are not going to use the product for a long period, be sure to unplug the power cord from the electrical outlet.
☐ Do not press too hard on the document table when placing the originals.
Using the product with a wireless connection
☐ Do not use this product inside medical facilities or near medical equipment. Radio waves from this product may adversely affect the operation of electrical medical equipment.
☐ Keep this product at least 22 cm away from cardiac pacemakers. Radio waves from this product may adversely affect the operation of cardiac pacemakers.
☐ Do not use this product near automatically controlled devices such as automatic doors or fire alarms. Radio waves from this product may adversely affect these devices, and could lead to accidents due to malfunction.
Handling ink cartridges
Observe the following when handling the ink cartridges:
☐ Keep ink cartridges out of the reach of children and do not drink.
☐ If ink gets on your skin, wash it off with soap and water. If it gets in your eyes, flush them immediately with water.
Before installing the new ink cartridge in the printer, shake it back and forth horizontally in five centimeter movements about 15 times within five seconds.
☐ Use the ink cartridge before the date printed on its package.
☐ Use up the ink cartridge within six months of installation for best results.
☐ Do not dismantle the ink cartridges or try to refill them. This could damage the print head.
☐ Do not touch the green IC chip on the side of the cartridge. This may affect normal operation and printing.
☐ The IC chip on this ink cartridge retains a variety of cartridge-related information, such as the ink cartridge status, so that the cartridge may be removed and reinserted freely.
☐ If you remove an ink cartridge for later use, protect the ink supply area from dirt and dust, and store it in the same environment as this product. Note that there is a valve in the ink supply port, making covers or plugs unnecessary, but care is needed to prevent the ink from staining items that the cartridge touches. Do not touch the ink supply port or surrounding area.
Contents
Contents
Copyright and Trademarks
Copyright and Trademarks. 2
Guidelines
Where to Find Information. 5
Available features for your product. 5
Illustrations used in this guide....5
Warnings, Cautions, and Notes. 5
Safety Instructions
Important Safety Instructions. 7
Setting up the product. 7
Choosing a place for the product. 8
Using the product. 8
Using the product with a wireless connection. . . . 9
Handling ink cartridges....9
Getting to Know Your Product
Product Parts. 13
Guide to the Control Panel....16
Buttons and Lights. 16
Paper Handling
Introduction to Using, Loading, and Storing
Media. 18
Selecting which tray to use and its loading capacities. 18
Storing paper....20
Loading Paper....20
Into the paper cassette....20
Into the rear MP tray....23
Loading Envelopes. 25
Printing
Using Your Software....28
Printer driver and status monitor....28
Basic Printing. 30
Selecting the correct paper type ..... 30
Loading paper or envelopes. 30
Basic printer settings for Windows....31
Basic printer settings for Mac OS X 10.5 or 10.6 32
Basic printer settings for Mac OS X 10.4....34
Canceling Printing. 36
Using the printer button. 36
For Windows....36
For Mac OS X. 37
Printing with Special Layout Options....37
2-Sided Printing....37
Fit to Page Printing. 45
Pages Per Sheet Printing. 48
Poster Printing (for Windows only)....51
Watermark Printing (for Windows only). ..... 55
Sharing Your Printer....57
Using the PostScript Printer Driver and the PCL6
Printer Driver....57
Installing Option
250-Sheet Paper Cassette Unit. 58
Installing the paper cassette unit. 58
Uninstalling the cassette unit. 59
Replacing Consumables
Ink Cartridges. 60
Checking the ink cartridge status. . . . . . . . . . . . . 60
Precautions on ink cartridge replacement. . . . . . 62
Replacing an ink cartridge. 63
Maintenance Box. 65
Checking the maintenance box status. . . . . . . . 65
Handling precautions. 65
Replacing a maintenance box. 66
Maintaining Your Printer and Software
Checking the Print Head Nozzles. 68
Using the Nozzle Check utility for Windows 68
Using the Nozzle Check utility for Mac OS X 68
Using the printer buttons. 69
Cleaning the Print Head. 69
Using the Head Cleaning utility for Windows 70
Using the Head Cleaning utility for Mac OS X 70
Using the printer buttons....71
Contents
Aligning the Print Head. 72
Using the Print Head Alignment utility for Windows....72
Using the Print Head Alignment utility for Mac OS X. 72
Making Printer Settings....73
Power Off Timer Setting. 73
Paper Size Loaded Setting. 74
Cleaning the Printer....75
Cleaning the exterior of the printer. . . . . . . . . . 75
Cleaning the interior of the printer....75
Transporting the Printer....75
Checking and Installing Your Software. . . . . . . . . 76
Checking the software installed on your computer....76
Installing the software....77
Uninstalling Your Software....77
For Windows....77
For Mac OS X. 79
Troubleshooting
Diagnosing the Problem. 80
Status lights. 80
Status monitor....83
Running a printer operation check. 83
Checking Printer Status....84
For Windows....84
For Mac OS X. 86
The Paper Jams....88
Removing jammed paper from the rear unit. . . . 88
Removing jammed paper from the front cover and the output tray....89
Removing jammed paper from the paper cassette(s). 90
Preventing paper jams. 91
Reprinting after a paper jam (for Windows only). 91
Print Quality Problems....92
Horizontal banding....92
Vertical banding or misalignment. 93
Incorrect or missing colors....93
Blurry or smeared print. 94
Miscellaneous Printout Problems. 94
Incorrect or garbled characters. 94
Incorrect margins. 95
Printout has a slight slant. 95
Inverted image....95
Blank pages print. 95
Printed side is smeared or scuffed. . . . . . . . . . . 96
Printing is too slow....96
Paper Does Not Feed Correctly. 97
Paper does not feed. 97
Multiple pages feed. 97
Paper is improperly loaded. 98
Paper is not ejected fully or is wrinkled. . . . . . . 98
The Printer Does Not Print. 98
All lights are off. 98
Lights came on and then went out. . . . . . . . . . 98
Only the power light is on. 98
The ink light is flashing or is on after you replace the cartridge. 99
Increasing the Print Speed (For Windows Only) 100
Other Problem. 101
Printing plain papers quietly. 101
Product Information
Ink and Paper. 103
Ink cartridges....103
Maintenance box. 104
Paper. 104
Option.... 105
250-Sheet Paper Cassette Unit/PXBACU1....105
System Requirements....105
Windows requirements.... 105
Macintosh requirements. 105
Technical Specifications. 106
Printer specifications....106
Network Interface Specification....109
Mechanical. 109
Electrical....109
Environmental. 111
Standards and approvals.... 111
Interface....112
Font Information....112
Available fonts. 112
Symbol sets. 119
Where To Get Help
Technical Support Web Site....124
Contacting Epson Support. 124
Before Contacting Epson. 124
Help for Users in Europe. 125
Help for Users in Taiwan. 125
Help for Users in Australia. 126
Contents
Help for Users in Singapore. 126
Help for Users in Thailand. 127
Help for Users in Vietnam....127
Help for Users in Indonesia. 127
Help for Users in Hong Kong. 129
Help for Users in Malaysia. 129
Help for Users in India. 130
Help for Users in the Philippines. 131
Index
Getting to Know Your Product
Product Parts
Note:
The illustrations in this section are from a similar product model. Although they may differ from your actual product, the method of operation is the same.
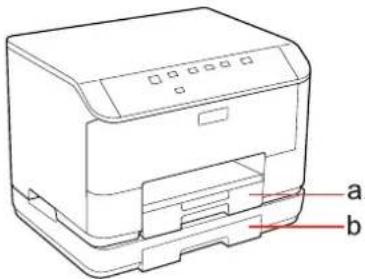
| a. | Paper cassette 1 |
| b. | Paper cassette 2 (optional) |
Getting to Know Your Product
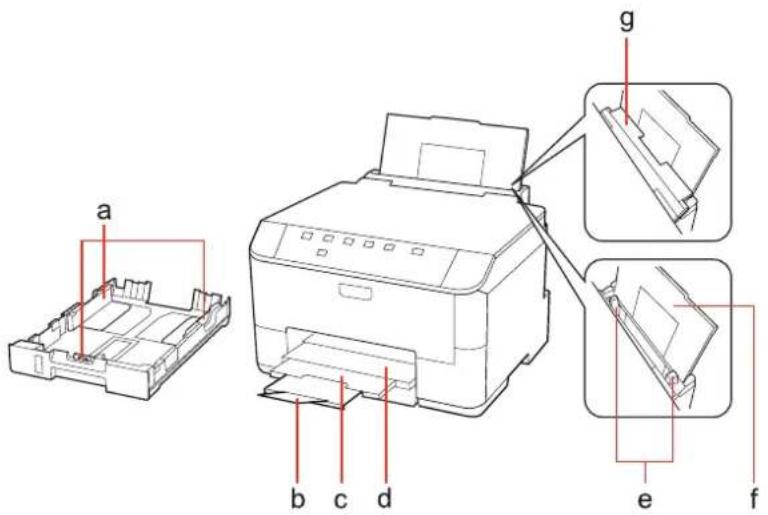
| a. | Edge guides |
| b. | Stopper |
| c. | Output tray extension |
| d. | Output tray |
| e. | Edge guides |
| f. | Rear MP tray |
| g. | Feeder guard |
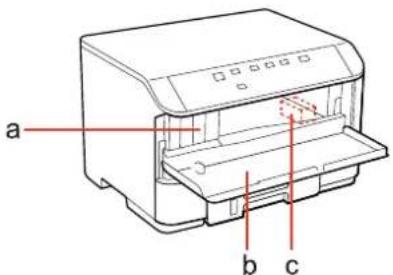
| a. | Ink cartridge slots |
| b. | Front cover |
| c. | Print head |
Getting to Know Your Product
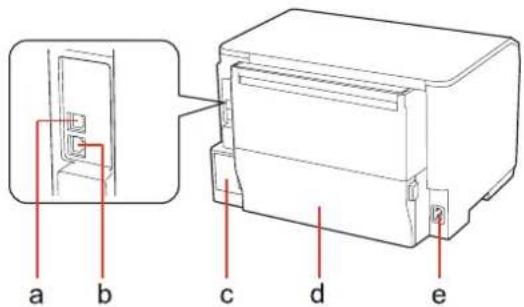
| a. | External USB port |
| b. | LAN port |
| c. | Maintenance box |
| d. | Rear unit |
| e. | AC inlet |
Getting to Know Your Product
Guide to the Control Panel
Control panel design varies depending on location.
Buttons and Lights

Buttons
| Buttons | Function | |
| a | Turns the printer on or off. | |
| b | (H22Y) | See the Network Guide for more details. |
| c | Wi-Fi | See the Network Guide for details. This button is only available for Wi-Fi capable models. |
| d | Loads or ejects paper.Resumes printing after a paper out error or a multiple page feed error.If the product is turned on while pressing and holding this button, the product prints the printer status sheet. | |
| e | Starts head cleaning (black only). | |
| f | (TWVC) | Starts head cleaning (all colors except black).If the product is turned on while pressing and holding this button, the product prints the nozzle check pattern. |
| g | (87X3) | Cancels printing during a print job.If the product is turned on while pressing and holding this button, the product prints the PS3 status sheet. |
Lights
| Lights | Function |
| On when the product is on.Flashes when the product is receiving data, printing, replacing an ink cartridge, charging ink, or cleaning the print head. | |
 | See the Network Guide for more details. Wi-Fi is only available for Wi-Fi capable models. |
| → "Status lights" on page 80 | |
| → "Status lights" on page 80 |
Getting to Know Your Product
| Lights | Function |
| BK Y M C | → "Status lights" on page 80 |
Paper Handling
Introduction to Using, Loading, and Storing Media
You can achieve good results with most types of plain paper. However, coated papers provide superior prints because they absorb less ink.
Epson provides special papers that are formulated for the ink used in Epson ink jet printers, and recommends these papers to ensure high-quality results.
For more details on Epson special media, see "Ink and Paper" on page 103.
When loading special paper distributed by Epson, read the instruction sheets packed with the paper first and keep the following points in mind.
Note:
☐ Load the paper into the paper cassette printable side down. The printable side is usually whiter or glossier. See the instruction sheets packed with the paper for more information. Some types of paper have cut corners to help identify the correct loading direction.
☐ If the paper is curled, flatten it or curl it slightly in the opposite direction before loading. Printing on curled paper may cause ink to smear on your prints.

Selecting which tray to use and its loading capacities
Refer to the following table to select the paper cassette tray and its loading capacities according to the type and size of the media you are using.
Paper Handling
| Media Type | Size | Loading capacity (sheets) for paper cassette 1 | Loading capacity (sheets) for paper cassette 2 | Loading capacity (sheets) for rear MP tray |
| Plain paper *1 | LetterA4B5 | 250 | 250 | 80 *5 |
| Legal | 250 | 250 | 1 *6 | |
| A5 | 250 | - | 80 *5 | |
| A6 | - | - | 80 *5 | |
| User-defined size | - | - | 1 *6 | |
| Thick paper *2 | LetterA4 | - | - | 10 *7 |
| Envelope | Envelope #10 *3Envelope DL *3Envelope C6 *3 | - | - | 10 |
| Envelope C4 *4 | - | - | 1 | |
| Epson Bright White Ink Jet Paper | A4 | 200 | 200 | 50 *8 |
| Epson Matte Paper - Heavyweight | A4 | - | - | 20 |
| Epson Photo Quality Ink Jet Paper | A4 | - | - | 80 |
| Epson Premium Glossy Photo Paper | A410×15 cm (4×6 in.)13×18 cm (5×7 in.)16:9 wide size (102∞181 mm) | - | - | 20 |
| Epson Premium Semigloss Photo Paper | A410×15 cm (4×6 in.) | - | - | 20 |
| Epson Photo Paper | A4 | - | - | 1 |
| 10×15 cm (4×6 in.)13×18 cm (5×7 in.) | - | - | 20 | |
| Epson Ultra Glossy Photo Paper | A410×15 cm (4×6 in.)13×18 cm (5×7 in.) | - | - | 20 |
Paper Handling
| Media Type | Size | Loading capacity (sheets) for paper cassette 1 | Loading capacity (sheets) for paper cassette 2 | Loading capacity (sheets) for rear MP tray |
| Epson Glossy Photo Paper | A4 13 × 18 cm( 5 × 7 in.) 10 × 15 cm( 4 × 6 in.) | - | - | 20 |
*1 Paper with a weight of 64 g/m² (17 lb) to 90 g/m² (24 lb).
*2 Paper with a weight of 91 g/m² (24 lb) to 256 g/m² (68 lb).
*3 Paper with a weight of 75 g/m ^2 (20 lb) to 90 g/m ^2 (24 lb).
*4 Paper with a weight of 80 g/m ^2 (21 lb) to 100 g/m ^2 (26 lb).
*5 The loading capacity for manual 2-sided printing is 30 sheets.
*6 The loading capacity for manual 2-sided printing is 1 sheet.
*7 The loading capacity for manual 2-sided printing is 5 sheets.
*8 The loading capacity for manual 2-sided printing is 20 sheets.
Note:
The availability of paper varies by location.
Storing paper
Return unused paper to the original package as soon as you finish printing. When handling special media, Epson recommends storing your prints in a resealable plastic bag. Keep unused paper and prints away from high temperature, humidity, and direct sunlight.
Loading Paper
Into the paper cassette
Follow these steps to load paper:
Note:
The illustrations in this section are from a similar product model. Although they may differ from your actual product, the method of operation is the same.
Paper Handling
1
Pull out the paper cassette.
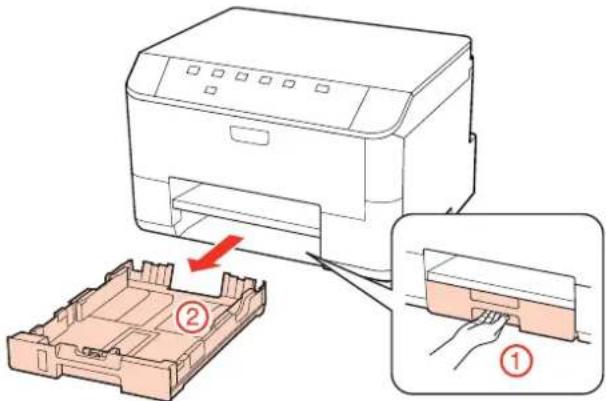
Note:
If the output tray has been ejected, close it before pulling out the paper cassette.

2
Slide the edge guides to the sides of the paper cassette.
natural_image
Diagram of a mechanical or electronic component with red arrows indicating directional flow or movement (no text or symbols present)Note:
When using Legal-size paper, extend the paper cassette as shown in the illustration.
Paper Handling
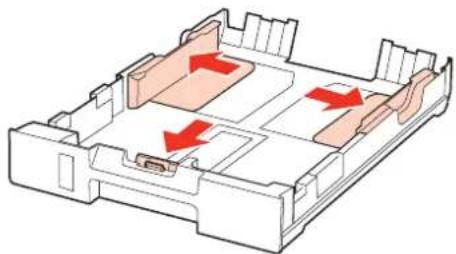
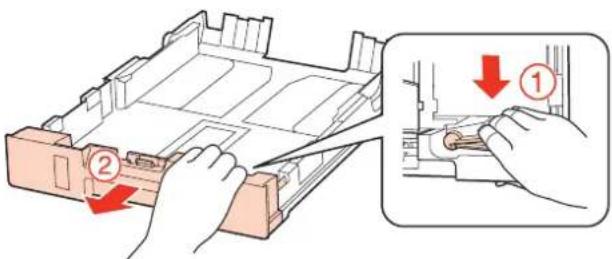
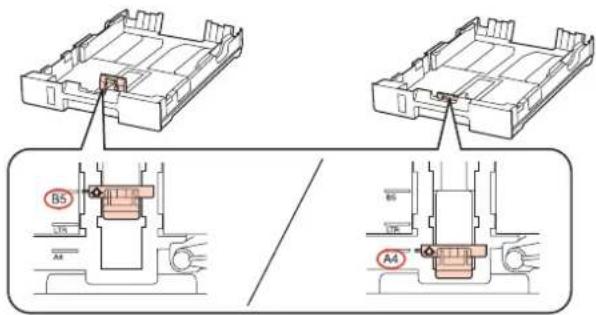
3
Slide the edge guide to adjust to the paper size you will use.
4
Load paper toward the edge guide with printable side face down, and check that the paper is not sticking out from the end of the cassette.
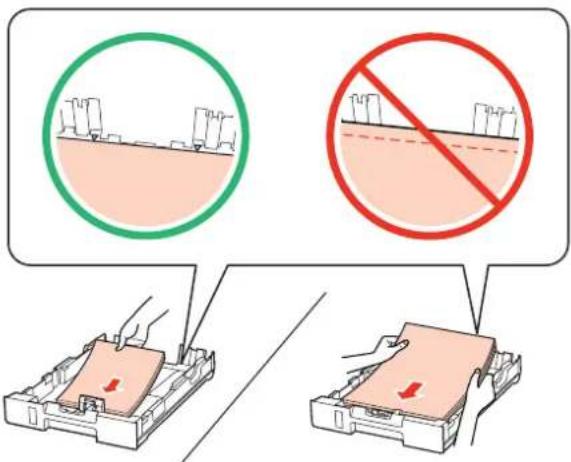
Note:
☐ Fan and align the edges of the paper before loading.
☐ For plain paper, do not load paper above the line just under the ▼ arrow mark inside the edge guide. For Epson special media, make sure the number of sheets is less than the limit specified for the media.
→ "Selecting which tray to use and its loading capacities" on page 18
☐ Do not use paper with binder holes.
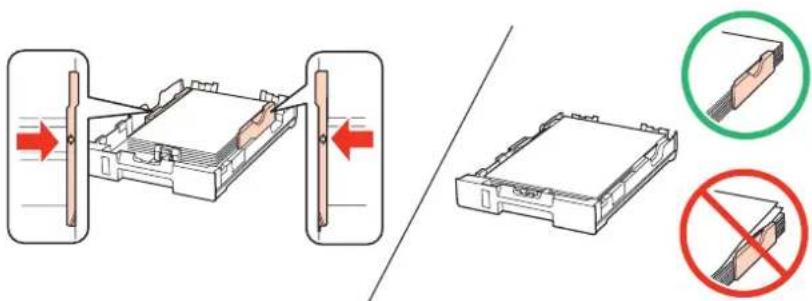
5
Slide the edge guides to the edges of the paper.
Paper Handling
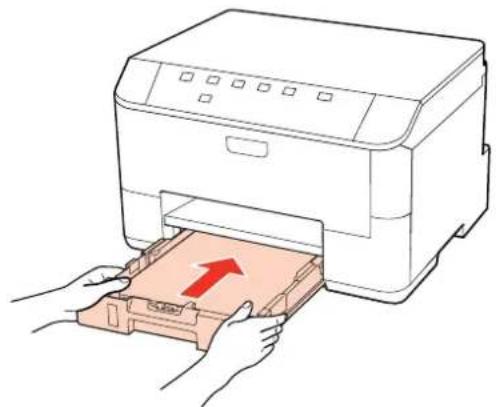
6
Keep the cassette flat and insert it back into the product carefully and slowly.
natural_image
Illustration of hands inserting a printer into a box with an arrow indicating the process (no text or symbols present)7
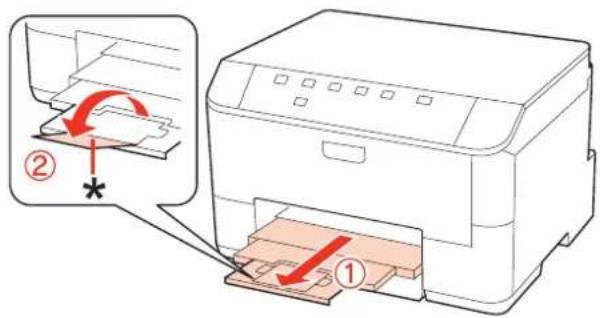
Slide out the output tray and raise the stopper.
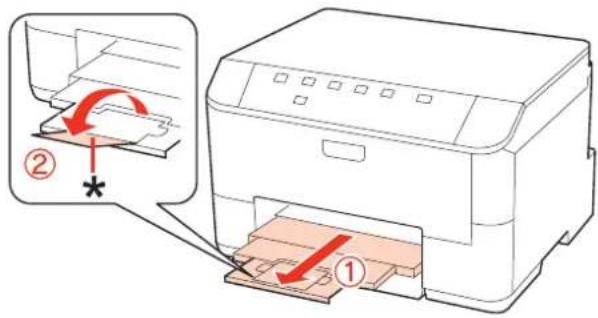
Note:
☐ After loading paper, set the paper size for each paper source. Paper is fed from the appropriate paper source depending on the setting. Use the panel utility to set the paper size.
→ "Paper Size Loaded Setting" on page 74
☐ When using Legal-size paper, lower the stopper (*).
Leave enough space in front of the product for the paper to be fully ejected.
☐ Do not remove or insert the paper cassette while the product is operating.
Into the rear MP tray
Follow these steps to load paper:
Note:
The illustrations in this section are from a similar product model. Although they may differ from your actual product, the method of operation is the same.
Paper Handling
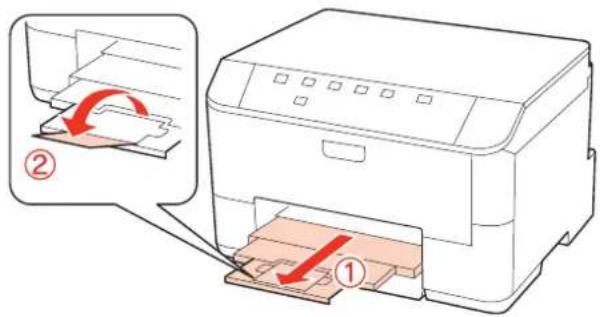
1 Slide out the output tray, and raise the stopper.
Note:
When using Legal-size paper, lower the stopper (*).
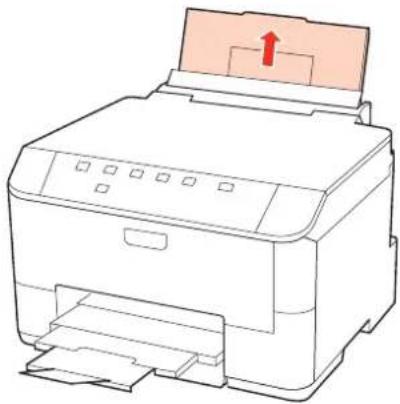
2 Pull up the rear MP tray.
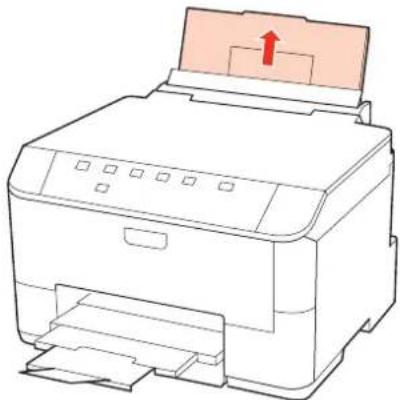
natural_image
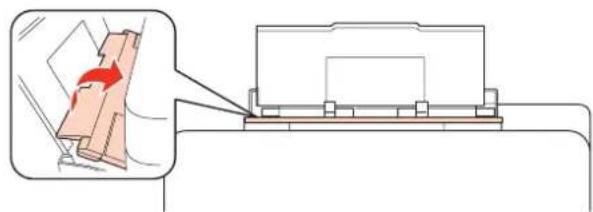
Line drawing of a printer with an arrow indicating paper direction (no text or symbols present)3 While holding the feeder guard forward, pinch and slide the edge guide.
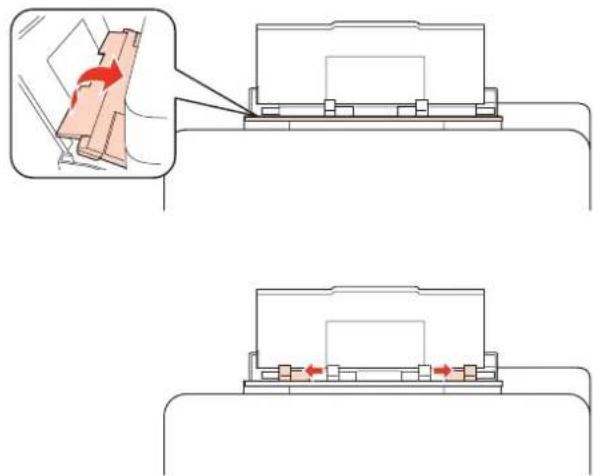
4 Fan a stack of paper, then tap it on a flat surface to even the edges.
Paper Handling
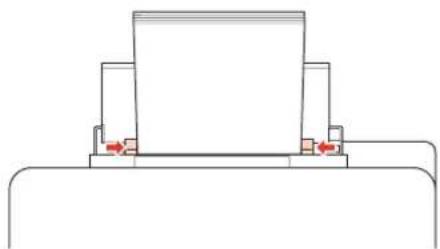
5 Load paper with the printable side up, at the center of the rear MP tray. The printable side is often whiter or brighter than the other side.
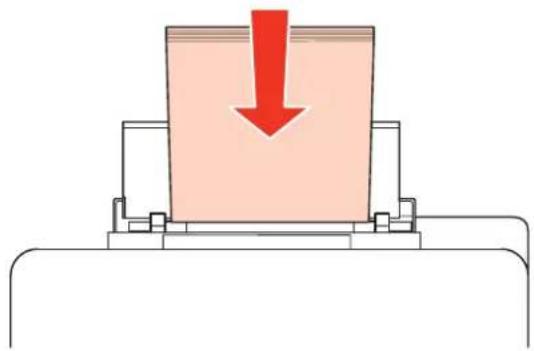
natural_image
Diagram of a mechanical press or clamping device with a red downward arrow indicating compression or disassembly (no text or symbols present)6 Slide the edge guide to the edge of the paper, but not too tightly.
natural_image
Pure mechanical assembly diagram showing two stacked components with red arrows indicating force or movement (no text or symbols)Note:
☐ After loading paper, set the paper size for each paper source. Paper is fed from the appropriate paper source depending on the setting. Use the panel utility to set the paper size.
→ "Paper Size Loaded Setting" on page 74
☐ For plain paper, do not load paper above the line just under the ▼ arrow mark inside the edge guide. For Epson special media, make sure the number of sheets is less than the limit specified for the media.
→ "Selecting which tray to use and its loading capacities" on page 18
☐ Up to 1 sheet of Legal-size paper can be loaded at a time.
Loading Envelopes
Follow these steps to load envelopes:
Note:
The illustrations in this section are from a similar product model. Although they may differ from your actual product, the method of operation is the same.
Paper Handling
1 Slide out the output tray, and raise the stopper.
2 Pull up the rear MP tray.
natural_image
Line drawing of a printer with an arrow indicating paper direction (no text or symbols present)3 While holding the feeder guard forward, pinch and slide the edge guide.
natural_image
Technical diagram showing a mechanical assembly with an inset view of a component being cut (no text or symbols present)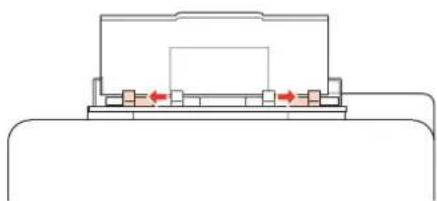
natural_image
Pure mechanical assembly diagram without any text, numbers, or symbolsPaper Handling
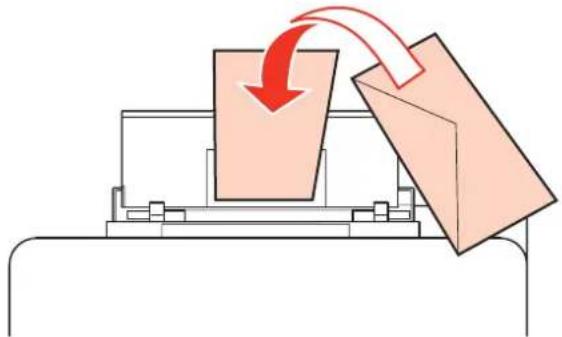
4
Load envelopes short edge first with the flap facing down and at the center of the rear MP tray.
natural_image
Diagram showing a mechanical press or printer with two overlapping sheets, one emitting a red arrow (no text or symbols present)Note:
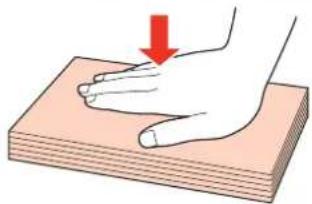
☐ The thickness of envelopes and their ability to fold vary widely. If the total thickness of the stack of envelopes exceeds 10 mm, press down on the envelopes to flatten them before loading. If print quality declines when a stack of envelopes is loaded, load one envelope at a time.
→ "Selecting which tray to use and its loading capacities" on page 18
☐ Do not use envelopes that are curled or folded.
☐ Flatten the envelope and the flaps before loading.
natural_image
Illustration of a hand pressing down on layered material with a red arrow indicating force (no text or symbols)
natural_image
Illustration of two hands exchanging a rectangular object with a red arrow indicating direction (no text or symbols)☐ Flatten the leading edge of the envelope before loading.
☐ Avoid using envelopes that are too thin, as they may curl during printing.
☐ Align the edges of the envelopes before loading.
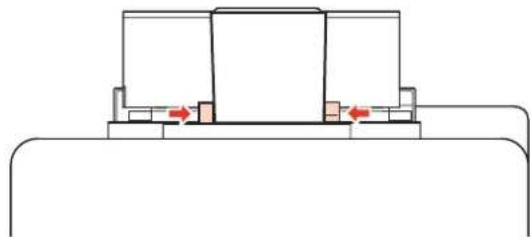
5
Slide the edge guide to the edge of the envelopes, but not too tightly.
natural_image
Pure mechanical assembly diagram showing two blocks with red arrows indicating motion or force direction (no text or symbols)For printing instructions, see the following instructions.
→ "Basic Printing" on page 30
Printing
Using Your Software
Printer driver and status monitor
The printer driver lets you choose from a wide variety of settings to get the best printing results. The status monitor and the printer utilities help you check the printer and keep it in top operating condition.
Note for Windows users:
☐ Your printer driver automatically finds and installs the latest version of the printer driver from Epson's Web site. Click the Driver Update button in your printer driver's Maintenance window, and then follow the on-screen instructions. If the button does not appear in the Maintenance window, point at All Programs or Programs in the Windows Start menu, and check in the Epson folder.
If you want to change the language of the driver, select the language you want to use from the Language setting in your printer driver's Maintenance window. Depending on the location, this function may not be available.
Accessing the printer driver for Windows
You can access the printer driver from most Windows applications, the Windows Start menu, or the taskbar.
To make settings that apply only to the application you are using, access the printer driver from that application.
To make settings that apply to all of your Windows applications, access the printer driver from the Start menu or the taskbar.
Refer to the following sections to access the printer driver.
Note:
Screen shots of the printer driver windows in this User's Guide are from Windows 7.
From Windows applications
1 Click Print or Print Setup on the File menu.
2 In the window that appears, click Printer, Setup, Options, Preferences, or Properties. (Depending on your application, you may need to click one or a combination of these buttons.)
From the Start menu
Windows 7: Click the start button, select Devices and Printers. Then right-click the printer and select Printing preferences.
Windows Vista and Server 2008: Click the start button, select Control Panel, and then select Printer from the Hardware and Sound category. Then select the printer and then click Select printing preferences or Printing Preferences.
Printing
□ Windows XP and Server 2003:
Click Start, Control Panel, then Printers and Faxes. Then right-click the printer and select Printing Preferences.
From the shortcut icon on the taskbar
Right-click the printer icon on the taskbar, then select Printer Settings.
To add a shortcut icon to the Windows taskbar, first access the printer driver from the Start menu as described above. Next, click the Maintenance tab, and then the Monitoring Preferences button. In the Monitoring Preferences window, select the Shortcut Icon check box.
Getting information through online help
In the printer driver window, try one of the following procedures.
☐ Right-click the item, then click Help.
☐ Click the ? button at the top right of the window, then click the item (for Windows XP only).
Accessing the printer driver for Mac OS X
The table below describes how to access the printer driver dialog.
| Dialog Box | How to Access It |
| Page Setup | Click Page Setup on the File menu of your application.Note for Mac OS X 10.5 or later:Depending on your application, the Page Setup menu may not appear in the File menu. |
| Click Print on the File menu of your application. | |
| Epson Printer Utility 4 | For Mac OS X 10.6, click System Preferences on the Apple menu and then click Print & Fax.Select your printer from the Printers list box, click Options & Supplies, Utility, and then click Open Printer Utility.For Mac OS X 10.5, click System Preferences on the Apple menu and then click Print & Fax.Select your printer from the Printers list box, click Open Print Queue and then click Utility button.For Mac OS X 10.4, double-click Macintosh HD, the Applications folder, and then the Printer Setup Utility icon in the Utilities folder. Select your printer from the Printer List and then click the Utility button. |
Getting information through online help
Click the ? Help button in the Print dialog.
Printing
Basic Printing
Selecting the correct paper type
The printer automatically adjusts itself for the type of paper you select in your print settings. That is why the paper type setting is so important. It tells your printer what kind of paper you are using and adjusts the ink coverage accordingly. The table below lists the settings you should choose for your paper.
| For this paper | Select this paper type setting |
| Plain paper*Epson Bright White Ink Jet Paper | plain papers |
| Thick paper* | Thick-Paper |
| Epson Ultra Glossy Photo Paper* | Epson Ultra Glossy |
| Epson Premium Glossy Photo Paper* | Epson Premium Glossy |
| Epson Premium Semigloss Photo Paper* | Epson Premium Semigloss |
| Epson Glossy Photo Paper* | Epson Glossy |
| Epson Photo Paper* | Epson Photo |
| Epson Matte Paper – Heavyweight*Epson Photo Quality Ink Jet Paper* | Epson Matte |
| Envelopes | Envelope |
* These paper types are compatible with Exif Print and PRINT Image Matching. For more information, refer to the documentation that came with the Exif Print or PRINT Image Matching compatible digital camera.
Note:
The availability of special media varies by location. For the latest information on media available in your area, contact Epson support.
→ "Technical Support Web Site" on page 124
Loading paper or envelopes
Refer to the section below for details on loading paper.
→ "Loading Paper" on page 20
→ "Loading Envelopes" on page 25
Printing
Note:
After loading paper, set paper size for each paper source. Paper will be fed from appropriate paper source based on setting.
→ "Paper Size Loaded Setting" on page 74
When using special Epson paper, refer to the section below.
→ "Introduction to Using, Loading, and Storing Media" on page 18
Refer to the section below for the printable area.
→ "Printable area" on page 108
Basic printer settings for Windows
1
Open the file you want to print.
2
Access the printer settings.
→ "Accessing the printer driver for Windows" on page 28
3
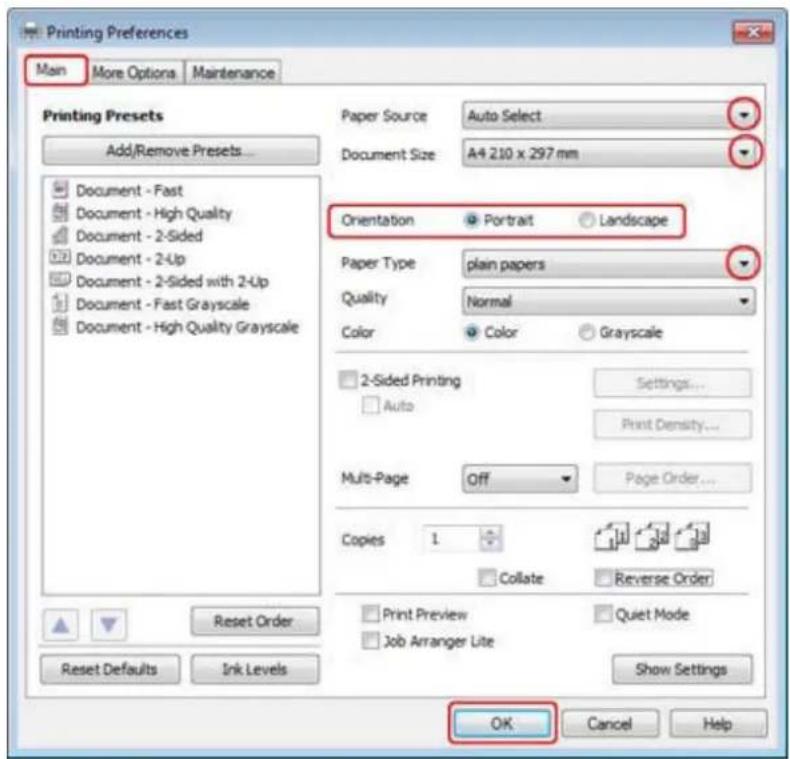
Click the Main tab.
4
Select the appropriate Paper Source setting.
Printing
5 Select the appropriate Document Size setting. You can also define a custom paper size. For details, see the online help.
6 Select Portrait (tall) or Landscape (wide) to change the orientation of your print.
Note:
Select Landscape when printing on envelopes.
7 Select the appropriate Paper Type setting.
→ "Selecting the correct paper type" on page 30
Note:
Print quality is automatically adjusted for the selected Paper Type.
8 Click OK to close the printer settings window.
Note:
To make changes to advanced settings, refer to the relevant section.
9 Print your file.
Basic printer settings for Mac OS X 10.5 or 10.6
1 Open the file you want to print.
2 Access the Print dialog.
→ "Accessing the printer driver for Mac OS X" on page 29
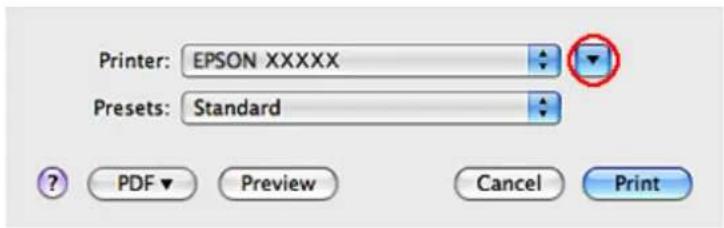
3 Click the ▼ button to extend this dialog.
Printing
4
Select the printer you are using as the Printer setting, and then make suitable settings.

Note:
☐ Select Landscape when printing on envelopes.
☐ Depending on your application, you may not be able to select some of the items in this dialog. If so, click Page Setup on the File menu of your application, and then make suitable settings.
Printing
5
Select Print Settings from the pop-up menu.
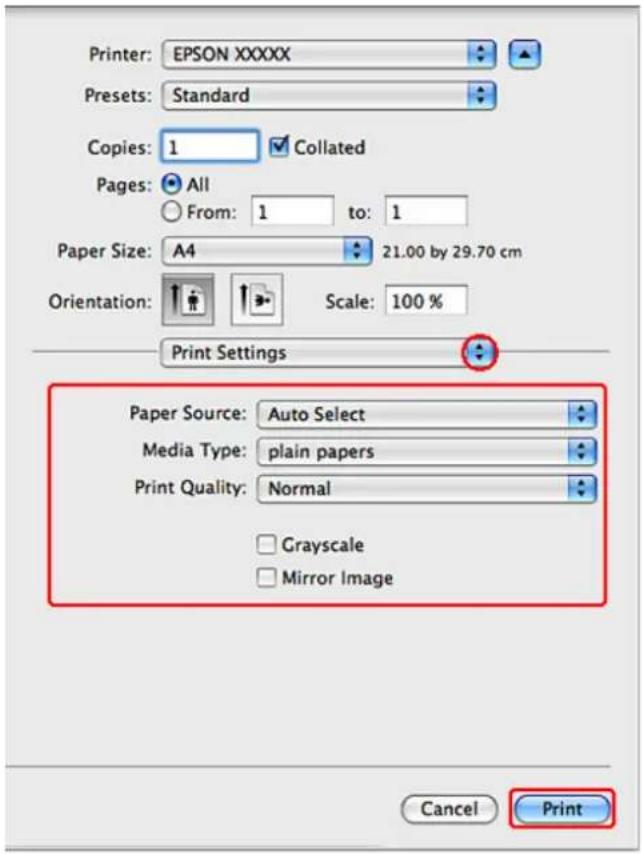
6
Make the settings that you want to use to print. See the online help for more details on Print Settings.
→ "Selecting the correct paper type" on page 30
Note:
To make changes to advanced settings, refer to the relevant section.
7
Click Print to start printing.
Basic printer settings for Mac OS X 10.4
1
Open the file you want to print.
Printing
2
Access the Page Setup dialog.
→ "Accessing the printer driver for Mac OS X" on page 29
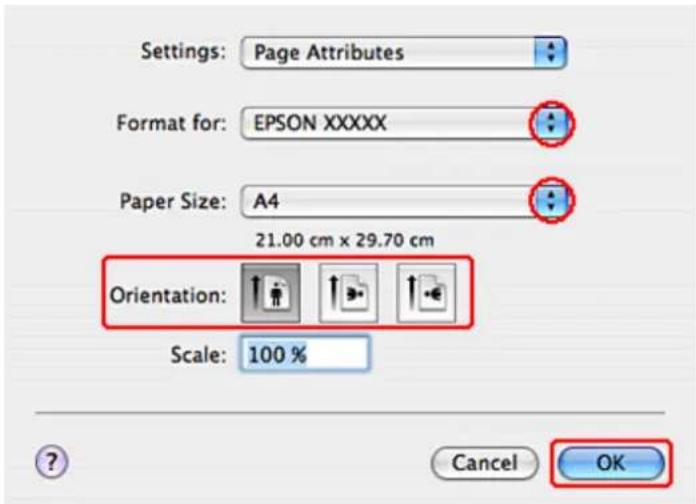
3
Select the printer you are using as the Format for setting and then make suitable settings.
Note:
Select Landscape when printing on envelopes.
4
Click OK to close the Page Setup dialog.
5
Access the Print dialog.
→ "Accessing the printer driver for Mac OS X" on page 29
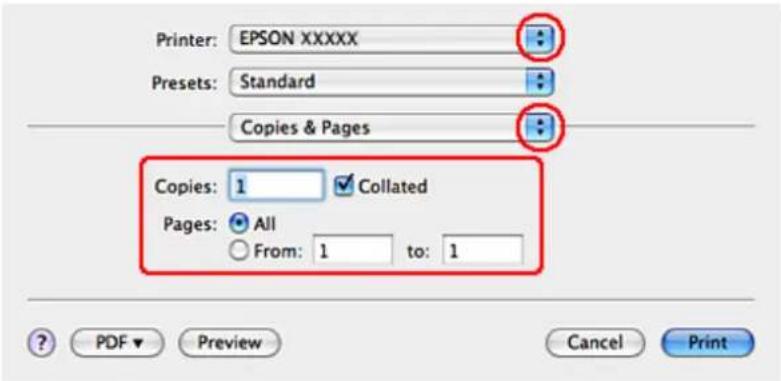
6
Select the printer you are using as the Printer setting. Then make the Copies & Pages settings.
Printing
7 Select Print Settings from the pop-up menu.
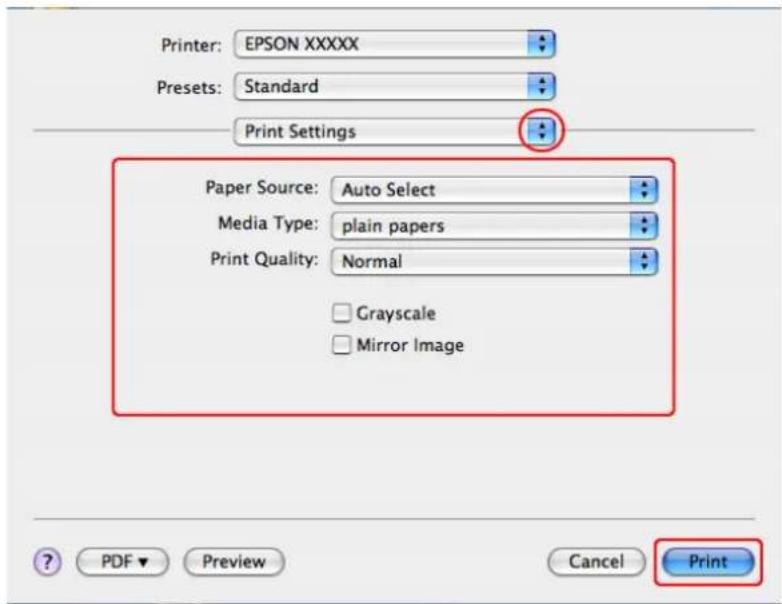
8 Make the settings that you want to use to print. See the online help for more details on Print Settings.
→ "Selecting the correct paper type" on page 30
Note:
To make changes to advanced settings, refer to the relevant section.
9 Click Print to start printing.
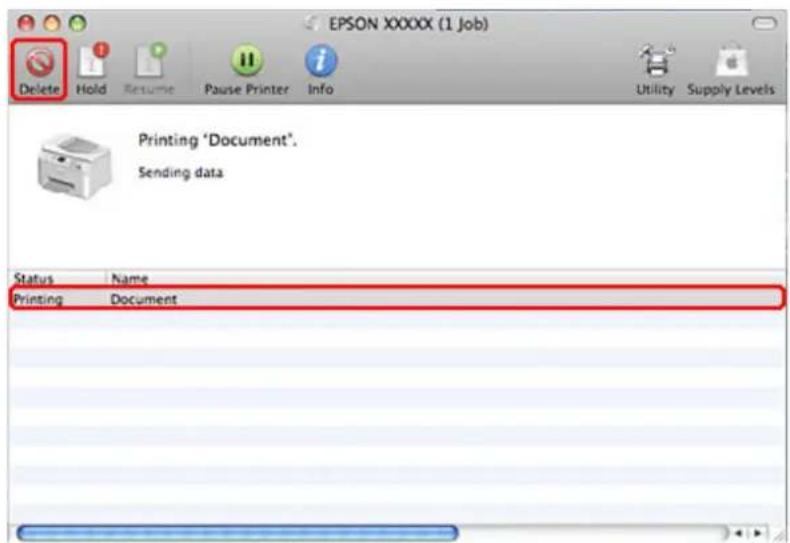
Canceling Printing
If you need to cancel printing, follow the instructions in the appropriate section below.
Using the printer button
Press the 📋 button to cancel a print job in progress.
For Windows
Note:
You cannot cancel a print job that has been completely sent to the printer. In this case, cancel the print job by using the printer.
Printing
Using EPSON Status Monitor 3
1 Access the EPSON Status Monitor 3.
→ "Using EPSON Status Monitor 3" on page 84
2 Click the Print Queue button. The Windows Spooler appears.
3 Right-click on the job you want to cancel and then select Cancel.
For Mac OS X
Follow the steps below to cancel a print job.
1 Click your printer icon in the Dock.
2 In the Document Name list, select the document which is printing.
3 Click the Delete button to cancel the print job.
Printing with Special Layout Options
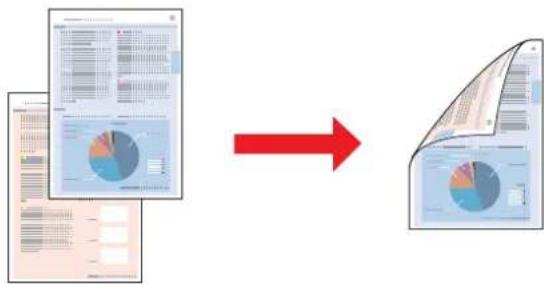
2-Sided Printing
Two types of 2-sided printing are available: standard and folded booklet.
Printing
Note:
If the ink runs low during automatic 2-sided printing, the printer stops printing and the ink needs to be replaced. When ink replacement is complete, the printer starts printing again, but there may be some missing parts in your print. If this happens, print again the page that has missing parts.
Note for Windows:
Manual 2-sided printing is available only when EPSON Status Monitor 3 is enabled. To enable the status monitor, access the printer driver and click the Maintenance tab followed by the Extended Settings button. In the Extended Settings window, check the Enable EPSON Status Monitor 3 check box.
Note for Mac OS X:
Mac OS X supports automatic standard 2-sided printing only.
Standard 2-sided printing allows you to print both sides of a sheet.
flowchart
graph LR
    A["Desktop Image"] --> B["Print Icon"]
    B --> C["Data Visualization Pie Chart"]
    C --> D["Print Icon"]
Choose automatic or manual printing. When you print manually, the even-numbered pages are printed first. Once these pages are printed, you can reload them to print the odd-numbered pages onto the opposite side of the paper.
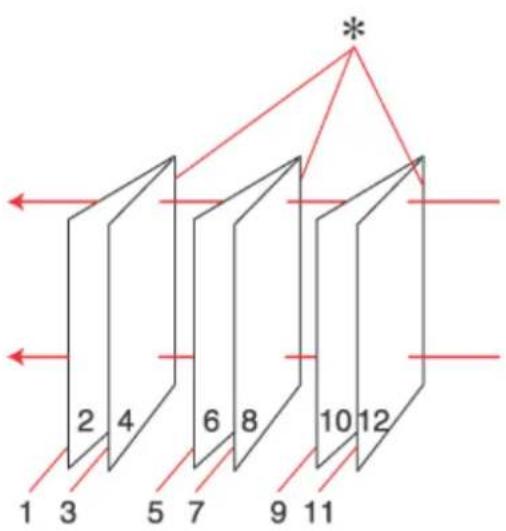
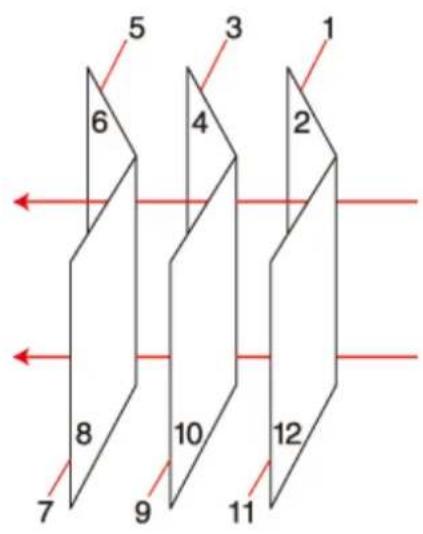
Folded booklet 2-sided printing allows you to make single-fold booklets.
Printing
flowchart
graph TD
    A["Block 1"] --> B["Block 2"]
    B --> C["Block 3"]
    C --> D["Block 4"]
    D --> E["Block 5"]
    E --> F["Block 6"]
    F --> G["Block 7"]
    G --> H["Block 8"]
    H --> I["Block 9"]
    I --> J["Block 10"]
    J --> K["Block 11"]
    K --> L["Block 12"]
    L --> M["Central Asterisk"]
    style M fill:#f9f,stroke:#333,stroke-width:2px
Side Binding
Center Binding
*: Binding edge
Choose automatic or manual printing. When you print manually, the pages that will appear on the inside (after the page is folded) are printed first. The pages that will appear outside the booklet can then be printed after you reload the paper into the printer.
The resulting pages can then be folded and bound together into a booklet.
2-sided printing is only available for the following papers and sizes.
| Paper | Size |
| Plain paper | Legal*, Letter, A4, Executive*, B5, A5*, A6* |
| Thick paper | Letter*, A4* |
| Epson Bright White Ink Jet Paper | A4 |
* Manual 2-sided printing only.
Note:
☐ Only use papers that are suitable for 2-sided printing. Otherwise, the print quality may deteriorate.
☐ Depending on the paper and the amount of ink used to print text and images, ink may bleed through to the other side of the paper.
☐ The surface of the paper may be smeared during 2-sided printing.
☐ Manual 2-sided printing may not be available when the printer is accessed over a network or is used as a shared printer.
☐ The loading capacity differs during 2-sided printing.
→ "Selecting which tray to use and its loading capacities" on page 18
Printing
Printer settings for Windows
1
Make adjustments to basic settings.
→ "Basic printer settings for Windows" on page 31
2
Select 2-Sided Printing check box.
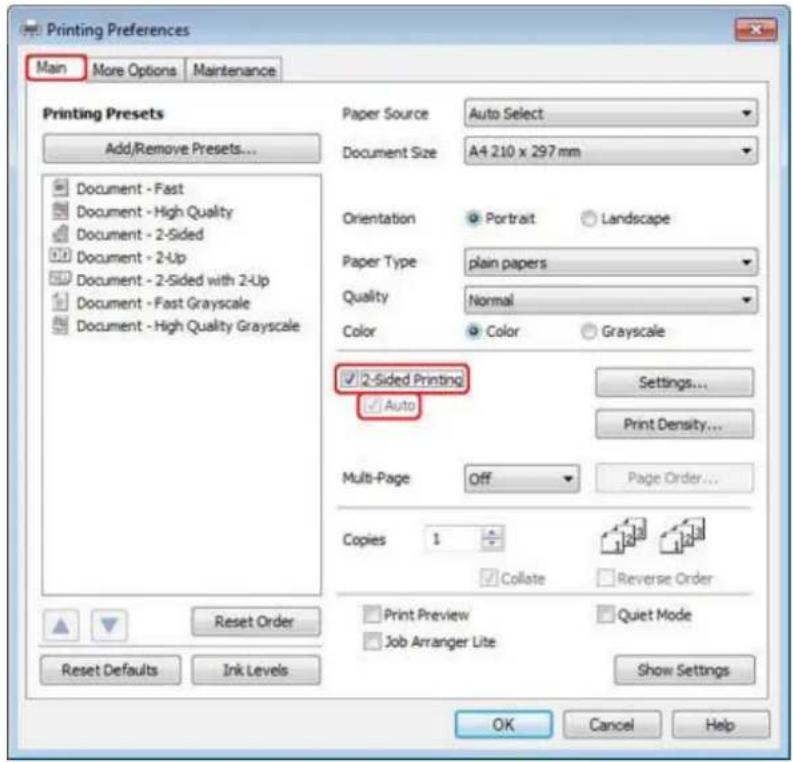
Note:
When using automatic printing, make sure the Auto check box is checked.
Printing
3
Click Settings to open the 2-Sided Printing Settings window.
![2-Sided Printing Settings Binding Edge Left Short-edge Top Long-edge Right Short-edge Binding Margin Front Page 3.0 [3.0 ... 30.0] Back Page 3.0 [3.0 ... 30.0] Unit mm inch Create Folded Booklet Booklet Center Binding Side Binding OK Cancel Help](/content/2026/05/1106596/images/f81907d08f0e716c2f017a4c88f0ed1d5906bb5c9748f786aa070203ecd31220.jpg)
4
To print folded booklets using the 2-sided printing option, select the Booklet check box, and choose Center Binding or Side Binding.
Note:
Center Binding is not available with manual printing.
5
Select which edge of the document will be bound.
Note:
Some settings are not available when Booklet is selected.
Printing
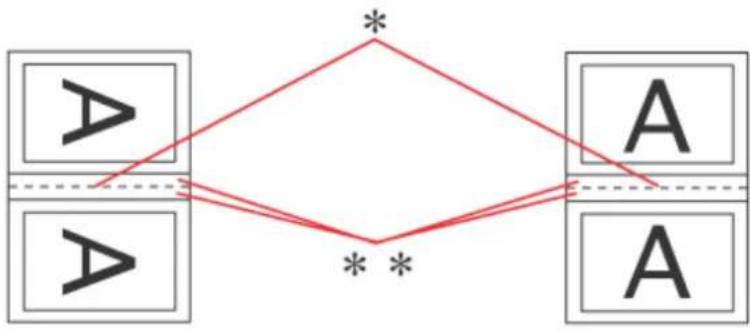
6
Choose mm or inch as the Unit setting. Then specify the width of the binding margin.
flowchart
graph TD
    A1["A"] -->|*| A2["A"]
    A2 -->|**| A3["A"]
    A3 --> A4["A"]
    A1 --> A2
    A2 --> A3
    A3 --> A4
Portrait
Landscape
*: Folding edge
**: Margin
When folded booklets are printed using the 2-sided printing option, a margin of the specified width will appear on both sides of the fold. For example, if you specify a 10-mm margin, you will get a 20-mm margin (a margin of 10 mm will be placed on each side of the fold).
Note:
The actual binding margin may be different from the specified settings depending on your application. Experiment with a few sheets to examine actual results before printing the entire job.
7
Click OK to return to the Main window.
8
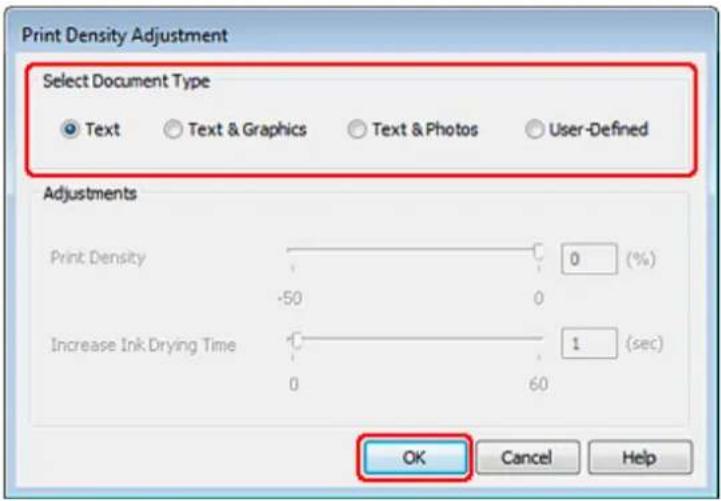
Click the Print Density button to open the Print Density Adjustment window.
Note:
This button is not available when you print manually.
Printing

Select one of the Select Document Type settings. This automatically adjusts Print Density and Increase Ink Drying Time.
Note:
If you are printing high-density data, such as graphs, we recommend adjusting settings manually.

Click OK to return to the Main window.

Make sure all of the settings are correct, and then click OK to close the printer settings window.
After completing the steps above, print one test copy and examine the results before printing an entire job.
Note:
If you are printing manually, instructions for printing the back pages will be displayed while the face pages are printed. Follow the on-screen instructions to reload the paper.
Printer settings for Mac OS X 10.5 or 10.6

Make adjustments to basic settings.
→ "Basic printer settings for Mac OS X 10.5 or 10.6" on page 32
Printing
2
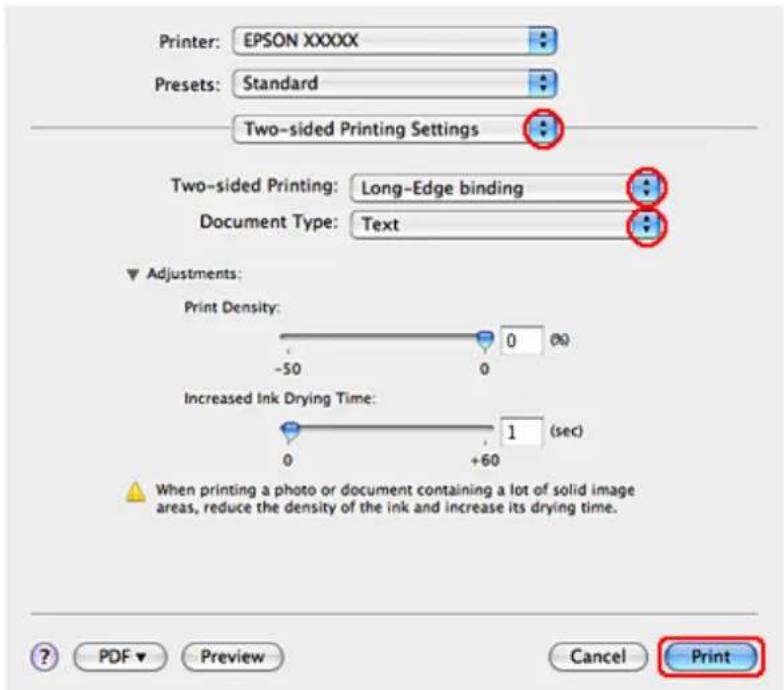
Select Two-sided Printing Settings from the pop-up menu.
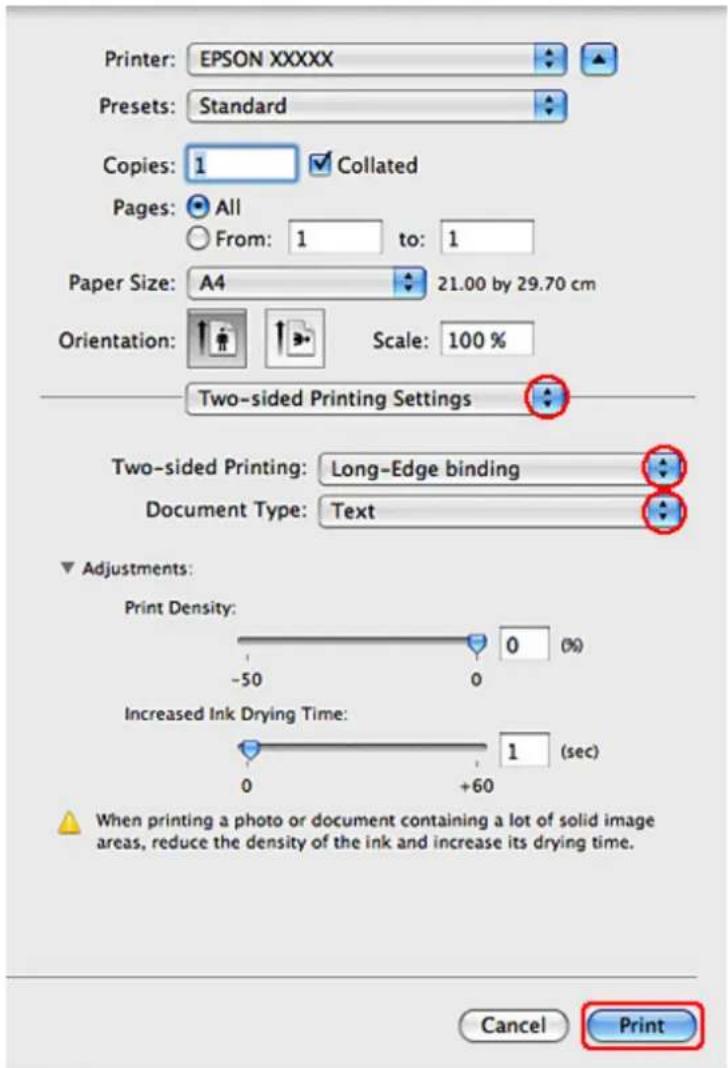
3
Select Long-Edge binding or Short-Edge binding from the Two-sided Printing pop-up menu.
4
Select one of the Document Type settings. This automatically adjusts Print Density and Increased Ink Drying Time.
Note:
If you are printing high-density data, such as graphs, we recommend adjusting settings manually.
5
Click Print to start printing.
Printer settings for Mac OS X 10.4
1
Make adjustments to basic settings.
→ "Basic printer settings for Mac OS X 10.4" on page 34
Printing
2
Select Two-sided Printing Settings from the pop-up menu.
3
Select Long-Edge binding or Short-Edge binding from the Two-sided Printing pop-up menu.
4
Select one of the Document Type settings. This automatically adjusts Print Density and Increased Ink Drying Time.
Note:
If you are printing high-density data, such as graphs, we recommend adjusting settings manually.
5
Load paper into the paper cassette, and click Print.
→ "Loading Paper" on page 20
Fit to Page Printing
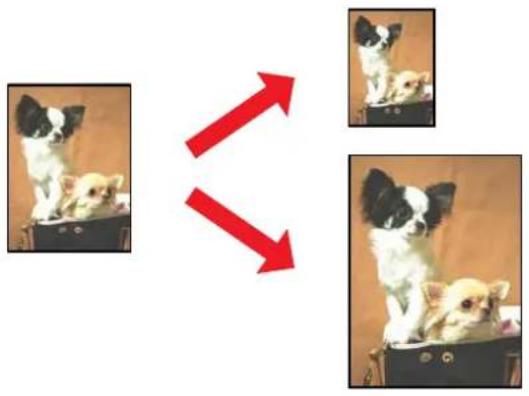
You can use the Fit to Page printing function when you want to print, for example, an A4-size document on another size paper.
Printing
Fit to Page printing automatically resizes your page to the paper size you select. You can also resize your page manually.
natural_image
Two small dogs sitting on a briefcase, each with a red arrow pointing to the other (no text or symbols)Printer settings for Windows
1 Make adjustments to basic settings.
→ "Basic printer settings for Windows" on page 31
2 Click the More Options tab, then select the Reduce/Enlarge Document check box.
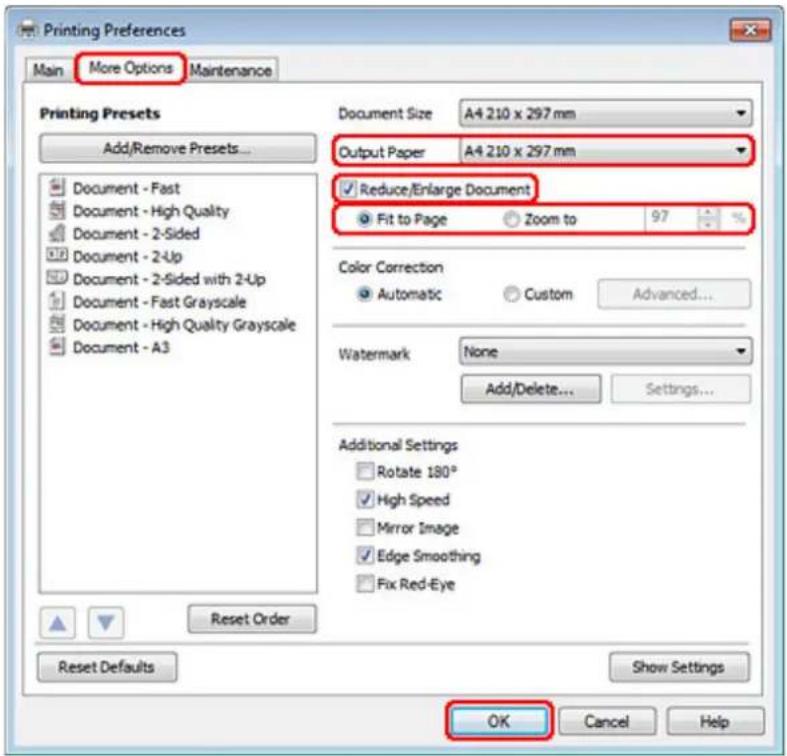
3 Do one of the following:
☐ If you selected Fit to Page, select the size of the paper you are using from the Output Paper.
☐ If you selected Zoom to, use the arrows to choose a percentage.
Printing
4 Click OK to close the printer settings window.
After completing the steps above, print one test copy and examine the results before printing an entire job.
Printer settings for Mac OS X 10.5 or 10.6
1 Make adjustments to basic settings.
→ "Basic printer settings for Mac OS X 10.5 or 10.6" on page 32
2 Select Paper Handling from the pop-up menu.
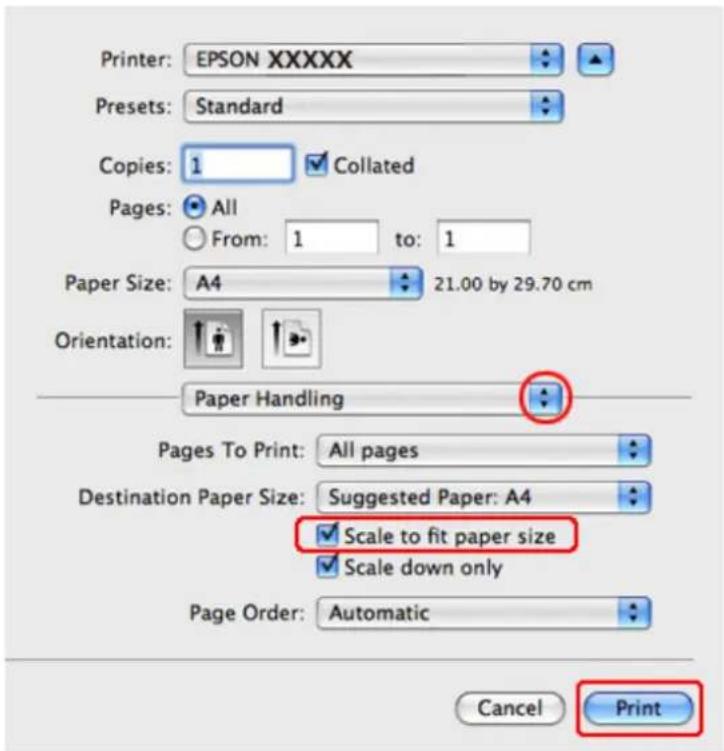
3 Select the Scale to fit paper size.
4 Make sure that the appropriate size is displayed in Destination Paper Size.
5 Click Print to start printing.
Printer settings for Mac OS X 10.4
1 Make adjustments to basic settings.
→ "Basic printer settings for Mac OS X 10.4" on page 34
Printing
2
Select Paper Handling from the pop-up menu.
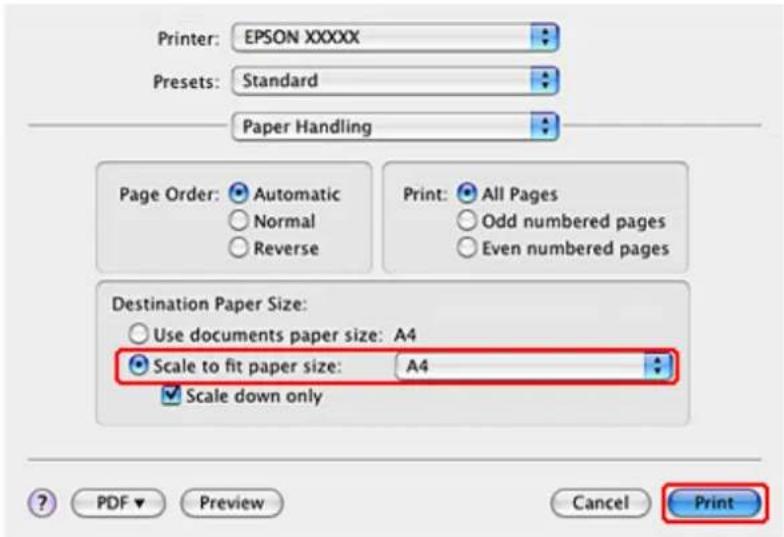
3
Select Scale to fit paper size as the Destination Paper Size.
4
Select the appropriate paper size from the pop-up menu.
5
Click Print to start printing.
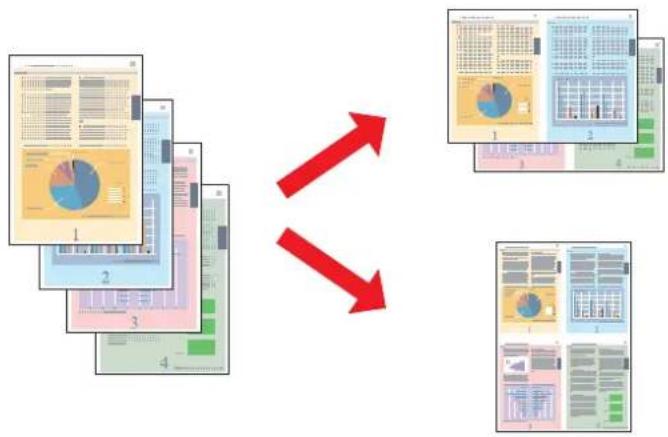
Pages Per Sheet Printing
Pages Per Sheet printing allows you to print two or four pages on single sheets of paper.
flowchart
graph TD
    A["Layer 1: Data visualization with pie chart and bar chart"] --> B["Layer 2: Data visualization with pie chart and bar chart"]
    B --> C["Layer 3: Data visualization with pie chart and bar chart"]
    C --> D["Layer 4: Data visualization with pie chart and bar chart"]
    D --> E["Output Panel 1: Data visualization with pie chart and bar chart"]
    E --> F["Output Panel 2: Data visualization with pie chart and bar chart"]
    F --> G["Output Panel 3: Data visualization with pie chart and bar chart"]
    G --> H["Output Panel 4: Data visualization with pie chart and bar chart"]
    H --> I["Feedback Loop"]
    I --> A
    I --> B
    I --> C
    I --> D
    I --> E
    I --> F
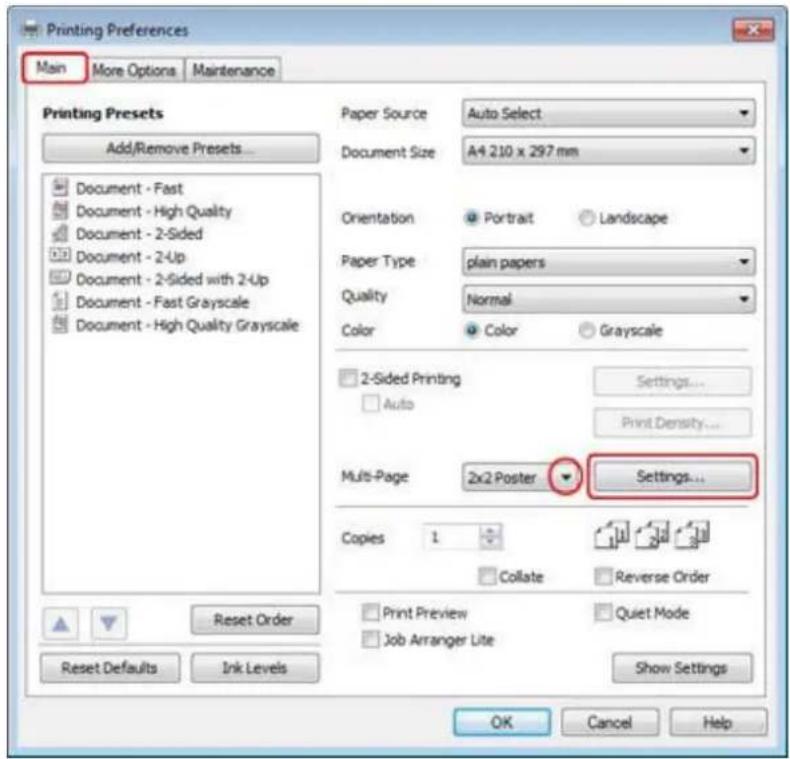
Printer settings for Windows
1
Make adjustments to basic settings.
→ "Basic printer settings for Windows" on page 31
Printing
2
Select 2-Up or 4-Up as Multi-Page.
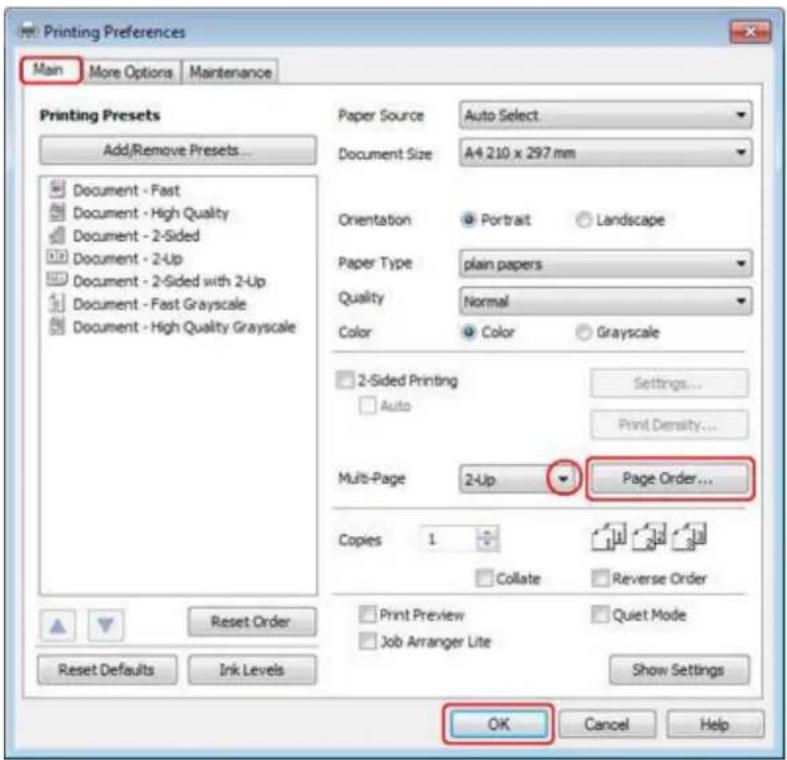
3
Click Page Order button to open the Page Order Settings window.
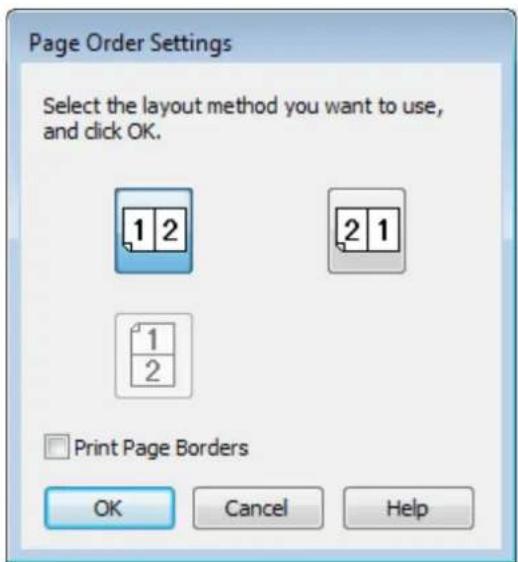
4
Select from the following settings.
| Page Order | Allows you to specify the order in which the pages will be printed on the sheet of paper. Some settings may be unavailable, depending on the Orientation setting on the Main window. |
| Print Page Borders | Prints frames around the pages printed on each sheet. |
Printing
5 Click OK to return to the Main window.
6 Click OK to close the printer settings window.
After completing the steps above, print one test copy and examine the results before printing an entire job.
Printer settings for Mac OS X 10.5 or 10.6
1 Make adjustments to basic settings.
→ "Basic printer settings for Mac OS X 10.5 or 10.6" on page 32
2 Select Layout from the pop-up menu.
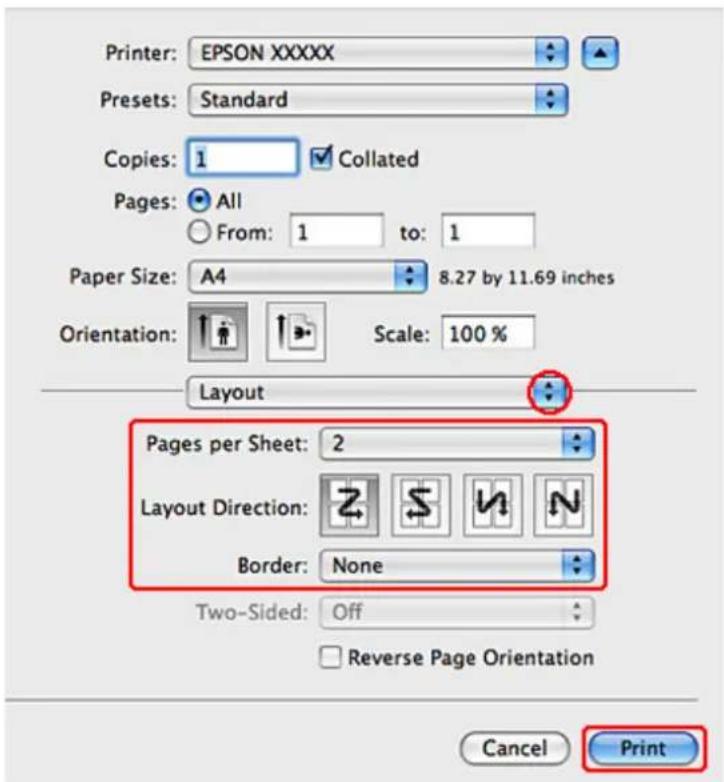
3 Select from the following settings:
| Pages per Sheet | Prints multiple pages of your document on a single sheet of paper.You can choose from 1, 2, 4, 6, 9, or 16. |
| Layout Direction | Allows you to specify the order in which the pages will be printed on the sheet of paper. |
| Border | Prints a border around the pages printed on each sheet. You can choose from None, Single Hairline, Single Thin Line, Double Hairline, or Double Thin Line. |
4 Click Print to start printing.
Printing
Printer settings for Mac OS X 10.4
1 Make adjustments to basic settings.
→ "Basic printer settings for Mac OS X 10.4" on page 34
2 Select Layout from the pop-up menu.
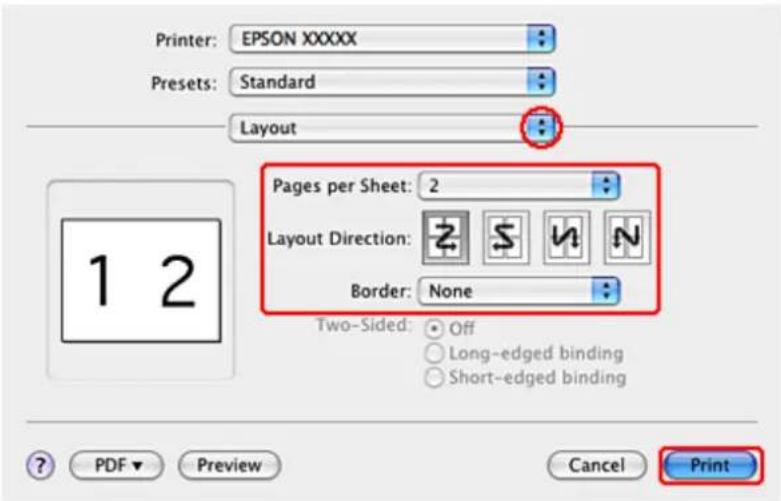
3 Select from the following settings:
| Pages per Sheet | Prints multiple pages of your document on a single sheet of paper. You can choose from 1, 2, 4, 6, 9, or 16. |
| Layout Direction | Allows you to specify the order in which the pages will be printed on the sheet of paper. |
| Border | Prints a border around the pages printed on each sheet. You can choose from None, Single Hairline, Single Thin Line, Double Hairline, or Double Thin Line. |
4 Click Print to start printing.
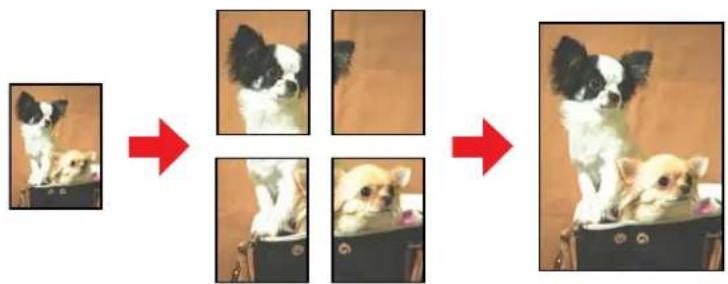
Poster Printing (for Windows only)
Poster Printing allows you to print poster-size images by enlarging one page to cover several sheets of paper.
natural_image
Sequence of photos showing a dog's posture before and after editing, with no visible text or symbols.Printing
Note:
This feature is not available for Mac OS X.
Printer settings
1
Make adjustments to basic settings.
→ "Basic printer settings for Windows" on page 31
2
Select 2x1 Poster, 2x2 Poster, 3x3 Poster, or 4x4 Poster as Multi-Page.
Printing
3
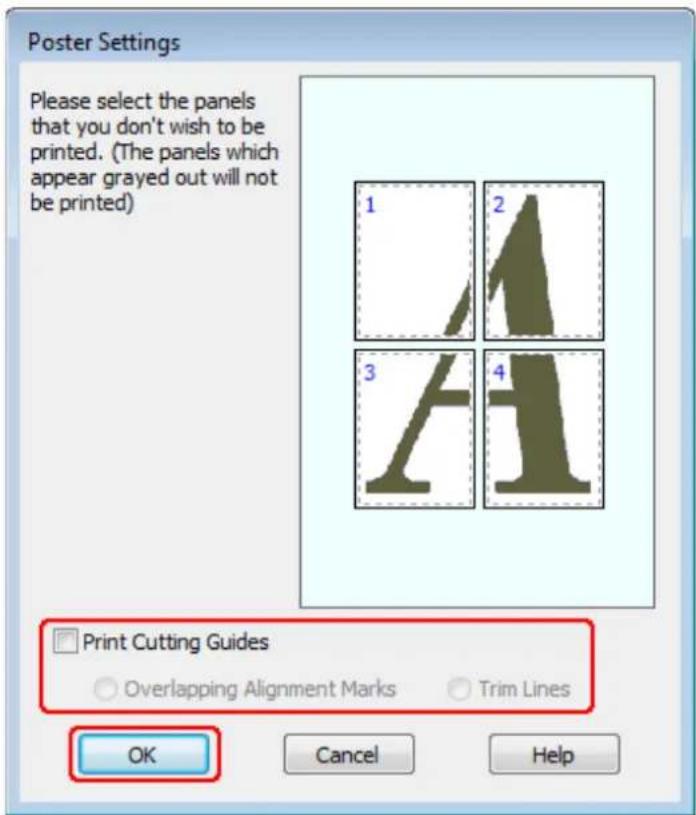
Click Settings to adjust the way your poster will be printed. The Poster Settings window opens.
4
Make the following settings:
| Print Cutting Guides | Prints guide lines for cutting. |
| Overlapping Alignment Marks | Slightly overlaps the panels and prints alignment markers so that the panels can be aligned more precisely. |
| Trim Lines | Prints border lines on the panels to guide you when trimming the pages. |
Note:
If you want to print only a few of the panels without printing the entire poster, click the panels that you do not want to print.
5
Click OK to return to the Main window.
6
Click OK to close the printer settings window.
After completing the steps above, print one test copy and examine the results before printing an entire job. Then follow the instructions.

"How to make a poster from your prints" on page 54
Printing
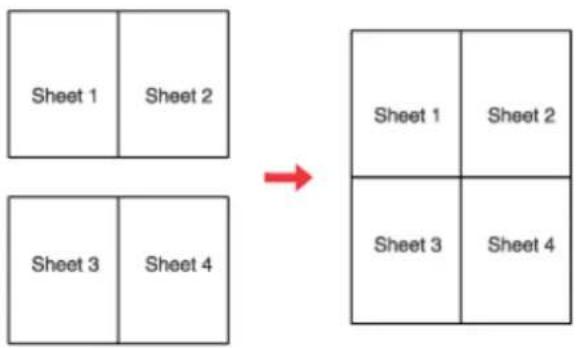
How to make a poster from your prints
The following is an example of how to create a poster with 2x2 Poster selected for Multi-Page and Overlapping Alignment Marks selected for Print Cutting Guides.
| Sheet 1 | Sheet 2 |
| Sheet 3 | Sheet 4 |
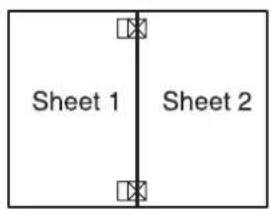
1 Cut off the margin of Sheet 1 along a vertical line through the center of the top and bottom cross-marks:

flowchart
graph LR
    A["Sheet 1"] --> B["Sheet 2"]
    B --> C["Sheet 1"]
    C --> D["Sheet 2"]
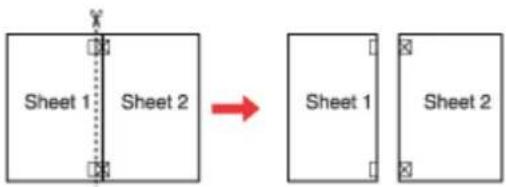
2 Place the edge of Sheet 1 on top of Sheet 2 and align the cross-marks, then temporarily tape the two sheets together from the back:
3 Cut the taped sheets in two along a vertical line through the alignment markers (this time, a line to the left of the cross-marks):
flowchart
graph LR
    A["Sheet 1"] --> B["Sheet 2"]
    B --> C["Sheet 1"]
    B --> D["Sheet 2"]
Printing
4 Align the edges of the paper using the alignment markers and tape them together from the back:
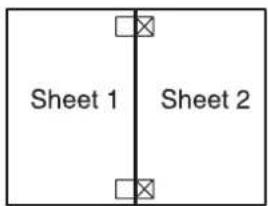
5 Repeat the instructions from step 1 to step 4 to tape Sheets 3 and 4 together.
6 Repeat the instructions from step 1 to step 4 to tape the top and bottom edges of the paper:
flowchart
graph TD
    A["Sheet 1"] --> D["Sheet 1"]
    B["Sheet 2"] --> D["Sheet 1"]
    C["Sheet 3"] --> D["Sheet 3"]
    E["Sheet 4"] --> D["Sheet 4"]
7 Cut off the remaining margins.
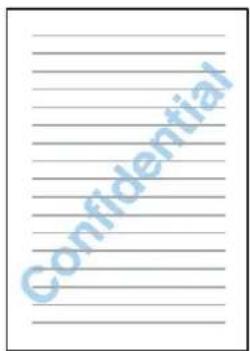
Watermark Printing (for Windows only)
Watermark printing allows you to print a text-based or image-based watermark on your document.
Note:
This feature is not available for Mac OS X.
Printing
Printing the watermark
1
Make adjustments to basic settings.
→ "Basic printer settings for Windows" on page 31
2
Click the More Options tab, choose the desired watermark from the Watermark list, then click Settings.
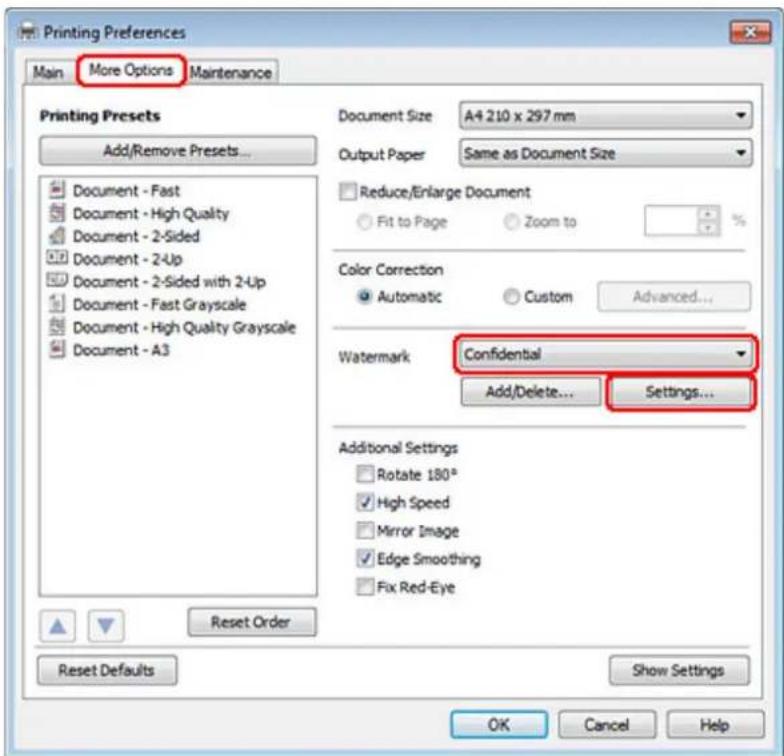
If you want to create your own watermark, see the online help.
Printing

Specify the settings you want for the watermark.
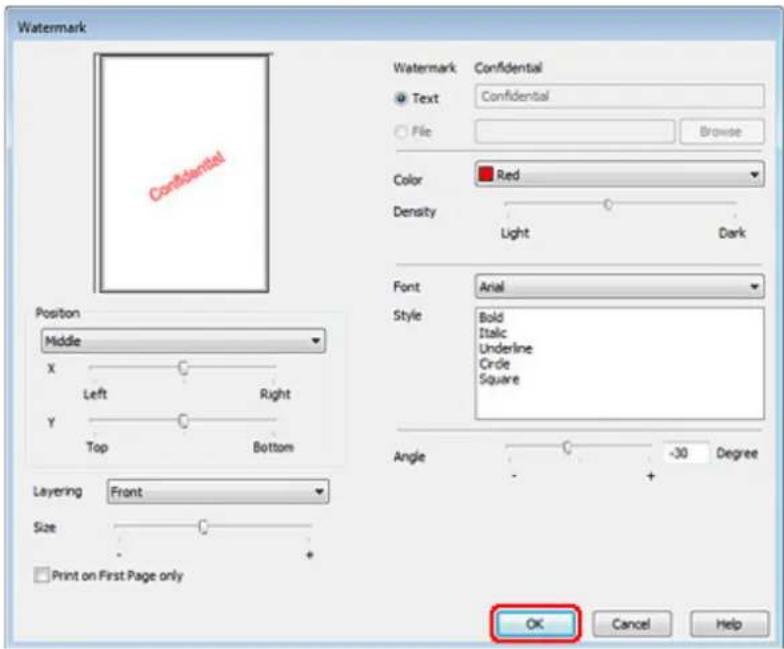

Click OK to return to the More Options window.

Click OK to close the printer settings window.
After completing the steps above, print one test copy and examine the results before printing an entire job.
Sharing Your Printer
You can set up your printer so other users on the network can share it.
First you will set up the printer as a shared printer on the computer directly connected to it. Then you will add the printer to each network computer that will access it.
See your Windows or Macintosh documentation for details.
Using the PostScript Printer Driver and the PCL6 Printer Driver
For PS3/PCL models, you need to download the software from the Epson's website. Contact customer support in your region for more details on obtaining the printer drivers and system requirements such as supported operating systems.
Installing Option
250-Sheet Paper Cassette Unit
Installing the paper cassette unit
Follow the steps below to install the paper cassette unit.
1 Turn the product off and unplug the power cord and all the interface cables.
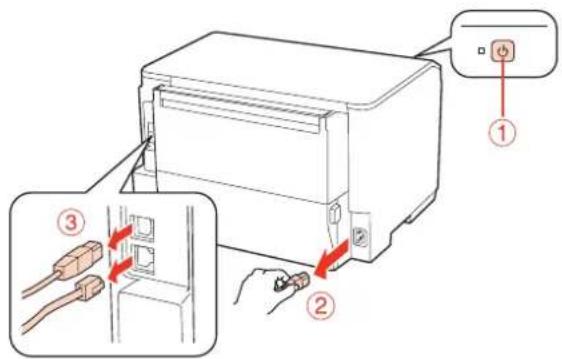
Caution: Make sur
2 Carefully remove the paper cassette unit from its carton and place it where you intend to set up the product.
Note:
☐ Remove the protective materials from the unit.
☐ Keep all protective materials in case you want to ship the optional paper cassette unit in the future.
3 Carefully, grasp the product at the position indicated below and lift it carefully.
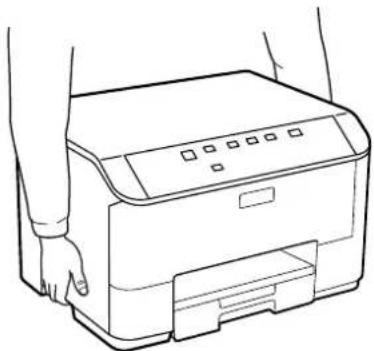
natural_image
Line drawing of a printer with hands operating it, no text or symbols presentInstalling Option
4 Align the corners of the product and the unit, then lower the product gently onto the unit so that the connector and two pins on the top of the unit fit into the terminal and the holes on the bottom of the product respectively.
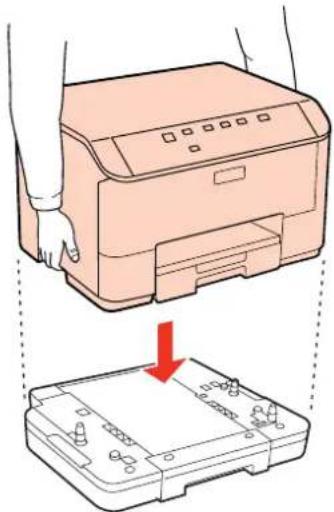
natural_image
Illustration of a printer being placed on a baseplate, showing the printer's lid and base with a red arrow indicating compression (no text or symbols present)5 Reconnect all the interface cables and the power cord.
6 Plug the product's power cord into an electrical outlet.
7 Turn on the product.
Uninstalling the cassette unit
Perform the installation procedure in reverse.
Replacing Consumables
Ink Cartridges
Checking the ink cartridge status
For Windows
Note:
☐ Epson cannot guarantee the quality or reliability of non-genuine ink. If non-genuine ink cartridges are installed, the ink cartridge status may not be displayed.
When an ink cartridge is running low, the Low Ink Reminder screen automatically appears. You can also check the ink cartridge status from this screen. If you do not want to display this screen, first access the printer driver and then click the Maintenance tab, and then Monitoring Preferences. On the Monitoring Preferences screen, clear the See Low Ink Reminder alerts check box.
☐ If an ink cartridge is running low, prepare a new ink cartridge.
To check the ink cartridge status, do one of the following:
Open the printer driver, click the Main tab, and then click the Ink Levels button.
☐ Double-click the printer shortcut icon on your Windows taskbar. To add a shortcut icon to the taskbar, see the following section:
→ "From the shortcut icon on the taskbar" on page 29
Replacing Consumables
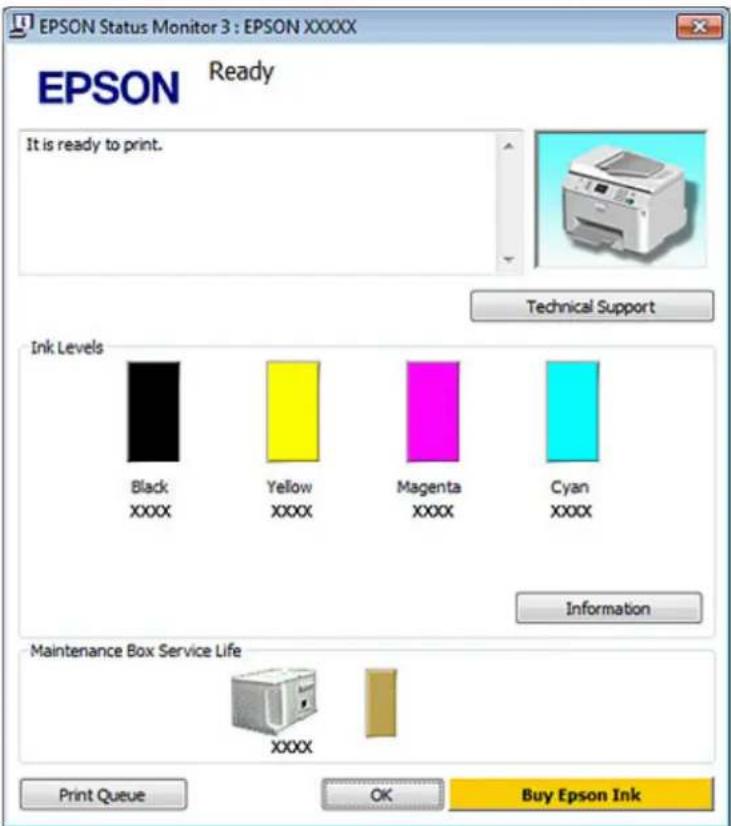
Open the printer driver, click the Maintenance tab, then click the EPSON Status Monitor 3 button. A graphic displays the ink cartridge status.
Note:
☐ When printing in monochrome or grayscale, color inks instead of black ink may be used depending on the paper type or print quality settings. This is because a mixture of color inks is used to create black.
☐ If EPSON Status Monitor 3 does not appear, access the printer driver and click the Maintenance tab and then the Extended Settings button. In the Extended Settings window, check the Enable EPSON Status Monitor 3 check box.
☐ Depending on current settings, the simplified status monitor may be displayed. Click the Details button to display the window above.
☐ The ink levels displayed are an approximate indication.
For Mac OS X
Note:
If an ink cartridge is running low, prepare a new ink cartridge.
You can check the ink cartridge status using EPSON Status Monitor. Follow the steps below.
1
Access the Epson Printer Utility 4 dialog.
→ "Accessing the printer driver for Mac OS X" on page 29
Replacing Consumables

Click the EPSON Status Monitor button. The EPSON Status Monitor appears.
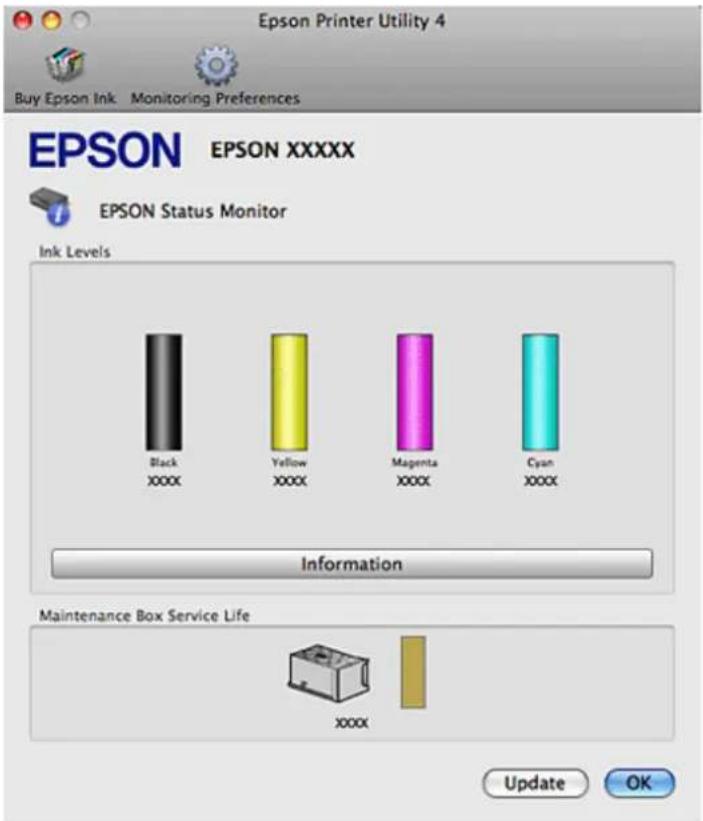
Note:
☐ The graphic displays the ink cartridge status when EPSON Status Monitor was first opened. To update the ink cartridge status, click Update.
☐ Epson cannot guarantee the quality or reliability of non-genuine ink. If non-genuine ink cartridges are installed, the ink cartridge status may not be displayed.
☐ When printing in monochrome or grayscale, color inks instead of black ink may be used depending on the paper type or print quality settings. This is because a mixture of color inks is used to create black.
☐ The ink levels displayed are an approximate indication.
Using the printer buttons
→ "Status lights" on page 80
Precautions on ink cartridge replacement
Read all of the instructions in this section before replacing the ink cartridges.
☐ We recommend storing ink cartridges at normal room temperature, and to use them by the expiry date printed on the cartridge packaging.
☐ For the best printing results, use up the ink cartridge within six months of installation.
Replacing Consumables
☐ If you move ink cartridges from a cold place to a warm place, leave it at room temperature for more than four hours before using the ink cartridge.
☐ Although the ink cartridges may contain recycled materials, this does not effect printer function or performance.
☐ Do not drop or knock it against hard objects; otherwise, the ink may leak.
☐ This printer uses ink cartridges equipped with an IC chip that monitors the amount of ink used by each cartridge. Cartridges are usable even if they are removed and reinserted.
☐ If you need to remove an ink cartridge temporarily, be sure to protect the ink supply area from dirt and dust. Store the ink cartridge in the same environment as the printer.
☐ Never turn off the printer during initial ink charging. The ink may fail to filled up and the printer may become unavailable to print.
☐ The valve in the ink supply port is designed to contain any excess ink that may be released. However, careful handling is recommended. Do not touch the supply port of the ink cartridge or its surrounding area.
☐ For maximum ink efficiency, only remove an ink cartridge when you are ready to replace it. Ink cartridges with low ink status may not be used when reinserted.
Other products not manufactured by Epson may cause damage that is not covered by Epson's warranties, and under certain circumstances, may cause erratic printer behavior.
☐ Keep ink cartridges out of the reach of children. Do not allow children to drink from or handle the cartridges.
☐ Be careful when you handle used ink cartridges, as there may be some ink around the ink supply port. If ink gets on your skin, wash the area thoroughly with soap and water. If ink gets into your eyes, flush them immediately with water. If discomfort or vision problems continue after a thorough flushing, see a doctor immediately.
☐ Epson recommends the use of genuine Epson ink cartridges. Epson cannot guarantee the quality or reliability of non-genuine ink. The use of non-genuine ink may cause damage that is not covered by Epson's warranties, and under certain circumstances, may cause erratic printer behavior. Information about non-genuine ink levels may not be displayed, and use of non-genuine ink is recorded for possible use in service support.
Leave the old cartridge installed in the printer until you have obtained a replacement; otherwise, ink remaining in the print head nozzles may dry out.
☐ You cannot continue printing with one ink cartridge expended, even if the other cartridges still contain ink. Before printing, replace the expended cartridge.
☐ Never turn off the printer while replacing the ink cartridge. Doing so may damage the IC chip on the ink cartridge and the printer may not print properly.
☐ To ensure you receive premium print quality and to help protect your print head, a variable ink safety reserve remains in the cartridge when your printer indicates to replace the cartridge. The yields quoted for you do not include this reserve.
Replacing an ink cartridge
When ink cartridges become low or expended, a message appears on your computer or the ink status light flashes.
Replacing Consumables
1 Open the front cover.
2 Push the ink cartridge that you want to replace and then grip the handle of the cartridge to pull it out of the printer. Dispose of the used cartridge properly. Do not take the used cartridge apart or try to refill it.
Note:
☐ The illustration shows replacement of the black ink cartridge. Replace the cartridge appropriate to your situation.
☐ Removed ink cartridges may have ink around the ink supply port, so be careful not to get any ink on the surrounding area when removing the cartridges.
3 Remove the replacement ink cartridge from its package. Do not touch the green chip on the side of the cartridge. Doing so may prevent normal operation and printing.
Note:
Do not shake used ink cartridges, as they may leak.
Replacing Consumables
4 Shake the ink cartridge for 5 seconds 15 times horizontally in approximately 5 cm movements as shown in the following illustration.

5 Place the ink cartridge into the cartridge holder. Push the cartridge until it clicks into place, and then close the front cover.
natural_image
Illustration of a hand pressing a button on a printer (no text or symbols visible)Note:
The power light continues to flash while the printer is charging ink. Do not turn off the printer during ink charging. If the ink charging is incomplete, you may not be able to print.
Ink cartridge replacement is complete. The printer will return to its previous status.
Maintenance Box
Checking the maintenance box status
The maintenance box status is shown in the same screen of the ink cartridge status. You can check the status from the printer software or the control panel.
→ "Checking the ink cartridge status" on page 60
Handling precautions
Read all of the instructions in this section before replacing the maintenance box.
□ Epson recommends the use of a genuine Epson maintenance box. The use of a non-genuine maintenance box may cause damage that is not covered by Epson's warranties, and under certain circumstances, may cause erratic printer behavior. Epson cannot guarantee the quality or reliability of a non-genuine maintenance box.
☐ Do not dismantle the maintenance box.
☐ Do not touch the green IC chip on the side of the maintenance box.
☐ Keep out of reach of children, and do not drink the ink.
Replacing Consumables
☐ Do not tilt the used maintenance box until it is placed in the plastic bag provided.
☐ Do not reuse a maintenance box which has been removed and left detached for a long period.
☐ Keep the maintenance box away from direct sunlight.
Replacing a maintenance box
To replace the maintenance box, follow the steps below.
1
Confirm that the product is not draining the ink.
2
Remove the replacement maintenance box from the package.
Note:
Do not touch the green chip on the side of the box. Doing so may prevent normal operation.
3
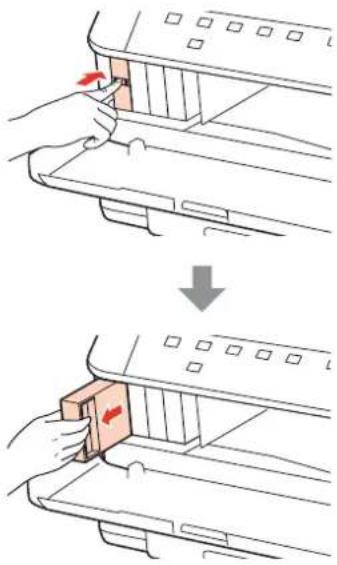
Push the buttons on either side of the rear unit at the same time, and then pull the unit out.
4
Put your hand on the handle of the maintenance box, and then pull the box outward.
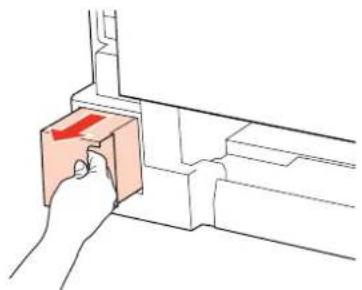
natural_image
Illustration of a hand placing a red rectangular object into a white structural frame (no text or symbols)Note:
If ink gets on your hands, wash them thoroughly with soap and water. If ink gets into your eyes, flush them immediately with water.
5
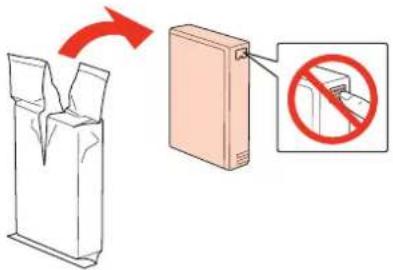
Put the used maintenance box in the plastic bag provided with the replacement box, and dispose of it properly.
Note:
Do not tilt the used maintenance box until after it is sealed in the plastic bag.

natural_image
Illustration of a cardboard box wrapped in a white sheet, with a red arrow pointing to its side (no text or symbols)Replacing Consumables
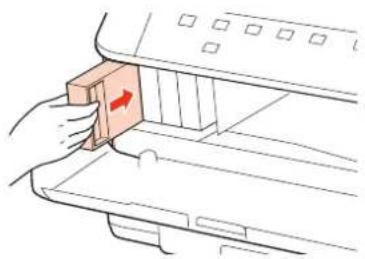
6
Insert the maintenance box into place as far as it will go.
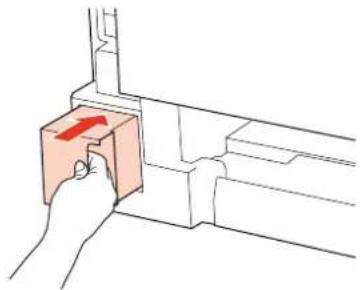
natural_image
Illustration of a hand pressing a red arrow on a box inside a mechanical bracket (no text or symbols)7
Push the button on either side of the rear unit at the same time, and then reattach the unit.
8
Press the ▲ button or the ⏻ button.
Maintenance box replacement is complete.
Maintaining Your Printer and Software
Checking the Print Head Nozzles
If you find that the print is unexpectedly faint or that dots are missing, you may be able to identify the problem by checking the print head nozzles.
You can check the print head nozzles from your computer by using the Nozzle Check utility or from the printer by using the buttons.
Using the Nozzle Check utility for Windows
Follow the steps below to use the Nozzle Check utility.
1
Make sure that no lights are indicating errors.
2
Make sure that A4-size paper is loaded in the rear MP tray or the paper cassette.
3
Right-click the printer icon on the taskbar, then select Nozzle Check.
If the printer icon does not appear, refer to the following section to add the icon.
→ "From the shortcut icon on the taskbar" on page 29
4
Follow the on-screen instructions.
Using the Nozzle Check utility for Mac OS X
Follow the steps below to use the Nozzle Check utility.
1
Make sure that no lights are indicating errors.
2
Make sure that A4-size paper is loaded in the rear MP tray or the paper cassette.
3
Access the Epson Printer Utility 4 dialog.
→ "Accessing the printer driver for Mac OS X" on page 29
4
Click the Nozzle Check button.
5
Follow the on-screen instructions.
Using the printer buttons
Follow the steps below to check the print head nozzles using the printer buttons.
1
Make sure that no lights are indicating errors.
2
Turn off the printer.
3
Make sure that A4-size paper is loaded in the paper cassette.
4
While holding down the ⏻ button, press the ⏻ button to turn on the printer.
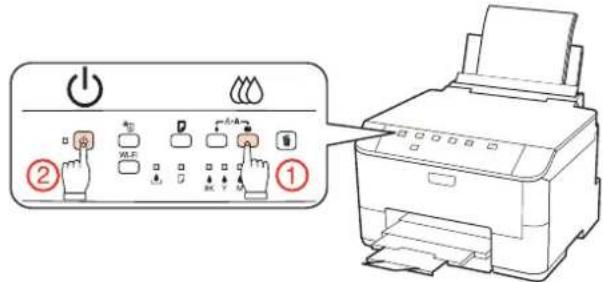
5
When the printer turns on, release both the buttons. The printer prints the nozzle check pattern.
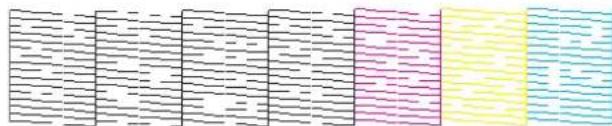
Below are two sample nozzle check patterns.
Compare the quality of the printed check page with the sample shown below. If there are no print quality problems, such as gaps or missing segments in the test lines, the print head is fine.
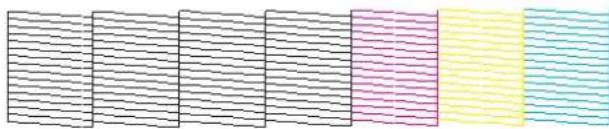
natural_image
Abstract pattern of horizontal wavy lines in black, gray, pink, and blue (no text or symbols)If any segment of the printed lines is missing, as shown below, this could mean a clogged ink nozzle or a misaligned print head.
natural_image
Abstract pattern of horizontal lines and a vertical color block (no text or symbols)→ "Cleaning the Print Head" on page 69
→ "Aligning the Print Head" on page 72
Cleaning the Print Head
If you find that the print is unexpectedly faint or that dots are missing, you may be able to solve these problems by cleaning the print head, which ensures that the nozzles are delivering ink properly.
Maintaining Your Printer and Software
You can clean the print head from your computer using the Head Cleaning utility in the printer driver or from the printer by using the buttons.
Note:
☐ Perform the nozzle check first to identify any defective color(s); this will allow you to select the appropriate color(s) for the head cleaning function.
→ "Checking the Print Head Nozzles" on page 68
☐ Black ink may be used when printing color images.
Because print head cleaning uses some ink from some cartridges, clean the print head only if quality declines; for example, if the printout is blurry or the color is incorrect or missing.
☐ When ink is low you may not be able to clean the print head. When ink is expended you cannot clean the print head. Replace the appropriate ink cartridge first.
Using the Head Cleaning utility for Windows
Follow the steps below to clean the print head using the Head Cleaning utility.
1
Make sure that no lights are indicating errors.
2
Right-click the printer icon on the taskbar, then select Head Cleaning.
If the printer icon does not appear, refer to the following section to add the icon.
→ "From the shortcut icon on the taskbar" on page 29
3
Follow the on-screen instructions.

Caution:
Do not open the front cover or turn off the printer during head cleaning.
Note:
☐ To maintain print quality, we recommend printing a few pages on a regular basis.
☐ If print quality does not improve, make sure you selected the appropriate color according to the nozzle check result.
Using the Head Cleaning utility for Mac OS X
Follow the steps below to clean the print head using the Head Cleaning utility.
1
Make sure that no lights are indicating errors.
2
Access the Epson Printer Utility 4.
→ "Accessing the printer driver for Mac OS X" on page 29
Maintaining Your Printer and Software
3 Click the Head Cleaning button.
4 Follow the on-screen instructions.
Caution: Do not open the front cover or turn off the printer during head cleaning.
Note:
☐ To maintain print quality, we recommend printing a few pages on a regular basis.
☐ If print quality does not improve, make sure you selected the appropriate color according to the nozzle check result.
Using the printer buttons
Follow the steps below to clean the print head using the printer buttons.
1 Make sure that no lights are indicating errors.
2 Press the ♠ button or ⏻ button.
Select either of the buttons according to the result of the nozzle check.
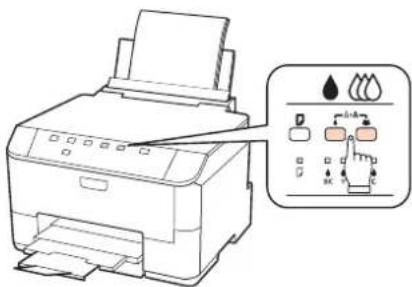
The printer starts cleaning the print head and the ⏻ light begins flashing.
Caution: Never tur
Never turn off the printer while the ⏻ light is flashing. Doing so may damage the printer.
3 When the ⏻ light stops flashing, print a nozzle check pattern to confirm that the head is clean.
→ "Checking the Print Head Nozzles" on page 68
Maintaining Your Printer and Software
Note:
☐ To maintain print quality, we recommend printing a few pages on a regular basis.
☐ If print quality does not improve, make sure you selected the appropriate color according to the nozzle check result.
☐ If print quality has not improved after repeating this procedure about four times, turn the printer off and wait for at least six hours. Then run the nozzle check again and repeat the head cleaning if necessary. If print quality has still not improved, contact Epson support.
Aligning the Print Head
If you notice a misalignment of vertical lines or horizontal banding, you may be able to solve this problem by using the Print Head Alignment utility in your printer driver.
Refer to the appropriate section below.
Note:
Do not press the ☑ button to cancel printing while printing a test pattern with the Print Head Alignment utility.
Using the Print Head Alignment utility for Windows
Follow the steps below to align the print head using the Print Head Alignment utility.
1
Make sure that no lights are indicating errors.
2
Make sure A4-size paper is loaded in paper cassette 1.
3
Right-click the printer icon on the taskbar, then select Print Head Alignment.
If the printer icon does not appear, refer to the following section to add the icon.
→ "From the shortcut icon on the taskbar" on page 29
4
Follow the on-screen instructions to align the print head.
Using the Print Head Alignment utility for Mac OS X
Follow the steps below to align the print head using the Print Head Alignment utility.
1
Make sure that no lights are indicating errors.
2
Make sure A4-size paper is loaded in paper cassette 1.
Maintaining Your Printer and Software

Access the Epson Printer Utility 4 dialog.
→ "Accessing the printer driver for Mac OS X" on page 29

Click the Print Head Alignment button.

Follow the on-screen instructions to align the print head.
Making Printer Settings
If you have installed the printer driver, you can make various printer settings from your computer using the setting utility.
Note:
For PS3/PCL models, you need to download the software from the Epson's website.
Power Off Timer Setting
The printer turns off automatically if no operations are performed for the selected period after it enters sleep mode.
You can adjust the time before power management is applied. Any increase will affect the product's energy efficiency. Please consider the environment before making any change.
Follow the steps below to adjust the time.
For Windows

Windows 7: Click the start button, select Devices and Printers, and then right-click the printer and select Printer properties.
Windows Vista and Server 2008: Click the start button, select Control Panel, and then select Printer from the Hardware and Sound category. Then right-click the printer and select Properties.
Windows XP and Server 2003: Click Start, Control Panel, and then Printers and Faxes. Then right-click the printer and select Properties.

Click the Optional Settings tab, and then click the Printer Settings button.

Select Off, 2h, 4h, 8h, or 12h as the Power Off Timer setting.

Click the Apply button.
Maintaining Your Printer and Software
For Mac OS X
1 Access the Epson Printer Utility 4 dialog box.
→ "Accessing the printer driver for Mac OS X" on page 29
2 Click the Printer Settings button. The Printer Settings screen appears.
3 Select Off, 2h, 4h, 8h, or 12h as the Power Off Timer setting.
4 Click the Apply button.
Paper Size Loaded Setting
Follow the steps below to define which paper size should be loaded in the rear MP tray and cassette(s).
Once this setting is made, you do not have to select the paper source every time you print.
For Windows
1 Windows 7: Click the start button, select Devices and Printers, and then right-click the printer and select Printer properties.
Windows Vista and Server 2008: Click the start button, select Control Panel, and then select Printer from the Hardware and Sound category. Then right-click the printer and select Properties.
Windows XP and Server 2003: Click Start, Control Panel, then Printers and Faxes. Then right-click the printer and select Properties.
2 Click the Optional Settings tab and click the Printer Settings button.
3 Select the paper size for each paper source as the Paper Size Loaded.
4 Click the Apply button.
For Mac OS X
1 Access the Epson Printer Utility 4 dialog box.
→ "Accessing the printer driver for Mac OS X" on page 29
2 Click the Printer Settings button. The Printer Settings screen appears.
3 Select the paper size for each paper source as the Paper Size Loaded.
4 Press the Apply button.
Maintaining Your Printer and Software
Cleaning the Printer
Cleaning the exterior of the printer
To keep your printer operating at its best, clean it thoroughly several times a year by using the following instructions.

Caution:
Never use alcohol or thinner to clean the printer. These chemicals can damage the printer.
Note:
Close the rear MP tray and the output tray when you are not using the printer to protect the printer from dust.
Cleaning the interior of the printer
To keep your print results at their best, clean the roller inside by using the following procedure.

Warning:
Be careful not to touch the parts inside the printer.

Caution:
☐ Be careful to keep water away from the electronic components.
☐ Do not spray the inside of the printer with lubricants.
☐ Unsuitable oils can damage the mechanism. Contact your dealer or a qualified service person if lubrication is needed.
1
Make sure that no lights are indicating errors.
2
Load several sheets of A4-size plain paper.
3
Press the □ button to feed and eject paper.
4
Repeat step 3 until the paper is not smeared with ink.
Transporting the Printer
If you move the printer some distance, you need to prepare it for transportation in its original box or one of a similar size.
Maintaining Your Printer and Software

Caution:
☐ When storing or transporting the printer, avoid tilting it, placing it vertically, or turning it upside down; otherwise ink may leak.
Leave the ink cartridges installed. Removing the cartridges can dry out the print head and may prevent the printer from printing.
1
Make sure the printer is off.
2
Unplug the power cord from the outlet, then disconnect the USB cable from your computer. Disconnect all other cables from the printer.
3
Remove all paper from the rear MP tray.
4
Flip back the feeder guard, and then close the paper support and the output tray.

5
Remove all paper from the paper cassette and re-insert the cassette into the printer.
6
Repack the printer in its box, using the protective materials that came with it.
Note:
☐ Keep the printer level during transport.
☐ Be sure to remove the protective materials from the printer before using it again.
Checking and Installing Your Software
Checking the software installed on your computer
To use the functions described in this User's Guide, you need to install the following software.
□ Epson Driver and Utilities
□ Epson Event Manager
Maintaining Your Printer and Software
Follow the steps below to check that the software is installed on your computer.
For Windows
1 Windows 7, Vista, and Server 2008: Click the start button and select Control Panel.
Windows XP and Server 2003: Click Start and select Control Panel.
2 Windows 7, Vista, and Server 2008: Click Uninstall a program from the Programs category.
Windows XP: Double-click the Add or Remove Programs icon.
Windows Server 2003: Click the Add or Remove Programs icon.
3 Check the list of currently installed programs.
For Mac OS X
1 Double-click Macintosh HD.
2 Double-click the Epson Software folder in the Applications folder and check the contents.
Note:
☐ The Applications folder contains software provided by third parties.
☐ To check that the printer driver is installed, click System Preferences on the Apple menu and then click Print & Fax. Then locate your product in the Printers list box.
Installing the software
Insert the printer software disk that came with your product and select the software you want to install on the Software Select screen.
Uninstalling Your Software
You may need to uninstall and then reinstall your printer software to solve certain problems or if you upgrade your operating system.
For Windows
Note:
☐ For Windows 7, Vista, and Server 2008, you need an administrator account and password if you log on as a standard user.
☐ For Windows XP and Server 2003, you must log on to a Computer Administrator account.
Maintaining Your Printer and Software
1 Turn off the product.
2 Disconnect the product's interface cable from your computer.
3 Do one of the following.
Windows 7, Vista, and Server 2008: Click the start button and select Control Panel.
Windows XP and Server 2003: Click Start and select Control Panel.
4 Do one of the following.
Windows 7, Vista, and Server 2008: Click Uninstall a program from the Programs category.
Windows XP: Double-click the Add or Remove Programs icon.
Windows Server 2003: Click the Add or Remove Programs icon.
5 Select the software you want to uninstall such as your product's driver and the application from the list displayed.
6 Do one of the following.
Windows 7 and Server 2008: Click Uninstall/Change or Uninstall.
Windows Vista: Click Uninstall/Change or Uninstall, and then click Continue in the User Account Control window.
Windows XP and Server 2003: Click Change/Remove or Remove.
Note:
If you chose to uninstall your product's printer driver in step 5, select the icon for your product and then click OK.
7 When the confirmation window appears, click Yes or Next.
8 Follow the on-screen instructions.
In some cases, a message may appear to prompt you to restart your computer. If so, make sure I want to restart my computer now is selected and click Finish.
Maintaining Your Printer and Software
For Mac OS X
Note:
☐ To uninstall your printer software you need to download the Uninstall Center.
Access the site at:
http://www.epson.com
Next, select the support section of your local Epson Web site.
☐ To uninstall applications, you must log on to a Computer Administrator account.
You cannot uninstall programs if you log on as a limited account user.
☐ Depending on the application, the Installer may be separated from the Uninstaller.
1
Quit all running applications.
2
Double-click the Uninstall Center icon in the Epson folder in your Mac OS X hard drive.
3
Select the check boxes for the software you want to uninstall, such as your product's driver and the application, from the list displayed.
4
Click Uninstall.
5
Follow the on-screen instructions.
If you cannot find the software you want to uninstall in the Uninstall Center window, double-click the Applications folder in your Mac OS X hard drive, select the application you want to uninstall, and then drag it to the Trash icon.
Note:
If you uninstall the printer driver and the name of your product remains in the Print & Fax window, select the name of your product and click the - remove button.
Troubleshooting
Diagnosing the Problem
Troubleshooting printer problems is best handled in two steps: first diagnose the problem, then apply likely solutions until the problem is fixed.
The information that you need to diagnose and solve most common problems is provided by online problem solving, the control panel, the status monitor, or by running a printer operation check. Refer to the appropriate section below.
If you have a specific problem relating to print quality, a printing problem not related to print quality, or a paper feeding problem, or if the printer does not print at all, refer to the appropriate section.
To solve a problem, you may need to cancel printing.
→ "Canceling Printing" on page 36
Status lights
You can identify many common printer problems using the lights on your printer. If the printer stops working and the lights are on or flashing, use the following table to diagnose the problem, then follow the recommended corrective measures.
Troubleshooting
| Lights | Problem and solution | |
 | Paper out | |
| No paper is loaded. | Load paper into the rear MP tray or the paper cassette, and then press the button. The printer resumes printing and the light goes out. | |
| No paper cassette | ||
| Paper cassette is not installed. | Install the paper cassette into the printer and press the button. | |
| Wrong paper size fed | ||
| During automatic 2-sided printing, the paper size fed into the printer is smaller than the selected paper size. | After loading paper that matches the print size selected on the computer, press the button to clear the error, and then continue printing. Reprint any missing pages. | |
| Paper size selected does not match the paper size setting | ||
| The selected paper size does not match any of the sizes set in the Paper Size Loaded setting. | After loading paper that matches the print size selected with the computer, press the button to clear the error, and then change the Paper Size Loaded setting to continue printing. ➔ "Paper Size Loaded Setting" on page 74 Reprint any missing pages. | |
| Double-paper feed | ||
| Two sheets of paper are fed at the same time. | Press the button to feed and eject the paper. If the paper remains in the printer, see "The Paper Jams" on page 88. | |
| Unsupported paper size fed (for PS3/PCL models only) | ||
| Unsupported paper size fed during 2-sided printing. | Press the button to cancel printing, or press the button to print one side using the currently loaded paper. For 2-sided printing, cancel printing, load a paper size that supports 2-sided printing, and then reprint the data. | |
 | Paper jam | |
| Paper has jammed in the printer. | Try the following solutions.1. ➔ "Removing jammed paper from the paper cassette(s)" on page 902. ➔ "Removing jammed paper from the rear unit" on page 883. ➔ "Removing jammed paper from the front cover and the output tray" on page 894. Press the button to clear the error. | |
 | Front cover open | |
| The front cover is open. | Close the front cover. | |
Troubleshooting
| Lights | Problem and solution | |
 | Insufficient printer memory (for PS3/PCL models only) | |
| Not enough memory in the printer to continue printing. | Not enough memory in the printer to complete the current print job. Press the button to cancel the current job. | |
 | Ink expended | |
| An ink cartridge is expended or not installed. | Replace the ink cartridge for which an error is indicated with a new one. If the light is still on after you have replaced the cartridge, it may not be installed correctly. Reinstall the ink cartridge so that it clicks into place. ➔ "Replacing an ink cartridge" on page 63 | |
| Wrong cartridge | ||
| The currently installed ink cartridge cannot be used with the printer. | Replace the incompatible cartridge for which an error is indicated with an appropriate ink cartridge. ➔ "Replacing an ink cartridge" on page 63 | |
| Incorrectly installed ink cartridge | ||
| An ink cartridge is not installed correctly. | Reinsert the ink cartridge for which an error is indicated. ➔ "The ink light is flashing or is on after you replace the cartridge" on page 99 | |
 | Ink low | |
| An ink cartridge is nearly expended. | Obtain a replacement ink cartridge. To determine which cartridge is nearly expended, check the ink cartridge status. ➔ "Checking the ink cartridge status" on page 60 | |
  | Maintenance box is at end | |
| The maintenance box is at the end of its service life. | Replace the maintenance box with a new one. ➔ "Replacing a maintenance box" on page 66 | |
| Wrong maintenance box | ||
| The currently installed maintenance box cannot be used with the printer. | Replace the incompatible maintenance box with an appropriate maintenance box. ➔ "Replacing a maintenance box" on page 66 | |
| No maintenance box | ||
| Maintenance box is not installed. | Insert the maintenance box. ➔ "Replacing a maintenance box" on page 66 | |
  | Maintenance box is near end | |
| The maintenance box is nearing the end of its service life. | Obtain a replacement maintenance box. | |
Troubleshooting
| Lights | Problem and solution | |
 | General error | |
| An unknown printer error has occurred. | Try the following solutions.1. ➔ “Removing jammed paper from the paper cassette(s)” on page 902. ➔ “Removing jammed paper from the rear unit” on page 883. ➔ “Removing jammed paper from the front cover and the output tray” on page 894. Press the ⏻ button to turn off the printer, and then press the ⏻ button again to turn the printer back on.If the error does not clear, contact your dealer. | |
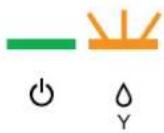 | Recovery mode | |
| The firmware update has failed, and the printer is in recovery mode. | You will need to re-attempt the firmware update. Ready a USB cable and visit your local Epson website for further instructions. | |
= on, = off, = flashing slowly, flashing fast
Status monitor
If a problem occurs while printing, an error message will appear in the status monitor window.
When you need to replace an ink cartridge or a maintenance box, click the How To button on the window, and the status monitor will lead you step-by-step through the cartridge or the maintenance box replacement procedure.
Note for Windows users:
If EPSON Status Monitor 3 does not appear, access the printer driver and click the Maintenance tab and then the Extended Settings button. In the Extended Settings window, check the Enable EPSON Status Monitor 3 check box.
To confirm the status of each ink cartridge, see one of the following sections:
→ "Using EPSON Status Monitor 3" on page 84 (Windows)
→ "Using EPSON Status Monitor" on page 86 (Mac OS X)
Running a printer operation check
If you are unable to determine the source of the problem, run a printer operation check to help you determine whether the problem comes from the printer or your computer.
To run a printer operation check, follow these steps.
1
Make sure the printer is turned off.
2
Make sure that A4-size paper is loaded in the paper cassette.
Troubleshooting
3 While holding down the ⏻ button, press the ⏻ button to turn on the printer. When the printer turns on, release both the buttons.
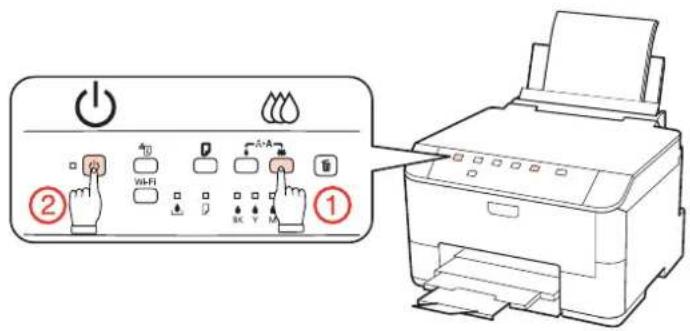
A test page prints showing a nozzle check pattern. If the pattern has gaps, you need to clean the print head.
→ "Cleaning the Print Head" on page 69
☐ If the test page prints, the problem probably lies in your software settings, the cable, or your computer. It is also possible that your software may not be installed correctly. Try uninstalling your software and reinstalling it.
→ "Uninstalling Your Software" on page 77
☐ If the test page does not print, you may have a problem with your printer. Try the suggestions in the following section.
→ "The Printer Does Not Print" on page 98
Checking Printer Status
For Windows
Using EPSON Status Monitor 3
EPSON Status Monitor 3 displays detailed information on the printer status.
There are two ways to access EPSON Status Monitor 3:
☐ Double-click the printer shortcut icon on your Windows taskbar. To add a shortcut icon to the taskbar, see the following section:
→ "From the shortcut icon on the taskbar" on page 29
Open the printer driver, click the Maintenance tab, then click the EPSON Status Monitor 3 button.
Troubleshooting
When you access EPSON Status Monitor 3, the following window appears:
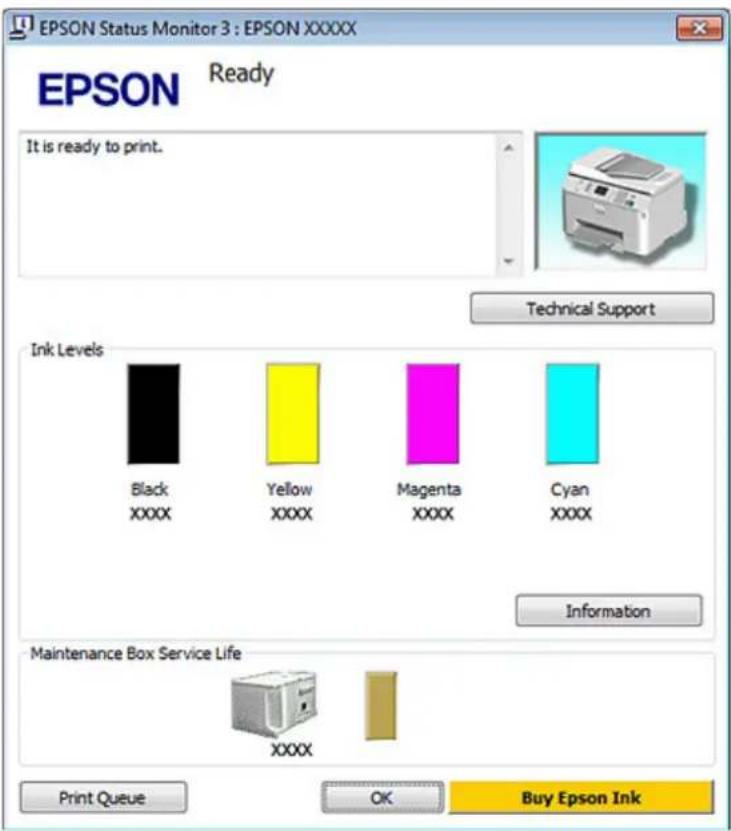
Note:
☐ If EPSON Status Monitor 3 does not appear, access the printer driver and click the Maintenance tab and then the Extended Settings button. In the Extended Settings window, check the Enable EPSON Status Monitor 3 check box.
☐ Depending on current settings, the simplified status monitor may be displayed. Click the Details button to display the window above.
EPSON Status Monitor 3 provides the following information:
Current Status:
If the ink is low/expended or the maintenance box is nearly full/full, the How to button appears in the EPSON Status Monitor 3 window. Clicking How to displays ink cartridge or maintenance box replacement instructions.
□ Ink Levels:
EPSON Status Monitor 3 provides a graphic display of the ink cartridge status.
Information:
You can view information about the installed ink cartridges by clicking Information.
□ Maintenance Box Service Life:
EPSON Status Monitor 3 provides a graphic display of the maintenance box status.
□ Technical Support:
You can access the online User's Guide from EPSON Status Monitor 3. If you encounter a problem, click Technical Support in the EPSON Status Monitor 3 window.
Troubleshooting
Print Queue:
You can view Windows Spooler by clicking Print Queue.
If a problem occurs during printing, EPSON Status Monitor 3 will pop up and display an error message. For more information, click Technical Support to access the online User's Guide.
When the ink is low/expended or the maintenance box is nearly full/full, the How to button appears. Click How to, and EPSON Status Monitor 3 will lead you step-by-step through the cartridge or maintenance box replacement procedure.
![EPSON Status Monitor 3 : EPSON XXXXX Replace Cartridge Black: XXXX Epson recommends the genuine Epson cartridges listed above. Click [How to] for ink cartridge replacement instructions. How to... Technical Support Ink Levels Black XXXX Yellow XXXX Magenta XXXX Cyan XXXX Information Maintenance Box Service Life XXXX Print Queue OK Buy Epson Ink](/content/2026/05/1106596/images/ea66f4fa4997576132a9b254fad3f8cc717fc282776efda75b80df117ae13f7c.jpg)
For Mac OS X
Using EPSON Status Monitor
If EPSON Status Monitor detects a printer problem, it will inform you with an error message.
Follow these steps to access EPSON Status Monitor.

Access the Epson Printer Utility 4.
→ "Accessing the printer driver for Mac OS X" on page 29
Troubleshooting

Click the EPSON Status Monitor button. The EPSON Status Monitor appears.

When ink is low/expended or the maintenance box is nearly full/full, a How to button appears. Click How to, and EPSON Status Monitor will lead you step by step through the ink cartridge or maintenance box replacement procedure.
![Epson Printer Utility 4 Buy Epson Ink Monitoring Preferences EPSON EPSON XXXXX Status description Replace Cartridge Black: XXXX Actions to take Epson recommends the genuine Epson cartridges listed above. Click [How to] for ink cartridge replacement instructions. How to... Continue Cancel](/content/2026/05/1106596/images/01007cc568b8edeb9b95b1708849f1ed51a334d61a1d5af722a70993478282e5.jpg)
You can also use this utility to check the ink cartridge status before printing. EPSON Status Monitor displays the ink cartridge status at the time it was opened. To update the ink cartridge status, click Update.
Troubleshooting
The Paper Jams

Warning:
Never touch the buttons on the control panel while your hand is inside the printer.
Check the lights on the printer first to diagnose the problem.
→ "Status lights" on page 80
Removing jammed paper from the rear unit
1 Push the buttons on either side of the rear unit at the same time, and then pull the unit out.
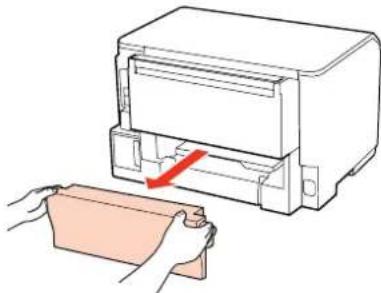
natural_image
Illustration of hands operating a printer to process a rectangular object with a red arrow indicating the process (no text or symbols present)2 Carefully remove the jammed paper.
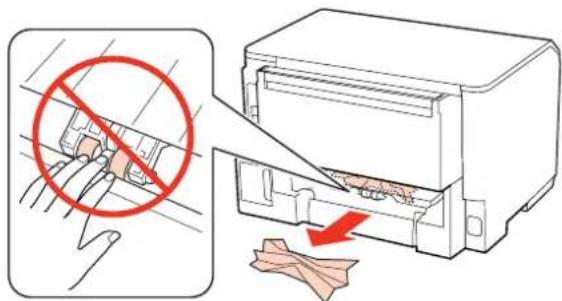
3 Carefully remove the jammed paper.
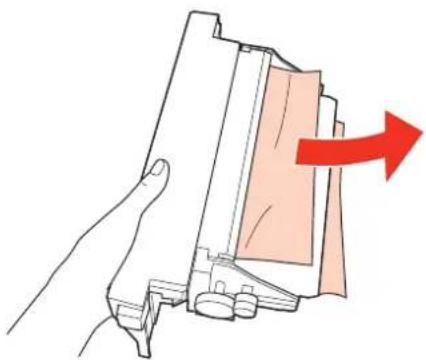
natural_image
Illustration of a hand holding a device with a red arrow indicating direction (no text or symbols)Troubleshooting
4 Push the button on either side of the rear unit at the same time, and then reattach the unit.
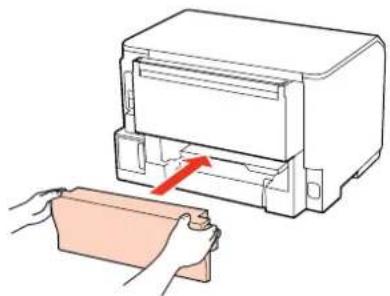
natural_image
Illustration of a printer being placed on a surface, showing the printer's handle and paper roll (no text or symbols present)Removing jammed paper from the front cover and the output tray
1 Open the front cover.
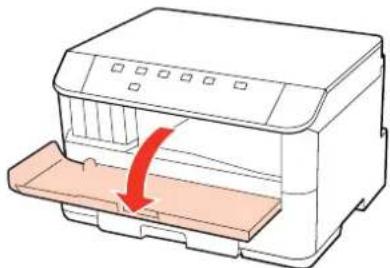
natural_image
Illustration of a printer with a red arrow indicating compression or disassembly (no text or symbols present)2 Remove all of the paper inside, including any torn pieces.
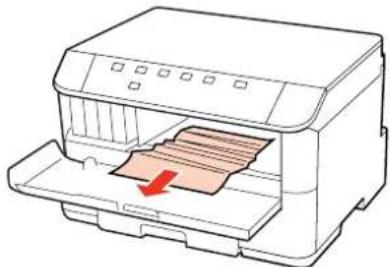
natural_image
Illustration of a printer with a paper feed being inserted, showing no text or symbols on the printer itself.3 Close the front cover. If the jammed paper remains near the output tray, carefully remove the paper.
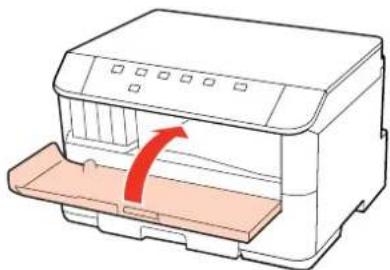
natural_image
Illustration of a printer with a red arrow indicating compression or disassembly (no text or symbols present)Troubleshooting
Removing jammed paper from the paper cassette(s)
Note:
The illustrations in this section show how to remove jammed paper from paper cassette 1.
When removing jammed paper from paper cassette 2, repeat the instructions described below.
1 Pull out the paper cassette.
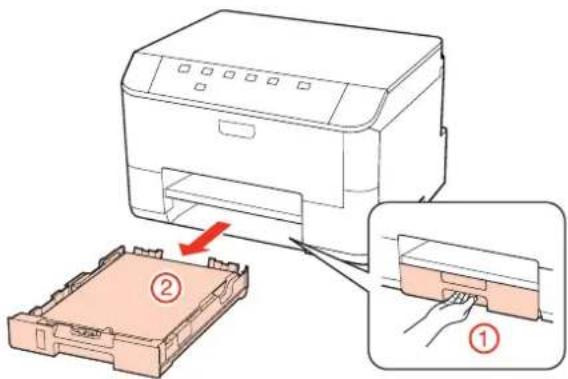
2 Reload the paper into the paper cassette.
→ "Into the paper cassette" on page 20
3 Carefully remove any paper jammed inside the printer.
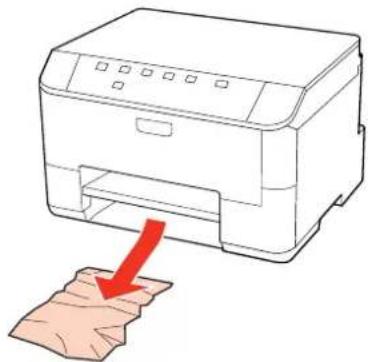
natural_image
Illustration of a printer with a red arrow pointing to a textured surface (no text or symbols)4 Keep the cassette flat and insert it back into the printer carefully and slowly.
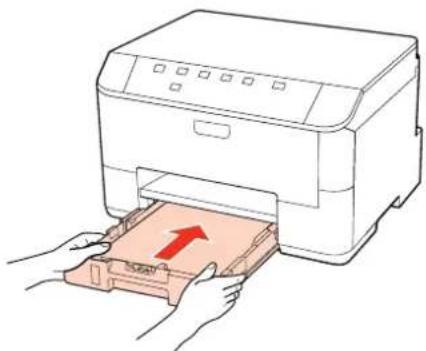
natural_image
Illustration of hands printing a printer into a stack of paper with a red arrow indicating print (no text or symbols present)Troubleshooting
Preventing paper jams
If your paper jams frequently, check the following.
☐ The paper is smooth, not curled or wrinkled.
☐ You are using high-quality paper.
☐ The printable side of the paper is face down in the paper cassette.
☐ The printable side of the paper is face up in the rear MP tray.
☐ The paper stack was fanned before loading.
☐ The edge guides are snug against the edges of the paper.
☐ For plain paper, do not load paper above the line just under the ▼ or ≡ arrow mark inside the edge guide. For Epson special media, make sure the number of sheets is less than the limit specified for the media. → "Selecting which tray to use and its loading capacities" on page 18
☐ The printer is on a flat, stable surface that extends beyond the base in all directions. The printer will not operate properly if it is tilted.
Reprinting after a paper jam (for Windows only)
After you cancel the print job because of a paper jam, you can reprint it without reprinting pages that have already been printed.
1 Solve the paper jam. → "The Paper Jams" on page 88
2 Access the printer settings. → "Accessing the printer driver for Windows" on page 28
3 Select the Print Preview check box in the Main window of your printer driver.
4 Make the settings that you want to use to print.
5 Click OK to close the printer settings window, and then print your file. Print Preview window opens.
6 Select a page that has already been printed in the page list box on the left side, and then select Remove Page from the Print Options menu. Repeat this step for all the pages that have already been printed.
7 Click Print on the Print Preview window.
Troubleshooting
Print Quality Problems
If you are having print quality problems, then compare it with the illustrations below. Click the caption under the illustration that best resembles your prints.
| enthalten alle Aufdruck. W J 5008 "Regel Good sample |  Good sample Good sample |
| enthalten alle Aufdruck. W J 5008 "Regel ➔ "Horizontal banding" on page 92 | enthalten alle Aufdruck. W J 5008 "Regel ➔ "Vertical banding or misalignment" on page 93 |
 ➔ "Horizontal banding" on page 92 ➔ "Horizontal banding" on page 92 |  ➔ "Vertical banding or misalignment" on page 93 ➔ "Vertical banding or misalignment" on page 93 |
 ➔ "Incorrect or missing colors" on page 93 ➔ "Incorrect or missing colors" on page 93 |  ➔ "Blurry or smeared print" on page 94 ➔ "Blurry or smeared print" on page 94 |
Horizontal banding
☐ Make sure the printable side of the paper is face up in the rear MP tray.
☐ Make sure the printable side of the paper is face down in the paper cassette.
☐ Run the Nozzle Check utility and then clean any print heads which produced a defective nozzle check result.
→ "Checking the Print Head Nozzles" on page 68
Troubleshooting
☐ For best results, use up ink cartridge within six months of opening the package.
☐ Try to use genuine Epson ink cartridges.
☐ Check the light. If the light is flashing, replace the appropriate ink cartridge.
→ "Replacing an ink cartridge" on page 63
☐ Make sure the paper type selected in the printer driver is appropriate for the type of paper loaded in the printer.
→ "Selecting the correct paper type" on page 30
☐ If banding appears at intervals of 2.5 cm, run the Print Head Alignment utility.
→ "Aligning the Print Head" on page 72
Vertical banding or misalignment
☐ Make sure the printable side of the paper is face up in the rear MP tray.
☐ Make sure the printable side of the paper is face down in the paper cassette.
☐ Run the Nozzle Check utility and then clean any print heads which produced a defective nozzle check result.
→ "Checking the Print Head Nozzles" on page 68
☐ Run the Print Head Alignment utility.
→ "Aligning the Print Head" on page 72
☐ For Windows, clear the High Speed check box from the More Options window in your printer driver. See the online help for details.
For Mac OS X 10.5 or later, select Off from the High Speed Printing. To display the High Speed Printing, click through the following menus: System Preferences, Print & Fax, your printer (in the Printers list box), Options & Supplies, and then Driver.
For Mac OS X 10.4, clear the High Speed Printing setting in Extension Settings in the Print dialog box of your printer driver.
☐ Make sure the paper type selected in the printer driver is appropriate for the type of paper loaded in the printer.
→ "Selecting the correct paper type" on page 30
Incorrect or missing colors
☐ For Windows, clear the Grayscale setting in the Main window in your printer driver.
For Mac OS X, clear the Grayscale setting in Print Settings in the Print dialog in your printer driver.
See the printer driver online help for details.
☐ Adjust the color settings in your application or in your printer driver settings.
For Windows, check the More Options window.
For Mac OS X, check the Color Options dialog from the Print dialog.
See the printer driver online help for details.
☐ Run the Nozzle Check utility and then clean any print heads which produced a defective nozzle check result.
→ "Checking the Print Head Nozzles" on page 68
☐ Check the light. If the light is flashing, replace the appropriate ink cartridge.
→ "Replacing an ink cartridge" on page 63
Troubleshooting
☐ If you have just replaced an ink cartridge, make sure the date on the box. If you have not used the printer for a long time, Epson recommends replacing the ink cartridges.
→ "Replacing an ink cartridge" on page 63
Blurry or smeared print
☐ We recommend using Epson paper.
→ "Paper" on page 104
☐ Try to use genuine Epson ink cartridges.
☐ Make sure the printer is on a flat, stable surface that extends beyond the base in all directions. The printer will not operate properly if it is tilted.
☐ Make sure your paper is not damaged, dirty, or too old.
☐ Make sure your paper is dry and the printable side is facing up in the rear MP tray.
☐ Make sure your paper is dry and the printable side is face down in the paper cassette.
☐ If the paper is curled toward the printable side, flatten it or curl it slightly in the opposite direction.
☐ Make sure the paper type selected in the printer driver is appropriate for the type of paper loaded in the printer.
→ "Selecting the correct paper type" on page 30
☐ Remove each sheet from the output tray as it is printed.
☐ Do not touch or allow anything to come into contact with the printed side of paper with a shiny finish. To handle your prints, follow the instructions of the paper.
☐ Run the Nozzle Check utility and then clean any print heads which produced a defective nozzle check result.
→ "Checking the Print Head Nozzles" on page 68
☐ If the paper is smeared with ink after printing, clean the interior of the printer.
→ "Cleaning the interior of the printer" on page 75
Miscellaneous Printout Problems
Incorrect or garbled characters
☐ Clear any stalled print jobs.
→ "Canceling Printing" on page 36
Turn off the printer and computer. Make sure the printer's interface cable is securely plugged in.
☐ Uninstall the printer driver, then reinstall it.
→ "Uninstalling Your Software" on page 77
Troubleshooting
Incorrect margins
☐ Check the margin settings in your application. Make sure that the margins are within the printable area of the page.
→ "Printable area" on page 108
☐ Make sure the printer driver settings are appropriate for the paper size you are using.
For Windows, check the Main window.
For Mac OS X, check the Page Setup dialog or Print dialog. See the printer driver online help for details.
☐ Uninstall the printer driver, then reinstall it.
→ "Uninstalling Your Software" on page 77
Printout has a slight slant
Make sure that the paper is loaded into the rear MP tray or the paper cassette correctly.
→ "Loading Paper" on page 20
Inverted image
☐ For Windows, clear the Mirror Image check box from the More Options window of your printer driver, or turn off the Mirror Image setting in your application.
For Mac OS X, clear the Mirror Image checkbox in Print Settings in the Print dialog box of your printer driver, or turn off the Mirror Image setting in your application.
For instructions, see the online help for your printer driver or for your application.
☐ Uninstall the printer driver, then reinstall it.
→ "Uninstalling Your Software" on page 77
Blank pages print
☐ Make sure the printer driver settings are appropriate for the paper size you are using.
For Windows, check the Main window.
For Mac OS X, check the Page Setup dialog or Print dialog.
See the printer driver online help for details.
☐ For Windows, check the Skip Blank Page setting by clicking the Extended Settings button on the Maintenance window of the printer driver.
For Mac OS X 10.5 or later, select On from the Skip Blank Page. To display the Skip Blank Page, click through the following menus: System Preferences, Print & Fax, your printer (in the Printers list box), Options & Supplies, and then Driver.
For Mac OS X 10.4, check the Skip Blank Page setting in Extension Settings in the Print dialog of your printer driver. If it is selected, blank pages in your data are not printed.
☐ Uninstall the printer driver, then reinstall it.
→ "Uninstalling Your Software" on page 77
After trying one or more of these solutions, run a printer operation check to check your results.
Troubleshooting
→ "Running a printer operation check" on page 83
Printed side is smeared or scuffed
☐ If the paper is curled toward the printable side, flatten it or curl it slightly in the opposite direction.
☐ For Windows, clear the High Speed check box from the More Options window in your printer driver. See the online help for details.
For Mac OS X 10.5 or later, select Off from the High Speed Printing. To display the High Speed Printing, click through the following menus: System Preferences, Print & Fax, your printer (in the Printers list box), Options & Supplies, and then Driver.
For Mac OS X 10.4, clear the High Speed Printing setting in Extension Settings in the Print dialog box of your printer driver.
☐ Load and eject plain paper several times.
→ "Cleaning the interior of the printer" on page 75
☐ Uninstall the printer driver, then reinstall it.
→ "Uninstalling Your Software" on page 77
Printing is too slow
☐ Make sure the paper type selected in the printer driver is appropriate for the type of paper loaded in the printer.
→ "Selecting the correct paper type" on page 30
☐ For Windows, choose a lower Quality in the printer driver Main window.
For Mac OS X, choose a lower Print Quality in the Print Settings dialog from your printer driver's Print dialog.
→ "Accessing the printer driver for Windows" on page 28
→ "Accessing the printer driver for Mac OS X" on page 29
☐ For Mac OS X 10.5 or later, select On from the High Speed Printing dialog. To display the High Speed Printing dialog, click through the following menus: System Preferences, Print & Fax, your printer (in the Printers list box), Options & Supplies, and then Driver.
For Mac OS X 10.4, check the High Speed Printing setting in Extension Settings in the Print dialog of your printer driver.
☐ Close any unnecessary applications.
☐ If you print continuously for an extended period, the printing may be extremely slow. This is to slow down the printing speed and prevent the printer mechanism from overheating and being damaged. If this happens, you can continue to print, but we recommend stopping and leaving the printer idle for at least 30 minutes with the power on. (The printer does not recover with the power off.) After you restart, the printer will print at normal speed.
☐ Uninstall the printer driver, then reinstall it.
→ "Uninstalling Your Software" on page 77
If you try all of the methods above and cannot solve the problem, see the following:
→ "Increasing the Print Speed (For Windows Only)" on page 100
Troubleshooting
Paper Does Not Feed Correctly
Paper does not feed
Remove the stack of paper and make sure of the following:
☐ You have inserted the paper cassette all the way into the printer.
☐ The paper is not curled or creased.
☐ The paper is not too old. See the instructions that came with the paper for more information.
☐ Check the Paper Size Loaded setting and load paper that matches the paper size set for each paper source.
→ "Paper Size Loaded Setting" on page 74
☐ You have selected the correct paper source in the application or printer driver settings.
→ "Selecting which tray to use and its loading capacities" on page 18
☐ For plain paper, do not load paper above the line just under the ▼ or ≡ arrow mark inside the edge guide. For Epson special media, make sure the number of sheets is less than the limit specified for the media.
→ "Selecting which tray to use and its loading capacities" on page 18
☐ Paper is not jammed inside the printer. If it is, remove the jammed paper.
→ "The Paper Jams" on page 88
☐ The ink cartridges are not expended. If a cartridge is expended, replace it.
→ "Replacing an ink cartridge" on page 63
☐ You have followed any special loading instructions that came with your paper.
☐ The paper does not have any binder holes.
Multiple pages feed
☐ For plain paper, do not load paper above the line just under the ▼ or ≡ arrow mark inside the edge guide. For Epson special media, make sure the number of sheets is less than the limit specified for the media.
→ "Selecting which tray to use and its loading capacities" on page 18
☐ Make sure the edge guides are snug against the edges of the paper.
☐ Make sure the paper is not curled or folded. If so, flatten it or curl it slightly toward the opposite side before loading.
☐ Remove the stack of paper and make sure that the paper is not too thin.
→ "Paper" on page 106
☐ Fan the edges of the stack to separate the sheets, then reload the paper.
Troubleshooting
☐ If too many copies of a file are being printed, check the Copies setting in your printer driver as follows, and also check in your application.
For Windows, check the Copies setting on the Main window.
For Mac OS X 10.4, check the Copies setting in the Copies & Pages setting in the Print dialog.
For Mac OS X 10.5 or later, check the Copies setting in the Print dialog.
Paper is improperly loaded
If you have loaded the paper too far into the printer, the printer cannot feed the paper correctly. Turn the printer off and gently remove the paper. Then turn the printer on and reload the paper correctly.
Paper is not ejected fully or is wrinkled
☐ If the paper does not eject fully, press the ☐ button to eject the paper. If the paper is jammed inside the printer, remove it by referring to the following section.
→ "The Paper Jams" on page 88
☐ If the paper is wrinkled when it comes out, it may be damp or too thin. Load a new stack of paper.
Note:
Store any unused paper in its original packaging in a dry area.
The Printer Does Not Print
All lights are off
☐ Press the ⏻ button to make sure the printer is on.
☐ Turn off the printer and make sure that the power cord is securely plugged in.
☐ Make sure that your outlet works and is not controlled by a wall switch or timer.
Lights came on and then went out
The printer's voltage may not match the outlet rating. Turn off the printer and unplug it immediately. Then check the label on the back of the printer.

Caution:
If the voltage does not match, DO NOT PLUG YOUR PRINTER BACK IN. Contact your dealer.
Only the power light is on
Turn off the printer and computer. Make sure the printer's interface cable is securely plugged in.
☐ If you are using the USB interface, make sure your cable meets the USB or Hi-Speed USB standards.
Troubleshooting
☐ If you are connecting the printer to your computer via a USB hub, connect the printer to the first-tier hub from your computer. If the printer driver is still not recognized on your computer, try to directly connect the printer to your computer without the USB hub.
☐ If you are connecting the printer to your computer via a USB hub, make sure the USB hub device is recognized by your computer.
Turn off the printer and the computer, disconnect the printer's interface cable, then print an operation check page.
→ "Running a printer operation check" on page 83
☐ If you are trying to print a large image, your computer may not have enough memory. Try reducing the resolution of your image or printing the image at a smaller size. You may need to install more memory in your computer.
□ Users of Windows can clear any stalled print jobs from the Windows Spooler.
→ "Canceling Printing" on page 36
☐ Uninstall the printer driver, then reinstall it.
→ "Uninstalling Your Software" on page 77
The ink light is flashing or is on after you replace the cartridge
1 Open the front cover. Remove and reinsert the ink cartridge and then continue with the ink cartridge installation.
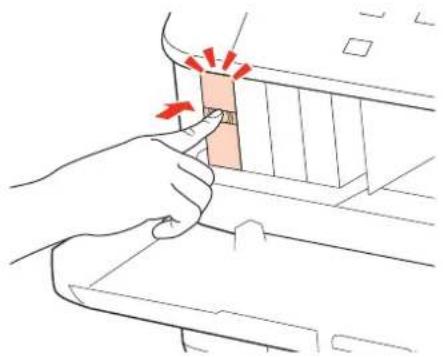
natural_image
Illustration of a hand pressing a button on a device (no text or symbols visible)2 Close the front cover firmly.
Troubleshooting
Increasing the Print Speed (For Windows Only)
Print speed may be increased by selecting certain settings in the Extended Settings window when the printing speed is slow. Click the Extended Settings button on your printer driver's Maintenance window.

Troubleshooting
The following dialog box appears.
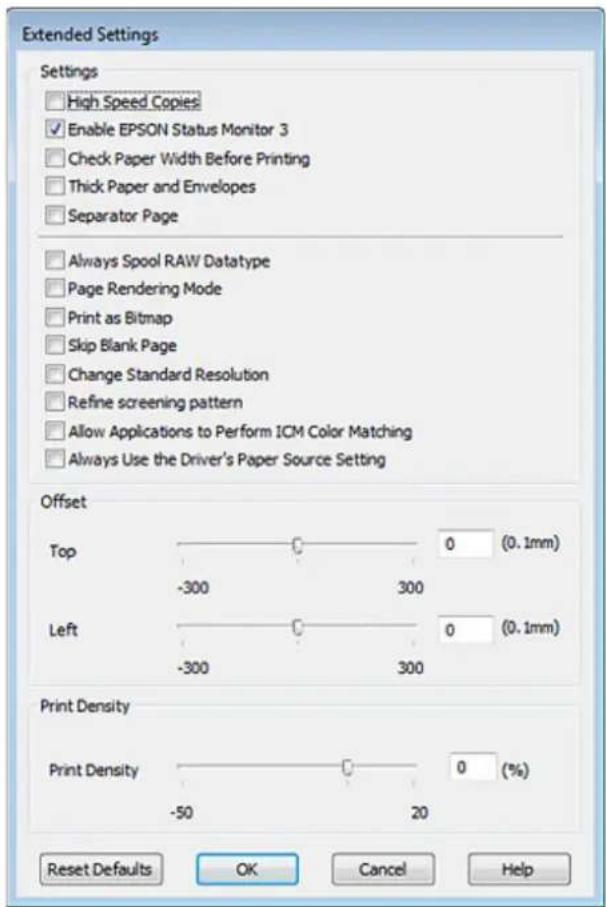
Select the following check boxes and print speed may be increased.
□ High Speed Copies
□ Always spool RAW datatype
Page Rendering Mode
□ Print as Bitmap
For more details on each item, see the online help.
Other Problem
Printing plain papers quietly
When plain paper is selected as the Paper Type setting and Normal is selected as the Quality setting in the printer driver, the printer prints at high speed. Try choosing Quiet Mode for quieter operation which will reduce the print speed.
Troubleshooting
For Windows, select the Quiet Mode check box in the Main window of your printer driver.
For Mac OS X 10.5 or later, select On from the Quiet Mode. To display the Quiet Mode, click through the following menus: System Preferences, Print & Fax, your printer (in the Printers list box), Options & Supplies, and then Driver.
For Mac OS X 10.4, open the printer driver and select the Quiet Mode check box in Extension Settings section of the Print dialog box of your printer driver.
Product Information
Ink and Paper
Ink cartridges
You can use the following ink cartridges with this printer:
| Ink cartridge | Part numbers | ||
| WP-4015/WP-4025/WP-4095 | WP-4011/WP-4091 | WP-4090 | |
| Black | T7011T7021T7031 | T6771T6781 | 676711 |
| Cyan | T7012T7022T7032 | T6772T6782 | 676711 |
| Magenta | T7013T7023T7033 | T6773T6783 | 676711 |
| Yellow | T7014T7024T7034 | T6774T6784 | 676711 |
Note:
☐ Not all cartridges are available in all regions.
☐ For WP-4015/WP-4095, Epson recommends the T701 or T702 ink cartridges.
☐ For WP-4025, Epson recommends the T702 or T703 ink cartridges.
| Color | Black, Cyan, Magenta, Yellow |
| Cartridge life | For best results, use up ink cartridge within six months of opening the package. |
| Temperature | Storage:-20 to 40 °C (-4 to 104 °F)1 month at 40 °C (104 °F)Freezing:*-13 °C (8.6 °F) |
* Ink thaws and is usable after approximately 3 hours at 25 °C (77 °F).
Product Information

Caution:
☐ Epson recommends the use of genuine Epson ink cartridges. Other products not manufactured by Epson may cause damage that is not covered by Epson's warranties, and under certain circumstances, may cause erratic printer behavior.
☐ Epson recommends using the ink cartridge before the date printed on the package.
Note:
☐ The ink cartridges packaged with your printer are partly used during initial setup. In order to produce high quality printouts, the print head in your printer will be fully charged with ink. This one-off process consumes a quantity of ink and therefore these cartridges may print fewer pages compared to subsequent ink cartridges.
☐ Quoted yields may vary depending on the images that you are printing, the paper type that you are using, the frequency of your prints and environmental conditions such as temperature.
☐ To ensure you receive premium print quality and to help protect your print head, a variable ink safety reserve remains in the cartridge when your printer indicates to replace the cartridge. The yields quoted for you do not include this reserve.
Although the ink cartridges may contain recycled materials, this does not affect product function or performance.
Maintenance box
You can use the following maintenance box with this product.
| Part number | |
| Maintenance Box | T6710 |
Paper
Epson offers specially-designed paper and other print media for all your printing needs.
Note:
☐ The availability of paper varies by location.
☐ You can find the part numbers for the following Epson special papers on the Epson support Web site.
→ "Technical Support Web Site" on page 124
| Paper | Size |
| Epson Bright White Ink Jet Paper | A4 |
| Epson Premium Glossy Photo Paper | A4,10×15 cm (4×6 in.),13×18 cm (5×7 in.),16:9 wide size (102×181 mm) |
| Epson Glossy Photo Paper | A4,10×15 cm (4×6 in.),13×18 cm (5×7 in.) |
Product Information
| Epson Premium Semigloss Photo Paper | A4,10 × 15 cm (4 × 6 in.) |
| Epson Ultra Glossy Photo Paper | A4,10 × 15 cm (4 × 6 in.),13 × 18 cm (5 × 7 in.) |
| Epson Photo Paper | A4,10 × 15 cm (4 × 6 in.),13 × 18 cm (5 × 7 in.) |
| Epson Matte Paper - Heavyweight | A4 |
| Epson Photo Quality Ink Jet Paper | A4 |
Option
250-Sheet Paper Cassette Unit/PXBACU1
You can use the following 250-Sheet Paper Cassette Unit/PXBACU1.
| Part number | |
| 250-Sheet Paper Cassette Unit/PXBACU1 | C12C817011 |
System Requirements
Windows requirements
| System | PC Interface |
| Windows 7, Vista, XP Professional x64 Edition, XP SP1 or higher, Server 2008 R2, Server 2008, and Server 2003 | Hi-Speed USB (Recommended)USB (Minimum) |
Note:
☐ Windows Server OS supports the printer driver only; the applications supplied are not supported.
☐ Contact your software manufacturer to find out if their software works in Windows XP Professional x64 Edition.
Macintosh requirements
| System | PC Interface |
| PowerPC-based or Intel-based Macintosh computers running Mac OS® X 10.4.11, 10.5.x, 10.6.x | Hi-Speed USB (Recommended)USB (Minimum) |
Product Information
Note:
The UNIX File System (UFS) for Mac OS X is not supported.
Technical Specifications
Printer specifications
| Paper path | Paper cassette 1 and 2, front entryRear MP tray, top entry |
| Capacity | 27.5 mm for paper cassette 1 and 2 *19.0 mm for rear MP tray *1*2*3*4 |
*1 Paper with a weight of 64 to 90g / m^2 (17 to 24 lb).
*2 Envelope #10, DL, and C6 with a weight of 75 to 90g / m^2 (20 to 24 lb).
*3 Envelope C4 with a weight of 80 to 100g / m^2 (21 to 26 lb).
*4 For Legal and User Defined sizes, load one sheet at a time.
Paper
Note:
☐ Since the quality of any particular brand or type of paper may be changed by the manufacturer at any time, Epson cannot attest to the quality of any non-Epson brand or type of paper. Always test samples of paper stock before purchasing large quantities or printing large jobs.
☐ Poor quality paper may reduce print quality and cause paper jams or other problems. If you encounter problems, switch to a higher grade of paper.
☐ Use paper under normal conditions: Temperature 15 to 25 °C (59 to 77 °F) Humidity 40 to 60% RH
If all the conditions below are met, pre-punched paper with binding holes can be used for this product:
| Paper source | rear MP tray |
| Paper size | A4, A5, A6, B5, Letter, Legal |
| Hole position | Within 19 mm (0.74 in.) from the left side of paper facing the printing surface. See the illustration below. |
Product Information
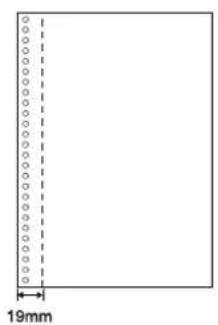
natural_image
Blank rectangular frame with dashed vertical line and 19mm dimension label (no text or symbols beyond measurement)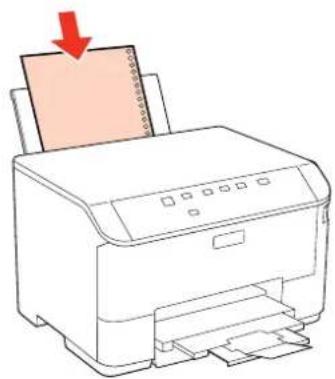
natural_image
Line drawing of a printer with a paper sheet being inserted, showing paper spout and print (no text or symbols)Single sheets:
| Size | A4 210 × 297 mm10 × 15 cm (4 × 6 in.)13 × 18 cm (5 × 7 in.)A6 105 × 148 mmA5 148 × 210 mmB5 182 × 257 mm9 × 13 cm (3.5 × 5 in.)13 × 20 cm (5 × 8 in.)20 × 25 cm (8 × 10 in.)16:9 wide size (102 × 181 mm)100 × 148 mmLetter 8 1/2 × 11 in.Legal 8 1/2 × 14 in. |
| Paper types | Plain paper or special paper distributed by Epson |
| Thickness(for plain paper) | 0.08 to 0.11 mm (0.003 to 0.004 in.) |
| Weight(for plain paper) | 64 g/m2(17 lb) to 90 g/m2(24 lb) |
Envelopes:
| Size | Envelope #10 4 1/8 × 9 1/2 in.Envelope DL 110 × 220 mmEnvelope C6 114 × 162 mmEnvelope C4 229 × 324 mm |
| Paper types | Plain paper |
| Weight | 75 g/m ^2 (20 lb) to 90 g/m ^2 (24 lb) for Envelope #10, DL, and C680 g/m ^2 (21 lb) to 100 g/m ^2 (26 lb) for Envelope C4 |
Product Information
Printable area
Highlighted portions show printable area.
Single sheets:
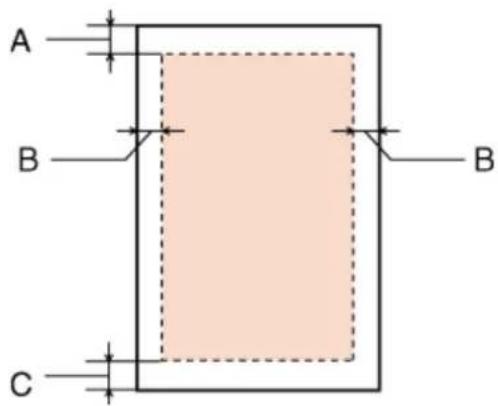
Envelopes:
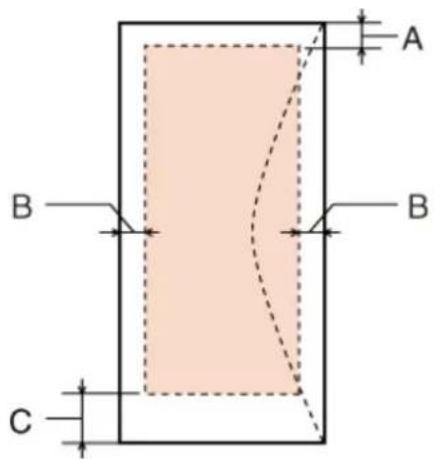
| Minimum margin | ||
| Media type | Single sheets | Envelopes |
| A | 3.0 mm (0.12 in.) | 3.0 mm (0.12 in.) |
| B | 3.0 mm (0.12 in.) | 5.0 mm (0.20 in.) *1 |
| C | 3.0 mm (0.12 in.) | 3.0 mm (0.12 in.) *2 |
*1 The recommended margin for Envelope C4 is 9.5 mm.
*2 The recommended margin for Envelope #10, Envelope DL, and Envelope C6 is 20.0 mm.
Note:
Depending on the type of paper, print quality may decline in the top and bottom areas of the print, or the area may be smeared.
Network Interface Specification
Wi-Fi is available only with the WP-4025.
| Wi-Fi | Standard: | IEEE 802.11b/g/n*1 |
| Security: | WEP (64/128bit)WPA-PSK (TKIP/AES)*2 | |
| Frequency Band: | 2.4 GHz | |
| Communication Mode: | Infrastructure mode,Ad hoc mode | |
| Ethernet | Standard: | Ethernet 100BASE-TX/10BASE-T |
*1 Complies with either IEEE 802.11b/g/n or IEEE 802.11b/g depending on location of purchase.
*2 Complies with WPA2 with support for WPA/WPA2 Personal.
Mechanical
WP-4011/WP-4015/WP-4025/WP-4090/WP-4091/WP-4092/WP-4095
| Dimensions | StorageWidth: 460 mm (18.1 inches)Depth: 420 mm (16.5 inches)Height: 284 mm (11.2 inches) |
| Printing*Width: 460 mm (18.1 inches)Depth: 654 mm (25.7 inches)Height: 383 mm (15.1 inches) | |
| Weight | Approx. 10.9 kg (24.0 lb) without the ink cartridges and the power cord. |
* With the output tray extension extended.
Electrical
WP-4011/WP-4015
| 100-240 V Model | |
| Input voltage range | 90 to 264 V |
| Rated frequency range | 50 to 60 Hz |
| Input frequency range | 49.5 to 60.5 Hz |
| Rated current | 0.5 to 0.25 A |
Product Information
| Power consumption | Printing | Approx. 22 W (ISO/IEC24712) |
| Ready mode | Approx. 5.0 W | |
| Sleep mode | Approx. 2.2 W | |
| Power off | Approx. 0.3 W |
WP-4025
| 100-240 V Model | ||
| Input voltage range | 90 to 264 V | |
| Rated frequency range | 50 to 60 Hz | |
| Input frequency range | 49.5 to 60.5 Hz | |
| Rated current | 0.5 to 0.25 A | |
| Power consumption | Printing | Approx. 23 W (ISO/IEC24712) |
| Ready mode | Approx. 6.0 W | |
| Sleep mode | Approx. 3.0 W | |
| Power off | Approx. 0.3 W | |
WP-4090/WP-4091/WP-4095
| 100-240 V Model | ||
| Input voltage range | 90 to 264 V | |
| Rated frequency range | 50 to 60 Hz | |
| Input frequency range | 49.5 to 60.5 Hz | |
| Rated current | 0.5 to 0.25 A | |
| Power consumption | Printing | Approx. 25 W (ISO/IEC24712) |
| Ready mode | Approx. 7.5 W | |
| Sleep mode | Approx. 2.2 W | |
| Power off | Approx. 0.3 W | |
Note:
Check the label on the back of the printer for its voltage.
Product Information
Environmental
| Temperature | Operation:10 to 35 °C (50 to 95 °F)Storage:-20 to 40 °C (-4 to 104 °F)1 month at 40 °C (104 °F) |
| Humidity | Operation:*20 to 80% RHStorage:*5 to 85% RH |
* Without condensation
Standards and approvals
WP-4020/WP-4025
U.S. model:
| Safety | UL60950-1CAN/CSA-C22.2 No.60950-1 |
| EMC | FCC Part 15 Subpart B Class BCAN/CSA-CEI/IEC CISPR 22 Class B |
This equipment contains the following wireless module.
Manufacture: Marvell Semiconductor Inc.
Type: SP88W8786-MD0-2C2T00
This product conforms to Part 15 of the FCC Rules and RSS-210 of the IC Rules. Epson cannot accept responsibility for any failure to satisfy the protection requirements resulting from a non-recommended modification of the product. Operation is subject to the following two conditions: (1) this device may not cause harmful interference, and (2) this device must accept any interference received, including interference that may cause undesired operation of the device.
To prevent radio interference to the licensed service, this device is intended to be operated indoors and away from windows to provide maximum shielding. Equipment (or its transmit antenna) that is installed outdoors is subject to licensing.
European model:
| Low voltage directive 2006/95/EC | EN60950-1 |
| EMC directive 2004/108/EC | EN55022 Class BEN61000-3-2EN61000-3-3EN55024 |
| R&TTE directive 1999/5/EC | EN300 328EN301 489-1EN301 489-17EN60950-1 |
Product Information
For European users:
We, Seiko Epson Corporation, hereby declare that the equipment Model B491B is in compliance with the essential requirements and other relevant provisions of Directive 1999/5/EC.
For use only in Ireland, UK, Austria, Germany, Liechtenstein, Switzerland, France, Belgium, Luxembourg, Netherlands, Italy, Portugal, Spain, Denmark, Finland, Norway, Sweden, Iceland, Cyprus, Greece, Slovenia, Bulgaria, Czech, Estonia, Hungary, Latvia, Lithuania, Poland, Romania, Slovakia, and Malta.
Only indoor operation is permitted in France.
If used outside of own premises, general authorization is required in Italy.
Epson can not accept responsibility for any failure to satisfy the protection requirements resulting a non-recommended modification of the products.

WP-4011/WP-4015/WP-4090/WP-4091/WP-4092/WP-4095
U.S. model:
| Safety | UL60950-1CAN/CSA-C22.2 No.60950-1 |
| EMC | FCC Part 15 Subpart B Class BCAN/CSA-CEI/IEC CISPR 22 Class B |
European model:
| Low voltage directive 2006/95/EC | EN60950-1 |
| EMC directive 2004/108/EC | EN55022 Class BEN61000-3-2EN61000-3-3EN55024 |
Interface
Hi-Speed USB (Device Class for computers)
Font Information
Font information only relates to PostScript and PCL.
Available fonts
The fonts provided with the printer are shown below.
Product Information
PS 3 mode
| Font Name |
| Albertus, Albertus Italic, Albertus Light |
| AntiqueOlive Roman, AntiqueOlive Italic, AntiqueOlive Bold, AntiqueOlive Compact |
| Apple Chancery |
| ITC AvantGarde Gothic Book, ITC AvantGarde Gothic Book Oblique, ITC AvantGarde Gothic Demi, ITC AvantGarde Gothic Demi Oblique |
| Bodoni, Bodoni Italic, Bodoni Bold, Bodoni Bold Italic, Bodoni Poster, Bodoni Poster Compressed |
| ITC Bookman Light, ITC Bookman Light Italic, ITC Bookman Demi, ITC Bookman Demi Italic |
| Carta |
| Chicago |
| Clarendon, Clarendon Light, Clarendon Bold |
| CooperBlack, CooperBlack Italic |
| Copperplate Gothic 32BC, Copperplate Gothic 33BC |
| Coronet |
| Courier, Courier Oblique, Courier Bold, Courier Bold Oblique |
| GillSans, GillSans Italic, GillSans Bold, GillSans Bold Italic, GillSansCondensed, GillSans Condensed Bold, GillSans Light, GillSans Light Italic, GillSans Extra Bold |
| Eurostile, Eurostile Bold, Eurostile Extended Two, Eurostile Bold Extended Two |
| Geneva |
| Goudy Oldstyle, Goudy Oldstyle Italic, Goudy Bold, Goudy BoldItalic, Goudy ExtraBold |
| Helvetica, Helvetica Oblique, Helvetica Bold, Helvetica Bold Oblique, Helvetica Condensed, Helvetica Condensed Oblique, Helvetica Condensed Bold, Helvetica Condensed Bold Oblique, Helvetica Narrow, Helvetica Narrow Oblique, Helvetica Narrow Bold, Helvetica Narrow Bold Oblique |
| Hoefler Text, Hoefler Text Italic, Hoefler Text Black, Hoefler Text Black Italic, Hoefler Text Ornaments |
| Joanna, Joanna Italic, Joanna Bold, Joanna Bold Italic |
| LetterGothic, LetterGothic Slanted, LetterGothic Bold, LetterGothic Bold Slanted |
| ITC Lubalin Graph Book, ITC Lubalin Graph Book Oblique, ITC Lubalin Graph Demi, ITC Lubalin Graph Demi Oblique |
| Marigold |
| Monaco |
| ITC Mona Lisa Recut |
| New Century Schoolbook Roman, New Century Schoolbook Italic, New Century Schoolbook Bold, New Century Schoolbook Bold Italic |
| New York |
| Optima, Optima Italic, Optima Bold, Optima Bold Italic |
Product Information
| Font Name |
| Oxford |
| Palatino Roman, Palatino Italic, Palatino Bold, Palatino Bold Italic |
| Stempel Garamond Roman, Stempel Garamond Italic, Stempel Garamond Bold, Stempel Garamond Bold Italic |
| Symbol |
| Tekton |
| Times Roman, Times Italic, Times Bold, Times Bold Italic |
| Univers, Univers Oblique, Univers Bold, Univers Bold Oblique, Univers Light, Univers Light Oblique |
| UniversCondensed, UniversCondensed Oblique, UniversCondensed Bold, UniversCondensed Bold Oblique |
| UniversExtended , UniversExtended Oblique, UniversExtended Bold, UniversExtended Bold Oblique |
| Wingdings |
| ITC ZapfChancery Medium Italic |
| ITC ZapfDingbats |
| Arial, Arial Italic, Arial Bold, Arial Bold Italic |
| Times New Roman, Times New Roman Italic, Times New Roman Bold, Times New Roman Bold Italic |
PCL5 mode
| Font Name | Family | HP Equivalent |
| FixedPitch 810 | Medium, Bold, Italic, Bold Italic | Courier |
| Ding Dings SWA | - | ITC Zapf Dingbats |
| Dutch 801 | Medium, Bold, Italic, Bold Italic | CG Times |
| Zapf Humanist 601 | Medium, Bold, Italic, Bold Italic | CG Omega |
| Ribbon 131 | - | Coronet |
| Clarendon 701 | - | Clarendon Condensed |
| Swiss 742 | Medium, Bold, Italic, Bold Italic | Univers |
| Swiss 742 Condensed | Medium, Bold, Italic, Bold Italic | Univers Condensed |
| Incised 901 | Medium, Bold, Italic | Antique Olive |
| Aldine 430 | Medium, Bold, Italic, Bold Italic | Garamond |
| Calligraphic 401 | - | Marigold |
| Flareserif 821 | Medium, Extra Bold | Albertus |
| Ryadh BT | Medium, Bold | Ryadh |
| Miryam BT | Medium, Bold, Italic | Miryam |
Product Information
| Font Name | Family | HP Equivalent |
| David BT | Medium, Bold | David |
| Narkis Tam BT | Medium, Bold | Narkis |
| Swiss 721 SWM | Medium, Bold, Italic, Bold Italic | Arial |
| Dutch 801 SWM | Medium, Bold, Italic, Bold Italic | Times New |
| Swiss 721 SWA | Medium, Bold, Oblique, Bold Oblique | Helvetica |
| Swiss 721 Narrow SWA | Medium, Bold, Oblique, Bold Oblique | Helvetica Narrow |
| Zapf Calligraphic 801 SWA | Medium, Bold, Italic, Bold Italic | Palatino |
| Geometric 711 SWA | Medium, Bold, Oblique, Bold Italic | ITC Avant Garde Gothic |
| Revival 711 SWA | Light, Demi Bold, Light Italic, Demi Bold Italic | ITC Bookman |
| Century 702 SWA | Medium, Bold, Italic, Bold Italic | New Century Schoolbook |
| Dutch 801 SWA | Medium, Bold, Italic, Bold Italic | Times |
| Chancery 801 Medium SWA Italic | - | ITC Zapf Chancery Medium Italic |
| Symbol SWM | - | Symbol |
| Symbol SWA | - | SymbolPS |
| More WingBats SWM | - | Wingdings |
| FixedPitch 850 | Regular, Bold, Italic | Letter Gothic |
| Naskh BT | Medium, Bold | Naskh |
| Koufi BT | Medium, Bold | Koufi |
| FixedPitch 810 Dark | Medium, Bold, Italic, Bold Italic | CourierPS |
| Line Printer | - | Line Printer |
| OCR A | - | - |
| OCR B | - | - |
| Code39 | 9.37cpi, 4.68cpi | - |
| EAN/UPC | Medium, Bold | - |
Note:
Depending on the print density, or on the quality or color of the paper, OCR A, OCR B, Code39, and EAN/UPC fonts may not be readable. Print a sample and make sure the fonts can be read before printing large quantities.
PCL6 mode
For symbol set, see "In the PCL6 mode" on page 121.
Product Information
Scalable font
| Font Name | Symbol Set |
| FixedPitch 810 | *1 |
| FixedPitch 810 Bold | *1 |
| FixedPitch 810 Italic | *1 |
| FixedPitch 810 Bold Italic | *1 |
| FixedPitch 850 Regular | *1 |
| FixedPitch 850 Bold | *1 |
| FixedPitch 850 Italic | *1 |
| FixedPitch 810 Dark | *3 |
| FixedPitch 810 Dark Bold | *3 |
| FixedPitch 810 Dark Italic | *3 |
| FixedPitch 810 Dark Bold Italic | *3 |
| Dutch 801 | *2 |
| Dutch 801 Bold | *2 |
| Dutch 801 Italic | *2 |
| Dutch 801 Bold Italic | *2 |
| Zapf Humanist 601 | *3 |
| Zapf Humanist 601 Bold | *3 |
| Zapf Humanist 601 Italic | *3 |
| Zapf Humanist 601 Bold Italic | *3 |
| Ribbon 131 | *3 |
| Clarendon 701 | *3 |
| Swiss 742 | *2 |
| Swiss 742 Bold | *2 |
| Swiss 742 Italic | *2 |
| Swiss 742 Bold Italic | *2 |
| Swiss 742 Condensed | *3 |
| Swiss 742 Condensed Bold | *3 |
| Swiss 742 Condensed Italic | *3 |
| Swiss 742 Condensed Bold Italic | *3 |
| Incised 901 | *3 |
| Incised 901 Bold | *3 |
Product Information
| Font Name | Symbol Set |
| Incised 901 Italic | *3 |
| Aldine 430 | *3 |
| Aldine 430 Bold | *3 |
| Aldine 430 Italic | *3 |
| Aldine 430 Bold Italic | *3 |
| Calligraphic 401 | *3 |
| Flareserif 821 Medium | *3 |
| Flareserif 821ExtraBold | *3 |
| Swiss 721 SWM | *3 |
| Swiss 721 SWM Bold | *3 |
| Swiss 721 SWM Italic | *3 |
| Swiss 721 SWM Bold Italic | *3 |
| Dutch 801 SWM | *3 |
| Dutch 801 SWM Bold | *3 |
| Dutch 801 SWM Italic | *3 |
| Dutch 801 SWM Bold Italic | *3 |
| Swiss 721 SWA | *3 |
| Swiss 721 SWA Bold | *3 |
| Swiss 721 SWA Oblique | *3 |
| Swiss 721 SWA Bold Oblique | *3 |
| Swiss 721 Narrow SWA | *3 |
| Swiss 721 Narrow SWA Bold | *3 |
| Swiss 721 Narrow SWA Oblique | *3 |
| Swiss 721 Narrow SWA Bold Oblique | *3 |
| Zapf Calligraphic 801 SWA | *3 |
| Zapf Calligraphic 801 SWA Bold | *3 |
| Zapf Calligraphic 801 SWA Italic | *3 |
| Zapf Calligraphic 801 SWA Bold Italic | *3 |
| Geometric 711 SWA | *3 |
| Geometric 711 SWA Bold | *3 |
| Geometric 711 SWA Oblique | *3 |
Product Information
| Font Name | Symbol Set |
| Geometric 711 SWA Bold Italic | *3 |
| Revival 711 Light SWA | *3 |
| Revival 711 Demi SWA Bold | *3 |
| Revival 711 Light SWA Italic | *3 |
| Revival 711 Demi SWA Bold Italic | *3 |
| Century 702 SWA | *3 |
| Century 702 SWA Bold | *3 |
| Century 702 SWA Italic | *3 |
| Century 702 SWA Bold Italic | *3 |
| Dutch 801 SWA | *3 |
| Dutch 801 SWA Bold | *3 |
| Dutch 801 SWA Italic | *3 |
| Dutch 801 SWA Bold Italic | *3 |
| Chancery 801 Medium SWA Italic | *3 |
| Symbol SWM | *4 |
| More WingBats SWM | *5 |
| Ding Dings SWA | *6 |
| Symbol SWA | *4 |
| David BT | *7 |
| David BT Bold | *7 |
| Narkis Tam BT | *7 |
| Narkis Tam BT Bold | *7 |
| Miryam BT | *7 |
| Miryam BT Bold | *7 |
| Miryam BT Italic | *7 |
| Koufi BT | *8 |
| Koufi BT Bold | *8 |
| Naskh BT | *8 |
| Naskh BT Bold | *8 |
| Ryadh BT | *8 |
| Ryadh BT Bold | *8 |
Product Information
Bitmap font
| Font Name | Symbol Set |
| Line Printer | *9 |
Symbol sets
Introduction to symbol sets
Your printer can access a variety of symbol sets. Many of these symbol sets differ only in the international characters specific to each language.
Note:
Since most software handles fonts and symbols automatically, you will probably never need to adjust the printer's settings. However, if you are writing your own printer control programs, or if you are using older software that cannot control fonts, refer to the following sections for symbol set details.
When you are considering which font to use, you should also consider which symbol set to combine with the font. Available symbol sets vary depending on which mode you use and which font you choose.
In the PCL5 mode
| Available typefaces | Symbol set name: | |
| 19 TypefacesFixedPitch 810Dutch 801Swiss 742FixedPitch 850Line Printer | IBM-US (10U) | Roman-8 (8U) |
| ECM94-1 (0N) | 8859-2 ISO (2N) | |
| 8859-9 ISO (5N) | 8859-10ISO (6N) | |
| IBM-DN (11U) | PcMultilingual (12U) | |
| Legal (1U) | 8859-15ISO (9N) | |
Product Information
| Available typefaces | Symbol set name: | |
| 19 Typefaces FixedPitch 810 Dutch 801 Swiss 742 FixedPitch 850 | PcBlt775 (26U) | Pc1004 (9J) |
| WiBALT (19L) | DeskTop (7J) | |
| PsText (10J) | Windows (9U) | |
| McText (12J) | MsPublishi (6J) | |
| PiFont (15U) | VeMath (6M) | |
| VelInternational (13J) | VeUS (14J) | |
| PcE.Europe (17U) | PcTk437 (9T) | |
| WiAnsi (19U) | WiE.Europe (9E) | |
| WiTurkish (5T) | UK (1E) | |
| Swedis2 (0S) | Italian (0I) | |
| Spanish (2S) | German (1G) | |
| Norweg1 (0D) | French2 (1F) | |
| Roman-9 (4U) | PcEur858 (13U) | |
| ISO 8859/4 Latin 4 (4N) | Unicode 3.0 (18N) | |
| 19 Typefaces FixedPitch 810 Dutch 801 Swiss 742 FixedPitch 850 David BT Miryam BT Narkis Tam BT Naskh BT Koufi BT Ryadh BT | PsMath (5M) | Math-8 (8M) |
| ANSI ASCII (0U) | ||
| FixedPitch 810 Dutch 801 Swiss 742 FixedPitch 850 | Pc866Cyr (3R) | Pc866Ukr (14R) |
| WinCyr (9R) | Pc8Grk (12G) | |
| Pc851Grk (10G) | WinGrk (9G) | |
| ISOGrk (12N) | Greek8 (8G) | |
| FixedPitch 810 Dutch 801 Swiss 742 FixedPitch 850 Line Printer | ISOCyr (10N) | |
| Line Printer | Roman Extension (0E) | |
| FixedPitch 810 FixedPitch 850 David BT Narkis Tam BT Miryam BT | Hebrew7 (0H) Hebrew8 (8H) | ISO 8859/8 Hebrew (7H) PC-862, Hebrew (15H) |
Product Information
| Available typefaces | Symbol set name: | |
| Koufi BTNaskh BTRyadh BT | Arabic8 (8V)PC-864, Arabic (10V) | HPWARA (9V) |
| Symbol SWASymbol SWM | Symbol (19M) | |
| More WingBats SWM | Wingdings (579L) | |
| Ding Dings SWA | ZapfDingbats (14L) | |
| OCR A | OCR A (0O) | |
| OCR B | OCR B (1O) | OCR B Extension (3Q) |
| Code3-9 | Code3-9 (0Y) | |
| EAN/UPC | EAN/UPC (8Y) | |
The 19 typefaces refer to those listed below:
Zapf Humanist 601
Ribbon 131
Clarendon 701
Swiss 742 Condensed
Incised 901
Aldine 430
Calligraphic 401
Flareserif 821
Swiss 721 SWM
Dutch 801 SWM
Swiss 721 SWA
Swiss 721 Narrow SWA
Zapf Calligraphic 801 SWA
Geometric 711 SWA
Revival 711 SWA
Century 702 SWA
Dutch 801 SWA
Chancery 801 Medium SWA Italic
FixedPitch 810 Dark
In the PCL6 mode
| Symbol Set Name | Attribute | Font Classification | ||||||||
| *1 | *2 | *3 | *4 | *5 | *6 | *7 | *8 | *9 | ||
| ISO Norwegian | 4 | ○ | ○ | ○ | - | - | - | - | - | - |
| ISO Italian | 9 | ○ | ○ | ○ | - | - | - | - | - | - |
| ISO 8859-1 Latin 1 | 14 | ○ | ○ | ○ | - | - | - | - | - | ○ |
| ISO Swedish | 19 | ○ | ○ | ○ | - | - | - | - | - | - |
Product Information
| Symbol Set Name | Attribute | Font Classification | ||||||||
| *1 | *2 | *3 | *4 | *5 | *6 | *7 | *8 | *9 | ||
| ASCII | 21 | ○ | ○ | ○ | - | - | - | ○ | ○ | - |
| ISO United Kingdom | 37 | ○ | ○ | ○ | - | - | - | - | - | - |
| ISO French | 38 | ○ | ○ | ○ | - | - | - | - | - | - |
| ISO German | 39 | ○ | ○ | ○ | - | - | - | - | - | - |
| Legal | 53 | ○ | ○ | ○ | - | - | - | - | - | ○ |
| ISO 8859-2 Latin 2 | 78 | ○ | ○ | ○ | - | - | - | - | - | ○ |
| ISO Spanish | 83 | ○ | ○ | ○ | - | - | - | - | - | - |
| Roman-9 | 149 | ○ | ○ | ○ | - | - | - | - | - | - |
| PS Math | 173 | ○ | ○ | ○ | - | - | - | ○ | ○ | - |
| ISO 8859-9 Latin 5 | 174 | ○ | ○ | ○ | - | - | - | - | - | ○ |
| Windows 3.1 Latin 5 | 180 | ○ | ○ | ○ | - | - | - | - | - | - |
| Microsoft Publishing | 202 | ○ | ○ | ○ | - | - | - | - | - | - |
| ISO 8859/10 Latin 6 | 206 | ○ | ○ | ○ | - | - | - | - | - | ○ |
| DeskTop | 234 | ○ | ○ | ○ | - | - | - | - | - | - |
| Math-8 | 269 | ○ | ○ | ○ | - | - | - | ○ | ○ | - |
| Roman-8 | 277 | ○ | ○ | ○ | - | - | - | - | - | ○ |
| Windows 3.1 Latin 2 | 293 | ○ | ○ | ○ | - | - | - | - | - | - |
| Pc1004 | 298 | ○ | ○ | ○ | - | - | - | - | - | - |
| ISO 8859-15 Latin 9 | 302 | ○ | ○ | ○ | - | - | - | - | - | - |
| PC-Turkish | 308 | ○ | ○ | ○ | - | - | - | - | - | - |
| Windows 3.0 | 309 | ○ | ○ | ○ | - | - | - | - | - | - |
| PS Text | 330 | ○ | ○ | ○ | - | - | - | - | - | - |
| PC-8 | 341 | ○ | ○ | ○ | - | - | - | - | - | ○ |
| PC-8 D/N | 373 | ○ | ○ | ○ | - | - | - | - | - | ○ |
| MC Text | 394 | ○ | ○ | ○ | - | - | - | - | - | - |
| PC-850 | 405 | ○ | ○ | ○ | - | - | - | - | - | ○ |
| PcEur858 | 437 | ○ | ○ | ○ | - | - | - | - | - | - |
| Pi Font | 501 | ○ | ○ | ○ | - | - | - | - | - | - |
Product Information
| Symbol Set Name | Attribute | Font Classification | ||||||||
| *1 | *2 | *3 | *4 | *5 | *6 | *7 | *8 | *9 | ||
| PC852 | 565 | ○ | ○ | ○ | - | - | - | - | - | - |
| Unicode 3.0 | 590 | ○ | ○ | ○ | - | - | - | - | - | - |
| WBALT | 620 | ○ | ○ | ○ | - | - | - | - | - | - |
| Windows 3.1 Latin 1 | 629 | ○ | ○ | ○ | - | - | - | - | - | - |
| PC-755 | 853 | ○ | ○ | ○ | - | - | - | - | - | - |
| Wingdings | 18540 | - | - | - | - | ○ | - | - | - | - |
| Symbol | 621 | - | - | - | ○ | - | - | - | - | - |
| ZapfDigbats | 460 | - | - | - | - | - | ○ | - | - | - |
| PC-866, Cyrillic | 114 | ○ | ○ | - | - | - | - | - | - | - |
| Greek8 | 263 | ○ | ○ | - | - | - | - | - | - | - |
| Windows Greek | 295 | ○ | ○ | - | - | - | - | - | - | - |
| Windows Cyrillic | 306 | ○ | ○ | - | - | - | - | - | - | - |
| PC-851, Greek | 327 | ○ | ○ | - | - | - | - | - | - | - |
| ISO 8859/5 Cyrillic | 334 | ○ | ○ | - | - | - | - | - | - | - |
| PC-8, Greek | 391 | ○ | ○ | - | - | - | - | - | - | - |
| ISO 8859/7 Greek | 398 | ○ | ○ | - | - | - | - | - | - | - |
| PC-866 UKR | 466 | ○ | ○ | - | - | - | - | - | - | - |
| Hebrew7 | 8 | ○ | - | - | - | - | - | - | - | - |
| ISO 8859/8 Hebrew | 232 | ○ | - | - | - | - | - | ○ | - | - |
| Hebrew8 | 264 | ○ | - | - | - | - | - | ○ | - | - |
| PC-862, Hebrew | 488 | ○ | - | - | - | - | - | ○ | - | - |
| Arabic8 | 278 | - | - | - | - | - | - | - | ○ | - |
| HPWARA | 310 | - | - | - | - | - | - | - | ○ | - |
| PC-864, Arabic | 342 | - | - | - | - | - | - | - | ○ | - |
Where To Get Help
Technical Support Web Site
Epson's Technical Support Web Site provides help with problems that cannot be solved using the troubleshooting information in your product documentation. If you have a Web browser and can connect to the Internet, access the site at:
http://support.epson.net/
If you need the latest drivers, FAQs, manuals, or other downloadables, access the site at:
http://www.epson.com
Then, select the support section of your local Epson Web site.
Contacting Epson Support
Before Contacting Epson
If your Epson product is not operating properly and you cannot solve the problem using the troubleshooting information in your product documentation, contact Epson support services for assistance. If Epson support for your area is not listed below, contact the dealer where you purchased your product.
Epson support will be able to help you much more quickly if you give them the following information:
☐ Product serial number
(The serial number label is on the side of the product.)
□ Product model
☐ Product software version
(Click About, Version Info, or similar button in the product software.)
☐ Brand and model of your computer
☐ Your computer operating system name and version
□ Names and versions of the software applications you normally use with your product
Note:
Depending on the product, the dial list data for fax and/or network settings may be stored in the product's memory. Due to breakdown or repair of a product, data and/or settings may be lost. Epson shall not be responsible for the loss of any data, for backing up or recovering data and/or settings even during a warranty period. We recommend that you make your own backup data or take notes.
Help for Users in Europe
Check your Pan-European Warranty Document for information on how to contact Epson support.
Help for Users in Taiwan
Contacts for information, support, and services are:
World Wide Web (http://www.epson.com.tw)
Information on product specifications, drivers for download, and products enquiry are available.
Epson HelpDesk (Phone: +0280242008)
Our HelpDesk team can help you with the following over the phone:
☐ Sales enquiries and product information
☐ Product usage questions or problems
☐ Enquiries on repair service and warranty
Repair service center:
| Telephone number | Fax number | Address |
| 02-23416969 | 02-23417070 | No.20, Beiping E. Rd., Zhongzheng Dist., Taipei City 100, Taiwan |
| 02-27491234 | 02-27495955 | 1F., No.16, Sec. 5, Nanjing E. Rd., Songshan Dist., Taipei City 105, Taiwan |
| 02-32340688 | 02-32345299 | No.1, Ln. 359, Sec. 2, Zhongshan Rd., Zhonghe City, Taipei County 235, Taiwan |
| 039-605007 | 039-600969 | No.342-1, Guangrong Rd., Luodong Township, Yilan County 265, Taiwan |
| 038-312966 | 038-312977 | No.87, Guolian 2nd Rd., Hualien City, Hualien County 970, Taiwan |
| 02-82273300 | 02-82278866 | 5F.-1, No.700, Zhongzheng Rd., Zhonghe City, Taipei County 235, Taiwan |
| 03-2810606 | 03-2810707 | No.413, Huannan Rd., Pingzhen City, Taoyuan County 324, Taiwan |
| 03-5325077 | 03-5320092 | 1F., No.9, Ln. 379, Sec. 1, Jingguo Rd., North Dist., Hsinchu City 300, Taiwan |
| 04-23291388 | 04-23291338 | 3F., No.510, Yingcai Rd., West Dist., Taichung City 403, Taiwan |
| 04-23805000 | 04-23806000 | No.530, Sec. 4, Henan Rd., Nantun Dist., Taichung City 408, Taiwan |
| 05-2784222 | 05-2784555 | No.463, Zhongxiao Rd., East Dist., Chiayi City 600, Taiwan |
Where To Get Help
| Telephone number | Fax number | Address |
| 06-2221666 | 06-2112555 | No.141, Gongyuan N. Rd., North Dist., Tainan City 704, Taiwan |
| 07-5520918 | 07-5540926 | 1F., No.337, Minghua Rd., Gushan Dist., Kaohsiung City 804, Taiwan |
| 07-3222445 | 07-3218085 | No.51, Shandong St., Sanmin Dist., Kaohsiung City 807, Taiwan |
| 08-7344771 | 08-7344802 | 1F., No.113, Shengli Rd., Pingtung City, Pingtung County 900, Taiwan |
Help for Users in Australia
Epson Australia wishes to provide you with a high level of customer service. In addition to your product documentation, we provide the following sources for obtaining information:
Your Dealer
Don't forget that your dealer can often help identify and resolve problems. The dealer should always be the first call for advise on problems; they can often solve problems quickly and easily as well as give advise on the next step to take.
Internet URL http://www.epson.com.au
Access the Epson Australia World Wide Web pages. Worth taking your modem here for the occasional surf! The site provides a download area for drivers, Epson contact points, new product information and technical support (e-mail).
Epson Helpdesk
Epson Helpdesk is provided as a final backup to make sure our clients have access to advice. Operators on the Helpdesk can aid you in installing, configuring and operating your Epson product. Our Pre-sales Helpdesk staff can provide literature on new Epson products and advise where the nearest dealer or service agent is located. Many types of queries are answered here.
The Helpdesk numbers are:
Phone: 1300 361 054
Fax: (02) 8899 3789
We encourage you to have all the relevant information on hand when you ring. The more information you prepare, the faster we can help solve the problem. This information includes your Epson product documentation, type of computer, operating system, application programs, and any information you feel is required.
Help for Users in Singapore
Sources of information, support, and services available from Epson Singapore are:
Where To Get Help
World Wide Web (http://www.epson.com.sg)
Information on product specifications, drivers for download, Frequently Asked Questions (FAQ), Sales Enquiries, and Technical Support via e-mail are available.
Epson HelpDesk (Phone: (65) 6586 3111)
Our HelpDesk team can help you with the following over the phone:
☐ Sales enquiries and product information
☐ Product usage questions or problems
□ Enquiries on repair service and warranty
Help for Users in Thailand
Contacts for information, support, and services are:
World Wide Web (http://www.epson.co.th)
Information on product specifications, drivers for download, Frequently Asked Questions (FAQ), and e-mail are available.
Epson Hotline (Phone: (66)2685-9899)
Our Hotline team can help you with the following over the phone:
☐ Sales enquiries and product information
☐ Product usage questions or problems
☐ Enquiries on repair service and warranty
Help for Users in Vietnam
Contacts for information, support, and services are:
Epson Hotline (Phone): 84-8-823-9239
Service Center: 80 Truong Dinh Street, District 1, Hochiminh City Vietnam
Help for Users in Indonesia
Contacts for information, support, and services are:
Where To Get Help
World Wide Web (http://www.epson.co.id)
Information on product specifications, drivers for download
☐ Frequently Asked Questions (FAQ), Sales Enquiries, questions through e-mail
Epson Hotline
☐ Sales enquiries and product information
□ Technical support
Phone (62) 21-572 4350
Fax (62) 21-572 4357
Epson Service Center
| Jakarta | Mangga Dua Mall 3rd floor No 3A/BJl. Arteri Mangga Dua,Jakarta |
| Phone/Fax: (62) 21-62301104 | |
| Bandung | Lippo Center 8th floorJl. Gatot Subroto No.2Bandung |
| Phone/Fax: (62) 22-7303766 | |
| Surabaya | Hitech Mall lt IIB No. 12Jl. Kusuma Bangsa 116 - 118Surabaya |
| Phone: (62) 31-5355035Fax: (62)31-5477837 | |
| Yogyakarta | Hotel Natour GarudaJl. Malioboro No. 60Yogyakarta |
| Phone: (62) 274-565478 | |
| Medan | Wisma HSBC 4th floorJl. Diponegoro No. 11Medan |
| Phone/Fax: (62) 61-4516173 |
Where To Get Help
Makassar
MTC Karebosi Lt. Ill Kav. P7-8
JI. Ahmad Yani No.49
Makassar
Phone: (62)411-350147/411-350148
Help for Users in Hong Kong
To obtain technical support as well as other after-sales services, users are welcome to contact Epson Hong Kong Limited.
Internet Home Page
Epson Hong Kong has established a local home page in both Chinese and English on the Internet to provide users with the following information:
Product information
□ Answers to Frequently Asked Questions (FAQs)
☐ Latest versions of Epson product drivers
Users can access our World Wide Web home page at:
http://www.epson.com.hk
Technical Support Hotline
You can also contact our technical staff at the following telephone and fax numbers:
Phone: (852) 2827-8911
Fax: (852) 2827-4383
Help for Users in Malaysia
Contacts for information, support, and services are:
World Wide Web (http://www.epson.com.my)
Information on product specifications, drivers for download
☐ Frequently Asked Questions (FAQ), Sales Enquiries, questions through e-mail
Epson Trading (M) Sdn. Bhd.
Head Office.
Where To Get Help
Phone: 603-56288288
Fax: 603-56288388/399
Epson Helpdesk
☐ Sales enquiries and product information (Infoline)
Phone: 603-56288222
☐ Enquiries on repair services & warranty, product usage and technical support (Techline)
Phone: 603-56288333
Help for Users in India
Contacts for information, support, and services are:
World Wide Web (http://www.epson.co.in)
Information on product specifications, drivers for download, and products enquiry are available.
Epson India Head Office - Bangalore
Phone: 080-30515000
Fax: 30515005
Epson India Regional Offices:
| Location | Telephone number | Fax number |
| Mumbai | 022-28261515 /16/17 | 022-28257287 |
| Delhi | 011-30615000 | 011-30615005 |
| Chennai | 044-30277500 | 044-30277575 |
| Kolkata | 033-22831589 / 90 | 033-22831591 |
| Hyderabad | 040-66331738/ 39 | 040-66328633 |
| Cochin | 0484-2357950 | 0484-2357950 |
| Coimbatore | 0422-2380002 | NA |
| Pune | 020-30286000 /30286001/30286002 | 020-30286000 |
| Ahmedabad | 079-26407176 / 77 | 079-26407347 |
Where To Get Help
Helpline
For Service, Product info or to order a cartridge - 18004250011 (9AM - 9PM) - This is a Toll-free number.
For Service (CDMA & Mobile Users) - 3900 1600 (9AM - 6PM) Prefix local STD code
Help for Users in the Philippines
To obtain technical support as well as other after sales services, users are welcome to contact the Epson Philippines Corporation at the telephone and fax numbers and e-mail address below:
Trunk Line: (63-2) 706 2609
Fax: (63-2) 706 2665
Helpdesk Direct Line: (63-2) 706 2625
E-mail: epchelpdesk@epc.epson.com.ph
World Wide Web (http://www.epson.com.ph)
Information on product specifications, drivers for download, Frequently Asked Questions (FAQ), and E-mail Enquiries are available.
Toll-Free No. 1800-1069-EPSON(37766)
Our Hotline team can help you with the following over the phone:
☐ Sales enquiries and product information
☐ Product usage questions or problems
☐ Enquiries on repair service and warranty
Index
Index
2
2-Sided Printing....37
A
Aligning print head....72
B
Banding....92, 93
Blank pages....95
Blurry prints....94
Buttons control panel....16
C
Canceling printing....36
Mac OS X....37
Windows....36
Cleaning print head....69
Color problems....93
Contacting Epson....124
Control panel....16
Copyright....2
D
Documents printing....30
Driver accessing for Mac OS X....29 accessing for Windows....28
E
Enlarging pages....45
Envelopes loading....25 printable area....108
Epson paper....18
Errors print....80
F
Fit to page printing....45
Font....112
Fonts LJ4 mode....114 PCL6 mode....115
PS 3 mode....113
H
Head cleaning Mac OS X....70 printer buttons....71 Windows....70
Help Epson....124 Horizontal banding....92
|
Incorrect characters....94
Ink checking ink cartridge status in Mac OS X....61 checking ink cartridge status in Windows....60
Ink cartridges part numbers....103 replacing when expended....63
Interface cables....112
L
Lights control panel....16 status lights....80
LJ4 mode....114
Loading envelopes....25 paper....18, 20, 23
M
Mac OS X accessing printer settings....29 checking printer status....86
Maintenance box....65
Managing print jobs Windows....84
Margins problems....95
Media Type selecting....30
Mirror image....95
Misalignment....93
Multiple pages per sheet....48
N
Nozzle check....68
Mac OS X....68
printer buttons....69
Windows....68
Index
0
Operation check....83
P
Pages per sheet printing....48
Paper
Epson special paper....18
feeding problems....97
jams....88
loading....20
loading capacity....18, 20, 23
printable area....108
selecting type....30
specifications....106
wrinkling....98
Paper cassette
installing....58
loading....20
uninstalling....59
PCL....57,112
PCL6 mode....115, 121
Poster printing....51
assembling pages....54
PostScript....57,112
Print head
aligning....72
checking....68
cleaning....69
Print quality
improving....92
Print speed
increasing....96,100
Printable area specifications....108
Printer
checking status....84
cleaning....75
operation check....83
transporting....75
Printer settings
accessing for Mac OS X....29
accessing for Windows....28
Paper Size Loaded....74
Power Off Timer....73
Printing
2-sided....37
canceling....36
fit to page....45
multiple pages per sheet....48
posters....51
text....30
watermarks....55
Problems
banding....92, 93
blank pages....95
blurry prints....94
contacting Epson....124
diagnosing....80
incorrect characters....94
incorrect colors....93
margins....95
mirror image....95
paper feeding....97
paper jams....88
print....80
print speed....96
printer does not print....98
smeared prints....94, 96
solving....124
Product
parts....13
PS 3 mode....113
R
Rear MP tray
loading....23
Reducing page size....45
Replacing ink cartridges....63
Resizing pages....45
s
Safety information....7
Scanning software
uninstalling....77
Service....124
Shipping printer....75
Smeared prints....94, 96
Specifications
ink cartridges....103
mechanical....109
paper....106
printer....106
standards and approvals....111
Speed
increasing....96,100
Status Monitor
Mac OS X....86
Windows....84
Symbol sets
introduction....119
PCL6 mode....121
System requirements....105
T
Technical support....124
Text
printing documents....30
Trademarks....2
Transporting printer....75
U
Uninstalling software....77
USB
connecter....112
Index
W
Watermark printing....55
Windows
accessing printer settings....28
checking printer status....84
managing print jobs....84
status monitor....84


- WP-4011/WP-4015/ WP-4025/WP-4090/ WP-4091/WP-4095
- User's Guide
- Copyright and Trademarks
- ZORAN
- Guidelines
- Where to Find Information
- Available features for your product
- Illustrations used in this guide
- Warnings, Cautions, and Notes
- Cautions
- Notes
- Safety Instructions
- Important Safety Instructions
- Setting up the product
- Choosing a place for the product
- Using the product
- Using the product with a wireless connection
- Handling ink cartridges
- Contents
- Getting to Know Your Product
- Paper Handling
- Printing
- Installing Option
- Replacing Consumables
- Maintaining Your Printer and Software
- Troubleshooting
- Product Information
- Where To Get Help
- Index
- Product Parts
- Note:
- Guide to the Control Panel
- Buttons and Lights
- Introduction to Using, Loading, and Storing Media
- Selecting which tray to use and its loading capacities
- Storing paper
- Loading Paper
- Into the paper cassette
- 1
- 2
- 3
- 4
- 5
- 6
- 7
- Into the rear MP tray
- Slide out the output tray, and raise the stopper.
- Pull up the rear MP tray.
- While holding the feeder guard forward, pinch and slide the edge guide.
- Fan a stack of paper, then tap it on a flat surface to even the edges.
- Loading Envelopes
- Using Your Software
- Printer driver and status monitor
- Note for Windows users:
- Accessing the printer driver for Windows
- From Windows applications
- From the Start menu
- From the shortcut icon on the taskbar
- Getting information through online help
- Accessing the printer driver for Mac OS X
- Basic Printing
- Selecting the correct paper type
- Loading paper or envelopes
- Basic printer settings for Windows
- Basic printer settings for Mac OS X 10.5 or 10.6
- Basic printer settings for Mac OS X 10.4
- Select Print Settings from the pop-up menu.
- Make the settings that you want to use to print. See the online help for more details on Print Settings.
- Click Print to start printing.
- Canceling Printing
- Using the printer button
- For Windows
- Using EPSON Status Monitor 3
- For Mac OS X
- Printing with Special Layout Options
- 2-Sided Printing
- Note for Windows:
- Note for Mac OS X:
- Printer settings for Windows
- 8
- Printer settings for Mac OS X 10.5 or 10.6
- Printer settings for Mac OS X 10.4
- Fit to Page Printing
- Pages Per Sheet Printing
- Make adjustments to basic settings.
- Select Layout from the pop-up menu.
- Select from the following settings:
- Click Print to start printing.
- Poster Printing (for Windows only)
- Printer settings
- How to make a poster from your prints
- Watermark Printing (for Windows only)
- Printing the watermark
- Sharing Your Printer
- Using the PostScript Printer Driver and the PCL6 Printer Driver
- 250-Sheet Paper Cassette Unit
- Installing the paper cassette unit
- Uninstalling the cassette unit
- Ink Cartridges
- Checking the ink cartridge status
- Using the printer buttons
- Precautions on ink cartridge replacement
- Replacing an ink cartridge
- Open the front cover.
- Push the ink cartridge that you want to replace and then grip the handle of the cartridge to pull it out of the printer. Dispose of the used cartridge properly. Do not take the used cartridge apart or try to refill it.
- Remove the replacement ink cartridge from its package. Do not touch the green chip on the side of the cartridge. Doing so may prevent normal operation and printing.
- Maintenance Box
- Checking the maintenance box status
- Handling precautions
- Replacing a maintenance box
- Checking the Print Head Nozzles
- Using the Nozzle Check utility for Windows
- Using the Nozzle Check utility for Mac OS X
- Cleaning the Print Head
- Using the Head Cleaning utility for Windows
- Caution:
- Using the Head Cleaning utility for Mac OS X
- Aligning the Print Head
- Using the Print Head Alignment utility for Windows
- Using the Print Head Alignment utility for Mac OS X
- Making Printer Settings
- Power Off Timer Setting
- Paper Size Loaded Setting
- Cleaning the Printer
- Cleaning the exterior of the printer
- Cleaning the interior of the printer
- Warning:
- Transporting the Printer
- Checking and Installing Your Software
- Checking the software installed on your computer
- Installing the software
- Uninstalling Your Software
- Diagnosing the Problem
- Status lights
- Status monitor
- Running a printer operation check
- Checking Printer Status
- Current Status:
- □ Ink Levels:
- Information:
- □ Maintenance Box Service Life:
- □ Technical Support:
- Print Queue:
- Using EPSON Status Monitor
- The Paper Jams
- Removing jammed paper from the rear unit
- Removing jammed paper from the front cover and the output tray
- Removing jammed paper from the paper cassette(s)
- Pull out the paper cassette.
- Reload the paper into the paper cassette.
- Carefully remove any paper jammed inside the printer.
- Keep the cassette flat and insert it back into the printer carefully and slowly.
- Preventing paper jams
- Reprinting after a paper jam (for Windows only)
- Print Quality Problems
- Horizontal banding
- Vertical banding or misalignment
- Incorrect or missing colors
- Blurry or smeared print
- Miscellaneous Printout Problems
- Incorrect or garbled characters
- Incorrect margins
- Printout has a slight slant
- Inverted image
- Blank pages print
- Printed side is smeared or scuffed
- Printing is too slow
- Paper Does Not Feed Correctly
- Paper does not feed
- Multiple pages feed
- Paper is improperly loaded
- Paper is not ejected fully or is wrinkled
- The Printer Does Not Print
- All lights are off
- Lights came on and then went out
- Only the power light is on
- The ink light is flashing or is on after you replace the cartridge
- Increasing the Print Speed (For Windows Only)
- Other Problem
- Printing plain papers quietly
- Ink and Paper
- Paper
- Option
- 250-Sheet Paper Cassette Unit/PXBACU1
- System Requirements
- Windows requirements
- Macintosh requirements
- Technical Specifications
- Printable area
- Network Interface Specification
- Mechanical
- Electrical
- Standards and approvals
- WP-4020/WP-4025
- WP-4011/WP-4015/WP-4090/WP-4091/WP-4092/WP-4095
- Interface
- Font Information
- Available fonts
- PCL5 mode
- PCL6 mode
- Symbol sets
- Introduction to symbol sets
- In the PCL6 mode
- Technical Support Web Site
- Contacting Epson Support
- Before Contacting Epson
- Help for Users in Europe
- Help for Users in Taiwan
- World Wide Web (http://www.epson.com.tw)
- Epson HelpDesk (Phone: +0280242008)
- Help for Users in Australia
- Your Dealer
- Internet URL http://www.epson.com.au
- Epson Helpdesk
- Help for Users in Singapore
- World Wide Web (http://www.epson.com.sg)
- Epson HelpDesk (Phone: (65) 6586 3111)
- Help for Users in Thailand
- World Wide Web (http://www.epson.co.th)
- Epson Hotline (Phone: (66)2685-9899)
- Help for Users in Vietnam
- Help for Users in Indonesia
- World Wide Web (http://www.epson.co.id)
- Epson Hotline
- Help for Users in Hong Kong
- Internet Home Page
- Technical Support Hotline
- Help for Users in Malaysia
- World Wide Web (http://www.epson.com.my)
- Epson Trading (M) Sdn. Bhd.
- Help for Users in India
- World Wide Web (http://www.epson.co.in)
- Epson India Head Office - Bangalore
- Helpline
- Help for Users in the Philippines
- A
- B
- C
- D
- E
- F
- H
- |
- L
- M
- N
- 0
- P
- R
- s
- T
- U
- W
Márka : EPSON
Modell : WorkForce Pro WP-4095
Kategória : Nyomtató