K5563 - Mirar Calypso - Manual de uso y guía de instrucciones gratis
Encuentra gratis el manual del aparato K5563 Calypso en formato PDF.
| Marca | Calypso |
| Modelo | K5563 |
| Tipo de producto | Reloj de cuarzo |
| Visualización estándar | Horas, minutos, mes, fecha, día de la semana, PM |
| Funciones | Mes, día AM/PM, luz electroluminiscente, alarma sonora, cronómetro con medición por vuelta, carillón horario, selector 12/24 horas, segunda zona horaria, temporizador |
| Precisión (a 25°C) | ±30 segundos por mes |
| Temperatura de uso normal | 10°C - 40°C |
| Iluminación | Luz electroluminiscente (EL) |
| Mantenimiento y limpieza | Limpiar con un paño suave y agua limpia únicamente. Evitar productos químicos, especialmente el jabón. |
| Precauciones de uso | No abrir la caja, evitar golpes violentos, temperaturas extremas, campos eléctricos o electrostáticos fuertes |
| Estanqueidad | No usar los botones bajo el agua o al nadar |
| Condensación | Si aparece agua o condensación en el interior, hacer revisar inmediatamente |
| Alimentación | Pila (no especificada, estándar para reloj de cuarzo) |
| Dimensiones | No especificadas en el manual |
| Peso | No especificado en el manual |
| Reparabilidad | No intentar abrir la caja, contactar a un profesional |
| Reciclaje | Recogida selectiva al final de su vida útil, depositar en un punto de recogida autorizado |
Preguntas frecuentes - K5563 Calypso
Preguntas de los usuarios sobre K5563 Calypso
0 pregunta sobre este aparato. Responde a las que conoces o haz la tuya.
Hacer una nueva pregunta sobre este aparato
Descarga las instrucciones para tu Mirar en formato PDF gratis! Encuentra tus instrucciones K5563 - Calypso y toma tu dispositivo electrónico nuevamente en la mano. En esta página están publicados todos los documentos necesarios para el uso de su dispositivo. K5563 de la marca Calypso.
MANUAL DE USUARIO K5563 Calypso
Manual de instrucciones
Instruction manual
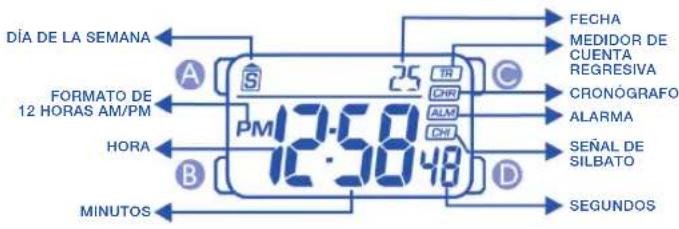
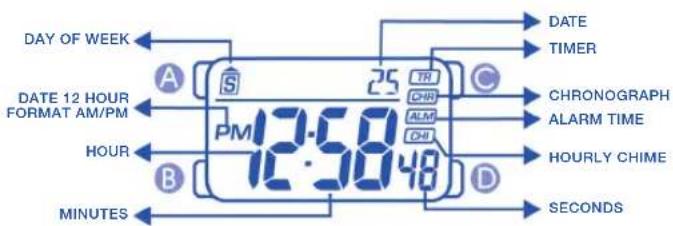
- MODO DE VISUALIZACIÓN Y OPERACIÓN DE LOS BOTONES
text_image
DÍA DE LA SEMANA FORMATO DE 12 HORAS AM/PM HORA MINUTOS A S PM 12:50 25 IR CHI ALM CHI C FECHA MEDIDOR DE CUENTA REGRESIVA CRONOGRAFO ALARMA SEÑAL DE SILBATO D SEGUNDOSOPERACIÓN DE BOTÓN
AJUSTE, REAJUSTE MODO
AJUSTE, INICIO/PARADA LUZ
2. COMO CAMBIAR EL MODO DE VISUALIZACIÓN
3. COMO VISUALIZAR EL MES Y LA FECHA
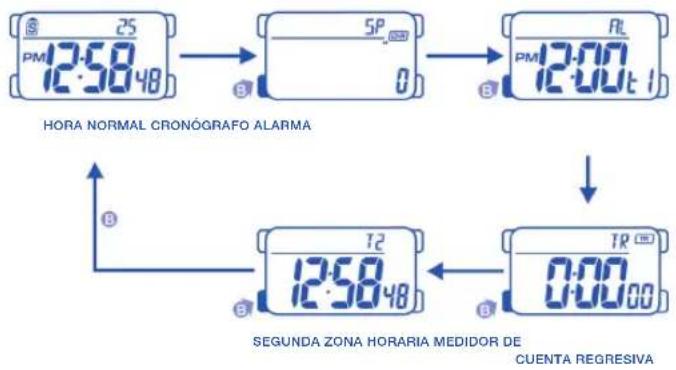
text_image
HORA NORMAL CRONOGRAFO ALARMA SEGUNDA ZONA HORARIA MEDIDOR DE CUENTA REGRESIVA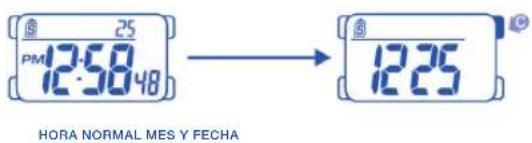
text_image
25 PM 12:50'48 HORA NORMAL MES Y FECHA 12:25- AJUSTE DE LA HORA NORMAL

flowchart
graph TD
    A["25 PM 12:50 48"] --> B["25 PM 12:50 48"]
    B --> C["25 PM 12:50 48"]
    C --> D["12:25"]
    D --> E["12:25"]
    E --> F["12:25"]
    F --> G["HP 12:25"]
    G --> H["+1 HORA"]
    H --> I["+1 MINUTO"]
    I --> J["AVANCE DE LOS MESES"]
    J --> K["AVANCE DE LA FECHA"]
    K --> L["AVANCE DE LOS DÍAS DE LA SEMANA"]
    L --> M["24 HORAS"]
    M --> N["AJUSTE FORMATO 12/24 HORAS"]
    N --> O["AJUSTE DE LAS HORAS"]
    O --> P["AJUSTE DE LOS MINUTOS"]
    P --> Q["+1 HORA"]
    Q --> R["+1 MINUTO"]
    R --> S["AJUSTE DE LOS MESES"]
    S --> T["AJUSTE DE LOS MESES"]
    T --> U["AJUSTE DE LAS FECHA"]
    U --> V["AJUSTE DE LA FECHA"]
    V --> W["AJUSTE DE LOS DÍAS DE LA SEMANA"]
    W --> X["AJUSTE DE LOS DÍAS DE LA SEMANA"]
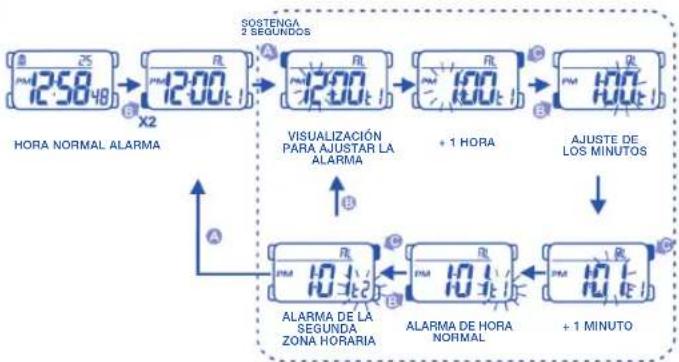
5. AJUSTE DE LA ALARMA
6. AJUSTE DE LA ALARMA Y SEÑAL HORARIA (ENCENDIDA/APAGADA)
flowchart
graph TD
    A["12:50 48"] --> B["12:00 t"]
    B --> C["12:00 t"]
    C --> D["10:00 t"]
    D --> E["+1 HORA"]
    E --> F["10:00 t"]
    F --> G["+1 MINUTO"]
    G --> H["ALARMA DE LA SEGUNDA ZONA HORARIA"]
    H --> I["ALARMA DE HORA NORMAL"]
    I --> J["+1 MINUTO"]
    J --> K["Visualización PARA AJUSTAR LA ALARMA"]
    K --> L["SOSTENGA 2 SEGUINDOS"]
    L --> M["HORA NORMAL ALARMA"]
    M --> N["X2"]
    N --> O["12:00 t"]
    O --> P["12:00 t"]
    P --> Q["10:00 t"]
    Q --> R["+1 HORA"]
    R --> S["AJUSTE DE LOS MINUTOS"]
    S --> T["ALARMA DE LA SEGUNDA ZONA HORARIA"]
    T --> U["ALARMA DE HORA NORMAL"]
    U --> V["+1 MINUTO"]

flowchart
graph TD
    A["12:58 48"] --> B["12:00 12:00 1"]
    B --> C["12:00 12:00 1"]
    C --> D["12:00 12:00 1"]
    D --> E["12:00 12:00 1"]
    E --> F["12:00 12:00 1"]
    F --> G["12:00 12:00 1"]
    G --> H["12:00 12:00 1"]
    H --> I["12:00 12:00 1"]
    I --> J["12:00 12:00 1"]
    J --> K["12:00 12:00 1"]
    K --> L["12:00 12:00 1"]
    L --> M["12:00 12:00 1"]
    M --> N["12:00 12:00 1"]
    N --> O["12:00 12:00 1"]
    O --> P["12:00 12:00 1"]
    P --> Q["12:00 12:00 1"]
    Q --> R["12:00 12:00 1"]
    R --> S["12:00 12:00 1"]
    S --> T["12:00 12:00 1"]
    T --> U["12:00 12:00 1"]
    U --> V["12:00 12:00 1"]
    V --> W["12:00 12:00 1"]
    W --> X["12:00 12:00 1"]
    X --> Y["12:00 12:00 1"]
    Y --> Z["12:00 12:00 1"]
    Z --> AA["12:00 12:00 1"]
    AA --> AB["12:00 12:00 1"]
    AB --> AC["12:00 12:00 1"]
    AC --> AD["12:00 12:00 1"]
    AD --> AE["12:00 12:00 1"]
    AE --> AF["12:00 12:00 1"]
    AF --> AG["12:00 12:00 1"]
    AG --> AH["12:00 12:00 1"]
    AH --> AI["12:00 12:00 1"]
    AI --> AJ["12:00 12:00 1"]
    AJ --> AK["12:00 12:00 1"]
    AK --> AL["12:00 12:00 1"]
    AL --> AM["12:00 12:00 1"]
    AM --> AN["12:00 12:00 1"]
    AN --> AO["12:00 12:00 1"]
    AO --> AP["12:00 12:00 1"]
    AP --> AQ["12:00 12:00 1"]
    AQ --> AR["12:00 12:00 1"]
    AR --> AS["12:00 12:00 1"]
    AS --> AT["12:00 12:00 1"]
    AT --> AU["12:00 12:00 1"]
    AU --> AV["12:00 12:00 1"]
    AV --> AW["12:00 12:00 1"]
    AW --> AX["12:00 12:00 1"]
    AX --> AY["12:33"]
    AY --> AZ["ALARMA APAGADA SENAL HORARIA APAGADA"]
    AZ --> BA["ALARMA APAGADA SENAL HORARIA ENCENDIDA"]
    BA --> BB["ALARMA APAGADA SENAL HORARIA ENCENDIDA"]
- COMO UTILIZAR EL CRONÓGRAFO

flowchart
graph LR
    A["25 PMI 12:58:48"] --> B["5P"]
    B --> C["5P"]
    C --> D["239"]
    D --> E["5P"]
    E --> F["25 PMI 12:58:48"]
HORA NORMAL CRONÓGRAFO INICIO CORRIENDO PARADA REAJUSTE HORA NORMA

flowchart
graph LR
    A["ANTES DE LOS 30 MINUTOS"] --> B["MINUTOS SEGUNDOS"]
    B --> C["295.9/99 1/100 SEGUNDOS"]
    B --> D["1/10 SEGUNDOS"]
    E["DESPUÉS DE LOS 30 MINUTOS"] --> F["HORAS SEGUNDOS"]
    F --> G["129/59 SEGUNDOS"]
    G --> H["2.02"]
    H --> I["ACCESO LAP 1"]
    I --> J["LAP"]
    J --> K["CONTANDO LAP 2"]
    K --> L["4.02"]
    L --> M["ACCESO LAP 2"]
    M --> N["5.02"]
    N --> O["CONTANDO LAP ÚLTIMO"]
    O --> P["6.02"]
    P --> Q["ACCESO LAP ÚLTIMO"]
    Q --> R["6.02"]
    R --> S["VISUALIZACIÓN DEL TIEMPO TOTAL ACUMULADO"]
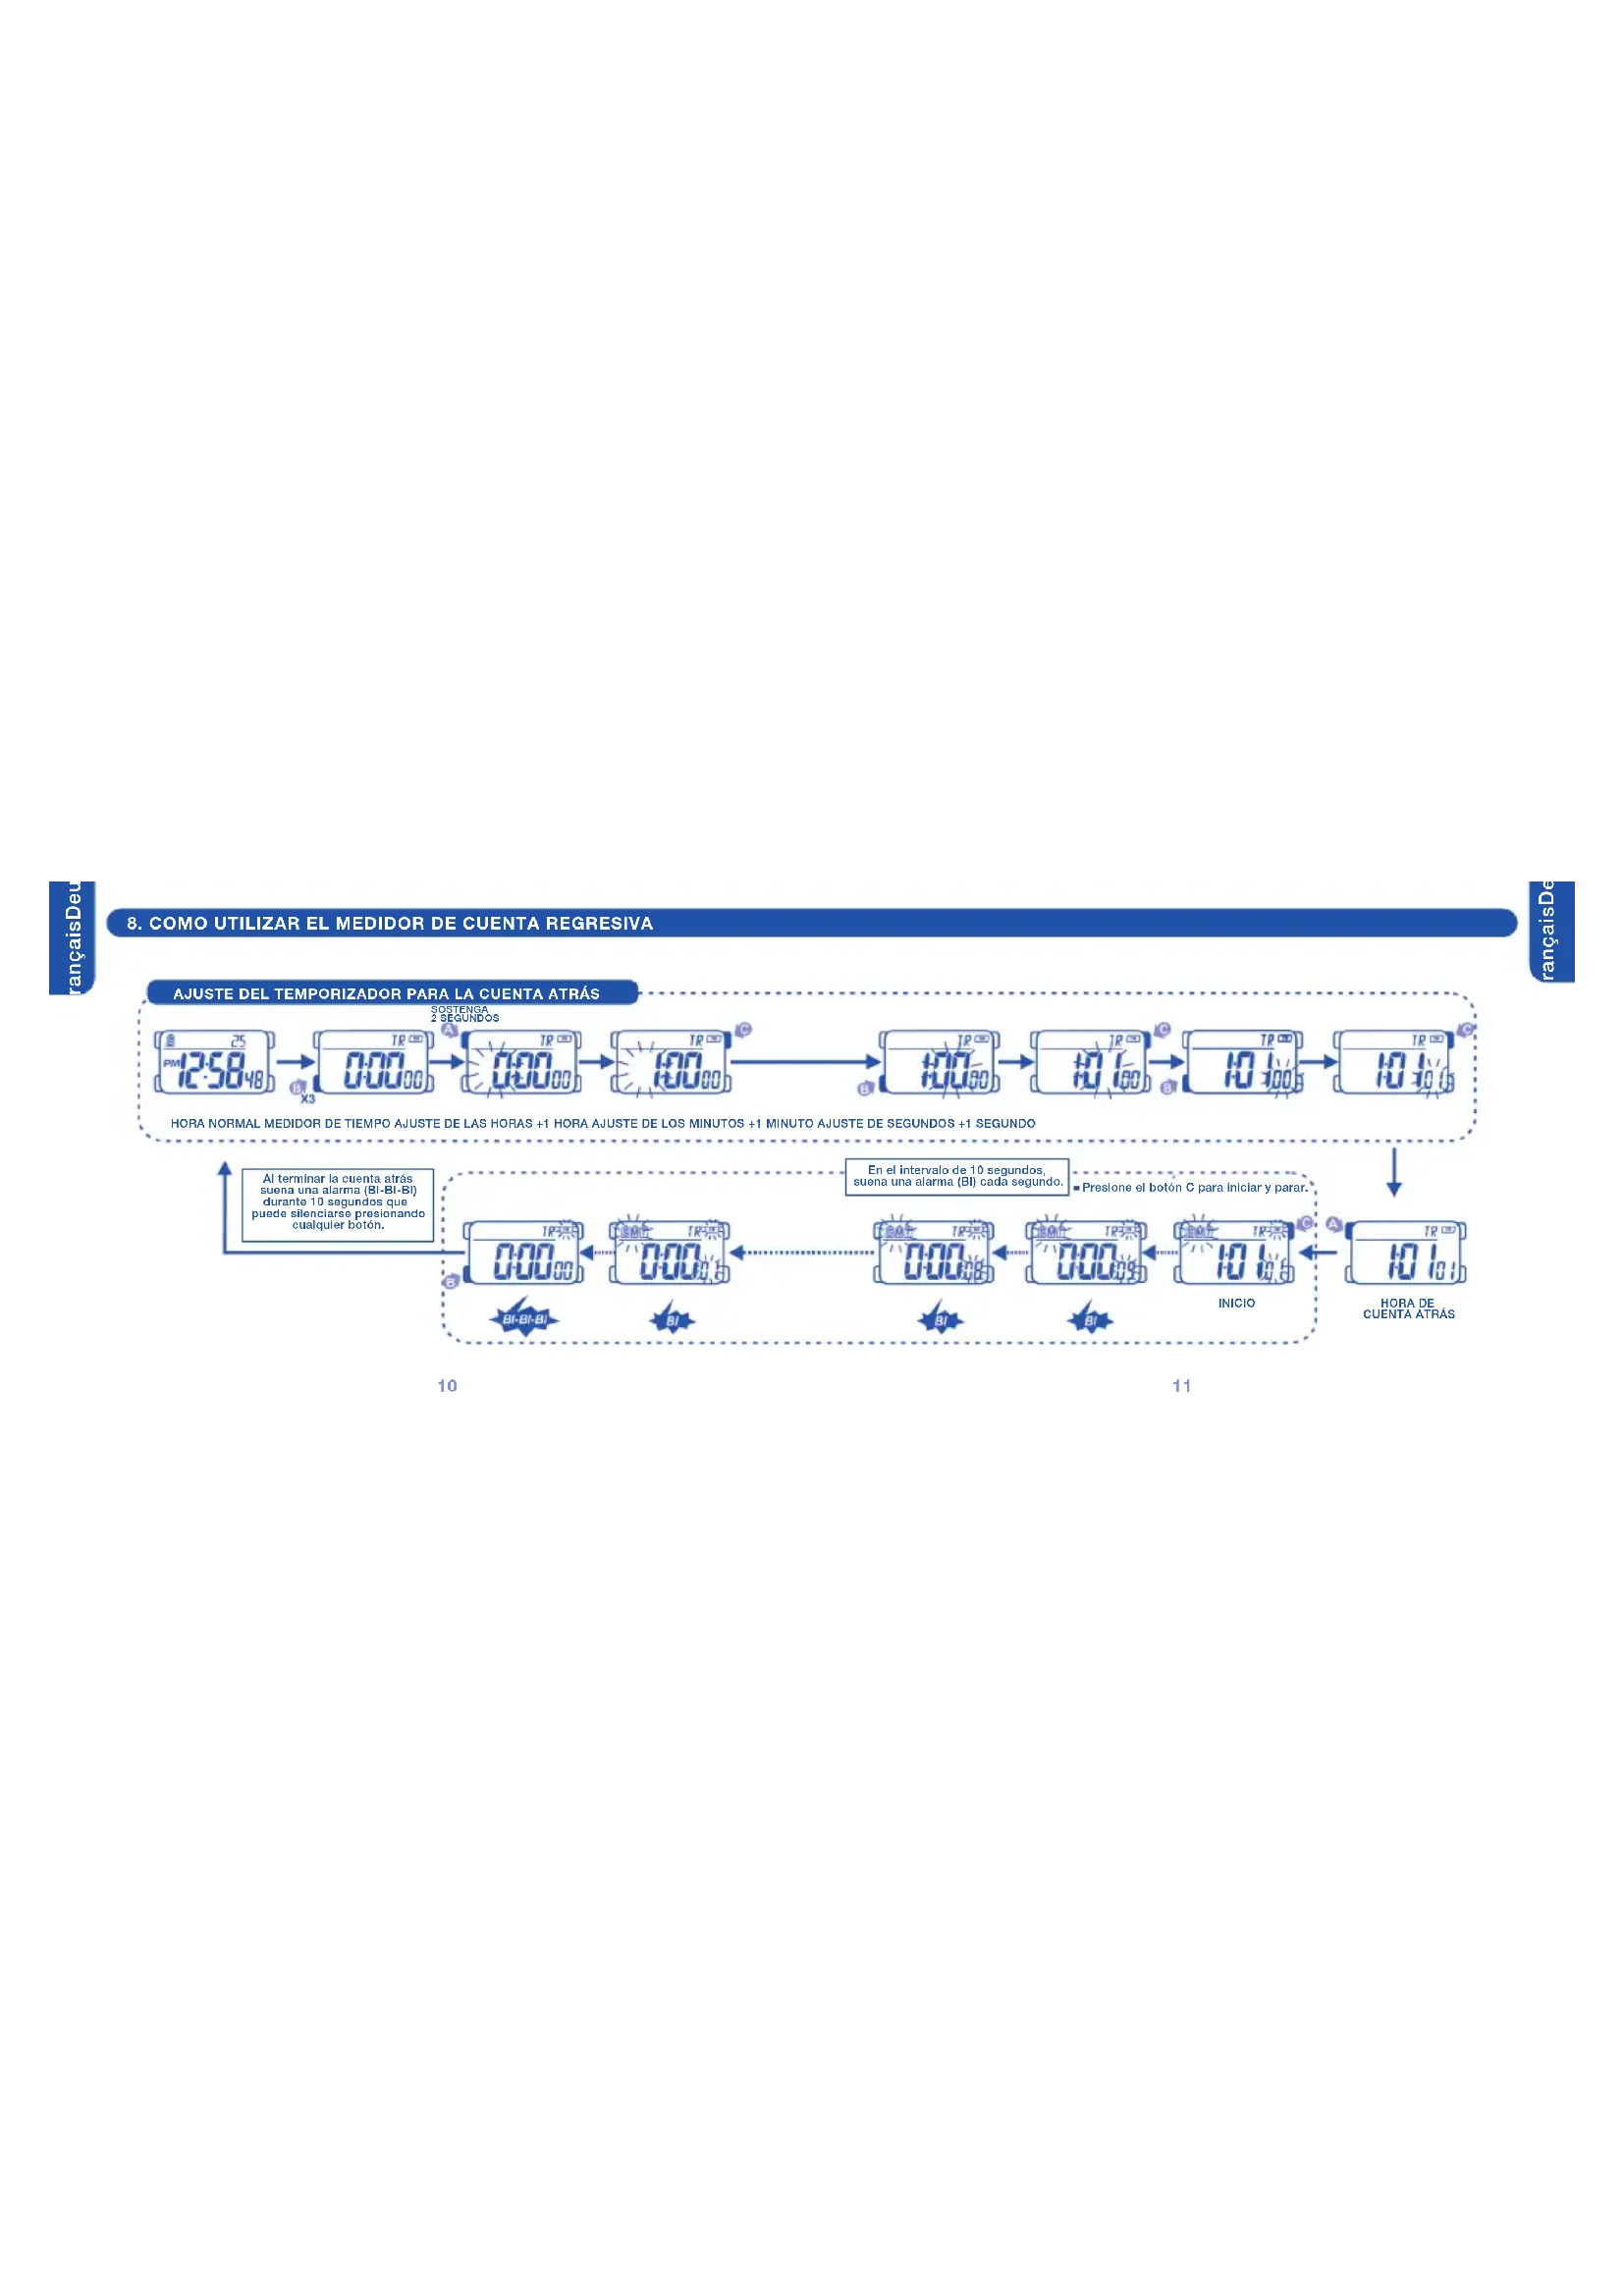
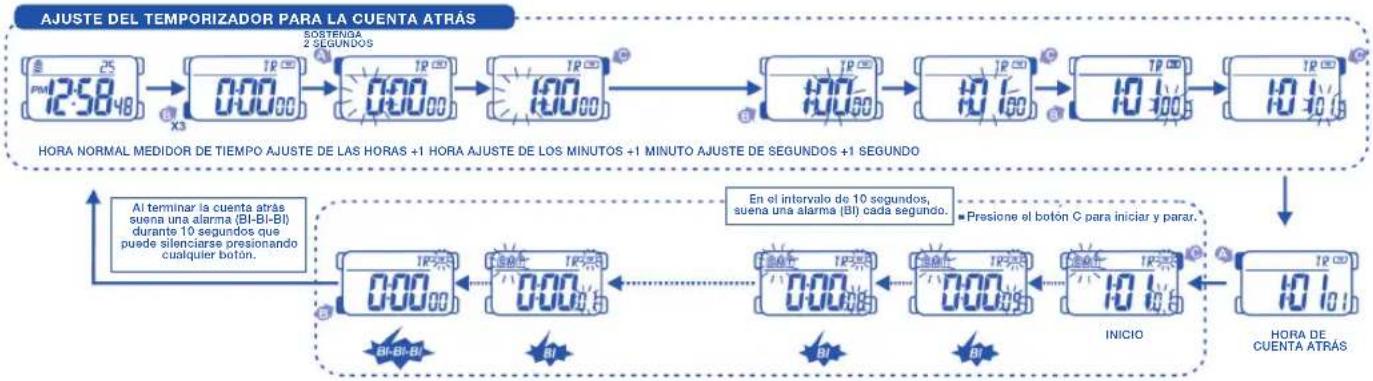
8. COMO UTILIZAR EL MEDIDOR DE CUENTA REGRESIVA
flowchart
graph TD
    A["25 PM"] --> B["TP 000"]
    B --> C["TP 000"]
    C --> D["TP 000"]
    D --> E["TP 000"]
    E --> F["TP 000"]
    F --> G["TP 000"]
    G --> H["TP 000"]
    H --> I["TP 000"]
    I --> J["TP 000"]
    J --> K["TP 000"]
    K --> L["TP 000"]
    L --> M["TP 000"]
    M --> N["TP 000"]
    N --> O["TP 000"]
    O --> P["TP 000"]
    P --> Q["TP 000"]
    Q --> R["TP 000"]
    R --> S["TP 000"]
    S --> T["TP 000"]
    T --> U["TP 000"]
    U --> V["TP 000"]
    V --> W["TP 000"]
    W --> X["TP 000"]
    X --> Y["TP 000"]
    Y --> Z["TP 000"]
    Z --> AA["TP 000"]
    AA --> AB["TP 000"]
    AB --> AC["TP 000"]
    AC --> AD["TP 000"]
    AD --> AE["TP 000"]
    AE --> AF["TP 000"]
    AF --> AG["TP 000"]
    AG --> AH["TP 000"]
    AH --> AI["TP 000"]
    AI --> AJ["TP 000"]
    AJ --> AK["TP 000"]
    AK --> AL["TP 000"]
    AL --> AM["TP 000"]
    AM --> AN["TP 000"]
    AN --> AO["TP 000"]
    AO --> AP["TP 000"]
    AP --> AQ["TP 000"]
    AQ --> AR["TP 000"]
    AR --> AS["TP 000"]
    AS --> AT["TP 000"]
    AT --> AU["TP 000"]
    AU --> AV["TP 000"]
    AV --> AW["TP 000"]
    AW --> AX["TP 000"]
    AX --> AY["TP 000"]
    AY --> AZ["TP 000"]
    AZ --> BA["TP 000"]
    BA --> BB["TP 000"]
    BB --> BC["TP 000"]
    BC --> BD["TP 000"]
    BD --> BE["TP 000"]
    BE --> BF["TP 000"]
    BF --> BG["TP 000"]
    BG --> BH["TP 000"]
    BH --> BI["TP 000"]
    BI --> BJ["TP 000"]
    BJ --> BK["TP 000"]
    BK --> BL["TP 000"]
    BL --> BM["TP 000"]
    BM --> BN["TP 000"]
    BN --> BO["HORA DE CUENTA ATRAS"]

    subgraph Timeframe
        direction LR
        A fill:#f9f,stroke:#333
        B fill:#f9f,stroke:#333
        C fill:#f9f,stroke:#333
        D fill:#f9f,stroke:#333
        E fill:#f9f,stroke:#333
        F fill:#f9f,stroke:#333
        G fill:#f9f,stroke:#333
        H fill:#f9f,stroke:#333
        I fill:#f9f,stroke:#333
        J fill:#f9f,stroke:#333
        K fill:#f9f,stroke:#333
        L fill:#f9f,stroke:#333
        M fill:#f9f,stroke:#333
        N fill:#f9f,stroke:#333
        O fill:#f9f,stroke:#333
        P fill:#f9f,stroke:#333
        Q fill:#f9f,stroke:#333
        R fill:#f9f,stroke:#333
        S fill:#f9f,stroke:#333
        T fill:#f9f,stroke:#333
        U fill:#f9f,stroke:#333
        V fill:#f9f,stroke:#333
        W fill:#f9f,stroke:#333
        X fill:#f9f,stroke:#333
        Y fill:#f9f,stroke:#333
        Z fill:#f9f,stroke:#333
        AA fill:#f9f,stroke:#333
        AB fill:#f9f,stroke:#333
        AC fill:#f9f,stroke:#333
        AD fill:#f9f,stroke:#333
        AE fill:#f9f,stroke:#333
        AF fill:#f9f,stroke:#333
        AG fill:#f9f,stroke:#333
        AH fill:#f9f,stroke:#333
        AI fill:#f9f,stroke:#333
        AJ fill:#f9f,stroke:#333
        AK fill:#f9f,stroke:#333
        AL fill:#f9f,stroke:#333
        AM fill:#f9f,stroke:#333
        AN fill:#f9f,stroke:#333
        AO fill:#f9f,stroke:#333
        AP fill:#f9f,stroke:#333
        AQ fill:#f9f,stroke:#333
        AR fill:#f9f,stroke:#333
        AS fill:#f9f,stroke:#333
        AT fill:#f9f,stroke:#333
        AU fill:#f9f,stroke:#333
        AV fill:#f9f,stroke:#333
        AW fill:#f9f,stroke:#333
        AX fill:#f9f,stroke:#333
        AY fill:#ccf,stroke:#155
        AZ fill:#ccf,stroke:#155
        BA fill:#ccf,stroke:#155
        BB fill:#ccf,stroke:#155
        BC fill:#ccf,stroke:#155
        DA fill:#ccf,stroke:#155
        EY fill:#ccf,stroke:#155
        ZY fill:#ccf,stroke:#155
        CA fill:#ccf,stroke:#155
        DD fill:#ccf,stroke:#155
        EX fill:#ccf,stroke:#155
        AFY fill:#ccf,stroke:#155
        AGY fill:#ccf,stroke:#155
        AHY fill:#ccf,stroke:#155
        AIY fill:#ccf,stroke:#155
        AJY fill:#ccf,stroke:#155
        AKY fill:#ccf,stroke:#155
        ALY fill:#ccf,stroke:#155
        AMY fill:#ccf,stroke:#155
        ANY fill:#ccf,stroke:#155
        AOY fill:#ccf,stroke:#155
        APY fill:#ccf,stroke:#155
        AQY fill:#ccf,stroke:#155
        ARY fill:#ccf,stroke:#155
        ASY fill:#ccf,stroke:#155
        ATY fill:#ccf,stroke:#155
        AUY fill:#ccf,stroke:#155
        AVY fill:#ccf,stroke:#155
        AWY fill:#ccf,stroke:#155
        AXY fill:#ccf,stroke:#155
        AZY fill:#ccf,stroke:#155
        ALY fill:#ccf,stroke:#155
        ANY fill:#ccf,stroke:#155
        AOY fill:#ccf,stroke:#155
        APY fill:#ccf,stroke:#155
        AZY fill:#ccf,stroke:#155
        ALY fill:#ccf,stroke:#155
        ANY fill:#ccf,stroke:#155
        AOY fill:#ccf,stroke:#155
        APY fill:#ccf,stroke:#155
        AZY fill:#ccf,stroke:#155
        ALY + AI YO YO YO YO YO YO YO YO YO YO YO YO YO YO YO YO YO YO YO YO YO YO YO YO YO YO YO YO YO YO YO YO YO YO YO YO YO YO YO YO YO YO YO YO YO YO YO YO YO YO Yo YO YO YO Yo Yo Yo Yo Yo Yo Yo Yo Yo Yo Yo Yo Yo Yo Yo Yo Yo Yo Yo Yo Yo Yo Yo Yo Yo Yo Yo Yo Yo Yo Yo Yo Yo Yo Yo Yo Yo Yo Yo Yo Yo Yo Yo Yo Yo Yo Yo Yo Yo Yo Yc #FF667777777777777777777777777777777777777777777777777777777777777777777777777777777777777777777777777777TJ#FJ#
    end

    %% Annotations:
    note right of A: Al terminar la cuenta atrás suena una alarma (BI-BI-BI) durante 12 segundos que puede silenciarse presionando cualquier botón.
    note right of AB: Presione el botón C para iniciar y parar.
    note right of AC: Presione el botón C para iniciar y parar.
    note right of AD: Presione el botón C para iniciar y parar.
    note right of AE: Presione el botón C para iniciar y parar.
    note right of AF: Presione el botón C para iniciar y parar.
    note right of AG: Presione el botón C para iniciar y parar.
    note right of AH: Presione el botón C para iniciar y parar.
    note right of AI: Presione el botón C para iniciar y parar.
    note right of AJ: Presione el botón C para iniciar y parar.
    note right of AK: Presione el botón C para iniciar y parar.
    note right of AL: Presione el botón C para iniciar y parar.
    note right of AM: Presione el botón C para iniciar y parar.
    note right of AN: Presione el botón C para iniciar y parar.
    note right of AO: Presione el botón C para iniciar y parar.
    note right of AP: Presione el botón C para iniciar y parar.
    note right of AZ: Presione el botón C para iniciar y parar.
    note right of AR: Presione el botón C para iniciar y parar.
    note right of AS: Presione el botón C para iniciar y parar.
    note right of AT: Presione el botón C para iniciar y parar.
    note right of AU: Presione el botón C para iniciar y parar.
    note right of AV: Presione el botón C para iniciar y parar.
    note right of AW: Presione el botón C para iniciar y parar.
9. AJUSTE DE LA SEGUNDA ZONA HORARIA
10. COMO USAR LA LUZ

flowchart
graph TD
    A["PM 12:50 48"] --> B["12:50 48"]
    B --> C["12:50 48"]
    C --> D["150 48"]
    D --> E["+30 MINUTOS"]
    E --> F["12:50 48"]
    F --> G["12:50 48"]
    G --> H["+1 HORA"]
    H --> I["12:50 48"]
    I --> J["+30 MINUTOS"]
    J --> K["12:50 48"]
    K --> L["+30 MINUTOS"]
    L --> M["+30 MINUTOS"]
    M --> N["+30 MINUTOS"]
    N --> O["HORA NORMAL SEGUNDA ZONA HORARIA AJUSTE DE LA HORA"]
    style A fill:#f9f,stroke:#333
    style B fill:#f9f,stroke:#333
    style C fill:#f9f,stroke:#333
    style D fill:#f9f,stroke:#333
    style E fill:#f9f,stroke:#333
    style F fill:#f9f,stroke:#333
    style G fill:#f9f,stroke:#333
    style H fill:#f9f,stroke:#333
    style I fill:#f9f,stroke:#333
    style J fill:#f9f,stroke:#333
    style K fill:#f9f,stroke:#333
    style L fill:#f9f,stroke:#333
    style M fill:#f9f,stroke:#333
    style N fill:#f9f,stroke:#333
    style O fill:#f9f,stroke:#333
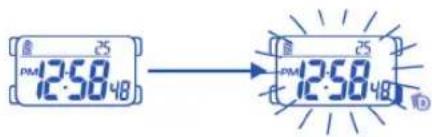
text_image
PMI 12:58.48 → PMI 12:58.48 IDAVISO:
1) La iluminación del reloj utiliza una luz electroluminiscente (EL) que tiende a perder potencia después de usos muy prolongados.
2) Bajo la luz solar directa es difícil ver la iluminación que proporciona la luz de la pantalla.
11. CUIDADO DE SU RELOJ
1) Este reloj contiene componentes electrónicos. No intente abrir la caja o remover la tapa posterior.
2) No oprimir los botones de su reloj bajo la superficie del agua, nadando o practicando submarinismo.
3) Si por cualquier motivo llegase a aparecer agua o condensación en el reloj hágalo chequear inmediatamente. El agua puede corroer los componentes electrónicos dentro de la caja.
4) Evite impactos severos. El reloj está diseñado para resistir impactos bajo condiciones normales de uso. Se sugiere no someterlo a impactos severos, al uso inadecuado o caídas bruscas sobre superficies duras.
5) Evite exponer el reloj a temperaturas extremas.
6) Limpie su reloj únicamente con agua y un paño suave. Evite el uso de productos químicos especialmente de jabón.
7) Mantenga su reloj lejos de cualquier campo eléctrico o estático.
12. CARACTERÍSTICAS Y ESPECIFICACIONES
1) Modo de tiempo: hora, minutos, segundos, mes, fecha y día de la semana.
2) Función:
• Luz electroluminiscente.
- Alarma: Funciona con el sonido de buzzer.
- Cronómetro: Funciona con operación repetida.
- Formato de 12/24 horas.
- Segunda zona horaria.
- Señal horaria encendida o apagada.
- Contador de cuenta regresiva.
3) Precisión a temperaturas normales (25°C): ± 30 segundos por mes.
4) Rango de temperatura de operación normal: 10°C - 40°C

En aplicación de la normativa sobre los desechos de equipos eléctricos y electrónicos, los productos de relojería de cuarzo que se encuentran al final de su vida útil deben ser sometidos a una recogida selectiva en vistas a su tratamiento. También puede depositar nuestros productos de relojería de cuarzo, nuestros puntos de venta autorizados, así como en cualquier punto de recogida. La recogida selectiva, el tratamiento, la valoración y el reciclaje contribuyen guarda de nuestro medio ambiente y a la protección de nuestra salud.
- REGULAR DISPLAY AND BUTTON OPERATION
text_image
DAY OF WEEK DATE 12 HOUR FORMAT AM/PM PM 12:58:48 A S 25 TR CHRI ALMI CHI D MINUTES DATE TIMER CHRONOGRAPH ALARM TIME HOURLY CHIME SECONDS