
EX-10 - Car stereo ALPINE - Free user manual and instructions
Find the device manual for free EX-10 ALPINE in PDF.
| Product Type | Car radio with iPod controller and Bluetooth |
| Brand | ALPINE |
| Model | EX-10 |
| Monitor dimensions | 78.6 x 55.7 x 20.2 mm |
| Monitor weight | 78 g (monitor), 60 g (bracket) |
| Interface unit dimensions | 58.7 x 27.7 x 85.5 mm |
| Interface unit weight | 72 g |
| Power supply | 14.4 V DC (11-16 V allowable) |
| Bluetooth version | Bluetooth 1.2 certified, Class 2, power +4 dBm |
| Supported Bluetooth profiles | HFP, HSP, A2DP, AVRCP |
| Main functions | iPod playback, Bluetooth audio, hands-free kit, FM transmitter, track search, shuffle and repeat |
| FM transmitter | Frequency 88.1-107.9 MHz, range approx. 1.5 m |
| Auxiliary audio output | 1200 mV max. |
| Remote control | CR2025 battery included |
| Care and cleaning | Use a soft, dry cloth. Do not use chemical products. |
| Safety | 2 A fuse built into the cigarette lighter adapter. Use only on 12 V negative ground vehicles. |
| Supplied parts | Monitor, bracket, interface unit, monitor cable (3 m), FULL SPEED cable (1 m), cigarette lighter extension cable, cigarette lighter adapter, microphone (3 m), double-sided adhesive tape, Velcro strips, mounting screws, cable ties, cloth, remote control, battery |
| Operating temperature | -10°C to +60°C |
| iPod compatibility | iPod classic (1st gen.), iPod touch (1st gen.), iPod nano (1st to 3rd gen.), iPod 5th gen., iPod 4th gen., iPod photo, iPod mini (with dock connector) |
Frequently Asked Questions - EX-10 ALPINE
User questions about EX-10 ALPINE
0 question about this device. Answer the ones you know or ask your own.
Ask a new question about this device
Download the instructions for your Car stereo in PDF format for free! Find your manual EX-10 - ALPINE and take your electronic device back in hand. On this page are published all the documents necessary for the use of your device. EX-10 by ALPINE.
USER MANUAL EX-10 ALPINE
Advanced iPod® Controller with Bluetooth®
eX-10


- OWNER'S MANUAL Please read before using this equipment.
- BEDIENUNGSCANLEITUNG Lesen Sie diese Bedienungsanleitungrette vor Gebrauch des Gerätes.
- MODE D'EMPLOI Veuillez dire avant d'utiliser cet apparéil.
- MANUAL DE OPERACION
Léalo antes de utiliser este equipo. - ISTRUZIONI PER L'USO
Si prega di leggere prima di utilizzato il attrezzatura.
ANVÄNDARHANDLEDNING Innan du anvander utrustingen bör du lasaigenomenenna användarhandledning.
ALPINE ELECTRONICS MARKETING, INC.
1-1-8 Nishi Gotanda,
Shinagawa-ku,
Tokyo 141-0031, Japan
Phone 03-5496-8231
ALPINE ELECTRONICS OF AMERICA, INC.
19145 Gramercy Place, Torrance,
California 90501, U.S.A.
Phone 1-800-ALPINE-1 (1-800-257-4631)
ALPINE ELECTRONICS OF CANADA, INC.
777 Supertest Road, Toronto,
Ontario M3J 2M9, Canada
Phone 1-800-ALPINE-1 (1-800-257-4631)
ALPINE ELECTRONICS OF AUSTRALIA PTY. LTD.
161-165 Princes Highway, Hallam
Victoria 3803, Australia
Phone 03-8787-1200
ALPINE ELECTRONICS GmbH
Frankfurter Ring 117, 80807 München, Germany
Phone 089-3242640
ALPINE ELECTRONICS OF U.K. LTD.
Alpine House
Fletchamstead Highway, Coventry CV4 9TW, U.K.
Phone 0870-33 33 763
ALPINE ELECTRONICS FRANCE S.A.R.L.
(RCS PONTOISE B 338 101 280)
98, Rue de la Belle Etoile, Z.I. Paris Nord II, B.P. 50016, 95945 Roissy Charles de Gaulle Cedex, France
Phone 01-48638989
Operating Instructions
WARNING
WARNING 3
CAUTION 3
PRECAUTIONS 3
Getting Started
Accessory List 4
When Using the Remote Control 4
Battery Replacement 4
About Slide Switch Operation 5
Turning Power On and Off 5
Detaching and Attaching the Monitor 5
How to connect to a Bluetooth compatible device (Pairing) 5
About Sound Output of the Unit 5
iPod®
How to View the Display 6
Playback 6
Searching for a desired Song/Title 7
Percent Skip Function 7
Search Position Memory 7
Up/Down Function 8
Random Play Shuffle 8
Random Play Shuffle All 8
Repeat Play 8
Changing the Display 9
Downloading Artwork Data manually 9
Bluetooth Audio
How to View the Display 10
Playback 10
Hands-Free Phone Control
About the Hands-Free Phone 11
Answering a Call 11
Hanging up the Telephone 11
Redial Function 11
Calling 11
Redialing a Number In Outgoing History 12
Dialing a Number In Incoming History 12
Dialing a Number In Incoming Missed Call History 12
Dialing a Number In The Phone Book 12
Voice Dial Operation 12
Adjusting the Volume when receiving a Call 12
SETUP
Transmitter Setting
FM Transmitter Function (Frequency) 13
Bluetooth Setting
Setting the Bluetooth Device (Paired Phone/Paired Audio) 14
Deleting a Bluetooth Device from the list (Clear Devices) 14
Setting the PIN Code (Pass Code) 14
Setting the Automatic Connection (Auto Connect) 14
Setting the Received Calls automatically (Auto Answer) 14
Adjusting the volume (HFP Volume) 14
Setting the Telephone Voice Output (HFP Speaker) 14
Audio Setting
Equalizer Presets 15
General Setting
Setting the Language 15
Sound (Beep) Guide Function 15
Demonstration 15
Setting Sound Output (Output Mode) 15
Automatic Power OFF Function (Auto Poweroff) 15
Display Setting
Adjusting the Level of the Display Brightness (Dimmer Level) 15
Scroll Setting (Text Scroll) 15
Switching the Display Type (BGV Select) ....15
iPod Setting
Setting Artwork Download (Artwork Display) 16
Setting Artwork Type (Artwork Type) 16
iPod Search Mode Setting 16
Information
In Case of Difficulty 17
Specifications 17
Installation and Connections
Warning 18
Caution 18
Precautions 18
Installation
Installing the Monitor 19
Mounting the Microphone 20
Connecting the Cigarette Adapter to the Cigarette I/F Box 20
Installing the Stand using Screws fixed 20
How to remove the Fuse 20
Connections 21
Operating Instructions
WARNING

WARNING
This symbol means important instructions. Failure to heed them can result in serious injury or death.
DO NOT OPERATE ANY FUNCTION THAT TAKES YOUR ATTENTION AWAY FROM SAFELY DRIVING YOUR VEHICLE.
Any function that requires your prolonged attention should only be performed after coming to a complete stop. Always stop the vehicle in a safe location before performing these functions. Failure to do so may result in an accident.
KEEP THE VOLUME AT A LEVEL WHERE YOU CAN STILL HEAR OUTSIDE NOISES WHILE DRIVING.
Excessive volume levels that obscure sounds such as emergency vehicle sirens or road warning signals (train crossings, etc.) can be dangerous and may result in an accident. LISTENING AT LOUD VOLUME LEVELS IN A CAR MAY ALSO CAUSE HEARING DAMAGE.
MINIMIZE DISPLAY VIEWING WHILE DRIVING.
Viewing the display may distract the driver from looking ahead of the vehicle and cause an accident.
DO NOT DISASSEMBLE OR ALTER.
Doing so may result in an accident, fire or electric shock.
USE ONLY IN CARS WITH A 12 VOLT NEGATIVE GROUND.
(Check with your dealer if you are not sure.) Failure to do so may result in fire, etc.
KEEP SMALL OBJECTS SUCH AS BOLTS OR SCREWS OUT OF THE REACH OF CHILDREN.
Swallowing them may result in serious injury. If swallowed, consult a physician immediately.
USE THE CORRECT AMPERE RATING WHEN REPLACING FUSES.
Failure to do so may result in fire or electric shock.
DO NOT BLOCK VENTS OR RADIATOR PANELS.
Doing so may cause heat to build up inside and may result in fire.
USE THIS PRODUCT FOR MOBILE 12V APPLICATIONS.
Use for other than its designed application may result in fire, electric shock or other injury.

CAUTION
This symbol means important instructions. Failure to heed them can result in injury or material property damage.
HALT USE IMMEDIATELY IF A PROBLEM APPEARS.
Failure to do so may cause personal injury or damage to the product. Return it to your authorized Alpine dealer or the nearest Alpine Service Center for repairing.
DO NOT MIX NEW BATTERIES WITH OLD BATTERIES. INSERT WITH THE CORRECT BATTERY POLARITY.
When inserting the batteries, be sure to observe proper polarity (+ and -) as instructed. Rupture or chemical leakage from the battery may cause fire or personal injury.

PRECAUTIONS
Product Cleaning
Use a soft dry cloth for periodic cleaning of the product. For more severe stains, please dampen the cloth with water only. Anything else has the chance of dissolving the paint or damaging the plastic.
Temperature
Be sure the temperature inside the vehicle is between +60^ (+140^) and -10^ (+14^) before turning your unit on.
Maintenance
If you have problems, do not attempt to repair the unit yourself. Return it to your Alpine dealer or the nearest Alpine Service Station for servicing.
Installation Location
Make sure the eX-10 will not be installed in a location subjected to:
- Direct sun and heat
High humidity and water - Excessive dust
-
Excessive vibrations
-
iPod is a trademark of Apple Inc., registered in the U.S. and other countries.
- The Bluetooth word mark and logos are owned by the Bluetooth SIG, Inc. and any use of such marks by Alpine Electronics, Inc. is under license. Other trademarks and trade names are those of their respective owners.
- "Uni-TypeTM" is a style of Universal design font developed by a joint research between LIM Corporation Ltd., and Chiba University Faculty of Engineering.
- "Uni-Type™" is the trademark registered by LIM Corporation Ltd.
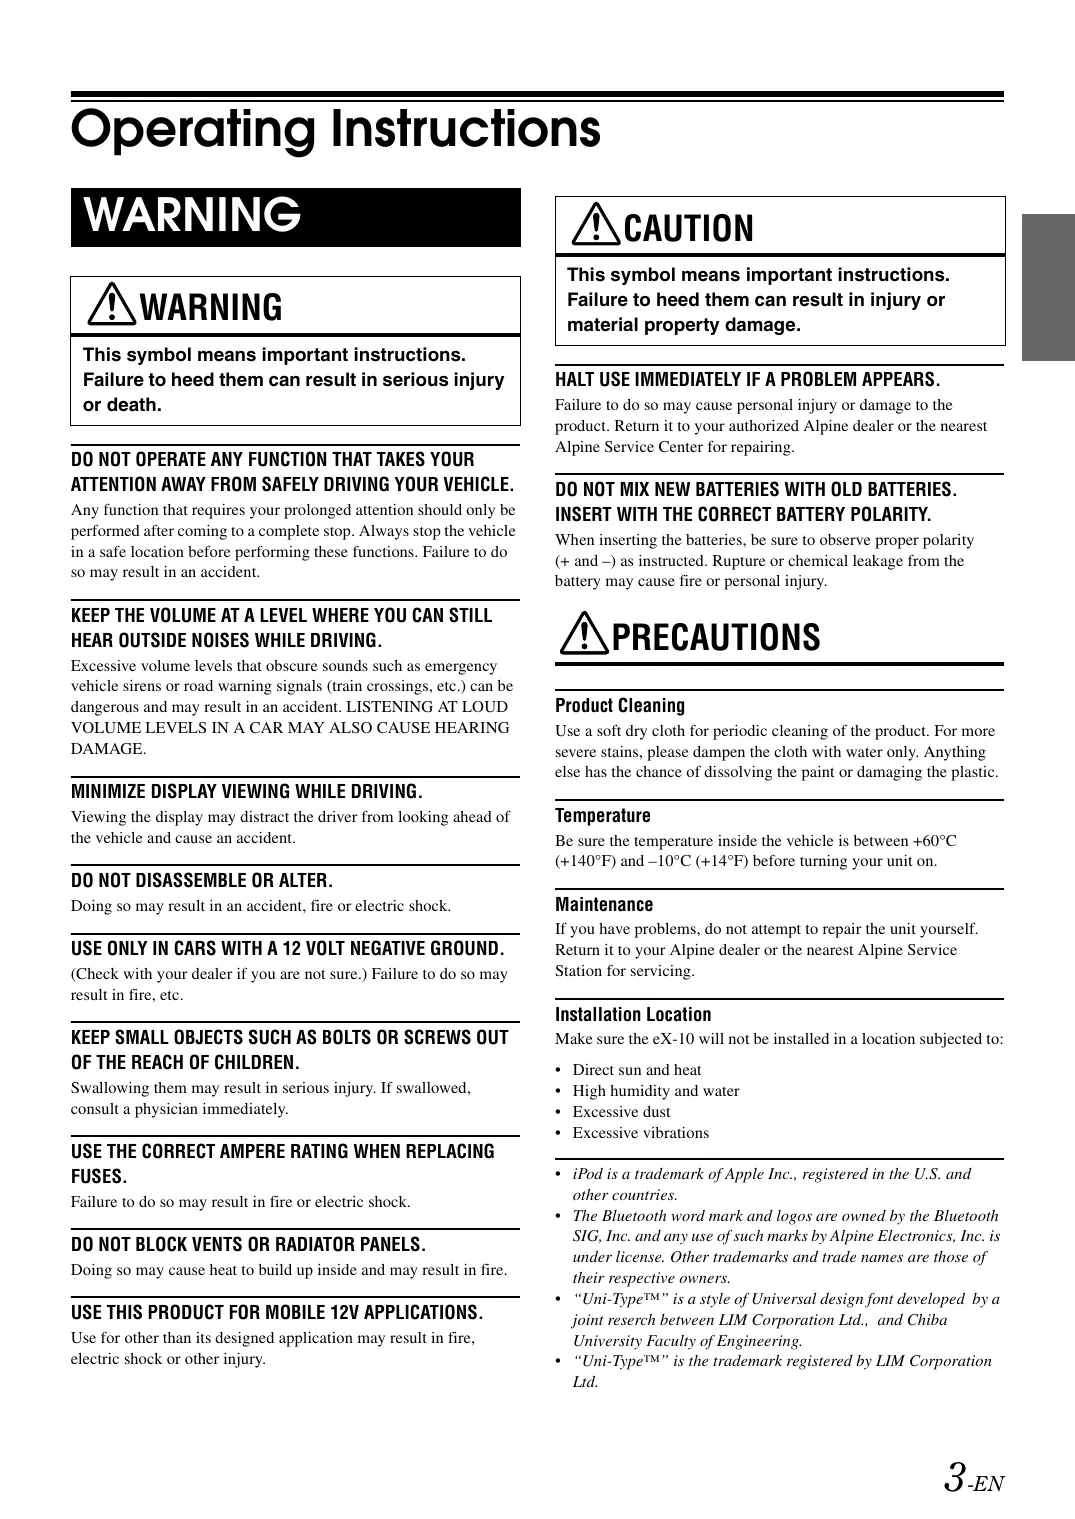
Getting Started
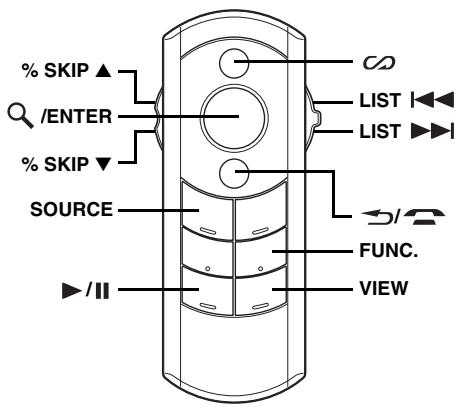
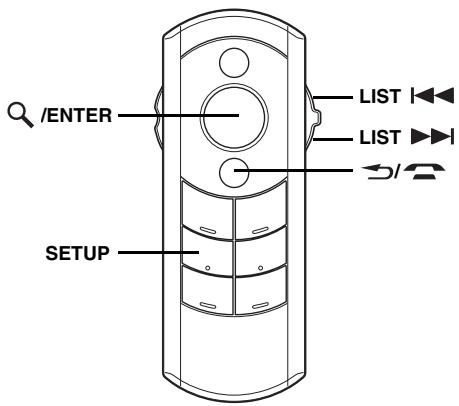
① POWER switch
Turns the power On/Off.
② iPod indicator
Lights up when an iPod is connected.
③ Bluetooth indicator
Lights up when a Bluetooth compatible device is connected.
④ Remote control sensor
Point the remote control towards and within 2m of the remote control sensor of the specified component.
Accessory List
Monitor 1
- Stand 1
Cigarette I/F Box. 1
Monitor Cable (3m) 1
FULL SPEED™ Connection Cable (1m) 1
Cigarette Adapter Extension Cable (1m) 1
Cigarette Adapter 1
- Microphone (3m) 1
Double-sided Adhesive Tape (for stand) 1
- Velcro Fasteners (for cigarette I/F Box) 2
Fixing screws 3
Cable clamps 3
Cloth 1
Remote Control 1
Battery (CR2025) 1
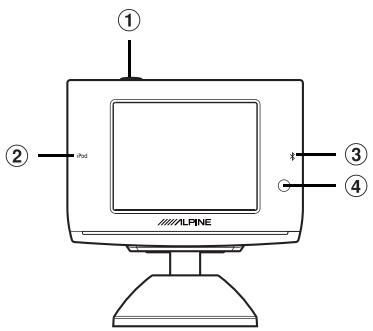
When Using the Remote Control
- Point the remote control at the remote control sensor within about 1 meter.
- It may not be possible to operate the remote control if the remote control sensor is exposed to direct sunlight.
-
The remote control is a small, lightweight precision device. To avoid damage, short battery life, operational errors and poor response, observe the following.
-
Do not subject the remote control to excessive shock.
- Do not put in a trouser pocket.
- Keep away from food, moisture and dirt.
-
Do not place in direct sunshine.
-
If another Alpine device is installed, it will function at the same time as when the unit is controlled by the remote control.
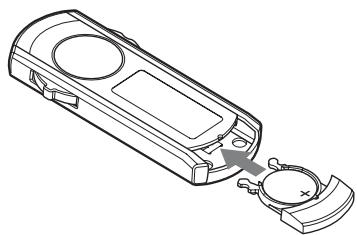
Battery Replacement
Battery type: CR2025 battery or equivalent
1 Opening the battery case
Slide out the battery cover.
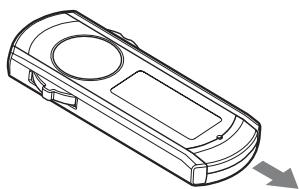
2 Replacing the battery
Put the battery in the case with the (+) indication upward as shown in the illustration.
- Placing a battery in backwards way may cause a malfunction.

WARNING
DO NOT OPERATE ANY FUNCTION THAT TAKES YOUR ATTENTION AWAY FROM SAFELY DRIVING YOUR VEHICLE.
Any function that requires your prolonged attention should only be performed after coming to a complete stop. Always stop the vehicle in a safe location before performing these functions. Failure to do so may result in an accident.
About Slide Switch Operation
Perform the LIST operation by moving the slide switch on the right forward or back . Perform the SKIP operation by moving the slide switch on the left forward or back .
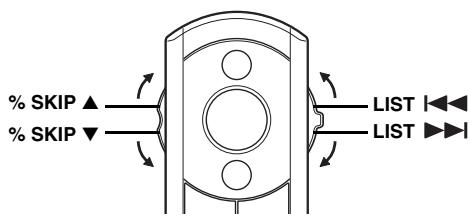
These switches are identified in this manual as follows.
Slide switch on the right: "the LIST switch"
Slide switch on the left: "the %SKIP switch"
Turning Power On and Off
Press the switch of monitor to turn on the unit.
Press and hold the switch of monitor for at least 2 seconds to turn off the unit.
- When an iPod is connected, the power is automatically turned on.
- If the unit is connected, and the power is turned on when the cigarette lighter power is turned on, the battery continues to be consumed. Depending on the vehicle, even if you turn off the engine, the cigarette lighter power is not turned off, and if it is left turned on for long time, the battery may be drained entirely. In this case, disconnect the cigarette adapter. Also, activate the Automatic Power OFF function. Refer to "Automatic Power OFF Function (Auto Poweroff)" (page 15).
Detaching and Attaching the Monitor
For taking the monitor out of the car, refer to step 3 in "Installing the Monitor" (page 19).
How to connect to a Bluetooth compatible device (Pairing)
For details on the control from a Bluetooth compatible device, refer to the Owner's Manual of the Bluetooth compatible device.
1 Press SETUP to activate the SETUP selection mode.
2 Slide the LIST switch in the direction of▶▶ to select "Bluetooth," and then press Q/ENTER.
3 Press ENTER.
The pairing mode is activated, and connection with a Bluetooth compatible device is available.
4 Set a Bluetooth connection from a Bluetooth compatible device.
5 The PIN code (Initial setting "0000") is displayed on this unit.
6 Input the PIN code in a Bluetooth compatible device.
7 If this unit is successfully connected to a Bluetooth compatible device, a paired device name is displayed on the unit.
- For mobile phone pass code (PIN code) input operation, refer to the mobile's Owner's Manual.
- The PIN code (pass code) can be set. Refer to "Setting the PIN Code (Pass Code)" (page 14).
- If a device name is not displayed when a mobile phone is connected, Phone1 to 5 is displayed; when an audio device is connected, Audio1 to 5 is displayed; phone/audios is connected, Device1 to 5 is displayed.
- You can connect (pair) up to 5 Bluetooth compatible mobile phones or audio devices. When a 6^th phone or device is connected, the least used device is automatically disconnected.
- If the unit cannot be connected to a Bluetooth compatible device, "Pairing Failed" is displayed for 2 seconds.
About Sound Output of the Unit
Sound of the unit is output from the FM car radio using the FM transmitter function, or via an audio output terminal. Set sound output in "Setting Sound Output (Output Mode)" (page 15).
If sound is output from the FM radio, refer to "FM Transmitter Function (Frequency)" (page 13), and adjust the frequency accordingly.
When the hands-free phone function is used, you can select whether sound is output from the built-in speaker of the unit. Refer to "Setting the Telephone Voice Output (HFP Speaker)" (page 14).
An iPod can be connected to the eX-10 by using the FULL SPEED™ Connection Cable (supplied).
When the eX-10 is connected by using the cable, the controls on the iPod are not functional.
About iPods usable with this unit
- The unit can be used with the following iPod versions.
Correct function of earlier versions cannot be guaranteed.
First generation iPod classic: Ver.1.0.1
First generation iPod touch: Ver.1.1.1
Third generation iPod nano: Ver.1.0.1
Fifth generation iPod: Ver.1.2.1
Fourth generation iPod: Ver.3.1.1
iPod photo: Ver.1.2.1
Second generation iPod nano: Ver.1.1.3
First generation iPod nano: Ver.1.3.1
iPod mini:Ver.1.4.1
- The unit can be used with the fourth generation and above iPod, iPod photo, iPod mini or the iPod nano only. However, future generation iPod compatibility cannot be guaranteed.
- Touch wheel or scroll wheel type iPods without the dock connector cannot be connected to the unit.
How to View the Display
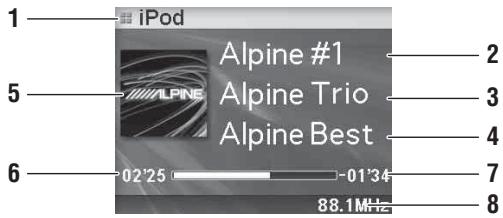
< iPod screen display example>
1 Mode display
2 Song title/Episode title/Audiobook title
3 Album title/Podcast title
4 Artist title/Release date
5 Artwork
6 Elapsed time
7 Remaining time for playing
8 FM transmitter frequency display/AUX display
- Only alphanumeric characters can be displayed.
- The maximum number of characters is 128 (128 byte).
- Some characters may not be correctly displayed.
- If there is no tag information, or there is character information that is not supported by the unit, nothing is displayed.
- If a song includes cover art data, etc., you can display it during playback. Note that while artwork data is being downloaded (max. 6 seconds), no operation can be performed. Elapsed playing time is also not displayed. If you want to display artwork automatically, set to Auto in "Setting Artwork Download (Artwork Display)" (page 16). 2 seconds after playback of a song has started, artwork data automatically starts downloading. If the artwork type is set to "Song" in "Setting Artwork Type (Artwork Type)" (page 16), data downloading is carried out every time a new song is selected.
Playback
1 Press SOURCE to switch to the iPod mode.
2 Slide the LIST switch in the direction of or .
Return to the beginning of the current song:
Slide the LIST switch in the direction of
Fast backward:
Slide and hold the LIST switch in the direction of
Advance to the beginning of the next song:
Slide the LIST switch in the direction of
Fast forward:
Slide and hold the LIST switch in the direction of
3 To pause playback, press /II.
Pressing / again will resume playback.
- If a song is playing on the iPod when it is connected to the eX-10, it will continue playing after the connection.
- For an iPod, if shuffle/repeat is set, even if the iPod is connected to the unit and shuffle/repeat mode is changed, the iPod will return to the original mode when it is removed.
Searching for a desired Song/Title
An iPod can contain thousands of songs. The unit for this reason can make various searches using the search function as shown below.
Using the Playlist/Artist/Album/Podcast/Audiobook/Genre/Composer/ Song search mode's individual hierarchy, you can narrow down your search as shown in the table below.
| Hierarchy 1 | Hierarchy 2 | Hierarchy 3 | Hierarchy 4 |
| Playlists | Songs | — | — |
| Artists | Albums | Songs | — |
| Albums | Songs | — | — |
| Podcasts | Episode | — | — |
| Audiobooks | — | — | — |
| Genres | Artists | Albums | Songs |
| Composers | Albums | Songs | — |
| Songs | — | — | — |
- You can select your preferred search mode. Refer to "iPod Search Mode Setting" (page 16).
For example: Searching by Artist name
The following example explains how an ARTIST search is performed. Another search mode can be used for the same operation, although the hierarchy differs.
1 Press ENTER to activate the Menu Select mode.
2 Slide the LIST switch in the direction of or to select "Artists," and then press /ENTER.
The artist search mode is activated and an artist name is displayed.
3 Slide the LIST switch in the direction of I or to select the desired Artist, and then press ENTER.
The album search mode is activated and an album name is displayed.
After selecting an artist, pressing / will play back all songs of the selected artist.
4 Slide the LIST switch in the direction of I or to select an album, and then press /ENTER.
The song search mode is activated and a song name is displayed.
After selecting an album, pressing /ll will play back all songs of the selected album.
5 Slide the LIST switch in the direction of or to select a song, and then press ENTER.
The selected song is played back.
- While in the search mode, if you press and hold for at least 2 seconds the search mode is canceled.
- In the search mode, pressing will return to the previous mode.
- If the iPod's name is selected in the Playlist search mode and /ENTER is pressed, all songs in the iPod are searchable.
- When a list is displayed, you can use the percent skip function. For details, refer to "Percent Skip Function" (page 7).
- If you slide and hold the LIST switch when a list is selected, you can change the list continuously.
- During the search mode, if "All" is selected and /ENTER is pressed, you can search for all titles in the next hierarchy. For example, if "All" is selected and /ENTER is pressed in the artist mode, a list of all albums is displayed.
Percent Skip Function
The unit is provided with a percent skip function for effective searching. When you use this function in the search mode, you can quickly search an artist or a song, etc.
1 Slide the % SKIP switch in the direction of or . For example, 100 songs are stored in the iPod. These 100 songs are divided into 10 groups (0%, 10% ... 90%).
Percent skip display example
- The percentage of songs stored in the list can be indicated by moving the cursor position. The display example shows 50% .

Cursor
- If you slide and hold the %SKIP switch, you can skip continuously.
Search Position Memory
During iPod playback, you can quickly return to the last-selected hierarchy level in the search mode.
1 Press
The hierarchy you selected last in the search mode is displayed.
- While playing back Shuffle All, search position memory is not available.
Up/Down Function
If you select an album and press / in the search mode, this album will be played back repeatedly. To go to the previous or next Album, use the Up/Down function.
Slide the % switch in the direction of
Returns to the previous item.
Slide the %KIP switch in the direction of\nabla$ .
Advances to the next item.
- If you do not perform a search or only search for a song name or audiobook, this function is not valid.
- During an artist search, albums for that artist can be played.
- If an album is selected during an artist search, the Up/Down function can be used to play other albums by that artist.
- This function is inactive during shuffle playback.
- If you slide and hold the %SKIP switch, you can skip continuously.
Random Play Shuffle
1 Press FUNC.
The Function screen is displayed.
2 Slide the LIST switch in the direction of or to select "Shuffle," and then press /ENTER.
The Shuffle mode is activated.
3 Slide the LIST switch in the direction of or to select the Shuffle playback mode, and then press /ENTER.
Shuffle Album : An album in the iPod is selected at random, and is played back in the album song order.
Song : If you select a song in the search mode, all songs in the selected mode are played back at random.
Off : Shuffle mode off.
4 Press
The songs will be played back in random sequence.
- To cancel, select Off in the above procedure.
- Shuffle Album/Shuffle Song works the same way as iPod Shuffle Albums/Shuffle Songs.
Random Play Shuffle All
Shuffle ALL plays all songs in the iPod randomly.
1 Press
The indicator × ALL lights, and the songs will be played back in random sequence.
To cancel, press again.
- If Shuffle All is selected, the selected ones which are being played back in the search mode are cancelled.
- You can also activate the Shuffle All mode from the Menu Select screen. After pressing ENTER while "Shuffle All" is being selected, press ENTER again.
Repeat Play
1 Press FUNC.
The Function screen is displayed.
2 Press ENTER.
The Repeat mode is activated.
3 Slide the LIST switch in the direction of or to select "Song," and then press ENTER.
Repeat Song : A single song is repeatedly played back.
Off :Repeat mode off.
4 Press 3/6.
The song is repeatedly played back.
- To cancel, select Off in the above procedure.
- During repeat playback, no other songs are selectable by sliding the LIST switch in the direction | | or .
- Both the shuffle and repeat indicators that can be set are displayed, only one song repeats.
Changing the Display
If a song contains cover art data, etc., you can change the current display to show the artwork.
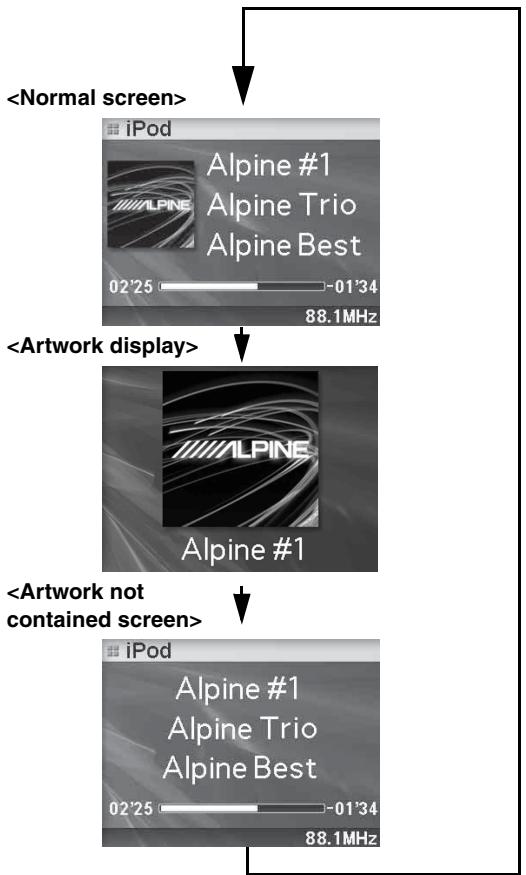
Press VIEW.
- You can set how to download artwork or artwork type. Refer to "Setting Artwork Download (Artwork Display)" (page 16) and "Setting Artwork Type (Artwork Type)" (page 16).
- If Auto is set in "Setting Artwork Download (Artwork Display)" (page 16), artwork is automatically downloaded every time a new song is selected. Artwork is downloaded approx. 2 seconds after starting playback of the song.
- When artwork is downloaded (maximum 6 seconds), no operation can be performed.
Downloading Artwork Data manually
If Manual is set in "Setting Artwork Download (Artwork Display)" (page 16), download artwork data manually.
During iPod playback, press and hold VIEW for at least 2 seconds.
- If there is no artwork data, or artwork data has already been obtained, data cannot be downloaded.
Bluetooth Audio

If a Bluetooth compatible mobile phone, portable player, etc. is connected by wireless, you can play back a song (operation is controllable from the unit).
- To play back audio, a mobile phone or a portable player conforming to A2DP (Advanced Audio Distribution Profile) or AVRCP (Audio/Video Remote Control Profile) is required. Not all functions work with all devices.
- Certain mobile phone features are dependent on the capabilities and setting of your service provider's network. Additionally, certain features may not be available due to the different implementation level of the Bluetooth protocol by the phone manufacturer.
How to View the Display
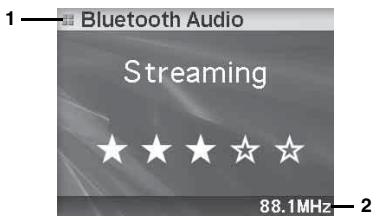
1 Mode display
2 FM transmitter frequency
Playback
1 Press SOURCE to select the Bluetooth Audio mode.
2 Slide the LIST switch in the direction of or
Returning to the beginning of the current track (file):
Slide the LIST switch in the direction of
Advancing to the beginning of the next track (file):
Slide the LIST switch in the direction of I
3 To pause playback, press /II.
Pressing / again will resume playback.
- Depending on the connected devices, pressing SOURCE during pause will start Bluetooth audio playback, then change to the audio mode.
Hands-Free Phone Control

About the Hands-Free Phone
Hands-free calls are possible when using a HSP (Head Set Profile) and HFP (Hands-Free Profile) compatible mobile phone with the eX-10.
- Avoid answering a hands-free call in heavy traffic or on narrow streets where driver attention is demanding.
- To enhance call audio, shut the windows to reduce ambient noises.
- Making or receiving calls in noisy locations reduces the audio quality on both ends of the call.
- Telephone line conditions and other hands-free microphones may cause voices to sound unnatural.
- Certain mobile phone features are dependent on the capabilities and setting of your service provider's network. Additionally, certain features may not be available due to the different implementation level of the Bluetooth protocol by the phone manufacturer.
Always contact your service provider about feature availability and functionality.
All features, functionality, and other product specifications, as well as the information contained in the Owner's Manual are based upon the latest available information and are believed to be accurate at the time of printing.
Alpine reserves the right to change or modify any information or specifications without notice or obligation.
Answering a Call
Incoming calls are announced by the received call ring tone and a displayed message (PHONE No., etc.).
Press
The call starts.
- When "Setting the Received Calls automatically (Auto Answer)" (page 14) is set to ON, you can receive a call automatically.
- While calling, iPod or Bluetooth audio temporarily stops. After calling, playback will resume.
Hanging up the Telephone
Press
The call finishes.
While receiving, you can also hang up by pressing 日 /公
Redial Function
You can redial the person you have previously called.
After finishing a call, press within 5 seconds.
The telephone is redialed.
- If you receive a call from an unknown number, you cannot use the radial function to call back.
Calling
Call History is recorded for up to the last 10 dialed/received/missed calls. There are various ways of making calls based on the "Calling." The following steps 1 to 5 are common to the various ways of making these calls. For details, refer to each individual category for making calls.
1 Press.
The outgoing method list is displayed.
2 Slide the LIST switch in the direction of or to select the outgoing mode.
Setting items :Dialed List / Received List/Missed List/ Phonebook /Phonebook (SIM)
Dialed List : Dialed history
Received List : Received history
Missed List : Missed incoming history
Phonebook : Mobile phonebook
Phonebook (SIM): Mobile phonebook stored in SIM card
3 Press ENTER.
The outgoing mode is activated, and each mode list is displayed.
- It may take some time for the list to be displayed, and also directly after connection, the list may not be brought up to date.
4 Slide the LIST swit
Select a telephone number from the list.
- If sliding the % SKIP switch in the direction of or , you can change a page of the list.
5 Press.
Select the telephone number and dial. If /ENTER is pressed, the selected name or the telephone number is displayed. If /ENTER is pressed again, the telephone will be called.
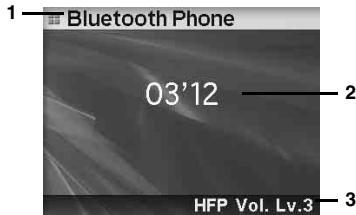
Display example
1 Mode display
2 Call time
3 Receiving Volume
- The names registered in the telephone book are displayed. If the name is not registered, a number is displayed. If both name and number cannot be displayed, “_” will be displayed.
- If you place a call directly from the paired mobile phone, the phone number is not displayed, you cannot redial from the unit in this case.
Redialing a Number In Outgoing History
Previously dialed telephone numbers are stored in dialed calls history. You can redial a number by searching from dialed calls history.
Setting item: Dialed List
Dialing a Number In Incoming History
Telephone numbers from received calls are stored in the Received List. You can redial these numbers by searching here.
Setting item: Received List
Dialing a Number In Incoming Missed Call History
Telephone numbers for received calls that are missed, are stored in the Missed List. You can redial these numbers by searching here.
Setting item: Missed List
Dialing a Number In The Phone Book
Up to 1,000 telephone numbers are downloadable from a mobile phone. Dial a call by selecting a person from the phone book list.
Setting item: Phonebook / Phonebook (SIM)
- If a name cannot be obtained via the phonebook, nothing is displayed.
- The order of the list display depends on the design of the mobile phone.
- If the call history or phonebook of the mobile phone is added or deleted while it is connected to the unit, the list displayed on the unit may not be brought up to date. If it is not updated, you cannot correctly place a call.
Voice Dial Operation
You can call the telephone by performing voice operation.
1 Press and hold for at least 2 seconds.
The speak mode is activated, and "Speak" is displayed.
2 Say the telephone number, name you want to call into the unit.
- You can perform this operation only when a voice dial compatible mobile phone is connected. If the mobile phone is not compatible with the voice dial, "No Support" is displayed for 2 seconds.
- If a called person that you say is not found, "No Call" is displayed for 2 seconds.
- Voice dial operation depends on the function of the mobile phone. For details, refer to the Owner's Manual of the mobile phone.
- If you place a call via voice dial, you cannot display a phone number or name.
Adjusting the Volume when receiving a Call
Set the receiving volume while calling.
1 While calling, press to adjust the volume.
Each press will adjust the volume during a call.
Level1 Level2 Level3 Level4 Level5 Level1
- When the call is finished, return to the volume level you previously set in the SETUP mode. Refer to "Adjusting the volume (HFP Volume)" (page 14).
SETUP
Use the SETUP menu to flexibly customize the unit to suit your own preferences and usage. Choose settings from General, Display, etc., to make the desired changes.
Follow steps 1 to 5 to choose an item to change. See the individual item descriptions following Step 5 for further details.
1 Press SETUP to activate the SETUP selection mode.
2 Slide the LIST switch in the direction of | or to select the desired item, and then press Q/ENTER.
Transmitter Bluetooth Audio General Display iPod (e.g. Select General)
3 Slide the LIST switch in the direction of or to select a setting item, and then press Q/ENTER.
(e.g. Select Beep)
Transmitter:
Frequency
Bluetooth:
Pairing Mode* Paired Phone Paired Audio Clear Devices Pass Code Auto Connect Auto Answer HFP Volume HFP Speaker
Audio:
Factory's EQ
General:
Language Beep Demo Output Mode Auto Poweroff
Display:
Dimmer Level Text Scroll BGV Select
iPod:
Artwork Display Artwork Type Playlist Artist Album Podcast Audiobook Genre Composer Song
- Refer to "How to connect to a Bluetooth compatible device (Pairing)" (page 5).
4 Slide the LIST switch in the direction of or to change the setting, and then press Q/ENTER.
(e.g. Select Beep On or Beep Off.)
5 Press and hold for 2 seconds to return to normal mode.
- Pressing during the procedure will return to the previous mode.
Transmitter Setting
Select Transmitter from the setup main menu in step 2.
FM Transmitter Function (Frequency)
Frequency 88.1-107.9 MHz
You can listen to sound of the unit from the FM car radio. Match the frequency set and stored in the unit with the frequency of the car radio.
Storing a Frequency
1 Slide the LIST switch in the direction of or to select the frequency you want to change, and then press and hold /ENTER for at least 2 seconds.
The frequency setting mode is activated.
2 Slide the LIST switch in the direction of or to tune the desired frequency, and then press ENTER.
The frequency is stored.
- If unit sound is interfered with by other FM radio stations, change to another frequency.
- Recommended frequencies should be more than 0.4MHz from the interfering FM radio station.
Volume is adjusted on the radio side. - When the radio frequency is tuned, automatic radio tuning may continue. In this case, tune the radio station manually.
- Actual transmission reach of the FM transmitter is approx. 1.5m . Depending on placement, you may not be able to listen to the radio. Place the transmitter where radio sensitivity is good.
While setting, pressing 12 will cancel the frequency you previously set.
Recalling the Stored Frequency
Recall the stored frequency.
Slide the LIST switch in the direction of or to select a frequency, and then press /ENTER.
The selected frequency is recalled.
Bluetooth Setting
Select Bluetooth from the setup main menu in step 2.
Setting the Bluetooth Device (Paired Phone/Paired Audio)
- Hands-free phone mode
- Paired Phone Device Name, or Device1 to Device5, Phone1 to Phone5
- Bluetooth audio mode
Paired Audio Device Name, or Device1 to Device5, Audio1 to Audio5
Select one of up to 10 connected Bluetooth compatible devices (5 mobile phones and 5 audio devices) that you previously registered.
You can set hands-free phone or Bluetooth audio in each mode. Select a mobile phone you want to use as a hands-free phone by Paired Phone. Select a device to listen to audio by Paired Audio. You can use both Paired Phone and Paired Audio by selecting the same mobile phone.
Slide the LIST switch in the direction of or to select a Bluetooth compatible device, and then press Q /ENTER.
The selected device is connected.
- If the connection is successfully changed, "Connected/(Device name)" is displayed for 2 seconds, and then the display returns to the SETUP screen.
- If you fail to disconnect the currently connected device, "Disconnecting Failed" will be displayed, and "Connecting Failed" will be displayed in the case of a failed connection.
- The connected device name is displayed at the top of the list.
Deleting a Bluetooth Device from the list (Clear Devices)
Clear Devices Device Name, or Device1 to Device5, Phone1 to Phone5, Audio1 to Audio5
You can delete the history of a previously connected Bluetooth compatible device.
Slide the LIST in the direction of or to select the Bluetooth compatible device to be deleted, and then press ENTER.
Registration of the selected device is deleted.
Setting the PIN Code (Pass Code)
Pass Code 0000 (Initial setting) ~ 9999
Set the PIN code (pass code) to use as a recognition key when Bluetooth communication is performed.
1 Select a digit to set by sliding the LIST switch in direction of or , and then press Q/ENTER.
The selected digit setting mode is activated.
2 Select a number by sliding the LIST switch in direction of or , and then press Q/ENTER.
The selected number is entered.
3 Set each 4 digit PIN code by repeating step 1 and 2.
While setting, pressing will cancel the number you previously set.
Setting the Automatic Connection (Auto Connect)
Auto Connect On (Initial setting) / Auto Connect Off
When ACC is turned on, set whether the Bluetooth device already registered in the unit is automatically connected or not.
On : Devices are automatically connected.
Off : Devices are not automatically connected.
Setting the Received Calls automatically (Auto Answer)
Auto Answer On / Auto Answer Off (Initial setting)
When a call is received, you can set whether to answer it automatically or not.
On : When a call is received, it will be answered automatically.
Off : When a call is received, it will not be answered automatically. Press to answer a call.
- Even if this setting is set to ON/OFF, the received call setting on the mobile phone takes priority.
Adjusting the volume (HFP Volume)
HFP Volume Level1 to Level 5 (initial setting:Level 3)
Slide the LIST switch in the direction of or to select a level, and then press /ENTER.
The receiving volume is set.
- You may need to increase volume from your regular audio listening source level. However, increasing the volume excessively may result in feedback. If feedback is noticed as feedback is directly related to the volume, turn down the volume as low as acceptable to eliminate it. Positioning the microphone in a direction away from the main car speakers (e.g. clipped on sunvisor) may also reduce feedback at high volume.
Setting the Telephone Voice Output (HFP Speaker)
HFP Speaker Internal (Initial setting)/External
Set how to output the mobile phone voice during a call.
Internal : Voice is output from the built-in speaker of the unit.
External : Voice is output from an external device (FM transmitter, or device connected to the audio output terminal).
Audio Setting
Select Audio from the setup main menu in step 2.
Equalizer Presets
Factory's EQ Flat (Initial setting) / Pops / Rock / News / Jazz / Blues / Electrical Dance / HipHop / Rap / Easy Listening / Country / Classical
9 typical equalizer settings are preset at the factory for a variety of musical source material.
Slide the LIST switch in the direction of or to select the desired equalizer characteristic, and then press ENTER.
General Setting
General is selected on the setup main menu in step 2.
Setting the Language
For US (Initial setting) / For EU1 / For EU2 / For JPN / OTHER
Set the language to be displayed on the unit. Set to For EU1 or EU2 to use the setting.
For US : English, French, Spanish
For EU1 : Russian, English
For EU2 : English, German, French, Spanish, Italian, Swedish, Portuguese
For JPN : Japanese, English
OTHER : Chinese (Chinese standard), English
Sound (Beep) Guide Function
Beep On (Initial setting) / Beep Off
This function will give audible feedback with varying tones depending upon the button pressed.
Demonstration
Demo On / Demo Off (Initial setting)
This unit has a Demonstration feature for the display.
- To quit Demo mode, set to Demo OFF.
Setting Sound Output (Output Mode)
Transmitter (Initial setting) / Wire Transmitter / AUX
When an iPod or Bluetooth audio is played back, set how to output sound.
Transmitter : Output sound using FM transmitter
Wire : Set when an optional FM Switching Box is
Transmitter connected and the transmitter function is used.
AUX : Output sound from an audio output terminal
- Depending on regulations, an optional FM Switching Box may be required. Consult your dealer.
Automatic Power OFF Function (Auto Poweroff)
60 min / 90 min / 120 min / Off (Initial setting)
Depending on the vehicle, even if the engine is turned off, the cigarette lighter may not be turned off. If the cigarette lighter is left turned on, the battery may be drained entirely. To prevent battery drainage, the unit has an Automatic Power OFF function that automatically turns the unit off when no operation performed for a certain period of time. Set this time to your preference.
60 min / 90 min / 120 min : if no operation is performed for 60 min. / 90 min. /120 min. the unit power is automatically turned off.
Off : Do not use the Auto Power OFF function.
Display Setting
Display is selected on the setup main menu in step 2.
Adjusting the Level of the Display Brightness (Dimmer Level)
Dimmer Level - 7 to + 7 (Initial setting: 0)
You can change the display brightness. You can use this function when the display is too bright while driving at night.
Slide the LIST switch in the direction of or .
: Display becomes darker.
: Display becomes brighter.
Scroll Setting (Text Scroll)
Text Scroll On / Text Scroll Off (Initial setting)
You can set a scroll type such as song title or file name on the source screen. If the search mode screen displays fills with text, the display scrolls.
Text Scroll On : Text information is scrolled automatically.
Text Scroll Off : The first display scrolls text information one time only.
- In parts of the display, scrolling may not occur, or scroll content may differ.
- Regardless of this setting, if the display is filled with text, the display scrolls.
Switching the Display Type (BGV Select)
BGV Select Type 1 (Initial setting) / Type 2 / Type 3
You can select your favorite display for background from 3 types.
iPod Setting
iPod is selected on the setup main menu in step 2.
Setting Artwork Download (Artwork Display)
Artwork Display Auto (Initial setting) / Artwork Display Manual
Download artwork in an iPod, and set whether artwork is displayed or not. Set when you use a First generation iPod classic, First generation iPod touch, First generation / Second generation / Third generation iPod nano, Fifth generation iPod.
Auto : During playback, downloads artwork automatically.
Manual : Download artwork manually.
Setting Artwork Type (Artwork Type)
Artwork Type Album (Initial setting) / Artwork Type Song
You can set the downloaded artwork type.
Album : Displays album artwork if a song contains the same album, artwork of the first song played back is displayed for all songs.
Song : Downloads artwork for every song, and display.
iPod Search Mode Setting
On/Off
The unit allows you to search for the iPod using eight different search modes.
When the search mode is in Playlists/Artists/Albums/Podcasts/
Audiobooks, the initial setting is On, and when the search mode is in
Genres/Composers/Songs, the initial setting is Off.
- For search mode details, refer to "Searching for a desired Song/ Title" (page 7).
Information
In Case of Difficulty
If you encounter a problem, please turn the power off, then on again. If the unit is still not functioning normally, please review the items in the following checklist. This guide will help you isolate the problem if the unit is at fault. Otherwise, make sure the rest of your system is properly connected or consult your authorized Alpine dealer.
Basic
No function or display.
- Vehicle's ignition is off.
- If connected following instructions, the unit will not operate with the vehicle's ignition off.
- Blown fuse.
- Check the fuse of the unit; replace with the proper value if necessary.
iPod
iPod does not play and no sound is output.
- The iPod has not been recognized.
- Reset the iPod. To reset the iPod, refer to the Owner's Manual of the iPod.
Indication for iPod Mode
No iPod
-
The iPod is not connected.
-
Make sure the iPod is correctly connected (refer to "Connections").
Make sure the cable is not bent excessively.
No Song
- There are no songs in the iPod.
- Download songs to the iPod and connect to this unit.
Error 01
-
Communication error
-
Turn the ignition key off, and then set to ON again.
- Check the display by reconnecting between the iPod and this unit, using the FULL SPEED™ Connection Cable.
Error 02
- Caused by the iPod Software Version not being compatible with this unit.
- Update the iPod Software Version to be compatible with this unit.
Bluetooth mode
No Unit
- The Bluetooth device is not connected.
- Connect the Bluetooth device.
Specifications
BLUETOOTH SECTION
| Bluetooth Version | Bluetooth 1.2 CERTIFIED |
| Output Power | +4 dBm Max. (Power class 2) |
| HFP | (Hands-Free Profile) |
| HSP | (Head Set Profile) |
| A2DP | (Advanced Audio Distribution Profile) |
| AVRCP | (Audio/Video Remote Control Profile) |
REMOTE CONTROL
Battery Type CR2025 battery
Width 36 mm (1-7/16")
Height 100 mm (3-15/16")
Depth 12.4 mm (15/32")
Weight 31g(1.09oz)
(battery excluded)
GENERAL
Power Requirement 14.4 V DC (11-16 V allowable)
Maximum Pre-Output Voltage AUX 1200mV
CHASSIS SIZE (Monitor section)
Width 78.6 mm (3-1/16")
Height 55.7 mm (2-1/4")
Depth 20.2 mm (25/32")
Weight 78 g (2.75 oz) (Monitor)
60g (2.12 oz) (Stand)
CHASSIS SIZE (I/Fbox)
Width 58.7 mm (2-5/16")
Height 27.7 mm (1-1/8")
Depth 85.5mm (3-3/8")
Weight 72 g (2.54 oz)
- Due to continuous product improvement, specifications and design are subject to change without notice.
Installation and Connections
Before installing or connecting the unit, please read the following and page 3 of this manual thoroughly for proper use.

Warning
MAKE THE CORRECT CONNECTIONS.
Failure to make the proper connections may result in fire or product damage.
USE ONLY IN CARS WITH A 12 VOLT NEGATIVE GROUND.
(Check with your dealer if you are not sure.) Failure to do so may result in fire, etc.
BEFORE WIRING THE ANTENNA CABLE ON THE CAR SIDE, DISCONNECT THE CABLE FROM THE NEGATIVE BATTERY TERMINAL.
Failure to do so may result in electric shock or injury due to electrical shorts.
DO NOT SPLICE INTO ELECTRICAL CABLES.
Never cut away cable insulation to supply power to other equipment. Doing so will exceed the current carrying capacity of the wire and result in fire or electric shock.
DO NOT DAMAGE PIPE OR WIRING WHEN DRILLING HOLES.
When drilling holes in the chassis for installation, take precautions so as not to contact, damage or obstruct pipes, fuel lines, tanks or electrical wiring. Failure to take such precautions may result in fire.
DO NOT USE BOLTS OR NUTS IN THE BRAKE OR STEERING SYSTEMS TO MAKE GROUND CONNECTIONS.
Bolts or nuts used for the brake or steering systems (or any other safety-related system), or tanks should NEVER be used for installations or ground connections. Using such parts could disable control of the vehicle and cause fire etc.
KEEP SMALL OBJECTS SUCH AS BOLTS OR SCREWS OUT OF THE REACH OF CHILDREN.
Swallowing them may result in serious injury. If swallowed, consult a physician immediately.
DO NOT INSTALL IN LOCATIONS WHICH MIGHT HINDER VEHICLE OPERATION, SUCH AS THE STEERING WHEEL OR SHIFT LEVER.
Doing so may obstruct forward vision or hamper movement etc. and results in serious accident.
DO NOT INSTALL THE MONITOR NEAR THE PASSENGER SEAT AIR BAG.
If the unit is not installed correctly the air bag may not function correctly and when triggered the air bag may cause the monitor to spring upwards causing an accident and injuries.

Caution
HAVETHEWIRINGANDINSTALLATIONDONEBYEXPERTS.
The wiring and installation of this unit requires special technical skill and experience. To ensure safety, always contact the dealer where you purchased this product to have the work done.
USE SPECIFIED ACCESSORY PARTS AND INSTALL THEM SECURELY.
Be sure to use only the specified accessory parts. Use of other than designated parts may damage this unit internally or may not securely install the unit in place. This may cause parts to become loose resulting in hazards or product failure.
ARRANGE THE WIRING SO IT IS NOT CRIMPED OR PINCHED BY A SHARP METAL EDGE.
Route the cables and wiring away from moving parts (like the seat rails) or sharp or pointed edges. This will prevent crimping and damage to the wiring. If wiring passes through a hole in metal, use a rubber grommet to prevent the wire's insulation from being cut by the metal edge of the hole.
DO NOT INSTALL IN LOCATIONS WITH HIGH MOISTURE OR DUST.
Avoid installing the unit in locations with high incidence of moisture or dust. Moisture or dust that penetrates into this unit may result in product failure.
Precautions
- If an antenna cable on the car side is used: be sure to disconnect the cable from the (-) battery post before installing your eX-10. This will reduce any chance of damage to the unit in case of a short-circuit.
- When making connections to the vehicle's electrical system, be aware of the factory installed components (e.g. on-board computer). Do not tap into these leads to provide power for this unit. When connecting the eX-10 to the fuse box, make sure the fuse for the intended circuit of the eX-10 has the appropriate amperage. Failure to do so may result in damage to the unit and/or the vehicle. When in doubt, consult your Alpine dealer.
IMPORTANT
Please record the serial number of your unit in the space provided below and keep it as a permanent record. The serial number or the engraved serial number is located on the bottom of the unit.
SERIAL NUMBER:
INSTALLATION DATE:
INSTALLATION TECHNICIAN:
PLACE OF PURCHASE:
Installation
Installing the Monitor

CAUTION
Do not install the monitor near the front passenger seat air bag system.
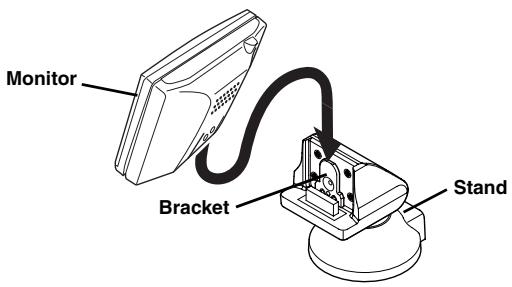
1 Install the monitor on the stand securely.
Install the monitor on the stand by aligning its back through the bracket of the stand.
2 Check the mounting location.
① Temporarily fasten the stand with adhesive tape.
② Adjust to a safe, viewable position.
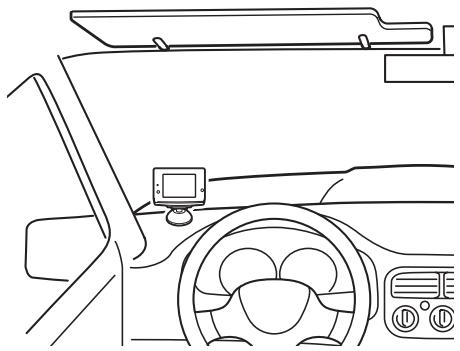
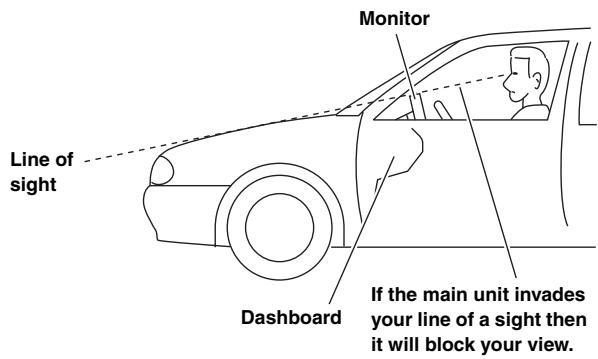
In order to use safely, attach to the following places.
- Stable and secure places.
- Places that will not have your view blocked by the main unit when driving.
- Places that you will not hit against if you lean forward while you wearing your seatbelt.
-
Places where the main unit cannot hit against the steering wheel while driving.
-
Be aware that if the surface of the dashboard is leather, wooden panel, stretched fabric or any non-resin based product, then the surface will be damaged when you remove the stand.
- Do not place the main unit directly in front of the air conditioner vents.
3 Remove the monitor from the stand.
- When you take the monitor out of the car, remove the monitor from the stand by referring to step 3. When you install the monitor, refer to step 1.
4 Install the stand using the supplied double-sided adhesive tape. Remove any dirt on the surface to install, using the supplied cloth.
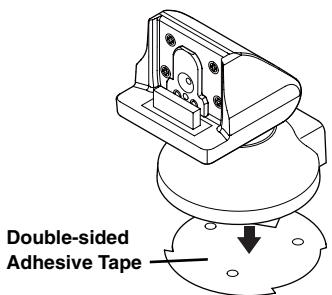
- If the temperature in the car is low (Winter), then first heat up the place where you are going to stick the mount with a hairdryer, etc.
- Do not apply force to the mount, or expose to humidity, within 24 hours after attaching.
- If the mount is not firmly stuck, then we recommend that you attach with the supplied fixing screws. (For installation, refer to page 20.)
5 Connect the stand to the monitor cable.
6 Attach the monitor to the stand as shown in step 1. Use the cable clamps to fix the cables.
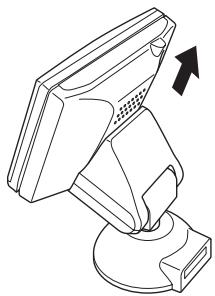
- Before using, check that the monitor and stand assembly is mounted securely at the chosen mounting location.
- Do not adjust the angle of the monitor with excessive force.
Mounting the Microphone
For the sake of safety, mount the microphone in the following location.
- In a stable and secure location.
- In a location that does not inhibit safely driving the vehicle.
- Mount the microphone in a location where the driver's voice can easily be picked up.
Choose a location for the microphone that can easily pick up the drivers voice. Requiring the driver to move towards the microphone for audibility causes a distraction that could be dangerous.
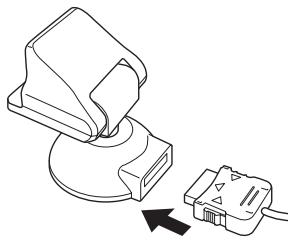
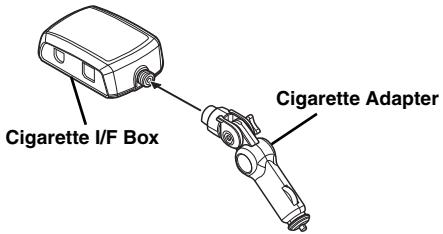
Connecting the Cigarette Adapter to the Cigarette I/F Box
If the cigarette adapter is directly connected:
If the cigarette adapter is connected using the cigarette adapter extension cable:
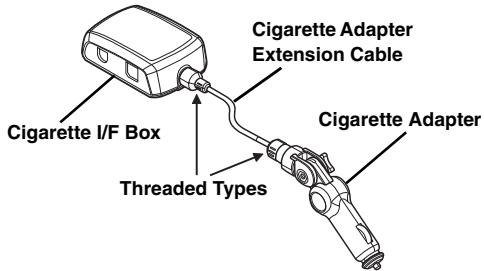
- Install the cigarette I/F Box:
- Install the cigarette I/F Box in a safe location using the supplied Velcro Fasteners (2 pieces).
Installing the Stand using Screws fixed
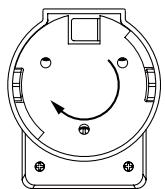
1 Remove the bottom cover from the stand by turning it in the direction of the arrow mark.
Stand Bottom Side
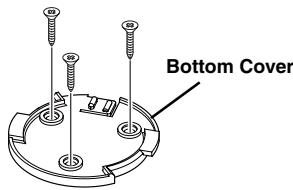
2 Attach the bottom cover using the supplied screws.
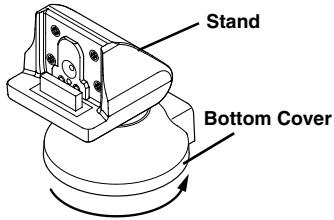
3 Attach the stand by turning it to the direction arrow marks until it locks.
How to remove the Fuse
The fuse (2A) is built into the cigarette adapter.
1
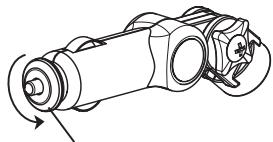
Remove it by turning (Threaded Type)
2
Remove the projection part.
3

Remove the fuse.
- There are two types of connections to output sound. Only one connection type is valid at one time. Make the selection as shown below.
1 When “AUX” is set in “Setting Sound Output (Output Mode)” (page 15), connect to a device with an external input.
2 Depending on regulations, an optional FM Switching Box may be required. Consult your Alpine dealer.
If the FM Switching Box is connected, set to "Wire Transmitter" in "Setting Sound Output (Output Mode)" (page 15).
*3 FUSE (2A) is built-in.
- Do not mount the Cigarette lighter I/F Box where it might be stepped upon. Excessive pressure can damage the box.
- Depending on the mounting location of the Cigarette lighter I/F Box, noise interference is possible. When using a Bluetooth compatible device, if noise or a malfunction occurs when sending or receiving data, mount the I/F Box in another location.
- Before using, check that the monitor and stand assembly is mounted securely at the chosen mounting location.