
SQ-19 - Screen AG Neovo - Free user manual and instructions
Find the device manual for free SQ-19 AG Neovo in PDF.


| Type | Monitor |
| Brand | AG Neovo |
| Model | SQ-19 |
| Screen Size | 19 inches (48.3 cm) |
| Resolution | 1280 x 1024 (SXGA) |
| Aspect Ratio | 5:4 |
| Panel Type | TN |
| Response Time | 5 ms |
| Brightness | 250 cd/m² |
| Contrast Ratio | 1000:1 |
| Viewing Angles (H/V) | 170° / 160° |
| Inputs | VGA, DVI-D |
| Power Consumption (typical) | 25 W |
| Standby Power | <1 W |
| VESA Mount | 100 x 100 mm |
| Weight (with stand) | 4.5 kg |
| Dimensions (WxHxD) | 412 x 412 x 180 mm |
| Color | Black |
| Built-in Speakers | No |
| Features | Auto-adjust, OSD controls, Kensington lock |
| Certifications | CE, FCC, RoHS, Energy Star |
| Package Contents | Monitor, power cable, VGA cable, DVI cable, user manual |
| Warranty | 3 years limited |
Frequently Asked Questions - SQ-19 AG Neovo
User questions about SQ-19 AG Neovo
0 question about this device. Answer the ones you know or ask your own.
Ask a new question about this device
Download the instructions for your Screen in PDF format for free! Find your manual SQ-19 - AG Neovo and take your electronic device back in hand. On this page are published all the documents necessary for the use of your device. SQ-19 by AG Neovo.
USER MANUAL SQ-19 AG Neovo
Important safeguards.... 2
Introduction.... 4
Features 5
Assembling the monitor.... 6
Wall hanging Standard 7
The function of the interface .... 7
Front panel controls ....... ... ...8
Control panel 8
Changing a monitor parameter....9
Hot keys .... 9
Adjustment procedure 10
OSD function.... 11
Self-diagnosis.... 26
Troubleshooting.... 27
Specifications.... 28
IMPORTANT SAFEGUARDS
1. Installation cautions
- Do not block any ventilation openings.
- Always ensure that the monitor is located in a well-ventilated area to prevent the unit from overheating.
- Only use accessories specified by the manufacturer or those sold with the product
- Avoid operating or placing the monitor in the following environments: extremes of temperatures, both hot and cold; high humidity; direct sunlight; excessively dusty surroundings; avoid close proximity to other equipment that generates a strong magnetic field
2. Water and moisture
Do not use this appliance near water. To reduce the risk of fire or electric shock, do not expose this unit to rain or moisture.
3. Power cord and power cord protection
Power cords should be routed so that they not likely to be walked on or pinched. Pay particular attention to the location of cords and plugs, convenience receptacles, and the point of exit from the appliance.
4. Product care
Do not touch the screen directly with fingers. The oils from your skin may leave marks on the surface of the screen, which are difficult to be removed and may damage the screen permanently. Do not apply pressure to the screen.
5. Cleaning
Clean only with a dry cloth.
6. Servicing
Do not attempt to service this unit yourself. Opening or removing covers may expose you to dangerous voltage or other hazards. Refer all servicing to qualified service personnel.
7. Lightning
For added protection during a lighting storm or when this unit is left unattended and unused for long periods of time, unplug the unit from the wall outlet and disconnect the cable system. This will prevent damage to the unit due to lightning and power line surges.
IMPORTANT SAFEGUARDS
8. Mains plug (2 pin/3 pin)
- Do not remove the grounding or earth connection from the power supply / mains plug.
- Always remember to unplug the monitor from the power supply under the following circumstances if the monitor will not be used for a long period of time, if the power supply cable or plug/connector is damaged or if the monitor housing is damaged or broken.
CAUTION: Do not attempt to dismantle this product. Any attempt to dismantle or remove the covers from this product will invalidate the warranty and may also result in serious injury.
INTRODUCTION
This manual explains how to correctly install, operate and get the best performance from your monitor. Please read this user manual carefully before installing your monitor then keep it near your monitor for quick reference. First, please check that the contents of the box correspond with the following checklist:
- LCD monitor
- Power cord
- Audio cord
- VGA cable
- AC adaptor
- User manual
If any item is missing or damaged, please contact your dealer. Please keep the box and packing materials so that you may properly store or transport your monitor.
- The monitor is designed for use in a small work area or for those who need more work space on the desk.
- The convenient and user-friendly onscreen display allows for easy and accurate adjustments of screen size, position and screen color.
- The monitor complies with the VESA Display Data Channel (DDC) specification for Plug and Play compatibility. Advanced microcircuitry makes setup and configuration fast and effortless.
- The monitor features Advanced Color Controls for fine-tuning to meet your own personal tastes or application requirements. Use the on-screen controls to adjust the color temperature,
- RGB gain value for the best possible screen color and intensity.
- Press the Menu button and activate the Self-Diagnosis menu to determine whether your monitor is functioning normally, not receiving a signal or is receiving a signal that is out of scanning range.
- Activate the higher refresh rates of the monitor to stabilize the screen and eliminate the annoying flicker that contributes to eye-strain and headaches.
- The monitor supports the optimal display performance with 1280x1024 @ 60 Hz (SQ-17/SQ-19 Model) and 1920x1080 @ 60 Hz (SQ-22 Model)
- The monitor can be connected to various types of video devices with supporting video input signals such as Composite video (CVBS), and Separate video.
- The internal stereo speakers produce a good quality audio sound.
ASSEMBLING THE MONITOR
The monitors are designed for use on a desktop.
The arm of the monitor stand is shipped preinstalled on the monitor.
To assemble the monitor:
-
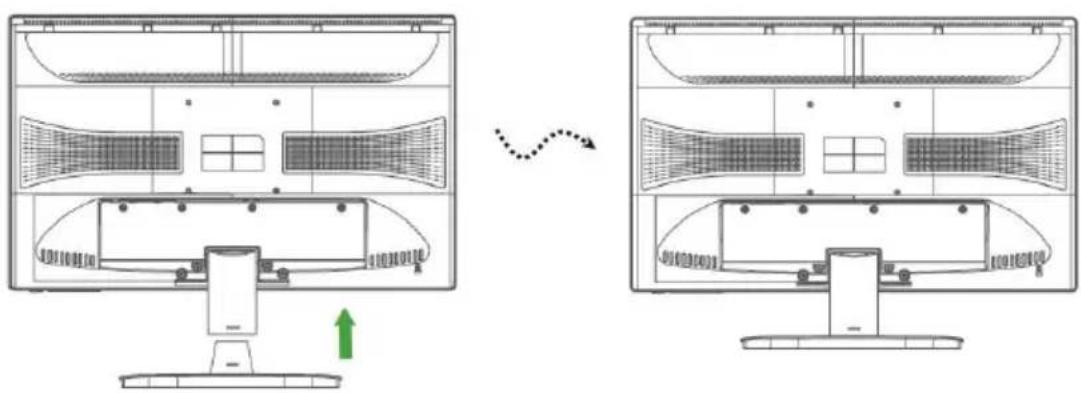
Put a smooth pad or cloth on a level surface. Place the monitor on it facing downwards.
-
Insert the arm of the monitor stand of the monitor into the pedestal foot provided. See figures below.
natural_image
Technical line drawing of a computer monitor with side panels and top view, showing structural changes (no text or symbols)To disassemble the monitor:
- Put a smooth pad or cloth on a level surface. Place the monitor on it facing downwards.
- Shrapnel with fingers or similar objects hold the base below, carefully detach the supporting arm from the foot by pressing the groove on the back of the supporting arm. (Note that the fixation point can be broken if too much force is applied). See figures below.

WALL HANGING STANDARD

The monitor's installation surface is compatible with other types of VESA standard stands.
Hole spacing: 100 x 100 mm
Screw length: 8 to 12 mm
The function of the interface

- DC 12V Input。
- VIDEO VIDEO signal output。
- VIDEO VIDEO signal Input。
- RCA L: AUDIO signal input left.
RCA AUDIO5. AUDIO signal out Right.
- STEREO Input: AUDIO signal input。
- STEREO Out: AUDIO signal out。
- USB: Service port。
- HDMI: HDMI signal input
- VGA: RGB signal input。
FRONT PANEL CONTROLS
Control panel

1. POWER indicator
Show both normal operation and power management status with power LED
2. POWER
Switch the monitor on and off.
3. MENU
Turn the OSD window on.
Secondary Function: Turns the OSD window off and moved from sub menu to top menu in the OSD window.
4. ◀ (Left Arrow (\*))
Primary Function: Used to adjust the volume.
Secondary Function: Moves cursor to the down in the OSD window and decreases the value of any selected menu.
5. ▶ (Right Arrow (\*))
Primary Function: Used to select from different input source.
Secondary Function: Moves cursor to the up in the OSD (On-Screen Display) window and increases the value of any selected menu.
6. AUTO (\*)
Primary Function: Automatically adjusts the display to the most optimal setting possible. (VGA mode only)
Secondary Function: Selects sub menu.
FRONT PANEL CONTROLS
Changing a monitor parameter
- Press the MENU button on the front panel to obtain the OSD menu screen.
- Use LeftRight buttons to select the menu.
- Use AUTO button to select the submenus.
- Use Left - Right buttons to select a submenu function.
- Press AUTO button, then using left-right buttons you can make adjustments as necessary.
- To exit, press MENU.
Hot keys
| ▶Right Arrow | When there is no OSD, to select input signal source.CAM-VGA-HDMI |
| ◀Left Arrow | When there is no OSD, you can adjust the volume directly. |
| AUTO | Automatically choose the correct horizontal and vertical position and the size of the screen image (VGA only). |
ADJUSTMENT PROCEDURE

flowchart
graph TD
    A["Perform auto tracking"] --> B{Is the H size correct?}
    B -->|No| C["Adjust the CLOCK control"]
    C --> D["Perform the H-V position"]
    B -->|Yes| E{Is noise displayed on-screen}
    E -->|Yes| F["Adjust PHASE until screen is cleared"]
    E -->|No| G["End"]
    F --> H{Is noise still displayed on-screen?}
    H -->|Yes| G
OSD FUNCTION
Configure the monitor using the on-screen display (OSD) menus and submenus.
Changes are immediately saved and implemented.
VGA menu
Video

(Advanced Control)

(Auto Config)
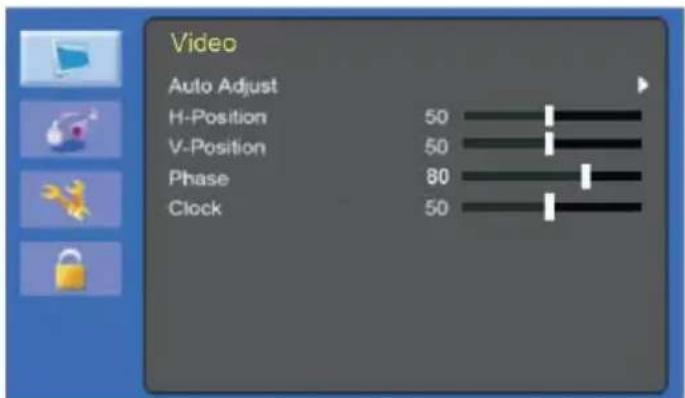
OSD FUNCTION
1. Brightness
Adjust the brightness of the image.
2. Contrast
Adjust the contrast of the image, the difference between light and dark areas on the screen.
3. Color Temperature
Choose a different preset color temperature or set your own customized color parameters.(Normal/ Warm/ Cool/ User).
4. Advanced Setting
4-1 Noise Reduction
4-2 DCR (not support)
4-3 DCC (not support)
5. Auto Config
5-1 Auto adjust Automatically choose the correct horizontal position and vertical position and size of the screen image.
5-2 H-Position Adjust the position of the display horizontally (left or right). 5-3 V-Position Adjust the position of the display vertically (up or down).
5-4 Phase Remove any horizontal noise and clear or sharpen the image of the characters. 5-5 Clock Adjust the width (horizontal size) of the screen image.
6. Auto Color
Operate the white balance and automatically adjust the color settings. (Available only during VGA input source signal)
OSD FUNCTION
● Sound
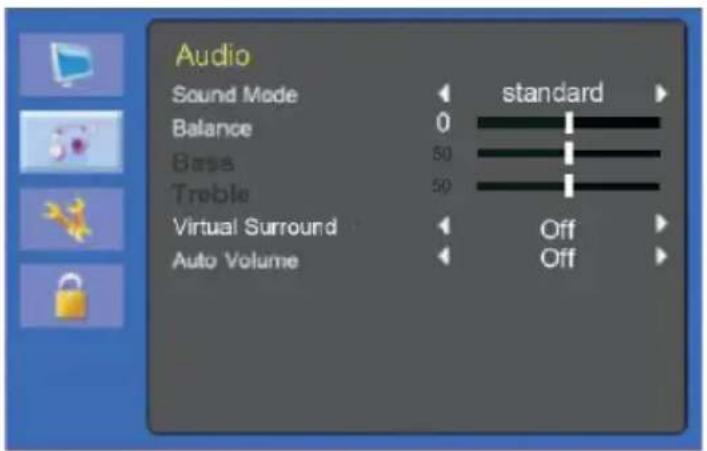
1. Sound Mode
Choose a different preset sound mode or your own customized sound. (Standard/ Speech/ Music/ Personal)
2. Balance
Adjust the sound balance of the left and right speakers.
3. Bass
When you select User mode, adjust the bass sound.
4. Treble
When you select the user mode, adjust the treble sound.
5. Virtual Surround
Provide an enhanced listening experience.
6. Auto Volume
Automatically remains at the same volume level if you change the program.
OSD FUNCTION
- Setting
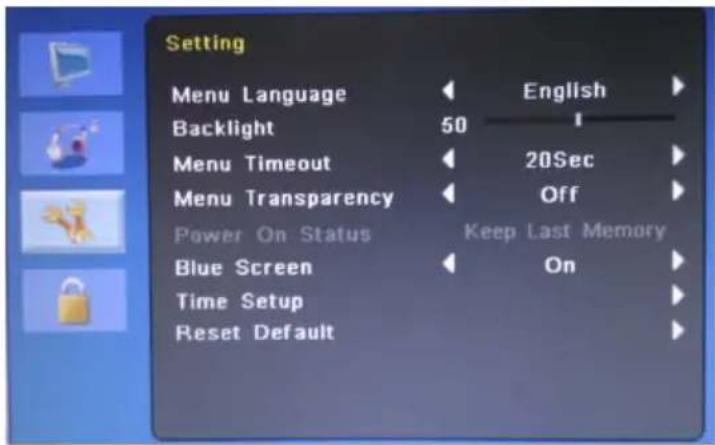
(Time setting)

1. Menu Language
Select language for the OSD.
2. Backlight
Adjust the brightness of the image.
3. Menu Time out
Adjust the display of the OSD menu (20 to 60 seconds).
4. Menu Transparency
Adjust the OSD transparency.
5. Power On Status (Not used)
6. Blue Screen
When there is no signal input, select the blue background color.
OSD FUNCTION
7. Time Setting
7- 1 Time
Not used.
7-2 Power Saving (ON/OFF)
Set Power Saving ON/OFF.
7-3 ANTI-BURN-IN
7-4 ENABLE(ON/OFF)
Anti Burn In Switch ON/OFF
7-5 INTERVAL
Anti Burn In Time (4Hours/ 5Hours/ 6Hours/ 8Hours)
7-6 Anti Burn Type (A/B/C)
8. Reset Default
Reset the screen to the factory preset display settings.
Child Lock

1. Keypad Lock
Turn the keypad lock on or off.
Keyboard lock unlock method: Long press "MENU" key for about 8 seconds, can be unlocked.
OSD FUNCTION
Cam menu
Video
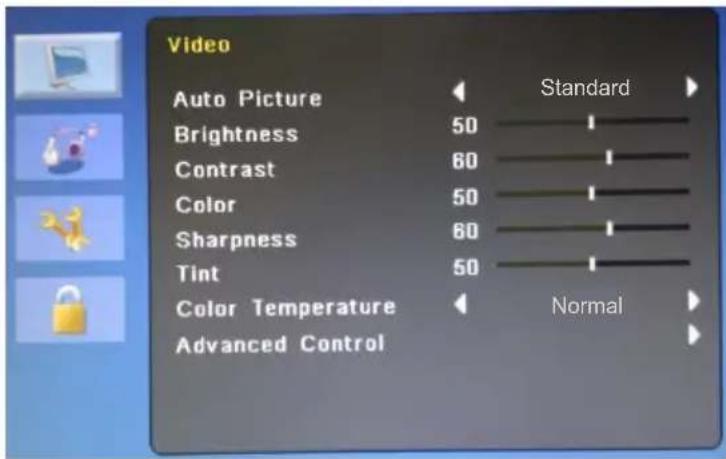
(Advanced Control)

1. Auto Picture
Select the picture mode (Standard/Movie/ECO/Personal/Vivid).
2. Brightness
Adjust the brightness of the image.
3. Contrast
Adjust the contrast of the image, the difference between light and dark areas on the screen.
4. Color
Adjust the color of the image.
5. Sharpness
Adjust the display image quality (if the screen proceeds to scaling up).
OSD FUNCTION
6. Tint
Adjust tint of the image.
Only for NTSC signal.
7. Color Temperature
Choose a different preset color temperature or set your own customized color parameters (Normal/ Warm/ Cool/ User).
8. Advanced Control
8-1 Noise Reduction
Reduce the noise in the picture due to poor reception or poor picture quality.
(Middle/ High/Off/ Low)
8-2 DCR
Turn DCR on or off.
8-3 DCC
Turn DCC on or off.
8-4 Picture Format
Select the aspect ratio (SQ-22:Over Scan/ 4:3/ Underscan)
( SQ-17/19 Underscan/Over Scan)
OSD FUNCTION
Audio
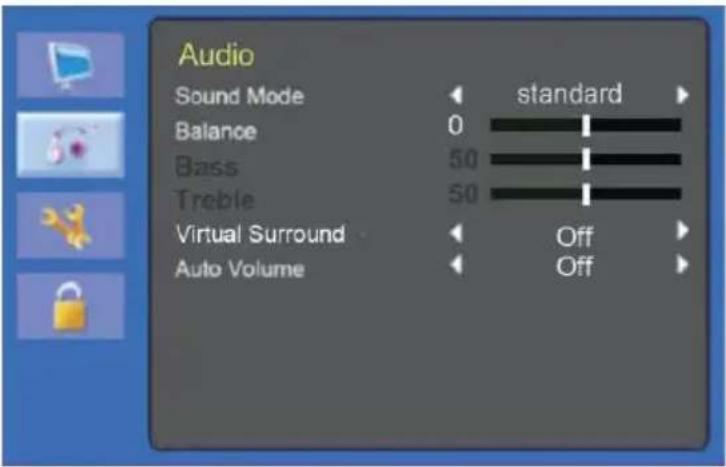
1. Sound Mode
Choose a different preset sound mode or your own customized sound.
(Standard/ Music/ Speech/ Personal)
2. Balance
Adjust the sound balance of the left and right speakers.
3. Bass
When you select Personal mode, adjust the bass sound.
4. Treble
When you select the Personal mode, adjust the treble sound.
5. Virtual Surround
Provide an enhanced listening experience.
6. Auto Volume
Automatically remains at the same volume level if you change the program.
OSD FUNCTION
- Setting

(Time Setting)
1. Menu Language
Select the OSD language.
2. Backlight
Adjust the brightness of the image.
3. Menu Time Out
Adjust the display time of the OSD menu (20 to 60 seconds).
4. Menu Transparency
Adjust the OSD transparency.
5. Power On Status (Not Used)
6. Blue Screen
When there is no signal input, select the blue background color.
7. Color System
Select the input signal system Auto or PAL, PAL-60, NTSC, NTSN_44, SECAM.
OSD FUNCTION
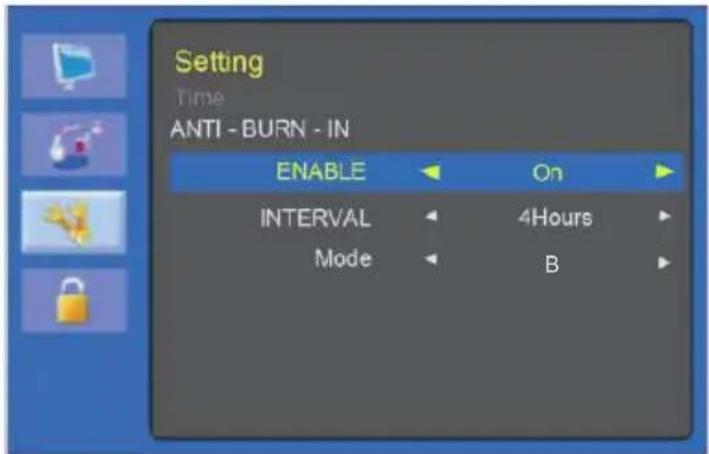
8. Time Setting
8-1 Time
Not Used
8-2 ANTI-BURN-IN
8-3 ENABLE (ON/OFF)
8-4 INTERVAL
Anti Burn In Time (4Hours/ 5Hours/ 6Hours/ 8Hours)
8-5 Anti Burn Type (A/B/C)
9. Reset Default
Reset the screen to the factory preset display settings.
- Lock Child

1. Keypad Lock
Turn the keypad lock on or off.
Keyboard lock unlock method: Long press "MENU" key for about 8 seconds, can be unlocked.
OSD FUNCTION
HDMI menu
Video
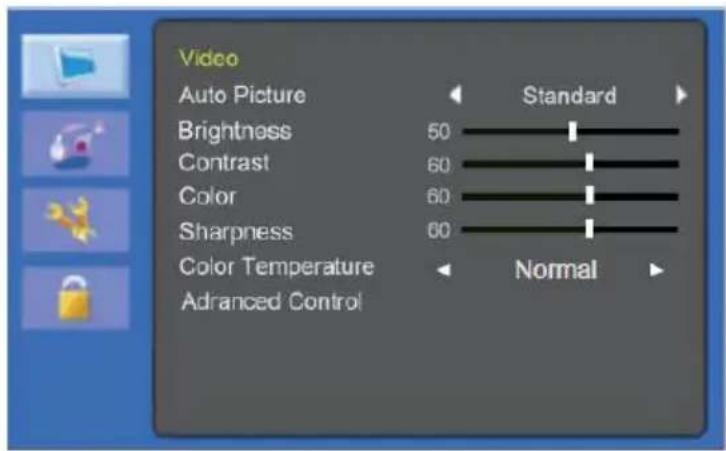
(Advanced Control)
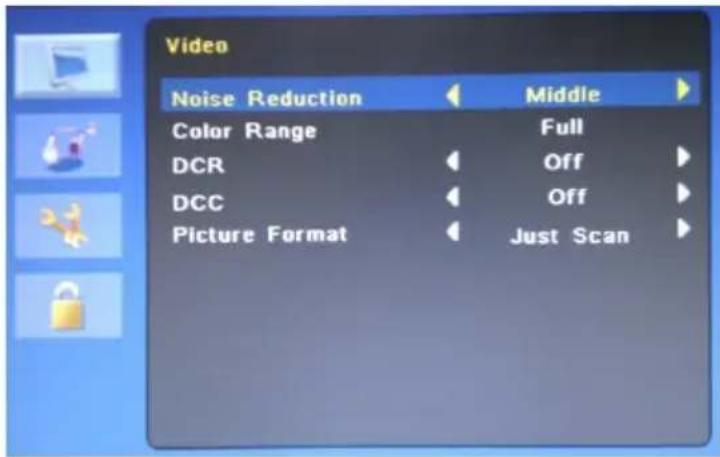
1. Auto Picture
Select the picture mode (Standard/Movie/ECO/Personal/Vivid).
2. Brightness
Adjust the brightness of the image.
3. Contrast
Adjust the contrast of the image, the difference between light and dark areas on the screen.
4. Color
Adjust the color of the image.
5. Sharpness
Adjust the display image quality (if the screen proceeds to scaling up).
OSD FUNCTION
6. Color Temperature
Choose a different preset color temperature or set your own customized color parameters (Normal/ Warm/ Cool/ User).
7. Advanced Control
7-1 Noise Reduction
Reduce the noise in the picture due to poor reception or poor picture quality.(Off/Low/ Middle/ High).
7-2 Color Range
Select the color format(Full/Limit).
7-3 DCR
Turn DCR on or off.
7-4 DCC
Turn DCC on or off.
7-5 Picture Format
Select the aspect ratio (Just Scan/ Over Scan)
OSD FUNCTION
Audio

1. Sound Mode
Choose a different preset sound mode or your own customized sound.
(Music/ Speech/ Personal/ Standard)
2. Balance
Adjust the sound balance of the left and right speakers.
3. Bass
When you select Personal mode, adjust the bass sound.
4. Treble
When you select the Personal mode, adjust the treble sound.
5. Virtual Surround
Provide an enhanced listening experience.
6. Auto Volume
Automatically remains at the same volume level if you change the program.
OSD FUNCTION
- Setting

(Time Setting)

1. Menu Language
Select the OSD language.
2. Backlight
Adjust the brightness of the image.
3. Menu Time Out
Adjust the display time of the OSD menu (20 to 60 seconds).
4. Menu Transparency
Adjust the OSD transparency.
5. Power On Status (Not Used)
6. Blue Screen
When there is no signal input, select the blue background color.
OSD FUNCTION
7. Time Setting
7-1 Time
Not Used
7-2 Power Saving (ON/OFF)
Set Power Saving ON/OFF
7-3 ANTI-BURN-IN
7-4 ENABLE (ON/OFF)
7-5 INTERVAL
Anti Burn In Time (4Hours/ 5Hours/ 6Hours/ 8Hours)
7-6 Anti Burn Type (A/B/C)
8. Reset Default
Reset the screen to the factory preset display settings.

LChild ock

1. Keypad Lock
Turn the keypad lock on or off.
Keyboard lock unlock method: Long press "MENU" key for about 8 seconds, can be unlocked.
SELF-DIAGNOSIS
If there is no image, the Self-Diagnosis screen will be displayed. The self-diagnosis function checks if the status of the monitor screen is No Signal, Out of Range or None Supported.
No Signal
The No Signal screen is displayed when the D-Sub signal connector is connected but the status of the monitor is on DPMS mode.
Out of Range
The Out of Range screen is displayed when the applied frequency is under or over normal range.
Normal range (Non-interlaced mode only):
H: 30 to 80 kHz
V: 50 to 76 Hz
TROUBLESHOOTING
| Symptom Check | |
| Picture is jittery | Adjust Clock to set the screen position and adjust the Clock value carefully until there is no noise displayed. |
| No picture | Check if the power switch and computer power switch are in the On position.Check if the signal cable is correctly connected to the video card.Check if the pins of D-subconnector are not bent.Check if the computer is in the power-saving mode. |
| POWER LED is not lit | Check if the power switch is in the On position.Check if the power cord is correctly connected. |
| Image is unstable Check if the signal cable is suitable to the video card. | |
| Picture bounces or a wave pattern is present in the picture | Keep the devices that may cause electrical interference away from the monitor.See the FCC information at the front cover of the manual. |
| Picture is blurred Adjust Contrast and Brightness. | |
| No sound | Check the audio cables are correctly connected to the computer.Adjust the volume after checking the sound is muted.Check the audio system in the computer. |
| Low sound | Adjust the volume on the OSD menu.Adjust the volume of the sound card in the computer. |
| VIDEO screen cannot be seen | Check if PICTURE mode has been set.Check if the video terminal is properly connected. |
| No video | Check if the video cable is correctly connected to the computer and set to Functions on the OSD picture menu. |
| Poor color in the video | Adjust the Color or Tint values on the OSD Picture menu. |
| Grainy picture in the video | Adjust the Sharpness on the OSD Picture menu. |
SPECIFICATIONS
| Items SQ-17 SQ-19 SQ-22 | ||||
| Panel | Screen size | 17" (43. cm) | 19" (48.3 cm) | 22" (54.6 cm) |
| Max. Resolution | 1280 x 1024 | 1280 x 1024 | 1920 x 1080 | |
| Frequency (H/V) | H: 30 kHz - 80 kHzV: 50 Hz -76 Hz | H: 30 kHz - 80 kHzV: 50 Hz -76 Hz | H: 30 kHz - 80 kHzV: 50 Hz -76 Hz | |
| Interface | VGA in(15 Pin D-Sub) | 1 1 1 | ||
| HDMI in | 1 | 1 | 1 | |
| Audio (L/R) | 1/1 | 1/1 | 1/1 | |
| BNC (in/out) 1/1 | 1/1 1/1 | |||
| PC Audio in Yes | Yes Yes | |||
| Head phone out | Yes Yes Yes | |||
| Service (USB) | Yes | Yes | Yes | |
| Audio | Speaker power | 2 W x 2 | 2 W x 2 | 2 W x 2 |
| Speakers Built-in Built-in Built-in | ||||
| Sound features | Stereo R/L | Stereo R/L | Stereo R/L | |
| Power | Consumption | 25 W | 25 W | 25 W |
| Source | 12 VDC, 3 A | 12 VDC, 3 A | 12 VDC, 3 A | |
| Operation Conditions | Temperature | 5°C ~ 35°C(41°F ~ 95°F) | 5°C ~ 35°C(41°F ~ 95°F) | 5°C ~ 35°C(41°F ~ 95°F) |
| Humidity | 20%~85% | 20%~85% | 20%~85% | |
| Storage Conditions | Temperature | -20°C ~ 60°C(-4°F ~ 140°F) | -20°C ~ 60°C(-4°F ~ 140°F) | -20°C ~ 60°C(-4°F ~ 140°F) |
| Humidity | 5%~85% | 5%~85% | 5%~85% | |
| Weight | Product weight(with base)Packagingweight | 2.57 kg (5.7 lb.)3.7 kg (8.2 lb.) 4.1 | 2.9 kg (6.4 lb.) 3.2kg (9.0 lb.) 4.6 kg ( | kg (7.1 lb.)10.1 lb.) |
Note: All specifications are subject to change without prior notice.
SQ-17 Dimensions

SQ-19 Dimensions

SPECIFICATIONS
SQ-22 Dimensions

Company Address: 5F-1, No. 3-1, Park Street, Nangang District, Taipei, 11503, Taiwan.
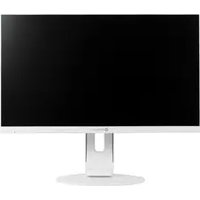

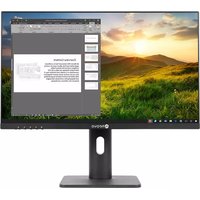
- IMPORTANT SAFEGUARDS
- Installation cautions
- Water and moisture
- Power cord and power cord protection
- Product care
- Cleaning
- Servicing
- Lightning
- Mains plug (2 pin/3 pin)
- INTRODUCTION
- ASSEMBLING THE MONITOR
- To assemble the monitor:
- To disassemble the monitor:
- WALL HANGING STANDARD
- The function of the interface
- FRONT PANEL CONTROLS
- Control panel
- POWER indicator
- POWER
- MENU
- ◀ (Left Arrow (\*))
- ▶ (Right Arrow (\*))
- AUTO (\*)
- Changing a monitor parameter
- ADJUSTMENT PROCEDURE
- OSD FUNCTION
- VGA menu
- Video
- (Advanced Control)
- (Auto Config)
- Brightness
- Contrast
- Color Temperature
- Advanced Setting
- Auto Config
- Auto Color
- ● Sound
- Sound Mode
- Balance
- Bass
- Treble
- Virtual Surround
- Auto Volume
- - Setting
- (Time setting)
- Menu Language
- Backlight
- Menu Time out
- Menu Transparency
- Power On Status (Not used)
- Blue Screen
- Time Setting
- Reset Default
- Child Lock
- Keypad Lock
- Cam menu
- Auto Picture
- Brightness
- Contrast
- Color
- Sharpness
- Tint
- Color Temperature
- Advanced Control
- Audio
- Color System
- Time Setting
- Reset Default
- - Lock Child
- HDMI menu
- Color Temperature
- Advanced Control
- SELF-DIAGNOSIS
- No Signal
- Out of Range
- TROUBLESHOOTING
- SPECIFICATIONS
Brand : AG Neovo
Model : SQ-19
Category : Screen