
OCR43SS - Oven Avanti - Free user manual and instructions
Find the device manual for free OCR43SS Avanti in PDF.


| Product Type | Electric Oven |
| Model | OCR43SS |
| Brand | Avanti |
| Capacity | 4.3 cu. ft. (approx. 120 L) |
| Dimensions (H x W x D) | 28.5 x 29.5 x 26.6 in (72.4 x 74.9 x 67.6 cm) |
| Weight | 145 lbs (65.8 kg) |
| Power Supply | 240 V / 60 Hz, 13.8 kW |
| Oven Mode | Bake, Broil, Convection Bake, Convection Roast |
| Temperature Range | 170°F - 550°F (77°C - 288°C) |
| Self-Cleaning | Yes, self-clean cycle |
| Interior Light | Yes, replaceable halogen bulb |
| Oven Racks | 2 adjustable racks |
| Convection Fan | Yes, with automatic shut-off |
| Control Type | Digital touch panel with timer |
| Safety Features | Auto shut-off, cool-touch door, child lock |
| Certifications | UL, Energy Star |
| Cleaning | Self-cleaning cycle or manual wipe |
| Warranty | 1 year limited parts and labor |
Frequently Asked Questions - OCR43SS Avanti
User questions about OCR43SS Avanti
0 question about this device. Answer the ones you know or ask your own.
Ask a new question about this device
Download the instructions for your Oven in PDF format for free! Find your manual OCR43SS - Avanti and take your electronic device back in hand. On this page are published all the documents necessary for the use of your device. OCR43SS by Avanti.
USER MANUAL OCR43SS Avanti
natural_image
Line drawing of a microwave oven with grating and control knobs (no text or symbols)BEFORE USE, PLEASE READ AND FOLLOW ALL SAFETY RULES AND OPERATING INSTRUCTIONS.
Avanti has a policy of continuous improvement on its products and reserves the right to change materials and specifications without notice.
Avanti Products, A Division of The Mackle Co., Inc.
P.O. Box 520604 - Miami, Florida 33152
www.avantiproducts.com
REGISTRATION INFORMATION
Thank you for purchasing this fine Avanti product. Please fill out this card and return it within 100 days of purchase and receive these important benefits to the following address:
Avanti Products, A Division of The Mackle Co., Inc.
P.O. Box 520604 - Miami, Florida 33152 USA
Protect your product:
We will keep the model number and date of purchase of your new Avanti product on file to help you refer to this information in the event of an insurance claim such as fire or theft.
Promote better products:
We value your input. Your responses will help us develop products designed to best meet your future needs.
-(detach here)
Avanti Registration Card
| Name | ||
| Address | ||
| City | State | Zip |
| Area Code | Phone Number | |
| Model # | Serial # |
| Date Purchased | Store/Dealer Name |
Did You Purchase An Additional Warranty:
Extended None
Reason For Choosing This Avanti Product:
Please indicate the most important factors that influenced your decision to purchase this product.
Price
Product Features
Avanti Reputation
Product Quality
Salesperson Recommendation
Friend/Relative Recommendation
Warranty
Other
Occupation
As Your Primary Residence, Do You:
Own Rent
Your Age:
under 18 18-25 26-30
31-35 36-50 over 50
Marital Status:
Married Single
Is This Product Used In The:
Home Business
How Did You Learn About This Product:
Advertising
In Store Demo Personal Demo
Other
Comments
HELP US HELP YOU ...
Read this guide carefully.
It is intended to help you operate and maintain your new appliance properly.
Keep it handy to answer your questions.
If you don't understand something or you need more assistance, please call:
Avanti Customer Service 800-220-5570
Keep proof of original purchase date (such as your sales slip) with this guide to establish the warranty period.
Write down the model and serial numbers.
You'll find them on a label located on the back side of the unit.
Please write these numbers here:
Date of Purchase
Model Number
Serial Number
Use these numbers in any correspondence or service calls concerning your appliance.
If you received a damaged appliance, immediately contact the dealer (or builder) that sold you the appliance.
Save time and money. Before you call for service, check the Problem Solver Guide. It lists causes of minor operating problems that you can correct yourself.
IF YOU NEED SERVICE
We're proud of our service and want you to be pleased. If for some reason you are not happy with the service you receive, here are some steps to follow for further assistance.
FIRST, contact the people who serviced your appliance. Explain why you are not pleased. In most cases, this will solve the problem.
NEXT, if you are still not pleased, write all the details, including your telephone number, and send it to:
Customer Service
Avanti Products
10880 NW 30 Street
Miami, FL 33172 USA
PARTS AND FEATURES
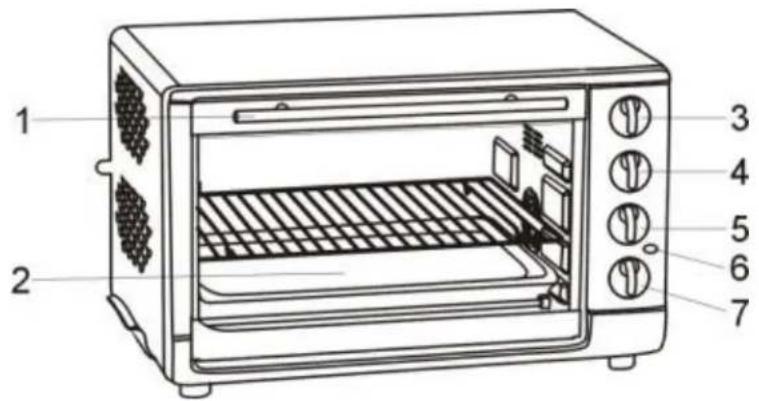
- HANDLE
- FULL VIEW GLASS DOOR
- TEMPERATURE CONTROL KNOB
-
FUNCTION CONTROL KNOB
-
CONVECTION-ROTISSERIE CONTROL KNOB
- POWER INDICATOR LIGHT
- TIMER CONTROL KNOB
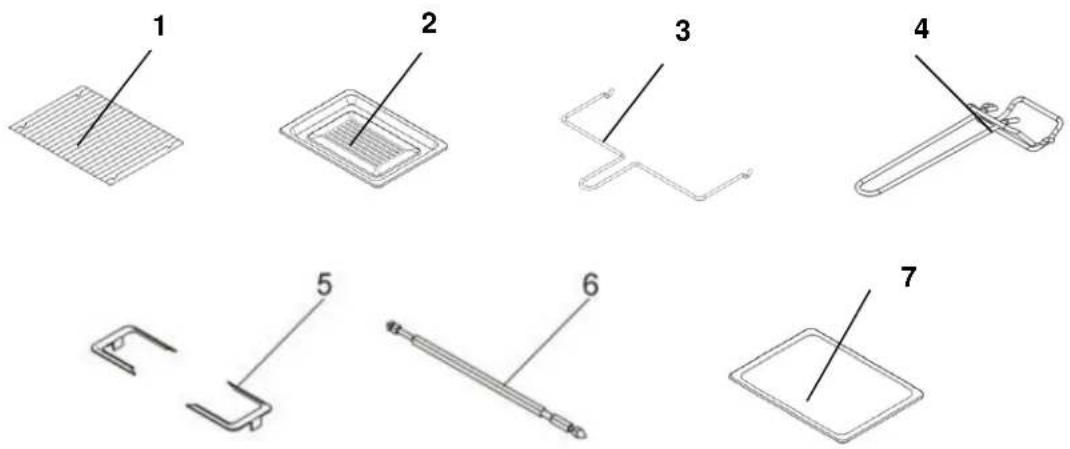
ACCESSORIES
- OVEN WIRE RACK
- BAKE/BROIL/DRIP PAN
- ROTISSERIESKEWER HANDLING TOOL
-
BAKE/BROIL/DRIP HANDLING TOOL
-
ROTISSERIE MEAT FORKS
- ROTISSERIE SKEWER
- CRUMB TRAY
TABLE OF CONTENTS
Registration Information 3
Help Us Help You 5
Parts and Features 6
Important Safety Instructions 8
Installation Instructions 9
Before Using Your Appliance 9
Installation of Your Appliance 9
Electrical Connection 10
Operating Your Appliance 11
Control Panel 11
Using Your Oven 12
Care and Maintenance 14
Cleaning Your Appliance 14
Storing Your Appliance 14
Troubleshooting Guide 14
Service For Your Appliance 15
Your Avanti Warranty 15
Wiring Diagram 16
Instrucciones en Español 17 - 20
IMPORTANT SAFETY INSTRUCTIONS
| WARNING | To reduce the risk of fire, electrical shock, or injury when using your appliance, follow these basic precautions: |
| When using electrical appliances, basic safety precautions should always be followed including the following:READ ALL INSTRUCTIONS, PRODUCT LABELS AND WARNINGS BEFORE USING THE APPLIANCE.? Do not touch hot surfaces, use handles or knobs. Always use oven mitts when handling hot materials and allow metal parts to cool before cleaning. Allow the unit to cool thoroughly before putting in or taking off parts.? When the unit is not in use and before cleaning, unplug the appliance from the wall outlet. Make sure the appliance is turned off before unplugging.? To protect against risk of electrical shock, do not immerse the appliance in water or any other liquids.? While using your appliance, you must take into consideration not to touch the surfaces as the entire cabinet, as well as the front glass door get very hot.? Don't leave children alone or unattended where the appliance is hot or in operation. This appliance is not designed to be used by children.? We do not recommend the use of extension cords to operate this unit.? Never use your appliance for heating the room. Your oven is not designed to heat your kitchen.? Do not operate this or any appliance with a frayed or damaged cord or plug, after the appliance malfunctions, is dropped or has been damaged in any manner.? Do not use attachments not recommended by the manufacturer; they may cause fire, electric shock or personal injury.? Do not use outdoors or for commercial purposes.? Do not use this appliance for other than its intended use.? Do not let the cord dangle over the edge of a tabletop, countertop or to touch hot surfaces.? Do not place the appliance near a hot gas, electric burner or in a heated oven.? Extreme caution should be used when using containers constructed of other than metal or glass.? A fire may occur if the appliance is covered or touching flammable materials, including curtains, draperies, walls, etc., when in operation. Do not store any items on top of the appliance when in operation.? Do not store any materials, other than manufacturer's recommended accessories, in this unit when not in use.? Do not place any flammable materials in the appliance, such as paper, cardboard, plastic or any materials that may catch fire or melt.? Never clean the appliance with flammable liquids. The fumes can create a fire hazard or explosion.? Do not cover the appliance with metal foil. This will cause overheating of the appliance.? Oversized foods or metal utensils must not be inserted in the appliance as they may create a fire or risk of electrical shock.? Do not clean with metal scouring pads. Pieces can break off the pad and touch electrical parts involving a risk of electrical shock.? When broiling, use extreme caution when removing tray or disposing of hot grease.? To turn this appliance off, return all controls to the "0" OFF position, then remove plug from wall outlet.? Cooked food can be very hot, especially pastry filling. Handle with care.? Never pick up a flaming pan. Turns the controls to the "0" OFF position. Unplug the unit from the AC wall outlet. Smother a flaming pan on a surface unit by covering the pan completely with a well fitting lid.? Do not use water on grease fires. Flaming grease outside a pan can be put out by covering it with baking soda, multipurpose dry chemical, or fire extinguisher. Flame in the oven can be smothered completely by closing the oven door and turning the oven off and unplugging the unit from the A/C outlet or by using baking soda, multipurpose dry chemical, or fire extinguisher.This Unit Is For Household Use Only- SAVE THESE INSTRUCTIONS - | |
INSTALLATION INSTRUCTIONS
Before Using Your Appliance
? Remove the exterior and interior packing.
? Check to be sure you have all of the following parts:
? 1 Bake/Broil/Drip Pan
? 1 Bake/Broil/Drip Handling Tool
? 1 Oven Wire Rack
? 1 Rotisserie Skewer Handling Tool
? 2 Rotisserie Forks with Screws
? 1 Rotisserie Skewer
? 1 Instruction Manual
? Remove all the items inside your oven and clean the interior surface with lukewarm water using a soft cloth.
? Do not attempt to repair or replace any part of your oven unless it is specially recommended in this manual.
? This appliance requires 1400W and should be the only appliance operating on the same circuit.
NOTICE
Before you use this oven for the first time: The heating elements have a protective coating, which must be burned off before use. To do this, open the oven door and set the temperature control knob to 250^ C/480°F. Move the function selector to toast and rotate the timer control knob to approximately 15 minutes. It is important to ensure adequate ventilation during this period.
Installation of Your Appliance
Select a location for the appliance. The location should be in an open area on a flat counter where the plug will reach an outlet.
? When positioning the appliance, it should be set on a flat, steady surface.
? Do not block air vents. If they are blocked during operation, the oven may overheat and eventually cause the appliance failure.
? Keep the appliance away from hot air, steam or splashing liquids when choosing a place to locate it, otherwise, the unit's operation may be adversely affected, causing it to break down.
? Direct sunlight may affect the acrylic coating and heat sources may increase electrical consumption.
? Plug the appliance into an exclusive properly installed grounded wall outlet. Any questions concerning power should be directed toward a certified electrician or an authorized Avanti Products service center.
? Do not place anything on the top of the broiler oven and automatic toaster.
? Keep the appliance at least 5 inches away from rear wall to ensure the proper ventilation.
Warning
Improper use of the grounded plug can result in the risk of electrical shock. If the power cord is damaged, have it replaced by an authorized Avanti Products service center.
The appliance is supplied with a molded 3-prong grounding type plug and should be used in combination with a properly connected grounding -type outlet. If a grounding type outlet is not available, an adapter may be obtained so that a 2-slot wall outlet can be used with a 3-prong plug. The adapter must be grounded by attaching its grounding plug under the screw of the outlet cover plate.
A short power cord is provided to reduce the hazards resulting from entanglement or tripping over a longer cord.
An extension cord may be used with care, however, be sure the marked electrical rating is at least as great as the rating of this appliance. The extension cord should be positioned such that it does not drape over the counter or tabletop where it can be pulled on by children or tripped over. The electrical rating of this appliance is listed on the rear wall of the appliance.
Do not under any circumstances cut or remove the third ground prong from the power cord supplied.
This unit requires a standard 115/120 Volts A.C. \~/60Hz electrical grounded outlet with three-prong.
The cord should be secured behind the mini kitchen and not left exposed or dangling to prevent accidental injury.
Do not pinch, knot, or bend the power cord in any manner.
To protect against electrical shock, do not immerse cord, plug, or appliance itself in water or other liquid.
Never unplug the appliance by pulling the power cord. Always grip the plug firmly and pull straight out from the receptacle.
OPERATING YOUR APPLIANCE
Control Panel
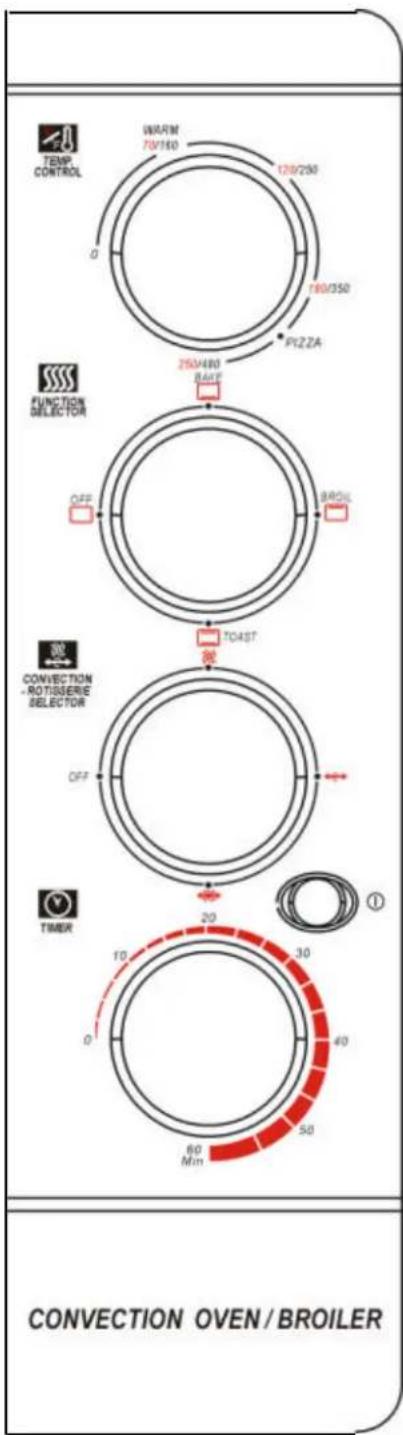
TEMPERATURE CONTROL KNOB
Turn the knob clockwise to select the desired temperature up to 250°C/480°F. To switch off the heating elements of oven turn the temperature control to the "0" setting position.
FUNCTION SELECTOR KNOB
There are three functions – BAKE, BROIL and TOAST.
To switch off the heating elements of oven turn the function selector to the OFF setting position.
CONVECTION-ROTISSERIE SELECTOR KNOB
You can control the convection fan and rotisserie operations by turning the knob to the desired following positions.
- Fan will operate
- Rotisserie will operate
- Fan and rotisserie will operate
If you do not need the additional functions, keep the knob in the OFF position
TIMER SELECTOR KNOB
You can set cooking time up to 60 minutes. It will automatically turn the oven off at the end of the cooking time selected with the sound of a bell signal.
To switch off the oven turn the timer selector to the "0" setting position.
OPERATING INDICATING LIGHT
The indicator light will come ON when the oven is in use.
Using Your Oven
Be sure that all the selector knobs are turned "0"/OFF position before plugging the cord into the outlet for use and when unplugging the appliance after use.
You will be able to turn the timer knob to the desired time (max 60 minutes). At the end of the cooking time a bell signal sounds and the oven will turn off automatically.
Please note that none of the OVEN selections (BAKE, FAN BAKE, BROIL, FAN BROIL, ROTISSERIE, CONVECTION, OR TOAST) will operate without the TIMER knob turned to desired cooking time.
Preheating the Oven
Turn the TEMPERATURE control knob to the desired temperature.
Turn the FUNCTION selector knob to the desired function.
Turn the timer selector knob to the "15\~20" minute marking for the oven to preheat.
To Use the DEFROST Function
Arrange food in the drip/baking pan.
Keep the function selector knob to the OFF position.
Turn the CONVECTION - ROTISSERIE selector knob to the position.
Turn the TIMER selector knob to your desired cooking time.
The motor fan will operate to defrost.
When DEFROST is completed, turn all knobs to the "0"/OFF position, open door fully and remove food carefully.
When defrosting do not preheat oven. Allow 15-20 minutes per side for meats or fish to defrost. Always cook food promptly after thawing.
To Use the BAKE or FAN BAKE Function
Arrange food on the wire rack or in the drip/baking pan.
Turn the FUNCTION selector knob to the BAKE position.
Turn the CONVECTION - ROTISSERIE selector knob to the ⚙ position for FAN BAKE, otherwise keep it in the OFF position.
Turn the TIMER selector knob to your desired cooking time.
Turn the TEMPERATURE control knob to the desired temperature.
The bottom heater element will cycle ON and OFF to maintain the selected temperature. At the same time the motor fan will operate for FAN BAKE.
When BAKING is completed, turn all knobs to the "0"/OFF position, open door fully and remove food carefully, using the metal handling tool provided.
To Use the BROIL or FAN BROIL Function
Arrange food on the wire rack or in the drip/baking pan. Close the door to the first notch, leaving approximately a 3-inch gap at the top. This will ensure adequate airflow during broiling.
Turn the FUNCTION selector knob to the BROIL position.
Turn the CONVECTION - ROTISSERIE selector knob to the ✗ position for FAN BROIL, otherwise keep it in the OFF position.
Turn the TIMER selector knob to your desired cooking time.
Turn the TEMPERATURE control knob to the desired temperature.
Only the top heater element will cycle ON and OFF to maintain the desired temperature in the oven. At the same time the motor fan will operate for FAN BROIL. For best results the oven should be preheated 20 minutes before adding the food to be broiled.
Turn food over about halfway through the broiling time.
When BROILING is completed, turn all knobs to the "0"/OFF position, open door fully and remove food carefully, using the metal handling tool provided.
To Use the ROTISSERIE Function
Place the drip/baking pan at the bottom position.
Arrange food as following steps:
? Place one meat fork on the end of the rotisserie skewer opposite the point, with the tines facing the center and tighten the screw slightly.
? Slide the pointed end of the rotisserie directly through the center of the meat.
? Place the other meat fork on the other end of the rotisserie. Make sure the forks secure the roast or chicken on the skewer and tighten the screws.
? Make sure the forks are not too close to the interior wall of the oven and interfere with the movement of the meat.
? When cooking poultry, legs and wings should be secured to the body with string making the chicken as compact as possible. This is necessary for smooth movement of the rotisserie and prevents dragging.
? Season or baste the meat as desired.
? Place the drip/baking pan directly on the bottom of the oven.
? Insert the pointed end of the skewer in the drive socket on the right interior wall of the oven and put the other end of the skewer in the bracket on the left interior wall of the oven.
Turn the FUNCTION selector knob to the BROIL position.
Turn the CONVECTION - ROTISSERIE selector knob to the ✿ position.
Turn the TIMER selector knob to your desired cooking time.
Turn the TEMPERATURE control knob to the desired temperature.
The top heater element will cycle ON and OFF to maintain the selected temperature. At the same time the motor fan will operate. Rotisserie roasting is a healthy way to cook meats because the slow turning skewer provides natural basting of meats while fats drip away. The rotisserie can be used to roast meats up to 4 pounds and will easily handle a 4-pound chicken. Season your roast or chicken with your favorite seasoning as desired. It is not necessary to preheat the oven for rotisserie roasting.
When ROTISSERIE is completed, turn all knobs to the "0"/OFF position.
Remove the rotisserie food from the oven by using the Metal Skewer Handling Tool to remove the skewer from the hole by lifting the left end of the skewer and sliding it to the left. And remove the drip/bake pan from the oven by using the metal handling tool provided.
Using a potholder, loosen the screws on the meat forks and remove the rotisserie skewer from the meat.
Carefully remove the meat forks and carve the meat.
CAUTION: The rotisserie skewer, meat forks and screws will be hot.
To Use the CONVECTION Function
Arrange food on the wire rack or in the drip/baking pan.
Turn the FUNCTION selector knob to the TOAST position.
Turn the CONVECTION - ROTISSERIE selector knob to the position.
Turn the TIMER selector knob to your desired cooking time.
Turn the TEMPERATURE control knob to the desired temperature.
The top and bottom heater elements will cycle ON and OFF to maintain the selected temperature. At the same time the motor fan will operate. Convection will keep a consistent temperature. The oven heats quickly, so preheating is not necessary or desirable. The fan circulates the hot air around the food making baked food rise quickly and evenly.
When CONVECTION is completed, turn all knobs to the "0"/OFF position, open door fully and remove food carefully, using the metal handling tool provided.
To Use the TOAST Function
Turn the FUNCTION selector knob to the TOAST position.
Keep the CONVECTION - ROTISSERIE selector knob in the OFF position.
Turn the TIMER selector knob to your desired cooking time.
Turn the TEMPERATURE control knob to the desired temperature.
Place the oven rack in the upper position.
No preheat period is required before toasting.
Place the bread to be toasted directly on the rack in the center of the oven, close the door.
Both the top and bottom elements will operate when TOAST function is used.
When TOASTING is completed, turn all knobs to the "0"/OFF position, open door fully and remove food carefully, using the metal handling tool provided.
Different types of bread require different toasting times. Lighter breads and waffles require a shorter toasting time. Darker breads, muffins, and English muffins require a longer toasting time.
CARE AND MAINTENANCE
Cleaning Your Appliance
? Before cleaning your appliance, unplug it and allow it to cool.
? Remove the rotisserie skewer, wire rack, drip/baking pan and crumb tray.
? Use a damp cloth to wash the inside with warm water and a mild detergent. Do not Immerse in Water. Abrasive cleaners, scrubbing brushes and chemical cleaners may damage the coating on this unit.
? Wash the rotisserie skewer, wire rack, drip/baking pan and crumb tray with a mild detergent solution.
? The glass oven door should be cleaned regularly with a non-abrasive liquid cleaner.
? Rinse with a damp cloth and then a dry one.
? The outside of the appliance should be cleaned with mild detergent and warm water.
? Occasionally wiping the surface of the burners with a trace of clean cooking oil will help to maintain their appearance.
Storing Your Appliance
Allow the appliance to cool completely before storing. If storing the appliance for long periods of time make certain that the appliance is clean and free of food particles. Store the appliance in a dry location such as on a table or countertop or in a cupboard shelf. Other than the recommended cleaning, no further user maintenance should be necessary.
PROBLEMS WITH YOUR APPLIANCE?
You can solve many common appliance problems easily, saving you the cost of a possible service call. Try the suggestions below to see if you can solve the problem before calling the servicer.
TROUBLESHOOTING GUIDE
| PROBLEMS POSSIBLE CAUSES/SOLUTIONS | |
| ? Appliance does not operate. | ? Unit not plugged in. Plug the unit into a 120V AC/ 60 Hz electrical outlet. ? The circuit breaker tripped or a blown fuse. ? Be sure that the function, temperature, convection - rotisserie and timer selectors are set. |
| ? Only one heating element is heating up. | ? Function setting selection determines which heating element will operate. ? When toasting and convection, make sure the oven is not set to BROIL and other settings. |
| ? Heating elements are not heating up. | ? Heating elements will cycle ON and OFF to maintain proper heat. Make sure function selector is positioned to desired cooking setting. |
| ? Overcooked/undercooked Foods | ? Incorrect temperature setting. You may have to adjust the temperature to desired position. ? Rack placement. Rack may need to be adjusted to accommodate different foods. |
| ? Burnt Smell | ? If this occurs the first time you are using the unit, this is the initial burn in procedure (see Installation Instructions). ? Food build-up inside appliance, on heating elements or in drip/baking pan. Refer to “Cleaning Your Appliance” |
SERVICE FOR YOUR APPLIANCE
We are proud of our customer service organization and the network of professional service technicians that provide service on your Avanti appliances. With the purchase of your Avanti appliance, you can be confident that if you ever need additional information or assistance, the Avanti Products Customer Service team will be here for you. Just call us toll-free.
AVANTI PRODUCTS CUSTOMER SERVICES
| Product Information800-323-5029 | Whatever your questions are about our products, help is available. |
| Part Orders800-220-5570 | You may order parts and accessories that will be delivered directly to your home by personal check, money order, Master Card, or Visa. |
| In-Home Repair Service800-220-5570 | An Avanti Products authorized service center will provide expert repair service, scheduled at a time that is convenient for you. Our trained servicers know your appliance inside and out. |
YOUR AVANTI WARRANTY
LENGTH OF WARRANTY
WE WILL PAY FOR
| FULL ONE YEAR WARRANTY FROM DATE OF PURCHASE ON ALL PARTS EXCEPT GLASS PARTS, AND/OR PARTS DAMAGED AS A RESULT OF MISUSE OR LACK OF REASONABLE CARE. | REPLACEMENT PARTS AND REPAIR LABOR TO CORRECT DEFECTS IN MATERIALS OR WORKMANSHIP. SERVICE MUST BE PROVIDED BY AN AUTHORIZED SERVICE COMPANY. |
| FULL 30-DAY WARRANTY FROM DATE OF PURCHASE ON GLASS PARTS AND FINISH OF PORCELAIN ENAMEL, PAINTED OR BRIGHT METAL FINISHED PARTS | REPLACEMENT PARTS AND REPAIR LABOR TO CORRECT DEFECTS IN MATERIAL OR WORKMANSHIP. SERVICE MUST BE PROVIDED BY AN AUTHORIZED SERVICE COMPANY. |
CARRY IN SERVICE ONLY.
CUSTOMER WILL BE RESPONSIBLE FOR ALL TRANSPORTATION CHARGES TO AND FROM THE AUTHORIZED SERVICE COMPANY, ALSO MAKE SURE TO SEND A COPY OF PROOF OF PURCHASE WHEN SENDING THE UNIT FOR SERVICE REPAIRS.
AVANTI PRODUCTS SHALL NOT BE LIABLE FOR INCIDENTAL OR CONSEQUENTIAL DAMAGES.
Some states do not allow the exclusion or limitation of incidental or consequential damages, so this exclusion or limitation may not apply to you. This warranty gives you specific legal rights, and you may also have other rights that vary from state to state.
This warranty is not valid outside the Continental United States.
WIRING DIAGRAM
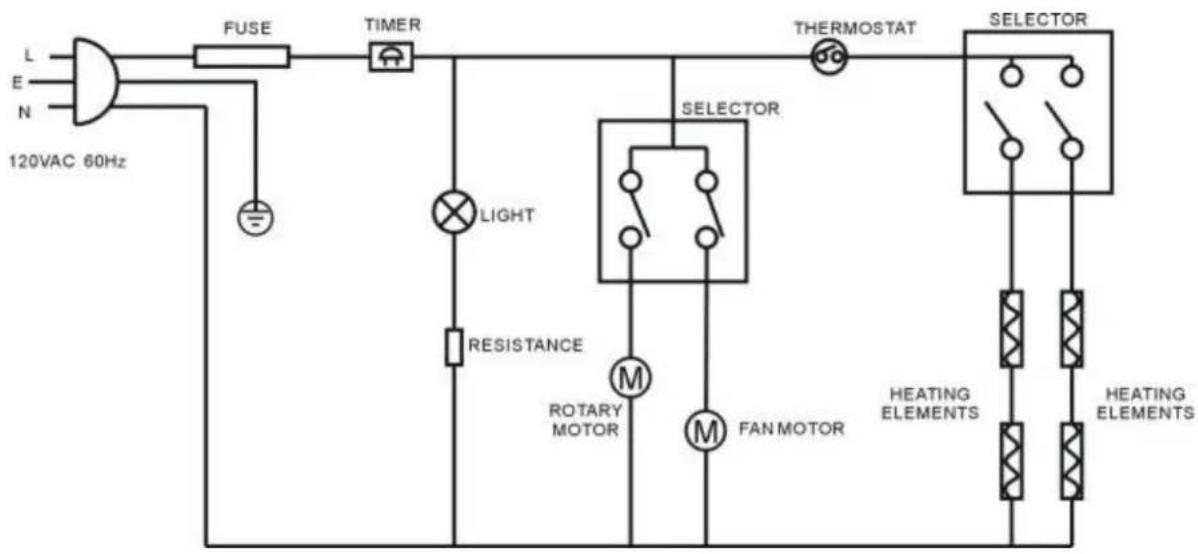
flowchart
graph TD
    A["120VAC 60Hz"] --> B["FUSE"]
    B --> C["TIMER"]
    C --> D["SELECTOR"]
    D --> E["HEATING ELEMENTS"]
    D --> F["FAN MOTOR"]
    D --> G["ROTARY MOTOR"]
    D --> H["RESISTANCE"]
    H --> I["LIGHT"]
    I --> J["THERMOSTAT"]
    J --> K["SELECTOR"]
    K --> L["HEATING ELEMENTS"]
    style A fill:#f9f,stroke:#333
    style K fill:#ccf,stroke:#333
- BEFORE USE, PLEASE READ AND FOLLOW ALL SAFETY RULES AND OPERATING INSTRUCTIONS.
- REGISTRATION INFORMATION
- Protect your product:
- Promote better products:
- Did You Purchase An Additional Warranty:
- Reason For Choosing This Avanti Product:
- As Your Primary Residence, Do You:
- Your Age:
- Marital Status:
- Is This Product Used In The:
- How Did You Learn About This Product:
- HELP US HELP YOU ...
- Read this guide carefully.
- Avanti Customer Service 800-220-5570
- Write down the model and serial numbers.
- IF YOU NEED SERVICE
- Customer Service
- PARTS AND FEATURES
- ACCESSORIES
- TABLE OF CONTENTS
- INSTALLATION INSTRUCTIONS
- Before Using Your Appliance
- NOTICE
- Installation of Your Appliance
- Warning
- OPERATING YOUR APPLIANCE
- TEMPERATURE CONTROL KNOB
- FUNCTION SELECTOR KNOB
- CONVECTION-ROTISSERIE SELECTOR KNOB
- TIMER SELECTOR KNOB
- OPERATING INDICATING LIGHT
- Using Your Oven
- Preheating the Oven
- To Use the DEFROST Function
- To Use the BAKE or FAN BAKE Function
- To Use the BROIL or FAN BROIL Function
- To Use the ROTISSERIE Function
- To Use the CONVECTION Function
- To Use the TOAST Function
- CARE AND MAINTENANCE
- Cleaning Your Appliance
- Storing Your Appliance
- PROBLEMS WITH YOUR APPLIANCE?
- TROUBLESHOOTING GUIDE
- SERVICE FOR YOUR APPLIANCE
- YOUR AVANTI WARRANTY
- WIRING DIAGRAM
Brand : Avanti
Model : OCR43SS
Category : Oven