KAWFLWASM9A - Washing machine Kogan - Free user manual and instructions
Find the device manual for free KAWFLWASM9A Kogan in PDF.


| Product Type | Freestanding Washing Machine |
| Brand | Kogan |
| Model | KAWFLWASM9A |
| Capacity | 9 kg |
| Maximum Spin Speed | 1400 rpm |
| Dimensions (H x W x D) | 850 mm x 600 mm x 600 mm |
| Weight | 72 kg |
| Power Supply | 220-240 V, 50 Hz, 10 A |
| Energy Rating | A+++ |
| Wash Programs | Cotton, Synthetics, Delicates, Quick Wash, Wool, Rinse & Spin, Drum Clean |
| Control Type | Electronic with LED Display |
| Noise Level (Wash/Spin) | 54 dB / 74 dB |
| Water Consumption | 52 L per cycle |
| Features | Delay Start, Child Lock, Auto Unbalance Detection, Foam Control |
| Maintenance | Clean filter monthly, run drum clean cycle, leave door open after use |
| Safety | Child lock, overflow protection, tempered glass door |
| Spare Parts Availability | Available through Kogan website |
| Repairability Score | 7.5/10 |
| Manual Included | Yes, downloadable in multiple languages |
Frequently Asked Questions - KAWFLWASM9A Kogan
User questions about KAWFLWASM9A Kogan
0 question about this device. Answer the ones you know or ask your own.
Ask a new question about this device
Download the instructions for your Washing machine in PDF format for free! Find your manual KAWFLWASM9A - Kogan and take your electronic device back in hand. On this page are published all the documents necessary for the use of your device. KAWFLWASM9A by Kogan.
USER MANUAL KAWFLWASM9A Kogan
natural_image
Front view of a white Kōgan washing machine with a circular black lid and digital display (no visible text or symbols on the main body)9KG FRONT LOAD INVERTER WASHING MACHINE
SERIES 9
KAWFLWASM9A, KAWFLWASM9B
⚠ WARNING: To protect the user and other people’s health and property, be sure to observe the following safety notices. Failure to respect these warnings may result in damage to nearby objects, severe bodily harm, or death.
- Dismantling, repair, or alterations should only be carried out by professional technicians to avoid the risk of electric shock, fire or injury.
- The electricity supply must always be unplugged with dry hands to avoid the risk of electric shock.
- Do not damage or alter the cable by forcibly bending, pulling, or twisting. Do not put weight on or trap the cable. Damaged or loosened cables or plugs should not be used to avoid the risk of electric shock, short circuit, or fire.
- If the supply cord is damaged, it must be replaced by Kogan.com or its service agent to avoid a hazard.
- Do not put gasoline, benzene, alcohol, thinner or fabrics with these stains into or near the washing machine. This may present the risk of fire or explosion.
- Keep children away from the appliance when in use. Do not place boxes or shelves next to the washing machine.
- This appliance is not intended for use by persons (including children) with reduced physical, sensory or mental capabilities or lack of experience and knowledge unless they have been given supervision or instruction concerning use of the appliance by a person responsible for their safety.
- This washing machine is equipped with a grounded plug. Use a single socket with a voltage and current that match that of the appliance. Sharing the same socket with other electric appliances may present the risk of fire.
- Thoroughly wipe the power plug when the dirt is adhering to the prong or around the base of the prong. Failure to do so may present a fire risk.
- The washing machine should not be installed in humid environments, or locations exposed to wind and rain.
- This washing machine is strictly prohibited from use in environments with an open flame, such as a candle or incense. Do not operate the machine when there is a gas leak.
- The glass door becomes hot in the process of high-temperature washing. Do not touch the door when the machine is on, especially children.
-
If the door must be opened during high temperature washing program, wait until the temperature drops to a safe standard and the door unlocks automatically.
-
Keep all packing materials (plastic bags, foam etc) away from children.
- Do not pull the cable from the socket when unplugging the unit. Always grasp the plug firmly to remove the cable from the power socket.
- Do not wash, rinse, or spin waterproof fabrics or cloth, sleeping bags, raincoats, or skiing clothes. This may otherwise lead to injury by abnormal vibration during spinning or damage to the washing machine, walls, floor, and clothes.
- Keep hands and feet away from the bottom of the washing when it is motion. Parts in motion beneath the unit may cause injuries.
- The water supply hose should be tightly screwed into the unit. Failure to do so may result in water leakage. After use for an extended period, water leakage may result from the loosening of this hose. Ensure that it is checked and tightened regularly.
• Unplug the appliance when it is not in use for an extended period. - Water above 50°C should not be used for washing. Electric shock or leakage may occur due to deformation of plastic parts of the unit.
- Do not stand on or put weight on the top of the unit. Two people are required for moving or transportation.
- Check the water supply hose connection by turning on the water before washing.
- Only utilise the new hose-sets supplied with the appliance. Old hose-sets should not be reused.
- Ensure the ventilation openings on the bottom of the washer are unobstructed when installed on a carpeted floor.
• Turn the water tap off when the unit is not in use - The appliance is designed for private household use only. It is not suitable for commercial, industrial or trade use.
COMPONENTS
natural_image
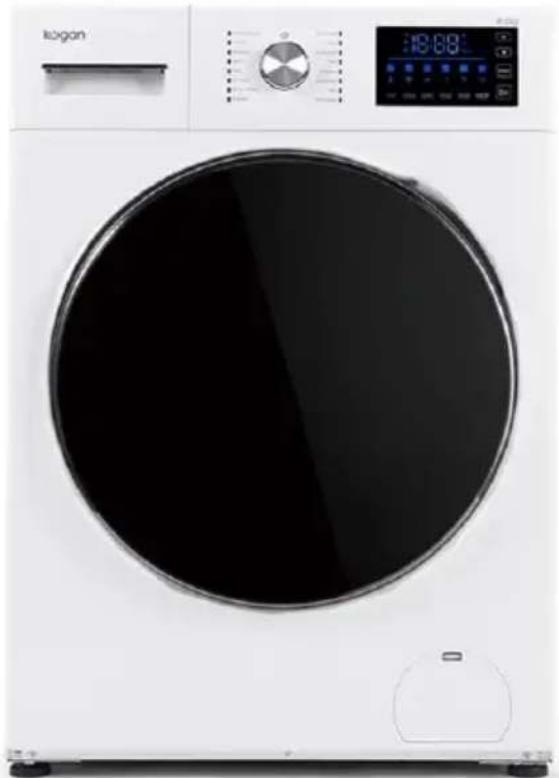
Front view of a white Kōgan washing machine with a circular black lid and digital display (no visible text or symbols on the main body)Washing Machine (x1)
natural_image
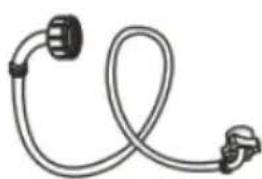
Simple line drawing of a coiled cable or hose with two connectors (no text or symbols)Water Inlet Hose (x1)

Transit Bolt Caps (x4)
natural_image
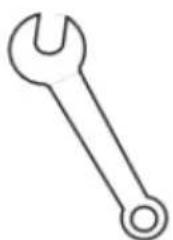
Simple line drawing of a wrench (no text or symbols)Spanner (x1) User Guide (x1)
OVERVIEW
Note:
It is recommended to run the drum clean program before washing clothes in the machine for the first time.
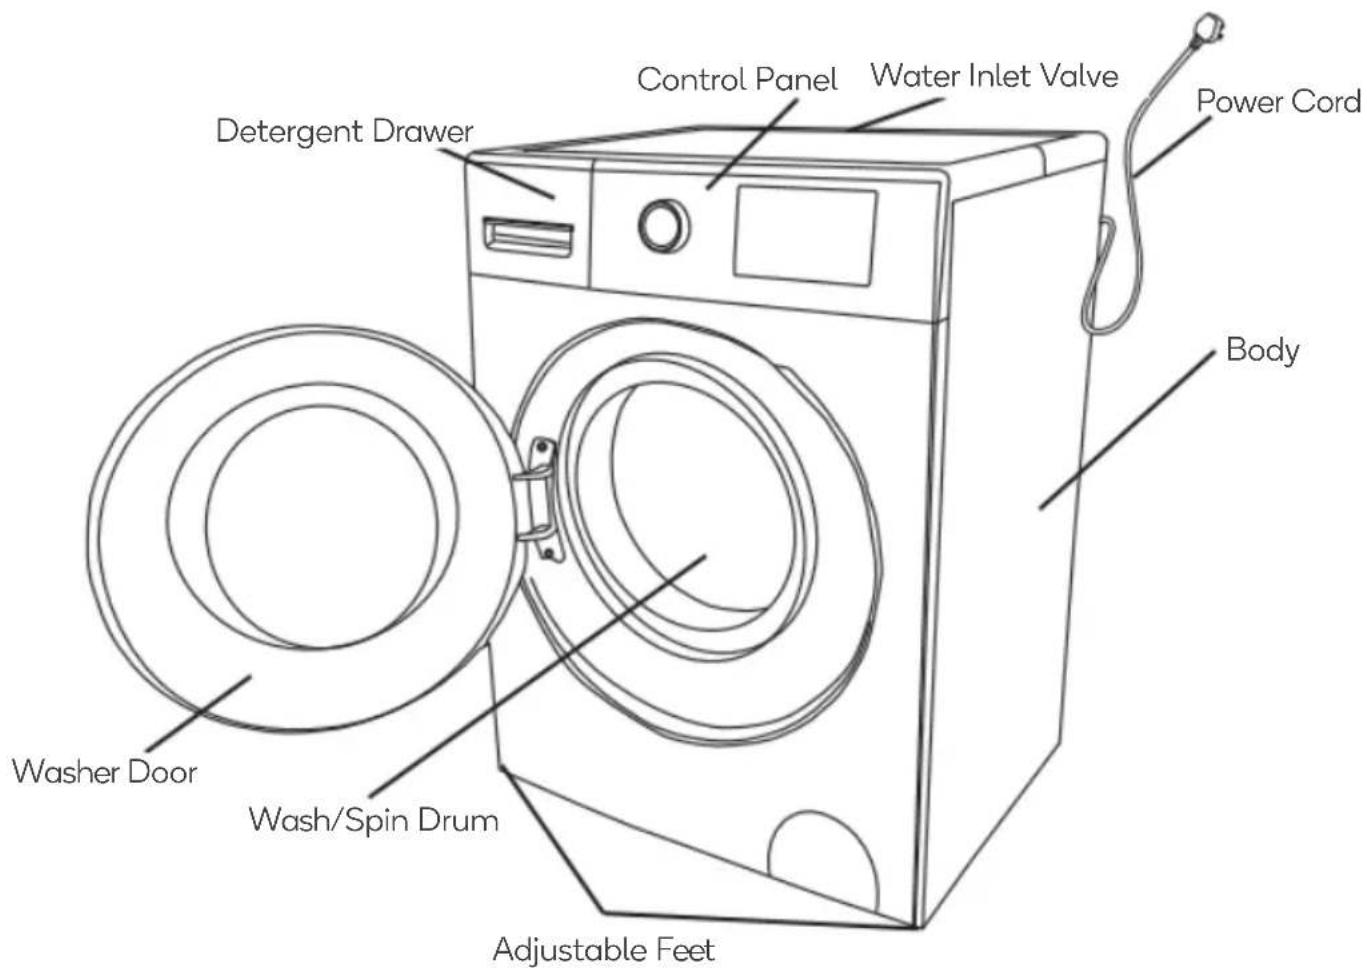
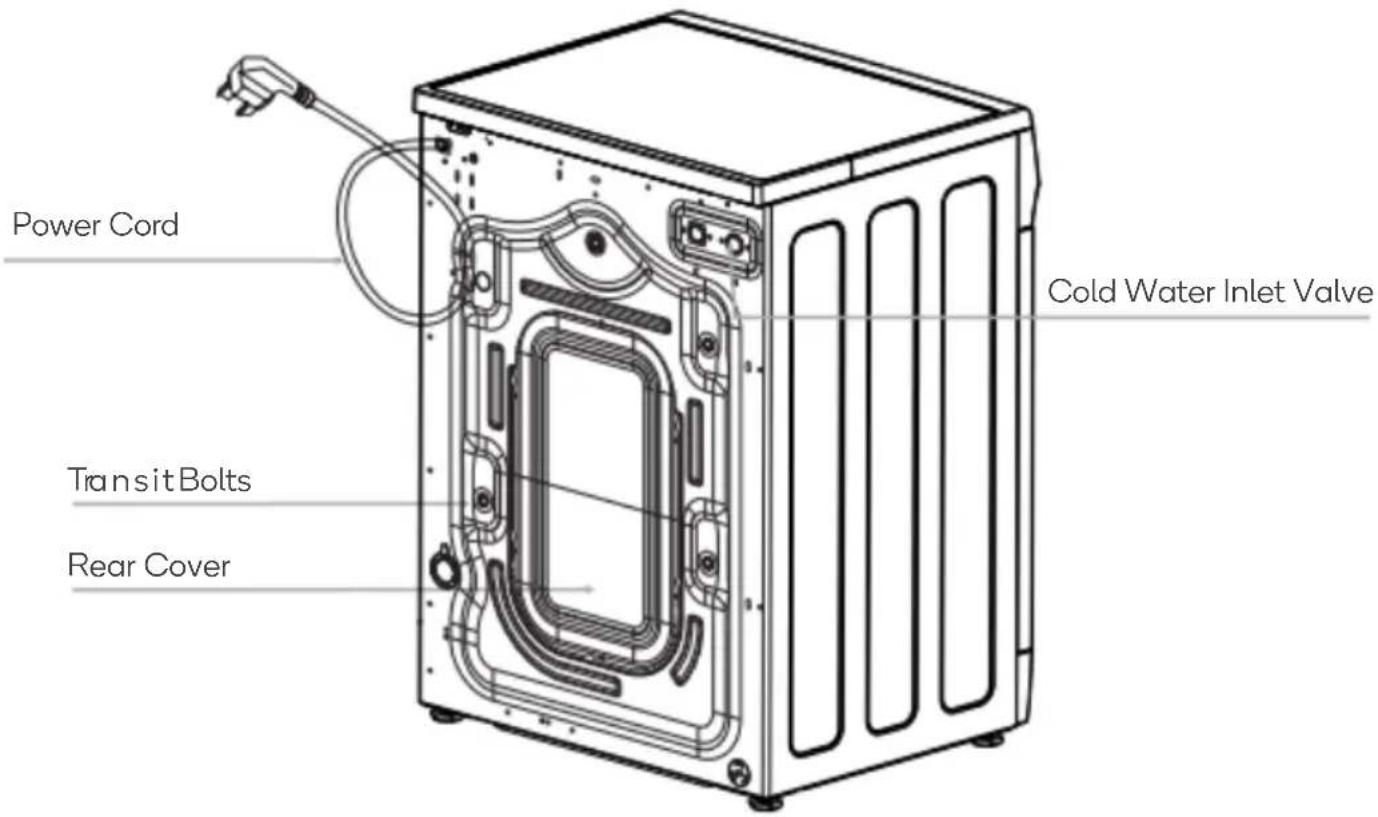
Note:
The artwork in this user guide is intended for reference only and may differ from the actual product.
INSTALLATION
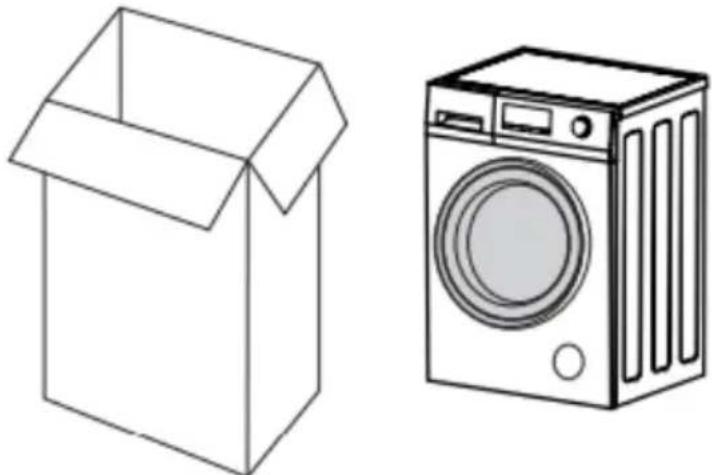
Packaging
natural_image
Line drawing of a cardboard box and a washing machine (no text or symbols)- Remove all the packaging (Including the foam base).
• Properly dispose of all the packaging and keep them out of the reach of children.
• Some condensation may appear on the packaging plastic bag and the door glass.
Transportation
Two people are required to carry the machine. One person on each side carries the machine by holding the base/adjustable feet of the machine.
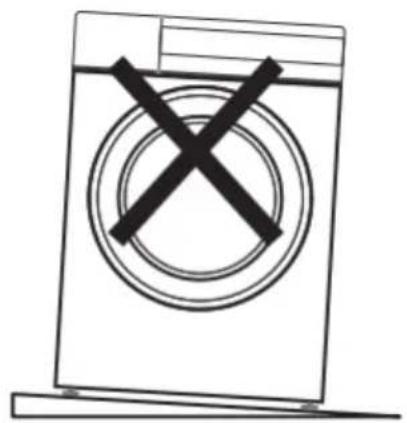
Positioning the washing machine
The washing machine must be installed on the ground which must be hard, flat and skid-proof. Please do not lay the washing machine on soft blankets or wooden floors. Do not lay the washing machine on a platform or bracket.
natural_image
Simple line drawing of a washing machine with a crossed-out circular symbol (no text or labels)Sloping ground
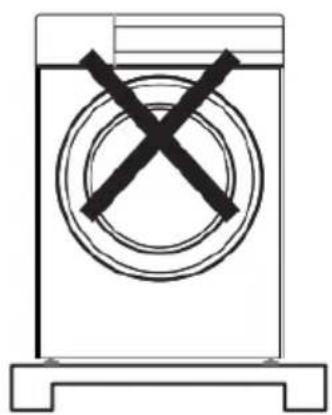
natural_image
Simple line drawing of a washing machine with a circular component and a cross mark (no text or symbols)Platforms or brackets
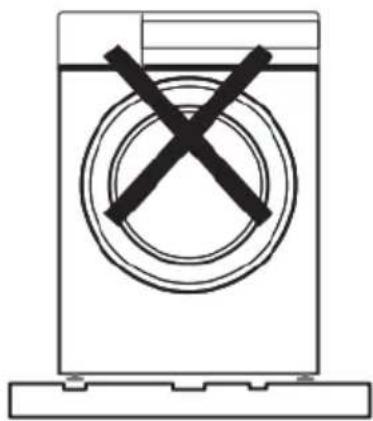
natural_image
Simple line drawing of a washing machine with a circular component and X mark (no text or symbols)Uneven surfaces
Removing the Transit Bolts
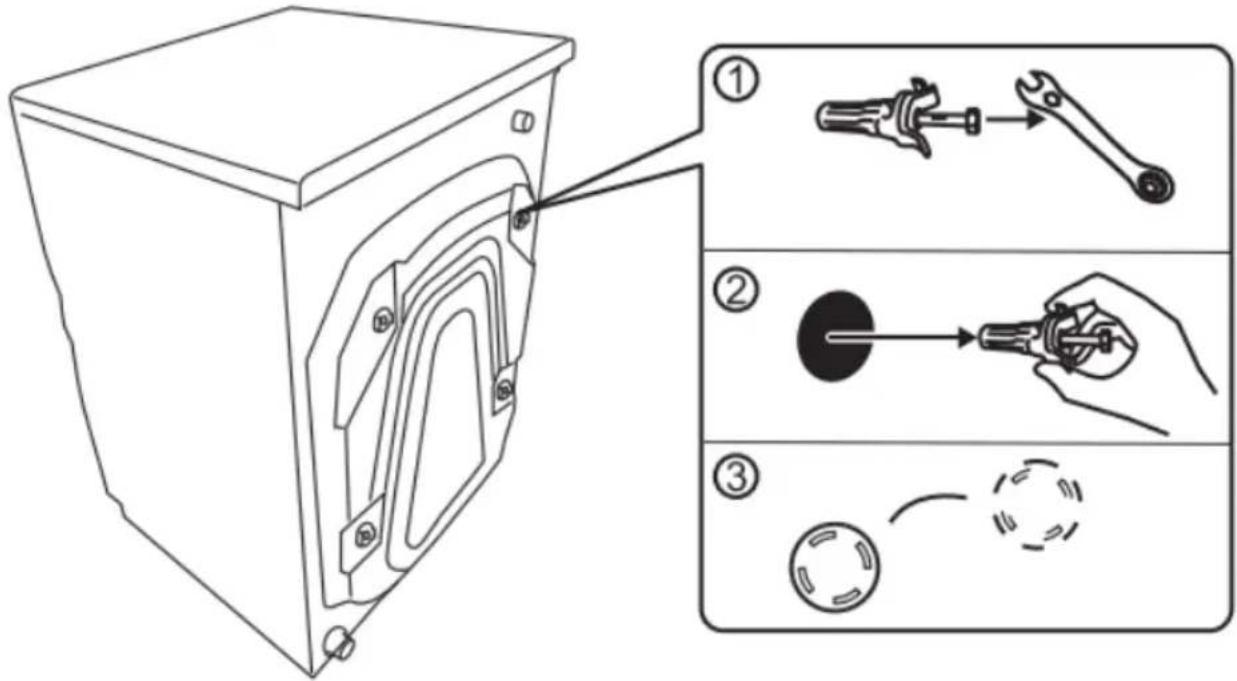
To protect the machine in transportation, there are 4 bolts inserted into the inner part of the machine to keep the drum in place. These bolts must be removed before use, or damage to the internal components of the machine or surrounding environment may occur.
- Unscrew each of the four bolts with a spanner.
- Remove the bolts horizontally.
- Fit the supplied caps into the holes.
- Keep the transit bolts in a safe place, as they will be needed to transport the machine in future as required.
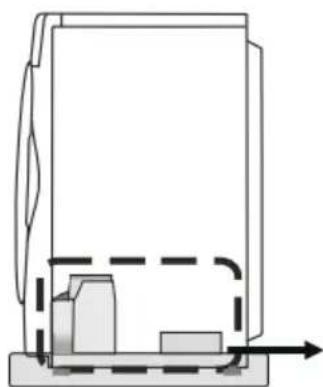
natural_image
Pure technical diagram of a mechanical component with no text, numbers, or symbolsBase protection device
- As shown above, confirm that the base protection device is not stuck at the bottom of the washing machine before use.
Level Adjustment
Adjust the machine horizontally
There may be strong vibrations, noise and disfunction if the washing machine is not steadily installed before operation. To ensure the appliance is correctly levelled:
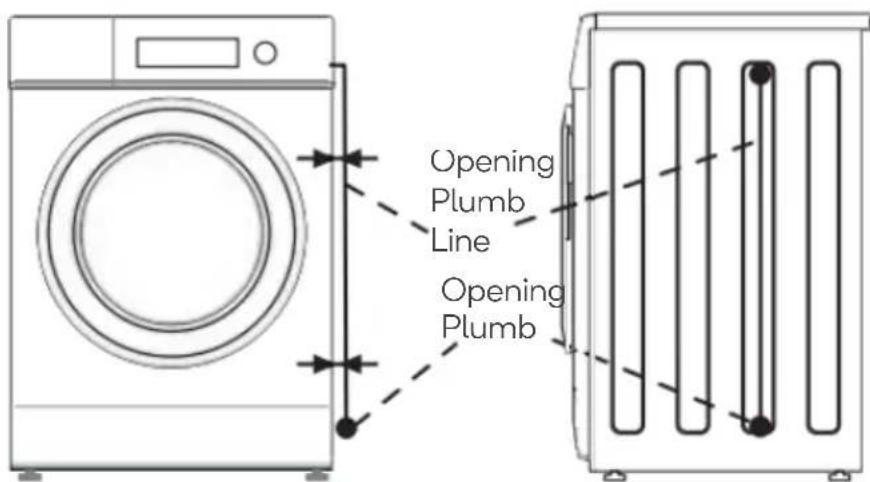
- Check whether the washer is on a level surface using a plumb line as shown in the image below.
The washer is level on the floor if the frame line of the washer is parallel with the plumb line.
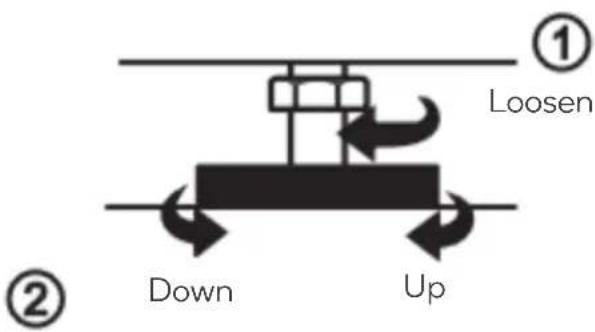
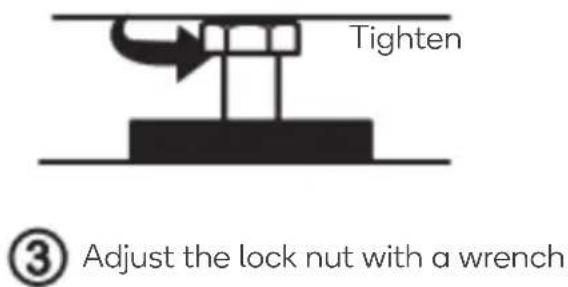
- If required, adjust the legs of the washer to make the unit level as shown below.
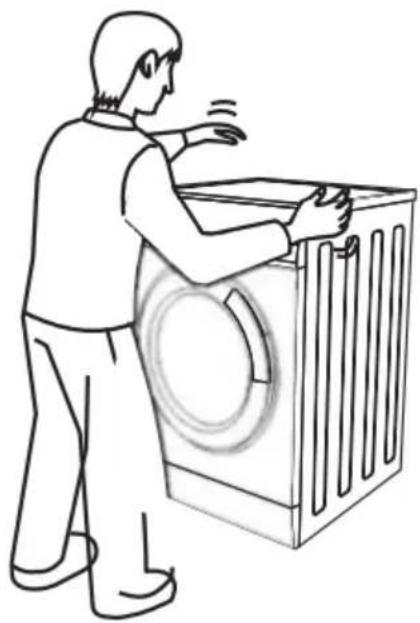
- Place both hands on top of the washer diagonally, then press down and shake the washer slightly to make sure that the washer is steady.
natural_image
Line drawing of a person washing a large washing machine (no text or symbols)Connecting the water inlet hose to the tap
-
Check that the sealing washer is firmly seated.
-
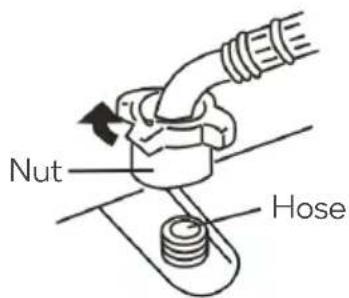
Attach the curved end of the hose to the inlet valve of the washing machine. Tighten the coupling nuts securely by hand.
-
Attach the straight end of the hose to the tap. Tighten the coupling nuts securely by hand.
-
Turn on the taps and check for leaks. Tighten the coupling nuts firmly if there is any leakage. If the water pressure is strong, close the water tap completely then open it slightly.
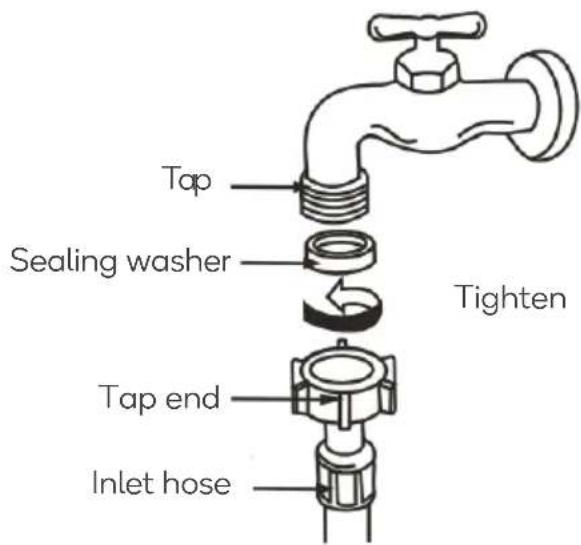
Connecting the water supply hose to the washer
Turn the nut clockwise while holding the hose until the nut is tight. When the hose requires detaching, turn the nut counter-clockwise after turning the tap off.
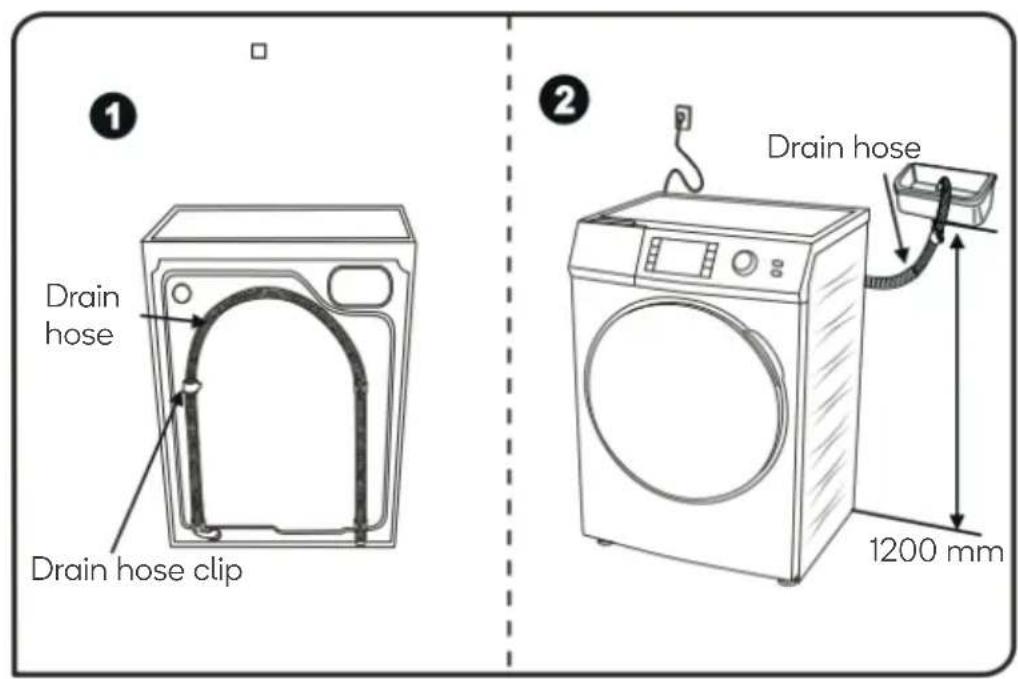
Connecting the drain hose
-
When the appliance is not in use, place the drain hose at the back of the washing machine as shown in image 1.
-
When the appliance is in use, place the hose into a drainage trough as shown in image 2. The end of the drain hose can alternatively be placed into the sewer. Keep space between the end of the drain hose and the sewer elbow to avoid drainage issues.
-
Clean the filter in the pump periodically to ensure reliable function.
Note:
Do not remove the drain hose clip, as this will lead to drainage problems.
OPERATION
Detergent drawer
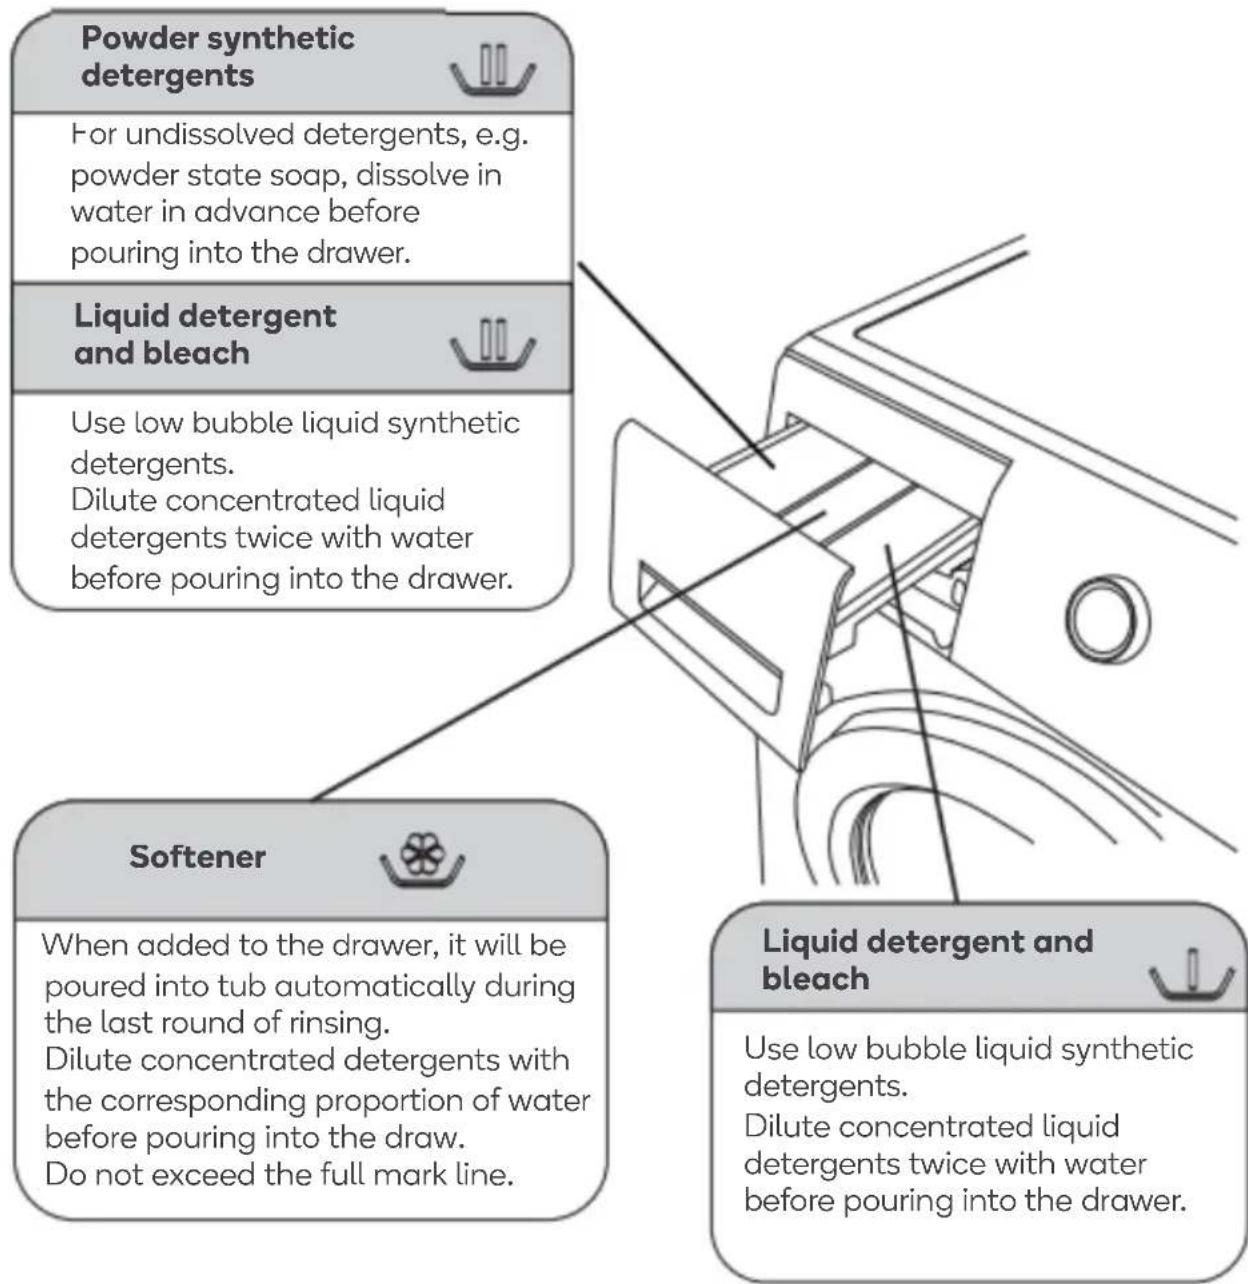
- Do not use high bubble washer powder or detergent.
• Use detergents in accordance with the instructions provided by their manufacturer. - Excessive detergent will cause too much bubble and affect the rinse, as well as presenting possible function faults.
- Choose suitable detergents considering the type and colour of clothes, the water temperature, and the stains to be removed.
Control Panel
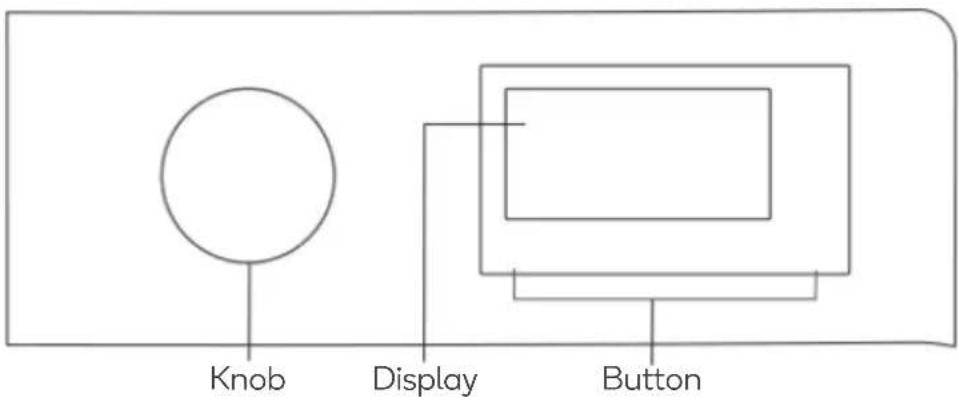
Start/Pause button:
- Press the button to start a program and press again to pause.
Program Select knob:
• Select the desired program to power on.
• Turn to On/Off position to end a wash cycle early and power off.
- When programs finish, the machine will power off automatically.
Display window introduction:
- When powering on, it will display the spin speed and other program details.
- When running, it will display the remaining program time.
- In the event of a malfunction, it will display an error code (see the Troubleshooting section below).
TEMP. Button:
- Sets the washing temperature according to the clothes type.
- The temperature setting range is different between programs, and some will have a temperature range limitation.
Speed button:
- Set the spin speed according to the user's requirement.
- The speed setting range is different between programs, and some will have a temperature range limitation.
Delay button:
- Allows the user to set the finishing time of the set program.
Oxygen Fresh button:
• Used to set the Oxygen Fresh function. This program will limit some settings.
• The drum will rotate 10sec every 4 min in 4 hrs after washing program ends.
- This is used to prevent wrinkles and odours in case users forget to take out the clothes after washing.
• The Oxygen Fresh icon will flash when this program is in use.
Rinse button:
- Set the number of rinses as needed. Adjusting the number of rinses in some programs is limited.
Soak button:
- Set the soak time as needed. Adjusting the soak time in some programs is limited.
Stain button:
The washing machine will adjust the temperature and time in accordance with the stain type selected.
 | Oil | Coffee | |
 | Juice | Red Wine | |
 | Watercolour | Mud |

Time wash button:
- Allows the user to adjust the set washing time.
Wash programs
| Cotton Eco | Recommended for a normally soiled cotton load at rated capacity |
| Cotton | Wash cotton clothes only |
| Mix Wash | Mixed wash of cotton and synthetics clothes |
| Jeans | Wash jeans and heavy denim clothing |
| Wool | Wash wool clothes that are machine washable |
| Synthetic | Wash clothing with synthetic fibres |
| Winter clothes | Wash down jackets which are machine washable |
| Quick wash | Wash a small amount of light dirty clothes |
| Colours | Wash clothes with dark or light colour. Always wash dark and light-coloured loads separately. |
| Under Wear | Wash underwear and delicates |
| Shirt | Wash dress and business shirts |
| Kids Wear | Wash children's clothing |
| Rinse + spin | For clothes which only require rinse and spin |
| Spin | For clothes which only require a spin |
| Drum clean | For cleaning the machine's drum. Do not run this cycle with clothes in the drum |
| Backpack | For washing backpacks (see more details below) |
Running a normal wash program
1. Preparation
o Put the clothes in and close the door.
- Put the detergent or washing powder into the detergent box.
- Switch on the water tap. Connect the drainpipe. Plug the power supply.
- Power on the machine.
- Choose a suitable program for the clothes to be washed.
- Adjust settings with the buttons as desired (where permitted by the selected program).
- Press the "START/PAUSE" button to commence operation.
- When the program is finished, the buzzer will sound.
Wool
• Always check any care instructions that may be on the clothes before washing.
- When the wash is completed, remove the clothes for airing immediately to avoid deformation.
- The temperature cannot be set higher than 40 degrees to avoid damage to clothing.
• Using wool detergent can improve washing performance.
• Always wash light colour clothes and dark colour clothes separately.
Backpack
- This cycle is only intended for washing backpacks which can be washed by washing machine.
- Remove any attached decoration (such as badges or pins) before washing and bind the straps and any belts tightly.
- Ensure all zippers are closed and that the backpack is being washed separately from other clothes.
- When the wash is completed, remove the backpack for airing immediately.
Delay wash
Once a suitable program has been set, press the delay button to set the finish time of the cycle. Press the Start/Pause button to start the delay wash function. The delay time can be set in one-hour increments to a maximum of 24 hours.
- If the delay time needs to be amended or cancelled after the program has started, turn off the power and set again.
- When confirming the delay time, press the delay button. The set delay time will display for 5 seconds.
- The delay time will differ depending on the water pressure, drainage, clothes type and water temperature.
Add
Use this function to add washing to the machine after a program has commenced. Press the "Start/Pause" button until the time disappears. The door lock will release, and the display will show "Add". Add washing as required then close the door and press the "Start/Pause" button to continue to wash.
- Do not attempt to forcibly open the door, as this can easily damage internal parts and cause safety issues.
- When there is a lot of foam or water in the drum, use a dry towel to prevent foam and water from spilling out when the door is opened.
Mute buzzer
Enabling this function will mute the buzzer that sounds when a program has finished.
After powering on the machine, press and hold the "Start/Pause" button until the buzzer is heard to mute the buzzer. Repeat this process to disable the mute function.
Child Protection
- If the door is opened before the program starts, the machine will activate child protection mode.
• Firstly, the door will be opened, and the motor will be running for a while.
- And then, the door will be unlocked for a while still working again. If during the waiting time, the door is opened. The machine will be stopped.
Child Lock
The child lock function can be set to prevent children from operating the machine when a cycle is in progress, locking the door and the control panel (except for the power button).
Power on the machine, then press and hold the “TEMP”. button for 3 seconds until the buzzer sounds. The child lock function is now set. If these steps are repeated, the child lock function will be disengaged. When this function is disabled, the door can be opened again.
DOOR LOCK
Unlocking the Automatic Door Lock
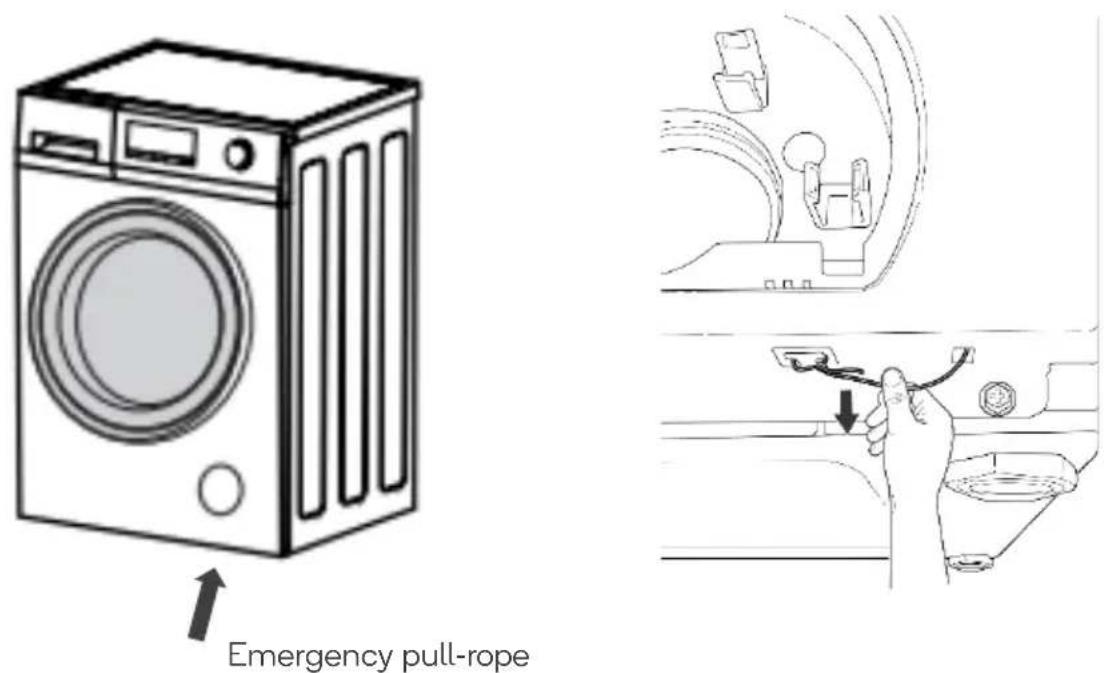
When the machine is operating, the door locks automatically. This is to prevent scalding from touching hot water before it has a chance to cool down. In normal usage, the door will not be unlocked until either the cycle is stopped, or the emergency pull-rope is activated.
When the machine is working, press the "start/stop" button. In most cases, the door can then be opened after the inner tub stops spinning. Exceptions to this are:
- If the power plug is removed when the machine is running, the door will remain locked as a safety measure.
- If the machine was running at a high working temperature, the door will remain locked as a safety measure until the temperature has reduced.
In most cases, the recommended course of action is to complete a full wash cycle and wait until the washing machine has cooled before opening.
To unlock the door in an emergency, there is a pull-rope located at the base of the washing machine. Tilt the machine up to gain access to the underside and locate the pull-rope. Pull the rope firmly until the door latch is unlocked, allowing door to be opened.
CAUTION – Water may be extremely hot and pose risk of scalding.
Note: If the door is opened whilst the machine is working, bubbles may escape. Clean the machine with a towel.
CLEANING & CARE
Ensure to maintain the machine after long term use to maximise the lifetime of the product. Always disconnect the power before cleaning or maintaining the appliance.
Machine body
- Use a soft cloth to clean the body after each wash. If it is heavily soiled, put some mild detergent or soapy water on the cloth to clean the body.
• Do not use water to flush the machine directly. - Dirty powder, diluents, petrol, and alcohol are not permitted for cleaning the machine.
Door gasket
Use a cloth to clean the gasket after each wash. If anything has become lodged in the door gasket, ensure to remove it.
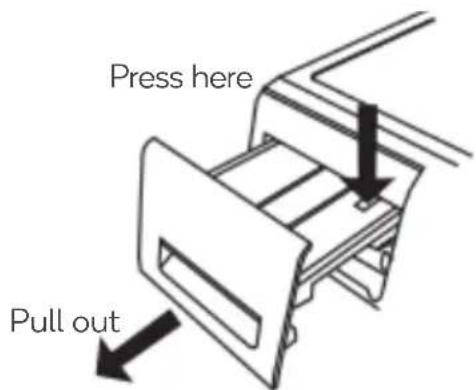
Detergent drawer
Routinely clean the detergent drawer. Take out the box and clean it with water.
Drum clean (recommended to be performed once a month)
There may be dirt left in the drum after an extended period of use. Run the drum clean program to clean the inner and external drum when this occurs. Do not add clothes or detergent when using the drum clean function.
Water inlet valve (recommended to be performed twice yearly)
-
Take out the inlet pipe.
-
Take out the filter screen.
-
Use a toothbrush to clean the filter screen and then assemble it again.
-
Reconnect the inlet pipe after cleaning.
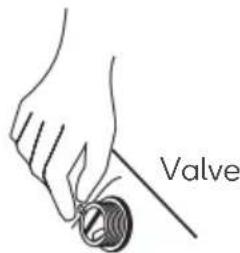
Machine frozen
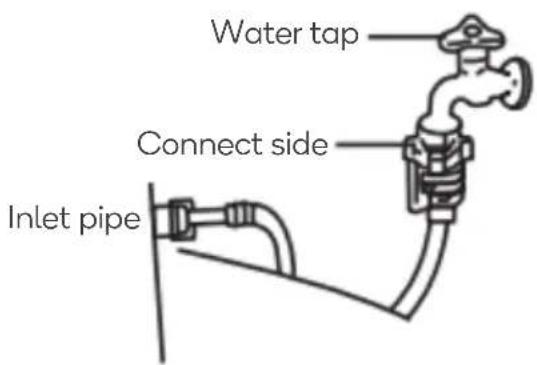
- Wrap a hot towel around the water tap and connector
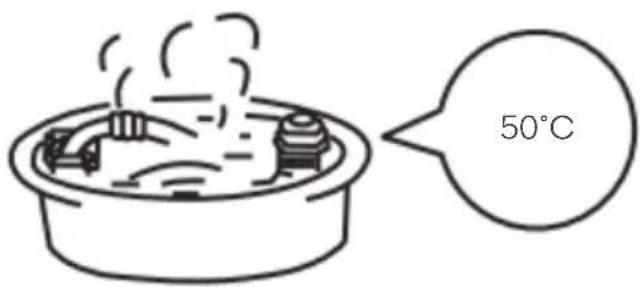
- Disassemble the inlet pipe and place it into hot (50°C) water.
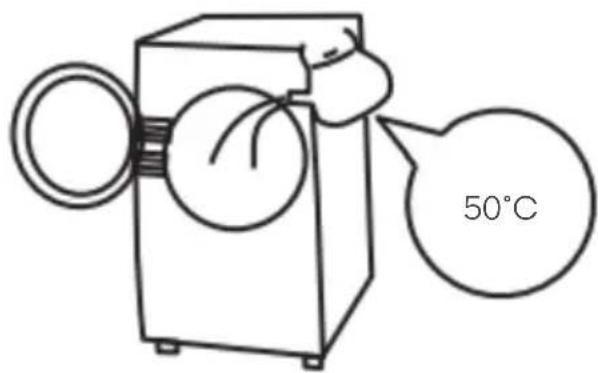
- Put 2-3 litres of hot (50°C) water into the machine.
- Assemble the inlet pipe again, open the water tap and start the machine. Once this has been done, examine the inlet pipe and drain pipe to ensure they can operate normally.
Pump filter (recommended to be performed once a month)
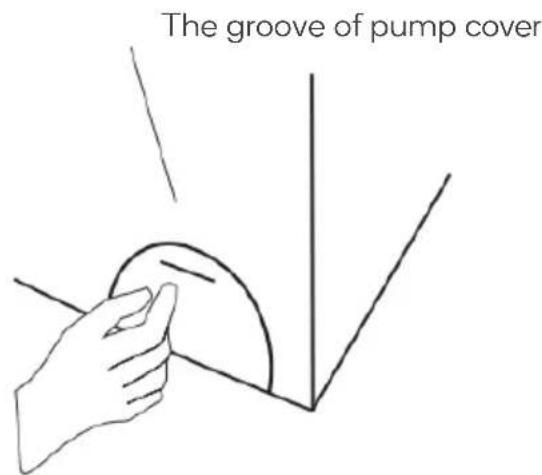
- Insert coin into the groove of the pump and press it. The cover of the filter can be opened. (Attention: If there is hot water in the machine, please wait for cooling and then open the filter.)
- Take out the filter anticlockwise.
- Wash the filter with water.
- Assemble the filter into the pump clockwise.
Attention: The filter should be assembled tightly in order to avoid water leakage. Never clean the filter when the machine is working.
SPECIFICATIONS
| Rated wash capacity | 9.0kg |
| Rated spin capacity | 9.0kg |
| Rated dry capacity | - |
| Rated dry power | - |
| Max current | 10A |
| Rated voltage | 230-240V-50Hz |
| Rated power | 2000W |
| Energy efficiency | 4 Stars |
| Water efficiency 4 Stars | |
| Water consumption per wash | 90L |
| Annual energy consumption | 316kWh |
| Washing performance | 0.8 |
| Water pressure | 0.03-1.0MPa |
| Product dimension | 600 x 635 x 850mm |
TROUBLESHOOTING
| Issue | Probable Cause |
| Door cannot be opened | Water temperature/water level is too high, or power has been cut.Child lock function has been enabledClothes are jammed between door and gasket. |
| Peculiar smell | The rubber components of the machine may emit an odour for the first few washes. This is normal. |
| No water | Turn the tap on.Ensure the water pipe has not frozen.Ensure the filter is not obstructed.Ensure the household water supply is uninterrupted. |
| Water filling halfway through a program | If the water level drops, the system will automatically fill with the appropriate amount of water. |
| Drainage when the machine is washing | Too much or bubbly detergent has been used. |
| Remaining program time unexpectedly increases | The machine will automatically fill with water to keep balance if the clothes are poorly distributed.The remaining time is calculated based on 15L/min inflow. The time will differ based on the water pressure supplied to the appliance.The washing machine will have an extended spin period if clothes are poorly distributed. |
| Abnormal sound during spin cycle | Ensure power is correctly connected to the appliance.Ensure the transit bolts have been removed.Ensure no hairpin, coins or other foreign objects have fallen into the drum. |
| Will not power on after power failure | If power has been restored and the machine will not operate, turn off the power then reset the program. |
| Emergency door opening | In the event of a power failure with clothes still in the machine; unplug the power cord, wait for the inner drum to stop spinning, then pull down the emergency rope on the bottom right corner of the cabinet. When a slight clicking noise is heard the door can be unlocked.Confirm the water level is below the bucket and the water temperature is below 50°C before proceeding. |
| Fault code | Issue | Probable Cause | Solution |
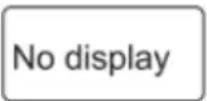 | No power | Ensure the machine is properly connected and power is supplied.Check for a power failure in your area.Check the leakage protector switch. | |
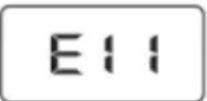 | No water | Turn the tap on.Ensure the water pipe has not frozen.Ensure the filter is not obstructed.Ensure the household water supply is uninterrupted. | Press the Start/Pause button. |
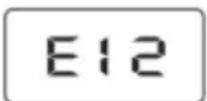 | No drainage | Ensure the drainpipe is connected securely.Drain height too high.Check if the drainpipe has been blocked.Ensure the drain-pipe length. | Press the Start/Pause button. |
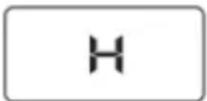 | Door cannot be opened | Ensure hot water has not been used.The water temperature is high when washing. | The door will be automatically locked until the temperature drops to a safe level. |
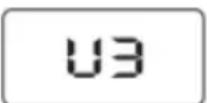 | No spin cycle | Ensure the washer is level and steady.Ensure you do not have too many large, bulky items in the wash.Load fewer towels into the wash.Avoid placing rolled up blankets into the machine. | Add two items of clothing and press Start/Pause. |
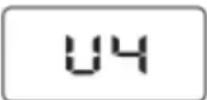 | Door not closed | Close the door properly and then press Start/ Pause to restart. | |
| Other code Alarm | Press the Start/Pause button to restart. Contact Kogan.com if issues persist. | ||
NOTES
NOTES
Need more information?
We hope that this user guide has given you the assistance needed for a simple set-up. For the most up-to-date guide for your product, as well as any additional assistance you may require, head online to help.kogan.com
kogan.com
- 9KG FRONT LOAD INVERTER WASHING MACHINE
- COMPONENTS
- OVERVIEW
- Note:
- INSTALLATION
- Packaging
- Transportation
- Positioning the washing machine
- Removing the Transit Bolts
- Level Adjustment
- Adjust the machine horizontally
- Connecting the water inlet hose to the tap
- Connecting the water supply hose to the washer
- Connecting the drain hose
- OPERATION
- Detergent drawer
- Control Panel
- Start/Pause button:
- Program Select knob:
- Display window introduction:
- TEMP. Button:
- Speed button:
- Delay button:
- Oxygen Fresh button:
- Rinse button:
- Soak button:
- Stain button:
- Wash programs
- Running a normal wash program
- Preparation
- Wool
- Backpack
- Delay wash
- Add
- Mute buzzer
- Child Protection
- Child Lock
- DOOR LOCK
- Unlocking the Automatic Door Lock
- CLEANING & CARE
- Machine body
- Door gasket
- Drum clean (recommended to be performed once a month)
- Water inlet valve (recommended to be performed twice yearly)
- Machine frozen
- Pump filter (recommended to be performed once a month)
- SPECIFICATIONS
- TROUBLESHOOTING
- NOTES
- Need more information?
Brand : Kogan
Model : KAWFLWASM9A
Category : Washing machine