
d-Copia 20W - Printer OLIVETTI - Free user manual and instructions
Find the device manual for free d-Copia 20W OLIVETTI in PDF.


| Product Type | Monochrome Laser Multifunction Printer |
| Functions | Print, Copy, Scan |
| Print Technology | Laser |
| Print Speed (A4) | Up to 22 pages per minute |
| First Print Out Time | Less than 8 seconds |
| Maximum Print Resolution | 1200 x 1200 dpi |
| Copy Speed (A4) | Up to 22 copies per minute |
| Scan Resolution | Up to 600 x 600 dpi (optical) |
| Paper Input Capacity | 250 sheets standard tray |
| Paper Output Capacity | 100 sheets |
| Media Sizes Supported | A4, A5, A6, B5, Letter, Legal, Custom |
| Connectivity | USB 2.0, Ethernet 10/100 Base-TX, Wi-Fi 802.11b/g/n |
| Mobile Printing | Apple AirPrint, Google Cloud Print, Mopria |
| Processor Speed | 600 MHz |
| Memory | 256 MB (maximum 512 MB) |
| Dimensions (W x D x H) | 410 x 390 x 310 mm |
| Weight | Approximately 12.5 kg |
| Power Consumption (Active) | 550 W (max) |
| Power Consumption (Sleep) | Less than 1.5 W |
| Power Supply | 220-240 V, 50/60 Hz |
| Operating Temperature | 10 to 30 °C |
| Operating Humidity | 20% to 80% (non-condensing) |
| Maintenance | Replace toner cartridge and drum unit as needed; clean scanner glass with soft cloth |
| Safety | Class 1 Laser Product; CE, FCC compliance |
| Spare Parts / Repairability | Toner cartridge (TN-320), drum unit (DR-320), maintenance kit available |
Frequently Asked Questions - d-Copia 20W OLIVETTI
User questions about d-Copia 20W OLIVETTI
0 question about this device. Answer the ones you know or ask your own.
Ask a new question about this device
Download the instructions for your Printer in PDF format for free! Find your manual d-Copia 20W - OLIVETTI and take your electronic device back in hand. On this page are published all the documents necessary for the use of your device. d-Copia 20W by OLIVETTI.
USER MANUAL d-Copia 20W OLIVETTI
natural_image
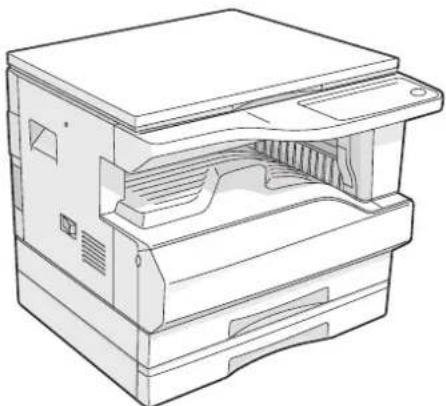
Line drawing of a printer with internal structure and ventilation slots (no text or symbols)d-Copia 16W
natural_image
Line drawing of a mechanical device with internal components (no text or symbols)d-Copia 20W
- BEFORE USING
THE MACHINE 8
• COPY FUNCTIONS ...... 18
• PRINTER FUNCTIONS ..... 29 - USER SETTINGS....31
• TROUBLESHOOTING 40 - ROUTINE MAINTENANCE...55
• PERIPHERAL DEVICES AND SUPPLIES ....58 - APPENDIX 60
PUBLICATION ISSUED BY:
Olivetti S.p.A.
Copyright © 2005, Olivetti
All rights reserved
May 2005
The C€ mark affixed to the product certifies that the product satisfies the basic quality requirements.

The manufacturer reserves the right to carry out modifications to the product described in this manual at any time and without any notice.

ENERGY STAR is a U.S. registered mark.
The ENERGY STAR program is an energy reduction plan introduced by the United States Environmental Protection Agency in response to environmental issues and for the purpose of advancing the development and utilization of more energy efficient office equipment.
Your attention is drawn to the following actions which could compromise the conformity attested to above, as well as the characteristics of the product:
- incorrect electrical power supply;
- incorrect installation, incorrect or improper use or use not in compliance with the warnings provided in the User's Manual supplied with the product;
- replacement of original components or accessories with others of a type not approved by the manufacturer, or performed by unauthorised personnel.
All rights reserved. No part of this material may be reproduced or transmitted in any form or by any means, electronic or mechanical, including photocopying, recording or by any information storage and retrieval system, without permission in writing from the Publisher.
Do not make copies of anything which is prohibited from copying by law. The following items are normally prohibited from copying by national law. Other items may be prohibited by local law.
- Money
- Stamps
- Bonds
- Stocks
- Bank drafts
- Checks
- Passports
- Driver's licenses
In some areas, the "POWER" switch positions are marked "I" and "O" on the copier instead of "ON" and "OFF".
If your copier is so marked, please read "I" for "ON" and "O" for "OFF".
Caution!
For a complete electrical disconnection, pull out the main plug.
The socket-outlet shall be installed near the equipment and shall be easily accessible.
Warning
This is a Class A product. In a domestic environment this product may cause radio interference in which case the user may be required to take adequate measures.
DIRECTIVE 2002/96/CE ON THE TREATMENT, COLLECTION, RECYCLING AND DISPOSAL OF ELECTRIC AND ELECTRONIC DEVICES AND THEIR COMPONENTS
1. FOR COUNTRIES IN THE EUROPEAN UNION (EU)
The disposal of electric and electronic devices as solid urban waste is strictly prohibited: it must be collected separately. The dumping of these devices at unequipped and unauthorized places may have hazardous effects on health and the environment.
Offenders will be subjected to the penalties and measures laid down by the law.
TO DISPOSE OF OUR DEVICES CORRECTLY:
a) Contact the Local Authorities, who will give you the practical information you need and the instructions for handling the waste correctly, for example: location and times of the waste collection centres, etc.
b) When you purchase a new device of ours, give a used device similar to the one purchased to our dealer for disposal.
The crossed dustbin symbol on the device means that:
- When it to be disposed of, the device is to be taken to the equipped waste collection centres and is to be handled separately from urban waste;
- Olivetti guarantees the activation of the treatment, collection, recycling and disposal procedures in accordance with Directive 2002/96/CE (and subsequent amendments).
2. FOR OTHER COUNTRIES (NOT IN THE EU)
The treatment, collection, recycling and disposal of electric and electronic devices will be carried out in accordance with the laws in force in the country in question.
CONTENTS
CAUTIONS....3
● CAUTIONS ON USING....3
● IMPORTANT POINTS WHEN SELECTING AN INSTALLATION SITE .... 3
● CAUTIONS ON HANDLING 4
● CAUTIONS ON LASER 4
● ENVIRONMENTAL INFORMATION......4
USING THE MANUAL 5
● ABOUT THE OPERATION MANUALS......5
● THE MEANING OF "R" IN ORIGINAL AND PAPER SIZE INDICATIONS 5
● CONVENTIONS USED IN THIS MANUAL....5
● SPF 5
● DIFFERENCES BETWEEN MODELS....6
MAIN FEATURES....7
1 BEFORE USING THE MACHINE
PART NAMES AND FUNCTIONS .... 8
● PAPER....13
- LOADING PAPER....14
● CHANGING A TRAY'S PAPER SIZE SETTING ....16
2 COPY FUNCTIONS
NORMAL COPYING 18
● MAKING A COPY DARKER OR LIGHTER ....21
- SELECTING THE TRAY....21
- SETTING THE NUMBER OF COPIES ......22
REDUCTION/ENLARGEMENT/ZOOM.... 22
● AUTOMATIC RATIO SELECTION .....22
● MANUAL RATIO SELECTION....23
- SELECTING THE VERTICAL AND HORIZONTAL COPY RATIOS SEPARATELY....24
TWO-SIDED COPYING USING THE BYPASS
TRAY....26
DUAL PAGE COPYING.... 27
INTERRUPTING A COPY RUN 28
3PRINTER FUNCTIONS
USING THE PRINTER MODE 29
● BASIC PROCEDURE FOR PRINTING...... 29
● OPERATION IN COPY AND PRINTER MODES.... 30
4USER SETTINGS
ADJUSTING THE AUTOMATIC EXPOSURE LEVEL.... 31
TONER SAVE MODE AND HIGH IMAGE QUALITY MODE.... 32
CUSTOMISING SETTINGS 33
- USER PROGRAMS 33
- SELECTING A SETTING FOR A USER PROGRAM .... 35
SETTINGS FOR AUDITING MODE.... 36
● AUDITING MODE 36
● AUDITING MODE SETTINGS 36
- SELECTING AUDITING MODE SETTINGS ..... 37
5TROUBLESHOOTING
TROUBLESHOOTING 40
● MACHINE/COPYING PROBLEMS......41
● PRINTING PROBLEMS......44
INDICATORS AND DISPLAY MESSAGES .... 46
MISFEED REMOVAL.... 47
● MISFEED IN THE SPF 47
● MISFEED IN THE BYPASS TRAY .....48
● MISFEED IN THE MACHINE....49
● MISFEED IN THE UPPER PAPER TRAY .....52
● MISFEED IN THE LOWER PAPER TRAY .....53
REPLACING THE TONER CARTRIDGE ..... 54
6ROUTINE MAINTENANCE
CHECKING THE TOTAL OUTPUT COUNT
AND TONER LEVEL...... 55
- CHECKING THE TOTAL OUTPUT COUNT...55
- CHECKING THE TONER LEVEL....56
ROUTINE MAINTENANCE.... 56
● CLEANING THE DOCUMENT GLASS AND SPF/DOCUMENT COVER ....56
● CLEANING THE BYPASS TRAY PAPER FEED ROLLER ....57
● CLEANING THE TRANSFER CHARGER .....57
7 PERIPHERAL DEVICES AND SUPPLIES
PERIPHERAL DEVICES 58
● SINGLE PASS FEEDER....58
STORAGE OF SUPPLIES.... 59
● PROPER STORAGE 59
8APPENDIX
SPECIFICATIONS 60
SOFTWARE LICENSE 62
INDEX 64
CAUTIONS
Follow the cautions below when using this machine.
CAUTIONS ON USING
⚠ Warning:
- The fusing area is hot. Exercise care in this area when removing misfed paper.
- Do not look directly at the light source. Doing so may damage your eyes.
Caution:
- Do not switch the machine rapidly on and off. After turning the machine off, wait 10 to 15 seconds before turning it back on.
• Machine power must be turned off before installing any supplies. - Place the machine on a firm, level surface.
- Do not install the machine in a humid or dusty location.
- When the machine is not used for a long time, for example, during prolonged holidays, turn the power switch off and remove the power cord from the outlet.
- When moving the machine, be sure to turn the power switch off and remove the power cord from the outlet.
- Do not cover the machine with a dust cover, cloth or plastic film while the power is on. Doing so may prevent heat dissipation, damaging the machine.
- Use of controls or adjustments or performance of procedures other than those specified herein may result in hazardous laser radiation exposure.
- The socket-outlet should be installed near the machine and should be easily accessible.
IMPORTANT POINTS WHEN SELECTING AN INSTALLATION SITE
Improper installation may damage the machine. Please note the following during initial installation and whenever the machine is moved.

If the machine is moved from a cool place to a warm place, condensation may form inside the machine. Operation in this condition will cause poor copy quality and malfunctions. Leave the machine at room temperature for at least 2 hours before use.
Do not install your machine in areas that are:
- damp, humid, or very dusty

• exposed to direct sunlight

natural_image
Diagram showing a printer emitting light rays into a screen, with a cross symbol indicating exposure (no text or labels present)• poorly ventilated

natural_image
Line drawing of a printer with a fan and emitting exhaust smoke (no text or symbols)- subject to extreme temperature or humidity changes, e.g., near an air conditioner or heater.
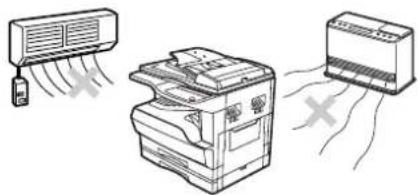
natural_image
Illustration of three household air conditioner units: a fan, a printer, and a washing machine (no text or symbols)The machine should be installed near an accessible power outlet for easy connection and disconnection.
Be sure to connect the power cord only to a power outlet that meets the specified voltage and current requirements. Also make certain the outlet is properly grounded.

Connect the machine to a power outlet which is not used for other electric appliances. If a lighting fixture is connected to the same outlet, the light may flicker.
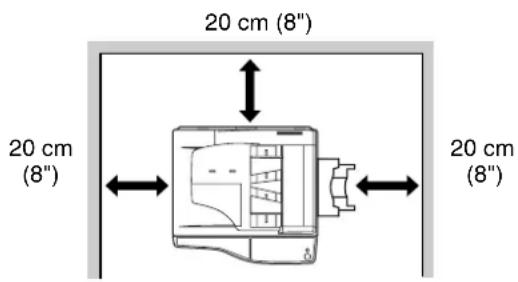
Be sure to allow the required space around the machine for servicing and proper ventilation.
CAUTIONS ON HANDLING
Be careful in handling the machine as follows to maintain the performance of this machine.
Do not drop the machine, subject it to shock or strike it against any object.
Store spare toner cartridges in a cool dry place without removing from the package before use.
- If they are exposed to direct sunlight or excessive heat, poor copies may result.
Do not touch the photoconductive drum (green portion).
- Scratches or smudges on the drum will cause dirty copies.
CAUTIONS ON LASER
| Wave length 785 nm + 10 nm/- 15 nm |
| Pulse times (8.141 μs ± 0.1 μs)/7 mm |
| Output power 0.14 mW - 0.22 mW |
Trademark acknowledgements
- Micro Windows® operating system is a trademark or copyright of Microsoft Corporation in the U.S.A. and other countries.
- Windows® 95, Windows® 98, Windows® Me, Windows NT® 4.0, Windows® 2000, and Windows® XP are trademarks or copyrights of Microsoft Corporation in the U.S.A. and other countries.
- IBM and PC/AT are trademarks of International Business Machines Corporation.
- Acrobat® Reader Copyright © 1987-2002 Adobe Systems Incorporated. All rights reserved. Adobe, the Adobe logo, Acrobat, and the Acrobat logo are trademarks of Adobe Systems Incorporated.
- All other trademarks and copyrights are the property of their respective owners.
ENVIRONMENTAL INFORMATION

As an ENERGY STAR® Partner, OLIVETTI has determined that this product meets the ENERGY STAR® guidelines for energy efficiency.
USING THE MANUAL
This machine has been designed to provide convenient copying features in a minimum amount of office space and with maximum operational ease. To get full use of all machine features, be sure to familiarise yourself with this manual and the machine. For quick reference during machine use, keep this manual in a handy location.
ABOUT THE OPERATION MANUALS
The operation manuals for the machine are as follows:
Operation Manual (Digital Multifunctional System) (this manual)
This manual contains explanations of the product and procedures for using the machine as a copier.
Online Manual (on the accessory CD-ROM)
This manual explains the procedures for using the machine as a printer.
Software Setup Guide (separate manual)
This manual contains instructions for installing the software that allows the machine to be used with your computer and procedures for establishing initial printer settings.
THE MEANING OF "R" IN ORIGINAL AND PAPER SIZE INDICATIONS
An "R" appearing at the end of an original or paper size (B5R, A4R (5-1/2" x 8-1/2"R, 8-1/2" x 11"R), etc.) indicates that the original or paper is oriented horizontally as shown below.

Sizes that can be placed only in the horizontal (landscape) orientation (B4, A3 (8-1/2" x 14", 11" x 17")) do not contain the "R" in their size indication.
CONVENTIONS USED IN THIS MANUAL

Warns the user that injury may result if the contents of the warning are not properly followed.

Cautions the user that damage to the machine or one of its components may result if the contents of the caution are not properly followed.

Notes provide information relevant to the machine regarding specifications, functions, performance, operation and such, that may be useful to the user.
SPF
This operation manual refers to the Single Pass Feeder as the "SPF".
DIFFERENCES BETWEEN MODELS
This manual covers the following models.
| Model d-Copia 20W | d-Copia 16W | |
| Appearance | (With optional SPF installed) (With  The above illustration is used in instances where a function and/or the operation of the machine is the same on both models. The above illustration is used in instances where a function and/or the operation of the machine is the same on both models. | optional SPF installed) |
| Copy speed 20CPM 16CPM | ||
| Paper trays Two (250 x 2) One | (250 x 1) |
AB series (metric) and inch series references
Both specifications are quoted where applicable.
For example:
Page 15, step 1 ......B4 and A3 (8-1/2" x 14" and 11" x 17")
Page 60....50%, 70%, 81%, 86%, 100%, 115%, 122%, 141%, 200% (50%, 64%, 77%, 95%, 100%, 121%, 129%, 141%, 200%)
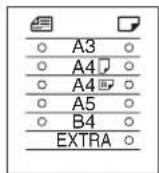
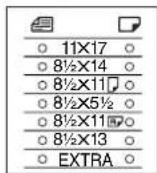
[Inch series][AB series]
Although AB series size indications are shown on the operation panel of this manual, inch series indications are displayed on the inch series machines.
MAIN FEATURES
High-speed laser copying
- First-copy time* ^1 at 300 dpi* ^2 is only 7.2 seconds.
- Copying speed is 20/16 copies per minute. This is ideal for business use and provides a big boost to workplace productivity.
*1 First-Copy time may vary depending on the power-supply voltage, ambient temperature, and other operating conditions.
*2 "dpi" ("dots per inch") is unit that is used to measure resolution. Resolution indicates how much detail can be reproduced in a printed or scanned image.
High-quality digital image
• High-quality copying at 600 dpi is performed.
- In addition to automatic exposure adjustment, two original modes can be selected: "TEXT" for text-only originals, and "PHOTO" for photographs. The exposure can be adjusted to five levels in each mode.
- The photo mode copying function allows clear copying of delicate halftone original images such as monochrome photos and colour photos.
Enhanced copying features
- Zoom copies can be made from 25% to 400% in 1% increments.
(When the SPF is being used, the zoom copy ratio range is 50% to 200%.) - Continuous copying of up to 999 copies is possible. (Can be changed to a maximum of 99 copies in the user programs.)
- The user programs allow customised machine settings and management. Access to the machine can be controlled by enabling audit mode.
Scan once/Print many
- The machine is equipped with a memory buffer allowing the machine to scan an original once and make up to 999 copies of the scanned image. This improves workflow, reduces operating noise from the machine and reduces wear and tear on the scanning mechanism, which provides for a higher reliability.
Laser printer function
- The accompanying printer driver can be installed to enable use of the machine as a printer. (See the accompanying Software Setup Guide.)
Environment and people friendly design
- Preheat and auto power shut-off modes are provided to reduce power consumption when the machine is not in use.
- A universal design has been implemented in the product whereby the height of the operation panel and shape of the keys are designed to be usable by as many people as possible.
This chapter contains basic information that should be read before using the machine.
PART NAMES AND FUNCTIONS

① Document feeder cover (when the SPF is installed) /document cover
Open to make copies from the document glass. (p.18)
② Document glass
Place an original that you wish to scan face down here. (p.18)
③ Handles
Use to move the machine.
④ Power switch
Press to turn the machine power on and off. (p.12)
⑤ Operation panel
Contains operation keys and indicator lights. (p.10)
⑥ Paper output tray
Copies and prints are deposited to this tray.
⑦ Front cover
Open to remove paper misfeeds and perform machine maintenance. (p.50, p.54)
⑧ Paper trays
Each tray holds 250 sheets of paper. (p.14)
⑨ Side cover
Open to remove paper misfeeds and perform machine maintenance. (p.48, p.57)
⑩ Side cover handle
Pull to open the side cover. (p.48)
⑪ Bypass tray guides
Adjust to the width of the paper. (p.15)
⑫ Bypass tray
Paper including special paper (such as transparency film) can be fed from the bypass tray. (p.15, p.26)
⑬ Bypass tray extension
Pull out when feeding large paper such as B4 and A3 (8-1/2" x 14" and 11" x 17"). (p.15)
⑭ Charger cleaner
Use to clean the transfer charger. (p.57)
⑮ USB 1.1 connector
Connect to your computer to use the printer functions. (Software Setup Guide)

⑯ Parallel connector
Connect to your computer to use the printer function. (Software Setup Guide)
⑰ Document feeder tray (when the SPF is installed)
Place the original(s) that you wish to scan face up here. Holds up to 40 originals.
⑱ Original guides (when the SPF is installed)
Adjust to the size of the originals.
⑲ Feeding roller cover (when the SPF is installed)
Open to remove misfed originals. (p.47)
⑳ Right side cover (when the SPF is installed)
Open to remove misfed originals. (p.47)
② Exit area (when the SPF is installed)
Originals exit the machine here after copying.
② Toner cartridge lock release lever
To replace the toner cartridge, pull out the toner cartridge while pushing on this lever.
②3 Toner cartridge
Contains toner. (p.54)
⑳ Roller rotating knob
Turn to remove misfed paper. (p.49, p.50)
⑲ Fusing unit release levers
To remove a paper misfeed from the fusing unit, push down on these levers and remove the paper. (p.50)

The fusing unit is hot. Do not touch the fusing unit when removing misfed paper. Doing so may cause a burn or injury.
②6 Photoconductive drum
Copy images are formed on the photoconductive drum.
⑳ Fusing unit paper guide
Open to remove misfed paper.

The model name can be seen on the machines front cover.
OPERATION PANEL
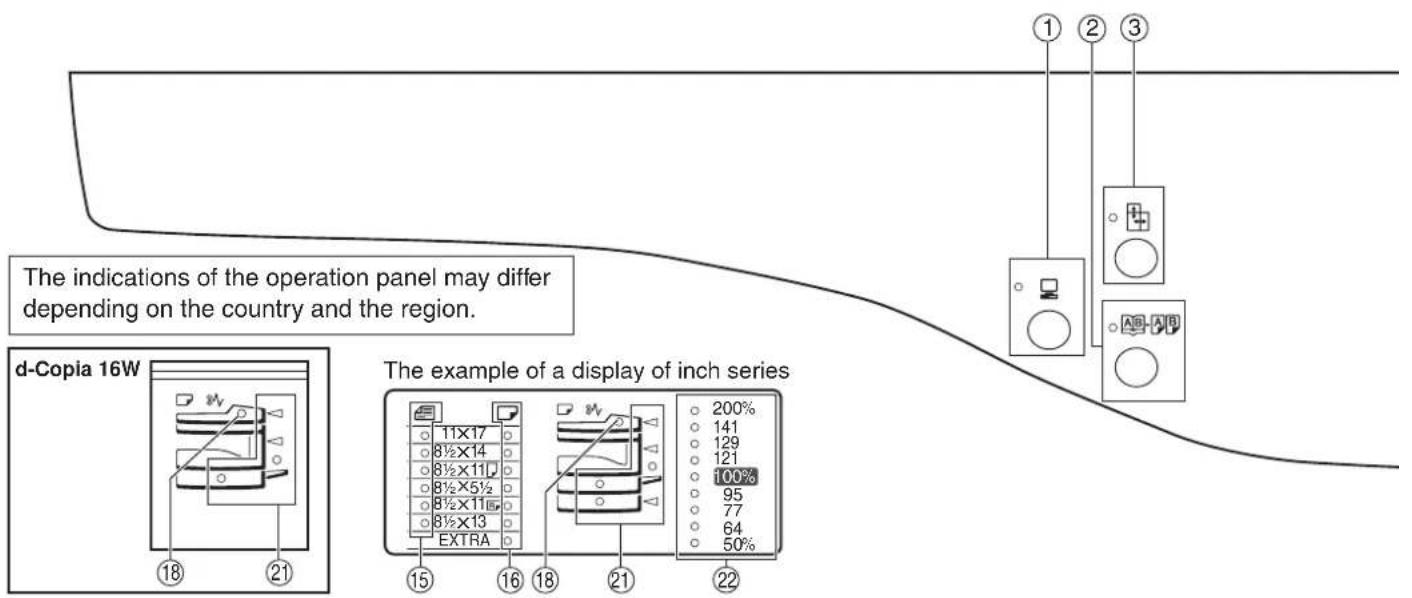
① ON LINE key (indicator
Press to toggle the machine between online and off-line. The indicator lights up when the machine is online, and goes off when the machine is off-line. The indicator blinks while the machine is receiving print data and while printing is paused. (p.29)
② DUAL PAGE COPY key (A) indicator
Use to make individual copies of the two pages of an open book or other two-page original. (p.27)
③ XY-ZOOM key (☐/ indicator
Press to change the horizontal and vertical copy ratios independently. (p.24)
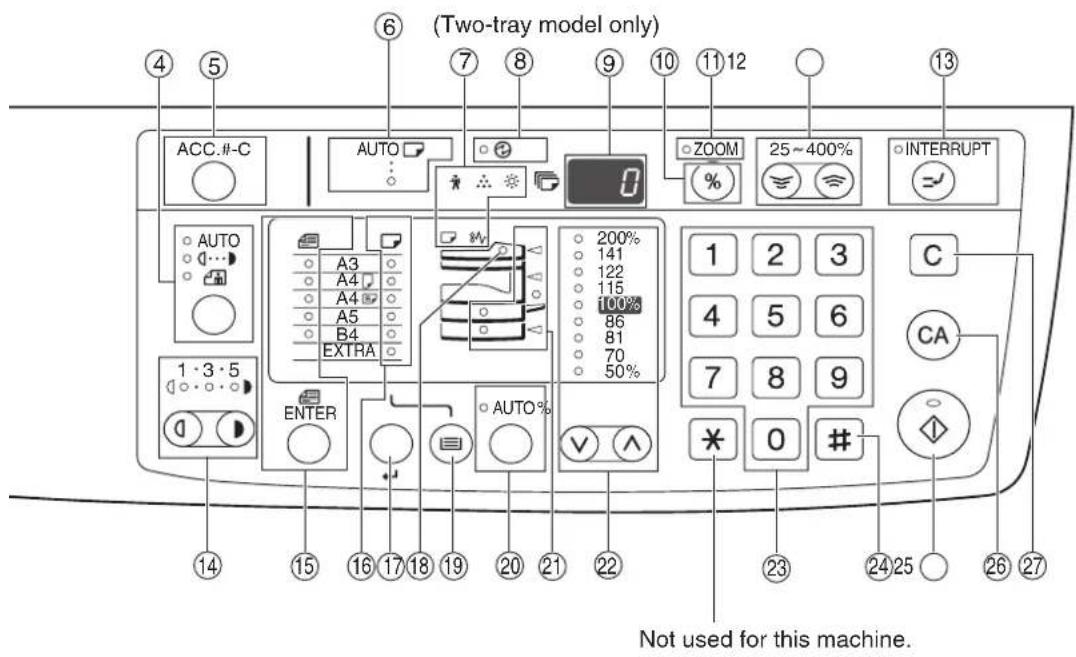
④ AUTO/TEXT/PHOTO key (AUTO indicators

Use to select the exposure mode:
"AUTO", "TEXT", or "PHOTO". (p.21)
⑤ AUDIT CLEAR key ( ) CC.#-C
Closes an open account. (p.39)
⑥ AUTO PAPER SELECT indicator (AUTO
Paper of the proper size will be automatically selected depending on the original size and selected copy ratio when this indicator is on. (p.20)
⑦ Alarm indicators
[ ] Maintenance indicator (p.46)
[ ]:Foner cartridge replacement required indicator (p.46)
[ ]:Developer replacement required indicator (p.46)
[1] Paper required indicator (p.46)
[BMisfeed indicator (p.46)
⑧ POWER SAVE indicator (①)
Lights up when the machine is in a power save mode. (p.12)
⑨ Display
Shows the set number of copies, as well as the copy ratio, user program function or setting code, or an error code when an error occurs.
⑩ Copy ratio display key ( )
Hold down when the machine is not in use to display the copy ratio in the display. (p.24)
⑪ ZOOM indicator
Lights up when a zoom ratio is set. (p.24)
⑫ Zoom keys (💡)
Use to select any reduction or enlargement copy ratio from 25% to 400% in increments of 1%. (p.24)
⑬ INTERRUPT key (P) indicator
Interrupts a copy run. (p.28)
⑭ Light and Dark keys (①, ⬆) / indicators
Use to adjust the TEXT or PHOTO exposure level. (p.21)
⑮ ORIGINAL SIZE ENTER key (ENTER) / ORIGINAL SIZE indicators
Use to enter the original size. (p.16) The selected original size will light up.
⑯ PAPER SIZE indicators
Light up to show the selected copy paper size. (p.16)
⑰ PAPER SIZE ENTER key (←)
Use to set the paper size in the paper trays. (p.16)
⑱ SPF indicator (when the SPF is installed)
Lights up when originals are set in the document feeder tray. (p.19)
⑲ TRAY SELECT key (☐)
Use to manually select a paper tray. (p.21)
⑳ AUTO IMAGE key (AUTIndicator
Press for automatic copy ratio selection. (p.22)
②1 Paper feed location / misfeed location indicators
The selected paper feed location is shown by a lit indicator ( ) (p.18)
The general location of misfed paper is shown by a blinking red indicator ( ) (p.47)
② PRESET RATIO selector keys (√) / indicators
Use to select preset reduction/enlargement copy ratios. (p.23)
②3 Numeric keys
Use to select the desired copy quantity or to make user program entries. (p.22)
To display the total number of pages output by the machine, hold the [0] key down. (p.55)
⑳ [#] k e y
Use to check the total number of copies made. (p.55)
25 START key ( indicator
Press to make a copy (p.18). Also press to exit "Auto power shut-off" mode and to set a user program. Copying is possible when the indicator is on.
②6 CLEAR ALL key (CA)
Clears all selected settings and returns the machine to the initial settings. (p.12)
⑳ CLEAR key ( )c
Clears the copy quantity display or terminates a copy run.
POWER ON AND OFF
The power switch is located on the left side of the machine.
POWER ON
Turn the power switch to the "ON" position.

natural_image
Diagram showing a device with a screen and a cable inserted, no text or symbols presentIt will take about 45 seconds for the machine to warm up. While the machine is warming up, the POWER SAVE indicator ( ^2 will blink. (The POWER SAVE indicator ( ^2 will go off when the machine is ready to copy.)
However, you can make desired settings and press the [START] key ( ) during warm-up. Copying will start after warm-up.
POWER OFF
Make sure that the machine is not in operation and then turn the power switch to the "OFF" position.

natural_image
Diagram showing a device with a magnified inset of its screen (no text or symbols visible)If the power switch is turned off while the machine is in operation, a misfeed may occur and the job that was in progress will be cancelled.
Check the following to make sure the machine is not in operation:
• The START indicator is lit. (Initial state)
- The POWER SAVE indicator ( ) is lit. ("Preheat mode" or "Auto power shut-off" mode)

- The machine reverts to the initial settings when it is first turned on, when the [CLEAR ALL] key (CA) is pressed, or when no keys are pressed for the preset "Auto clear" time following the end of a copy job. When the machine reverts to the initial settings, all settings and functions selected to that point are cancelled. The "Auto clear" time can be changed in the user settings. (p.33)
- The machine is initially set to automatically enter power save mode if not used for copying or printing, for a preset period of time. This setting can be changed in the user programs. (p.33)
Power Save Modes

The machine has two power save modes to reduce overall power consumption thereby reducing the cost of operation. In addition, these modes conserve natural resources and help reduce environmental pollution. The two power save modes are "Preheat mode" and "Auto power shut-off mode".
Preheat mode
This function automatically switches the machine to a low power consumption state if the set duration of time elapses without the machine being used when the power is on. The POWER SAVE indicator (💡) lights up, however, the keys on the operation panel can be used. Normal operation automatically resumes when a key on the operation panel is pressed, an original is placed, or a print job is received.
Auto power shut-off mode
This function automatically switches the machine to a state that consumes even less power than preheat mode if the set duration of time elapses without the machine being used when the power is on. All lights except the POWER SAVE indicator (☐) and ON LINE indicator (☐) go off. To resume normal operation, press the [START] key (☐). Normal operation also resumes automatically when a print job is received. While in auto power shut-off mode, no keys (except the [START] key (☐) can be used.

The preheat activation time and the "Auto power shut-off timer" can be changed using user programs. It is suggested that you set times that are appropriate for your usage of the machine. (p.33)
Initial settings
The machine assumes the initial settings when it is first turned on, when the [CLEAR ALL] key (CA) is pressed, and approximately one minute after the last copy is made in any mode.
Copy ratio: 100%, Exposure: Automatic
Copy quantity: 0, All special copier modes: Off
Auto paper selection: On, Paper feed station: The tray selected in the "Default tray setting" in the user programs. (p.34)
LOADING PAPER
The paper required indicator (☐) will light up when there is no copy paper in the selected paper feed tray, or when the selected paper tray is not installed or is improperly installed.
PAPER
For best results, use only OLIVETTI recommended paper.
| Paper tray type | Paper type | Size | Weight | Capacity |
| Paper tray Standard | paperRecycled paper | A5*1B5A4B4A3(5-1/2" x 8-1/2"*1 (Invoice))(8-1/2" x 11" (Letter))(8-1/2" x 13" (Foolscap))(8-1/2" x 14" (Legal))(11" x 17" (Ledger)) | 56 g/m2 to 90 g/m2 *2(15 lbs. to 24 lbs. *2) | 250 sheets(Load paper lower than the line on the tray) |
| Bypass tray Standard | paperRecycled paper | A6R to A3(5-1/2" x 8-1/2" (Invoice)to 11" x 17" (Ledger)) | 56 g/m2 to 80 g/m2(15 lbs. to 20 lbs.) | 100 sheets *3 |
| Thick paper Max. 200 g/m | 2 (54lbs.) | Load one sheet of these papers at a time to the bypass tray. | ||
| Transparency film Labels | ||||
| Envelopes International DL(110 mm x 220 mm)International C5(162 mm x 229 mm)Commercial 9(3-7/8" x 8-7/8")Commercial 10(4-1/8" x 9-1/2") | 5 sheets | |||
*1 A5 (5-1/2" x 8-1/2") can be used in the upper paper tray but cannot be used in other trays.
*2 When making a large number of copies or prints using 90 g/m² (24 lbs.) paper, remove the output from the paper output tray when about 100 pages have been printed. The output may not stack correctly if more than 100 pages are allowed to accumulate.
*3 The number of sheets of the paper which can be set changes with the weight of a paper.
Special papers
Follow these guidelines when using special papers.
- Use OLIVETTI recommended transparency film and label sheets. Using other than OLIVETTI recommended paper may result in misfeeds or smudges on the output. If other than OLIVETTI recommended media must be used, feed each sheet one at a time using the bypass tray (do not attempt continuous copying or printing).
- There are many varieties of special paper available on the market, and some cannot be used with this machine. Before using special paper, contact your authorised service representative.
● Before using other than OLIVETTI recommended paper, make a test copy to see if the paper is suitable.
LOADING PAPER
Make sure that the machine is not copying or printing, and then follow these steps to load paper.
Loading the paper tray
1 Gently lift and pull out the paper tray until it stops.
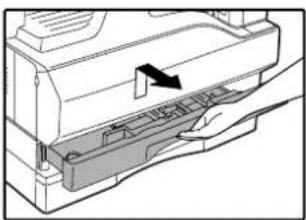
natural_image
Diagram of a printer's internal structure with a hand holding the paper (no text or symbols visible)2 Push the pressure plate down until it locks in place.

natural_image
Technical line drawing of a mechanical assembly with a hand operating a component (no text or symbols)Push the centre of the pressure plate down until it locks into place.
3 Fan the paper.

natural_image
Illustration of two hands holding a fan-shaped object (no text or symbols visible)If the paper is not fanned, double-feeds or misfeeds may occur.
4 Load paper into the tray.


- Do not load paper higher than the line on the tray (up to 250 sheets).
- Make sure that the paper fits under the tabs on the right side of the tray.
- Make sure the stack of paper is straight before loading it. When adding paper, take the remaining paper out and combine it into a single stack with the new paper.
5 Gently push the paper tray into the machine.

natural_image
Diagram of a printer's internal structure with an arrow indicating left motion (no text or symbols present)
If you loaded a different size of paper than was loaded previously in the tray, go to "CHANGING A TRAY'S PAPER SIZE SETTING" (p.16).
Loading the bypass tray
1 Unfold the bypass tray.
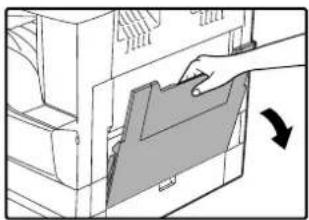
natural_image
Illustration of a hand inserting a folder into a computer (no text or symbols visible)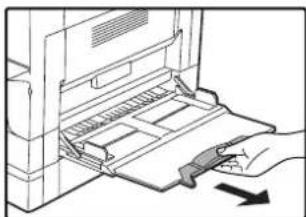
natural_image
Illustration of a hand inserting a device into a rack, with a black arrow indicating direction (no text or symbols present)When feeding large paper such as B4 and A3 (8-1/2" x 14" and 11" x 17"), pull out the bypass tray extension.
3 Insert the paper (print face down) all the way into the bypass tray.
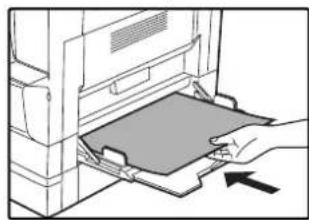
natural_image
Line drawing of a hand inserting a card into a printer (no text or symbols)To prevent a misfeed, verify once more that the paper guides are adjusted to the width of the paper.

If you loaded paper in the bypass tray, press the [TRAY SELECT] key (☐) to select the bypass tray. The bypass tray will not be selected automatically.

2 Set the paper guides to the copy paper width.

natural_image
Line drawing of hands operating a computer with a scroll (no text or symbols)Important points when inserting paper in the bypass tray
- Up to 100 sheets of standard copy paper can be set in the bypass tray.
- Be sure to place A6, A5 or 5-1/2" x 8-1/2" size paper or envelopes horizontally as shown in the following diagram (☐).

- When loading envelopes, make sure that they are straight and flat and do not have loosely glued construction flaps (not the closure flap).
- Special papers except OLIVETTI recommended transparency film, labels, and envelopes must be fed one sheet at a time through the bypass tray.
- When adding paper, first remove any paper remaining in the tray, combine it with the paper to be added and then reload as a single stack. The paper to be added must be the same size and type as the paper already in the tray.
- Do not use paper that is smaller than the original. This may cause smudges or unclean images.
- Do not use paper that has already been printed on by a laser printer or plain paper fax machine. This may cause smudges or unclean images.
Envelopes
Do not use the following envelopes, as misfeeds will occur.
- Envelopes with metal tabs, clasps, strings, holes, or windows.
- Envelopes with rough fibres, carbon paper, or glossy surfaces.
- Envelopes with two or more flaps.
- Envelopes with tape, film, or paper attached to the flap.
- Envelopes with a fold in the flap.
- Envelopes with glue on the flap to be moistened for sealing.
- Envelopes with labels or stamps.
- Envelopes that are slightly inflated with air.
- Envelopes with glue protruding from the seal area.
- Envelopes with part of the seal area peeled off.
CHANGING A TRAY'S PAPER SIZE SETTING
Follow these steps to change a tray's paper size setting.

- The paper size setting cannot be changed when the machine has stopped temporarily due to running out of paper or a misfeed, or during interrupt copying.
- During printing (even in copy mode), the paper size setting cannot be changed.
- A5 (5-1/2" x 8-1/2") size paper can only be selected in upper paper tray.
- Do not load paper that is a different size than the paper size setting. Copying will not be possible.
1 Hold down the [PAPER SIZE ENTER] key (↘) for more than 5 seconds to set the selected paper size.

The currently selected paper feed location indicator will blink and the corresponding paper size (which is currently set) indicator will light steadily. All other indicators will go out.
3 Use the [ORIGINAL SIZE ENTER] key ( ) to select the paper size.
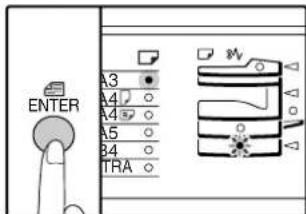
The indicator of the selected paper size lights up.
2 If the machine has two paper trays, use the [TRAY SELECT] key (to select the paper tray for which you wish to change the paper size setting.

Each time the [TRAY SELECT] key (is pressed, a paper tray will be indicated with a blinking paper feed location indicator.
4 Squeeze the lock lever of the front guide and slide the front guide to match the width of the paper, and move the left guide to the appropriate slot as marked on the tray.

- The front guide is a slide-type guide. Grasp the locking knob on the guide and slide the guide to the indicator line of the paper to be loaded.
- The left guide is an insert-type guide. Remove it and then insert it at the indicator line of the paper to be loaded.
- When using 11" x 17" sized paper store the left guide in the slot at the left front of the paper tray.
![OLIVETTI d-Copia 20W - If the machine has two paper trays, use the [TRAY SELECT] key (to select the paper tray for which you wish to change the paper size setting. - 3](/content/2026/05/998535/images/77df9e2bf0b0a7c39c7ee9ad3defbdb65b7feaca9eb39c0ab72510bcd3f45116.jpg)
natural_image
Diagram of a mechanical component with a hammer and arrow indicating a process (no text or symbols present)5 Press the [START] key ( ) and then the [PAPER SIZE ENTER] key ( )

To change the paper size setting of another tray, repeat steps 2 to 5 after pressing the [START] key ( )
![OLIVETTI d-Copia 20W - If the machine has two paper trays, use the [TRAY SELECT] key (to select the paper tray for which you wish to change the paper size setting. - 5](/content/2026/05/998535/images/ba7bebc5460e824e1c0001b322db1f029dfafc32639e33c7fd41ad7520e515ef.jpg)
Affix the paper size label for the paper size selected in step 3 to the label position on the right end of the tray.
Important points when using the printer mode
- Make sure that the tray's paper size setting is the same as the tray's paper size setting in the printer driver. For example, if the tray's paper size setting is A4R (8-1/2" x 11"R), set "Setting Paper Size" to "A4-R" ("Letter-R"). For more information, see "CONFIGURING THE PRINTER DRIVER" in the "Software Setup Guide".
2
Chapter 2
COPY FUNCTIONS
This chapter explains basic copying functions such as normal copying, reduction or enlargement, and exposure adjustment.
NORMAL COPYING
This section explains how to make a regular copy.
If "Auditing mode" has been enabled (p.39), enter your 3-digit account number.
Copying from the document glass
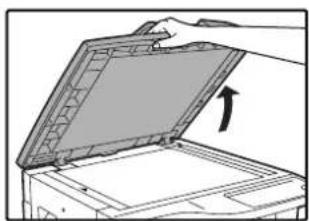
1 Open the document cover/SPF, and place the original.
natural_image
Illustration of a hand opening a device with an arrow indicating the open lid (no text or symbols present)
natural_image
Diagram of a printer or printer with a paper clip being placed on top, showing mechanical components and no visible text or symbols.Place the original face down on the document glass. Align it with the original size scale.

An original up to A3 (11" x 17") can be placed on the document glass.
2 Close the document cover/SPF.

natural_image
Illustration of a hand opening a device into a rack with an arrow indicating rotation (no text or symbols present)3 Press the [ORIGINAL SIZE ENTER] key ( ) and select the original size.

When the original size is selected, the tray with the same size of paper is automatically selected. (Two-tray model only)
- Make sure that the PAPER SIZE indicator lights up. If the indicator is not lit, no tray has the same size of paper as the original. Load paper of the required size in a tray, or select the bypass tray with the [TRAY SELECT] key (and copy from the bypass tray.
- The bypass tray must be manually selected.
- To copy on paper of a different size than the original, select the paper with the [TRAY SELECT] key ( )
- If the ORIGINAL SIZE indicator is blinking, rotate the original so that it is in the same orientation as the blinking ORIGINAL SIZE indicator.
4 Set the number of copies.
5 Press the [START] key ( ) to begin copying.
![OLIVETTI d-Copia 20W - Press the [START] key ( ) to begin copying. - 1](/content/2026/05/998535/images/fe3818bacfe88298127fe8f885a613f4bff25cb9a3111d596ce60df0e1a7f015.jpg)
natural_image
Simple line drawing of a finger pressing a circular button with a diamond symbol (no text or labels)The copy is delivered to the paper output tray.
![OLIVETTI d-Copia 20W - Press the [START] key ( ) to begin copying. - 2](/content/2026/05/998535/images/5d1a358c10d2d6bd50f9b105b65320704b85db6ef7251c27ee466a1b90a06244.jpg)
• The paper output tray can hold up to 250 sheets of paper.
- About one minute after copying ends, "Auto clear" activates and restores the copy settings to the initial settings. (p.12) The setting for "Auto clear time" can be changed in the user programs. (p.33)
- Press the [CLEAR] key ( ) to stop copying in the middle of a run.
Copying from the SPF
1 Make sure that an original has not been left on the document glass. Close the SPF.
2 Adjust the original guides to the size of the original(s).

natural_image
Illustration of hands placing a tray with arrows on the cover (no text or symbols)3 Set the original(s) face up in the document feeder tray.

natural_image
Illustration of a hand pressing down on a printer cover with a paper airplane (no text or symbols)- Insert the original into the document feeder tray as far as it will go. When the original is set, the SPF indicator will light up.
- The ORIGINAL SIZE indicator corresponding to the size of the original lights up.
- If the ORIGINAL SIZE indicator is blinking, rotate the original so that it is in the same orientation as the blinking ORIGINAL SIZE indicator.
- Make sure that the PAPER SIZE indicator is lit. If the indicator is not lit, no tray has the same size of paper as the original. Load paper of the required size in a tray, or select the bypass tray with the [TRAY SELECT] key (and copy from the bypass tray.
- The bypass tray must be manually selected.
- To copy on paper of a different size than the original, select the paper with the [TRAY SELECT] key (④)

Do not place originals of different sizes together in the document feeder tray. This may cause misfeeds.
4 Set the number of copies.
5 Press the [START] key (©to begin copying.
natural_image
Simple line drawing of a finger pressing a circular button with a diamond symbol (no text or labels)The copy is delivered to the paper output tray.

• The paper output tray can hold up to 250 sheets of paper.
- About one minute after copying ends, "Auto clear" activates and restores the copy settings to the initial settings. (p.12) The setting for "Auto clear" time can be changed in the user programs. (p.33)
- Press the [CLEAR] key ( ) to stop copying in the middle of a run.
- If you find it difficult to remove the original from the document feeder tray, open the feeding roller cover first and then remove the original. If you remove the original without opening the feeding roller cover, the original may become dirty.
Auto paper select mode (Two-tray model only)
When the AUTO PAPER SELECT indicator (AUTO ☐) lights up, "Auto paper select mode" is enabled. This function automatically selects the paper that is the same size as the original A5, B5, B5R, A4, A4R, B4, A3 (5-1/2" x 8-1/2", 8-1/2" x 11", 8-1/2" x 11" R, 8-1/2" x 13", 8-1/2" x 14" and 11" x 17") paper. "Auto paper select mode" can be disabled in the user programs. (p.33)
- The sizes of paper that can be loaded vary by country and region.
- If a zoom setting is selected after placing the original, the paper size that is appropriate for the zoom setting will be automatically selected.
- "Auto paper select mode" is cancelled if the automatic ratio selection is enabled (p.22) or if a tray is selected with the [TRAY SELECT] key (⊕) Auto paper select resumes operation when the [CLEAR ALL] key ( ) Ⓧ pressed or when "Auto clear time" activates.
Removing the document cover
To copy large originals like newspapers, remove the document cover. To remove the cover, lift straight up as shown. To replace the cover, do the reverse. The SPF cannot be removed.

natural_image
Illustration of hands installing or adjusting a flatboard on a machine (no text or symbols visible)Copying books or originals with folds or creases
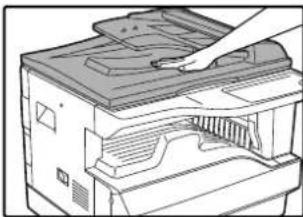
Press down on the document cover/SPF while copying as shown. If the document cover/SPF is not completely closed, shadows may appear on the copy or it may be fuzzy. Straighten originals with folds or creases well before placing.
natural_image
Illustration of a printer with a hand inserting a slot into the cover (no text or symbols visible)Originals that can be used in the SPF
Originals that are A5 to A3 (5-1/2" x 8-1/2" to 11" x 17") and 56 g/m² to 90 g/m² (15 lbs. to 24 lbs.) can be used. A maximum of 40 pages can be placed at once.
For originals that are B4 (8-1/2" x 14") or larger (B4, A3 (8-1/2" x 14", 11" x 17)), a maximum of 30 pages can be placed at once.

• Make sure that there are no paper clips or staples on the original.
- Straighten curled originals before placing them in the document feeder tray. Curled originals may cause misfeeds.
Originals that cannot be used in the SPF
The following originals cannot be used. These may cause misfeeds or smudging and unclear images.
- Transparencies, tracing paper, other transparent or translucent paper, and photographs.
• Carbon paper, thermal paper.
• Originals that are creased, folded, or torn.
• Glued originals, cut-out originals.
• Originals with binder holes. - Originals printed using an ink ribbon (thermal transfer printing), originals on thermal transfer paper.
Stream feeding mode
If "Stream feeding mode" is enabled in the user programs (p.33), the SPF indicator will blink for about 5 seconds after all originals are fed. If a new original is placed in the SPF during this time, the original will be automatically fed in and copying will begin.
MAKING A COPY DARKER OR LIGHTER
Automatic exposure adjustment is initially enabled. This function automatically adjusts the copy image according to the original being copied. If you wish to select the exposure level yourself, follow the steps below. (Select from two original types and five exposure levels for each original type.) The exposure level used in automatic exposure adjustment can also be changed. ("ADJUSTING THE AUTOMATIC EXPOSURE LEVEL" (p.31))
Original types
- AUTO.....Automatic exposure adjustment is enabled and the exposure is automatically adjusted according to the original being copied. The exposure is lowered for coloured areas and background shadows.
- TEXT......The exposure is raised for light areas and lowered for dark backgrounds to make text easier to read.
- PHOTO...Halftones in the photo are reproduced with greater clarity.
1 Press the [AUTO/TEXT/PHOTO] key (AUTO) to select the original type.

To adjust the exposure of a text original manually, press until the TEXT indicator ( lights. To copy a photo, press until the PHOTO indicator ( lights.
![OLIVETTI d-Copia 20W - Press the [AUTO/TEXT/PHOTO] key (AUTO) to select the original type. - 2](/content/2026/05/998535/images/c135d5836280b722088d315a5b557a6997e52b2d542c489a1f4722a8252f0875.jpg)
To return to automatic adjustment, press until the AUTO indicator (Augs).
2 Press the [Light] key ( ) or [Dark] key ( ) to adjust the exposure.
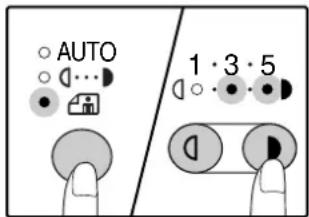
For a darker image, press the [Dark] key ( ) For a lighter image, press the [Light] key ( Ⓤ ). If exposure level 2 or 4 is selected, the two indicators will light simultaneously.
![OLIVETTI d-Copia 20W - Press the [Light] key ( ) or [Dark] key ( ) to adjust the exposure. - 2](/content/2026/05/998535/images/937fb85b8d637de395649c19269e23e8b37e8a5c07ca12064be935fcfb2d33fd.jpg)
Exposure value guidelines
1 – 2 Dark originals like newspapers
3 Normal originals
4 – 5 Coloured text or text written in pencil
SELECTING THE TRAY
If you wish to use a tray other than the automatically selected tray (for example you wish to enlarge or reduce the copy or use the bypass tray), press the [TRAY SELECT] key (To select the desired tray.
natural_image
Simple line drawing of a finger pressing a button with an arrow above (no text or symbols)
- If the desired PAPER SIZE indicator does not light up, change the paper in the tray to the desired paper size. (p.16)
- Automatic ratio selection (p.22) does not operate when the bypass tray or a tray set for a special paper size is selected.
Auto tray switching (Two-tray model only)
If the tray runs out of paper during copying and there is another tray with the same size of paper and the same feeding orientation (horizontal or vertical), the other tray is automatically selected and copying continues. "Auto tray switching" can be disabled in the user programs (p.33).
SETTING THE NUMBER OF COPIES
Press the numeric keys to set the number of copies.

- The set number of copies appears in the display. A maximum of 999 copies (factory default setting) can be set.
- If you wish to make only a single copy, copying is possible with the display showing "0".

If you enter the wrong number, press the [CLEAR] key ( ) and enter the correct number.
Important note when making a large number of copies
The maximum number of copies can be changed in the user programs. (p.34)
When the maximum number of pages (about 250 pages) that can be held in the paper output tray are output, copying will temporarily stop. When this happens, promptly remove the copies and press the [START] key ( ) to resume copying. Copying will also stop after about 500 pages and 750 pages.
Remove the pages and resume copying in the same way.
REDUCTION/ENLARGEMENT/ZOOM
The zoom function enables precise copy ratio selection from 25% to 400% in increments of 1%.
There are three ways to enlarge and reduce copies, as explained below.
- Reduction and enlargement ratios can be selected automatically with the [AUTO IMAGE] key ( AUTO %). "AUTOMATIC RATIO SELECTION" (below)
- Reduction and enlargement ratios can be selected manually with the [PRESET RATIO] selector keys (√) and/or the [ZOOM] keys (, ). 😊
"MANUAL RATIO SELECTION" (p.23)
- Separate settings can be selected for the vertical and horizontal ratios.
"SELECTING THE VERTICAL AND HORIZONTAL COPY RATIOS SEPARATELY" (p.24)
Ratios that can be selected will vary depending on whether the original is placed on the document glass or in the SPF.
| Original position Selectable ratios | |
| Document glass 25% – 400% | |
| SPF 50% – 200% | |
AUTOMATIC RATIO SELECTION
1 Place the original(s) in the document feeder tray or on the document glass.
2 If the original is placed on the document glass, select the original size. (p.18)

Automatic ratio selection can be used when the original size is A5, B5, A4, A4R, B4, A3 (5-1/2" x 8-1/2", 8-1/2" x 11", 8-1/2" x 11" R, 8-1/2" x 13", 8-1/2" x 14" or 11" x 17"). The sizes of paper that can be loaded vary by country and region. It cannot be used for other sizes.
3 Use the [TRAY SELECT] key (☐to select the paper tray with the desired paper size.
natural_image
Simple line drawing of a finger pressing a button with an arrow above it (no text or symbols)This feature will not work when using copy paper of non-standard size or when using the bypass tray.
4 Press the [AUTO IMAGE] key (AUTO %

The AUTO IMAGE indicator (Aights up and the appropriate ratio for the original size and paper size is selected. (The indicator of the selected ratio will light up.)
![OLIVETTI d-Copia 20W - Press the [AUTO IMAGE] key (AUTO % - 2](/content/2026/05/998535/images/86a8d9836b65b1fa0a89d21dd8505afd9b8263f13ab6d18b05c3ebc8993742fb.jpg)
- If the ORIGINAL SIZE indicator blinks, change the orientation of the placed original.
- If the copy is made when a PRESET RATIO selector indicator is blinking, the copied image may run off the page.
5 Set the number of copies and other copy settings, and then press the [START] key ( )
The copy will be delivered to the paper output tray.
![OLIVETTI d-Copia 20W - Set the number of copies and other copy settings, and then press the [START] key ( ) - 1](/content/2026/05/998535/images/4413c890f18ba259ac86ae9b72944d08bf21dc1bc05918a56a453d09a538ad49.jpg)
To cancel automatic ratio selection, press the [AUTO IMAGE] key (AutoData).
MANUAL RATIO SELECTION
Copies can be reduced down to 25% or enlarged up to 400%. The [PRESET RATIO] selector keys (☑, ⚗) can be pressed to quickly select a ratio from among eight preset ratios. In addition, the [Zoom] keys (≡) can be pressed to select the ratio in increments of 1%.
1 Place the original(s) in the document feeder tray or on the document glass.
2 If the original is placed on the document glass, select the original size. (p.18)
3 Use the [PRESET RATIO] selector keys (☑) and [Zoom] keys (, ) 🤨 to select the desired copy ratio.
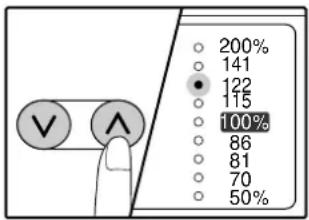
Selecting a preset ratio
Press the [PRESET RATIO] selector key (⊗) to move up through the preset ratios.
Press the [PRESET RATIO] selector key ( ) to move down through the preset ratios.

Fine adjustment of the ratio
Any ratio from 25% to 400% can be set in increments of 1%.
Press a [PRESET RATIO] selector key (or) to set the approximate ratio, then press the [Zoom] keys (or) to increase or decrease the ratio.
To decrease or increase the zoom ratio rapidly, hold down the [Zoom] keys ( ☑ ). ≡
When a [Zoom] key (or) is pressed, the ZOOM indicator will light up and the zoom ratio will appear in the display for about two seconds.

- To verify a zoom setting without changing the zoom ratio, Hold down the [Copy ratio display] key (When the key is released, the display will return to the number of copies display.
- If the copy is made when a PRESET RATIO selector indicator or the ZOOM indicator is blinking, the copied image may run off the page. To ensure that the image fits on the page, lower the copy ratio until the indicator stops blinking and lights steadily.
- If the PAPER SIZE indicator is not lit, there is no appropriate paper. Load appropriate paper in a paper tray. (p.14)
4 Set the number of copies and other copy settings, and then press the [START] key ( ).
The copy will be delivered to the paper output tray.
![OLIVETTI d-Copia 20W - Set the number of copies and other copy settings, and then press the [START] key ( ). - 1](/content/2026/05/998535/images/88a017fa8d76d6a7069802641e39d5dce6b8229528398935e939c141258186d1.jpg)
To return the ratio to 100%, press the [PRESET RATIO] selector key (or) until the 100% indicator lights up.
SELECTING THE VERTICAL AND HORIZONTAL COPY RATIOS SEPARATELY
(XY ZOOM copying)
The XY ZOOM feature allows the horizontal and vertical copy ratios to be changed independently.
Example: Reduction only in the horizontal direction.

Original Copy

- To use the XY ZOOM feature with the DUAL PAGE COPY feature, set the DUAL PAGE COPY feature first and then the XY ZOOM feature.
- The XY ZOOM feature cannot be used in combination with the AUTO IMAGE function.
Ratios that can be selected will vary depending on the position of the original.
| Original position Selectable ratios | |
| Document glass 25% – 400% | |
| SPF 50% – 200% | |
1 Place the original(s) in the document feeder tray or on the document glass.
2 If the original is placed on the document glass, select the original size. (p.18)
3 Press the [XY-ZOOM] key (☐)

natural_image
Simple line drawing of a finger pressing a button with two circular icons above (no text or symbols)XY-ZOOM Indicator ( lights up.
The current value for the vertical direction will appear in the display.
4 Use the [PRESET RATIO] selector keys ( ) and [Zoom] keys ( , ) 🕒 to change the copy ratio in the vertical direction.

Press the [PRESET RATIO] selector keys (☑) to select a ratio close to the desired ratio, and then press the [Zoom] keys (☑) to adjust the ratio in increments of 1%. The ratio appears in the display.
5 Press the [Copy ratio display] key ( % ).

The selected ratio for the vertical direction will be entered.
6 Use the [PRESET RATIO] selector keys (☑) and [Zoom] keys (, ) 🕒 to change the copy ratio in the horizontal direction.
Press the [PRESET RATIO] selector keys (☑) to select a ratio close to the desired ratio, and then press the [Zoom] keys (☑) to adjust the ratio in increments of 1%. The ratio appears in the display.
7 Press the [Copy ratio display] key ( Ⓞ ).
The selected ratio for the horizontal direction will be entered and the display will change to the number of copies display.
8 Set the number of copies and other copy settings, and then press the [START] key (①)
The copy will be delivered to the paper output tray.
![OLIVETTI d-Copia 20W - Set the number of copies and other copy settings, and then press the [START] key (①) - 1](/content/2026/05/998535/images/3f9faa52bac9eb1f07a613290588dccf349561a01d17b36096cf83a38d8d863a.jpg)
- To verify the copy ratios, press and hold down the [Copy ratio display] key (The vertical and horizontal ratios will be alternately displayed.
- If you need to change the ratios, press the [PRESET RATIO] selector keys (√) and the [Zoom] keys (≡, ≡) to reset the ratios, beginning with the vertical ratio. (step 4)
- To cancel XY ZOOM copy, press the [XY-ZOOM] key (The XY-ZOOM indicator will go off, indicating that the function is cancelled.
TWO-SIDED COPYING USING THE BYPASS TRAY
To perform manual two-sided copying, follow these steps.
Example: Copying originals A and B onto each side of one sheet of paper
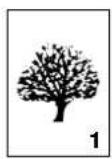
Original A Original B


Copy
1 Copy original A.
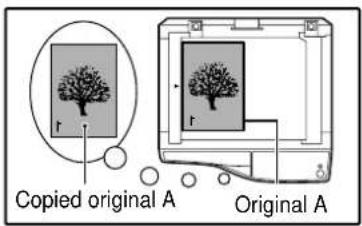

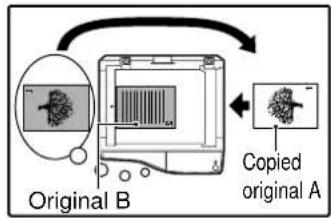
2 Place original B as shown below.

Vertically-oriented original:
If the original is oriented vertically, place it in the same orientation as original A.

Horizontally-oriented original:
If the original is oriented horizontally, place it with the top and bottom and left and right sides reversed with respect to the placement of original A.
3 Turn the copy of original A over, and without changing the position of the edge closest to you, insert it in the bypass tray.

flowchart
graph TD
    A["Original B"] -->|Arrow| B["Copied original A"]
    B --> C["Original B with tree icon"]
    style A fill:#f9f,stroke:#333
    style B fill:#ccf,stroke:#333
Insert the paper all the way in.
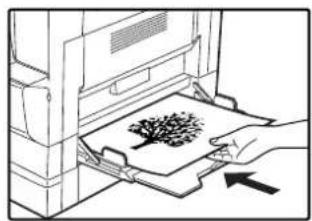
natural_image
Illustration of a hand pressing down on a printer's paper with a tree symbol (no text or symbols present)
- Copies made on the back side of paper should always be made one sheet at a time using the bypass tray.
- Straighten curled or wavy paper before using it. Curled paper may cause misfeeds, creases, or a poor-quality image.
4 Select the bypass tray with the [TRAY SELECT] key (♀) and then press the [START] key (♀)
The copy is delivered to the paper output tray.
DUAL PAGE COPYING
A dual page original can be automatically separated into two pages during copying. This feature is convenient for making copies of books and other dual page originals on individual sheets of paper.
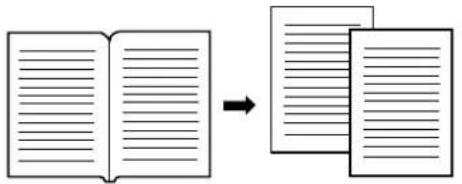
Original Copy

• A4 (8-1/2" x 11") paper is used for dual page copying.
- When used in combination with XY ZOOM copying, enlargement is not possible.
- Dual page copying cannot be used in combination with the enlargement copying.
• Automatic ratio selection cannot be used when dual page copying is used.
- Dual page copying cannot be selected when an original is placed in the SPF.
1 Place the original on the document glass, aligning the division between the pages with the size marker (A4 ( 8^1/2 )). Close the document cover SPF.

Copying will begin from the page to the right of the size marker.

To keep the copies in the correct page order when performing dual page copying over multiple pages, make sure that the original is always placed on the document glass with the lower page number to the right.
2 Set the original size to A3 (11" x 17").
3 Press the [DUAL PAGE COPY] key (and make sure that the DUAL PAGE COPY indicator (is)it.

4 Make sure that a paper tray with A4 (8-1/2" x 11") size paper is selected.
5 Set the number of copies and other copy settings, and press the [START] key (①)
The copy will be delivered to the paper output tray.

To cancel dual page copying, press the [DUAL PAGE COPY] key (AB) THE DUAL PAGE COPY indicator (AB) will go off, indicating that the function is cancelled.
INTERRUPTING A COPY RUN
(Interrupt copying)
A copy run can be temporarily interrupted to allow another copy job to be performed. When the other job is finished, the copy run will resume using the original copy settings.

Interrupt copying is not possible when the user programs are being configured.
1 Press the [INTERRUPT] key (①) to interrupt the copy run.
The INTERRUPT indicator will light up and the machine will revert to the initial settings. (p.12) The INTERRUPT indicator will blink until the current copy run stops.
![OLIVETTI d-Copia 20W - Press the [INTERRUPT] key (①) to interrupt the copy run. - 2](/content/2026/05/998535/images/1799973eea3ea3119da4592651aa8cef9d0f9f575323e8b2160c533aa76339d2.jpg)
- If the SPF is being used, the copy run will not stop until the set number of copies is completed.
- If "Auditing mode" is enabled: "- - - " will appear in the number of copies display. Enter your 3-digit account number. Copying will not be possible unless a correct account number is entered. (p.39)
2 Remove the previous original(s) and place the original(s) of the interrupt copy job.
3 Set the number of copies and other copy settings and then press the [START] key (⑧)
4 When the copy job is finished, press the [INTERRUPT] key (⊕ and remove the original(s).
The INTERRUPT indicator will go off, indicating that the interrupt function is no longer operating. The copy settings will automatically revert to the settings selected for the copy run before the run was interrupted.
5 Replace the previous original(s) and press the [START] key (⑤)
The interrupted copy run will resume.
The machine includes a USB 1.1 connector and a parallel connector as standard equipment.
A computer can be connected to these connectors to use the machine as a printer.
To use the machine as a printer, the printer driver must first be installed as explained in the "Software Setup Guide".
![OLIVETTI d-Copia 20W - Replace the previous original(s) and press the [START] key (⑤) - 1](/content/2026/05/998535/images/23b6c9f1713c97a9e75f838026cb682b51a24b6131f530a03f66f3f63caecdfe.jpg)
- If a problem occurs in printer mode, see "TROUBLESHOOTING" (p.40).
- When interrupt copying is being performed, printing is not possible.
USING THE PRINTER MODE
The procedure for loading paper is the same as for loading copy paper. See "LOADING PAPER". (p.13)

- Print jobs received while the machine is copying will be stored in memory. When the copy job is finished, the print jobs will begin printing.
- Printing is not possible when the front or side cover is opened for machine maintenance, or when a misfeed occurs or the machine runs out of paper or toner, or when the drum cartridge reaches its replacement time.
- If an original misfeed occurs in the SPF, printing will not be possible until the misfed original is removed and the SPF is restored to a usable state.
BASIC PROCEDURE FOR PRINTING
The basic procedure for printing is explained below. To use convenient printer functions, see the "Online Manual" or the printer driver help file.
1 Make sure that paper is loaded in the tray.
The procedure for loading paper is the same as for copying. See "LOADING PAPER" (p.13) and make sure the paper that you wish to use is loaded.

Make sure that the paper size setting on the machine is the same as the paper size set in the printer driver.
2 Make sure that the ON LINE indicator (on the operation panel is lit.

natural_image
Simple diagram with a circle, a computer monitor, and a circular icon (no text or symbols)If the ON LINE indicator (☐s not lit, press the [ON LINE] key (☐When the indicator is not lit, the machine is off-line and cannot print. When the indicator is blinking, a print job is transferred to the machine.
3 Open the file that you wish to print and select "Print" from the File menu.
4 Make sure that the printer driver for the machine is selected, and select print settings in the printer driver.
For information on the settings in the printer driver, see the "Online Manual", the "Software Setup Guide", or the printer driver help file.
5 Click the "Print" button or the "OK" button to begin printing.
The print job will be delivered to the paper output tray.
Important points when setting the paper size
- Make sure that the tray's paper size setting is the same as the tray's paper size setting in the printer driver. For example, if the tray's paper size setting is A4R (8-1/2" x 11"R), set "Setting Paper Size" to "A4-R" ("Letter-R"). For more information, see "CONFIGURING THE PRINTER DRIVER" in the "Software Setup Guide".
Pausing a print job
To pause a print job during printing, press the [ON LINE] key (on the operation panel to switch the machine off-line. Printing will be paused and the ON LINE indicator (will blink.
To cancel a print job, press the [CLEAR] key ( ) or the [CLEAR ALL] key (). CA
To resume printing, press the [ON LINE] key (☐ to switch the machine online.
When "Use close paper size" is disabled
The PAPER SIZE indicator on the operation panel will blink. You can press the [TRAY SELECT] key (☐) to select a tray manually, or load paper in the bypass tray and press the [ON LINE] key (☐) to begin printing.
When "Use close paper size" is enabled
Printing will take place using a size of paper that is close to the size of the print image.
OPERATION IN COPY AND PRINTER MODES
Some operations cannot be performed simultaneously when the machine is being used in printer mode or copy mode.
| Modes Copying Printing | |||
| Copy | Copy key input | YesYes | |
| During copying | Yes^*1 | No^*2 | |
| Printer During printing | Yes^*3 | No | |
*1 Can be used after pressing the [INTERRUPT] key (∅)
*2 Printing will begin when the [CLEAR ALL] key (CA) is pressed after the copy job is finished, or when the [ON LINE] key (☐) is pressed to switch the machine online. Printing will also begin after the set auto clear time elapses, or after 60 seconds if "Auto clear time" is disabled.
^*3 The print job is paused and copying begins.
This chapter explains how to set the automatic exposure level, toner save mode/high image quality mode, and the user programs, which are custom settings that control fine points of the machine's operation.
The exposure level used in automatic exposure adjustment, which automatically adjusts the copy exposure according to the original, can be adjusted. If copies tend to be too dark or too light when automatic exposure adjustment is used, follow the steps below to adjust the automatic exposure level.
The automatic exposure level can be adjusted separately for the document glass and the SPF.

The copy and printer cannot be used while the automatic exposure level is being adjusted.
1 To adjust the automatic exposure level in the SPF, place the original in the SPF. (p.19)
Make sure that the SPF indicator is lit.

To adjust the automatic exposure level for copies made from originals placed on the document glass, proceed to step 2.
2 Press the [AUTO/TEXT/PHOTO] key (Autoto select "PHOTO" ()).
3 Hold down the [AUTO/TEXT/PHOTO] key (AUTO) until the AUTO indicator ( ) blinks.

The exposure level indicators show the current setting.
4 Press the [Light] key ( ) or [Dark] key ( ) to lighten or darken the automatic exposure level as desired.
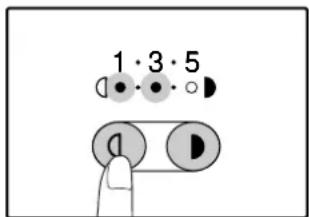
5 Press the [AUTO/TEXT/PHOTO] key (Autpto complete the setting.
The AUTO indicator ( ) stops blinking and lights steadily.
![OLIVETTI d-Copia 20W - Press the [AUTO/TEXT/PHOTO] key (Autpto complete the setting. - 1](/content/2026/05/998535/images/0883750479fad93944632ff9ce14ca41bb816e5287803cc51dd3c23d72191bbd.jpg)
After adjusting the automatic exposure level, it is recommended that you make a test copy to check the new level.
TONER SAVE MODE AND HIGH IMAGE QUALITY MODE
Toner save mode can be enabled to reduce toner consumption by about 10%.
The high image quality mode improves copy image quality in the automatic and manual exposure modes by increasing copy density with a slight increase of toner consumption.
To switch between toner save mode and high image quality mode, follow the steps below.

In Europe, high image quality mode is initially selected. In regions other than Europe, toner save mode is initially selected.
1 Press the [AUTO/TEXT/PHOTO] key (AUTO to select "TEXT" (↓…).
2 Hold down the [AUTO/TEXT/PHOTO] key (AUTO) until the PHOTO indicator ( ) links.

The exposure level indicators show the current setting.
3 To enable toner save mode, press the [Light] key (☐) To enable high image quality mode, press the [Dark] key (☐).
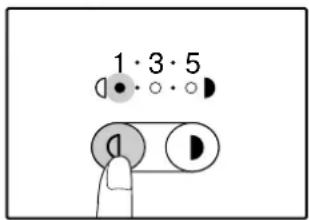
When enabling toner save mode, make sure that "1" is lit. When enabling high image quality mode, make sure that "5" is lit.
4 Press the [AUTO/TEXT/PHOTO] key (AUTO) to complete the setting.
The PHOTO indicator ( ) stops blinking and lights steadily.
CUSTOMISING SETTINGS
(User programs)
The user programs allow you to customise the machine to match your needs.
USER PROGRAMS
| Program number | Program name | Setting codes (factory default setting appears in bold) | Explanation |
| 1 Auto clear time | 1: OFF2: 10 sec.3: 20 sec.4: 60 sec.5: 90 sec.6: 120 sec. | • "Auto clear time" automatically returns the copy settings to the initial settings (p.12) when a certain period of time elapses after a copy is made. This program is used to select the period of time. "Auto clear time" can also be disabled. | |
| 2 Preheat mode | 1: 1 min.2: 5 min.3: 30 min.4: 60 min.5: 120 min.6: 240 min. | • This function automatically switches the machine to a low power consumption state if the set duration of time elapses without the machine being used when the power is on. The POWER SAVE indicator (lights up, however, the keys on the operation panel can be used. Normal operation automatically resumes when a key on the operation panel is pressed, a print job is received or an original is placed. | |
| 3 | Auto power shut-off timer | 1: 5 min.2: 30 min.3: 60 min.4: 120 min.5: 240 min. | • This function automatically switches the machine to a state that consumes even less power than preheat mode if the set duration of time elapses without the machine being used when the power is on. All lights except the POWER SAVE indicator (and ON LINE indicator (go off. To resume normal operation, press the [START] key (Normal operation also resumes automatically when a print job is received. While in auto power shut-off mode, no keys (except the [START] key (can be used. |
| 4 | Stream feeding mode*1 | 0: OFF1: ON | • When copying using the SPF, during the period of time that the SPF indicator blinks after an original has been scanned (about 5 seconds), a subsequent original can be placed and automatically fed into the machine. |
| 5 | Auto power shut-off setting | 0: OFF1: ON | • Use this setting to enable or disable auto power shut-off. |
| 8 | Auto paper select mode*2 | 0: OFF1: ON | • This function automatically selects paper that is the same size as the original placed in the SPF, or the same size as that selected with the [ORIGINAL SIZE ENTER] key (the function can be disabled. |
| 9 Auto tray switching *2 | 0: OFF1: ON | • If the paper runs out during printing and there is paper of the same size and orientation in another tray, this function automatically switches to that tray (excluding the bypass tray). The function can be disabled. | |
| 10 to 15 Auditing mode - See "AUDITING MODE SETTINGS" (p.36). | |||
^1 When the SPF is installed.
^2 On model with the two trays.
| Program number | Program name | Setting codes (factory default setting appears in bold) | Explanation |
| 23 | Resolution in Auto/Text mode | 1: 300 dpi2: 600 dpi | ·This setting is used to change the copy resolution in AUTO and TEXT mode from 600 x 300 dpi to 600 x 600 dpi (high-quality mode). Scanning is slower when high-quality mode is used. |
| 25 Key auto repeat | 0: OFF1: ON | ·Use this setting to select whether or not holding down a key causes repeated input of the key. For keys that normally cause a set value to increase when held down (for example, holding down the [ZOOM] key (⓹,⓺)), this program can be used to have the set value not change when the key is held down. | |
| 26 Key press time | 1: Minimum(current response speed)2: 0.5 sec.3: 1.0 sec.4: 1.5 sec.5: 2.0 sec. | ·Use this setting to select how long a key must be pressed for the input to be accepted. By selecting a longer time, you can prevent settings from being changed by the accidental pressing of a key. | |
| 27 Audible signals volume | 1: Short beep2: Long beep3: OFF | ·This sets the volume of beep signals. (p.35) | |
| 28 | Base setting beep signal | 0: OFF1: ON | ·Use this to sound a beep when a base setting is selected. (p.35) |
| 29 Number of copies limit | 1: 99 copies2: 999 copies | ·Use this setting to select 99 or 999 for the maximum number of copies. | |
| 30 Use close paper size | 0: OFF1: ON | ·When this function is enabled, printing in printer mode will automatically continue using a different size of paper if the specified size of paper runs out in all trays. This feature does not function in copy mode. | |
| 31 Default tray setting | 1: Upper paper tray*32: Lower paper tray*35: Bypass tray*3 | ·Use this program to select a default tray. This tray is automatically selected each time the power is turned on or each time the machine reverts to the initial settings. | |
| 32 | Default exposure mode | 1: AUTO2: TEXT3: PHOTO | ·Use this program to set "AUTO", "TEXT", or "PHOTO" as the default exposure mode. |
^*3 d-Copia 16W is as follows:
1: Paper tray (factory default),
5: Bypass tray
SELECTING A SETTING FOR A USER PROGRAM
1 Hold down the [Light] key (until the alarm indicators (✗, ✉, ✉) blink.

The display shows "-" with the left hyphen blinking.
2 Enter the program number with the numeric keys.
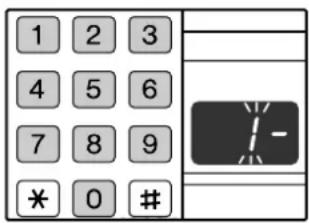
• See "USER PROGRAMS" (p.33 to p.34) for the program numbers.
- The selected program number blinks.
- For example, to select "Auto clear timer", press the [1] key.

If you enter the wrong number, press the [CLEAR] key ( ) and then enter the correct number.
3 Press the [START] key (⑤)

• The selected program number stops blinking and lights steadily.
- The currently selected setting code blinks on the right side of the display.
4 Enter the desired setting code by pressing a numeric key.

- For the setting codes, see "USER PROGRAMS". (p.33 to p.34)
- The selected setting code blinks.
- For example, to select 90 seconds, press the [5] key.

If you enter the wrong number, press the [CLEAR] key ( ) and return to step 2.
5 Press the [START] key ( )

The selected setting code stops blinking and lights steadily.
![OLIVETTI d-Copia 20W - Press the [START] key ( ) - 2](/content/2026/05/998535/images/84acaaafcf1f8a64e50d01ce1b1a47ddcc62db3c63fb70345ca81819dc153bb9.jpg)
To select a setting for another user program, press the [CLEAR] key ( ) and then return to step 2.
6 Press the [Light] key ( ) to complete the settings.
The alarm indicators (✗, ☐, ☐) go ☐ 8√ off and the display returns to the number of copies display.
Audible signals (key entry beep, invalid key beep, base setting beep)
The machine sounds three different types of beep signals: a key entry beep that sounds when a valid key is pressed, an invalid key beep that sounds when an invalid key is pressed, and a base setting beep that sounds when a setting is the same as the base setting (base settings are explained below). The base setting beep is initially disabled. If you wish to enable the base setting beep, see "Base setting beep signal" on page 34. If you wish to change the volume of the beep signals or disable them, see "Audible signals volume" on page 34. The beep patterns of each type of beep signal are as follows:
Key entry beep ...... One beep
Invalid key beep .......Two beeps
Base setting beep ....Three beeps
Base settings
The base settings are preset standard selections for each copy setting. The base settings are as follows:
Copy ratio 100%
Light and Dark indicator.... 3
Paper feed location..... Upper paper tray
ORIGINAL SIZE.....A4 (8-1/2" x 11")
AUTO/TEXT/PHOTO (AUTO ⬆⋯) AUTO
SETTINGS FOR AUDITING MODE
AUDITING MODE
When "Auditing mode" is enabled, a count is kept of the number of copies made by each account (up to 20 accounts can be established), and the counts can be displayed and totalled as necessary. In "Auditing mode", the display shows "--", and this indicates that a 3-digit account number must be entered in order to use the machine for copying.

The administrator of the machine should complete the following settings:
- Enable "Auditing mode" (p.38)
• Account number entry (p.38)
AUDITING MODE SETTINGS
| Program number | Program name | Setting codes (factory default settings are indicated in bold) | Explanation |
| 10 Auditing mode | 0: OFF1: ON | Use to enable or disable "Auditing mode". "Auditing mode" is initially disabled. | |
| 11 Account number entry None | Use to set up account numbers. Up to 20 accounts can be established. | ||
| 12 | Account number change | None Use to change an account number. | |
| 13 | Account number deletion | 0: Delete single account1: Delete all accounts | Use to delete an account number.A single account number can be deleted, or all account numbers at once. |
| 14 | Number of copies per account | None | This displays the number of copies made by each account.The maximum count is 49,999. If this number is exceeded, the count will start over from 0. |
| 15 Resetting account | 0: Reset single account1: Reset all accounts | Use to reset the copy count of an account to 0.The copy count of a single account or of all accounts can be reset. | |
SELECTING AUDITING MODE SETTINGS
1 Hold down the [Light] key (until the alarm indicators (✗, ✉, ✉) blink.

The display shows "-" with the left hyphen blinking.
2 Enter the program number with the numeric keys.

• See "AUDITING MODE SETTINGS" (p.36) for the program numbers.
- The selected program number blinks.
- For example, to select "Auditing mode", enter "10".

If you enter the wrong number, press the [CLEAR] key (☐) and then enter the correct number.
3 Press the [START] key (⑤)

- The selected program number stops blinking and lights steadily.
- The currently selected setting code blinks on the right side of the display.
4 Enter the desired setting code for the program as explained in the detailed procedures on the following pages.
For the setting codes, see "AUDITING MODE SETTINGS". (p.36)

- If you enter the wrong number, press the [CLEAR] key ( ) and return to step 2.
- If "E" (error code) blinks in the first digit of the display, press the [CLEAR] key (C) and return to step 2.
5 Press the [Light] key ( ) to complete the settings.
The alarm indicators (A, ...); go □ 8V off and the display returns to the number of copies display.
Auditing mode
(program No.10)
1 Press the [1] key to enable "Auditing mode" or the [0] key to disable it, and then press the [START] key (✗)

After enabling "Auditing mode", use "Account number entry" to establish account numbers for each account (up 20 accounts can be established).
2 Press the [CLEAR] key ( ).c
Account number entry (program No.11)
If 20 accounts have already been established, the error code "11E" will appear in the display.
1 Use the numeric keys to enter a 3-digit number (any number except "000") and then press the [START] key (✗)

- If you enter "000" or a number that has already been stored, the number will blink in the display. Enter a different number. (Up to 20 accounts can be established.)
- Repeat the same procedure to enter any other account numbers that you wish to establish.
- Keep a record of what group is using each account number (account names cannot be stored, so keep a record to prevent confusion when totalling account values).
2 Press the [CLEAR] key ().c
Account number change (program No.12)
Use this procedure to change an account number. If no account numbers have been established, the error code "12E" will appear in the display.
1 Press the [Copy ratio display] key ( ) to select the account number that you wish to change, and then press the [START] key ( ⑥ ).
The display will show 3 blinking hyphens "-- --".
2 Press the numeric keys to enter a new account number (any 3-digit number except "000"), and then press the [START] key (✗)

- If you enter "000" or a number that has already been stored, the number will blink in the display. Enter a different number.
- To change another account number, repeat steps 1 and 2.
3 When finished, press the [CLEAR] key (☐).
Account number deletion (program No.13)
Use this procedure to delete account numbers. A single account number can be deleted, or all account numbers at once.
If no account numbers have been established, the error code "13E" will appear in the display.
[Deleting all accounts at once]
Press the [1] key and then press the [START] key (∅)
All account numbers will be deleted.
[Deleting a single account]
1 Press the [0] key, and then press the [START] key (①)
2 Select the account number to be deleted with the [Copy ratio display] key (① and then press the [START] key (④)
![OLIVETTI d-Copia 20W - [Deleting a single account] - 1](/content/2026/05/998535/images/602f056eba4f269912288f57125ef2e37ea035cadbf89b4fc9bdf4c7ebb2a179.jpg)
To delete another account number, enter the program number (13) for account number deletion and then repeat the procedure for "Deleting a single account".
Number of copies per account (program No.14)
Use this procedure to display the copy count of each account. If no account numbers have been established, the error code "14E" will appear in the display.
1 Select the account number with the [Copy ratio display] key (✗)
2 Hold down the [0] key.
The copy count of the selected account will appear in the display while you hold down the [0] key. The count is displayed sequentially as shown below.
Example: 12,345 copies


- Each A3 (11" x 17") size page is counted as two pages.
- To view the copy count of another account, repeat steps 1 and 2.
3 When finished, press the [CLEAR] key (☐).
Resetting account
(program No.15)
The copy count of a single account or all accounts can be reset to 0. If no account numbers have been established, the error code "15E" will appear in the display.
[Resetting all accounts]
Press the [1] key and then press the [START] key ( )
The copy counts of all accounts will be deleted.
[Resetting a single account]
1 Press the [0] key, and then press the [START] key ( )
2 Select the account number to be reset with the [Copy ratio display] key ( ) and then press the [START] key ( )
![OLIVETTI d-Copia 20W - [Resetting a single account] - 1](/content/2026/05/998535/images/c9a30234089efc1cdfb709b07242e970ec1d3c77678152b7c842830dd36f60bd.jpg)
To reset another account number, enter the program number (15) for account number deletion and then repeat the procedure for "Resetting a single account".
Copying when "Auditing mode" is enabled
When "Auditing mode" is enabled, "-- -" appears in the display.

natural_image
Simple diagram of a rectangular block with three horizontal lines inside, no text or symbols present.1 Enter your 3-digit account number with the numeric keys.
When you enter your account number, "0" appears in the display to indicate that copying is possible.

If you enter an incorrect number, press the [CLEAR] key ( ) and then enter the correct number.
2 Follow the appropriate steps to make the copy.

If you are performing an interrupt copy (p.28), be sure to press the [INTERRUPT] key ⏻ when finished to exit interrupt mode.
3 When finished, press the [AUDIT CLEAR] key (ACC.#-C

![OLIVETTI d-Copia 20W - When finished, press the [AUDIT CLEAR] key (ACC.#-C - 2](/content/2026/05/998535/images/21fb476cbca5673a060a02a2433982a9669a7b971a5f64a66c51ae8a2dd0d812.jpg)
If a misfeed occurs or the paper runs out during copying, your session will not end even if the [AUDIT CLEAR] key (AGC.#-C pressed.
This chapter describes troubleshooting and misfeed removal.
TROUBLESHOOTING
If you experience difficulty using the machine, check the following troubleshooting guide before calling for service. Many problems can be easily resolved by the user. If you are unable to solve the problem using the troubleshooting guide, turn off the power switch and unplug the machine, and contact your authorised service representative.
MACHINE/COPYING PROBLEMS
The machine does not operate....41
Copies are too dark or too light....41
Blank copies....41
Part of the image is cut off or there is too much blank space.... 41
Wrinkles appear in the paper or the image disappears in places. 41
Paper misfeed....42
Original size not selected automatically....42
Copies are smudged or dirty....43
White or black lines appear on copies. 43
Paper size for a paper tray cannot be set....43
A copy job stops before it is finished.... 43
The POWER SAVE indicator (💡) is lit. 43
Any one of the alarm indicators (♀, ♀, ⚙, □, ♂) is lit or blinking. 43
Lighting fixture flickers. 43
PRINTING PROBLEMS
The machine does not print. (ON LINE indicator (☐) does not blink.) 44
The machine does not print. (ON LINE indicator (☐) was blinking.) 44
Printing is slow....45
The printed image is light and uneven. 45
The printed image is dirty 45
The printed image is skewed or it runs off the paper.... 45
Any one of the alarm indicators ( , , , , , □, 8V) is lit or blinking. 45
Removing the software 45
INDICATORS AND DISPLAY MESSAGES.... 46
MISFEED REMOVAL 47
REPLACING THE TONER CARTRIDGE.... 54
MACHINE/COPYING PROBLEMS
The following problems are related to the general operation of the machine and copying.
| Problem Cause and solution Page | ||
| The machine does not operate. | The machine is not plugged into a power outlet.→ Plug the machine into a grounded outlet. | - |
| Power switch OFF.→ Turn the power switch ON. | 12 | |
| The POWER SAVE indicator (is blinking.→ Indicates that the machine is warming up. Copies cannot be made until the machine has finished warming up. | 12 | |
| The front cover or the side cover is not completely closed.→ Close the front cover or the side cover. | - | |
| The machine is in auto power shut-off mode.→ In auto power shut-off mode, all lights are off except the POWER SAVE indicator (and ON LINE indicator ( ). press the [START] key (to resume normal operation. | 12 | |
| PAPER SIZE indicator is blinking.→ A blinking PAPER SIZE indicator means that the size of paper loaded in the tray is different from the paper size setting for the tray. Change the paper size setting.To clear the display, do one of the following:Use the [TRAY SELECT] key (to change the tray selection.Open and close the tray.Press the [CLEAR ALL] key (CA) | 16 | |
| Copies are too dark or too light. | Select the correct original type for the original.→ Select AUTO with the [AUTO/TEXT/PHOTO] key or press the [Light] key (and Dark] key ( ) to manually select an appropriate exposure.If the copy is too light or too dark even though AUTO was selected with the [AUTO/TEXT/PHOTO] key ( AUTO /... ) ,the automatic exposure level. | 2131a |
| Blank copies. | The original is not placed face up in the SPF or face down on the document glass.→ Place the original face up in the SPF or face down on the document glass. | 18, 19 |
| Part of the image is cut off or there is too much blank space. | The original was not placed in the correct position.→ Place the original correctly. | 18, 19 |
| An appropriate ratio was not used for the size of the original and the size of the paper.→ Press the [AUTO IMAGE] key AUTO have the copy made using the appropriate ratio for the original and paper. | 22 | |
| The size of paper loaded in the tray was changed without changing the tray's paper size setting.Be sure to change the tray's paper size setting whenever you change the size of paper loaded in the tray. | 16 | |
| Wrinkles appear in the paper or the image disappears in places. | The paper is outside of the specified size and weight range.→ Use copy paper within the specified range. | 13 |
| Paper curled or damp.→ Do not use curled or crimped paper. Replace with dry copy paper.During periods when the machine is not used for a long time, remove the paper from the tray and store it in a dark place in a bag to prevent moisture absorption. | - | |
| Paper misfeed. | Misfeed occurs.→ To remove the misfeed, see "MISFEED REMOVAL". | 47 |
| The paper is outside of the specified size and weight range.→ Use copy paper within the specified range. | 13 | |
| Paper curled or damp.→ Do not use curled or crimped paper. Replace with dry copy paper. During periods when the machine is not used for a long time, remove the paper from the tray and store it in a dark place in a bag to prevent moisture absorption. | - | |
| Paper is not loaded properly.→ Make sure the paper is properly installed. | 14 | |
| Pieces of paper inside machine.→ Remove all pieces of misfed paper. | 47 | |
| Too much paper is loaded in the tray.→ If the stack of paper is higher than the indicator line on the tray, remove some of the paper and reload so that the stack does not exceed the line. | 14 | |
| Some sheets of paper stick together.→ Fan the paper well before loading it. | 14 | |
| The guides on the bypass tray do not match the width of the paper.→ Adjust the guides to match the width of the paper. | 15 | |
| The bypass tray extension is not pulled out.→ When loading a large size of paper, pull out the extension. | 15 | |
| The bypass paper feed roller is dirty.→ Clean the roller. | 57 | |
| A5 (5-1/2" x 8-1/2") paper is loaded in lower paper tray.→ A5 (5-1/2" x 8-1/2") size paper must be loaded in upper paper tray or the bypass tray. | 13, 14 | |
| Original size not selected automatically.(When the SPF is installed.) | Original(s) curled.→ The original size cannot be correctly detected if the original is curled or folded. Straighten the original. | - |
| The original includes any large black solid areas.→ If the original includes any large black solid areas, the original size may not be detected automatically. Use the [ORIGINAL SIZE ENTER] key ( ) select the paper size. | - | |
| The machine is directly exposed to sunlight.→ Install in a location that is not exposed to sunlight. | - | |
| Copies are smudged or dirty. | The document glass or the underside of the document cover/SPF is dirty.→ Clean regularly. | 56 |
| Original smudged or blotchy.→ Use a clean original. | - | |
| White or black lines appear on copies. | The scanner glass in the SPF is dirty.→ Clean the long, narrow glass in the SPF. | 56 |
| The transfer charger is dirty.→ Clean the transfer charger. | 57 | |
| Paper size for a paper tray cannot be set. | Copying or printing is performed.→ Set the paper size after copying is complete. | - |
| The machine has stopped temporarily due to running out of paper or a misfeed.→ Load paper or remove the misfeed, and then set the paper size. | 14, 47 | |
| An interrupt copy job is in progress.→ Set the paper size after the interrupt copy job is finished. | 28 | |
| A copy job stops before it is finished. | The paper output tray is full.→ Long copy runs are automatically paused every 250 copies.Remove the copies in the paper output tray and press the [START] key ( )to resume copying. | 22 |
| The tray is out of paper.→ Load paper. | 14 | |
| The POWER SAVE indicator ( )is lit. | Any other indicators are lit.→ If other indicators are lit, the machine is in "Preheat mode". Press any key on the operation panel to resume normal operation. | 12 |
| The POWER SAVE indicator ( )and ON LINE indicator ( )are only lit.→ If only the POWER SAVE indicator ( )and ON LINE indicator ( )are lit, the machine is in auto power shut-off mode. Press the [START] key ( )to resume normal operation. | 12 | |
| Any one of the alarm indicators ( )is blinking. | See "INDICATORS AND DISPLAY MESSAGES" to check the meaning of the alarm indicator and error message in the display, and take appropriate action. | 46 |
| Lighting fixture flickers. | The same power outlet being used is for the lighting fixture and the machine.→ Connect the machine to a power outlet which is not used for other electric appliances. | - |
PRINTING PROBLEMS
In addition to this section, troubleshooting information can also be found in the README files for each of the software programs. To view a README file, see the "Software Setup Guide".
| Problem Cause and solution Page | ||
| The machine does not print.(ON LINE indicator (does not blink.) | The machine is set to off-line mode.→ Press the [ON LINE] key (☐) to turn on the ON LINE indicator (☐). | 29 |
| The machine is not correctly connected with your computer.→ Check both ends of the printer cable and make sure you have a solid connection. Try a known good cable. For information on cables, see "SPECIFICATIONS". | 60 | |
| Copy job is performed.→ Wait until the copy job is complete. | - | |
| The port setting is not correct.→ Printing is not possible if the printer driver port setting is not correct. Set the port correctly. | Software Setup Guide | |
| Your machine is not selected correctly in the current application for the print job.→ When choosing "Print" from the "File" menu located in applications, be sure you have selected "OLIVETTI d-Copia xxW" (where xx is the model name of your machine) printer displayed in the "Print" dialog box. | - | |
| The printer driver has not been installed properly.→ Follow these steps to check and see if the printer driver is installed.1 Click the "start" button, click "Control Panel", click "Printers and Other Hardware", and then click "Printers and Faxes".(On Windows 95/98/Me/NT 4.0/2000, click the "Start" button, select "Settings" and then click "Printers".)2 The "OLIVETTI d-Copia xxW" printer driver icon is not shown (where xx is the model name of your machine).3 If the icon is shown but you still cannot print, the printer driver may not have been installed correctly. In this case, deleted-Copia 16W/20W Software and then reinstall it. | - | |
| The machine does not print.(ON LINE indicator (was blinking.) | The tray size settings are not the same on the machine and in the printer driver.→ Make sure that the same tray paper size is set on the machine and in the printer driver. To change the tray paper size setting in the printer driver, see the Software Setup Guide. | 16 Software Setup Guide |
| The specified size of paper has not been loaded.→ Load the specified size of paper in the paper tray. | 14 | |
| The PAPER SIZE indicator is blinking.→ When "Use close paper size (user program)" is disabled, the PAPER SIZE indicator on the operation panel will blink. You can press the [TRAY SELECT] key (☐) to select a tray manually, or load paper in the bypass tray and press the [ON LINE] key (☐) to begin printing.→ When "Use close paper size" is enabled, printing will take place using a size of paper that is close to the size of the print image. | 16, 21- | |
| Problem Cause and solution Page | ||
| Printing is slow. | Simultaneous use of two or more application software programs.→ Start printing after quitting all unused application software programs. | - |
| The printed image is light and uneven. | The paper is loaded so that printing takes place on the back side of the paper.→ Some paper types have a front and back side. If the paper is loaded so that printing takes place on the back side, toner will not adhere well to the paper and a good image will not be obtained. | 14 |
| The printed image is dirty. | You are using paper that is outside the specified size and weight range.→ Use copy paper within the specified range. | 13 |
| Paper curled or damp.→ Do not use curled or crimped paper. Replace with dry copy paper. During periods when the machine is not used for a long time, remove the paper from the tray and store it in a dark place in a bag to prevent moisture absorption. | - | |
| You did not set sufficient margins in the paper settings of your application.→ The top and bottom of the paper may be dirty if the margins are set outside of the specified print quality area.→ Set the margins in the software application within the specified print quality area. | - | |
| The printed image is skewed or it runs off the paper. | The paper loaded in the tray is not the same size as that specified in the printer driver.→ Check if the "Paper Size" options suit the size of the paper loaded in the tray.→ If the "Fit To Page" setting is activated, make sure that the paper size selected from the drop-down list of the "Fit To Paper Size" option is the same as the size of the loaded paper. | - |
| The orientation of document setting is not correct.→ Click the "Paper" tab in the printer driver setup screen, and verify if the "Image Orientation" option is set to your requirements. | - | |
| Paper is not loaded properly.→ Make sure the paper is properly loaded. | 14 | |
| You did not correctly specify the margins for the application in use.→ Check the layout of the document margins and the paper size settings for the application you are using. Also check if the print settings are specified correctly to suit the paper size. | - | |
| Any one of the alarm indicators (A B C D E F G H) is lit or blinking. | See "INDICATORS AND DISPLAY MESSAGES" to check the meaning of the alarm indicator and error message in the display, and take appropriate action. | 46 |
Removing the software
If you need to remove the software, follow these steps.
1 Click the "start" button, and then click "Control Panel".
On Windows 95/98/Me/NT 4.0/2000, click the "Start" button, select "Settings", and then click "Control Panel".
2 Click "Add or Remove Programs".
On Windows 95/98/Me/NT 4.0/2000, double-click the "Add/Remove Programs" icon.
3 Select "OLIVETTI d-Copia 16W/20W Series Printer Driver" from the list, and remove the software.
For more information, refer to your operating manual or to the help files for your operating system.
INDICATORS AND DISPLAY MESSAGES
If one of the following indicators lights up or one of the following messages appears in the display, check the meaning of the indicator or message in the following table and take appropriate action.

Paper required indicator—8v—Misfeed indicator
| Indication Cause and solution Page | ||||
| # | Maintenance indicator | Steadily lit | Service by an authorised OLIVETTI service technician is required. | - |
| ☀ | Developer replacement required indicator | Steadily lit | Developer is required. Contact your authorised service representative. | - |
| ● | Toner cartridge replacement required indicator | Steadily lit | Replacement of toner cartridge will be needed soon.Prepare a new cartridge. | - |
| Blinking | Toner cartridge must be replaced. Replace it with a new one. | 54 | ||
| ☐ | Paper required indicator | Steadily lit | The tray is out of paper. Load paper. It is also possible that the tray is not inserted completely into the machine. Make sure it is inserted correctly. | 14 |
| 8√ | Misfeed indicator Blinking | A paper misfeed has occurred. Remove the misfeed as explained in "MISFEED REMOVAL". | 47 | |
| ORIGINAL SIZE indicator Blinking | The original is not placed in the correct orientation. Rotate the original so that it is in the same orientation as the blinking ORIGINAL SIZE indicator. | 18,19 | ||
| PAPER SIZE indicator Blinking | A blinking PAPER SIZE indicator means that the size of paper loaded in the tray is different from the paper size setting for the tray. Change the paper size setting.To clear the display, do one of the following:Use the [TRAY SELECT] key ( )to change the tray selection.Open and close the tray.Press the [CLEAR ALL] key ( )CA | 16 | ||
| [CH] appears in display | Steadily lit | The front cover or the side cover is open. Close the front cover or the side cover. | - | |
| Blinking | The toner cartridge is not installed correctly. Reinstall the toner cartridge. If [CH] still blinks in the display after reinstalling the toner cartridge, contact your authorised service representative. | 54 | ||
 | Letters and numbers appear in the display | Turn off the power switch, wait about 10 seconds, and then turn on the switch again. If this does not clear the message, write down the code that appears and then unplug the power cord and contact your authorised. Tell service representative what code appeared and the circumstances under which it appeared. | - | |
When "Use close paper size" is disabled | Press the [TRAY SELECT] key ( )to manually select the tray and then press the [ON LINE] key ( ). Printing will begin. If you are selecting the bypass tray, load paper in the bypass tray. | Online manual | ||
MISFEED REMOVAL
When a misfeed occurs, the misfeed indicator (_V) and a misfeed location indicator (◄) will blink and the machine will automatically stop.
Check the blinking misfeed location indicator to identify the location of the misfeed and remove it.

The paper may tear when you remove a misfeed. In this event, be sure to remove all torn pieces of paper from the machine, taking care not to touch the photoconductive drum (the green part). Any scratches or damage to the surface of the drum will cause dirty copies.
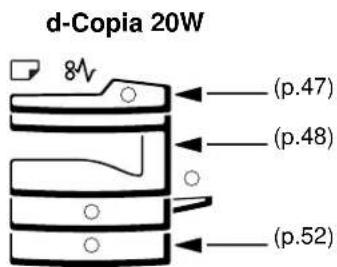

MISFEED IN THE SPF
1 Remove the misfed original.

Check sections A, B, and C in the left shows the illustration (see the next page), and remove the misfed original.
Section A
Open the feeding roller cover and remove the misfed original from the document feeder tray. Close the feeding roller cover.

Section B
Open the SPF and rotate the two release rollers in the direction of the arrow to feed the original out. Close the SPF and then remove the original.


natural_image
Line drawing of a hand inserting a card into a stack of documents (no text or symbols)If a small original (A5 (5-1/2" x 8-1/2"), etc.) is misfed, open the right side cover and remove the original. Close the right side cover.

Section C
Remove the misfed original from the exit area.
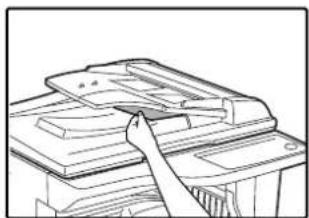
natural_image
Line drawing of a printer or printer with a clasp, no text or symbols presentIf the misfed original cannot be easily removed from the exit area, open the moveable part of the document feeder tray and remove the original.

natural_image
Illustration of a hand using a smartphone to press documents on a desk (no text or symbols visible)2 Open and close the SPF to make the misfeed location indicator stop blinking.

natural_image
Diagram of a hand opening a device with an arrow indicating rotation (no text or symbols present)You can also make the misfeed indicator stop blinking by opening and closing the feeding roller cover or the right side cover.
3 Return the originals indicated by the minus number in the display to the document feeder tray and press the [START] key (①)
Copying will resume from the originals that still remained when the misfeed occurred.
MISFEED IN THE BYPASS TRAY
1 Gently pull the misfed paper out.

natural_image
Illustration of a hand pressing a mechanical component with a downward arrow (no text or symbols)2 Open and close the side cover.
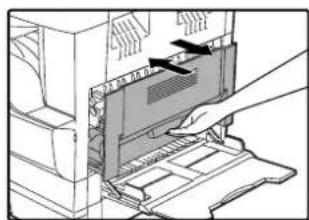
natural_image
Illustration of a hand inserting a device into a computer tower (no text or symbols visible)The misfeed indicator (will go out.

- When closing the side cover, press down on the handle.
- If the misfeed indicator ( ) does not stop blinking, check for torn pieces of paper in the machine.
MISFEED IN THE MACHINE
1 Open the bypass tray and the side cover.

natural_image
Illustration of a hand inserting a device into a machine (no text or symbols visible)2 Check the misfeed location. Remove the misfed paper following the instructions for each location in the illustration below.
If the misfed paper is visible here, go to "C. Misfeed in the transport area".
If paper is misfed here, go to "A. Misfeed in the paper feed area".
If paper is misfed here, go to "B. Misfeed in the fusing area".
A. Misfeed in the paper feed area
1 Push gently on both ends of the front cover.
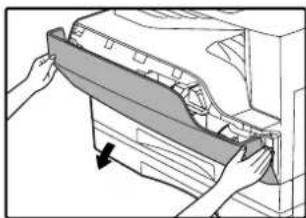
natural_image
Diagram of a mechanical assembly with hands holding a component, showing a curved section and an arrow indicating direction (no text or symbols present)3 Close the front cover and side cover.
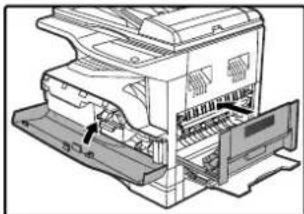
natural_image
Technical line drawing of a mechanical device with internal components and a labeled arrow (no text or symbols present)The misfeed indicator (8 will go out.
2 Carefully remove the misfed paper. Turn the roller rotating knob in the direction of the arrow to assist in removing it.

Be careful not to tear the misfed paper during removal.

- When closing the front cover, gently hold both ends.
- When closing the side cover, press on the handle.
- If the misfeed indicator ( does not stop blinking, check for torn pieces of paper in the machine.
The fusing unit is hot. Do not touch the fusing unit when removing misfed paper. Doing so may cause a burn or injury.
Do not touch the photoconductive drum (green portion) when removing the misfed paper. Doing so may damage the drum and cause smudges on copies.
B. Misfeed in the fusing area
1 Push gently on both ends of the front cover.
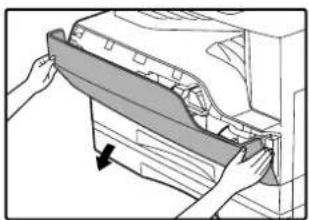
natural_image
Illustration of hands installing or adjusting a mechanical component with a downward arrow (no text or symbols)2 Turn the roller rotating knob in the direction of the arrow.

3 Carefully remove the misfed paper. Lower the fusing unit release levers to allow easier removal.

Be careful not to tear the misfed paper during removal.
Warning
The fusing unit is hot. Do not touch the fusing unit when removing misfed paper. Doing so may cause a burn or injury.
Caution
- Do not touch the photoconductive drum (green portion) when removing the misfed paper. Doing so may damage the drum and cause smudges on copies. - Be careful about unfixed toner on the misfed paper not to soil your hands or clothes.
4 Lift the fusing unit release levers, to return them to their operating positions.

natural_image
Technical line drawing of a computer monitor with scrollbars and ventilation slots (no text or symbols)5 Close the front cover and side cover.

natural_image
Technical line drawing of a mechanical assembly with no visible text or symbolsThe misfeed indicator (will go out.
Note
- When closing the front cover, gently hold both ends.
- When closing the side cover, press on the handle.
- If the misfeed indicator ( does not stop blinking, check for torn pieces of paper in the machine.
C. Misfeed in the transport area
1 Open the fusing paper guide by pressing down the projection on either side of the guide and remove the misfed paper.

natural_image
Illustration of hands inserting a card into a filing cabinet (no text or symbols visible)Be careful not to tear the misfed paper during removal.
Warning
The fusing unit is hot. Do not touch the fusing unit when removing misfed paper. Doing so may cause a burn or injury.
2 If the misfed paper cannot be removed by the previous step but is visible in the paper output area, remove the paper by pulling it into the paper output area.

natural_image
Line drawing of a printer's internal structure showing paper feeding into a printer (no text or symbols)Be careful not to tear the misfed paper during removal.
3 Close the side cover.
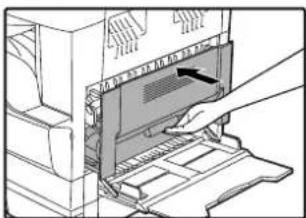
natural_image
Illustration of a hand inserting a device into a rack with a handle (no text or symbols visible)The misfeed indicator (will go out.
Note
- When closing the side cover, press on the handle.
- If the paper was torn, make sure that no torn pieces remain in the machine.
- If the misfeed indicator (8) does not stop blinking, check for torn pieces of paper in the machine.
MISFEED IN THE UPPER PAPER TRAY

Make sure that there is no misfed paper in the tray before pulling it out. (p.49)
1 Lift and pull out the upper paper tray and remove the misfed paper.

natural_image
Illustration of a hand inserting a device into a rack, with an arrow indicating the direction (no text or symbols present)Be careful not to tear the misfed paper during removal.
2 Open and close the side cover.

natural_image
Illustration of a hand inserting a device into a rack, showing internal components and arrows indicating motion (no text or symbols)The misfeed indicator (will go out.

- When closing the side cover, press on the handle.
- If the misfeed indicator (8) does not stop blinking, check for torn pieces of paper in the machine.
3 Close the upper paper tray.
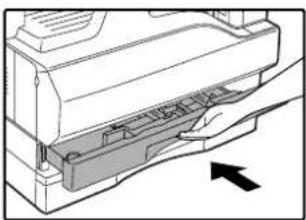
natural_image
Technical line drawing of a mechanical component with an arrow indicating direction (no text or symbols)Push the upper paper tray in completely.
MISFEED IN THE LOWER PAPER TRAY (Two-tray model only)

Make sure that there is no misfed paper in the tray before pulling it out. (p.49)
1 Open the lower side cover.

natural_image
Diagram of a hand pressing down on a mechanical component with an arrow indicating force (no text or symbols present)Grasp the handle to open the lower side cover.
5 Close the lower paper tray.

natural_image
Diagram of a hand pressing a component into a machine (no text or symbols visible)2 Remove the misfed paper.

natural_image
Diagram of a hand pressing down on a mechanical component with an upward arrow (no text or symbols)Be careful not to tear the misfed paper during removal.
3 If the misfed paper is not seen in step 2, lift and pull out the lower paper tray and remove the misfed paper.

natural_image
Illustration of a hand pressing down on a mechanical component (no text or symbols visible)Be careful not to tear the misfed paper during removal.
4 Close the lower side cover.

natural_image
Hand inserting a component into a device (no text or symbols visible)The misfeed indicator (8 will go out.

If the misfeed indicator (g does not stop blinking, check for torn pieces of paper in the machine.
REPLACING THE TONER CARTRIDGE
When the toner cartridge replacement required indicator ( ) lights up, the toner cartridge will need replacement soon. Obtain a new cartridge. When the toner cartridge replacement required indicator ( ) links, the toner cartridge must be replaced before copying can be resumed.
Replace the toner cartridge by following the procedure below.

When the toner cartridge replacement indicator ( ) lights up, little toner remains and thus copies may be faint.
1 Push on both ends of the front cover and open it.

natural_image
Diagram of hands installing or adjusting a mechanical component with a downward arrow (no text or symbols present)2 Pull the toner cartridge out while pressing the lock release lever.

When pulling out the toner cartridge, place your other hand on the green part of the cartridge.

After removing the toner cartridge, do not shake it or tap on it. Doing so may cause toner to leak from the cartridge. Put the old cartridge immediately in the bag contained in the box of the new cartridge. Dispose of the old toner cartridge in accordance with local regulations.
3 Remove the new toner cartridge from the bag. Grasp the cartridge on both sides and shake it horizontally four or five times. After shaking the cartridge, remove the tape.


- Grasp the grip when holding the cartridge. Do not hold the cartridge by the shutter. - Be sure to shake the cartridge only before the tape is removed.
4 Insert the toner cartridge along the guides until it locks in place while pushing the lock release lever.

natural_image
Technical line drawing of a mechanical assembly or bracket (no text or symbols visible)If there is any dirt or dust on the toner cartridge, remove it before installing the cartridge.
5 Remove the tape from the shutter. Pull the shutter out of the toner cartridge.

natural_image
Mechanical assembly diagram showing a hand operating a component with an arrow indicating direction (no text or symbols present)Discard the shutter.
6 Close the front cover.

natural_image
Technical line drawing of a mechanical device with a labeled component (no text or symbols present)The toner cartridge replacement required indicator ( ) will go out.

- Even after a new toner cartridge is installed, the toner cartridge replacement required indicator ( ) may still light up, indicating that copying cannot be resumed (toner is not fed sufficiently). In this case, open and close the front cover. The machine will feed toner again for about two minutes and then copying can be resumed.
- Before closing the front cover, make sure that the toner cartridge is correctly installed.
- When closing the front cover, gently hold both ends.
This chapter explains how to keep the machine operating smoothly, including viewing copy count, the toner level indicator, and cleaning the machine.
CHECKING THE TOTAL OUTPUT COUNT AND TONER LEVEL
CHECKING THE TOTAL OUTPUT COUNT
From the "0" display, you can check the total output count, total copy count, as explained below.
The total output count is all pages (for both printing and copying) printed by the machine and the total output count can be counted up to 999,999.
[Total output count]
Hold down the [0] key.

The total output count appears sequentially in two parts while you hold down the [0] key.
Example: Total number of pages output is 12,345.

![OLIVETTI d-Copia 20W - Hold down the [0] key. - 3](/content/2026/05/998535/images/0e3ce10ca70fda9513c56290b07a5c9826130b3309fb69a46821b63319ff23a5.jpg)
• Each A3 (11" x 17") size page is counted as two pages.
- During a copy run, pressing the [0] key shows the number of completed copy pages, not the total output count.
[Total copy count] Hold down the [ ]#key.
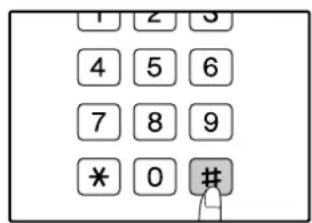
The count display and counting method are the same as for the total output count.
![OLIVETTI d-Copia 20W - [Total copy count] Hold down the [ ]#key. - 2](/content/2026/05/998535/images/43b5351a91f63d862a5b4fd78802240eac6872725666501d3823a4d74ac06e2d.jpg)
The total number of pages printed in printer mode can be calculated by subtracting the total copy count from the total output count.
CHECKING THE TONER LEVEL
The toner level is indicated by a 6-level display. Use it as a guideline for replacing the toner cartridge.
1 Hold down the [Light] key (until the alarm indicators (✗, ✉) ☐ 8V blink.

The display will show "- -".
2 Hold down the [Copy ratio display] key (☐ for more than 5 seconds.

The approximate quantity of toner remaining will be indicated in the display as a percentage. ("100", "75", "50", "25", "10" is displayed.) When the percentage is less than 10%, "LO" will be displayed.
3 Press the [Light] key (☐ to return to the normal display.
The alarm indicators ( 🔍 🔍 🔍 🔍 🔍 🔍 🔍 🔍 🔍 🔍 🔍 🔍 🔍 🔍 🔍 🔍 🔍 🔍 🔍 🔍 🔍 🔍 🔍 🔍 🔍 🔍 🔍 🔍 🔍 🔍 🔍 🔍 🔍 🔍 🔍 🔍 🔍 🔍 🔍 🔍 🔍 🔍 🔍 🔍 🔍 🔍 🔍 🔍 🔍 🔍 🔉 The display returns to the number of copies display.
ROUTINE MAINTENANCE
CLEANING THE DOCUMENT GLASS AND SPF/ DOCUMENT COVER
If the document glass, SPF, underside of the document cover, or the scanner for originals coming from the SPF (the long narrow glass surface on the right side of the document glass) become dirty, the dirt may appear on copies. Always keep these parts clean.

natural_image
Illustration of a printer's open lid with a hand inserting a clip onto the cover (no text or symbols)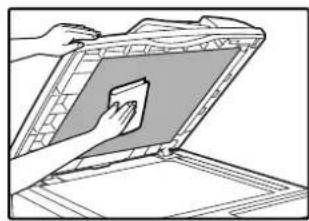
natural_image
Illustration of hands cleaning a laptop with a cloth (no text or symbols)
natural_image
Line drawing of a mechanical component with an open lid and handle (no text or symbols)Stains or dirt on the document glass/SPF will also be copied. Wipe the document glass, document cover portion of the SPF and the scanning window on the document glass with a soft, clean cloth. If necessary, dampen the cloth with water. Do not use thinner, benzene, or similar volatile cleaning agents.

Do not spray flammable cleaner gas. Gas from the spray may come in contact with the internal electrical components or high-temperature parts of the fusing unit, creating a risk of fire or electrical shock.
CLEANING THE BYPASS TRAY PAPER FEED ROLLER
If misfeeds occur frequently when feeding envelopes, thick paper, etc. through the bypass tray, wipe the paper feed roller at the feed slot of the bypass tray with a soft, clean cloth dampened with alcohol or water.

CLEANING THE TRANSFER CHARGER
If copies start becoming streaky or blotchy, the transfer charger may be dirty. Clean the charger using the following procedure.
1 Turn the power switch off.
2 Open the bypass tray and the side cover.

natural_image
Illustration of a hand inserting a device into a computer (no text or symbols visible)3 Lift and pull out the upper paper tray.
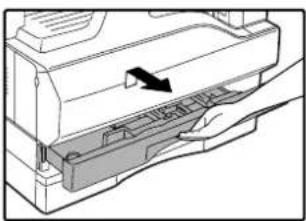
natural_image
Diagram of a printer's internal structure with an arrow indicating the page direction (no text or symbols present)4 Take the charger cleaner out by holding the tab.

5 Set the charger cleaner onto the transfer charger and gently slide the cleaner in the direction indicated by the arrow two or three times.

natural_image
Mechanical assembly diagram showing a gear shift and gear meshing (no text or labels)If the white sheet metal is smudged with toner, wipe it with a soft, clean cloth.

Slide the charger cleaner from one end to the other end along the groove of the transfer charger. If the cleaner is stopped on the way, smudges on copies may occur.
6 Return the charger cleaner to its original position. Close the upper paper tray. Close the side cover by pressing the handle on the cover.
7 Turn the power switch on.
7
Chapter 7
PERIPHERAL DEVICES AND SUPPLIES
Optional equipment and supplies are explained in this chapter. To purchase optional equipment and supplies, contact your authorised service representative.
PERIPHERAL DEVICES

As a part of our policy of continuous improvement, OLIVETTI reserves the right to make design and specification changes for product improvement without prior notice. The performance specification figures indicated are nominal values of production units. There may be some deviations from these values in individual units.
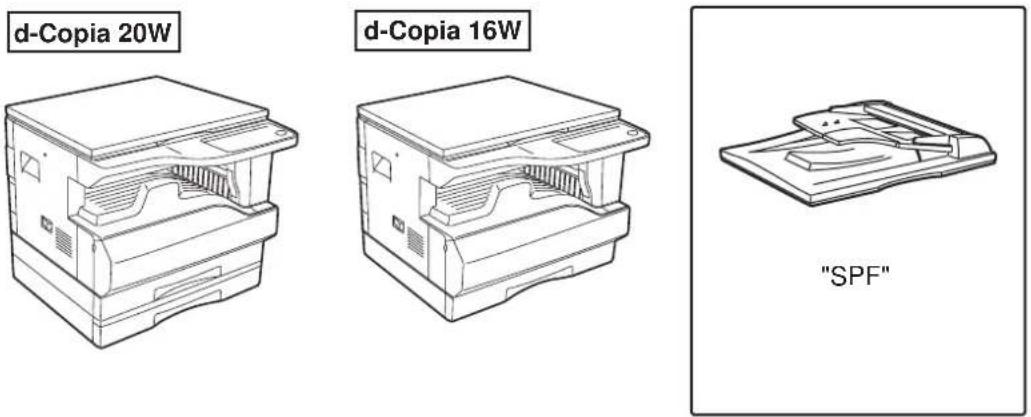
SINGLE PASS FEEDER
For the names of the parts of the SPF, see "PART NAMES AND FUNCTIONS". (p.8)
Specifications
| SPF-16W (Single pass feeder) | ||
| Acceptable original | Weight 56 | g/m ^2 to 90 g/m ^2 (15 lbs. to 24 lbs.) |
| Size | A5 to A3 (5-1/2" x 8-1/2" to 11" x 17")(5-1/2 x 8-1/2" size originals cannot be used in the duplex copy mode.) | |
| Capacity | Up to 40 sheets (Thickness 4 mm (5/32") and below)For B4 (8-1/2" x 13") and larger sizes, up to 30 sheets | |
| Detectable original sizes* | A5, B5, B5R, A4, A4R, B4, A3(5-1/2" x 8-1/2", 8-1/2" x 11", 8-1/2" x 11"R, 8-1/2" x 13", 8-1/2" x 14", 11" x 17") | |
| Weight | 5.0 kg (11.1 lbs.) | |
| Dimensions | 583 mm (W) x 435 mm (D) x 133 mm (H)(22-61/64" (W) x 17-9/64" (D) x 5-1/4" (H)) | |
* The detectable original sizes vary by country and region.
STORAGE OF SUPPLIES
Standard supplies for this product that are to be replaced by the user are paper and toner cartridge.
olivetti

GENUINE SUPPLIES
For best copying results, be sure to use only OLIVETTI products.
Only genuine OLIVETTI consumables carry the Genuine Supplies label.
PROPER STORAGE
- Store the supplies in a location that is:
clean and dry,
at a stable temperature,
not exposed to direct sunlight.
- Store paper in the wrapper and lying flat.
Paper stored out of the wrapper or in packages standing on end may curl or get damp, resulting in paper misfeeds.
SPECIFICATIONS
| Model d-Copia 16W d-Copia | 20W | |
| Type Digital Multifunctional | System, Desktop | |
| Photoconductive type OPC | drum | |
| Document glass type Fixed | ||
| Copy system Dry, electrostatic transfer | ||
| Originals Sheets, bound documents | ||
| Original sizes Max. A3 (11" x 17") | ||
| Copy size | Max. A3 (11" x 17")Min. A6 (5-1/2" x 8-1/2") (A6 must be fed from the bypass tray)Image loss: Max. 4 mm (5/32") (leading and trailing edges)Max. 4 mm (5/32") (along other edges in total) | |
| Copying speed(one-sided copying at 100% copy ratio) | 9 copies/min. A3 (11" x 17")10 copies/min. B4 (8-1/2" x 14")12 copies/min. A4R (8-1/2" x 11"R)14 copies/min. B5R16 copies/min. A4, B5R, A5 (8-1/2" x 11", 8-1/2" x 8-1/2") | 11 copies/min. A3 (11" x 17")12 copies/min. B4 (8-1/2" x 14")14 copies/min. A4R (8-1/2" x 11"R)16 copies/min. B5R20 copies/min. A4, B5R, A5 (8-1/2" x 11", 8-1/2" x 8-1/2") |
| Continuous copy Max. 999 | copies; subtractive counter | |
| First-copy time* Approx. 7 | 2 sec. | |
| Warm-up time* Approx. 45 | sec. | |
| Copy ratio | Variable: 25% to 400%, in 1% increments (total 376 steps)Fixed preset: 50%, 70%, 81%, 86%, 100%, 115%, 122%, 141%, 200%(50%, 64%, 77%, 95%, 100%, 121%, 129%, 141%, 200%) | |
| Exposure system | Document glass: Moving optical source, slit exposure (stationary platen) with automatic exposureSPF: Moving original | |
| Paper feed | One automatic feeding paper tray (250 sheets) + bypass tray (100 sheets) | Two automatic feeding paper trays (250 sheets each) + bypass tray (100 sheets) |
| Fusing system | Heat rollers | |
| Developing system | Magnetic brush development | |
| Light source | Cold cathode fluorescent lamp | |
| Resolution | Scan: 600 x 300 dpi Output: 600 x 600 dpi (AUTO/TEXT mode)Scan: 600 x 600 dpi Output: 600 x 600 dpi (PHOTO mode) | |
| Gradation | Scanning: 256Printing: 2 value | |
| Power supply | Local voltage ±10% (For this machine's power supply requirements, see the name plate located on the back of the machine.) | |
| Power consumption | Max. 1.2 kW | |
| Overall dimensions(with bypass tray folded) | 590 mm (W) x 577 mm (D) (23-15/64" (W) x 22-23/32" (D)) | |
| Weight | Approx. 31.3 kg (69.1 lbs.) (Not including toner cartridge) | Approx. 36.3 kg (80.1 lbs.) (Not including toner cartridge) |
| Dimensions | 590 mm (W) x 577 mm (D) x470 mm (H) (23-15/64" (W) x 22-23/32" (D) x 18-33/64" (H)) | 590 mm (W) x 577 mm (D) x555 mm (H) (23-15/64" (W) x 22-23/32" (D) x 21-55/64" (H)) |
| Operating conditions Temperature: 15°C to 30°C (59°F to 86°F), Humidity: 20% to 85% | ||
| Noise level | Sound Power Level LwA(1B=10dB) Copying: 6.2[B] Standby: 3.1[B] Sound Pressure Level LpA (bystander positions) Copying: 48[dB(A)] Standby: 16[dB(A)] Sound Pressure Level LpA (operator position) Copying: 50[dB(A)] Standby: 18[dB(A)] Noise emission measurement in accordance with ISO 7779. | |
| Emission concentration (measured according to RAL-UZ62: Edition Jan. 2002) | Ozone: 0.02 mg/m ^3 or less Dust: 0.075 mg/m ^3 or less Styrene: 0.07 mg/m ^3 or less | |
* The first-copy time and warm-up time may vary depending on the power-supply voltage, ambient temperature, and other operating conditions.
Printer Function
| Print speed 12 ppm | |
| Resolution 600 dpi | |
| Memory 16 MB | |
| Emulation GDI | |
| Interface | IEEE1284 parallel connector/USB connector (USB1.1) |
| Interface cables | [Parallel cable]Shielded bi-directional (IEEE1284) cable (max. length 3 m (10 feet))Please purchase a commercially available parallel cable.[USB cable (only for connection to USB 1.1 connector)]Shielded twisted pair cable (max. length 3 m (10 feet)) |

As a part of our policy of continuous improvement, OLIVETTI reserves the right to make design and specification changes for product improvement without prior notice. The performance specification figures indicated are nominal values of production units. There may be some deviations from these values in individual units.

SOFTWARE LICENSE
PLEASE READ THIS LICENSE CAREFULLY BEFORE USING THE SOFTWARE. BY USING THE SOFTWARE, YOU ARE AGREEING TO BE BOUND BY THE TERMS OF THIS LICENSE.
- License. The application, demonstration, system and other software accompanying this License, whether on disk, in read only memory, or on any other media (the "Software") and related documentation are licensed to you by OLIVETTI. You own the disk on which the Software is recorded but OLIVETTI and/or OLIVETTI's Licensors retain title to the Software and related documentation. This License allows you to use the Software on one or more computers connected to a single printer and make one copy of the Software in machine-readable form for backup purposes only. You must reproduce on such copy the OLIVETTI copyright notice, the copyright notice of OLIVETTI's Licensors and any other proprietary legends of OLIVETTI and/or its Licensors that were on the original copy of the Software. You may also transfer all your license rights in the Software, the backup copy of the Software, the related documentation and a copy of this License to another party, provided the other party reads and agrees to the terms and conditions of this License.
- Restrictions. The Software contains copyrighted material, trade secrets and other proprietary material which is owned by OLIVETTI and/or its Licensors and in order to protect them you may not decompile, reverse engineer, disassemble or otherwise reduce the Software to a human-perceivable form. You may not modify, network, rent, lease, loan, distribute or create derivative works based upon the Software in whole or in part. You may not electronically transmit the Software from one computer to another or over a network.
- Termination. This license is effective until terminated. You may terminate this License at any time by destroying the Software and related documentation and all copies thereof. This License will terminate immediately without notice from OLIVETTI and/or OLIVETTI's Licensors if you fail to comply with any provision of this License. Upon termination you must destroy the Software and related documentation and all copies thereof.
- Export Law Assurances. You agree and certify that neither the Software nor any other technical data received from OLIVETTI, nor the direct product thereof, will be exported outside the United States except as authorized and as permitted by the laws and regulations of the United States. If the Software has been rightfully obtained by you outside of the United States, you agree that you will not re-export the Software nor any other technical data received from OLIVETTI, nor the direct product thereof, except as permitted by the laws and regulations of the United states and the laws and the regulation of the jurisdiction in which you obtained the Software.
- Government End Users. If you are acquiring the Software on behalf of any unit or agency of the United States Government, the following provisions apply. The Government agrees:
(i) if the Software is supplied to the Department of Defense (DoD), the Software is classified as "Commercial Computer Software" and the Government is acquiring only "restricted rights" in the Software and its documentation as that term is defined in Clause 252.227-7013 (c)(1) (Oct., 1988) of the DFARS; and
(ii) if the Software is supplied to any unit or agency of the United States Government other than DoD, the Government's rights in the Software and its documentation will be as defined in Clause 52.227-19 (c)(2) of the FAR or, in the case of NASA, in Clause 18-52.227-86 (d) of the NASA Supplement to the FAR.
- Limited Warranty on Media. OLIVETTI warrants the disks on which the Software is recorded to be free from defects in materials and workmanship under normal use for a period of ninety (90) days from the date of purchase as evidenced by a copy of the receipt. The entire liability of OLIVETTI and/or its Licensors and your exclusive remedy will be replacement of the disk which fails to meet the limited warranty provided by this Clause 6. A disk will be replaced when it is returned to OLIVETTI or a OLIVETTI authorized representative with a copy of the receipt. OLIVETTI will have no responsibility to replace a disk damaged by accident, abuse or misapplication.
ANY IMPLIED WARRANTIES ON THE DISKS, INCLUDING THE IMPLIED WARRANTIES OF MERCHANTABILITY AND FITNESS FOR A PARTICULAR PURPOSE, ARE LIMITED IN DURATION TO NINETY (90) DAYS FROM THE DATE OF DELIVERY. THIS WARRANTY GIVES YOU SPECIFIC LEGAL RIGHTS, AND YOU MAY ALSO HAVE OTHER RIGHTS WHICH VARY FROM JURISDICTION TO JURISDICTION.
-
Disclaimer of Warranty on Software. You expressly acknowledge and agree that use of the Software is at your sole risk. The Software and related documentation are provided "AS IS" and without warranty of any kind and OLIVETTI and OLIVETTI's Licensor(s) (for the purpose of provisions 7 and 8, OLIVETTI and OLIVETTI's Licensor(s) shall be collectively referred to as "OLIVETTI") EXPRESSLY DISCLAIM ALL WARRANTIES, EXPRESS OR IMPLIED, INCLUDING, BUT NOT LIMITED TO, THE IMPLIED WARRANTIES OF MERCHANTABILITY AND FITNESS FOR A PARTICULAR PURPOSE. OLIVETTI DOES NOT WARRANT THAT THE FUNCTIONS CONTAINED IN THE SOFTWARE WILL MEET YOUR REQUIREMENTS, OR THAT THE OPERATION OF THE SOFTWARE WILL BE UNINTERRUPTED OR ERROR-FREE, OR THAT DEFECTS IN THE SOFTWARE WILL BE CORRECTED. FURTHERMORE, OLIVETTI DOES NOT WARRANT OR MAKE ANY REPRESENTATIONS REGARDING THE USE OR THE RESULTS OF THE USE OF THE SOFTWARE OR RELATED DOCUMENTATION IN TERMS OF THEIR CORRECTNESS, ACCURACY, RELIABILITY, OR OTHERWISE. NO ORAL OR WRITTEN INFORMATION OR ADVICE GIVEN BY OLIVETTI OR A OLIVETTI AUTHORIZED REPRESENTATIVE SHALL CREATE A WARRANTY OR IN ANY WAY INCREASE THE SCOPE OF THIS WARRANTY. SHOULD THE SOFTWARE PROVE DEFECTIVE, YOU (AND NOT OLIVETTI OR A OLIVETTI AUTHORIZED REPRESENTATIVE) ASSUME THE ENTIRE COST OF ALL NECESSARY SERVICING, REPAIR OR CORRECTION, SOME JURISDICTIONS DO NOT ALLOW THE EXCLUSION OF IMPLIED WARRANTIES, SO THE ABOVE EXCLUSION MAY NOT APPLY TO YOU.
-
Limitation of Liability. UNDER NO CIRCUMSTANCES INCLUDING NEGLIGENCE, SHALL OLIVETTI BE LIABLE FOR ANY INCIDENTAL, SPECIAL OR CONSEQUENTIAL DAMAGES THAT RESULT FROM THE USE OR INABILITY TO USE THE SOFTWARE OR RELATED DOCUMENTATION, EVEN IF OLIVETTI OR A OLIVETTI AUTHORIZED REPRESENTATIVE HAS BEEN ADVISED OF THE POSSIBILITY OF SUCH DAMAGES. SOME JURISDICTIONS DO NOT ALLOW THE LIMITATION OR EXCLUSION OF LIABILITY FOR INCIDENTAL OR CONSEQUENTIAL DAMAGES SO THE ABOVE LIMITATION OR EXCLUSION MAY NOT APPLY TO YOU.
In no event shall OLIVETTI's total liability to you for all damages, losses, and causes of action (whether in contract, tort (including negligence) or otherwise) exceed the amount paid by you for the Software.
-
Controlling Law and Severability. For a portion of the Software related with Apple Macintosh and Microsoft Windows, this license shall be governed by and construed in accordance with the laws of the state of California and Washington, respectively. If for any reason a court of competent jurisdiction finds any provision of this License, or portion thereof, to be unenforceable, that provision of the License shall be enforced to the maximum extent permissible so as to effect the intent of the parties, and the remainder of this License shall continue in full force and effect.
-
Complete Agreement. This License constitutes the entire agreement between the parties with respect to the use of the Software and related documentation, and supersedes all prior or contemporaneous understandings or agreements, written or oral, regarding such subject matter. No amendment to or modification of this License will be binding unless in writing and signed by a duly authorized representative of OLIVETTI.
INDEX
Symbols
[#] key 11, 55
A
About the operation manuals
- Online Manual....5
- Operation Manual ....5
- Software Setup Guide....5
Adjusting the automatic exposure level....31
Alarm indicators ....10, 35, 37, 43, 45, 46
Appendix 60
Audible signals....34, 35
AUDIT CLEAR key....10, 39
Auditing mode 33, 36, 37, 38, 39
Auto clear....12, 18, 19, 33
AUTO IMAGE indicator....11, 21
AUTO IMAGE key....11, 21
AUTO PAPER SELECT indicator 10, 20
Auto paper select mode ....20
Auto power shut-off mode....12, 33
Auto tray switching....21, 33
AUTO/TEXT/PHOTO key.....10, 21, 31, 32
B
Base setting 34, 35
Basic procedure for printing 29
Before using the machine ....8
Bypass tray 8, 13, 15, 26
Bypass tray extension....8, 15
Bypass tray guides....8, 15
Bypass tray paper feed roller 57
C
Caution
- Cautions on handling ....4
- Cautions on laser....4
- Cautions on using 3
- Installation site ....3
Changing a tray's paper size setting....16
Charger cleaner 8,57
Checking the total output count....55
Checking the toner level....56
Cleaning
- Bypass tray paper feed roller 57
- Document cover....56
- Document glass ....56
- SPF....56
- Transfer charger ....57
CLEAR ALL key 11, 12
CLEAR key....11, 18, 19
Conventions used in this manual ....5
Copy functions ......18
Copy ratio display key....10, 23, 38, 56
D
Dark indicator....10, 21
Dark key....10, 21, 31, 32
Developer replacement required indicator .....10, 46
Differences between models....6
Display 10,39,46
Document cover.... 8, 18, 20, 56
Document feeder tray....9, 19
Document glass 8, 18, 56
DUAL PAGE COPY indicator 10,27
DUAL PAGE COPY key.... 10, 27
E
Environmental information 4
Exit area 9
F
Feeding roller cover 9,47
Front cover 8
Fusing unit paper guide.... 9, 51
Fusing unit release levers 9,50
H
Handles 8
High image quality mode.... 32
|
Indicators and display messages 46
Initial settings 12
INTERRUPT indicator 10,28
INTERRUPT key 10,28
L
Light indicator.... 10, 21
Light key.... 10, 21, 31, 32, 35, 37
Loading paper 13, 14
Loading the bypass tray.... 15
Loading the paper tray 14
M
Main features 7
Maintenance indicator 10,46
Making a copy darker or lighter.... 21
Misfeed indicator.... 10, 46, 47
Misfeed location indicator.... 11, 46, 47
Misfeed removal
- Bypass tray 48
- Lower paper tray 53
- Machine.... 49
- SPF 47
- Upper paper tray 52
N
Normal copying
Document glass 18
- SPF 19
Numeric keys 11, 22, 35, 37
0
ON LINE indicator 10,29
ON LINE key 10,29
Operation panel....8,10
Original guides 9, 19
ORIGINAL SIZE ENTER key 10, 16, 18
ORIGINAL SIZE indicator 10, 19
Original types
- AUTO....21
- PHOTO 21
- TEXT....21
P
Paper....13
Paper feed location indicator....11, 16
Paper output tray....8
Paper required indicator....10, 13, 46
PAPER SIZE ENTER key 11, 16
PAPER SIZE indicator 11, 16, 18, 19
Paper tray....8, 14, 52, 53
Parallel connector 9
Part names and functions ....8
Peripheral devices....58
Photoconductive drum 4,9
Power....12
Power off....8, 12
Power on....8, 12
POWER SAVE indicator 10, 12
Power save modes....12
Power switch....8, 12
Preheat mode....12, 33
PRESET RATIO selector indicator....11, 23
PRESET RATIO selector keys....11, 23, 24
Printer functions 29
R
Reduction/enlargement/zoom
- Automatic ratio selection....22
- Manual ratio selection....23
- XY ZOOM copying ....24
Removing the document cover 20
Replacing the toner cartridge....54
Right side cover 9,47
Roller rotating knob....9, 49, 50
Routine maintenance ....55, 56
S
Selecting the tray 21
Setting the number of copies ....22
Side cover 8
Side cover handle 8
Single pass feeder (SPF)....58
Software license....62
Specifications....60
SPF indicator....11, 19, 20
START indicator....11, 12
START key....11, 12, 18, 19, 35, 37
Storage of supplies 59
Stream feeding mode....20, 33
T
Toner cartridge....9, 54
Toner cartridge lock release lever.... 9, 54
Toner cartridge replacement required indicator ..... 10, 46, 54
Toner save mode 32
Total output count 55
Transfer charger.... 57
TRAY SELECT key 11, 16, 18, 19, 21, 22
Troubleshooting
- Machine/copying problems 41
- Printing problems 44
Two-sided copying using the bypass tray 26
U
USB 1.1 connector 8
User programs 33, 35
User settings 31
Using the manual 5
Using the printer mode.... 29
X
XY-ZOOM indicator.... 10, 24
XY-ZOOM key.... 10, 24
Z
ZOOM indicator.... 10, 23
Zoom keys.... 10, 23, 24
INDEX BY PURPOSE
Copying
Automatic ratio selection 22
Cancelling a copy run....18, 19
Copying, starting 18, 19
Dual page copying 27
Enlargement/reduction.... 22
Exposure adjustment 21
Exposure selector 21
Interrupt copying 28
Manual ratio selection 23
Number of copies, setting 22
Original cover, removing 20
Original size, specifying 18
Original, placing
- Document cover....18
- SPF....19
Tray selection....21
Two-sided copies using bypass tray 26
XY Zoom 24
Machine settings
Auditing mode
- Copies, how to make ....39
- Setting procedures....37
- Settings ....36
Automatic exposure level, setting ....31
High image quality mode....32
Toner save mode 32
User programs ....33
- Setting procedures....35
- Settings ....33
Problem occurs
Misfeeds
- Bypass tray 48
- Machine (fusing area) 49
- Machine (paper feed area).... 49
- Machine (transfer area).... 51
- SPF 47
- Tray (Lower paper tray).... 53
- Tray (Upper paper tray).... 52
Troubleshooting 40
Indicators, lit and blinking
[ ]Developer replacement required indicator.... 46
[ ]Maintenance indicator.... 46
[ \$Misfeed indicator...... 46, 47
[ ] Paper required indicator 13, 46
[ ]:Toner cartridge replacement required indicator
- Blinking 46, 54
- Lit 46,54
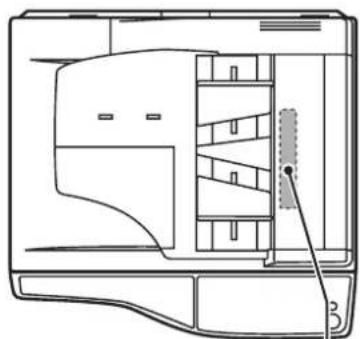
natural_image
Technical line drawing of a mechanical device interior with no visible text or symbolsVAROITUS!
LAITTEEN KÄYTTÄMINEN
MUULLA KUIN TÄSSÄ
KÄYTTÖOHJEESSA MAINITULLA
TAVALLA SAATTAA ALTISTAA
KÄYTTÄJÄN
TURVALLISUUSLUOKAN 1
YLITTÄVÄLLE
NÄKYMÄTTÖMÄLLE
LASERSÄTEILYLLE.
WARNING
OM APPARATEN ANVÄNDS PÅ
ANNAT SÄTT ÄN I DENNA
BRUKSANVISNING
SPECIFICERATS, KAN
ANVÄNDAREN UTSÄTTAS FÖR
OSYNLIG LASERSTRÅLNING,
SOM ÖVERSKRIDER GRÄNSEN
FÖR LASERKLASS 1.

Laserstrahl
CAUTION INVISIBLE LASER RADIATION WHEN OPEN AND INTERLOCKS DEFEATED. AVOID EXPOSURE TO BEAM.
natural_image
Technical line drawing of a computer monitor case with ports and cables (no text or symbols)CLASS 1 LASER PRODUCT
LASER KLASSE 1
This equipment complies with the requirements of Directives 89/336/EEC and 73/23/EEC as amended by 93/68/EEC.
The CE mark logo label is affixed on an equipment in case that the directives described in the above sentence are applicable to the product. (This sentence is not applicable in any country where the above directives are not required.)
CODE: 508904
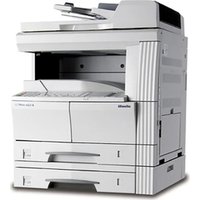
- PUBLICATION ISSUED BY:
- Caution!
- Warning
- DIRECTIVE 2002/96/CE ON THE TREATMENT, COLLECTION, RECYCLING AND DISPOSAL OF ELECTRIC AND ELECTRONIC DEVICES AND THEIR COMPONENTS
- FOR COUNTRIES IN THE EUROPEAN UNION (EU)
- TO DISPOSE OF OUR DEVICES CORRECTLY:
- FOR OTHER COUNTRIES (NOT IN THE EU)
- CONTENTS
- CAUTIONS....3
- USING THE MANUAL 5
- MAIN FEATURES....7
- BEFORE USING THE MACHINE
- PART NAMES AND FUNCTIONS .... 8
- COPY FUNCTIONS
- NORMAL COPYING 18
- REDUCTION/ENLARGEMENT/ZOOM.... 22
- TWO-SIDED COPYING USING THE BYPASS
- TRAY....26
- DUAL PAGE COPYING.... 27
- INTERRUPTING A COPY RUN 28
- 3PRINTER FUNCTIONS
- USING THE PRINTER MODE 29
- 4USER SETTINGS
- ADJUSTING THE AUTOMATIC EXPOSURE LEVEL.... 31
- TONER SAVE MODE AND HIGH IMAGE QUALITY MODE.... 32
- CUSTOMISING SETTINGS 33
- SETTINGS FOR AUDITING MODE.... 36
- 5TROUBLESHOOTING
- TROUBLESHOOTING 40
- INDICATORS AND DISPLAY MESSAGES .... 46
- MISFEED REMOVAL.... 47
- REPLACING THE TONER CARTRIDGE ..... 54
- 6ROUTINE MAINTENANCE
- CHECKING THE TOTAL OUTPUT COUNT
- AND TONER LEVEL...... 55
- ROUTINE MAINTENANCE.... 56
- PERIPHERAL DEVICES AND SUPPLIES
- PERIPHERAL DEVICES 58
- STORAGE OF SUPPLIES.... 59
- 8APPENDIX
- SPECIFICATIONS 60
- SOFTWARE LICENSE 62
- INDEX 64
- CAUTIONS
- CAUTIONS ON USING
- ⚠ Warning:
- Caution:
- IMPORTANT POINTS WHEN SELECTING AN INSTALLATION SITE
- Do not install your machine in areas that are:
- CAUTIONS ON HANDLING
- CAUTIONS ON LASER
- Trademark acknowledgements
- ENVIRONMENTAL INFORMATION
- USING THE MANUAL
- ABOUT THE OPERATION MANUALS
- Operation Manual (Digital Multifunctional System) (this manual)
- Online Manual (on the accessory CD-ROM)
- Software Setup Guide (separate manual)
- THE MEANING OF "R" IN ORIGINAL AND PAPER SIZE INDICATIONS
- CONVENTIONS USED IN THIS MANUAL
- SPF
- DIFFERENCES BETWEEN MODELS
- AB series (metric) and inch series references
- For example:
- MAIN FEATURES
- High-speed laser copying
- High-quality digital image
- Enhanced copying features
- Scan once/Print many
- Laser printer function
- Environment and people friendly design
- PART NAMES AND FUNCTIONS
- OPERATION PANEL
- POWER ON AND OFF
- POWER ON
- POWER OFF
- Power Save Modes
- Preheat mode
- Auto power shut-off mode
- Initial settings
- LOADING PAPER
- PAPER
- Special papers
- Loading the paper tray
- Loading the bypass tray
- Unfold the bypass tray.
- Insert the paper (print face down) all the way into the bypass tray.
- Set the paper guides to the copy paper width.
- Important points when inserting paper in the bypass tray
- Envelopes
- CHANGING A TRAY'S PAPER SIZE SETTING
- Hold down the [PAPER SIZE ENTER] key (↘) for more than 5 seconds to set the selected paper size.
- Use the [ORIGINAL SIZE ENTER] key ( ) to select the paper size.
- If the machine has two paper trays, use the [TRAY SELECT] key (to select the paper tray for which you wish to change the paper size setting.
- Important points when using the printer mode
- 2
- Chapter 2
- COPY FUNCTIONS
- NORMAL COPYING
- Copying from the document glass
- Open the document cover/SPF, and place the original.
- Close the document cover/SPF.
- Press the [ORIGINAL SIZE ENTER] key ( ) and select the original size.
- Set the number of copies.
- Press the [START] key ( ) to begin copying.
- Copying from the SPF
- Auto paper select mode (Two-tray model only)
- Removing the document cover
- Copying books or originals with folds or creases
- Originals that can be used in the SPF
- Originals that cannot be used in the SPF
- Stream feeding mode
- MAKING A COPY DARKER OR LIGHTER
- Original types
- Press the [AUTO/TEXT/PHOTO] key (AUTO) to select the original type.
- Press the [Light] key ( ) or [Dark] key ( ) to adjust the exposure.
- Exposure value guidelines
- SELECTING THE TRAY
- Auto tray switching (Two-tray model only)
- SETTING THE NUMBER OF COPIES
- Important note when making a large number of copies
- REDUCTION/ENLARGEMENT/ZOOM
- AUTOMATIC RATIO SELECTION
- Press the [AUTO IMAGE] key (AUTO %
- Set the number of copies and other copy settings, and then press the [START] key ( )
- MANUAL RATIO SELECTION
- Set the number of copies and other copy settings, and then press the [START] key ( ).
- SELECTING THE VERTICAL AND HORIZONTAL COPY RATIOS SEPARATELY
- Use the [PRESET RATIO] selector keys (☑) and [Zoom] keys (, ) 🕒 to change the copy ratio in the horizontal direction.
- Press the [Copy ratio display] key ( Ⓞ ).
- Set the number of copies and other copy settings, and then press the [START] key (①)
- TWO-SIDED COPYING USING THE BYPASS TRAY
- Copy original A.
- Place original B as shown below.
- Vertically-oriented original:
- Horizontally-oriented original:
- Turn the copy of original A over, and without changing the position of the edge closest to you, insert it in the bypass tray.
- Select the bypass tray with the [TRAY SELECT] key (♀) and then press the [START] key (♀)
- DUAL PAGE COPYING
- INTERRUPTING A COPY RUN
- (Interrupt copying)
- Press the [INTERRUPT] key (①) to interrupt the copy run.
- Remove the previous original(s) and place the original(s) of the interrupt copy job.
- Set the number of copies and other copy settings and then press the [START] key (⑧)
- When the copy job is finished, press the [INTERRUPT] key (⊕ and remove the original(s).
- Replace the previous original(s) and press the [START] key (⑤)
- USING THE PRINTER MODE
- BASIC PROCEDURE FOR PRINTING
- Make sure that paper is loaded in the tray.
- Make sure that the ON LINE indicator (on the operation panel is lit.
- Open the file that you wish to print and select "Print" from the File menu.
- Make sure that the printer driver for the machine is selected, and select print settings in the printer driver.
- Click the "Print" button or the "OK" button to begin printing.
- Important points when setting the paper size
- Pausing a print job
- When "Use close paper size" is disabled
- When "Use close paper size" is enabled
- OPERATION IN COPY AND PRINTER MODES
- To adjust the automatic exposure level in the SPF, place the original in the SPF. (p.19)
- Press the [AUTO/TEXT/PHOTO] key (Autoto select "PHOTO" ()).
- Hold down the [AUTO/TEXT/PHOTO] key (AUTO) until the AUTO indicator ( ) blinks.
- Press the [Light] key ( ) or [Dark] key ( ) to lighten or darken the automatic exposure level as desired.
- Press the [AUTO/TEXT/PHOTO] key (Autpto complete the setting.
- TONER SAVE MODE AND HIGH IMAGE QUALITY MODE
- CUSTOMISING SETTINGS
- SELECTING A SETTING FOR A USER PROGRAM
- Hold down the [Light] key (until the alarm indicators (✗, ✉, ✉) blink.
- Enter the program number with the numeric keys.
- Press the [START] key (⑤)
- Enter the desired setting code by pressing a numeric key.
- Press the [START] key ( )
- Press the [Light] key ( ) to complete the settings.
- Audible signals (key entry beep, invalid key beep, base setting beep)
- Base settings
- SETTINGS FOR AUDITING MODE
- AUDITING MODE
- SELECTING AUDITING MODE SETTINGS
- Enter the desired setting code for the program as explained in the detailed procedures on the following pages.
- Press the [Light] key ( ) to complete the settings.
- (program No.10)
- Account number entry (program No.11)
- Account number change (program No.12)
- Account number deletion (program No.13)
- [Deleting all accounts at once]
- Press the [1] key and then press the [START] key (∅)
- [Deleting a single account]
- Number of copies per account (program No.14)
- Resetting account
- (program No.15)
- [Resetting all accounts]
- [Resetting a single account]
- Copying when "Auditing mode" is enabled
- Enter your 3-digit account number with the numeric keys.
- Follow the appropriate steps to make the copy.
- When finished, press the [AUDIT CLEAR] key (ACC.#-C
- TROUBLESHOOTING
- MACHINE/COPYING PROBLEMS
- PRINTING PROBLEMS
- Removing the software
- Click the "start" button, and then click "Control Panel".
- Click "Add or Remove Programs".
- Select "OLIVETTI d-Copia 16W/20W Series Printer Driver" from the list, and remove the software.
- INDICATORS AND DISPLAY MESSAGES
- MISFEED REMOVAL
- MISFEED IN THE SPF
- Remove the misfed original.
- Section A
- Section B
- Section C
- Open and close the SPF to make the misfeed location indicator stop blinking.
- Return the originals indicated by the minus number in the display to the document feeder tray and press the [START] key (①)
- MISFEED IN THE BYPASS TRAY
- Gently pull the misfed paper out.
- Open and close the side cover.
- MISFEED IN THE MACHINE
- Open the bypass tray and the side cover.
- Check the misfeed location. Remove the misfed paper following the instructions for each location in the illustration below.
- Misfeed in the paper feed area
- Push gently on both ends of the front cover.
- Close the front cover and side cover.
- Carefully remove the misfed paper. Turn the roller rotating knob in the direction of the arrow to assist in removing it.
- Misfeed in the fusing area
- Caution
- Note
- Misfeed in the transport area
- MISFEED IN THE UPPER PAPER TRAY
- Lift and pull out the upper paper tray and remove the misfed paper.
- Close the upper paper tray.
- MISFEED IN THE LOWER PAPER TRAY (Two-tray model only)
- Open the lower side cover.
- Close the lower paper tray.
- Remove the misfed paper.
- If the misfed paper is not seen in step 2, lift and pull out the lower paper tray and remove the misfed paper.
- Close the lower side cover.
- REPLACING THE TONER CARTRIDGE
- Push on both ends of the front cover and open it.
- Pull the toner cartridge out while pressing the lock release lever.
- Remove the new toner cartridge from the bag. Grasp the cartridge on both sides and shake it horizontally four or five times. After shaking the cartridge, remove the tape.
- Insert the toner cartridge along the guides until it locks in place while pushing the lock release lever.
- Remove the tape from the shutter. Pull the shutter out of the toner cartridge.
- Close the front cover.
- CHECKING THE TOTAL OUTPUT COUNT AND TONER LEVEL
- [Total output count]
- Hold down the [0] key.
- [Total copy count] Hold down the [ ]#key.
- CHECKING THE TONER LEVEL
- Hold down the [Light] key (until the alarm indicators (✗, ✉) ☐ 8V blink.
- Hold down the [Copy ratio display] key (☐ for more than 5 seconds.
- Press the [Light] key (☐ to return to the normal display.
- ROUTINE MAINTENANCE
- CLEANING THE DOCUMENT GLASS AND SPF/ DOCUMENT COVER
- CLEANING THE BYPASS TRAY PAPER FEED ROLLER
- CLEANING THE TRANSFER CHARGER
- 7
- Chapter 7
- PERIPHERAL DEVICES AND SUPPLIES
- PERIPHERAL DEVICES
- SINGLE PASS FEEDER
- STORAGE OF SUPPLIES
- PROPER STORAGE
- SOFTWARE LICENSE
- INDEX
- Symbols
- A
- B
- C
- D
- E
- F
- H
- |
- L
- M
- N
- 0
- P
- R
- S
- T
- U
- X
- Z
- INDEX BY PURPOSE
- Copying
- Machine settings
- Problem occurs
- Indicators, lit and blinking
- VAROITUS!
Brand : OLIVETTI
Model : d-Copia 20W
Category : Printer