Black Trevoce 12EQ - Subwoofer OSD Audio - Free user manual and instructions
Find the device manual for free Black Trevoce 12EQ OSD Audio in PDF.


| Product Type | Powered Subwoofer |
| Brand | OSD Audio |
| Model | Black Trevoce 12EQ |
| Driver Size | 12 inches |
| Amplifier Power (RMS) | 400 Watts |
| Peak Power | 800 Watts |
| Frequency Response | 25 Hz – 200 Hz |
| Impedance | 4 Ohms |
| Enclosure Type | Sealed (Acoustic Suspension) |
| Controls | Volume, Phase, Low-Pass Crossover, EQ |
| Inputs | LFE (RCA), Line Level (RCA L/R) |
| Dimensions (H x W x D) | 16.5 x 16 x 18 inches |
| Weight | 45 lbs |
| Power Supply | AC 110-120V, 60Hz (Internal) |
| Standby Power Consumption | < 0.5W |
| Cabinet Finish | Black Vinyl |
| Grille | Detachable Black Cloth |
| Protection Circuitry | Short Circuit, Overheat, Overload |
| Placement | Floor-standing, Front-firing |
| Recommended Room Size | Medium to Large (up to 400 sq ft) |
| Accessories Included | Power Cord, User Manual, RCA Cable |
| Maintenance | Clean with dry cloth; do not use solvents |
| Safety Certifications | ETL, UL Listed |
| Warranty | 5 years (electronics) / Lifetime (driver) |
Frequently Asked Questions - Black Trevoce 12EQ OSD Audio
User questions about Black Trevoce 12EQ OSD Audio
0 question about this device. Answer the ones you know or ask your own.
Ask a new question about this device
Download the instructions for your Subwoofer in PDF format for free! Find your manual Black Trevoce 12EQ - OSD Audio and take your electronic device back in hand. On this page are published all the documents necessary for the use of your device. Black Trevoce 12EQ by OSD Audio.
USER MANUAL Black Trevoce 12EQ OSD Audio
by OPTIMAL SPEAKER DESIGN
OSD
BLACK
TREVOCE EQ SEIRES SUBWOOFER INSTALL GUIDE
TREVOCE15 EQ
TREVOCE12 EQ
natural_image
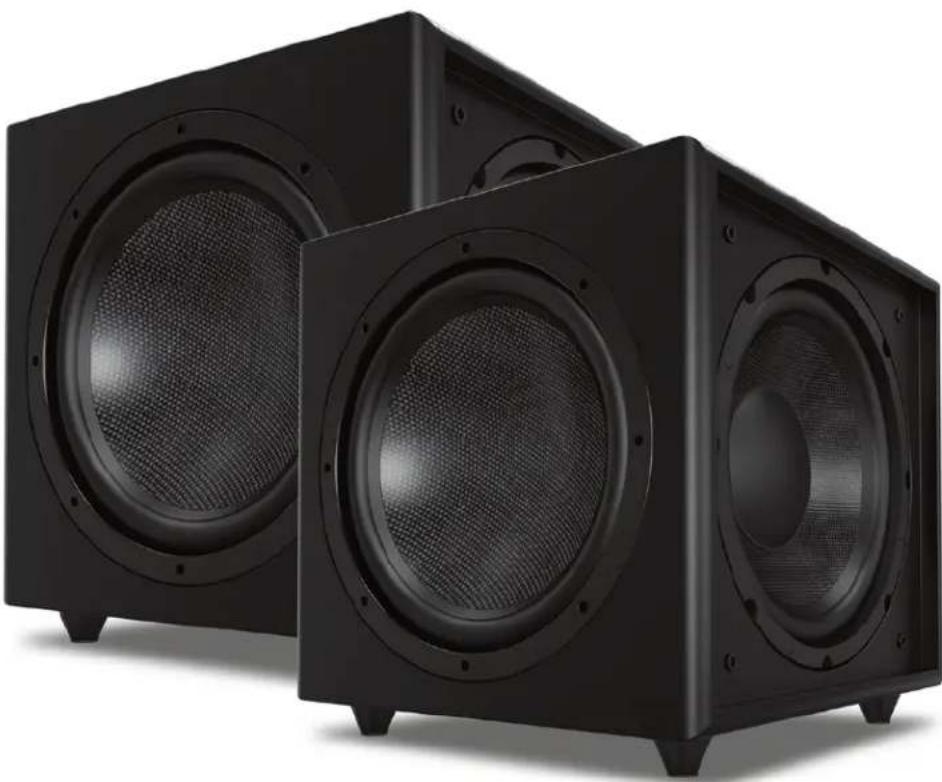
Exterior view of two black audio/video speakers with mesh head covers (no text or symbols visible)TREVOCE EQ SERIES SUBWOOFER INSTALL GUIDE
Thank you for buying the latest version of our most popular subwoofer.
The additional upgrades we have made make this the best all-round sub in our history. Incorporated in the Trevoce EQ Series is the new native EQ. The native EQ has allowed us to extract the maximum base extension possible from our design. This allows the full range of musical instruments and special effects to be reproduced. The Trevoce EQ Series does this all without any increase in the size of the sub. Our Trevoce subs offer the smallest footprint you will find in triple driver designs.
Installation Precautions:
Before installing
Before connecting your subwoofer, make sure all equipment is switched off and that voltage switch is set to your country's voltage. Do not connect the subwoofer power supply cable before completing all connections;
Features:
World Class Digital Amplifier Technology
The TreVoce Series powered subwoofer incorporates the latest digital amplifier technology to maximize performance while generating very little heat. In standby mode, the unit consumes less than 0.5 watts, making it one of the greenest solutions available.
Tuned System Performance
Rear mounted volume control, low pass crossover, phase control ensure optimal system integration and built-in native EQ ensures the deepest bass frequencies.
Cabinet
An attractive furniture quality solid cabinet with 'leather' finish, provides the foundation for high sound quality and clarity.
Connection & Controls
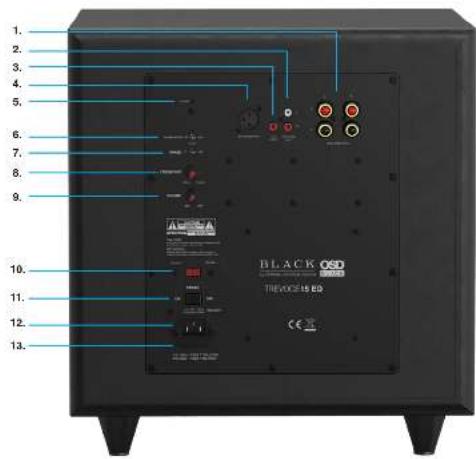
1. High Level Inputs
Use for Left/Right connection from speakers.
2. Line Level Input
Use for Left/Right connection from subwoofer-out, or line-out, on amp/AVR.
3. LFE Input
Connect to the LFE output on the Receiver/Processor.
4. Balanced XLR Input
For lower noise connection if available.
5. Power LED
(Red) Standby Mode - (Blue) Power Mode ON
6. Power Mode Switch
Set the power mode ( OFF, AUTO, or ON )
7. Phase Switch
Allows you to set the phase of the woofer 0-180°
8. Crossover Control
Adjusts the subwoofers frequency output output to match main speakers
9. Volume Control
Adjusts subwoofer volume level.
10. Voltage Switch
Select input voltage. Default: 110-120V or 220-240V
11. Master Power Switch
Controls the main power to the subwoofer
12. AC Power Cord
Connect the Included AC power cord.
13. Fuse Holder
Master Power Fuse. Includes spare fuse inside holder.
TREVOCE EQ SERIES SUBWOOFER INSTALL GUIDE
Settings & Controls
Setting the Power Mode
ON Mode:
If the subwoofer is set to ON mode, it will always be ready to play. However, undesired noise from interference or connections changing may be heard. Use the standard ON mode only if needed, set the power switch to OFF when not in use.
AUTO Mode:
Setting the switch to AUTO enables AUTO Sense. The subwoofer turns ON and OFF automatically in response to signal input. The subwoofer will enter standby mode if no signal is sensed for longer than 15 minutes.
Set the MODE switch to the ON position for setup.
After making all the connections, setup your subwoofer using the following steps:
-
Plug the subwoofer into an electrical outlet using the included power cord. The status LED will illuminate solid blue when power is present and the subwoofer is ON.
-
Set the controls and switches to their initial setup positions:
VOLUME set the dial to 50% or 12 o'clock
CROSSOVER adjust the upper frequency limit. The purpose is to control the overlap the upper frequencies of the subwoofer and the main speakers lower frequencies. Check your main speakers specs to determine their low-end limit.
PHASE set to 0°
- Play a movie scene or soundtrack and set the system volume to an average level. Listen to the bass level from your favorite listening position and adjust the volume accordingly.
- Continue listening to your favorite source track and experiment with the phase control until you find the best setting for you. Depending on the location of the subwoofer the bass may sound louder and deeper when the phase has been optimized. In some cases adjusting the phase will have no audible difference.
- Initial setup is now complete.
Specifications
| Spec TreVoce15 EQ TreVoce12 EQ | ||
| Power 1000W RMS 2000W Peak 375W RMS 750W Peak | ||
| Active Woofer 15" Graphite Paper Cone 12" Graphite Paper Cone | ||
| Passive Woofer Dual 15" Glass Fiber Cone Dual 12" Glass Fiber Cone | ||
| Frequency | 16 -160 Hz ±3dB 18 -160 Hz ±3dB | |
| Phase 0-180° 0-180° | ||
| Voltage 100-120V AC / 220-240V AC 100-120V AC / 220-240V AC | ||
| Inputs Hi Level / Low Level / LFE Hi Level / Low Level / LFE | ||
| Dimensions | (WxHxD) 19.3 x 19.3 x 19.3 in | (WxHxD) 16 x 15.4 x 15 in |
| Weight | 98 lbs | 46 lbs |
Warranty Information
All Optimal Speaker Design powered subwoofer products have a 2 Year Limited Warranty against defects in materials and workmanship. Proof of purchase must accompany all claims. During the warranty period Optimal Speaker Design will replace any defective part and correct any defect in workmanship without charge for either parts or labor Optimal Speaker Design may replace returned speakers with a product of equal value and performance. In such cases, some modification to the mounting may be necessary and are not Optimal Speaker Designs responsibility.
For this warranty to apply, the unit must be installed and used according to its written instructions. If necessary, repairs must be performed by Optimal Speaker Design. The unit must be returned to Optimal Speaker Design at the owner's expense and with prior written permission. Accidental damage and shipping damage are not considered defects, nor is damaged resulting from abuse or from servicing performed by an agency or person not specifically authorized in writing by Optimal Speaker Design
Optimal Speaker Design sells products only through authorized dealers and distributors to ensure that customers obtain proper support and service. Any Optimal Speaker Design product purchased from an unauthorized dealer or other source, including retailers, mail over dealers and on-line sellers will not be honored or serviced under existing Optimal Speaker Design warranty policy. Any sale of product by an unauthorized source or other manner not authorized by Optimal Speaker Design shall void the warranty on the applicable product.
Damage to or destruction of components due to application of excessive power voids the warranty on those parts. In these cases, repairs will be made on the basis of the retail value of the parts and labor. To return for repairs, you must email customer service at RMA@audiogeargroup.com for a Returned Merchandise Authorization (RMA) number# then the unit must be shipped to Optimal Speaker Design at the owner's expense, along with a note explaining the nature of service required. Be sure to pack the speaker(s) in a corrugated container with at least 3 inches of resilient material to protect the unit from damage in transit.
This Warranty Does Not Cover: Damage caused by abuse, accident, misuse, negligence, or improper operation (installation) • Any products that have been altered or modified • Any product whose identifying number of decal, serial #, etc. has been altered, defaced or removed • Normal wear and maintenance.

- OSD
- BLACK
- TREVOCE EQ SERIES SUBWOOFER INSTALL GUIDE
- Installation Precautions:
- Before installing
- Features:
- World Class Digital Amplifier Technology
- Tuned System Performance
- Cabinet
- Connection & Controls
- High Level Inputs
- Line Level Input
- LFE Input
- Balanced XLR Input
- Power LED
- Power Mode Switch
- Phase Switch
- Crossover Control
- Volume Control
- Voltage Switch
- Master Power Switch
- AC Power Cord
- Fuse Holder
- Settings & Controls
- Setting the Power Mode
- ON Mode:
- AUTO Mode:
- Warranty Information
Brand : OSD Audio
Model : Black Trevoce 12EQ
Category : Subwoofer