PS12 - Subwoofer OSD Audio - Free user manual and instructions
Find the device manual for free PS12 OSD Audio in PDF.


| Product Type | Powered Subwoofer |
| Brand | OSD Audio |
| Model | PS12 |
| Driver Size | 12 inches |
| Amplifier Power (RMS) | 300 watts |
| Amplifier Power (Peak) | 600 watts |
| Frequency Response | 20 Hz - 200 Hz |
| Inputs | Line Level (RCA), Speaker Level (Binding Posts) |
| Outputs | Speaker Level (Binding Posts) |
| Controls | Volume, Crossover Frequency, Phase (0/180°), Auto On/Off |
| Auto Power On | Yes (Signal Sensing) |
| Phase Switch | 0° / 180° |
| Protection | Short Circuit, Overload, Thermal |
| Power Supply | 110-120V / 220-240V, 50/60 Hz (Selectable) |
| Power Consumption | 400 Watts (Max) |
| Dimensions (H x W x D) | 14.5 x 14.5 x 15.5 inches |
| Weight | 35 lbs |
| Enclosure Type | Front-Firing Ported |
| Finish | Black Vinyl (MDF Cabinet) |
| Mounting Options | Floor Standing (Rubber Feet Included) |
| Warranty | 2 Years (Limited) |
| Included Accessories | RCA Cable, Power Cord, Owner's Manual |
| Discontinued | No |
Frequently Asked Questions - PS12 OSD Audio
User questions about PS12 OSD Audio
0 question about this device. Answer the ones you know or ask your own.
Ask a new question about this device
Download the instructions for your Subwoofer in PDF format for free! Find your manual PS12 - OSD Audio and take your electronic device back in hand. On this page are published all the documents necessary for the use of your device. PS12 by OSD Audio.
USER MANUAL PS12 OSD Audio
natural_image
Black wooden speaker with a circular sound block and four feet, isolated on white background (no text or symbols)PS10 / PS12
Home Audio Powered Subwoofer
Congratulations on your purchase of the OSD Audio PS10/PS12. Please take a few moments to read this entire manual, and be sure to retain this document for future reference. Please read and observe all safety instructions detailed on page 2.
NOTE: if any part of this product is damaged or missing, please call your dealer or OSD Audio directly at 1.888.779.4968 or 1.562.697.2600
Please read your warranty and retain your receipt and original carton for possible future use.
For more information about OSD Audio electronics, speakers and accessories please visit www.OSDAudio.com
FEATURES:
Volume control
40Hz-180Hz variable crossover control
Status LED
Front firing ports
Speaker level input
Signal sensing "Power On"
180° Phase switch
Removable grill
CAUTION:
TO REDUCE THE RISK OF ELECTRIC SHOCK, DO NOT REMOVE COVER (OR BACK). NO USER-SERVICEABLE PARTS INSIDE REFER SERVICING TO QUALIFIED SERVICE PERSONNEL
NOT SUITABLE FOR IN-WALL MOUNTING
EXPLANATION OF SAFETY SYMBOLS

The exclamation point within an equilateral triangle is intended to alert the user of the presence of important operating and maintenance (servicing) instructions in the literature accompanying the appliance.

The lightning flash with the arrowhead symbol within an equilateral triangle is intended to alert the user to the presence of uninsulated "dangerous voltage" within the products' enclosure that may be of sufficient magnitude to constitute a risk of electric shock to persons.
IMPORTANT SAFETY INSTRUCTIONS
- WARNING: TO PREVENT FIRE OR SHOCK HAZARD, DO NOT EXPOSE THIS APPLIANCE TO RAIN OR MOISTURE. THE APPARATUS SHALL NOT BE EXPOSED TO DRIPPING OR SPLASHING AND THAT OBJECTS FILLED WITH LIQUIDS, SUCH AS VASES, SHALL NOT BE PLACED ON APPARATUS.
- WARNING: TO PREVENT FIRE OF SHOCK HAZARD, DO NOT USE THIS PLUG WITH AN EXTENSION CORD, RECEPTACLE OR OTHER OUTLET UNLESS THE BLADES CAN BE FULLY INSERTED TO PREVENT BLADE EXPOSURE.
- WARNING: THE MAINS PLUG IS USED AS DISCONNECT DEVICE. THE DISCONNECT DEVICE SHALL REMAIN READILY AVAILABLE.
-
WARNING: ONLY USE ATTACHMENTS OR ACCESSORIES SPECIFIED OR PROVIDED BY THE MANUFACTURER.
-
Read these instructions.
- Keep these instructions.
- Heed all warnings.
- Follow all instructions.
- Do not use this apparatus near water.
- Clean only with dry cloth.
- Do not block any ventilation openings. The ventilation should not be impeded by covering the ventilation openings with items such as newspaper, table-cloths, curtains etc. Install in accordance with the manufacturer's instructions.
- Do not install near heat sources such as radiators, heat registers, stoves, or other apparatus (including amplifiers) that produce heat. No open flame sources, such as lighted candles, should be placed on the apparatus.
-
Do not defeat the safety purpose of the polarized or grounding type plug. A polarized plug has two blades with one wider than the other. A grounding type plug has two blades and a third grounding prong. The wide blade or third prong is provided for your safety. If the provided plug does not fit into your outlet, consult an electrician for replacement of the obsolete outlet.
-
Protect the power cord from being walked on or pinched particularly at the plugs, convenience receptacles, and at the point of exit from the apparatus.
- Unplug the apparatus during lightning storms or when unused for long periods of time.
- Refer all servicing to qualified personnel. Servicing is required when the apparatus has been damaged in any way, such as when the power supply cord or plug is damaged, liquid has been spilled or objects have fallen into the apparatus, the apparatus has been exposed to rain or moisture, does not operate normally, or has been dropped.
- The apparatus should be connected to a mains socket outlet with a protective earthing connection.
- There are two different types of mains fuse for different input voltage rating. Please check the marking on the rear enclosure for rating and type of mains fuse provided with the apparatus. Please ask local service personnel for help to replace the fuse before connecting the apparatus to a mains socket outlet with another voltage rating.
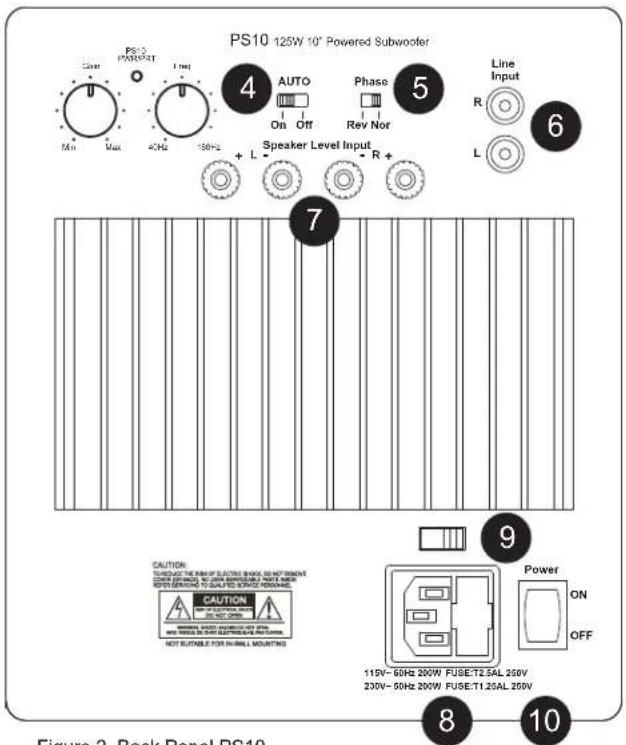
Figure 2. Back Panel PS10
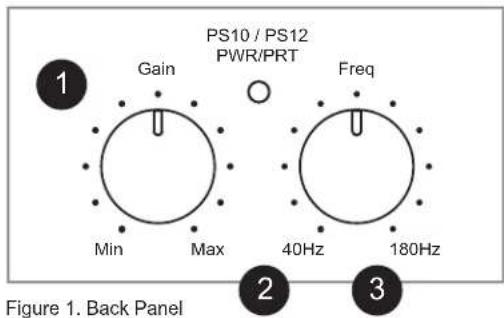
BACK PANEL CONTROLS (Figure 1)
- Volume Control
Adjusts output volume.
- Power/Protect LED indicator
Illuminates green indicating the unit is turned on while switch 10 is in "Normal" position, or when receiving signal in "Auto-On" mode. Illuminates red during standby/protect mode.
- Variable Crossover
Sets crossover frequency between 40Hz and 180Hz. For stereo music or home theater, set the frequency to a level that sounds pleasing to your ear and the overall reproduction of your audio. If using LFE signal, set crossover to 180Hz.
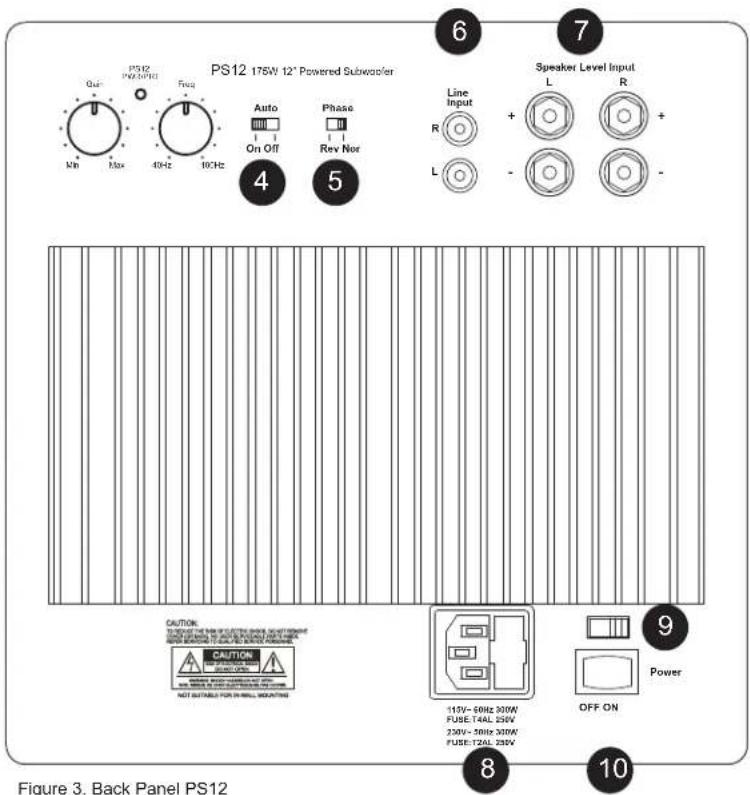
BACK PANEL CONTROLS (Figures 2-3)
- Autosensing
Sets the power-on/off option of the PS10/12. Set it to on for manual control using switch 10. Set switch to Auto-On for automatic power-on when signal is present; after 10 minutes with no signal, unit will enter standby mode. For Auto-On the power switch is left in "ON" position.
- Phase Control
Normally set to Nor. In rare instances, due to your unique sound system or the size of your room, the output may be out of phase. If the sound is hollow or the volume knob has little effect, set to Rev to compensate for these factors.
- Line Level Input
Connect to the line level, subwoofer, or LFE output of your receiver, pre-amp, or power amp. Do not use if Speaker Level Inputs are connected. For single mono input: plug into either R or L terminal, or use a y-adaptor.
- Speaker Level Input
Use when line level outputs are unavailable from your receiver, pre-amp or power amp. Your existing stereo speakers can share these terminals, allowing you to add bass to any stereo or home theater system. Always maintain speaker polarity by connecting positive (+) and negative (-) terminals on this unit with corresponding terminals on your existing speakers and source. Do not use if Line Level Inputs are connected.
- Main Power Inlet & Fuse Holder
Accepts IEC type line cord. A fuse located in the integrated holder provides safety from fault conditions: replace fuse with one of same type and rating only.
- Main Voltage Selector
Voltage selection switch is preset to 115V (USA). For use in areas which require 230V contact your dealer. Fuse must be of type and rating marked on amplifier for use at local mains voltage.
- Power Switch
Turns unit on and off in Normal power mode. Leave set to "ON" when using Auto-On power mode.
PLACEMENT
This unit features removable feet, a front firing woofer and ports. The bass output of this unit is omnidirectional so this unit may be placed anywhere in the listening environment. Walls or corners will help reflect the bass for fuller sound. During use, unit will vibrate: care should be taken not to place any liquids or heavy items such as drinks or houseplants on top as they may fall and damage your subwoofer.
PS10 SPECIFICATIONS
Output: 125W@ <1% THD
(Continuous operation at 1/8 rated power)
Frequency Response: 25Hz to 180Hz (-3dB ref. 0dB)
Singal to Noise Ratio: 100dB A
Sensitivity: Variable, 350mV to 2.8V for rated
Power at 8 ohms
AC Power Consumption: 200W maximum
Net Weight: 29.17lbs / 13.23kgs
Gross Weight: 36.38lbs / 16.5kgs
Warranty: 2 year
PS12 SPECIFICATIONS
Output: 175W@ <1% THD
(Continuous operation at 1/8 rated power)
Frequency Response: 25Hz to 180Hz (-3dB ref. 0dB)
Singal to Noise Ratio: 100dB A
Sensitivity: Variable, 350mV to 2.8V for rated
Power at 8 ohms
AC Power Consumption: 300W maximum
Net Weight: 36.88lbs / 16.73kgs
Gross Weight: 44.09lbs / 20kgs
Warranty: 2 year
Warranty & Repair
OSD AUDIO free standing subwoofers have a (2) year Limited Warranty against defects in materials and workmanship. Proof of purchase must accompany all claims. During the warranty period OSD AUDIO will replace any defective part and correct any defect in workmanship without charge for either parts or labor.
OSD AUDIO may replace returned speakers with a product of equal value and performance. In such cases, some modifications to the mounting may be necessary and are not OSD AUDIO's responsibility.
For this warranty to apply, the unit must be installed and used according to its written instructions. If necessary, repairs must be performed by OSD AUDIO. The unit must be returned to OSD AUDIO at the owner's expense and with prior written permission. Accidental damage and shipping damage are not considered defects, nor is damage resulting from abuse or from servicing performed by an agency or person not specifically authorized in writing by OSD Audio.
Any sale of product by an unauthorized source or other manner not authorized by OSD AUDIO shall void the warranty on the applicable product.
Damage to or destruction of components due to application of excessive power voids the warranty on those parts. In these cases, repairs will be made on the basis of the retail value of the parts and labor. To return for repairs, you must email customer service at RMA@OSDAUDIO.com for a Returned Merchandise Authorization (RMA) number# then the unit must be shipped to OSD AUDIO at the owner's expense, along with a note explaining the nature of service required. Be sure to pack the speaker(s) in a corrugated container with at least 3 inches of resilient material to protect the unit from damage in transit
This Warranty Does Not Cover: Damage caused by abuse, accident, misuse, negligence, or improper operation (installation) • Any products that have been altered or modified • Any product whose identifying number of decal, serial #, etc. has been altered, defaced or removed • Normal wear and maintenance.

Brand : OSD Audio
Model : PS12
Category : Subwoofer