KYST081HA - Air conditioner Keystone - Free user manual and instructions
Find the device manual for free KYST081HA Keystone in PDF.


| Product Type | Portable Air Conditioner |
| Cooling Capacity | 8,000 BTU (ASHRAE) / 5,200 BTU (DOE) |
| Dimensions (W x D x H) | 17.5 x 15.5 x 28.5 inches |
| Net Weight | 62 lbs |
| Power Supply | 115V / 60Hz / 8.0A |
| Energy Efficiency Ratio (EER) | 9.5 |
| Dehumidification Capacity | 1.5 pints per hour |
| Airflow (High Speed) | 200 CFM |
| Noise Level (Low/High) | 48 / 54 dB |
| Refrigerant Type | R-32 |
| Thermostat Control | Digital with remote control |
| Operating Modes | Cool, Fan, Dehumidify, Auto, Sleep |
| Fan Speeds | 3 (Low, Medium, High) |
| Auto Swing | Yes (horizontal louvers) |
| Timer | 24-hour programmable |
| Filter Type | Washable mesh filter |
| Filter Maintenance | Clean every 2 weeks under normal use |
| Drainage Options | Continuous or manual drain |
| Window Kit Included | Yes, adjustable for vertical/horizontal windows |
| Safety Features | Tip-over auto shut-off, overheat protection |
| Spare Parts Available | Remote control, filter, window kit components |
| Certifications | ETL listed, Energy Star certified |
| Warranty | 1 year parts and labor |
Frequently Asked Questions - KYST081HA Keystone
User questions about KYST081HA Keystone
0 question about this device. Answer the ones you know or ask your own.
Ask a new question about this device
Download the instructions for your Air conditioner in PDF format for free! Find your manual KYST081HA - Keystone and take your electronic device back in hand. On this page are published all the documents necessary for the use of your device. KYST081HA by Keystone.
USER MANUAL KYST081HA Keystone
WINDOW/WALL-TYPE ROOM AIR CONDITIONER
Keystone®
USER'S MANUAL
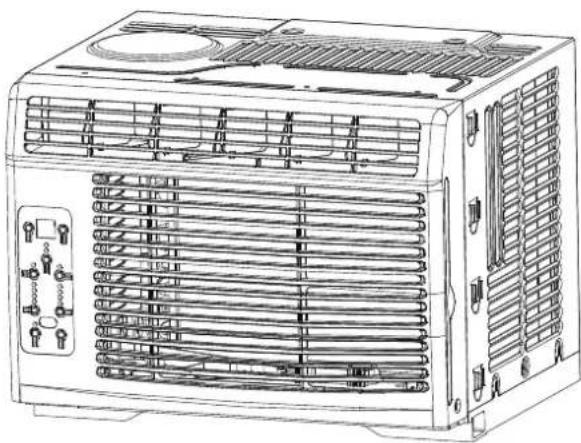
natural_image
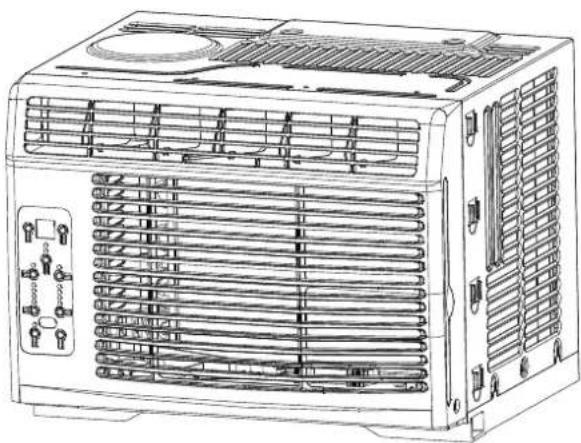
Line drawing of an air conditioning unit with ventilation grilles and cooling fans (no text or labels)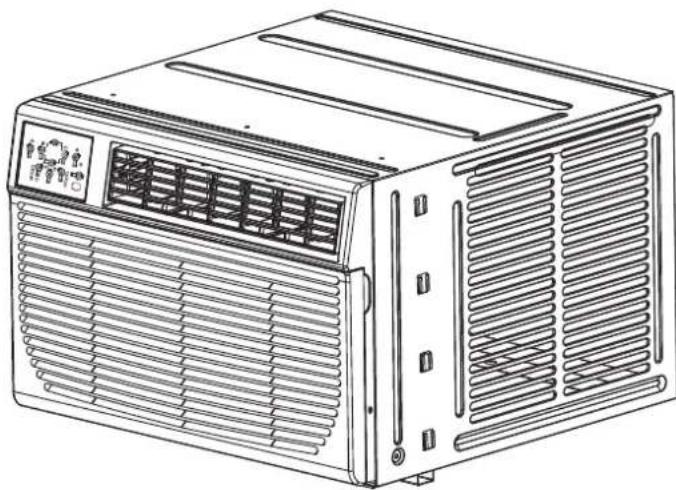
natural_image
Line drawing of a portable air conditioner unit with ventilation grilles and ventilation grilles (no text or symbols)Model: KYST081HA
KYST121HA
TABLE OF CONTENTS
Important Safety Instructions ....1-3
Installation Instructions....4-9
Normal Sounds....10
Air Conditioner Features....10-12
Care and Cleaning 12-13
Troubleshooting Tip....13-14
Before using your air conditioner, please read this manual carefully and keep it for future reference.
Keystone®
Product Registration Card
It's simple! Complete and mail your Product Registration Card today!
Please return your Product Registration Card today!
[Non-Text]
Keystone®
PLACE STAMP HERE
Postage Required. Post Office will not deliver without proper postage.

Keystone®
Air conditioner warranty
Your product is protected by this warranty:
Your appliance is warranted by Keystone. Any obligations for services and parts under this warranty must be performed Keystone.
To contact a Customer Service Representative, Call TOLL FREE
800-849-1112
keystonecs@keystone-products.com
Garantia
keystonecs@keystone-products.com
READ THIS MANUAL
Inside you will find many helpful hints on how to use and maintain your air conditioner properly. Just a little preventive care on your part can save you a great deal of time and money over the life of your air conditioner. You'll find many answers to common problems in the chart of troubleshooting tips. If you review our chart of Troubleshooting Tips first, you may not need to call for service at all.
To prevent injury to the user or other people and property damage, the following instructions must be followed. Incorrect operation due to ignoring of instructions may cause harm or damage. The seriousness is classified by the following indications.
| WARNING | This symbol indicates the possibility of death or serious injury. | ||
| CAUTION | This symbol indicates the possibility of injury or damage to property. | ||
| Never do this. | ! | Always do this. | |

WARNING
●Plug in power plug properly.
- Otherwise, it may cause electric shock or fire due to excess heat generation.
Do not operate or stop the unit by inserting or pulling out the power plug.
- It may cause electric shock or fire due to heat generation.
Do not damage or use an unspecified power cord.
- It may cause electric shock or fire.
- If the power cord is damaged, it must be replaced by the manufacturer or an authorised service centre or a similarly qualified per son in order to avoid a hazard.
breaker and a dedicated power circuit.
- Incorrect installation may cause fire and electric shock.
Do not operate with wet hands or in damp environment.
- It may cause electric shock.
Do not direct airflow at room occupants only.Alw
- This could damage your health.
Always ensure effective grounding.
- Incorrect grounding may cause electric shock.
Do not allow water to run into electric parts.
- It may cause failure of machine or electric shock.
Do not modify power cord length or share the outlet with other appliances.
- It may cause electric shock or fire due to heat generation.
©Unplug the unit if strange sounds, smell, or smoke comes from it.
- It may cause fire and electric shock.
Do not use the socket if it is loose or damaged.
- It may cause fire and electric shock.
Do not open the unit during operation.
- It may cause electric shock.
Keep firearms away.
- It may cause fire.
Do not use the power cord close to heating appliances.
- It may cause fire and electric shock.
Do not use the power cord near flammable gas or combustibles, such as gasoline, benzene, thinner, etc.
- It may cause an explosion or fire.
①Ventilate room before operating air conditioner if there is a gas leakage from another appliance.
- It may cause explosion, fire and, burns.
Do not disassemble or modify unit.
- It may cause failure and electric shock.
CAUTION
When the air filter is to be removed, do not touch the metal parts of the unit.
- It may cause an injury.
Do not use strong detergent such as wax or thinner but use a soft cloth.
- Appearance may be deteriorated due to change of product color or scratching of its surface.
Stop operation and close the window in storm or hurricane.
• Operation with windows opened may cause wetting of indoor and soaking of household furniture.
Always insert the filters securely. Clean filter once every two weeks
● Operation without filters may cause failure.
Do not place obstacles around air-inlets or inside of air-outlet.
- It may cause failure of appliance or accident.
Use caution when unpacking and installing. Sharp edges could cause injury.
Do not put a pet or house plant where it will be exposed to direct air flow.
- This could injure the pet or plant.
Do not clean the air conditioner with water.
• Water may enter the unit and degrade the insulation. It may cause an electric shock.
When the unit is to be cleaned, switch off, and turn off the circuit breaker.
- Do not clean unit when power is on as it may cause fire and electric shock, it may cause an injury.
Hold the plug by the head of the power plug when taking it out.
- It may cause electric shock and damage.
Do not place heavy object on the power cord and ensure that the cord is not compressed.
- There is danger of fire or electric shock.
① Ventilate the room well when used together with a stove, etc.
- An oxygen shortage may occur.
Do not use for special purposes.
- Do not use this air conditioner to preserve precision devices, food, pets, plants, and art objects. It may cause deterioration of quality, etc.
☐ Ensure that the installation bracket of the outdoor appliance is not damaged due to prolonged exposure.
- If bracket is damaged, there is a concern of damage due to falling of unit.
Turn off the main power switch when not using the unit for a long time.
- It may cause failure of product or fire.
Do not drink water drained from air conditioner.
- It contains contaminants and could make you sick.
If water enters the unit, turn the unit off at the power outlet and switch off the circuit breaker. Isolate supply by taking the power-plug out and contact a qualified service technician.
CAUTION
- This appliance is not intended for use by persons (including children) with reduced physical, sensory or mental capabilities or lack of experience and knowledge, unless they have been sufficient or instruction concerning use of the appliance by a person responsible for their safety.
- Children should be supervised to ensure that they do not play with the appliance.
-
If the supply cord is damaged, it must be replaced by the manufacturer, its service agent or similarly qualified persons in order to avoid a hazard.
-
The appliance shall be installed in accordance with national wiring regulations.
- Do not operate your air conditioner in a wet room such as a bathroom or laundry room.
- The appliance with electric heater shall have at least 1 meter space to the combustible materials.
- Contact the authorised service technician for repair or maintenance of this unit.
- Contact the authorised installer for installation of this unit.

NOTE:
The power supply cord with this air conditioner contains a current detection device designed to reduce the risk of fire. Please refer to the section Operation of Current Device for details. In the event that the power supply cord is damaged, it cannot be repaired-it must be replaced with a c ord f rom t he P roduct M anufac

WARNING
Avoid fire hazard or electric shock. Do not use an extension cord or an adaptor plug. Do not remove any prong from the power cord.
Grounding type wall receptacle
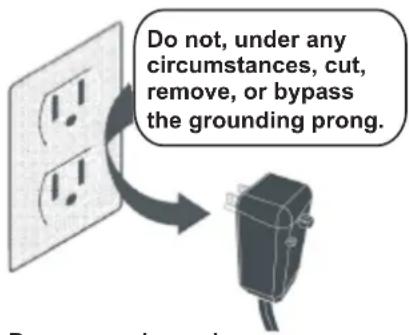
Power supply cord with 3-prong grounding plug and current detection device

WARNING
For Your Safety
Do not store or use gasoline or other flammable vapors and liquids in the vicinity of this or any other appliance.

WARNING
Prevent Accidents
To reduce the risk of fire, electrical shock, or injury to persons when using your air conditioner, follow basic precautions, including the following:
Be sure the electrical service is adequate for the model you have chosen. This information can be found on the serial plate, which is located on the side of the the cabinet and behind the grille.
- If the air conditioner is to be installed in a window, you will probably want to clean both sides of the glass first. If the window is a triple-track type with a screen panel included, remove the screen completely before installation.
- Be sure the air conditioner has been securely and correctly installed according to the installation instructions in this manual. Save this manual for possible future use in removing or installing this unit.
- When handling the air conditioner, be careful to avoid cuts from sharp metal fins on front and rear coils.

WARNING
Electrical Information
The complete electrical rating of your new room air conditioner is stated on the serial plate. Refer to the rating when checking the electrical requirements.
- Be sure the air conditioner is properly grounded. To minimize shock and fire hazards, proper grounding is important. The power cord is equipped with a three-prong grounding plug for protection against shock hazards.
- Your air conditioner must be used in a properly grounded wall receptacle. If the wall receptacle you intend to use is not adequately grounded or protected by a time delay fuse or circuit breaker, have a qualified electrician install the proper receptacle. Ensure the receptacle is accessible after the unit installation.
- Do not run air conditioner without side protective cover in place. This could result in mechanical damage within the air conditioner.
- Do not use an extension cord or an adapter plug.
Operation of Current Device
(Applicable to the unit adopts current detection device only)
The power supply cord contains a current device that senses damage to the power cord. To test your power supply cord do the following:
- Plug in the Air Conditioner.
- The power supply cord will have TWO buttons on the plug head. Press the TEST button, you will notice a click as the RESET button pops out.
- Press the RESET button, again you will notice a click as the button engages.
- The power supply cord is now supplying electricity to the unit. (On some products this it also indicated by a light on the plug head.)

NOTE:
- Do not use this device to turn the unit on or off.
- Always make sure the RESET button is pushed in for correct operation.
- The power supply must be replaced if it fails reset when either the TEST button is pushed, or it cannot be reset. A new one can be obtained from the product manufacturer. If power supply cord is damaged, it cannot be repaired. It
- MUST be replaced by one obtained from the product manufacturer.
NOTE: This air conditioner is designed to be operated under condition as follows:
| Cooling operation | Outdoor temp: | 64-109°F/18-43°C (64-125°F/18-52°C for special tropical models) |
| Indoor temp: | 62-90°F/17-32°C | |
| Heating operation | Outdoor temp: | 23-76°F/-5-24°C |
| Indoor temp: | 32-80°F/0-27°C |
Note: Performance may be reduced outside of these operating temperatures.

CAUTION
To avoid risk of personal injury, property damage, or product damage due to the weight of this device and sharp edges that may be exposed:
- Air conditioners covered in this manual pose an excessive weight hazard. Two or more people are needed to move and install the unit. To prevent injury or strain, use proper lifting and carrying techniques when moving unit.
- Carefully inspect location where air conditioner will be installed. Be sure it will support the weight of the unit over.
- Handle air conditioner with care. Wear protective gloves whenever lifting or carrying the unit. AVOID the sharp metal fins of front and rear coils.
- Make sure air conditioner does not fall during installation.
Tools and Parts:
Gather the required tools and parts before starting installation. Read and follow the instructions provided with any tools listed here.
| TOOLS NEEDED | |
| • Flat-blade and Phillips screwdrivers | • Tape measure |
| • Level | • Drill and 3/16 , "1/8 , "3/32 , 0r smaller drill bit |
Through-the-wall Installation:
In addition to the tools listed above, the following tools are needed for through-the-wall installation.
| TOOLS NEEDED | |
| • Saw | • Caulk |
| • 1" (2.5 cm) or thicker lumber | • #10 X 1"wood screws (7) |
Parts Supplied:
Check that all parts are included in parts package:
| Hardware | Qty. | Hardware | Qty. | ||
 | #10 X 1/2" pan - head Phillipsscrews | 3 | 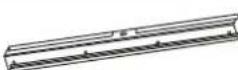 | Top channel | 1 |
| #10 X 3/4" or #10 X 1/2" round - head screws | 7 | [KSCS] | Window sash seal | 1 | |
| #10 X 1/4" pan - head Phillips screws | 5 | Foam seal | 1 | ||
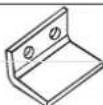 | Window lock bracket | 1 | |||
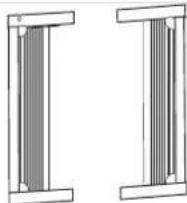 | side curtains | 2 |  | Safety Lock (for Vinyl-Clad window) | 2 |
| ### | weather seals (6"X3/4"X1/12") | 5 | |||
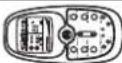 | Remote Control | 1 |  | Remote Battery | 2 |
NOTE:
- Installation parts are supplied for double-hung windows up to 36 (91.4"cm) wide. A special Wide Window Kit is available from your dealer or service center. See Accessories.
- Do not use any screws other than those specified here.
Location Requirements:
IMPORTANT: Observe all governing codes and ordinances. Check the location where air conditioner will be installed. Proper installation is your responsibility. Make sure you have everything necessary for correct installation.
- Grounded electrical outlet within 4 ft (122 cm) of where the power cord exits the air conditioner.
• Free movement of air in room to be cooled. - A large enough opening for the air conditioner.
- Adequate wall support for weight of air conditioner. Air conditioner weights between 70 and 85 lbs (32 to 40 kgs).
NOTE:
- Do not use an extension cord.
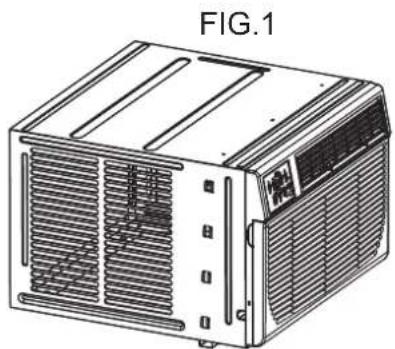
- Cabinet louvers must not be obstructed. Air must be able to pass freely through the cabinet louvers. (FIG.1)
natural_image
Line drawing of an air conditioning unit (no text or symbols on the device itself)A. Cabinet louvers
Window Installation:
Window opening measurements (FIG.2):
- 26-7/8 "to 36" (68.3 cm to 91.4 cm) opening width.
• 16-1/2 " (41.9 cm) minimum opening height.
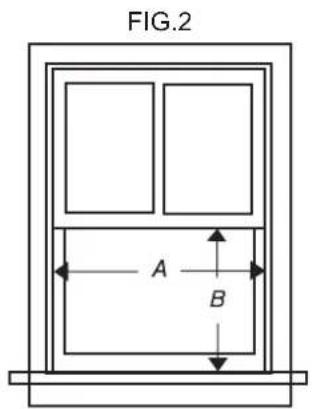
A. 26-7/8" (68.3 cm) minimum
B. 16-1/2" (41.9 cm) minimum
Remove packaging material:
- Remove and dispose of / recycle packaging materials. Remove tape and glue residue from surfaces before installing the air conditioner. Rub a small amount of liquid dish soap over the adhesive with your fingers. Wipe with warm water and dry.
- Do not use sharp instruments, rubbing alcohol, flammable fluids, or abrasive cleaners to remove tape or glue. These products can damage the surface of your air conditioner.
- Handle the air conditioner gently.
- Remove the air conditioner from the carton and place it on cardboard.
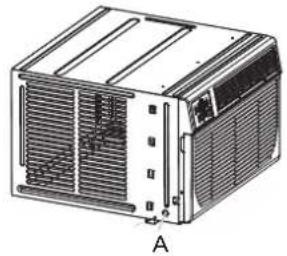
- Remove 1 shipping screw from each side of the cabinet (FIG.3).
- Remove front panel by removing 1 Phillips screw from each side of the front panel. Set screws a side and save (FIG.4).
- Pull on the handles to slide the air conditioner out of the cabinet. Place the air conditioner on cardboard (FIG.5).
NOTE:
Installation parts are supplied for double-hung windows up to 36 (91.4 cm) wide. A special Wide Window Kit is available from your dealer or service center. See Accessories .
Do not use any screws other than those specified here.
Remove packaging material:
FIG.3 FIG.4 FIG.5
natural_image
Technical line drawing of a modular air conditioner unit (no text or symbols)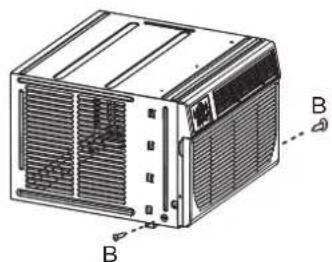
natural_image
Technical line drawing of a mechanical device with ventilation grilles and labeled parts B (no text or symbols beyond labels)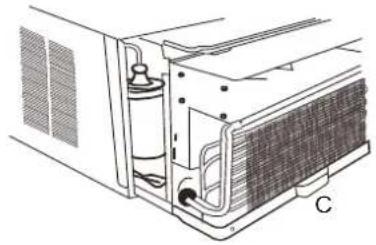
natural_image
Technical line drawing of an air conditioning unit with cooling fins and ventilation duct (no text or symbols)
NOTE:
- Handle the air conditioner gently.
- Be sure your air conditioner cabinet does not fall out of the opening during installation or removal.
- The place where the power cord exits the air conditioner should be no more than 4 ft (122 cm) from a grounded 3 prong outlet.
- Do not block the louvers on the front panel.
- Do not block the louvers on the outside of air conditioner.
- Do not lift, pull or remove any expanded polystyrene (foam) from inside of the air conditioner. It is not packing material
Attach Top Channel (FIG.6):

NOTE:
Attach the top channel and side curtains to the air conditioner cabinet before placing the cabinet in the window.
- Locate provided bag of screws.
- Place the top channel on top of the air conditioner cabinet, lining up the three holes in the top channel with the three holes on top of the air conditioner cabinet.
- Using three #10 x 1/4pan-head Phillips thread cutting screws, attach the top channel to the air conditioner cabinet.
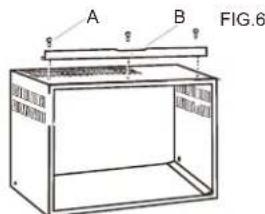
A. #10 X 1/4" pan-head Phillips thread cutting screws
B. Top channel
- Locate provided bag of screws.
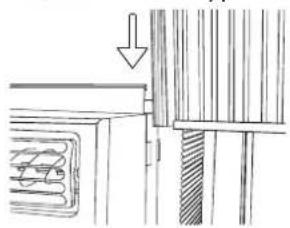
- Insert the right-hand curtain connector tab into the curtain housing channels on the air conditioner (FIG.7A).
- Insert the top and then the bottom of the right-hand curtain housing in the top and bottom curtain channels on the air conditioner (FIG.7B, FIG.7C).
- Slide the curtain housing into the curtain guides as far as it could go.
- Repeat the above steps for the left-hand curtain.
FIG.7A
natural_image
Pure technical line drawing of a mechanical assembly without any text, numbers, or symbolsA. Side Curtain
FIG.7B Top view
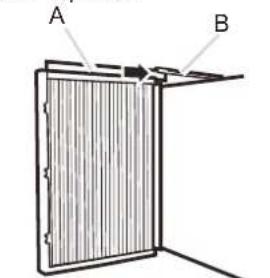
A. Curtain housing
B. Curtain top channel on air conditioner
FIG.7C Bottom view
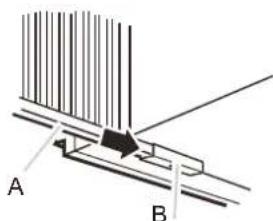
A. Curtain housing
B. Curtain bottom channel on air conditioner
Attach foam adhesive seal:
Attach foam adhesive seal along the bottom of the curtain bottom channel (FIG.8).
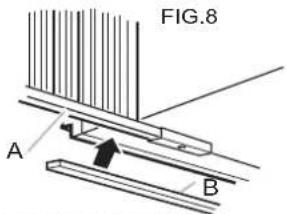
A. Curtain housing
B. Foam adhesive seal
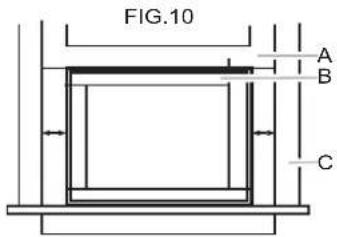
A. Window sash
B. Empty cabinet
C. Window channel
Install Cabinet into Window:
- Center empty cabinet in window:
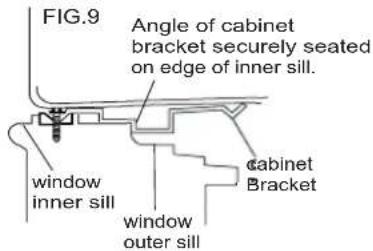
Check that lower rail of air conditioner cabinet is behind and against back side of window sill. Maintain a firm hold on the air conditioner cabinet (FIG.9). Lower window sash to hold the cabinet in place. Measure the distance between the right side of the cabinet and the inside of the window channel (FIG.10). Repeat for the left side. Adjust the cabinet until the distance on each side is the same.
- Attach the cabinet to window:
A: For wooden window:
Use a 3/16 "drill bit to drill three starter holes 3/8 deep through the three holes in the cabinet and into the window sill, and drill one starter hole 3/8 deep through the hole in the middle of top rail and into the window frame (FIG.11). Attach cabinet to window with three #10 x 1/2 pan-head Phillips screws and one #10 X 3/4" or (1/2 round-head screw (FIG.11).
B: For Vinyl-Clad window:
Use a 1/8 "drill bit to drill one hole through the hole in the middle of top rail and into the window frame. Attach cabinet to window with one #10 x 3/4 or(1/2) round-head Phillips screw (FIG.11). Place two safety locks into the holes that located in the bottom of the cabinet and drive two locking screws through the safety locks into the cabinet as shown (FIG.12)
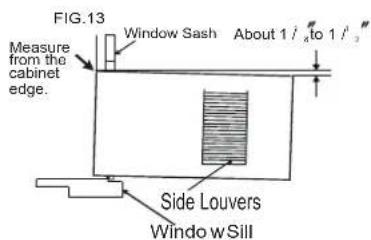
- Check that air conditioner cabinet is tilted back about 1/to1^1/_8^2 (tilted about 3^ to 4^ downward to the outside). After proper installation, condensate should not drain from the overflow drain hole during normal use, correct the slope otherwise. (See F IG.13).
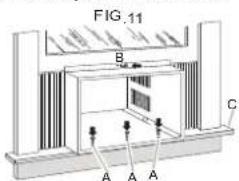
A. #10 X 1/2" pan-head Phillips screws
B. #10 X 3/4"(or 1/2")round-head screw
C. Window channel
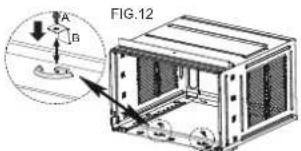
A.#10×1/4"Pan-head Phillips screws
B. Safety Lock
Only for Vinly-Clad Window
Attach Side Curtains to Window Frame:
- Extend the side curtains out against the window frame (FIG.11).
- Drill holes and drive locking screws:
A: For wooden windows:
Use a 3/32 "drill bit to drill 4 starter holes through the holes in the side curtains into the window. Drive four #10 X 3/4 or (1/2) Lockingscrews through the holes in the side curtains into the window sill and window frame(FIG.14A, FIG.14B).
B: For Vinyl-Clad windows:
Use a 1/8 "drill bit to drill two holes through the holes in the side curtains into the window frame as shown (FIG.14A). Drive two #10 X 3/4 "or (1/2) locking screws through the holes in the side curtains into the window sash (FIG.14A)
- Trim the weather seal (6 X3/4 X1/12) with a proper length, peel off the protective backing and plug any gaps if needed as shown (FIG.14B).

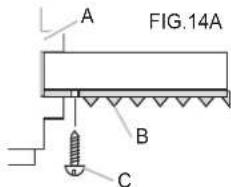
A. Window channel
B. Left-hand curtain
C. #10 X 3/4"(or 1/2")
round-head screw
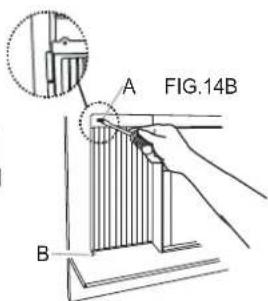
A. #10 X 3/4"(or 1/2")
round-head screw
B. Slotted hole in the bottom of the curtain
Complete Installation:
- Insert window sash seal behind the top of the lower window sash and against the glass of the upper window (FIG.15).
- Place the window-lock bracket on top of lower window and against upper window sash on right side of the window (FIG.15).
- Use a 3/32 'drill bit to drill starter holes through the holes in the bracket into the window sash (FIG.15).
- Attach the window lock-bracket to the window sash with two #10 X 3/4 or or (1/2 "round-head screws to secure window in place (FIG.15).
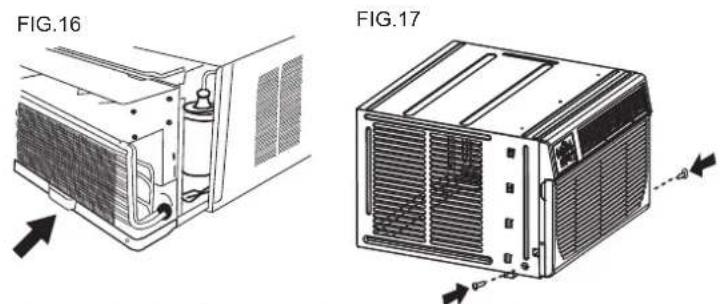
- Insert air conditioner into cabinet (FIG.16).
- Insert front tabs of front panel into top of cabinet and swing front into place.
- Attach bottom front of panel with front panel screws (FIG.17).
- Plug into a grounded 3 prong outlet.
- Press RESET on the power supply cord.
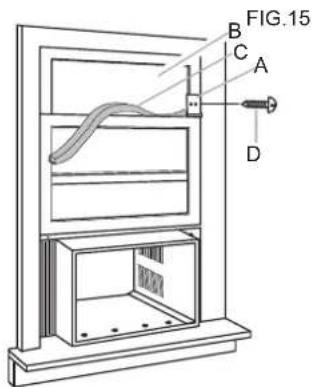
A. Window lock bracket
B. Upper window glass
C. Window sash seal
D. #10X3/4 "or or (1/2 )"
round-head screws
Through-the-Wall Cabinet Installation:
Option 1 —wood, metal or plastic molding:
When using a wood, metal or plastic molding, the wood frame should line up with the inside wall as shown FIG.18 Option 2 -Plastered wall with no molding:
If the plastered wall is to be flush with the cabinet and no molding is used, the wood frame must be set 1/2"(13mm) into the inside wall FIG.19.
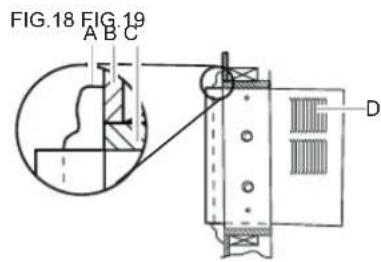
A. Molding
B. Inside wall
C. Wood frame
D. Louvers
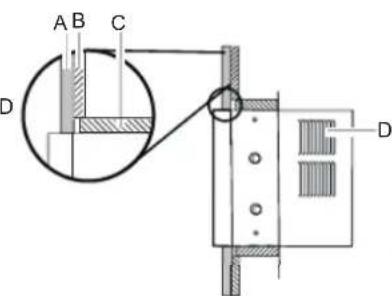
A. Plastered wall
B. Inside wall
C. Wood frame
D. Louvers
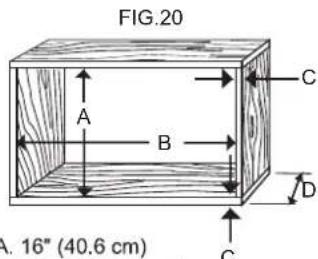
A. 16" (40.6 cm)
B. 22-5/8" (57.5 cm)
C. Wood thickness
D. 2-1/2" (6.4 cm) minimum to 6-1/2"(16.5 cm) maximum
Install Wood Frame:
- Construct the wood frame. See FIG.20 for dimensions.
- Measure the outside width and height of frame to determine wall opening dimensions. The wall opening measurements should be :
- Width : 22-5/8 (57.5 cm) plus twice thickness of wood used to build frame.
- Height: 16 (40.6 cm) plus twice thickness of wood used to build frame.
- Depth : 2-1/2 (6.4 cm) minimum to 6-1/2 (16.5 cm) maximum.
- Cut the opening through the wall. Remove and save insulation.
- Apply the wood preservative to the outside exposed surface.
- Insert the frame in the wall opening. Square and level frame.
- Attach frame securely to the wall.

NOTE:
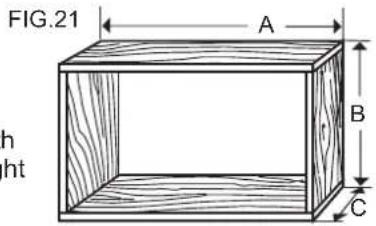
- Dimension for depth depends on wall thickness and type of molding (FIG.21).
- Do not block louvers in air conditioner cabinet. Use 1"(2.5 cm) or thicker lumber for wood frame.
A. Outside width
B. Outside height
C. Depth
Install Cabinet into Wood Frame:
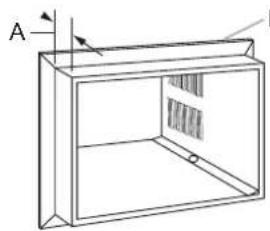
- Insert cabinet into the framed wall opening. The top of the cabinet should extend 3/4" (19.1 mm) into the room. If there is trim, the cabinet should extend 3/4 (19.4 mm) past trim (FIG.22).
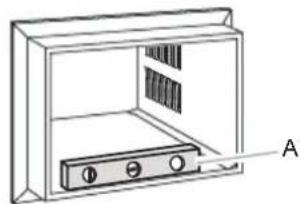
- Use a level to check that cabinet is level side to side (FIG.23).
- Check that air conditioner cabinet is tilted to the outside so that water could run to the outside. The cabinet should slop at least half-a-bubble towards the rear.
- Reuse the insulation to seal opening between cabinet and frame.
- Use existing holes in sides and top of cabinet and seven #10 X 1" wood screws (not provided) to attach cabinet to frame.
- Caulk all outside wall openings around cabinet.

NOTE:
- Do not overtighten screws or the cabinet will distort and provide a poor air seal between cabinet and air conditioner.
natural_image
Simple line drawing of a cabinet or enclosure with labeled components A and I, showing internal structure and arrows (no text or symbols)B FIG.22 FIG.23
A. 3/4" (19.1 mm) extending into room B. Trim
natural_image
Line drawing of a cabinet or enclosure with labeled component A, showing internal structure and no text or symbols beyond labelA. level
Complete Installation:
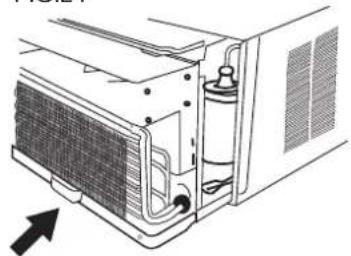
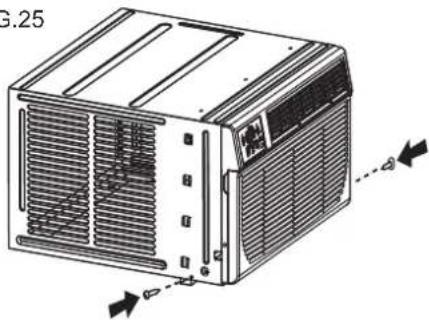
- Insert air conditioner into cabinet (FIG.24).
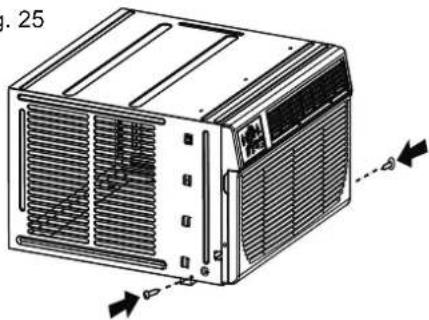
- Insert front tabs of front panel into top of cabinet and swing front into place.
- Attach bottom front of panel with front panel screws (FIG.25).
- Plug into a grounded 3 prong outlet.
- Press RESET on the power supply cord.

NOTE:
- Handle the air conditioner gently. For through-the-wall installations, if needed, install molding around the room side of cabinet.
FIG.24
natural_image
Diagram of an air conditioning unit showing airflow path and component layout (no text or labels)FIG.25
natural_image
Technical line drawing of an air conditioner unit with ventilation grilles and cooling fins (no text or symbols)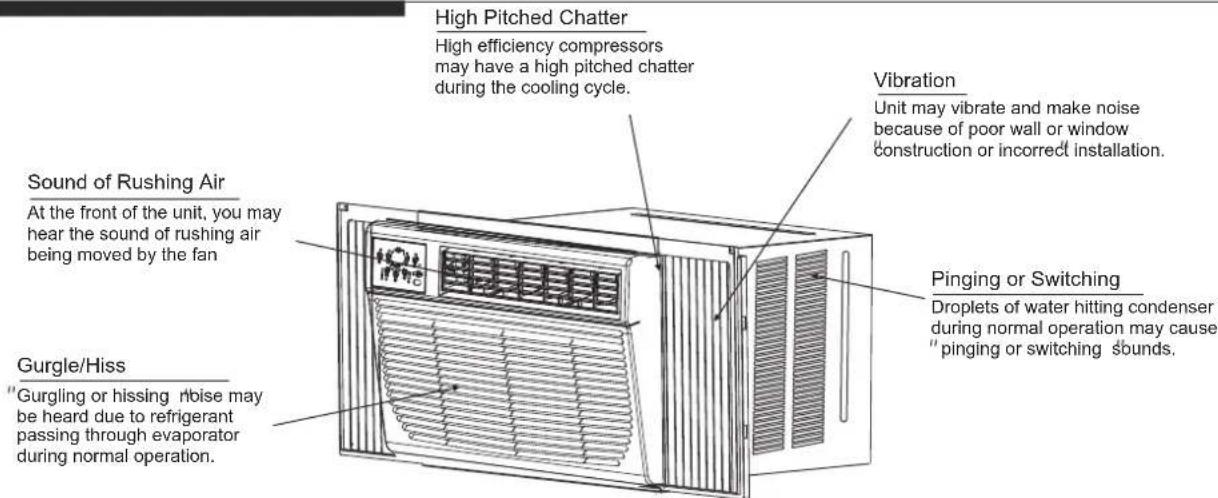

NOTE:
All the illustrations in this manual are for explanation purpose only. Your air conditioner may be slightly different. The actual shape shall prevail.
AIR CONDITIONER FEATURES
ELECTRONIC CONTROL OPERATING INSTRUCTIONS
Before you begin, thoroughly familiarize yourself with the control panel as shown below and all its functions, then follow the symbol for the functions you desire. The unit can be controlled by the unit control alone or with the remote.
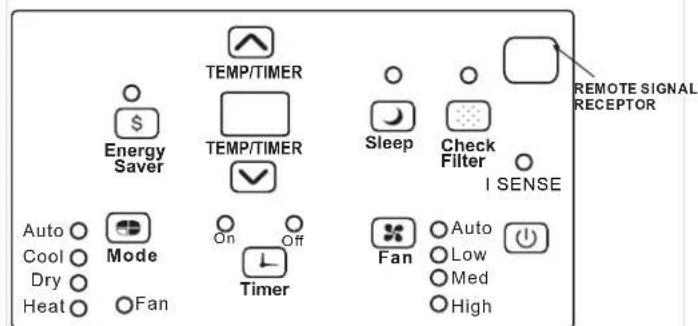
(Electric Heating Models)
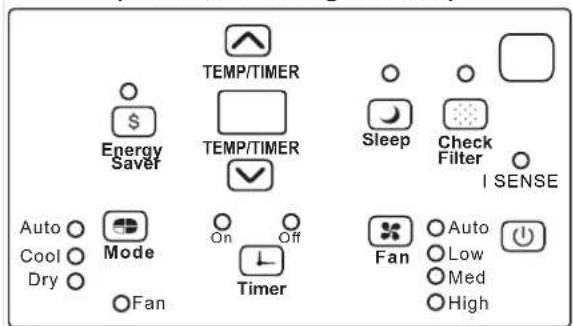
(Cooling Only Models)
TO TURN UNIT ON OR OFF:
Press ON/OFF button to turn u nit o no ro ff. NOTE: The unit will initiate automatically the Energy Saver function under Cool, Dry, Auto(only Auto-Cooling and Auto-Fan) modes.
TO CHANGE TEMPERATURE SETTING:
Press ▲/ ▼UP/DOWN button to change temperature setting.
NOTE:Press or hold either UP( ) or DOWN ( ) button until the desired temperature is seen on the display. This temperature will be automatically maintained anywhere between 62°F(17°C) and 86°F(30°C). If you want the display to read the actual room temperature, see "To Operate on Fan Only section."
TO ADJUST FAN SPEEDS:
Press ✗ to select the Fan Speed in four steps-Auto, Low, Med or High. Each time the button is pressed, the fan speed mode is shifted. For some models, the fan speed can not be adjusted under HEAT mode. On Dry mode, the fan speed is controlled at Low automatically.
SLEEP FEATURE:
Press 📄 Sleep button to initiate the sleep mode. In this mode the selected temperature will increase (cooling) or decrease (heating) by 2 F/1 ^0 (or 2) C 30 minutes after the mode is selected. The t temperature will then increase (cooling) or decrease (heating) by another 2 F/1(or 2) C after an additional 30 minutes. This new temperature will be maintained for 6 hours before it returns to the originally selected temperature. This ends the Sleep mode and the unit will continue to operate as originally programmed. The Sleep mode program can be cancelled at any time during operation by pressing the Sleep button again.
CHECK FILTER FEATURE:
Press ☐Check filter button to initiate theis feature. This feature is a reminder to clean the Air Filter for more efficient operation. The LED(light) will illuminate after 250 hours of operation. To reset after cleaning the filter, press the Check Filter button and the light will go off.
ENERGY SAVER FEATURE:
Press 8 Energy saver button to initiate this function. This function is available on COOL, DRY, AUTO (only AUTO-COOLING and AUTO-FAN) modes. The fan will continue to run for 3 minutes after the compressor shuts off. The fan then cycles on for 2 minutes at 10 minute intervals until the room temperature is above the set temperature, at which time the compressor turns back on and Cooling Starts.
I SENSE FEATURE: (on some models)
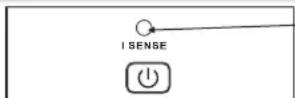
Light flashing
This feature can be activated from the remote control ONLY. The remote control serves as a remote thermostat allowing for the precise temperature control at its location. To activate the I SENSE feature, point the remote control towards the unit and press the I SENSE button. The remote display is actual temperature at its location. The remote control will send this signal to the air conditioner every 3 minutes interval until press the I SENSE button again. If the unit does no receive the I SENSE signal during any 7 minutes interval, the unit will beep to indicate the I SENSE mode has ended.
To choose operating mode, press ☐ Mode button. Each time you press the button, a mode is selected in a sequence that goes from Auto, Cool, Dry ,heat(cooling only models without)and Fan. The indicator light beside will be illuminated and remained on once the mode is selected.
The unit will initiate automatically the Energy Saver function under Cool, Dry, Auto(only Auto-Cooling and Auto-Fan) modes.
To operate on Auto feature:
- When you set the air conditioner in AUTO mode, it will automatically select cooling, heating(cooling only models without), or fan only operation depending on what temperature you have selected and the room temperature.
- The air conditioner will control room temperature automatically round the temperature point set by you.
- In this mode, the fan speed cannot be adjusted, it starts automatically at a speed according to the room temperature.
To operate on Fan Only:
- Use this function only when cooling is not desired, such as for room air circulation or to exhaust stale air (on some models). (Remember to open the vent during this function, but keep it closed during cooling for maximum cooling efficiency.) You can choose any fan speed you prefer.
- During this function, the display will show the actual room temperature, not the set temperature as in the cooling mode.
- In Fan only mode, the temperature is not adjusted.
To operate on Dry mode:
- In this mode, the air conditioner will generally operate in the form of a dehumidifier. Since the conditioned space is a closed or sealed area, some degree of cooling will continue.
TIMER: AUTO START/STOP FEATURE:
- When the unit is on or off, first press ☐imer button, the TIMER ON indicator light illuminates. It indicates the Auto Start program is initiated.
- When the time of TIMER ON is displayed, press the Timer button again, the TIMER OFF indicator light illuminates. It indicates the Auto Stop program is initiated.
- Press or hold the UP or DOWN button to change the Auto time by 0.5 hour increments, up to 10 hours, then at 1 hour increments up to 24 hours. The control will count down the time remaining until start.
- The selected time will register in 5 seconds, and the system will automatically revert back to display the previous temperature setting or room temperature when the unit is on.(when the unit is off, there is no display.)
- Turning the unit ON or OFF at any time or adjusting the timer setting to 0.0 will cancel the Auto Start/Stop timed program.
DISPLAYS:
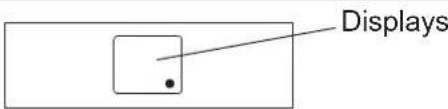
DISPLAYS:
Shows the set temperature in "C" or "F" and the Auto-timer settings. While on Fan only mode, it shows the room temperature.
Error codes:
AS-Room temperature sensor error-Unplug the unit and plug it back in. If error repeats, call for service. NOTE: In Fan only mode, it will display "LO" or "HI".
- -Evaporator temperature sensor error-Unplug the unit and plug it back in. If error repeats, call for service. NOTE: " •" is displayed as shown in the left picture.
HS -Electric heating sensor error-Unplug the unit and plug it back in.If error repeats, call for service.

NOTE:
If the unit breaks off unexpectedly due to the power cut, it will restart with the previous function setting automatically when the power resumes.
Air Directional Louvers
Air Directional Louvers
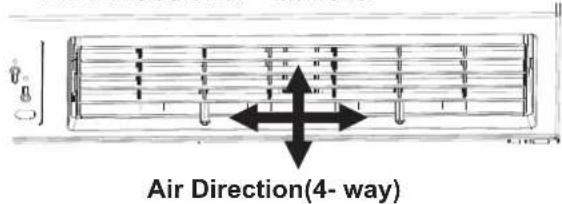
The 4-way air directional louvers allow you to direct the air flow Up or Down(on some models) and Left or Right throughout the room as needed. To adjust the air directional louvers side-to -side, use the center handles as you move it side-to-side.
ADDITIONAL THINGS YOU SHOULD KNOW
Now that you have mastered the operating procedure, here are more features in your control that you should become familiar with.
- The Cool circuit has an automatic 3 minute time delayed start if the unit is turned off and on quickly. This prevents overheating of the compressor and possible circuit breaker tripping. The fan will continue to run during this time.
- The control is capable of displaying temperature in degrees Fahrenheit or degrees Celsius. To convert from one to the other, press and hold the Left and Right Temp/Timer buttons at the same time, for 3 seconds.
CARE AND CLEANING
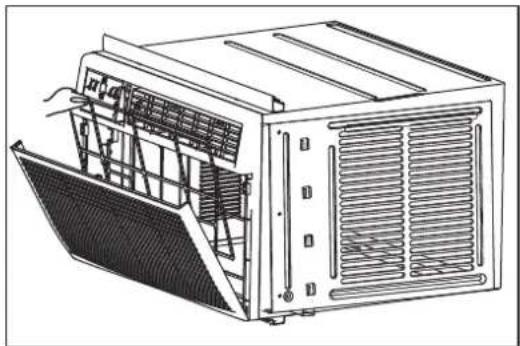
Air Filter Cleaning
natural_image
Technical line drawing of a modular air conditioner unit with cooling fins and ventilation slots (no text or symbols)The air filter should be checked at least once a month to see if cleaning is necessary. Trapped particles in the filter can build up and cause an accumulation of frost on the cooling coils.

CAUTION
Clean your air conditioner occasionally to keep it looking new. Be sure to unplug the unit before cleaning to prevent chock or fire hazards.
Air Filter Cleaning
- Open the front panel.
• Take the filter by the center and pull up and out. - Wash the filter using liquid dishwashing detergent and warm
- water. Rinse filter thoroughly. Gently shake excess water from the filter. Be sure the filter is thoroughly dry before replacing. Or, instead of washing you may vacuum the filter clean.
Note: Never use hot water over 40^ C(104°F) to clean the air filter. Never attempt to operate the unit without the air filter.
Cabinet Cleaning
- Be sure to unplug the air conditioner to prevent shock or fire hazard. The cabinet and front may be dusted with an oil-free cloth or washed with a cloth dampened in a solution of warm water and mild liquid dishwashing detergent. Rinse thoroughly and wipe dry.
- Never use harsh cleaners, wax or polish on the cabinet front.
- Be sure to wring excess water from the cloth before wiping around the controls. Excess water in or around the controls may cause damage to the air conditioner.
- Plug in air conditioner.
Winter Storage
If you plan to store the air conditioner during the winter, remove it carefully from the window according to the installation instructions. Cover it with plastic or return it to the original carton.
TROUBLESHOOTING TIPS
Before calling for service, review this list. It may save your time and expense. This list includes common occurrences that are not the result of defective workman-ship or materials in this appliance.
| Problem | Solution |
| Air conditioner does not start | Wall plug disconnected. Push plug firmly into wall outlet. |
| House fuse blown or circuit breaker tripped. Replace fuse with time delay type or reset circuit breaker. | |
| Plug Current Device Tripped. Press the RESET button. | |
| Power is OFF. Turn power ON. | |
| Air from unit does not feel cold enough | Room temperature below 62°F(17°C). Cooling may not occur until room temperature rises above 62°F(17°C). |
| Temperature sensing behind air filter element touching cold coil. Keep it from the cold coil. | |
| Set to a Lower temperature. | |
| Compressor stopped when changing modes. Wait for 3 minutes after set to the COOL mode. | |
| Air conditioner cooling, but room is too warm- ice forming on cooling coil behind decorative front. | Outdoor temperature below 64°F(18°C). To defrost the coil, set FAN ONLY mode. |
| Air filter may be dirty. Clean filter. Refer to Care and Cleaning section. To defrost, set to FAN ONLY mode. | |
| Thermostat set too cold for night-time cooling. To defrost the coil, set to FAN ONLY mode. Then, set temperature to a Higher setting. |
TROUBLESHOOTING TIPS
| Problem | Solution |
| Air conditioner cooling, but room is too warm- NO ice forming on cooling coil behind decorative front. | Dirty air filter- air restricted. Clean air filter. Refer to Care and Cleaning section. |
| Temperature is set too High, set temperature to a Lower setting. | |
| Air directional louvers positioned improperly. Position louvers for better air distribution. | |
| Front of units is blocked by drapes, blinds, furniture, etc. - restricts air distribution. Clear blockage in front of unit. | |
| Doors, windows, registers, etc. Open- cold air escapes. Close doors, windows, registers. | |
| Unit recently turned on in hot room. Allow additional time to remove" Stored heat" from walls, ceiling, floor and furniture. | |
| Air conditioner turns on and off rapidly | Dirty air filter- air restricted. Clean air filter. |
| Outside temperature extremely hot. Set FAN speed to a Higher setting to bring air past cooling coils more frequently. | |
| Noise when unit is cooling | Air movement sound. This is normal . If too loud, set to a slower FAN setting. |
| Window vibration - poor installation. Refer to installation instructions or check with installer. | |
| Water dripping INSIDE when unit is cooling. | Improper installation. Tilt air conditioner slightly to the outside to allow water drainage. Refer to installation instructions - check with installer. |
| Water dripping OUTSIDE when unit is cooling. | Unit removing large quantity of moisture from humid room. This is normal during excessively humid days. |
| Remote Sensing Deactivating Prematurely (some models) | Remote control not located within range. Place remote control within 20 feet & 180°, radius of the front of the unit. |
| Remote control signal obstructed. Remove obstruction. | |
| Room too cold | Set temperature too low. Increase set temperature. |
The design and specifications are subject to change without prior notice for product improvement. Consult with the sales agency or manufacturer for details.
AIRE ACONDICIONADO DEL CUARTO
DEL TIPO DE VENTANA / PARED
Keystone®
MANUAL DEL USUARIO
natural_image
Line drawing of an air conditioning unit with multiple ventilation grilles and cooling fans (no text or labels)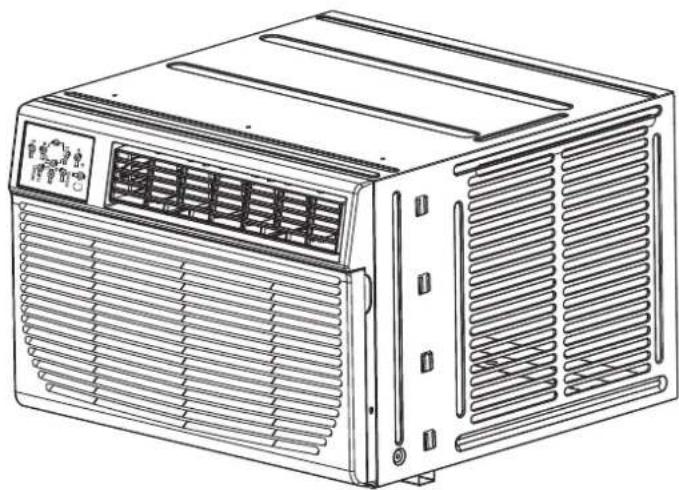
natural_image
Line drawing of a portable air conditioner unit with ventilation grilles and ventilation slots (no text or symbols)Model: KYST081HA
KYST121HA
TABLA DE CONTENIDO
natural_image
Line drawing of an air conditioning unit (no text or symbols on the device itself)A. Rejillas del gabinete
natural_image
Technical line drawing of a modular air conditioner unit (no text or symbols)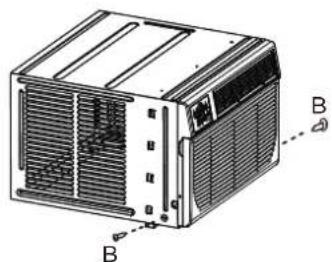
natural_image
Technical line drawing of a modular air conditioner unit with labeled components (no text or symbols present)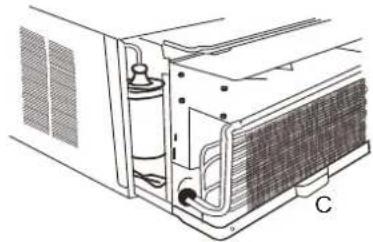
natural_image
Technical line drawing of an air conditioning unit with cooling fan and ventilation duct (no text or symbols)
NOTA:
natural_image
Diagram of a vertical panel with labeled points A and B, showing internal structure without any text or symbols.natural_image
Technical line drawing of an air conditioning unit with cooling fan and vent, showing internal components and airflow direction (no text or symbols)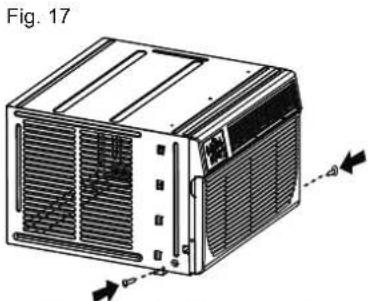
natural_image
Technical line drawing of a 3D air conditioner unit with ventilation grilles and heat exchangers, shown without any text or symbols.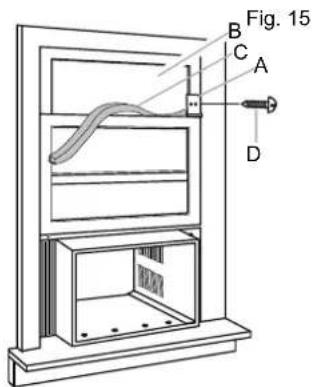
natural_image
Technical line drawing of a rectangular cabinet or enclosure with internal components and directional arrows (no text or symbols)B Fig. 22 Fig. 23
natural_image
Line drawing of a simple open box with internal compartments and a labeled component 'A' (no text or symbols on the diagram itself)A. Nivel
natural_image
Diagram of an air conditioning unit showing airflow path and component layout (no text or labels)Fig. 25
natural_image
Technical line drawing of a 3D air conditioner unit with ventilation grilles and cooling fins (no text or symbols)natural_image
Technical line drawing of a computer rack unit with ventilation grilles and fan base (no text or symbols)- WINDOW/WALL-TYPE ROOM AIR CONDITIONER
- Keystone®
- USER'S MANUAL
- TABLE OF CONTENTS
- Product Registration Card
- Air conditioner warranty
- Garantia
- READ THIS MANUAL
- WARNING
- CAUTION
- NOTE:
- For Your Safety
- Prevent Accidents
- Electrical Information
- Operation of Current Device
- (Applicable to the unit adopts current detection device only)
- Tools and Parts:
- Parts Supplied:
- Location Requirements:
- Window Installation:
- Remove packaging material:
- Attach Top Channel (FIG.6):
- Attach foam adhesive seal:
- Install Cabinet into Window:
- Attach Side Curtains to Window Frame:
- Complete Installation:
- Through-the-Wall Cabinet Installation:
- Install Wood Frame:
- Install Cabinet into Wood Frame:
- AIR CONDITIONER FEATURES
- ELECTRONIC CONTROL OPERATING INSTRUCTIONS
- TO TURN UNIT ON OR OFF:
- TO CHANGE TEMPERATURE SETTING:
- TO ADJUST FAN SPEEDS:
- SLEEP FEATURE:
- CHECK FILTER FEATURE:
- ENERGY SAVER FEATURE:
- I SENSE FEATURE: (on some models)
- To operate on Auto feature:
- To operate on Fan Only:
- To operate on Dry mode:
- TIMER: AUTO START/STOP FEATURE:
- DISPLAYS:
- Error codes:
- Air Directional Louvers
- ADDITIONAL THINGS YOU SHOULD KNOW
- CARE AND CLEANING
- Air Filter Cleaning
- Cabinet Cleaning
- Winter Storage
- TROUBLESHOOTING TIPS
- AIRE ACONDICIONADO DEL CUARTO
- DEL TIPO DE VENTANA / PARED
- MANUAL DEL USUARIO
- TABLA DE CONTENIDO
- NOTA:
Brand : Keystone
Model : KYST081HA
Category : Air conditioner