
Spectra Cyc 50 - Lighting Altman - Free user manual and instructions
Find the device manual for free Spectra Cyc 50 Altman in PDF.


| Product Type | Cyclorama Lighting Fixture |
| Model | Spectra Cyc 50 |
| Brand | Altman |
| Light Source | LED, 50W RGBW (est.) |
| Color Range | RGBW color mixing |
| Beam Angle | Approximately 120° x 120° |
| Power Consumption | Max 60W (est.) |
| Input Voltage | 100-240V AC, 50/60Hz |
| Control Protocol | DMX512 |
| Channels | 4 (R, G, B, W) or 5 (including dimmer) |
| Dimensions (L x W x H) | Approximately 600 x 150 x 300 mm |
| Weight | Approximately 4.5 kg |
| Housing Material | Aluminum with steel brackets |
| Cooling | Passive (convection) or quiet fan (est.) |
| Mounting | Floor stand or hanging via C-clamp |
| Degree of Protection | IP20 (indoor use) |
| Operating Temperature | 0°C to 40°C |
| Included Accessories | Power cord, DMX cables (est.) |
| Cleaning | Use a soft dry cloth; avoid solvents |
| Maintenance | Check connections and clean optics regularly |
| Safety | Disconnect power before servicing; do not stare into beam |
| Repairability | Replaceable LED module, PSU, and control board |
Frequently Asked Questions - Spectra Cyc 50 Altman
User questions about Spectra Cyc 50 Altman
0 question about this device. Answer the ones you know or ask your own.
Ask a new question about this device
Download the instructions for your Lighting in PDF format for free! Find your manual Spectra Cyc 50 - Altman and take your electronic device back in hand. On this page are published all the documents necessary for the use of your device. Spectra Cyc 50 by Altman.
USER MANUAL Spectra Cyc 50 Altman
Spectra Series Programming Manual


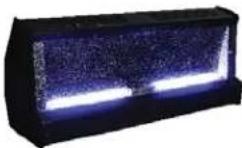


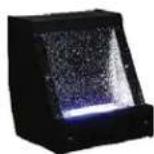


natural_image
Bar with twelve identical LED array light fixtures, no visible text or symbols
natural_image
Bar with eight illuminated LED array pattern (no text or symbols)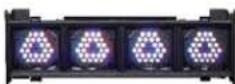

BRINGING IMAGINATION TO LIGHT
57 Alexander St., Yonkers, NY 10701 Tel: 914-476-7987 Visit our website at www.altmanlighting.com © 2012 Altman Stage Lighting, Inc.
Table of Contents
Safety Instructions Page 3
Features Page 4
Operation Page 5
DMX Mode Page 6
Personalities Page 7
Resolution Page 8
Stand Alone Mode Page 9
Fixed Color Mode Page 10
Master Mode Page 11
Spectra Strip Operation Page 12
-Menu Navigation Page 13
•Control Mode & Preset Selection Page 14
•DMX & SHOW mode Operation Page 15
•Fixture Lock & Test Page 16
- Reset to Factory Defaults Page 16
- Preset Configurations Page 17
• Interpolation Curves Page 18
SAFETY INSTRUCTIONS
INSTRUCTIONS PERTAINING TO A RISK OF FIRE, ELECTRICAL SHOCK, OR INJURY TO PERSONS FOR SPECTRA SERIES LED LIGHTING FIXTURES.
WARNING! - TO REDUCE THE RISK OF FIRE, ELECTRIC SHOCK, OR INJURY TO PERSONS, FOLLOW THESE IMPORTANT SAFETY INSTRUCTIONS:
- Turn off, unplug power, and allow fixture to cool before cleaning or servicing.
- Ensure that fi xture is properly grounded.
- Ensure that ventilation slots are not obstructed.
- Do not look directly at lighted LEDs.
- Keep away from fl ammable materials.
- No user serviceable parts inside. Replace entire LED assembly.
- Do not touch the LEDs at any time. Use a soft lint free cloth to clean lens. Do not use solvents to clean. Use cloth dampened with water. Allow to dry completely before reenergizing.
- Do not operate the unit with a missing or damaged lens.
----SAVE THESE INSTRUCTIONS!----
INSTRUCTIONS DE SÛRETÉ
LES INSTRUCTIONS AU SUJET D'UN RISQUE D'INCENDIE LE CHOC ÉLECTRIQUE, OU LA BLESSURE AUX PERSONNES POUR SS-CYC-100.
AVERTISSEMENT! - POUR RÉDUIRE LE RISQUE D'INCENDIE, LE CHOC ÉLECTRIQUE, OU LA BLESSURE AUX PERSONNES, SUIVRE CES INSTRUCTIONS DE SÉCURITÉ IMPORTANTES:
GARDER CES INSTRUCTIONS!
Features
The SPECTRA SERIES LED lighting fixtures are the first of its kind in the Theatrical and Architectural Lighting Industry offered by Altman Lighting.
- Compatible with DMX512 and RDM protocols.
- 8/16 bit DMX512 control for smoother dimming.
- On board power supply, microprocessor controller, and current drivers.
- Feed thru DMX/RDM data with a maximum total run of 1000 feet.
- Push button addressing.
- Stand-Alone Pre-programmed modes.
- Keypad Lock functions to prevent accidental Re-Programming.
• Efficient cooling system offering Silent Operation with No Fans.
WARNING: ALL ELECTRICAL WIRING AND CONNECTIONS SHOULD BE PERFORMED BY A QUALIFIED ELECTRICIAN
OPERATION
There are 3 buttons below the 3 digit LED display on the side of the unit. The buttons are : (From left to right)

000

[HUNDREDS], [TENS], [ONES].
All settings for Modes, DMX address, Personalities, etc., can be made by using the three buttons on the back of the unit while power is on.
(Note: Display goes out after no activity for approx 4 sec. Touch any button once to bring it back on.)
There are 3 main operating Modes: DMX, Fixed Color, and Locked.
DMX Mode:
DMX Mode is used for Setting DMX address, Personalities, and Stand-alone Effects. This is the default mode for a new unit. (Also see Fixed Color Mode section on page 9.)
To Switch to DMX Mode from Fixed Color Mode (or vice versa):
Wait a few seconds until the display goes blank,
- press and hold the [ ONES ] button
- press and hold the [ TENS ] button
- release the [ ONES ] button
- release the [TENS] button.
DMX ADDRESS
To set, press the buttons repeatedly (or hold) to count up until the desired DMX address (1-512), appears on the display. Wait a few seconds, the display will blink once quickly, and the address is set live and retained in memory, even if you remove power.
(RDM addressing sent from a remote unit will overwrite local DMX setting.)
PERSONALITIES:
There are 8 different personalities.
Each personality is made up of 3 settings: RESOLUTION (8 Bit /16 Bit), MASTER (On /Off), and SMOOTHING (On/Off) which are explained in greater detail below.
The current active Personality # is displayed for about 1 second during power up. The format is Pxx where xx is replaced by the active personality #01-08.
To set the desired Personality, you must be in DMX mode (not Fixed Color mode).
To select the personality:
- Press the buttons until the desired personality address 601-608) appears in the display (see list below).
- Wait a few seconds, and a confirmation display will appear that shows a question mark? on the left, followed by the personality #. This gives you an opportunity to either accept or reject the new setting.
- To accept the new personality, press the [ONES] button.
- To reject the new personality, press the [HUNDREDS] button (below the ?).
Once the new personality is accepted, it is entered into memory and retained even if power is disconnected. Once personality is either accepted or rejected, the display will go back to the current DMX address. The default personality for a new unit is #02.
EXAMPLE: Let's say that we want to select personality #05. We enter 605 on the display.
After a few seconds the display will show ?05. Since we want this, we press the [ONES] button (below the 5), and that enters personality #05 into memory.

BRINGING IMAGINATION TO LIGHT
PERSONALITY ADDRESS SETTINGS LIST
601-608: 4-COLOR CHANNELS:
601 Personality #01 8 bit Master OFF Smoothing OFF
Uses 4 DMX Channels
Channel order is RGBA
602 Personality #02 8 bit Master OFF Smoothing ON
Uses 4 DMX Channels
Channel order is RGBA
603 Personality #03 8 bit Master ON
Uses 5 DMX Channels
Smoothing OFF
Channel order is RGBAM
604 Personality #04 8 bit Master ON
Uses 5 DMX Channels
Smoothing ON
Channels order is RGBAM
605 Personality #05 16 bit
Uses 8 DMX Channels
Master OFF Smoothing OFF
Channel order is RrGgBbAa
606 Personality #06 16 bit
Uses 8 DMX Channels
Master OFF Smoothing ON
Channel order is RrGgBbAa
607 Personality #07
Uses 10 DMX Channels
16 bit
Master ON
Smoothing OFF
Channel order is RrGgBbAaMm
608 Personality #08
Uses 10 DMX Channels
16 bit
Master ON
Smoothing ON
Channel order is RrGgBbAaMm
609-612: 1-COLOR CHANNELS
609Personality #09 8 bit Smoothing OFF
Uses 1 DMX Channel
610Personality #10 8 bit Smoothing ON
Uses 1 DMX Channel
611Personality #11 16 bit Smoothing OFF
Uses 2 DMX Channels
612Personality #12 16 bit Smoothing ON
Uses 2 DMX Channels
RESOLUTION is selectable as either:
8 Bit (one DMX channel per color) this is normal resolution, or
16 Bit (two DMX channels per color) Coarse+Fine high resolution similar to moving lights.
If unit is in 8 Bit mode, and the unit is set to DMX Channel 001, then the DMX channels would be:
CH1 Red
CH2 Green
CH3 Blue
CH4 Amber*
If unit is in 16 Bit Mode, and the unit was set to DMX Channel 001, then the DMX channels would be:
CH1 Red Coarse CH2 Red Fine
CH3 Green Coarse CH4 Green Fine
CH5 Blue Coarse CH6 Blue Fine
CH7 Amber* Coarse CH8 Amber* Fine
Master Channel is selectable as ON or OFF and provides a Master fade channel that dims all 4 colors proportionally at the same time in order to maintain the color.
If you are in 8 Bit mode and the unit is set to DMX Channel 001, then the DMX channels would be:
CH1 Red
CH2 Green
CH3 Blue
CH4 Amber*
CH5 Master
If you are in 16 Bit mode and the unit is set to DMX Channel 001, then the DMX channels would be:
CH1 Red Coarse CH2 Red Fine
CH3 Green Coarse CH4 Green Fine
CH5 Blue Coarse CH6 Blue Fine
CH7 Amber* Coarse CH8 Amber* Fine
CH9 Master Coarse Ch10 Master Fine
SMOOTHING is selectable as ON or OFF and provides a smooth transition ramp from one level to another in a similar way to how an incandescent lamp behaves. This helps to eliminate the "steppiness" associated with LED fixtures that is caused by the instantaneous response of LEDs.
*Amber if RGBA, or White if RGBW
STAND-ALONE MODE (does not require a control console):
Note: Must be in DMX Mode (see page 6). If Master Mode (see page 10) is on, stand-alone effects from a single unit will control other units connected via DMX cable to all synchronize. Set other units to DMX channel 001.
(Do not use the Stand-Alone Effects while connected to a control console or a conflict may result.)
Color Fades (700-799):
| 700 - 709 | R»A»G»B fade | 700 = faster - 709 = slower |
| 740 - 749 | B»G»A»R fade | 740 = faster - 749 = slower |
| 780 - 789 | R»A»G»B»W fade | 780 = faster - 789 = slower |
| 790 - 799 | W»B»G»A»R fade | 790 = faster - 799 = slower |
Strobes (800-879):
| 800 - 809 | WHITE STROBE | 800 = faster - 809 = slower |
| 810 - 819 | RED STROBE | 810 = faster - 819 = slower |
| 820 - 829 | AMBER STROBE | 820 = faster - 829 = slower |
| 830 - 839 | GREEN STROBE | 830 = faster - 839 = slower |
| 840 - 849 | BLUE STROBE | 840 = faster - 849 = slower |
| 850 - 858 | R-A-G-B RAINBOW STROBE | 850 = faster - 859 = slower |
| 870 - 879 | B-G-A-R RAINBOW STROBE | 870 = faster - 879 = slower |
FIXED COLOR MODE:
This is a special mode that allows you to manually select colors for a single unit using the 3 keys. (Also see DMX Mode on page 6.)
To enter Fixed Color Mode (or exit to DMX Mode):
Wait a few seconds until the display goes blank,
- press and hold the [ONES] button
- press and hold the [TENS] button
- release the [ONES] button
- release the [TENS] button
While in Fixed Color Mode, the hundreds button cycles through 'r', 'G', 'b', and 'A' colors. The tens and ones digits select 0-99 values. Level 99 is that channel at full.
Locked Mode:
To Lock (or unlock) the buttons:
Wait a few seconds until the display goes blank,
- press and hold the [ONES] button
- press and hold the [ HUNDREDS ] button
- release the [ONES] button
- release the [ HUNDREDS ] button.
Display will show LOC for a moment and then blink. Buttons will ave no effect until they are unlocked.
MASTER MODE (Different than the Master Channel described on page 7.)
Master Mode only works while in STAND-ALONE EFFECTS MODE (see page 8). It causes the unit that is set to Master Mode to behave like a console and Transmit 4-channel (RGBA) 8-bit DMX set on address 001, reflecting its present light output.
Note: Only the first unit that is going to serve as the MASTER fixture should be set to Stand-alone Effects mode with Master Mode on. Stand-alone Effects Mode with Master Mode on should also not be used while units are connected to a DMX console. All fixtures following the Master fixture should be set with the Master Mode OFF, for Normal Operation.
To Turn on MASTER MODE:
- Place fixture in Stand-alone Mode (see page 8)
- Wait a few seconds until the display goes blank
- Press and hold the [HUNDREDS] button
- Press and hold the [ONES] button
- Release the [ HUNDREDS ] button
- Release the [ONES] button
- Display will show ON for a moment to indicate new setting and then blink.
- Address remaining fixtures connected to the MASTER fixture to DMX address 001
To Turn off the MASTER MODE:
Wait a few seconds until the display goes blank
Press and hold the [ HUNDREDS ] button
Press and hold the [ONES] button
Release the [ HUNDREDS ] button
Release the [ ONES ] button
Display will show OFF for a moment to indicate new setting and then blink.
Spectra Strip Operation

natural_image
Simple diagram with a rectangle and three circles below (no text or symbols)
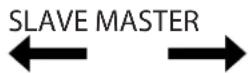
MASTER and SLAVE modes refer to the origin of the control signal the fixture is listening to.
SLAVE
- Putting the switch in the "Slave" position means the fixture is listening to the incoming DMX signal.
- Also considered "Normal" operation.
MASTER
- Putting the switch in the Master position means the fixture is NO LONGER listening to the incoming DMX signal and has now become the source of DMX control information for all fixture coming after it. The Master fixture will broadcast the pre-built show included in the fixtures software that has been selected by the user. All fixtures coming after the Master fixture should be set to Slave to receive the DMX signal originated from the Master fixture. This feature allows for rudimentary color changing capability without the need of an outside DMX control device.
- Also considered Stand-alone operation.
Menu Navigation

flowchart
graph TD
    A[" "] --> B[" "]
    C[" "] --> D[" "]
    E[" "] --> F[" "]
    G["M+"] --> H[" "]
    I[" "] --> J[" "]
Pressing Ⓜ
- Shows the current mode or the next menu item; use the without making any changes
- Saves a changed value
- Turns off the display at the last menu item
Pressing or - +
• Changes a value (which is only saved when
iMpressed).
- Accidentally changed a value but haven't confirmed it yet by pressing Ⓜ? By refraining from pressing the buttons for at least 8 seconds, you will leave the ,menu (display is turned off) without changing the value.
- If you are in a menu and want to change to another menu, refrain from pressing the buttons for at least 8 seconds (display is turned off), and subsequently press the button combination for the menu you want to change to.
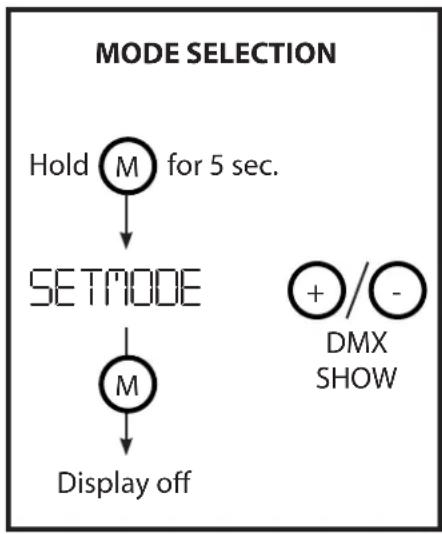
Control Mode Selection
To operate the Spectra Strip, one of two control modes must be selected: DMX Mode or Show Mode (also known as Stand-alone mode).
flowchart
graph TD
    A["Hold M for 5 sec."] --> B["SETMODE"]
    B --> C["M"]
    C --> D["Display off"]
    E["+/- DMX SHOW"] --> C
DMX Mode:
Set/read the DMX start address of the fi xture Change network resolution to 8 or 16 bit Select the interpolation mode
Show Mode:
- Selecting one of the 8 pre-programmed shows
- Change the speed of the selected show
- Turn Chase on or off
Note: When the Spectra Strip is in Show Mode, the fixture will not respond to any incoming DMX signal!
Preset Selection
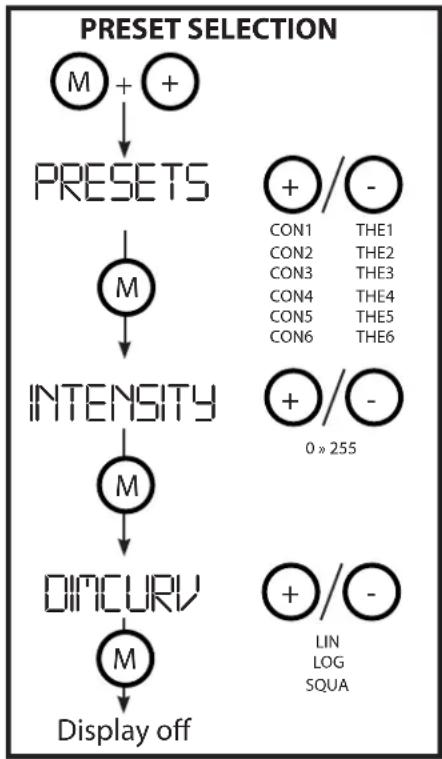
Spectra Strip Presets govern the operation of the fixture including how each cell responds, the maximum intensity the fixture will output and the dimming curve the fixture will operate with.
flowchart
graph TD
    A["M"] --> B["PRESETS"]
    C["+"] --> B
    B --> D["M"]
    D --> E["INTENSITY"]
    F["CON1"] --> G["+/-"]
    H["CON2"] --> I["CON1"]
    J["CON3"] --> K["CON2"]
    L["CON4"] --> M["CON3"]
    N["CON5"] --> O["CON4"]
    P["CON6"] --> Q["CON5"]
    R["CON7"] --> S["CON6"]
    T["CON8"] --> U["CON7"]
    V["CON9"] --> W["CON8"]
    X["CON10"] --> Y["CON9"]
    Z["CON11"] --> AA["CON10"]
    AB["CON12"] --> AC["CON11"]
    AD["CON13"] --> AE["CON12"]
    AF["CON14"] --> AG["CON13"]
    AH["CON15"] --> AI["CON14"]
    AJ["CON16"] --> AK["CON15"]
    AL["CON17"] --> AM["CON16"]
    AN["CON18"] --> AO["CON17"]
    AP["CON19"] --> AQ["CON18"]
    AR["CON20"] --> AS["CON19"]
    AT["CON21"] --> AU["CON20"]
    AV["CON22"] --> AW["CON21"]
    AX["CON23"] --> AY["CON22"]
    AZ["CON24"] --> BA["CON23"]
    BB["CON25"] --> BC["CON24"]
    BD["CON26"] --> BE["CON25"]
    BF["CON27"] --> BG["CON26"]
    BH["CON28"] --> BI["CON27"]
    BJ["CON29"] --> BK["CON28"]
    BL["CON30"] --> BM["CON29"]
    BN["CON31"] --> BO["CON30"]
    BP["CON32"] --> BQ["CON31"]
    BR["CON33"] --> BS["CON32"]
    BT["CON34"] --> BU["CON33"]
    BV["CON35"] --> BW["CON34"]
    BX["CON36"] --> BY["CON35"]
    BZ["CON37"] --> CA["CON36"]
    CB["CON38"] --> CC["CON37"]
    CD["CON39"] --> CE["CON38"]
    CF["CON40"] --> CG["CON39"]
    CH["CON41"] --> CI["CON40"]
    CJ["CON42"] --> CK["CON41"]
    CL["CON43"] --> CM["CON42"]
    CN["CON44"] --> CO["CON43"]
    CP["CON45"] --> CQ["CON44"]
    CR["CON46"] --> CS["CON45"]
    CT["CON47"] --> CU["CON46"]
    CV["CON48"] --> CW["CON47"]
    CX["CON49"] --> CY["CON48"]
    CZ["CON50"] --> DA["CON49"]
    DB["LIN LOG SQUA"] --> DC["LIN LOG SQUA"]
Select Preset
Select one of the pre-programmed presets: Concert or Theater:
CON1-CON6: Concert Mode.
- Concert mode groups individual LED Cells into groups. CON1 is all LED cells responding to channels 1-4(RGBA). CON6 is each cell responding to channels 1-48(RGBA).
THE1-THE6: Theater Mode
- Theater Mode groups cell by traditional border light 3 circuit / 4 circuit emulation.
Set Intensity:
- Sets the maximum intensity for the fi xture.
- Default is 255 or maximum intensity.
Dimming Curve\*:
Selects the output dimming curve. Options are:
- LIN - Linear
- LOG - Logarithmic
- SQUA - Square
Default is LOG

BRINGING IMAGINATION TO LIGHT
DMX Mode parameter selection
Configuration of the operation of the Spectra Strip while in DMX mode, responding to a DMX control signal.

flowchart
graph TD
    A["M"] --> B["DMX ADDR"]
    B --> C["M"]
    C --> D["NETURES"]
    D --> E["M"]
    E --> F["INTERPOL"]
    F --> G["M"]
    G --> H["Display off"]

    I["+"]//(-) 0 » 512] --> J["+/-/(-)"]
    K["+"]//(-) 8 bit 16 bit] --> L["+/-/(-)"]
    M["OFF VID COLR WHIT GLOW"] --> N["+/-/(-)"]
Select DMX start address
• This is the start address of the first output of the fixture.
- Total amount of addresses per fixture depends on fixture configuration and number of cells.
- Default address is 1.
Select network resolution:
- Change between 8 and 16 bit resolution.
- Using 16 bit gives you 2 addresses per output: Address 1 - Coarse, Address 2 - Fine.
Interpolation modes:
To get the mose optimized dimming performance for different applications. Default is COLR.
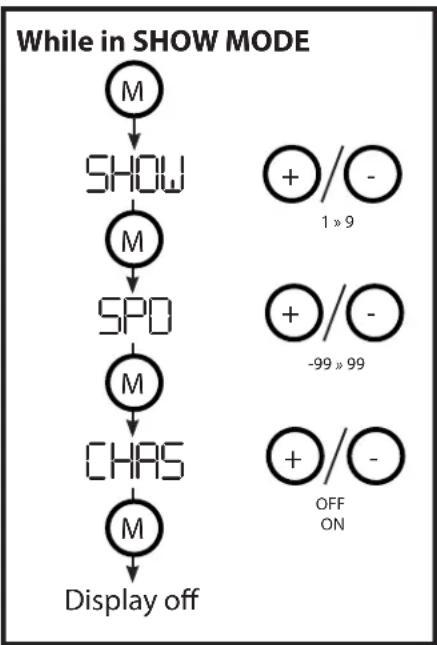
SHOW Mode parameter selection
Configuration of fixture operation while operating as a Stand-alone fixture or Master fixture.
flowchart
graph TD
    A["M"] --> B["SHOW"]
    B --> C["M"]
    C --> D["SPD"]
    D --> E["M"]
    E --> F["CHAS"]
    F --> G["M"]
    G --> H["Display off"]
Select Show:
Select one of the pre-programmed shows
• 1 - Static, all outputs 100%
• 2 - Static, R 100%
• 3 - Static, G 100%
• 4 - Static, B 100%
• 5 - Static, A 100%
- 6 - RGB color change
- 7- RGBA color change
- 8 - RGB+A color shift
• 9 - All outputs off
Default is show 1
Set speed:
- Set the show speed between -99 and 99.
- Default is 0
Enable Chase mode:
- Selects the show chasing mode for more dynamic effects.
- Default is OFF
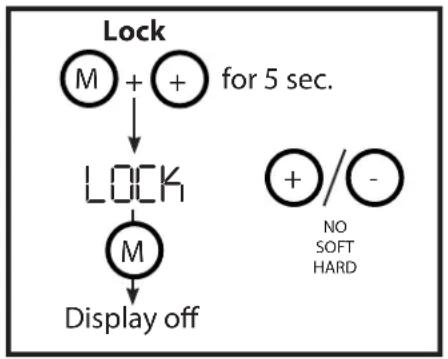
Fixture LOCK
Disabling of the menu while fi xture is in operation.
flowchart
graph TD
    A["Lock"] --> B["M + +"]
    B --> C["LOCK"]
    C --> D["M"]
    D --> E["Display off"]
    F["+"] --> G["/-"]
    H["NO SOFT HARD"] --> I["+/-"]
Select Lock level:
Soft: Disables menu operation until UNLOCK is applied.
Hard: Disables menu operation until FACTORY RESET is applied
NOTE: Only activate the hard lock after careful consideration: once you have hard-locked the fixture you can ONLY reset the fixture to its factory default setting.
Fixture unLOCK
Re-enabling of the menu while fi xture is in operation.

flowchart
graph TD
    A["Unlock"] --> B["M + +"]
    B --> C["UNLOCK"]
    C --> D["M"]
    D --> E["Display off"]
    F["+"] / (-) --> G["YES NO"]
    F --> H["NO"]
Select Lock level:
Soft: Disables menu operation until UNLOCK is applied.
Hard: Disables menu operation until FACTORY RESET is applied
NOTE: Only activate the hard lock after careful consideration: once you have hard-locked the fixture you can ONLY reset the fixture to its factory default setting.
Fixture test Reset to factory defaults
Individual testing of channels Rests fi xture to factory default values
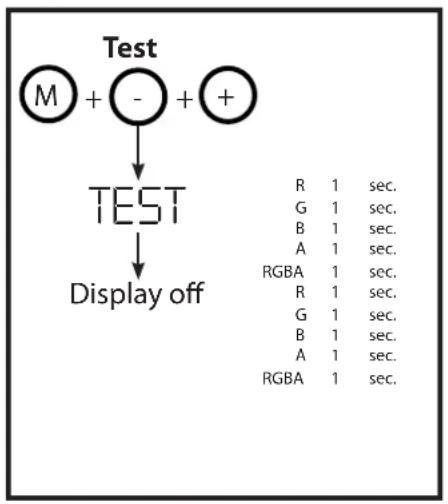
flowchart
graph TD
    A["Test M + - +"] --> B["TEST"]
    B --> C["Display off"]
    D["R 1 sec."] --> E["G 1 sec."]
    E["B 1 sec."] --> F["A 1 sec."]
    F --> G["RGBA 1 sec."]
    G --> H["R 1 sec."]
    H --> I["G 1 sec."]
    I --> J["B 1 sec."]
    J --> K["A 1 sec."]
    K --> L["RGBA 1 sec."]

flowchart
graph TD
    A["Reset to Factory Default"] --> B["M + - + + for 5 sec."]
    B --> C["RESET PRESMENU"]
    C --> D["M"]
    D --> E["Display off"]
PRESET CONFIGURATIONS FOR FIXTURES
Control configuration for each Preset setting per fixture.
2' SPECTRA STRIP
Concert 1
Concert 2
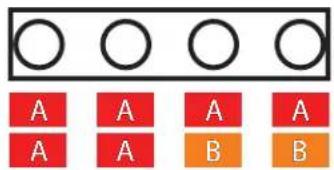
4' SPECTRA STRIP
Concert 1
Concert 2
Concert 3

Interpolation Curves

line
| 8 bit network setpoint | SQUARE | LOG | LIN | | ---------------------- | ------ | ---- | ---- | | 1 | 0 | 0 | 0 | | 11 | 0 | 0 | 0 | | 21 | 0 | 0 | 0 | | 31 | 0 | 0 | 0 | | 41 | 0 | 0 | 0 | | 51 | 0 | 0 | 0 | | 61 | 0 | 0 | 0 | | 71 | 0 | 0 | 0 | | 81 | 0 | 0 | 0 | | 91 | 0 | 0 | 0 | | 101 | 0 | 0 | 0 | | 111 | 0 | 0 | 0 | | 121 | 0 | 0 | 0 | | 131 | 0 | 0 | 0 | | 141 | 0 | 0 | 0 | | 151 | 0 | 0 | 0 | | 161 | 0 | 0 | 0 | | 171 | 0 | 0 | 0 | | 181 | 0 | 0 | 0 | | 191 | 0 | 0 | 0 | | 201 | 0 | 0 | 0 | | 211 | 0 | 0 | 0 | | 221 | 0 | 0 | 0 | | 231 | 0 | 0 | 0 | | 241 | 0 | 0 | 0 | | 251 | 100 | 100 | 100 |
- Spectra Series Programming Manual
- Table of Contents
- SAFETY INSTRUCTIONS
- INSTRUCTIONS PERTAINING TO A RISK OF FIRE, ELECTRICAL SHOCK, OR INJURY TO PERSONS FOR SPECTRA SERIES LED LIGHTING FIXTURES.
- INSTRUCTIONS DE SÛRETÉ
- LES INSTRUCTIONS AU SUJET D'UN RISQUE D'INCENDIE LE CHOC ÉLECTRIQUE, OU LA BLESSURE AUX PERSONNES POUR SS-CYC-100.
- Features
- OPERATION
- DMX Mode:
- DMX ADDRESS
- PERSONALITIES:
- PERSONALITY ADDRESS SETTINGS LIST
- 601-608: 4-COLOR CHANNELS:
- 609-612: 1-COLOR CHANNELS
- RESOLUTION is selectable as either:
- STAND-ALONE MODE (does not require a control console):
- FIXED COLOR MODE:
- Locked Mode:
- MASTER MODE (Different than the Master Channel described on page 7.)
- To Turn on MASTER MODE:
- To Turn off the MASTER MODE:
- Spectra Strip Operation
- SLAVE
- MASTER
- Menu Navigation
- Pressing Ⓜ
- Pressing or - +
- Control Mode Selection
- Show Mode:
- Preset Selection
- Select Preset
- CON1-CON6: Concert Mode.
- THE1-THE6: Theater Mode
- Set Intensity:
- Dimming Curve\*:
- DMX Mode parameter selection
- Select DMX start address
- Select network resolution:
- Interpolation modes:
- SHOW Mode parameter selection
- Select Show:
- Set speed:
- Enable Chase mode:
- Fixture LOCK
- Select Lock level:
- Fixture unLOCK
- Fixture test Reset to factory defaults
- PRESET CONFIGURATIONS FOR FIXTURES
- Interpolation Curves
Brand : Altman
Model : Spectra Cyc 50
Category : Lighting