
STHM10 - Drill STANLEY - Free user manual and instructions
Find the device manual for free STHM10 STANLEY in PDF.


| Product Type | Corded Hammer Drill |
| Brand | STANLEY |
| Model | STHM10 |
| Power Source | AC corded (120V~60Hz) |
| Power Input | 550 W |
| No-Load Speed | 0-2800 RPM |
| Impact Rate | 0-48000 BPM |
| Chuck Type | Keyless, 1/2" (13 mm) |
| Drilling Capacity (Wood) | 25 mm (1") |
| Drilling Capacity (Steel) | 10 mm (3/8") |
| Drilling Capacity (Masonry) | 13 mm (1/2") |
| Weight | 1.8 kg (4.0 lbs) |
| Dimensions (LxWxH) | 300 x 65 x 200 mm |
| Variable Speed Trigger | Yes |
| Forward/Reverse | Yes |
| Lock-On Button | Yes |
| Side Handle | Included |
| Depth Rod | Included |
| Clutch | Adjustable, 16 positions |
| Double Insulation | Yes |
| Keyless Chuck | Yes |
| Cord Length | 2.5 m (8.2 ft) |
| Maintenance | Clean vents; replace carbon brushes periodically |
| Spare Parts Availability | Online and authorized service centers |
| Included Accessories | Side handle, depth rod, chuck key (if keyed), carrying case |
Frequently Asked Questions - STHM10 STANLEY
User questions about STHM10 STANLEY
0 question about this device. Answer the ones you know or ask your own.
Ask a new question about this device
Download the instructions for your Drill in PDF format for free! Find your manual STHM10 - STANLEY and take your electronic device back in hand. On this page are published all the documents necessary for the use of your device. STHM10 by STANLEY.
USER MANUAL STHM10 STANLEY
natural_image
Line drawing of a STANLEY drill press tool (no text or symbols on the device body)STHM10
MANUAL DE INSTRUÇÕES
INSTRUCTIONS MANUAL
Español
Português
English
Page
Page
Page 14
4
9
WARNING: READ INSTRUCTION MANUAL BEFORE USING PRODUCT.
A


natural_image
Line drawing of a hand operating a power tool with a tool partially visible (no text or symbols)D
Your STANLEY STHM10 Demolition Hammer has been designed for heavy duty demolition, chipping and chiseling applications in concrete, brick, stone and other masonry materials.
SAFETY INSTRUCTIONS
General Power Tool Safety Warnings

WARNING! Read all safety warnings and all instructions. Failure to follow the warnings and instructions may result in electric shock, fire and/or serious injury.
Save all warnings and instructions for future reference. The term "power tool" in the warnings refers to your mains-operated (corded) power tool or battery-operated (cordless) power tool.
1. Work area safety
a. Keep work area clean and well lit. Cluttered or dark areas invite accidents.
b. Do not operate power tools in explosive atmospheres, such as in the presence of flammable liquids, gases or dust. Power tools create sparks which may ignite the dust or fumes.
c. Keep children and bystanders away while operating a power tool. Distractions can cause you to lose control.
2. Electrical safety
a. Power tool plugs must match the outlet. Never modify the plug in any way. Do not use any adapter plugs with earthed (grounded) power tools. Unmodified plugs and matching outlets will reduce risk of electric shock.
b. Avoid body contact with earthed or grounded surfaces, such as pipes, radiators, ranges and refrigerators. There is an increased risk of electric shock if your body is earthed or grounded.
c. Do not expose power tools to rain or wet conditions. Water entering a power tool will increase the risk of electric shock.
d. Do not abuse the cord. Never use the cord for carrying, pulling or unplugging the power tool. Keep cord away from heat, oil, sharp edges or moving parts. Damaged or entangled cords increase the risk of electric shock.
e. When operating a power tool outdoors, use an extension cord suitable for outdoor use. Use of a cord suitable for outdoor use reduces the risk of electric shock.
f. If operating a power tool in a damp location
is unavoidable, use a residual current device (RCD) protected supply. Use of an RCD reduces the risk of electric shock. NOTE: The term “residual current device (RCD)” may be replaced by the term “ground fault circuit interrupter (GFCI)” or “earth leakage circuit breaker (ELCB)”.
3. Personal safety
a. Stay alert, watch what you are doing and use common sense when operating a power tool. Do not use a power tool while you are tired or under the influence of drugs, alcohol or medication. A moment of inattention while operating power tools may result in serious personal injury.
b. Use personal protective equipment. Always wear eye protection. Protective equipment such as dust mask, non-skid safety shoes, hard hat, or hearing protection used for appropriate conditions will reduce personal injuries.
c. Prevent unintentional starting. Ensure the switch is in the off-position before connecting to power source and/or battery pack, picking up or carrying the tool. Carrying power tools with your finger on the switch or energising power tools that have the switch on invites accidents.
d. Remove any adjusting key or wrench before turning the power tool on. A wrench or a key left attached to a rotating part of the power tool may result in personal injury.
e. Do not overreach. Keep proper footing and balance at all times. This enables better control of the power tool in unexpected situations.
f. Dress properly. Do not wear loose clothing or jewellery. Keep your hair, clothing and gloves away from moving parts. Loose clothes, jewellery or long hair can be caught in moving parts.
g. If devices are provided for the connection of dust extraction and collection facilities, ensure these are connected and properly used. Use of dust collection can reduce dust-related hazards.
4. Power tool use and care
a. Do not force the power tool. Use the correct power tool for your application. The correct power tool will do the job better and safer at the rate for which it was designed.
b. Do not use the power tool if the switch does not turn it on and off. Any power tool that cannot be controlled with the switch is dangerous and must be repaired.
c. Disconnect the plug from the power source and/or the battery pack from the power tool
before making any adjustments, changing accessories, or storing power tools. Such preventive safety measures reduce the risk of starting the power tool accidentally.
d. Store idle power tools out of the reach of children and do not allow persons unfamiliar with the power tool or these instructions to operate the power tool.
Power tools are dangerous in the hands of untrained users.
e. Maintain power tools. Check misalignment or binding of moving parts, breakage of parts and any other condition that may affect the power tool's operation. If damaged, have the power tool repaired before use. Many accidents are caused by poorly maintained power tools.
f. Keep cutting tools sharp and clean.
Properly maintained cutting tools with sharp cutting edges are less likely to bind and are easier to control.
g. Use the power tool, accessories and tool bits etc. in accordance with these instructions, taking into account the working conditions and the work to be performed. Use of the power tool for operations different from those intended could result in a hazardous situation.
5. Service
a. Have your power tool serviced by a qualified repair person using only identical replacement parts. This will ensure that the safety of the power tool is maintained.
HAMMER SAFETY WARNINGS
- Wear ear protectors. Exposure to noise can cause hearing loss.
Use auxiliary handle(s), if supplied with the tool. Loss of control can cause personal injury.
Hold power tool by insulated gripping surfaces, when performing an operation where the cutting accessory may contact hidden wiring or its own cord. Cutting accessory contacting a "live" wire may make exposed metal parts of the power tool "live" and could give the operator an electric shock.
- Be certain that the material being drilled does not conceal electric or gas service and that their locations have been verified with the utility companies.
- Keep a firm grip on the tool at all times. Do not attempt to operate this tool without holding it with both hands. Operating this tool with one hand will result in loss of control. Breaking through or encountering hard materials such as re-bar may be hazardous as well. Tighten the side handle securely before use.
- Ensure the chisel is secured in place before operating the tool.
In cold-weather conditions or when the tool has not been used for a longer period of time, let the tool run with no load for several minutes before use.
When working above ground level ensure the area below is clear.
Do not touch the chisel or the parts close to the chisel immediately after operation, as they may be extremely hot and cause burns to the skin.
◆ Always direct the power cable to the rear, away from the chisel.
Do not operate this tool for long periods of time. Vibration caused by hammer action may be harmful to your hands and arms. Use gloves to provide extra cushion and limit exposure by taking frequent rest periods.
Note: Mains voltage: When connecting to the mains, it is imperative to verify if the voltage of the mains matches that of the power tool. If the mains voltage exceeds the voltage indicated on the power tool, the user may become severely injured in an accident, and the tool may be damaged. On the contrary, if the mains voltage is lower than the voltage required by the tool, the motor may be damaged as a result. Thus, if it is not possible to verify the voltage, it is imperative not to plug in to the power source.
RESIDUAL RISKS
Additional residual risks may arise when using the tool which may not be included in the enclosed safety warnings. These risks can arise from misuse, prolonged use etc. In spite of the application of the relevant safety regulations and the implementation of safety devices, certain risks cannot be avoided. These are:
◆ Injuries caused by touching any rotating/moving parts.
◆ Injuries caused when changing any parts, blades or accessories.
Injuries caused by prolonged use of a tool. When using any tool for prolonged periods ensure you take regular breaks.
◆ Impairment of hearing.
Health hazards caused by breathing dust developed when using your tool (example:- working with wood, especially oak, beech and MDF.)
SAFETY OF OTHERS
This appliance is not intended for use by persons (including children) with reduced physical, sensory or mental capabilities, or lack of experience and knowledge, unless they have been given supervision or instruction concerning use of the appliance by a person responsible for their safety.
Children should be supervised to ensure that they do not play with the appliance.
LABELS ON TOOL
The following symbols are shown on the tool along with date code:
 | WARNING! To reduce the risk of injury, the user must read the instruction manual before use. | ||
 | Wear ear protection. | ||
 | Wear safety glasses or goggles. | ||
| V Volts | --- | Direct Current | |
| A Amperes n | 0 | No-Load Speed | |
Hz Hertz Class II Cons  | |||
| W Watts |  | Earthing Terminal | |
| min minutes | [D05H] | Safety Alert Symbol | |
 | Alternating Current | /min. | Revolutions or Reciprocation per minute |
Position of Date Code (Fig. A)
The Date Code, which also includes the year of manufacture, is printed into the housing.
Example:
2016 XX JN
Year of manufacturing
PACKAGE CONTENTS
The package contains:
1 Demolition hammer
1 Kitbox
1 Side handle
1 Chisel
1 Instruction manual
◆ Check for damage to the tool, parts or accessories which may have occurred during transport.
Take the time to thoroughly read and understand this manual prior to operation.
ELECTRICAL SAFETY

Your tool is double insulated; therefore no earth wire is required. Always check that the main voltage corresponds to the voltage on the rating plate.
Warning! If the power cord is damaged, it must be replaced by the manufacturer, authorized Stanley Service Center or an equally qualified person in order to avoid damage or injury. If the power cord is replaced by an equally qualified person, but not authorized by Stanley the warranty will not be valid.
USING AN EXTENSION CABLE
If it is necessary to use an extension cable, please used an approved extension cable that fits the tool's power input specifications. The minimum cross-sectional area of the conducting wire is 1.5 sq. mm. Cables should be untangled before reeling up.
| Cable cross-sectional area (mm ^2 ) Cable rated current (Ampere) | Cable cross-sectional area (mm ^2 ) Cable rated current (Ampere) |
| 0.75 6 | |
| 1.00 10 |
| 1.50 15 | |
| 2.50 20 | |
| 4.00 25 |
| Cable length (m) | ||||||
| 7.5 | 1 | 5 | 25 | 30 | 45 | |
| Voltage Amperes Cable rated current (Ampere) | |||||||
| 110-127 | 0 - 2.0 | 6 | 6 | 6 | 6 | 6 | 10 |
| 2.1 - 3.4 | 6 | 6 | 6 | 6 | 15 | 15 | |
| 3.5 - 5.0 | 6 | 6 | 10 | 15 | 20 | 20 | |
| 5.1 - 7.0 | 10 | 10 | 15 | 20 | 20 | 25 | |
| 7.1 - 12.0 | 15 | 15 | 20 | 25 | 25 | - | |
| 12.1 - 20.0 | 20 | 20 | 25 | -- | |||
| 220-240 | 0 - 2.0 | 6 | 6 | 6 | 6 | 6 | 6 |
| 2.1 - 3.4 | 6 | 6 | 6 | 6 | 6 | 6 | |
| 3.5 - 5.0 | 6 | 6 | 6 | 6 | 10 | 15 | |
| 5.1 - 7.0 | 10 | 10 | 10 | 10 | 15 | 15 | |
| 7.1 - 12.0 | 15 | 15 | 15 | 15 | 20 | 20 | |
| 12.1 - 20.0 | 20 | 20 | 20 | 20 | 25 | - | |
FEATURES (FIG. A)
This tool includes some or all of the following features.
a. Side Handle
b. Switch
c. Electronic impact energy control dial
d. Chisel position index collar
e. Lube oil-injection inlet
f. Tool holder / sleeve
j. Service indicator
Electronic impact energy control
The electronic impact energy control (3) offers the following advantages:
- Use of smaller accessories without risk of breakage
- Minimised break-out when chiselling soft or brittle materials
- Optimal tool control for precise chiselling
Service reminder light
When the service reminder light (7) lights up or blinks, this will indicate that the cut-out carbon brushes will switch off the tool in approximately 8 hours. After that period, the light will go off and the tool will stop running. The tool must then be sent to a service center for service.
Soft start feature
The soft start feature allows the impact rate to build up more slowly, thus preventing the chisel or point from "bouncing" around on the masonry when starting up.
ASSEMBLY AND ADJUSTMENT
WARNING! To reduce the risk of injury, turn unit off and disconnect machine from power source before installing and removing accessories, before adjusting or changing set-ups or when making repairs. Be sure the trigger switch is in the OFF position. An accidental start-up can cause injury.
Inserting and Removing SDS Max Accessories (Fig. A)
This tool uses SDS-MAX chisels (refer to the inset in Fig. A for a cross-section of a chisel shank). We recommend to use professional accessories only.
- Clean and grease the bit shank.

CAUTION: Do not apply lubricant to the machine.
- Insert the chisel shank into the bit holder/tool sleeve (f). Press and turn the chisel slightly until the sleeve snaps into position.
◆ Pull on the chisel to check if it is properly locked. The hammering function requires the chisel to be able to move axially several centimetres when locked in the tool holder.
◆ To remove a chisel, pull back the tool holder/ sleeve (f) and pull the chisel out of the tool holder.
WARNING! Always wear gloves when you change accessories. The exposed metal parts on the tool and accessory may become extremely hot during operation.
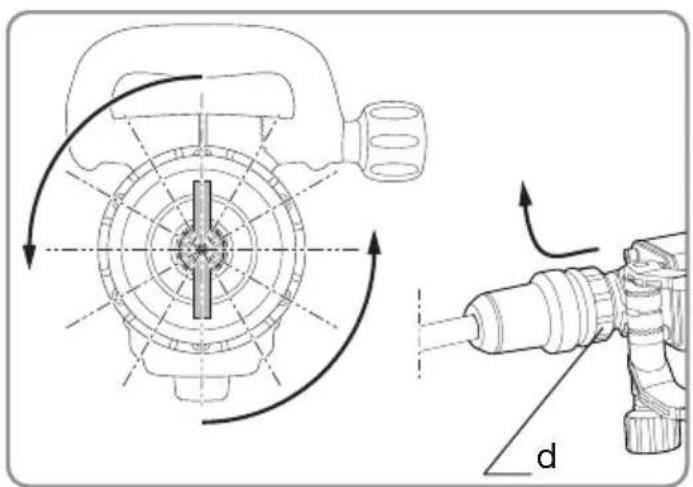
INDEXING THE CHISEL POSITION (Fig. D)
The chisel can be indexed and locked into 12 different positions.
1 Insert the chisel as described above.
2 Pull forward and rotate the chisel position collar (d) in the direction of the arrow until the chisel is in the desired position.
Setting The Electronic Impact Power Control Dial (Fig. A)
Turn the dial (c) to the desired level. The higher the number, the greater the impact energy. With dial settings from «1» (low) to «6» (full power) the tool is extremely versatile and adaptable for many different applications. The required setting is a matter of experience, for example:
- when chiselling soft, brittle materials or when minimum break-out is required, set the dial to «1» or «2» (low);
- when breaking harder materials, set the dial to «6» (full power).
Fitting The Side Handle (Fig. A)
The side handle (a) can be mounted on the front of the machine to suit both RH- and LH-users.

WARNING: Always operate the machine with the side handle properly mounted.
- Unscrew the side handle clamp knob (g).
- Adjust the side handle (a) to the desired angle.
- Slide and rotate the side handle to the desired position.
- Lock the side handle in place by tightening the clamp knob (g).
USE
WARNING! Always observe the safety instructions and applicable regulations.
- Be aware of the location of pipework and wiring.
- Apply a pressure of approx. 20 - 30 kg to the tool. Excessive force does not speed up chiselling but decreases tool performance and may shorten tool life.
◆ Always hold the tool firmly with both hands and ensure a secure stance (Fig. C). Always operate the tool with the side handle properly mounted.
Proper Hand Position (Fig. C)

WARNING: To reduce the risk of serious personal injury, ALWAYS use proper hand position as shown.

WARNING: To reduce the risk of serious personal injury, ALWAYS hold securely in anticipation of a sudden reaction.
Proper hand position requires one hand on the side handle (a), with the other hand on the main handle.
Switching On and Off (Fig. A)
- To run the tool, press the switch(b) and turn it in 'I' position.
- To stop the tool, turn it in 'O' position and release the switch(b).
- Select the appropriate chisel, and clean and grease its shank.
- Insert the chisel and check whether it is properly locked.
- Set the desired impact energy level.
- Fit and adjust the side handle (a) and make sure it is firmly tightened.
- Hold the tool at main handle and side handle (a) and switch on. The tool now runs in continuous operation.
- Always switch off the tool when work is finished and
Demolition, Chiseling And Channelling (Fig. A)
before unplugging.
Various types of chisels are available as an option.
Only Stanley recommended accessories should be used with this product.

WARNING:
- Do not use this tool to mix or pump easily combustible or explosive fluids (benzine, alcohol, etc.).
- Do not mix or stir inflammable liquids labelled accordingly.
Accessory maintenance (Fig B)
Accessory maintenance at the right time guarantees optimal results in application and a long and efficient accessory life. Grind the chisels on grinding discs. Refer to Fig. B for the appropriate angles of the following chisels:
Pointed chisel (8)
Flat chisel (9)

WARNING! These chisels can be reground only a limited number of times. If in doubt, contact your dealer for recommendations.

WARNING! Ensure that the cutting edge does not show discolouration caused by too much pressure. This may impair the hardness of the accessory.
MAINTENANCE
Your Stanley corded/cordless appliance/tool has been designed to operate over a long period of time with a minimum of maintenance. To ensure satisfactory operations, the tool must be maintained and cleaned regularly

WARNING: To reduce the risk of injury, turn unit off and disconnect machine from power before installing and removing accessories, adjusting or changing set-ups or when making s. Be sure the trigger switch is in the OFF position.idental start-up can cause injury.
- This machine is not user-serviceable. If problems occur contact an authorised repair agent.
- The tool will automatically switch off when the carbon brushes are worn.
WARNING! Before performing any maintenance on corded/cordless power tools:
♦ Switch off and unplug the appliance/tool.
- Or switch off and remove the battery from the appliance/tool if the appliance/tool has a separate battery pack.
- Or run the battery down completely if it is integral and then switch off.
- Unplug the charger before cleaning it. Your charger does not require any maintenance apart from regular cleaning.
- Regularly clean the ventilation slots in your appliance/tool/ charger using a soft brush or dry cloth.
♦ Regularly clean the motor housing using a damp cloth. Do not use any abrasive or solvent-based cleaner.
♦ Regularly open the chuck and tap it to remove any dust from the interior (when fitted).
Replace the Carbon Brush (Fig. D)

Lubrication
♦ Regularly replace and check the carbon brushes. Replace it in time when it is worn to the abrasive boundary line. Keep the carbon brush clean and make it freely slide in the brushing range. Two brushes shall be eplaced at the same time.
Use the cross screwdriver to counterclockwise unscrew the screws, open the bottom cover (8) with a flat screwdriver to counterclockwise open the brush cover, you can remove the brush as shown in the Fig. D, and put the new brush, and then clockwise fasten the brush cover, finally put the bottom cover, and then use the cross screwdriver to tighten it properly.
- Open the cap of the lube oil-injection inlet (5), check the lube oil in the gearbox, if the lube oil is dirty or insufficient, replace or add the adequate amount of lube oil provided by the company.

Cleaning

WARNING! Blow dirt and dust out of the main housing with dry air as often as dirt is seen collecting in and around the air vents.
Wear approved eye protection and approved dust mask when performing this procedure.

WARNING! Never use solvents or other harsh chemicals for cleaning the non-c parts of the tool. These chemicals may in the material of the parts. Use only mild and damp cloth to clean the tool. Never let any get inside the tool, cleaning of gasoline or chemicals, never immerse any part of the tool fluid.

IMPORTANT! To ensure product SAFETY and RELIABILITY, repairs, maintenance and adjustment (other than those listed in this manual) should be performed by authorized service centers or other qualified organizations, always using identical replacement parts. Unit contains no user service able parts inside.
Optional Accessories

WARNING! Since accessories, other than those offered by Stanley, have not been tested with this t, use of such accessories with this tool could be ous. To reduce the risk of injury, only Stanley, mended accessories should be used with this t.
Various types of SDS MAX drill bits and chisels are available as an option.
Consult your dealer for further information on the appropriate accessories.
Protecting The Environment

Separate collection. This product must not be disposed of with normal household waste.
Should you find one day that your Stanley product
needs replacement, or if it is of no further use to you, do not dispose of it with household waste. Please sort it out for separate recycling.

Separate collection of used products and packaging allows materials to be recycled and used again. Re-use of recycled materials helps prevent environmental on and reduces the demand for raw materials.
Some local governments may require the local or municipal waste disposal centers or retailers of new products to provide households with electronic product recycling services.
Notes
Stanley's policy is one of continuous improvement to our products and as such, we reserve the right to change product specifications without prior notice.
Standard equipment and accessories may vary by country. Product specifications may differ by country.
Complete product range may not be available in all countries. Contact your local Stanley dealers for range availability.
SERVICE INFORMATION
Stanley offers a full network of company-owned and authorized service locations. All Stanley Service Centers are staffed with trained personnel to provide customers with efficient and reliable power tool service. For more information about our authorized service centers and if you need technical advice, repair, or genuine factory replacement parts, contact the Stanley location nearest you.
TECHNICAL DATA
| DEMOLITION HAMMER STHM10 | ||||||
| TYPE | -AR | -B2C | -B3 | -B2 | -BR | |
| Voltage V 220 220 120 220 127 | ||||||
| Frequency Hz 50 50 60 60 60 | ||||||
| Power input W | 1600 | |||||
| Impact per Minute | bpm, gpm or ipm | 900-1890 | ||||
| Impact energy | J | 5-25 | ||||
| Chuck type | SDS Max | |||||
| Weight | Ibs (kg) | 23.1 (10.5) | ||||
CNPJ: 53.296.273/0001-91
Insc. Est.: 701.948.711.00-98
S.A.C.: 0800.703.4644
Col. Santa Fé, Alvaro Obregón




- STHM10
- SAFETY INSTRUCTIONS
- General Power Tool Safety Warnings
- Work area safety
- Electrical safety
- Personal safety
- Power tool use and care
- Service
- HAMMER SAFETY WARNINGS
- RESIDUAL RISKS
- SAFETY OF OTHERS
- LABELS ON TOOL
- Position of Date Code (Fig. A)
- PACKAGE CONTENTS
- ELECTRICAL SAFETY
- USING AN EXTENSION CABLE
- FEATURES (FIG. A)
- Electronic impact energy control
- Service reminder light
- Soft start feature
- ASSEMBLY AND ADJUSTMENT
- Inserting and Removing SDS Max Accessories (Fig. A)
- INDEXING THE CHISEL POSITION (Fig. D)
- Setting The Electronic Impact Power Control Dial (Fig. A)
- Fitting The Side Handle (Fig. A)
- USE
- Proper Hand Position (Fig. C)
- Switching On and Off (Fig. A)
- Demolition, Chiseling And Channelling (Fig. A)
- WARNING:
- Accessory maintenance (Fig B)
- MAINTENANCE
- Lubrication
- Cleaning
- Optional Accessories
- Protecting The Environment
- Notes
- SERVICE INFORMATION
Brand : STANLEY
Model : STHM10
Category : Drill