ISH-6500MP - Water heaters and boilers Imarflex - Free user manual and instructions
Find the device manual for free ISH-6500MP Imarflex in PDF.


| Product Type | Water Heater and Boiler |
| Brand | Imarflex |
| Model | ISH-6500MP |
| Capacity | 6.5 L |
| Power | 2000 W |
| Voltage | 220-240 V ~ 50 Hz |
| Dimensions (W x D x H) | 300 x 200 x 450 mm |
| Weight | 4.5 kg |
| Tank Material | Stainless steel |
| Temperature Range | 30°C to 75°C (adjustable thermostat) |
| Safety Features | Overheat protection, pressure relief valve |
| Installation Type | Wall-mounted |
| Water Connection | G 1/2 inch inlet/outlet |
| Control Type | Mechanical dial with indicator light |
| Heating Time (to max temp) | Approx. 20 minutes |
| Thermal Insulation | High-density foam |
| Max Water Pressure | 0.6 MPa |
| Power Cord Length | 1.5 m |
| Certification | CE |
| Warranty | 2 years |
Frequently Asked Questions - ISH-6500MP Imarflex
User questions about ISH-6500MP Imarflex
0 question about this device. Answer the ones you know or ask your own.
Ask a new question about this device
Download the instructions for your Water heaters and boilers in PDF format for free! Find your manual ISH-6500MP - Imarflex and take your electronic device back in hand. On this page are published all the documents necessary for the use of your device. ISH-6500MP by Imarflex.
USER MANUAL ISH-6500MP Imarflex
When using electrical appliances, basic safety precautions should always be followed, including the following:
- Read all instructions carefully before use.
- Check the condition of the unit after taking out from the box. Ensure that all parts are in good condition.
- Separate electric circuits must be provided.
- Do not use any appliance with a damaged cord. If the cord is damaged it should be replaced with the same type and size or call to the nearest authorized service center.
- To ensure the correct installation of the shower heater, it should be done by an authorized lmarflex technician.
- Before installing the unit, check if the voltage indicated corresponds with the convenience outlet (230Va.c.).
- Do not attempt to repair, adjust or replace parts in the unit, it must be check and repair by an Authorized Imarflex Technician or by similar qualified persons in order to avoid electric hazard.
- Children should be supervised to ensure that they do not play with the appliance.
- This appliance is not intended for use by persons (including children) with reduced physical, sensory or mental capabilities, or lack of experience and knowledge, unless they have been given supervision or instruction concerning use of the appliances by a person responsible for their safety.
- Save this instruction manual for future reference.
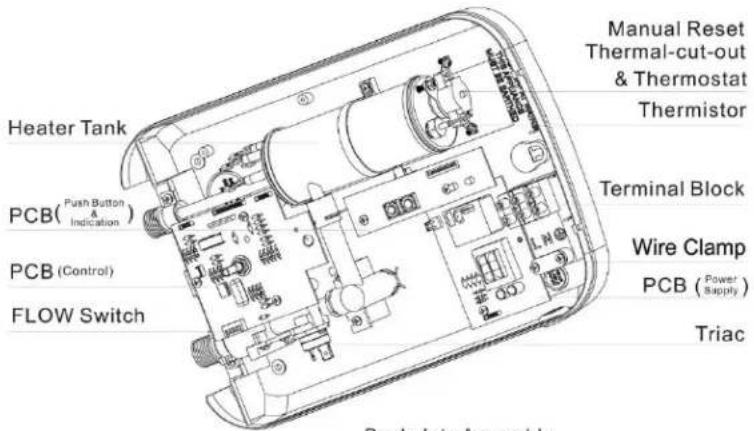
Backplate Assembly
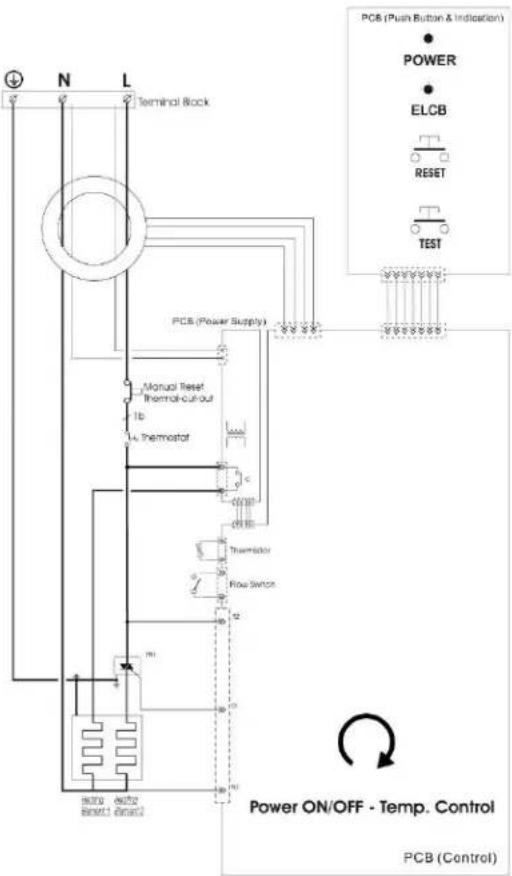
(Schematic Diagram)
Site requirements
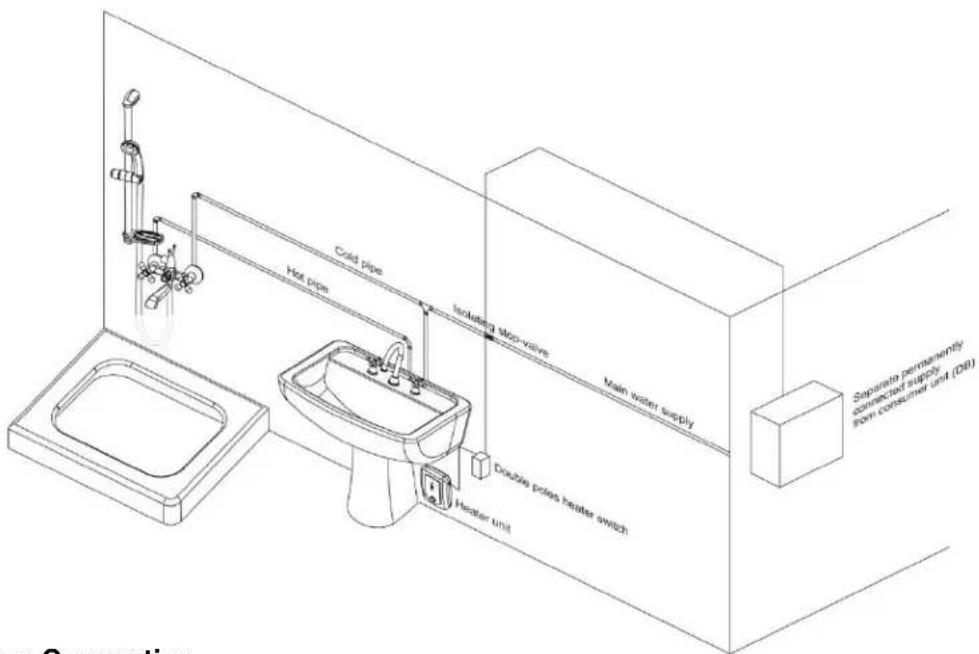
Plumbing Connection
-
Turn OFF the main water valve.
-
Connect the water supply to the inlet of the multi-point water heater using 12 " (.5mm) pipe with compression fitting.
-
Turn ON the main water valve and check for leaks in the pipe work connection of the Multi-point Water Heater.
INSTALLATION INSTRUCTION
The Multi-point Water Heater should be installed by an authorized IMARFLEX technician.
Fitting the Unit into the Wall
- Unscrew the bottom retained screw and lift the front cover from the back plate.
- Use the back plate as a template and mark the three fixing holes.
- Drill the holes and insert the tox.
- Insert the wire through the wire entry of the Multi-point Water Heater.
- Fit the Multi-point Water Heater to the wall.
NOTE:
• The Control Knob is integral part of the front cover do not attempt to remove them.
NOTE:
- Using Pressure Relief Valve (optional) will help to release excess high pressure build up due to abnormal operation. It can be installed at the outlet to respond fast enough to the high temperature build up, this PRV cannot be used as a check valve, and therefore, it can be installed bi-directional.
- Before completing the connection of the water supply to the inlet of the Multi-point Water Heater, flush out the pipe work to remove all debris in the system.
- Do not use joining compounds on any pipe fittings for the installation. Compression fittings must be used to connect the inlet of the Multi-point Water Heater.
Electrical Connection
- For electrical installation, disconnect the main power supply to avoid electric shock.
- Make sure to the required wire size which is 12 AWG.
- Route the wire into the Multi-point Heater and connect to the terminal block as follows:
• Live Wire to terminal marked L
• Neutral Wire to terminal marked N
- Earth Wire to terminal marked E
- Used the wire clamp to secure the wire. The clamp is suitable for 6mm^2 wires or can be reverse for 10mm^2 cables. If the wire is larger than 10mm^2 is been used, do not use the wire clamps but make sure that the cable is securely fitted.
NOTE:
- Make sure that the terminal block screws are fully tightened and that no wire insulation is trapped under the screws.
- The Multi-point Heater must be permanently connected to the electrical supply via a circuit breaker.
- The Multi-point Heater should be earthed. Improper grounding may result in malfunctioning of ELCB. Never use the Multi-point Heater if there is a doubt on the grounding installation.
- Do not switch ON the electrical supply until the front cover has been fitted.
FEATURES AND FUNCTIONS
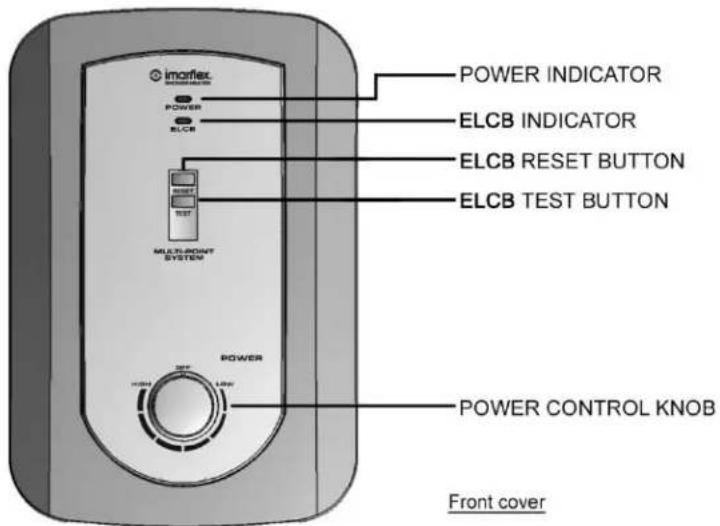
Light Indicators
- POWER: As soon as the Power Control Knob is turned clockwise the indicator will turn ON but if the water pressure is not enough the power light indicator will still OFF then the Multi-point Water Heater is not functioning.
- ELCB: It indicates that there is no electric leakage in the system and the Multi-point Water Heater is safe to use.
Control
- POWER CONTROL KNOB: to set the desired water temperature.
- TEST BUTTON: to simulate the ELCB (Electronic Leakage Circuit Breaker). Once you press this button, the unit will automatically shut OFF.
- RESET BUTTON: to activate the unit.
NOTE:
- ELCB (Electronic Leakage Circuit Breaker)- this is a safety device that detects an electrical leakage and turns the unit OFF to protect the users.
HOW TO USE
- Turn the main water valve ON.
- Adjust the Power Control Knob to the desired water temperature.
- Turn the tap outlet ON or until the water flows from the faucet / shower head, the Multi-point Water Heater will automatically turn ON.
- Turn the tap outlet OFF and the Multi-point Water Heater will automatically turn OFF.
NOTE:
- The temperature of the water can be altered by adjusting the water control knob of the tap outlet.
TROUBLE SHOOTING GUIDE
| Symptoms | Possible Causes | Solutions |
| Water is too cold | Too much water is flowing through the shower heater. Defective heating element. Water pressure is below minimum of 14psi. The wiring is open circuit. | Reduce the flow rate of the water via tap outlets. Change the heating element assy. Check the main water valve if it is fully open Have a qualified electrician to check the electrical wirings. |
| Water is too hot | Not enough water is flowing through the water heater. | Increase the flow rate via the tap outlet |
| Shower heater is switching off during operation | Interruption of main electrical supply ELCB activates due to possible electrical leakage. | Check the breakers, switches and supply cabling Check electrical leakage and press the Reset Button. |
| The water stop flowing | Blockage in the shower head, twisted or blocked flexible shower hose. No water supply. | Clean / change the shower head, check and clean the shower hose. Replace if necessary. Check if the water supply is open and no blockage. |
| Water temperature varies from hot to cold during operation | Water pressure has dropped below the minimum level. | Increase the hot water supply. |
Brand : Imarflex
Model : ISH-6500MP
Category : Water heaters and boilers