PLCMDVR7G - Camcorder Pyle - Free user manual and instructions
Find the device manual for free PLCMDVR7G Pyle in PDF.


| Product Type | Camcorder |
| Brand | Pyle |
| Model | PLCMDVR7G |
| Dimensions (L x W x H) | 5.5 x 6.5 x 3.5 inches |
| Weight | 1.2 lbs |
| Power Source | Rechargeable lithium-ion battery (7.4V, 1400mAh) |
| Video Resolution | 1920x1080p (Full HD) at 30fps |
| Photo Resolution | 16 megapixels (interpolated) |
| Display | 3.0-inch TFT LCD screen |
| Optical Zoom | 8x digital zoom |
| Image Stabilization | Electronic image stabilization |
| Storage Media | SD/SDHC card (up to 32GB, not included) |
| Connectivity | USB 2.0, HDMI mini, AV output |
| Main Functions | Video recording, photo capture, playback, night vision mode (infrared), time-lapse |
| Cleaning Instructions | Wipe exterior with a soft, dry cloth. Avoid liquids. Lens cleaning: use a lens brush or microfiber cloth. |
| Safety Precautions | Keep away from water and extreme temperatures. Do not disassemble. Use only approved charger. |
| Spare Parts Availability | Battery and charger available from Pyle or authorized dealers. Other parts may be limited. |
| Repair Service | Contact Pyle customer support for repair options. Do not attempt self-repair. |
| General Information | Includes user manual, USB cable, AV cable, battery, charger, and carrying case. |
Frequently Asked Questions - PLCMDVR7G Pyle
User questions about PLCMDVR7G Pyle
0 question about this device. Answer the ones you know or ask your own.
Ask a new question about this device
Download the instructions for your Camcorder in PDF format for free! Find your manual PLCMDVR7G - Pyle and take your electronic device back in hand. On this page are published all the documents necessary for the use of your device. PLCMDVR7G by Pyle.
USER MANUAL PLCMDVR7G Pyle
natural_image
City skyline at dusk with illuminated skyscrapers and city lights, no visible text or signage
PLCMDVR7G

Multi-Function Rearview Mirror System GPS Navigation, Bluetooth, DVR Recording
Pyleaudio.com
Contents
1 Warning & Notes
2 Button Control & System Layout
3 Bluetooth
4 Main Menu Interface
5 Media Browser
6 Settings Menu
7 'Carcorder' Menu & Settings
8 Accessories Included
9 Mounting / Installation
10 Wring & Installation
11 Troubleshooting
*For additional information visit www.PyleAudio.com
Congratulations and thank you for purchasing the Pyle PLCMDVR7G Mirror Car Navigation & Camera System. We hope you will enjoy using this exciting product and trust that it will make your driving experience more comfortable and hassle-free. The PLCMDVR7G provides an easy-to-use touch screen user interface, and innovative functionality in a mirror housing that mounts in place of your existing rearview factory mirror. The unit also has important safety features for safe operation and optimal performance. Please read and refer to this owner manual carefully. If you have any further questions about this unit, please visit pyleaudio.com for product support. Please carefully read the entire owner manual before using the product.
www.pyleaudio.com
GPS Navigation
*Make sure to have Inserted a micro SD card with map data to begin using GPS navigation.
This unit receives the signal from satellites with the GPS signal receiver antenna to search the destination / route to display it onto the mirror monitor's LCD display. The GPS system typically calculates the best (fastest) and safest route possible.
Safety Notes & Warnings - Important Information
The Mirror Car Navigation & Camera System is intended to provide reliable and accurate GPS navigation directions that will help you quickly reach your designated route. The system was designed for automobile vehicles. It is recommend that you read and follow all information and instructions in this manual for optimal unit performance and to take full advantage of the unit's features.
Please take caution when operating the touch screen panel. Make sure to keep the panel clean, avoiding the use of excessive moisture, or harsh chemicals. Do not use rough, sharp or pointy objects to control the touch screen interface.
The Mirror Car Navigation & Camera System should be used along with regulatory driving principles. The route suggestions should never go against any local traffic laws or regulations, personal judgment of driving knowledge or any other practice of safe driving fundamentals. Before making any turns, or traveling any routes insisted by the PLCMDVR7G GPS navigation system, please be sure that the suggest driving practice can be completed legally and safely. Drive carefully!
Do not rely on the Mirror Car Navigation & Camera System to locate emergency services or establishments. The GPS maps and software may not include all emergency services available, or there may be newer emergency services available. Please call 911 in an emergency situation.
Adjust the volume level on the Mirror Car Navigation & Camera System to an appropriate level so you will be able to hear outside traffic and emergency vehicles.
To reduce interference and possible irregular operation, please try to keep the GPS antenna away from smart phones, cell phones, tablets or other wireless devices. The wireless frequency and signals of these devices may weaken or interfere with the Mirror Car Navigation & Camera System's GPS satellite signal.
Settings should be adjusted and configured once your vehicle is parked, or you are in a safe position away from traffic. Do not attempt to operate the Mirror Car Navigation & Camera System while in motion.
Do not mount Mirror Car Navigation & Camera System in the deployment area of vehicle airbags. The system should be mounted mimicking the original factory's, OEM, rearview mirror assembly (at eye level - or slightly above). Please make sure to apply adequate glue and to assure the mirror assembly is strongly, and safely, affixed to your windshield.
Mount the Mirror Car Navigation & Camera System in a safe location, like in place of your existing rearview mirror. Make sure, once installed, that the Mirror Car Navigation & Camera System does not interfere with normal driving practices or does not obstruct the view of the road, of the driver. Make sure to have clear visual access to all mirrors once installed.
Only refer to the technical support of a Pyle service technician, or similar vehicle specialist, when servicing, installing or troubleshooting the Mirror Car Navigation & Camera System. Avoid opening the system and self-servicing the Mirror Car Navigation & Camera System. For technical support and troubleshooting, please contact Pyle. If you feel the unit does not function as advertised, is damaged, or performs irregularly, please contact Pyle. Changes or modifications to the Mirror Car Navigation & Camera System will result in void of the unit's warranty.
Choking Hazard: small parts present in the packaging of the Mirror Car Navigation & Camera System.
Avoid excessive exposure to heat, moisture, smoke, sunlight, cold.
Drive safely!
Button Control & System Layout

A B C D E F

Mirror Assembly Control
A Microphone
B Video (Camera) Display
C Volume Down
D Power
E Volume Up
F Menu / Back to Video Display
G LCD Monitor
H Mirror
Built-in Speaker
J GPS Antenna Input
K Power & Wiring Cable
L Adjustable Camera
M Micro SD (for Media Playback)
N USB Port
O Micro SD (for GPS Maps)
P Micro SD (for DVR - Recording)

Bluetooth

Bluetooth Interface Layout
| 1 | Search Bluetooth Device |
| 2 | Pairing Mode |
| 3 | Disconnect |
| 4 | Dial Pad |
| 5 | Phonebook |
| 6 | Call Records |
| 7 | Settings |
| 8 | Bluetooth Music Streaming |
| 9 | Delete (Phonebook Records) |
| 10 | Download Phonebook |
| 11 | Voice Switch |
When pairing the Mirror Car Navigation & Camera System, the Bluetooth network name should appear as 'CAR_KITT' in your device.
*When pairing, if prompted, use the default password 0000.
To access Bluetooth ability, press the 'BT' icon on the LCD display monitor interface's home screen. If the home screen does not appear on the LCD display, press the 'Menu' button located on the bottom-middle of the mirror assembly.
Download Phonebook: Once in the 'Phonebook' screen, you can press the 'Download Phonebook' icon to download the contacts saved in your device.
Voice Switch: You can change the speaker from which you hear your Bluetooth phone calls. Choose between your phone and the vehicle system.
Main Menu Interface


Layout & Control
A Main Menu / Video
B Time
C Volume
D Connectivity Icons
E Media Browser
F Settings
G DVR - Video Display
H GPS Navigation
1 Bluetooth
Media Browser
Playback & Control
| AUX | Control & Playback |
| SD | your inserted media |
| USB | device / flash memory |
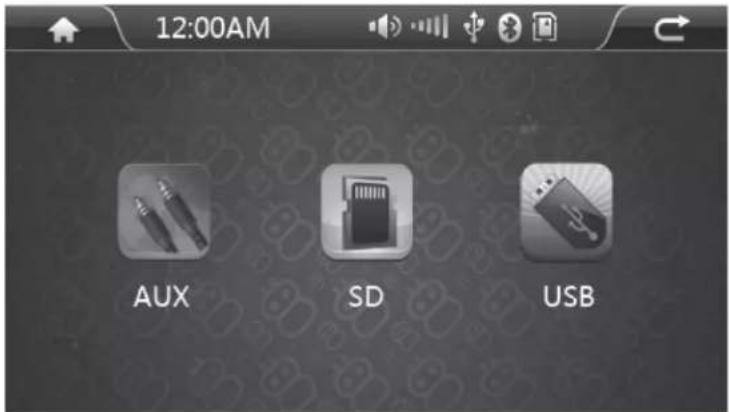
Take note of the side-loading micro SD card slots and USB port. Pay attention to the labeled micro SD cards slots as each serves a purpose. The 'DVR' slot saves video recordings and images, the 'GPS' slot is for the micro SD card with GPS maps, and the 'SD' slot is for media playback. The USB port s also for media playback. The user can access music, image and video files from this menu.
*Please make sure to use class 10 micro SD cards for maximum performance.
Maximum micro SD card support: 64GB
Maximum USB flash drive support: 32GB
Settings Menu

In the 'Settings Menu' interface, you can access device configuration and adjust accordingly. Choose from options like FM Frequency Output Settings, Time, Wallpaper, Picture Adjustment, Audio EQ and more.
The 'Set Navi' screen shows you the destination of the file of GPS maps used to navigate you to the desired destination. The destination file is located on the micro SD card.
*Troubleshooting Tip: In case of system reset, or failure to acquire GPS maps navigation, the file should point to 'EXE' within the 'Set Navi' options screen.
FM Out: Set the FM Transmitter ON / OFF. Also choose the FM frequency.
Set System: The main system settings can be found here. Options include the device's power-on startup logo, GPS monitor and calibration, reverse volume, language selection and more.
Set Time: Set the date and time to be used in accordance with the watermark.
Video: Brightness, contrast and hue settings adjustment.
Wallpaper: Set the background for the mirror monitor's LCD display.
Sound: Fade and balance vehicle audio.
EQ: Choose presets like pop, classic, soft, rock, jazz or a custom user-defined setting.
'Carcorder' Menu
Find the 'Carcorder' settings by pressing the 'Car DVR' icon at the main menu interface.
Carcorder - Car Video Recorder
| A | Snap Picture |
| B | Record Video |
| C | Record SOS Video |
| D | Microphone (Audio Record) |
| E | Next Page of Options |
| F | Previous Page of Options |
| G | Browse Captured Media |
| H | Change Camera View (PiP) |
| I | 'Carcorder' Settings |
| J | Format SD Card |

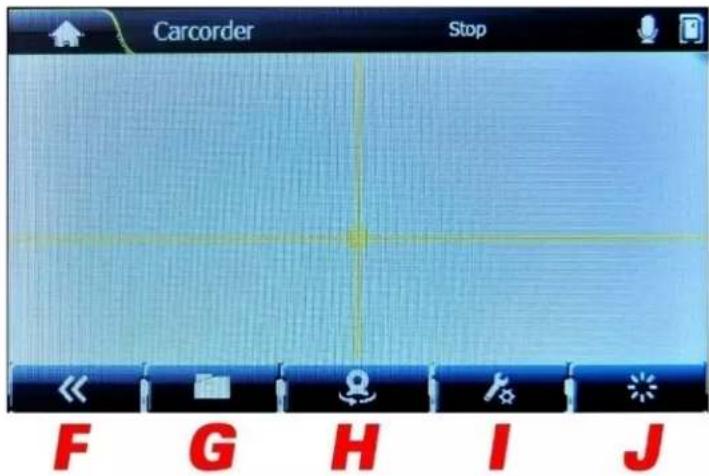
SOS Recording
When recording a video, the PLCMDVR7G will record a video file in loop mode - continually recording. When storage space on your inserted micro SD card reaches capacity, the DVR will being to overwrite previously recorded video to progressively record. Earlier recorded videos will be replaced by new videos and will not be saved onto the micro SD card. To prevent older videos from being 'overwrited' please stop recording by pressing the RECORD VIDEO icon.
G-Sensor
The unit also features G-Sensor recording that automatically triggers video recording in case of impact or collision. Upon G-Sensor activation, the unit will continue to loop record however, the file will not be 'overwrited' or replaced by a new video file recording. This file can be deleted via the PLCMDVR7G's file browser, or when you insert the micro SD card into your computer and managed thereafter.
*While recording video, manually record an SOS file by pressing the button on the interface.
File Browser (G)
Playback your video and image files. You also have the option to delete them by pressing the garbage pail icon towards the top right of the screen.
Camera View - PiP (H)
Your connected camera inputs can be controlled through this option. Press the button to switch between connected camera views. Continue to press the button to change views, which then activates the PiP (Picture in Picture) ability.
*When recording a video, the PLCMDVR7 will record video from all connected cameras. Once at the media playback screen, after choosing the selected file, you will be able to select from which camera video you would like to view. The unit saves separate files for each connected camera at the time the file was recorded.
Car DVR Settings (I)
- The Car DVR 'Carcorder' settings allow you to customize the recording experience:
- Turn ON/OFF the time stamp (Time Mark)
- Turn ON/OFF voice recording (Record Mark)
• Light Frequency Setting: 50Hz/60Hz - Sensitivity Set (for G-Sensor impact recording): Close, Low, Mid, High
• Factory Settings Reset: Recover Default Settings
GPS Navigation
The PLCMDVR7G features built-in iGo™ GPS Navigation Software. To access the software and navigate to a desired destination press on the 'Navi' icon on the main menu interface display.
Accessories Includes
| 1 | Rearview mirror mount assembly |
| 2 | Windshield mount extension arm |
| 3 | Wired GPS antenna |
| 4 | Video and power wiring harness |
| 5 | Stylus pen |
| 6 | Mounting hardware |
Mirror Assembly Installation/Mounting
Do not use excessive force for removal of your existing mirror assembly.
Do not route wiring over sharp metal edges or allow it to be pinched behind any trim to avoid causing an electrical short or break in the wire.
Manufacturer/distributor is not responsible for installation-related damage to the unit or your vehicle.
Be sure to proceed with caution with the mirror mount removal procedure.
Note that there are several versions of screw mount mirror systems and different methods and procedures must be used for the best results.
Using a small flat-blade screwdriver, or razor blade, carefully 'cut-away' at the area where the windshield meets the mirror extending arm. Gently apply a small amount of additional upward force to separate the mount from whatever glue-backing or adhesive is present.
Be sure to completely clean the area and remove and debris or older glue or adhesive that held your original rearview mirror assembly. Make sure the windshield is clean and dry before attempting to mount the PLCMDVR7G.
Attach and tighten the extending arm onto the PLCMDVR7G before applying the unit to your windshield. Use, a strong double-stick adhesive pad, or glass glue, to secure the PLCMDVR7G to your windshield. *Not included with system.
Please make sure to position the GPS antenna in a location without obstruction and with a clear view to the sky, as the unit must receive satellite imagery for GPS navigation assistance. On top of your dashboard is a preferred mounting location for the GPS antenna.
With careful adjustment and modification, you will be able to run device wiring behind your trim and in your dashboard. Please be sure as not to damage any of your vehicle's components or circuitry and proceed with caution. Make sure nothing from the installation affects your driving ability or affects any safety or functions of your vehicle.
Please make sure the PLCMDVR7G is mounted in a similar, or an easier visually accessible location, as compared to your prior rearview mirror assembly.
Wiring & Installation
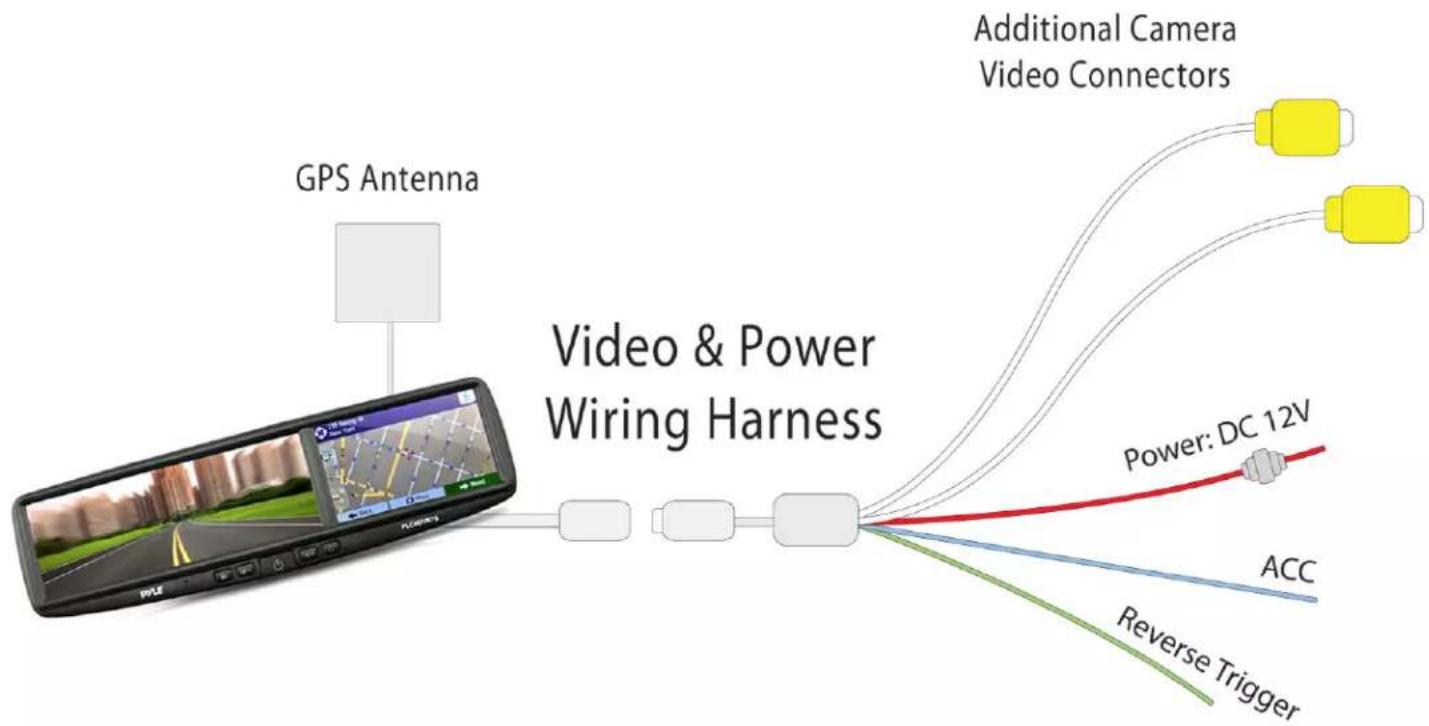
flowchart
graph LR
    A["GPS Antenna"] --> B["Video & Power Wiring Harness"]
    B --> C["Additional Camera Video Connectors"]
    C --> D["Power: DC 12V"]
    D --> E["ACC"]
    D --> F["Reverse Trigger"]
The PLCMDVR7G features a built-in, retractable and pull-out camera. Manually release the camera from the mirror housing and adjust to the desired viewing angle.

natural_image
Close-up of a black remote control device with attached camera and connector (no visible text or symbols)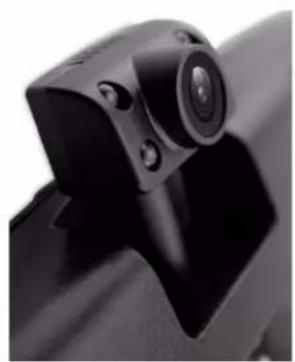
natural_image
Close-up of a black mechanical component with a circular lens and mounting bracket (no visible text or symbols)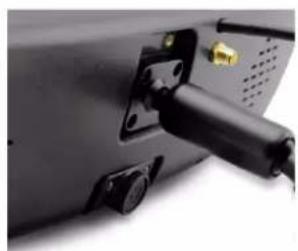
natural_image
Close-up of a black electronic device with a metallic connector and mounting holes (no visible text or symbols)*For additional installation support visit www.pyleaudio.com
| Problem | Probable Reason | Solution |
| Does not power on | Power cable not properly connectedHigh temperature may cause device not to power on | Check power cable is connected properlyPower off unit and let temperature cool down |
| No GPS signal | GPS antenna is not properly connectedUnit needs to boot up before receiving signalUnder bridge or tunnel receiving bad signal | Check GPS antennaWait for system to finish boot to receive signalDrive until you are in a clear area to receive signal |
| Unit powers off while in use | User input too many instructions at once and memory was overloaded | Restart device |
| Device panel flashes on and off continuously | Power cable is not properly connected | Check power cable |
| No voice guidance, lag in navigation or wrong picture | Device is reroutingRoad changed other than what navigation displays | This normal when system reroutesKeep driving until GPS catches upContinue driving until you receive a better signal |
*For additional support please contact Pyle technical support, www.pyleaudio.com
[Non-Text]
Follow Us On:
![Pyle PLCMDVR7G - [Non-Text] - 1](/content/2026/05/997305/images/b25c26fc36872efc77861174cf2d4578dc9ce5573b7ef3bdce241f2846678874.jpg)
![Pyle PLCMDVR7G - [Non-Text] - 2](/content/2026/05/997305/images/a320ebad5ce27217ffd8617c046982968f9df802a05a15b83e583e9ff550da45.jpg)
![Pyle PLCMDVR7G - [Non-Text] - 3](/content/2026/05/997305/images/c2551ad999b70dba4b8ff8ea6ef0ccfa7f42b1dd50a3fdf60728a6a2bd4b064c.jpg)
Visit Pyleaudio.com
1600 63rd Street. Brooklyn. NY 11204
- Multi-Function Rearview Mirror System GPS Navigation, Bluetooth, DVR Recording
- Contents
- GPS Navigation
- Safety Notes & Warnings - Important Information
- Button Control & System Layout
- Mirror Assembly Control
- Bluetooth
- Main Menu Interface
- Layout & Control
- Media Browser
- Playback & Control
- Settings Menu
- 'Carcorder' Menu
- Carcorder - Car Video Recorder
- SOS Recording
- G-Sensor
- File Browser (G)
- Camera View - PiP (H)
- Car DVR Settings (I)
- Mirror Assembly Installation/Mounting
- Wiring & Installation
- [Non-Text]
Brand : Pyle
Model : PLCMDVR7G
Category : Camcorder