PLCMDVR42 - Camcorder Pyle - Free user manual and instructions
Find the device manual for free PLCMDVR42 Pyle in PDF.


| Product Type | Digital Camcorder |
| Brand | Pyle |
| Model | PLCMDVR42 |
| Dimensions (approx.) | 4.5 x 2.5 x 1.8 inches |
| Weight | 0.5 lbs (225 g) |
| Power Source | Rechargeable Lithium-Ion battery (3.7V, 1200mAh) via USB |
| Recording Resolution | 1080p Full HD (1920x1080) at 30fps |
| Storage | microSD card up to 32GB (not included) |
| Lens Type | Fixed focus, wide angle |
| Display | 2.0-inch TFT LCD screen |
| Main Functions | Video recording, photo capture, playback, time-lapse, loop recording |
| Connectivity | USB 2.0, HDMI output |
| Audio | Built-in microphone and speaker |
| Night Vision | Infrared LED for low-light recording |
| Mounting | Standard tripod mount (1/4 inch) |
| Maintenance & Cleaning | Clean lens with soft cloth; keep away from moisture |
| Safety Concerns | Do not disassemble; avoid extreme temperatures |
| Spare Parts & Repairability | Battery and charger available; contact Pyle support for repairs |
| General Information | User manual available in PDF; compatible with Windows and Mac |
Frequently Asked Questions - PLCMDVR42 Pyle
User questions about PLCMDVR42 Pyle
0 question about this device. Answer the ones you know or ask your own.
Ask a new question about this device
Download the instructions for your Camcorder in PDF format for free! Find your manual PLCMDVR42 - Pyle and take your electronic device back in hand. On this page are published all the documents necessary for the use of your device. PLCMDVR42 by Pyle.
USER MANUAL PLCMDVR42 Pyle
natural_image
Exterior view of a red car front-mounted display with cable and connector components (no text or symbols visible)PLCMDVR42
Backup Camera Parking Assist System
Dual Cameras and Monitor with Image & Video Recording
Please read all of the installation instructions carefully before installing the product. Improper installation will void manufacturer's warranty. The installation instructions do not apply to all types of vehicles, and are written as guidelines to assist in installing the system. Please consult an experienced technician if you are not comfortable installing the product. Prior to using and installing the Backup Camera System, please read the safety information provided in this user manual. Be sure to use the product as outlined in this user manual. Altercation or modifications carried out without appropriate authorization may invalidate the user's right to operate the equipment.
WARNING: Failure to read and follow these warnings and instructions may result in serious injury, including damaged property, so please pay close attention and exhibit the utmost care.
The Digital Backup Camera is designed as an aid to the driver in detecting potentially hazardous driving conditions, obstructions, and large stationary objects. You, the driver, must also remember to drive safely and properly. Use of the Digital Backup Camera is not a substitute for safe, proper and legal driving practices.
Never back up while looking only at the screen. You should always check behind and around the vehicle when backing up just as you would if the vehicle did not have the Digital Backup Camera. Always make sure your driving area is clear. Always back up slowly and with caution.
Never depend on the Backup Camera entirely when backing up. The image on the screen is different from actual and real-time conditions. Objects viewed in the rear view monitor differ from actual distances because a wide-angle lens is used. So use the camera as an aid and always follow intended driving practices to properly judge distances from objects.
The Backup Camera's assisted low lux lighting performance feature is also an aid to a driver. Always use your own eyes to confirm the vehicle's surroundings, as the displayed image may be not well lit or not entirely visible. Always proceed with caution and perform double-checks before proceeding.
The area displayed by the Backup Camera is limited. It does not display objects that are close to or just below the bumper, underneath the vehicle, or objects out of the camera's view. The camera's view can change according to your vehicle's orientation on the road or changing road conditions.
Be sure to always check the camera is properly functioning, is properly positioned and securely mounted.
Make sure your trunk or hatch operates correctly, as intended, before and after installation.
Proceed with caution when cleaning your vehicle around the camera. Avoid excess water exposure around the camera especially with spraying or a power washer.
Please make sure to keep the camera clean and unobstructed from any debris
Follow all traffic laws and motor vehicle regulations.
Consult local laws and regulations for any restrictions on installation or use.
Using a Backup Camera System is not adequate enough to completely eliminate a vehicle's blind spot. Always remember to drive with caution, following all traffic laws.
System Installation and Wiring
Camera System installation on diesel vehicles may require a slightly different wiring install. These installation instructions do not apply to all types of vehicles. They are meant only as a general guide due to the large number of vehicle makes and models. Consult your local motor vehicle laws on the use of this product to be sure it is permitted. Through installation of this backup camera system, you should be sure as to not degrade, damage or compromise the safety of any system or device on your vehicle. Improper installation and wiring of the vehicle back-up camera system may damage the vehicle's electrical system, including vital vehicle computer and operating systems. That could lead to an accident or fire, causing property damage and /or serious personal injury. It is highly recommended to seek professional installation advice from a qualified auto electrician or, in the alternative, to have the installation performed by a qualified auto electrician.
Please ensure that your monitor is secured and mounted where it would NOT obstruct any OEM vehicle safety features. In an event of an accident, manufacturer is not responsible for bodily injury caused by the monitor being a projectile. Select location for mounting the monitor in desired location. Ensure monitor location will not obstruct your vision while driving. The manufacturer assumes no liability for damage caused to your vehicle due to improper installation or use.
Caution: This unit is designed to operate on a 12V/24V DC NEGATIVE GROUND electrical systems. Connecting to other types of electrical systems will cause damage to your vehicle. Please contact the manufacturer if you are unaware of the system type in your vehicle.
Quick Installation (*Refer to the installation diagram found later in this user manual):
The backup camera system is compatible with a wide range of vehicles and video display monitors.
This kit includes necessary wiring and cable connector accessories sufficient for typical connections. However, additional accessory cables and installation materials may be necessary for a completely secure and operational backup camera performance.
Connect the camera, using the DC 12V power and video harness cable. Connect the red wire to the positive 12V reverse tail light in the rear of your car. You may need to temporarily remove an interior panel or other cover. Then, connect the black wire, and ground properly. Then, on the power and video harness cable, use the camera connector cable to connect to the exterior mount camera. This connection will supply power to the camera directly. (Red wire is positive, black wire is negative).
Then, connect the power and wiring harness to the video mirror assembly. It will appear as the 'AV' Input located on the top side of the rearview mirror assembly.
To connect the rearview mirror monitor assembly, use the included rubber straps to mount the assembly over your existing rearview mirror. (The mirror assembly also features a camera that faces the front of your vehicle). The included cigarette lighter accessory cable allows you to directly power the mirror monitor assembly via the DC power lighter receptacle. Simply connect the cable to your vehicle, then to the mirror monitor's USB connector.
- Mount your exterior camera in the desired location, then connect the included RCA video cable, from the camera, and run the cable through to your video display's RCA connection. Make sure to route all cables and wiring in the least obtrusive route possible as to avoid conflict with other vehicle circuitry and to ensure a safe and stable installation/connection.
Rearview Mirror Mounting
The system includes rubber straps that allow you to mount the mirror monitor assembly onto your vehicle's existing rearview mirror. The rearview mirror assembly comes equipped with built-in microphone for sound recording, speaker for audio playback (for your videos) and adjustable angle camera. This camera features the ability to snap pictures and record video while it's mounted inside your vehicle. Manually adjust the angle of the camera to position exactly where needed. The mirror monitor assembly also features button controls.

Button Eject Switch
Hit the button control eject switch, located on the underside of the mirror monitor assembly. This will reveal the touch button controls and will allow you to navigate the system's interface and control settings. From here, you will be able to record video, snap pictures, adjust picture settings and playback your recorded media.

User Control Interface
The 'Main Screen' or user interface is where you can take control.
| Control Mode | User can distinguish whether he will record video (with the video film icon appearing), capturing images (with the camera icon appearing) or playing back media files (with the play button appearing). |
| Mode Quality | See what resolution you are capturing media |
| Input Camera Selection | A: Interior camera located on the mirror assemblyB: Exterior cameraAB: PiP Picture-in-Picture ability, displays both the front mirror mounted video along with the exterior mounted backup camera (PiP ability available with Video Mode Only) |
| Micro SD Card Icon | Indicates whether a compatible Micro SD card is inserted |
| Battery Indicator | Displays battery level of the mirror monitor assembly unit |
| Mic Inindicator | Indicates whether audio is being recorded with your videos |
| Record Time / Images Remaining | Based on your inserted Micro SD card (32GB Max.) This displays the amount of images remaining available to take with your memory capacity, the length of your recorded video, or the amount of time left to record video. |
| Date / Time | Allows you to set the date & time for time stamping your media |
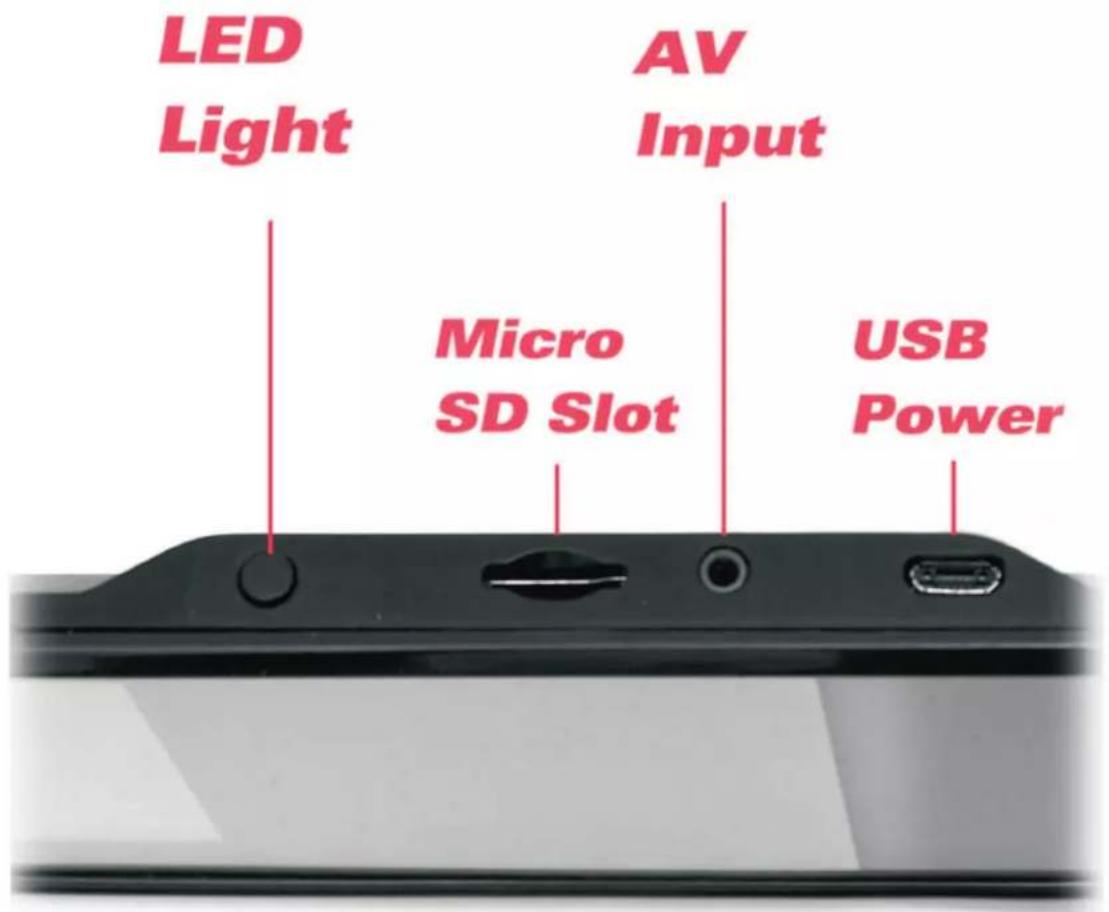
User Input Control
| LED Light | Projects a strong front facing LED light, into the direction for the front facing camera, located on the mirror mount assembly |
| Micro SD Card Slot | Max compatibility 32GB |
| AV Input | Used for connecting the power and video wiring harness, which then connects to the exterior mount camera |
| USB Power | Used for connecting the cigarette lighter DC power cable, which then provides power to the mirror mount assembly |
Capture Images
Press 'OK' while in the 'Camera Mode' to capture a photo.
Record Video
Press 'OK' while in the 'Video Mode' to record a video.
Record Time
In the video settings menu, the 'RT' section allows you to choose a time at which the PLCMDVR42 will automatically record videos and save in a continuous pattern. The system will make sure to continue to record and 'save over' your unwanted recording videos.
Recording
The system stops recording once the SD card is full or if the record option is turned OFF.
G-Sensor
Activate the G-Sensor in the settings menu to allow saving and locking the recording files in the event of sudden impact or an accident. Emergency File Save
When in video recording mode, press 'Mode' to prevent that file from being overwritten by circular recording. Once you select a
Playback Media
While in the playback mode, press the up and down arrows to cycle through your captured media, then press OK to view your media.
Model: PLCMDVR42
HD Rearview Mirror Monitor and Dual Camera System with Hi-Res Video Recording, Image Capture, Night Vision Illumination, Motion Impact Recording, (2) Cameras, Built-in 4.25" Screen Display, Built-in Distance Scale Lines, Parking Assist
ξ Dual Camera and Rearview Mirror Monitor System
ξ Rubber Straps Mount the System Over Your Existing Mirror
ξ Easily Snap Pictures and Record Video
ξ Transfer Files to Computer to Save & Share
ξ Includes (2) Cameras and 4.25" Video Screen Display Monitor
ξ Exterior Mount Waterproof Camera (Rear Vehicle Recording)
ξ Camera Located on the Mirror (Front Vehicle Recording)
ξ Micro SD Card Slot (Supports up to 32 GB)
ξ PiP Function: Picture-in-Picture Ability to See Both Cameras On-Screen
ξ Switchable to View Either Camera on the Video Screen Display
ξ Night Vision Illumination and Low Light Performance, 0.2 LUX
ξ Built-in Distance Scale Lines (Exterior Mount Camera)
ξ Marine Grade Waterproof Construction, IP68 (Exterior Mount Camera)
ξ Convenient Parking Assist System Adds Safety & Reliability
ξ Record Video from One or Both Cameras
ξ Quickly Mount and Un-mounts
ξ Slide-Out Touch Button Menu Controls
ξ User-Friendly Interface Display
ξ Auto Record Function: Automatically Records on Vehicle Start
ξ Includes All the Necessary Cables & Wiring
ξ Brightness, Exposure and Color Adjustment Settings
ξ Video Frequency Selectable: 50/60Hz
ξ Watermark / Date Stamp: ON/OFF
*Can be hard-wired or powered via included cigarette lighter accessory cable
LCD Display:
Hi-Res 4.25" Full Color Video Display
Monitor is Built-into the Rearview Mirror Assembly
Display Screen Can Be Powered Off for Full Mirror Use
Instantly Preview Your Images and Video On the Display Screen
Video Recording:
Choose Between 1080p and VGA
1080p: 1920 x 1080 Pixels
VGA: 640 x 480 Pixels
Record Modes: Front, Back or Double Record
Video File Format: .mp4
Image Capture:
Choose Between 1, 2 or 3 Mega Pixel Images
Image File Format: .jpeg
Rearview Mirror Assembly Dimensions
(L x W x H): 12.1" x 1.3" x 3.3" - Mirror Size (L x H): 11.5" x 2.80"
PLCMDVR42

flowchart
graph TD
    A["Camera Power Connection Cable"] --> B["Connects to Mirror Assembly"]
    B --> C["Monitor Cigarette-Lighter Power Cable"]
    C --> D["...to vehicle's Reverse Lights"]

PyleAudio.com
- PLCMDVR42
- Backup Camera Parking Assist System
- System Installation and Wiring
- Rearview Mirror Mounting
- Button Eject Switch
- User Control Interface
- Capture Images
- Record Video
- Record Time
- Recording
- G-Sensor
- Playback Media
- Model: PLCMDVR42
- LCD Display:
- Video Recording:
- Image Capture:
- Rearview Mirror Assembly Dimensions
Brand : Pyle
Model : PLCMDVR42
Category : Camcorder