
SC-U11 MA - Vacuum Cleaner SANYO - Free user manual and instructions
Find the device manual for free SC-U11 MA SANYO in PDF.


| Product Type | Canister Vacuum Cleaner |
| Brand | Sanyo |
| Model | SC-U11 MA |
| Color | White and Green |
| Dimensions (L x W x H) | 40 x 30 x 25 cm |
| Weight | 4.5 kg |
| Power Supply | 220-240 V, 50/60 Hz |
| Power Consumption | 1200 W |
| Dust Capacity | 2.0 L |
| Filtration System | HEPA Washable Filter |
| Dust Bag Type | Reusable cloth bag |
| Cord Length | 6 m |
| Cleaning Radius | 8 m |
| Noise Level | 78 dB |
| Main Functions | Dry vacuuming for carpets and hard floors |
| Included Accessories | Floor brush, crevice tool, dusting brush, upholstery nozzle |
| Vacuum Hose | Flexible hose, 1.5 m |
| Handle | Ergonomic grip |
| Safety Features | Thermal overload protection, automatic cord rewind |
| Maintenance | Washable filter; replace dust bag when full |
| Repairability | Replaceable hose, nozzle, and filters |
| Certification | CE, RoHS |
Frequently Asked Questions - SC-U11 MA SANYO
User questions about SC-U11 MA SANYO
0 question about this device. Answer the ones you know or ask your own.
Ask a new question about this device
Download the instructions for your Vacuum Cleaner in PDF format for free! Find your manual SC-U11 MA - SANYO and take your electronic device back in hand. On this page are published all the documents necessary for the use of your device. SC-U11 MA by SANYO.
USER MANUAL SC-U11 MA SANYO
natural_image
Line drawing of a vacuum cleaner with coiled cable and ventilation slots (no text or symbols)SC-U11 MA
SC-U8 MA
SC-U9 MA
SC-U11 MA
SC-U8 WA
Contents
IMPORTANT SAFETY INSTRUCTIONS ...1
NAMES OF EACH PART ....3
PREPARATIONS BEFORE USE......4
USING THE VACUUM CLEANER......5
USING THE ATTACHMENTS ......6
DUST DISPOSAL....7
CLEANING AND REPLACING THE SECONDARY FILTERS....8
CLEARING BLOCKAGES IN THE SUCTION HOSE AND CLEANING THE AGITATOR ASSEMBLY....9
REPLACING THE BELT 10
TROUBLESHOOTING....11
IMPORTANT SAFETY INSTRUCTIONS
When using an electrical appliance, basic precautions should always be followed, including the following.
READ ALL INSTRUCTIONS BEFORE USING THE VACUUM CLEANER
WARNING – To reduce the risk of fire, electric shock or injury:
- Do not leave the vacuum cleaner when plugged in. Unplug it from the outlet when not in use and before servicing.
- Do not use outdoors or on wet surfaces.
- Do not allow it to be used as a toy. Close attention is necessary when used by or near children.
- Use only as described in this manual. Use only the manufacturer's recommended attachments.
- Do not use with a damaged cord or plug. If the vacuum cleaner is not working as it should, or if it has been dropped, damaged, left outdoors or dropped into water, return it to a service center.
- Do not pull or carry by the cord, use the cord as a handle, close a door on the cord, or pull the cord around sharp edges or corners. Do not run the vacuum cleaner over the cord. Keep the cord away from heated surfaces.
- Do not unplug by pulling on the cord. To unplug, grasp the plug, not the cord.
- Do not handle the plug or the vacuum cleaner with wet hands.
- Do not put any objects into the openings. Do not use with any opening blocked: keep free of dust, lint, hair and anything that may reduce air flow.
- Keep hair, loose clothing, fingers and all the parts of your body away from openings and moving parts.
- Do not pick up anything that is burning or smoking, such as cigarettes, matches or hot ashes.
- Do not use without paper bag and/or filters in place.
- Turn off all controls before unplugging.
- Use extra care when cleaning on stairs.
-
Do not use to pick up flammable or combustible liquids such as gasoline, or use in areas where they may be present.
-
Do not touch the agitator while it is spinning.
- Do not place any heavy items on top of the vacuum cleaner.
- Do not step on the hose or pull it too strongly.
- Do not pick up items such as pieces of waste paper or cloth which look as though they may cause the hose to become blocked.
- Do not clean or store the vacuum cleaner in places where there are high temperatures.
- Store the vacuum cleaner away from excessive humidity.
- When carrying the vacuum cleaner, hold it by the carrying handle.
- Before servicing the vacuum cleaner, allow all metal parts to cool first.
- Always depress the foot pedal release when adjusting the handle position of the vacuum cleaner.
- (For Special Areas only Australia, New Zealand, Singapore and Czecho.) If the supply cord of this appliance is damaged, it must only be replaced by a repair shop appointed by the manufacturer, because special purpose tools are required.
SAVE THESE INSTRUCTIONS
This vacuum cleaner is intended for household use only.
NAMES OF EACH PART
SC-U11MA SC-U9MA
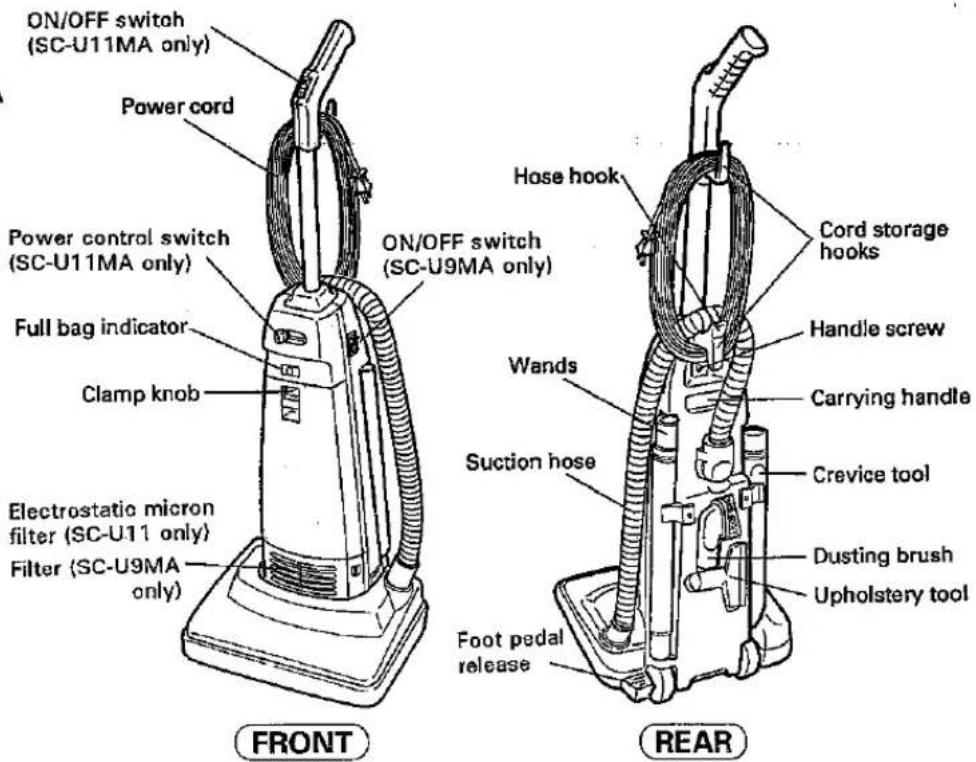
SC-U8MA SC-U8WA
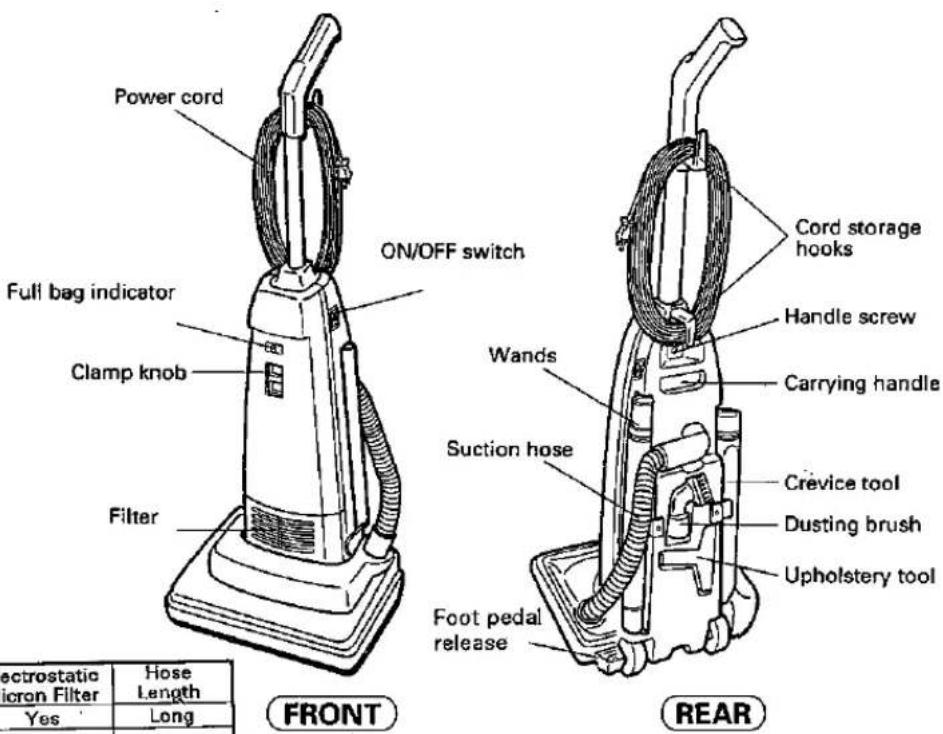
| Features Model | Power Control | Electrostatic Micron Filter | Hose Length |
| SC-U11MA | Variable | Yes | Long |
| SC-U9MA | 1-speed | No | Long |
| SC-U8MA | 1-speed | No | Short |
| SC-U8WA | 1-speed | No | Short |
WARNING:
Operate vacuum cleaner only at the voltage specified on nameplate.
PREPARATIONS BEFORE USE
Caution: Do not connect the power plug to the wall socket until assembly is completed.
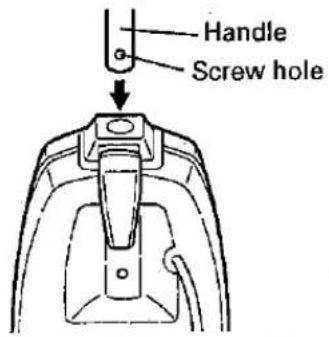
ATTACHING THE HANDLE TO THE VACUUM CLEANER
1 Insert the handle as far as it will go into the hole at the top of the vacuum.
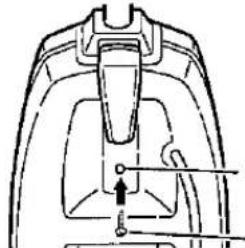
2 Locate the handle screw, and remove the tape covering the screw. Align the screw hole in the handle with the screw hole in the vacuum cleaner body, and insert the handle screw and tighten it as far as it will go.
natural_image
Technical line drawing of a mechanical component with no visible text or symbolsScrew hole - Handle screw
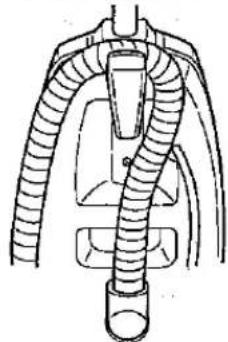
3 {SC-U11MA/U9MA ONLY} Hang the hose over the hose hook.
natural_image
Diagram of a mechanical device with coiled tubing and a cylindrical component (no text or symbols)WINDING THE POWER CORD
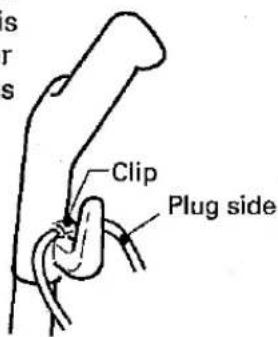
1 Hook the power cord over the clip which is located on the upper cord storage hook as shown.
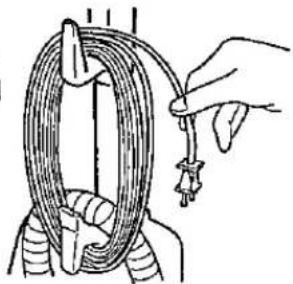
2 Wind the power cord around the cord storage hooks.
*Plug shown in figure may differ from actual plug attached to unit for your area.
natural_image
Illustration of a hand holding a coiled cable or wire, no text or symbols presentRELEASING THE POWER CORD
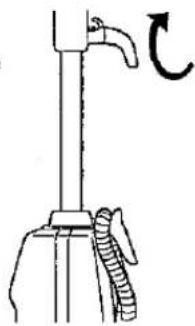
1 Rotate the upper cord storage hook downward.
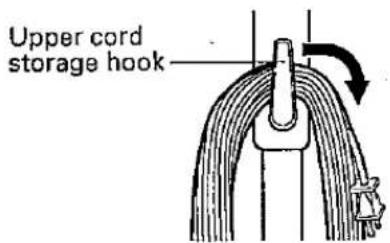
2 Return the hook to the upright position before attempting to rewind the power cord.
natural_image
Simple line drawing of a mechanical device with a curved arrow indicating rotation (no text or symbols)USING THE VACUUM CLEANER
ON/OFF SWITCH (SC-U8MA/U9MA/U11MA/U8WA)
1 Set the ON/OFF switch to ON ("1") to operate the vacuum cleaner.
2 Set the ON/OFF switch to OFF ("0") to stop the vacuum cleaner.
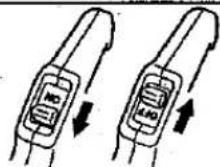
SC-U11MA only
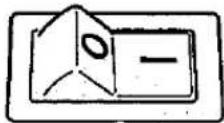
SC-U8MA/U9MA/U8WA only
POWER CONTROL SWITCH (SC-U11WA ONLY)
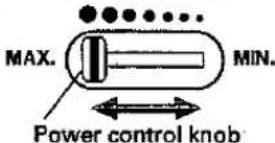
The suction force can be adjusted to several settings between MIN. and MAX.
1 To make the suction force strong, move the power control knob to the MAX. position.
2 To make the suction force weak, move the power control knob to the MIN. position.
MAX.: When a strong suction force is necessary for cleaning dust and dirt that is hard to remove.
MIN.: When a weak suction force is necessary in cases such as when you wish to clean quietly.
POWER CONTROL
FULL BAG INDICATOR
Checking the full bag indicator as a guide for when to replace the paper bag.
- If the full bag indicator displays a red color when the vacuum cleaner is operating and the main unit is lifted off the floor, this indicates that it is time to replace the paper bag. (For the SC-U11WA, set the power control switch to the MAX.position before checking.)
- The full bag indicator may also display a red color when the crevice tool is being used, however this does not indicate abnormality.
Caution
- If a lot of rubbish such as lint has been picked up, the full bag indicator may not display red even though the paper bag has become full.
- If a lot of sand and dirt has been picked up, the full bag indicator may display red even though the paper bag has not yet become full. In both the above cases, replace the paper bag.
ADJUSTING THE HANDLE
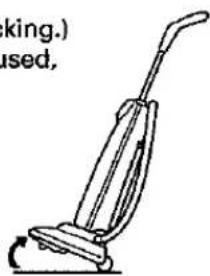
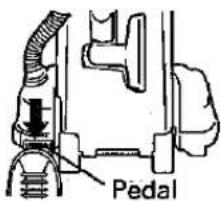
The handle of this vacuum cleaner can be set to one of three positions - Upright, Normal or Parallel. To release the handle, depress the pedal at the left rear corner of the vacuum cleaner.
Upright position
The handle is normally locked in this position for storage or when using the attachments.
Push the handle forward until it locks.
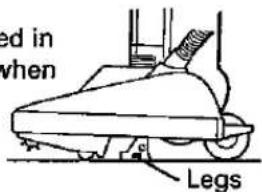
Normal position
This position is used for normal cleaning.
natural_image
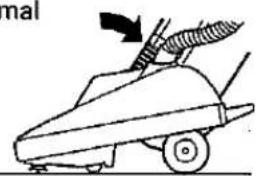
Diagram of a manual lawn saw with a tool, showing blade and handle (no text or symbols)Parallel position
This position is used for cleaning under furniture. To set to the Parallel position, depress the pedal at the left rear corner of the vacuum cleaner again.
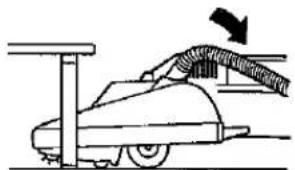
natural_image
Diagram of a mechanical device with a curved pipe and arrow indicating motion (no text or symbols)EDGE CLEANING
This vacuum cleaner is equipped with an "edge cleaning" function for cleaning carpet edges near baseboards and stationary furniture.
USING THE ATTACHMENTS
Caution: When using one of the attachments during cleaning, set the vacuum cleaner to the upright position.
1 Disconnect the hose from the vacuum cleaner.
- Pull the hose gently in the direction of the arrow to disconnect it.
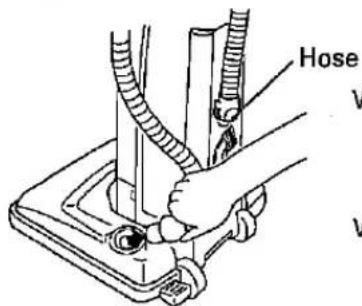
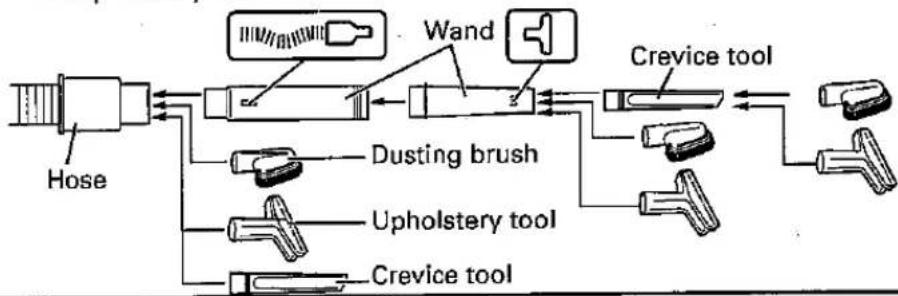
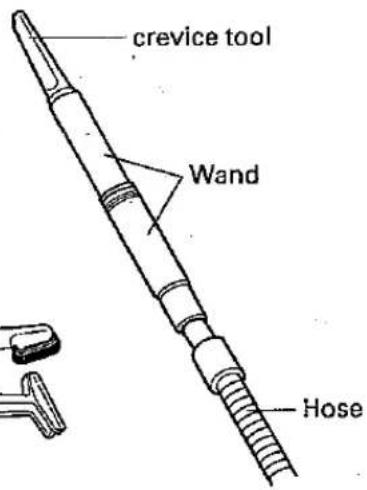
3 Install the wand to the hose.
- To achieve maximum reach with attachments, attach the crevice tool to the end of the wand.
- Securely and firmly connect the wand to the hose while twisting the wand, as shown in the illustration below.
- The end of the wand which has the marking of v_wam should be connected to the hose.
- The dusting brush and the upholstery tool can be attached directly to the wand, hose or the end of the crevice tool. Refer to the illustration for the correct way to position the dusting brush and the upholstery tool.
flowchart
graph LR
    A["Hose"] --> B["Dusting brush"]
    B --> C["Upholstery tool"]
    C --> D["Crevice tool"]
    D --> E["Crevice tool"]
    E --> F["Dusting brush"]
    F --> G["Wand"]
    G --> H["Crevice tool"]
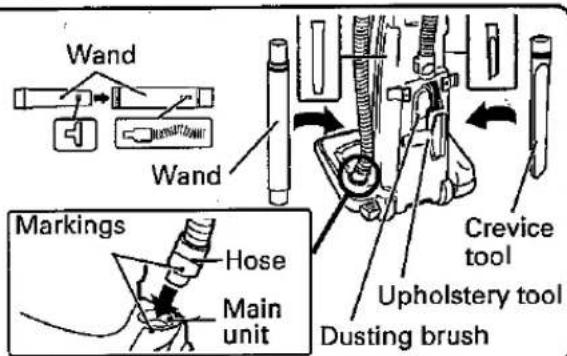
2 Remove the wand and crevice tool from the vacuum cleaner.
- The wand contains another wand in it. Pull out the second wand.
Caution: When removing the wand and crevice tool, pull them in the directions shown in the illustration below. Pulling them toward the back of the vacuum cleaner or pulling them forcefully may cause damage to the attachment ribs.
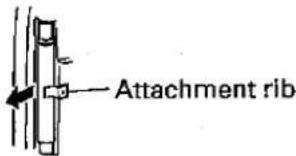
STORING THE ATTACHMENTS
When you have finished using the vacuum cleaner, replace the attachments in their original positions.
- Place one wand back into the other, as shown in the illustration to the right.
- Replace the wands and crevice tool aligning the markings on the attachments with the markings of the main unit.
- Firmly insert the hose into the main unit of the vacuum cleaner aligning the markings (.) on both.
DUST DISPOSAL
Caution: Be sure to turn the ON/OFF switch to the OFF position and disconnect the power cord from the wall outlet when you intend to dispose of the bag (in the case of paper bags) or its contents (in the case of cloth bags).
Always make sure the paper or cloth bag is installed properly before using.
(PaPer Bag Type)
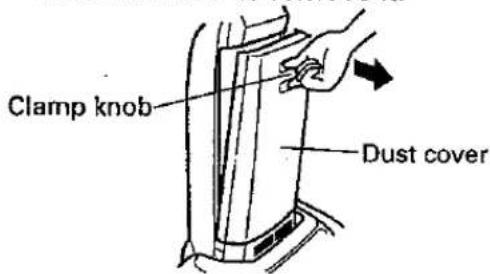
1 Press the clamp knob which is on top of the dust cover, and then pull the dust cover forward to remove it.
2 Hold the collar of the paper bag and carefully pull it forward to remove the paper bag.
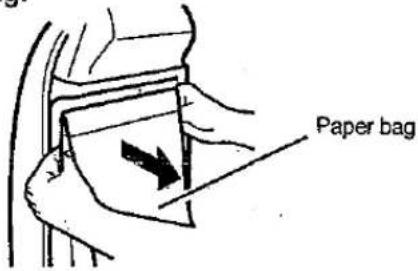
3 Place the vacuum cleaner in the parallel position. Unfold a new paper bag, and insert it by pressing the hole in the paper bag collar completely around the suction inlet.
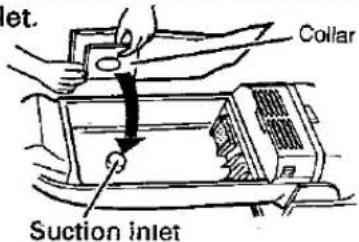
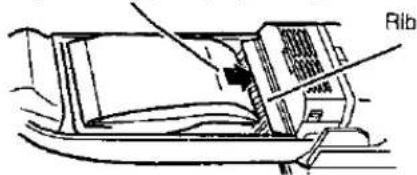
4 Spread out the sides of the new bag, and then place the bottom edge of the paper bag under the rib of the bag compartment.
Bottom edge of paper bag
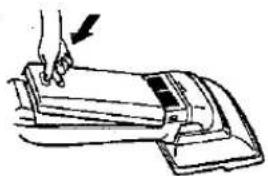
5 Return the dust cover to its original position.
natural_image
Illustration of a hand pressing down on a mechanical component (no text or symbols visible)Caution:
Be careful not to clamp the paper bag with the edge of the dust cover.
Caution: If the bottom edge of the paper bag is not placed under the rib, the dust cover may not close properly or suction performance may suffer.
(Cloth Bag Type)
- Removal and installation procedures are the same for both cloth and paper bag.
Emptying the bag
1 Remove the holder for the cloth bag and empty the contents of the bag. Reinstall the holder exactly as it was before.

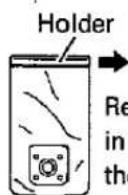
Maintenance
2 Wash gently in water, then hang to dry for approximately one day in a location away from direct sunlight.
Obtaining new paper bags
- You can obtain new paper bags from your nearest Sanyo dealer.
- Be sure to specify only Sanyo vacuum cleaner bags. If bags from any other manufacturer are used, it may have adverse effects on vacuum cleaner performance.
SC-PU1
CLEANING AND REPLACING THE SECONDARY FILTERS
Caution: Be sure to turn the ON/OFF switch to the OFF position and disconnect the power cord from the wall outlet before cleaning and replacing the filters.
CLEANING THE FILTER
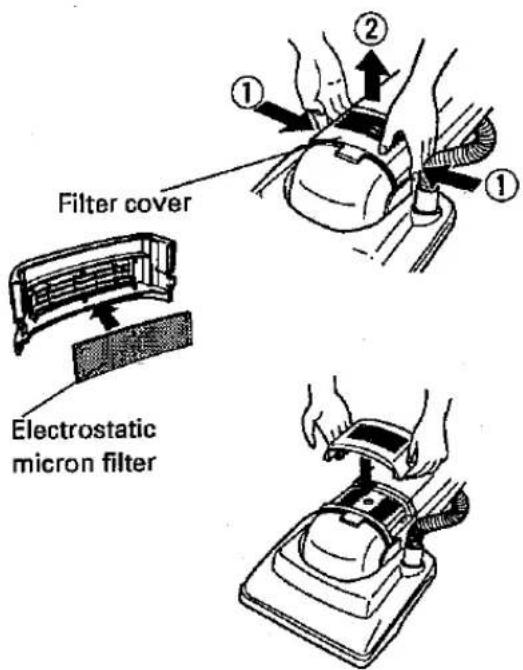
The secondary filters consist of an electrostatic micron filter (a general filter in the case of the SC-U8MA/U9MA/U8WA) and a sub-filter.
The electrostatic micron filter should be replaced at least once every 10 months in order to maintain cleaning performance. Only use genuine Sanyo replacement filters.
1 Depress the foot pedal release and set the handle to the parallel position.
2 Remove the filter cover.
Grasp the filter cover with a hand on each side, press inward and pull the filter cover away from the vacuum cleaner.
3 Replace the electrostatic micron filter. (SC-U11MA only)
Caution: The electrostatic filter cannot be reused.
For SC-U8MA/U9MA/U8WA:
After washing the filter in water and leaving the filter in a shady place to dry for about one day, make sure that it is completely dry and then re-install it into the vacuum cleaner.
4 Replace the filter cover.
CLEANING THE SUB-FILTER
Clean the sub-filter when it becomes dirty.
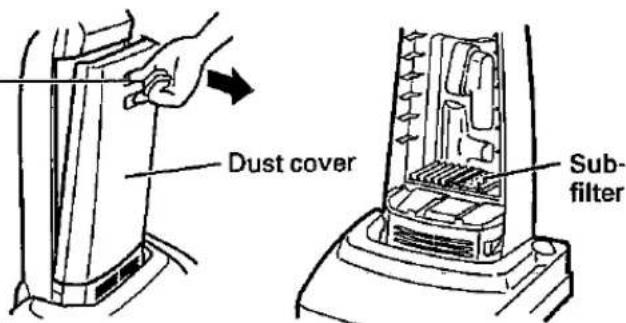
1 Remove the dust cover. Clamp knob
Remove the paper bag.
2 Remove the sub-filter from the vacuum cleaner.
3 Gently clean the sub-filter with water.
4 After leaving the sub-filter in a shady place to dry for about one day, make sure that it is completely dry and re-install it into the vacuum cleaner. Replace the paper bag.
Caution: Do not wash the sub-filter in a washing machine, and do not use any other equipment such as a hair dryer to dry it. Do not operate the cleaner without the sub-filter. Be sure the filter is dry and properly installed. Failure to do so could result in electrical shock, personal injury, or motor failure.
CLEARING BLOCKAGES IN THE SUCTION HOSE AND CLEANING THE AGITATOR ASSEMBLY
Caution: Be sure to turn the ON/OFF switch to the OFF position and disconnect the power cord from the wall outlet before clearing the blockages in the suction hose and cleaning the agitator assembly.
Clearing blockages in the suction hose
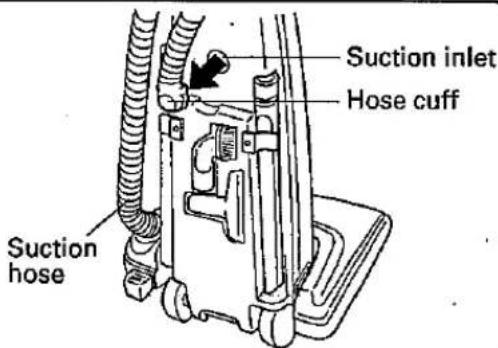
1 Set the vacuum cleaner to the upright position.
2 Twist the hose cuff and pull it away from the vacuum cleaner to remove it from the suction inlet, and then remove the blockage.
3 Reattach the hose cuff to the suction inlet, and then operate the vacuum cleaner to check that the blockage has been properly cleared. If the hose is still blocked, the suction force will be weak.
If the hose still appears to be blocked
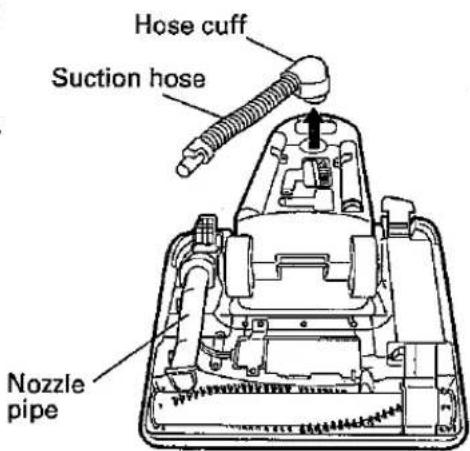
1 Set the vacuum cleaner to the parallel position and turn it over.
2 Twist the hose cuff and pull it away from the vacuum cleaner to remove it from the suction inlet.
3 Remove the bottom plate (refer to page 10). Disconnect the suction hose from the nozzle pipe.
4 Remove any blockages in the hose and the nozzle pipe, while being extremely careful not to damage the hose or the nozzle pipe.
5 Re-install all the parts in the reverse order of removal. (For the procedure for reattaching the bottom plate, refer to page 10.)
Caution:
- Check that all parts have been installed correctly before reattaching the bottom plate.
- Firmly and securely insert the hose cuff.
Cleaning the agitator assembly
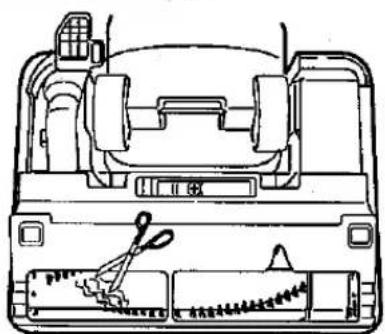
When threads get caught in the agitator assembly, clean the assembly.
1 Remove threads caught in the assembly by cutting them with scissors.
natural_image
Technical line drawing of a vehicle front panel with no visible text or symbolsREPLACING THE BELT
Caution: Be sure to turn the ON/OFF switch to the OFF position and disconnect the power cord from the wall outlet before replacing.
1 Set the vacuum cleaner to the parallel position.
2 Turn the vacuum cleaner over.
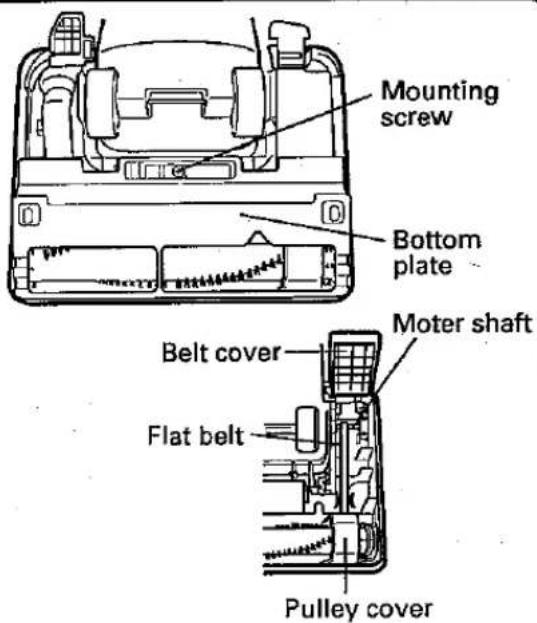
3 Loosen the mounting screw, and then remove the bottom plate.
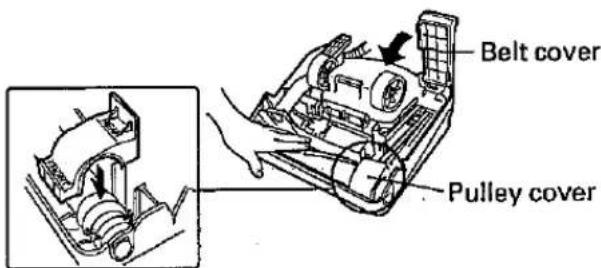
4 Lift up the belt cover and then remove the pulley cover.
5 Lift out the agitator assembly, and then remove the flat belt from the motor shaft and the agitator pulley.
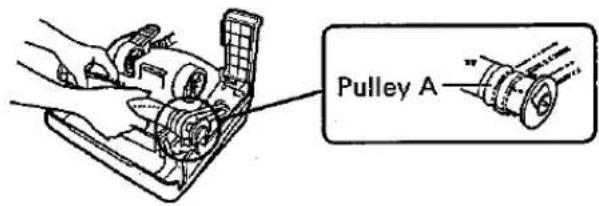
6 Place a new belt onto the motor shaft and onto pulley A.
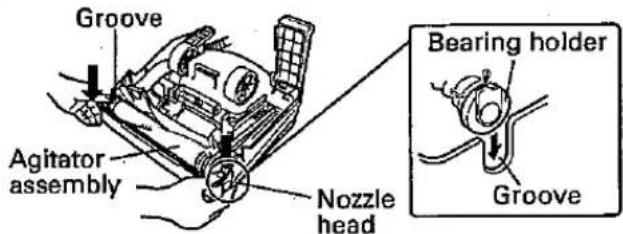
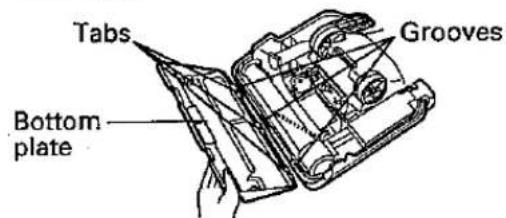
7 Place the agitator into the grooves in the nozzle head, making sure that the new belt slides securely into the guide.
Caution: Install the belt so that it has no twists in it, and so that all components turn smoothly.
8 Replace the pulley cover, lower the belt cover, and check that all parts have been installed correctly before reattaching the bottom plate.
9 Install the bottom plate so that the tabs fit into the grooves at the front end of the nozzle head.
- Tighten the mounting screw.
TROUBLESHOOTING
- If there is a problem with the vacuum cleaner, carry out the following checks to find the cause. If the problem still persists after the checks have been made, do not use the vacuum cleaner to prevent the possibility of an accident occurring. Turn the ON/OFF switch to the OFF position, disconnect the power cord from the wall outlet, and contact the place of purchase or your nearest Sanyo service center.
| Problem | Cause | Remedy |
| The motor does not operate when the ON/OFF switch is set to the ON position. | ● The power cord plug is not securely inserted into the wall socket. | ● Insert the power cord plug securely into the wall socket. |
| Suction force is weak. | ● The full bag indicator displays a red color.● The power head or suction hose is blocked.● The secondary filters are dirty. | ● Replace the paper bag.● Remove the blockage.● Clean the secondary filters. |
| The agitator does not operate. | ● The flat belt is worn or broken. | ● Replace the flat belt. |
- SC-U8 MA
- SC-U9 MA
- SC-U11 MA
- SC-U8 WA
- Contents
- IMPORTANT SAFETY INSTRUCTIONS
- READ ALL INSTRUCTIONS BEFORE USING THE VACUUM CLEANER
- SAVE THESE INSTRUCTIONS
- NAMES OF EACH PART
- SC-U11MA SC-U9MA
- SC-U8MA SC-U8WA
- WARNING:
- PREPARATIONS BEFORE USE
- ATTACHING THE HANDLE TO THE VACUUM CLEANER
- WINDING THE POWER CORD
- RELEASING THE POWER CORD
- USING THE VACUUM CLEANER
- ON/OFF SWITCH (SC-U8MA/U9MA/U11MA/U8WA)
- POWER CONTROL SWITCH (SC-U11WA ONLY)
- FULL BAG INDICATOR
- Caution
- ADJUSTING THE HANDLE
- Upright position
- Normal position
- Parallel position
- EDGE CLEANING
- USING THE ATTACHMENTS
- Disconnect the hose from the vacuum cleaner.
- Install the wand to the hose.
- Remove the wand and crevice tool from the vacuum cleaner.
- STORING THE ATTACHMENTS
- DUST DISPOSAL
- (PaPer Bag Type)
- Caution:
- (Cloth Bag Type)
- Emptying the bag
- Maintenance
- Obtaining new paper bags
- CLEANING AND REPLACING THE SECONDARY FILTERS
- CLEANING THE FILTER
- CLEANING THE SUB-FILTER
- CLEARING BLOCKAGES IN THE SUCTION HOSE AND CLEANING THE AGITATOR ASSEMBLY
- Clearing blockages in the suction hose
- If the hose still appears to be blocked
- Cleaning the agitator assembly
- REPLACING THE BELT
- TROUBLESHOOTING
Brand : SANYO
Model : SC-U11 MA
Category : Vacuum Cleaner