
30850000 - Remote control toy Hobbywing - Free user manual and instructions
Find the device manual for free 30850000 Hobbywing in PDF.


| Product Type | Remote Control Toy Car |
| Brand | Hobbywing |
| Model Number | 30850000 |
| Scale | 1:10 |
| Dimensions (approx.) | 420 x 250 x 150 mm |
| Weight | 1.8 kg |
| Power Supply (Vehicle) | 7.2V NiMH or 11.1V LiPo Battery (not included) |
| Power Supply (Remote) | 4 x AA batteries (not included) |
| Motor Type | Brushless DC Motor |
| Speed Controller | Hobbywing WP-SC8 120A |
| Transmitter Frequency | 2.4 GHz |
| Control Range | Up to 100 m |
| Steering Type | Servo (high torque) |
| Suspension | Independent front and rear |
| Drive Type | 4WD |
| Main Functions | Forward, reverse, brake, left/right steering |
| Maintenance | Clean after each use; check screws and bearings regularly |
| Safety Warnings | Not for children under 14 years; keep fingers away from moving parts |
| Spare Parts Availability | Available online via Hobbywing or third-party retailers |
| Manual Languages | English (online PDF) |
Frequently Asked Questions - 30850000 Hobbywing
User questions about 30850000 Hobbywing
0 question about this device. Answer the ones you know or ask your own.
Ask a new question about this device
Download the instructions for your Remote control toy in PDF format for free! Find your manual 30850000 - Hobbywing and take your electronic device back in hand. On this page are published all the documents necessary for the use of your device. 30850000 by Hobbywing.
USER MANUAL 30850000 Hobbywing
Electronic Power Switch


Thank you for purchasing this HOBBYWING product! Devices used on RC models can be dangerous, any improper use may cause personal injury and damage to devices, so please make sure to read through this manual before use. In that we have no control over the use, installation and maintenance of this product or other related electronics, no liability may be assumed nor will be accepted for any damages, losses or costs resulting from the use of the product. Besides, we don't shoulder any responsibility for any losses caused by unauthorized modifications to our product. The last but not least, we have the right to change the product design, appearance, features and operating requirements without notice.
01 Introduction
This Electronic Power Switch features multiple functions like battery capacity indication, low-voltage indication, over-current protection, short-circuit protection and thermal protection; it can control the ON/OFF of current flow to the receiver, and it is operated by only one button, this helped to solve problems like bad contact caused by vibration or oxidation of contacts conventional mechanical switches have. As its case is made of plastic, it can be easily mounted at any place via the double-faced adhesive tape. Besides, the waterproof design makes it applicable for all weather conditions.
02 Begin to Use the Electronic Power Switch
Please connect the JR female connector (Input end) to the receiver battery and plug the JR male connector (Output end) into the Battery channel or any other unoccupied channel on the receiver according to the following diagram.

Specifications
Battery Type LiPo / LiFe / NiMH
Input Voltage 2S LiPo / 2S LiFe / 5S NiMH
Max. Current 12A
Size 26.5X19.7X10.5mm (LxWxH)
Weight 7.5g
03 Switching On/Off & Setting
1 Switching On/Off
Switching On:
Please press the power (/RED) button to turn on the electronic switch after connecting it to the battery; then both the POWER LED and the BATT TYPE LED will come solid on. (For detailed explanation about LED status, please check the two forms below)
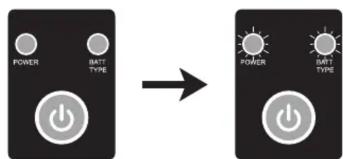
Press the power button, then both LEDs will turn solid on.
Switching Off:
After turning on the electronic switch, press the power button again for about 0.5 second can turn off the switch and make both LEDs go out.

Press the button for about 0.5 second, both LEDs will turn off.
2 Setting (Battery Type)
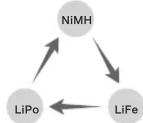
It's important to set the battery type properly. If not, then the battery capacity indicator and low-voltage indicator will function abnormally. Therefore, when the first time you turn on this switch and find the color of the BATT TYPE LED doesn't match with the actual battery type, please set it again. And you also need to reset the battery type after changing another type of battery. The following part explains how to set the battery type: Keep pressing the POWER button after turning on the electronic switch, then the BATT TYPE LED will blink, about 3 seconds later the switch will enter the battery type selection mode and the LED will flash Green/Blue/Red circularly; release the button, then you can select the corresponding battery type to the color. (Please check the "BATT TYPE LED" form below for reference.)
04 Explanations for Different LED Status
BATT TYPE LED: Different LED color indicates different battery type.
| BATT TYPE LED | Green | Blue | Red |
| Battery Type | LiPo | LiFe | NiMH |
POWER LED: For battery capacity indication.
| POWER LED | Solid Green | Solid Orange | Solid Red | Blinking Red |
| Remaining Capacity | 80%~100% | 60%~80% | 30%~60% | 0%~30% |
05 Other Protections & Indications
Low-voltage Indication
When the battery voltage goes below the following threshold value for about 2 seconds, the POWER LED will blink RED slowly in this way "☆,☆,☆", but the electronic switch won't cut off its power output. Threshold Voltage of Different Batteries are listed below:
For a 2S LiPo: 6.0V;
For a 2S LiFe: 4.0V;
For a 5cells Ni-MH: 4.5V;
Thermal / Overheat Protection
-
Threshold "Temperature": 100°C (212°F);
-
When the internal temperature of the electronic switch goes above 100° C ( 212° F) for about 2 seconds, the POWER LED will flash RED in the following way "☆☆☆, ☆☆☆, ☆☆☆", but the switch will continue outputting power.
Over-current / Short-circuit Protection
- Trigger condition of the over-current protection: The current is between 20\~39Amp and that lasts for about 500ms;
Trigger condition of the short-circuit protection: The current is over 40Amp and that lasts for about 500 µ s.
- When the over-current/short-circuit protection is activated, the electronic switch will automatically CUT OFF the output and enter the protection; and the POWER LED will blink RED in this way "☆☆, ☆☆, ☆☆".
Battery Polarity Reversal Protection
(Note: It only works when no load is connected to the switch)
-
If it's not connected to any load, the electronic switch will trigger this protection to stop itself from starting up when detected the battery polarity at the input end is reversed.
-
If it's connected to some load and the battery polarity is wrong, the receiver and other connected devices will get damaged as they get the polarity-reversed voltage from the electronic power switch.

Either over-current protection or short-circuit protection can cause the receiver to lose power supply, so please ensure the current draw of all the devices connected to the receiver is below 12Amp (12 Amp is the maximum output current this switch can stand).

For avoiding possible damages caused by battery reversal, we strongly recommend disconnecting the JR male connector (Output end) from your receiver before connecting this electronic power switch to the battery; After connecting to the battery, try to turn on the electronic switch first; if you can turn it on normally, then you can plug the JR male connector (Output end) into the receiver.

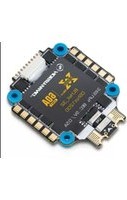
- ELECTRONIC POWER SWITCH
- 01 INTRODUCTION
- 02 BEGIN TO USE THE ELECTRONIC POWER SWITCH
- SPECIFICATIONS
- 03 SWITCHING ON/OFF & SETTING
- 1 SWITCHING ON/OFF
- SWITCHING ON
- SWITCHING OFF
- 2 SETTING (BATTERY TYPE)
- 04 EXPLANATIONS FOR DIFFERENT LED STATUS
- 05 OTHER PROTECTIONS & INDICATIONS
- LOW-VOLTAGE INDICATION
- THERMAL / OVERHEAT PROTECTION
- OVER-CURRENT / SHORT-CIRCUIT PROTECTION
- BATTERY POLARITY REVERSAL PROTECTION
Brand : Hobbywing
Model : 30850000
Category : Remote control toy