
GWC25V - Vacuum Cleaner GEMINI - Free user manual and instructions
Find the device manual for free GWC25V GEMINI in PDF.


| Product Type | Upright Vacuum Cleaner |
| Brand | Gemini |
| Model | GWC25V |
| Dimensions (L x W x H) | 30 cm x 25 cm x 40 cm |
| Weight | 5 kg |
| Power Supply | 1200 W, AC 220-240 V, 50/60 Hz |
| Dust Capacity | 1.5 L (bagless) |
| Filtration System | HEPA filter + washable foam filter |
| Suction Control | Variable speed control on handle |
| Brush Roll | Motorized brush with height adjustment |
| Cord Length | 5 m |
| Noise Level | 76 dB(A) |
| Main Functions | Carpet cleaning, hard floor cleaning, upholstery, crevice, dusting |
| Accessories Included | Crevice tool, dusting brush, upholstery nozzle |
| Maintenance | Empty dust bin after each use; wash HEPA filter monthly |
| Cleaning Instructions | Unplug before cleaning; use a damp cloth for exterior |
| Safety Features | Thermal overload protection, automatic shut-off if obstructed |
| Intended Use | Dry vacuuming of household floors and surfaces only |
| Spare Parts Availability | Replacement filter, brush roll, and belt available |
| Repairability | User-replaceable filters and belt; consult service center for motor |
| General Information | Designed for residential use; comply with local waste disposal regulations |
Frequently Asked Questions - GWC25V GEMINI
User questions about GWC25V GEMINI
0 question about this device. Answer the ones you know or ask your own.
Ask a new question about this device
Download the instructions for your Vacuum Cleaner in PDF format for free! Find your manual GWC25V - GEMINI and take your electronic device back in hand. On this page are published all the documents necessary for the use of your device. GWC25V by GEMINI.
USER MANUAL GWC25V GEMINI
25V 2-in-1 Handheld / Stick Cordless Rechargeable Water Cyclonic Vacuum Cleaner
- This appliance can be used by children aged from 8 years and above and persons with reduced physical, sensory or mental capabilities or lack of experience and knowledge if they have been given supervision or instruction concerning use of the appliance in a safe way and understand the hazards involved.
• Children shall not play with the appliance as it is not a toy. - Children should be supervised at all times to ensure that they do not play with the appliance.
- Cleaning and user maintenance shall not be performed by children.
- The appliance is only to be used with the power supply unit provided with the appliance.
- Using any other recharging unit will void the warranty.
WARNING: For the purposes of recharging the battery, only use the detachable supply unit provided with this appliance.
WARNING: The plug must be removed from the socket-outlet before cleaning or maintaining the appliance.
- The appliance must be disconnected from the supply mains when removing the battery.
- The battery is to be disposed of safely.
- Attention should be drawn to the environmental aspects of battery disposal. Don’t throw used batteries in dustbin. Please contact your retailer in the order to protect the environment.
- Regarding the detail on how to remove the battery, thanks to refer to the section “Remove the Battery (Waste disposal)” in Page 20 and 21 of the manual.
IMPORTANT SAFEGUARDS
- The external flexible cable of the transformer cannot be replaced, if the cord of this transformer is damaged, it is necessary to dispose the transformer and replaced by a transformer of the same model.
- This product is intended for indoor / household use on light dry household dust and debris only.
- This product is designed for vacuuming small areas of dry material only; do not use for vacuuming water or other liquids.
- Sparks inside the motor can ignite flammable vapors or dust. Do not vacuum or use this product near flammable or combustible liquids (e.g., gasoline or other fuels, lighter fluid, cleaners, oil-based paints), gases (e.g., natural gas, hydrogen), explosive dust (e.g., coal dust, magnesium dust, grain dust, gunpowder) or any fire sources.
- Do not vacuum anything that is smoking or burning (e.g., cigarettes, matches, hot ashes).
- Never vacuum toxic materials as the vapors or dust may cause a health hazard.
- Do not use the machine to vacuum clean gypsum plaster, cement, etc. that can harden on coming into contact with water and can thus hamper the normal functioning of the machine.
- This product is not a toy. Close attention is necessary when used by or near children or pets. Never use this product on pets.
- Never use a damaged Vacuum or AC Adapter.
- Do not mutilate or incinerate the Battery Packs, as they will explode at high temperatures.
- Do not plug/unplug the AC Adapter into/from the electrical outlet with a wet hand.
IMPORTANT SAFEGUARDS
- Do not place or drop the product into water or other liquids. If the product falls into water or other liquid, do not touch or reach into the water. Immediately unplug it from the electrical outlet before retrieving the product from the water/liquid.
- Do not charge the product if the power cord is cut, damaged, or if the wires are exposed.
- Keep the adapter cord and the product away from heated surfaces.
- To disconnect the AC Adapter from an electric outlet, pull directly on the adapter base; do not pull on the cord.
- Do not put any stress on the adapter cord where it connects to the product, as the cord may fray and break.
- If using an extension cord with this product, the marked electrical rating of the cord set or extension cord must be at least as great as the electrical rating of the product.
- Do not operate this product if it has a damaged adapter cord or plug, malfunctions, dropped or damaged, left outdoors, or dropped into water. Do not attempt to repair this product yourself. Take the defective product to the service centre for inspection and repairs.
- To avoid the risk of electric shock, do not immerse the adapter cord, plug or appliance into water or other liquids.
- Do not expose to skin or eyes directly when the UV light is on and do not look directly to the UV light.
- This product is not intended to use by persons (including children) with weak physical condition, slow reaction, mental retardation, lack of experience and common sense, unless they are under supervision or instruction by the person who is responsible for their safety.
IMPORTANT SAFEGUARDS
PRECAUTIONS
- Do not use this product outdoors. For optimal operation, keep the product in a location that does not exceed 40^ C. Do not store in a vehicle under the sun or near heating equipment.
- Do not operate the product while it is charging.
- Do not touch the rotating parts of power brush when in operation.
- Never insert objects into any of the openings in the product. Do not use the product if any of the openings are blocked.
- Do not use the product to vacuum metal objects such as screws, nails, tacks and metal filings etc.
- Empty the product after each use. Keep it free of dust, lint, hair, or anything that reduces airflow.
- Keep hair, loose clothing, and body parts away from openings or moving parts, especially the part of the product where there is suction.
- Never place the vacuum nozzle near your face, especially eyes and ears, during operation.
- Do not use the product without the filter and filter cover securely in place.
- Be careful when using the product on stairs in order to prevent falls.
- The battery charging terminals on the vacuum cleaner must be kept clean and free of debris.
- Only use the AC/DC adapter provided with the product.
PRODUCT OVERVIEW
MAIN BODY
- ON/OFF Main switch
- ECO SPEED switch
- Handheld release button
- Handheld unit
- Floor nozzle release button (5a+5b)
- Floor nozzle
- LED pivoting lights
- Stick handle
- Handle lock screw
- Charging port
- UV function display
- UV Sterilize button
- Chamber release button
- Chamber cover
- Reservoir
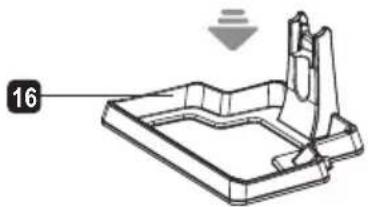
- Free standing base
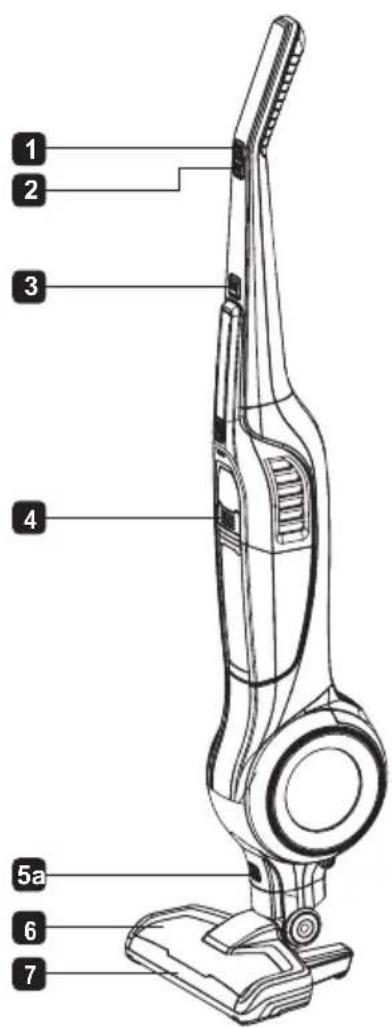
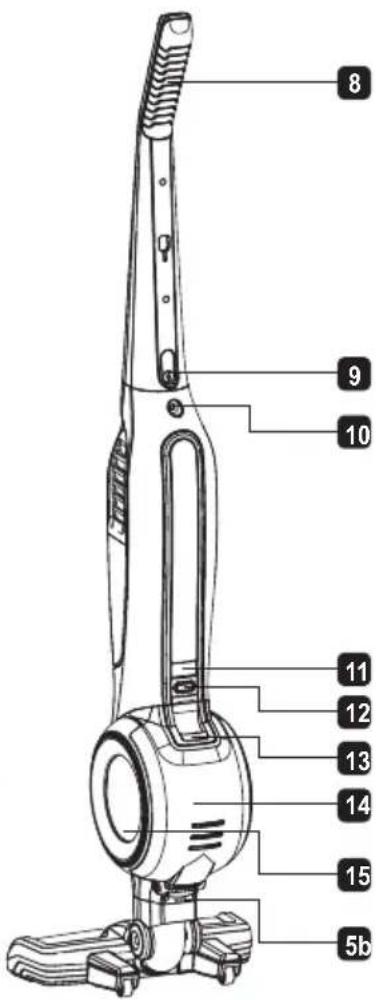
natural_image
Technical line drawing of a mechanical component with a labeled part (16), no readable text or symbols present.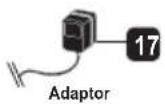
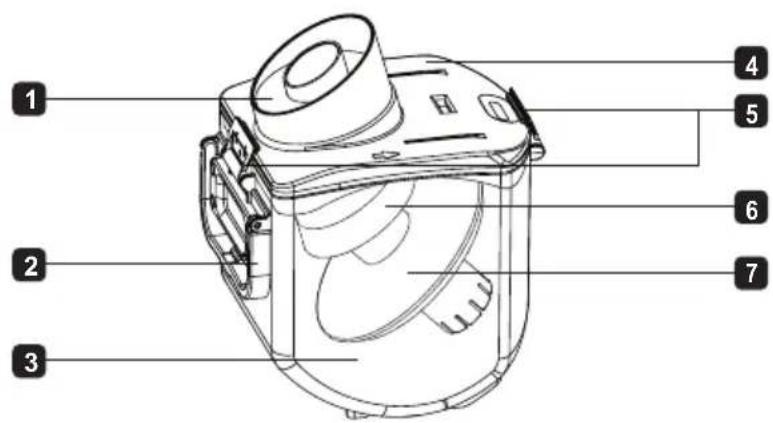
RESERVOIR
- Active carbon filter
- Handle
- Reservoir
- Reservoir cover
- Cover locks
- Inner tube
- Tube head
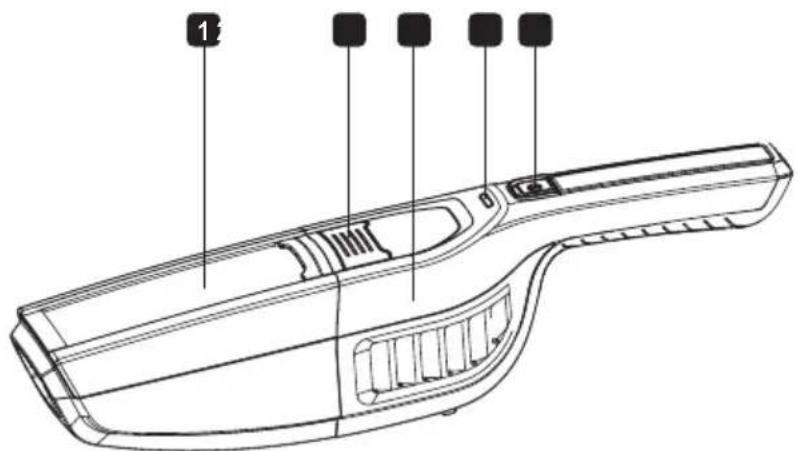
HANDHELD UNIT
- Handheld nozzle
- Nozzle release button
- Handheld unit
- Charging indicator
- Handheld ON/OFF switch
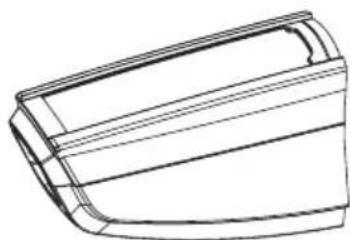
- Outer filter
- HEPA inner filter
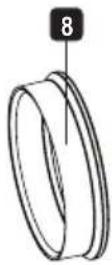
- Seal ring
natural_image
Line drawing of a rectangular plastic housing or container (no text or symbols)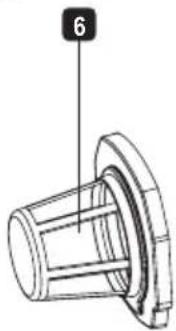
natural_image
Technical line drawing of a mechanical component with a flanged base and cylindrical body (no text or symbols)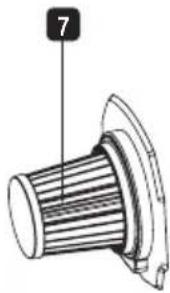
ACCESSORY INCLUDED
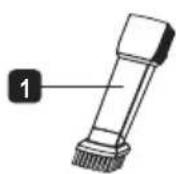
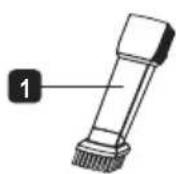
- Crevice with brush
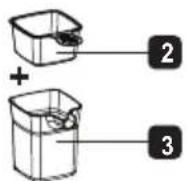
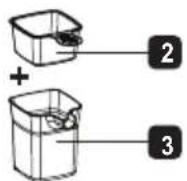
- Sifter
- Measure cup
ASSEMBLY
Unpacking and assembly
- Check that the package includes all parts described in this instruction manual before starting.
- Fit the stick handle by carefully inserting it into the main body.
- Remove the supplied screws, insert the handle into the main unit, install the screw and tightening the handle, by a screwdriver (flat head). (screwdriver not included) (Fig.1)
- Insert the floor nozzle into the main body. (Fig.2)
- Insert the handheld unit into the main body. Make sure to hear the "click" sound such that it locks into the main body. (Fig.3)
- Pick up and place the vacuum cleaner on the stand base provided. It can secure the product to stand firmly in position. (Fig.4)
- Place the sifter on top of the measuring cup. There is two recessive slots at the bottom of measuring cup, then insert either the slot into the post of the stand base for storage purpose.
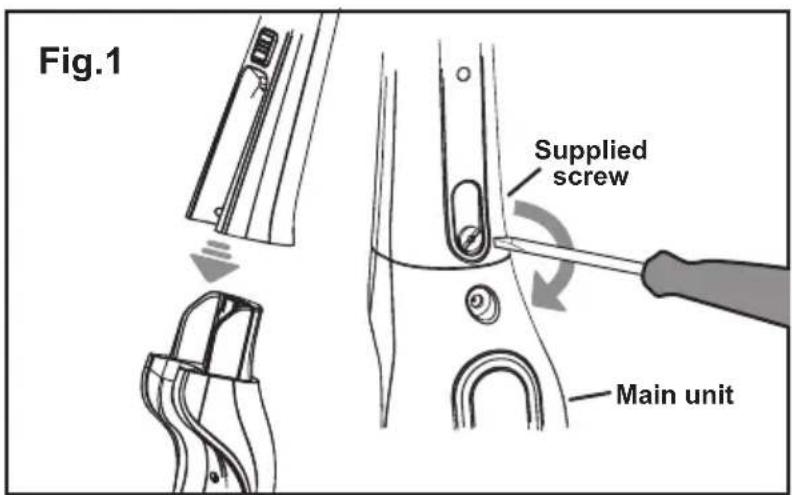
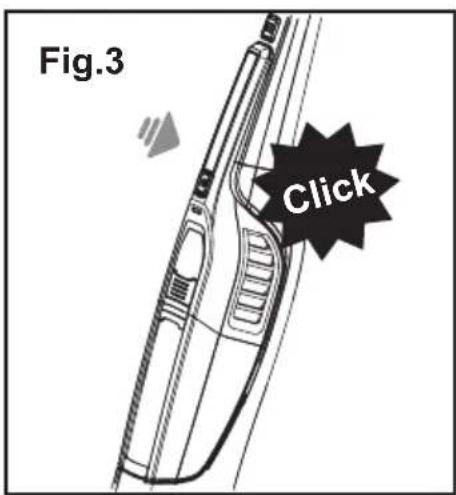
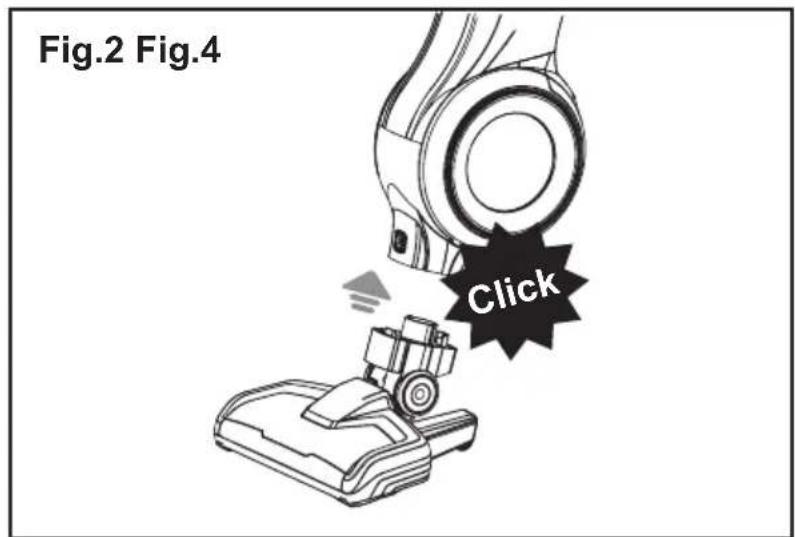
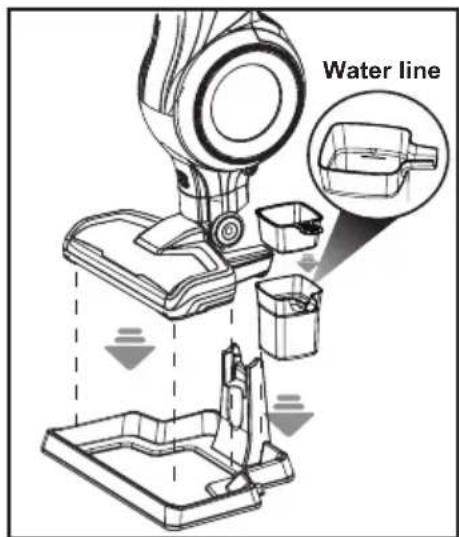
CHARGING
Charge the battery in the following situations and sequence.
- Before using the product for the first time after purchase.
- Before using the product after storing for an extended period of time.
(It is recommended to re-charge the vacuum cleaner at least every 3 months for longer battery lifespan)
1. INSERTING THE HANDHELD UNIT INTO THE MAIN BODY
- Always turn OFF the stick vacuum when inserting the handheld unit into the main body.
- Ensure there are no substances between the contacts of the handheld unit and the main body.
2. CONNECTING THE ADAPTOR
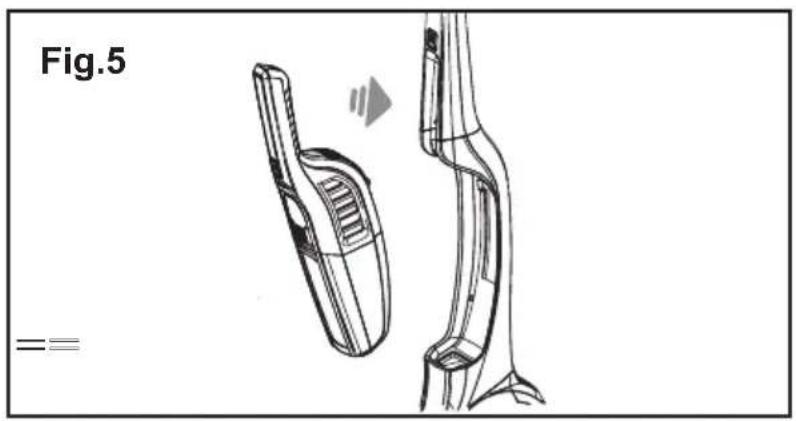
- Makesure the handheld unit is securely inserted into the main body (Fig.5)
- Connect the adaptor into the power outlet. (Fig.6)
- Connect the power plug into the charging port. (Fig.7)
natural_image
Technical line drawing of a mechanical device with two views, one showing internal components and the other showing external parts (no text or symbols)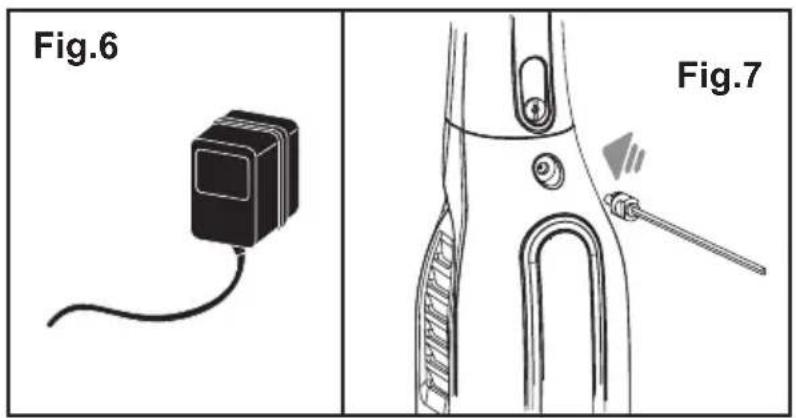
CHARGING
- Make sure that the contacts of the vacuum cleaner and charger are not dirty. Unplug the adaptor and clean the contacts if necessary.
- Before using the appliance for the first time, the vacuum cleaner batteries must be charged for 6-8 hours.
- Insert the charger plug into the electrical outlet.
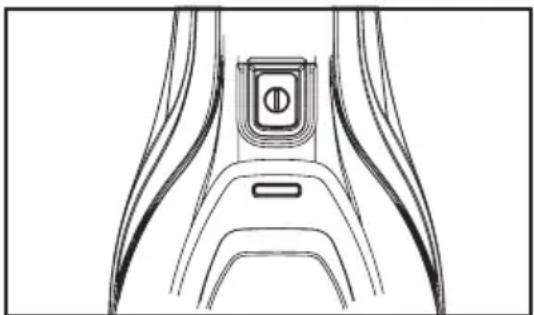
- The charging indicator will light up in red to indicate the battery is charging.
- The charging indicator color will turn blue when fully charged.
- It is normal for both the adaptor and vacuum cleaner to become warm during charging.
- You can charge the vacuum cleaner at any time when it is not in use.
- When using the handheld unit continuously with built-in battery pack, the batteries of the handheld unit will become warm, which is a normal phenomenon.
NOTE:
It is recommended to recharge the vacuum cleaner after every use to maintain the maximum performance.
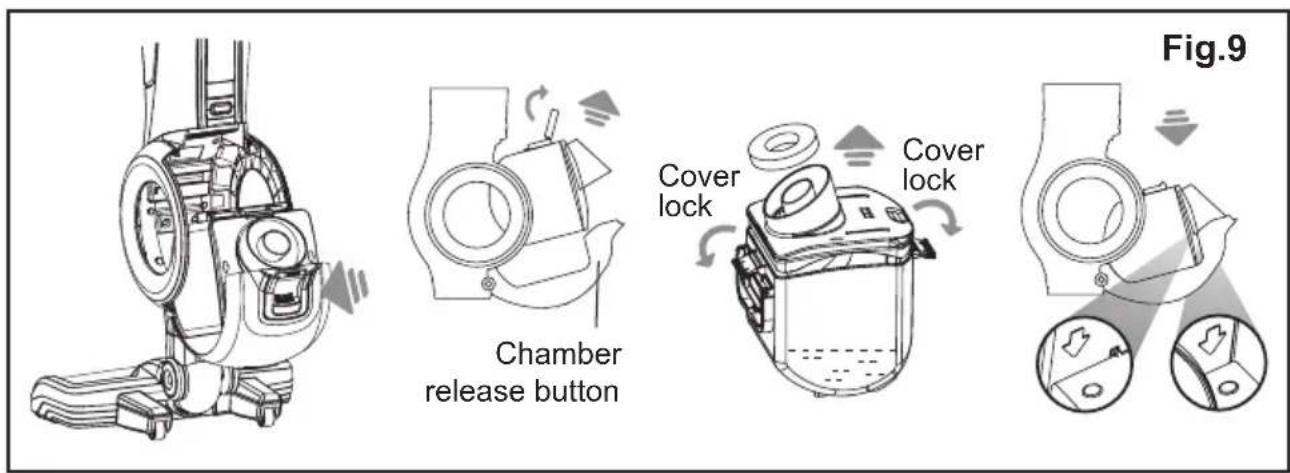
- Press the chamber release button as shown above to unlock the chamber. (Fig.9)
- Pull out the reservoir handle and remove the reservoir.
- Unlock the top lid of the reservoir.
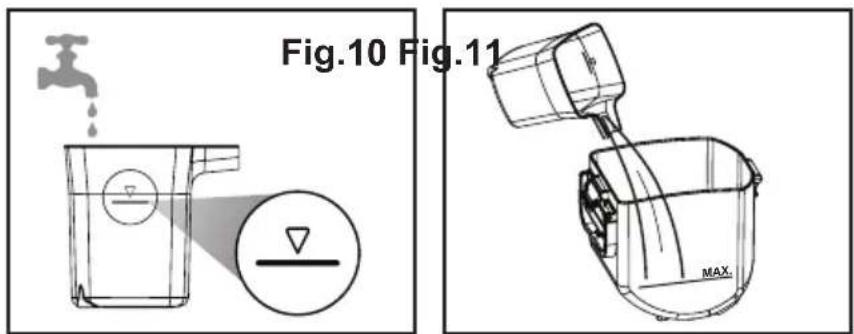
- Pour fresh/ tap water into the provided measuring cup up to the water line marking (Fig.10), then pour the water into reservoir (Fig.11).
- Close and lock the top lid. Return the reservoir back into the chamber (follow the direction of icon ⌘ and lock it.
Turn ON the unit by pressing the "Power" button on the stick handle. Select either the "Power" or "ECO" mode by pressing the speed button. The "Power" mode provides maximum suction power and the "ECO" mode operates at a lower sound level.
NOTE:
- The formation of foam inside the reservoir may occur during the cleaning process. Slight foam formation is normal and does not hamper the functioning of the machine.
- Detergent, soap powder, bleaching liquids and the like MUST NOT be added to the reservoir.
- Turn OFF the unit by pressing the "Power" button again.
- During short pauses in vacuuming, the vacuum cleaner can be left standing by leaning it slightly forward or you can rest it on the free standing base properly.
Caution!
Always turn off the vacuum cleaner when left standing because the brush bristles may damage a floor or carpet if left running.
Indicator lights
natural_image
Technical line drawing of a mechanical component with no visible text or symbols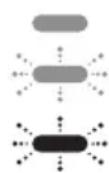
Battery full - Blue light on
Battery below 20% - Blue light flashing
Battery low - Red light flashing
| STATUS | LED Indication | |
| RED BLUE | ||
| Power ON OFF ON | ||
| Battery below 20% OFF | Flashing | |
| Battery low Flashing OFF | ||
| Charging ON OFF | ||
| Charge complete OFF ON | ||
| Roller brush jam Red on + Purple flashing | ||
| Main motor jam Purple flashing | ||
| Battery failure | Red & Blue alternative flashing | |
| Short circuit | Blue on + Purple flashing | |
WARNING:
- This product is designed for household use only. The supplier is not responsible for the damage caused by improper use or misuse of the product.
- To avoid injury, do not put fingers or hands into the roller brush / beater.
- Change the water when it becomes dirty. Do not vacuum for very long extended period of time with one filling of water. Check the water quality during cleaning and if the water becomes too discolored or dense with dust and lint, unlock the top cover of reservoir and empty the reservoir and refill with fresh/clean tap water.
• Empty the reservoir immediately after every usage
UV Sterilization
- After the clearance of the reservoir and restore into chamber.
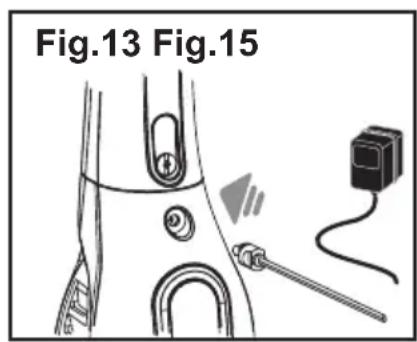
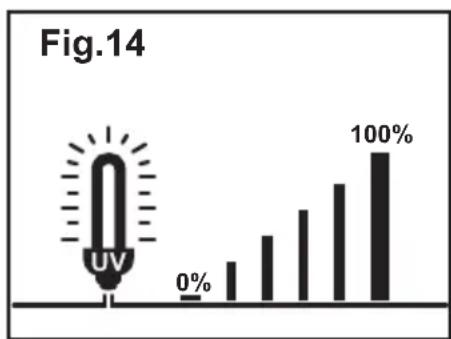
- Connect the adaptor into power outlet and then connect power plug into the charging port (Fig.13), sterilization cycle will start automatically and the indicator light will illuminate indicating sterilization status (Fig.14).
- UV light is being emitted to kill the bacteria inside the tank.
- The UV light will be automatically shut down after 45 minutes.
- User can repeat or switch on the next sterilization cycle by pressing the sterilize button again (Fig.15).
bar
Fig.14 | Category | Value (%) | |---|---| | UV | 0 | | Other | 25 | | Other | 50 | | Other | 75 | | Other | 100 |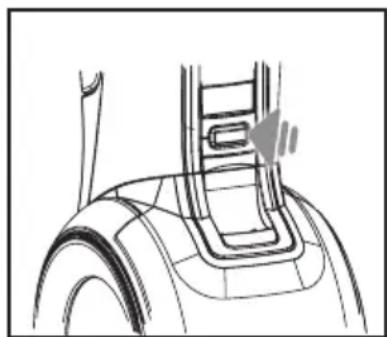
natural_image
Technical line drawing of a mechanical component with a highlighted section (no text or symbols)NOTE:
- The UV light will be automatically shut down if the chamber is accidentally opened as it is protected by a safety lock.
- No UV light will be emitted if the sterilize button is OFF.
- Sterilization will only be activated to function when the power adapter is connected to the main body and power outlet.
Using the handheld unit
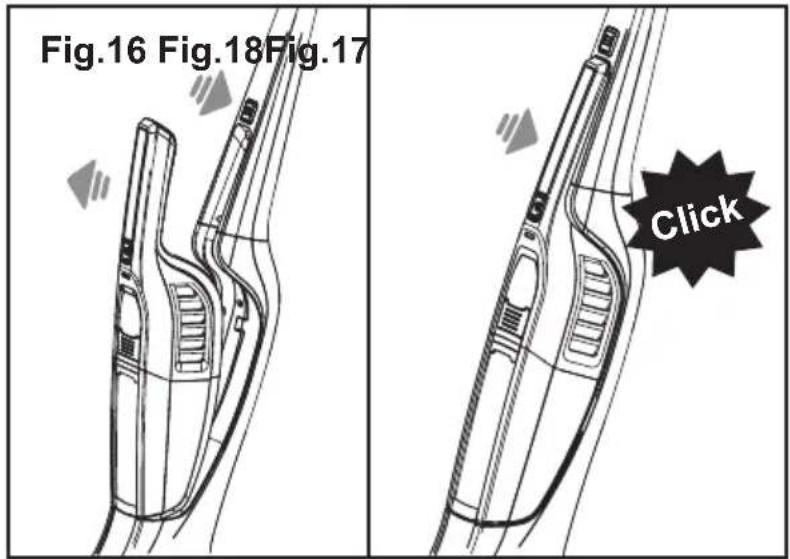
- Press the handheld release button on the main body to release the handheld unit. (Fig.16)
- Insert the handheld unit into the main body for assembly. Make sure to hear the "click" sound. (Fig.17)
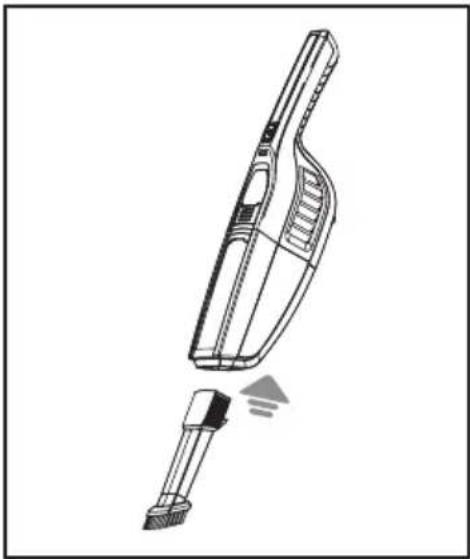
- Select the accessory to be used and connect it to the handheld unit. (Fig.18)
- Turn on the handheld unit by pressing the "Power" button on the handle.
- Turn off the handheld unit by pressing the "Power" button again.
- Insert the handheld unit into the main body. Ensure to hear the “click” sound which confirms that it has locked into the main body.
natural_image
Technical line drawing of a handheld vacuum cleaner with a detached screwdriver (no text or symbols)CAUTION:
The handheld unit is not allowed to vacuum water or liquid.
NOTE:
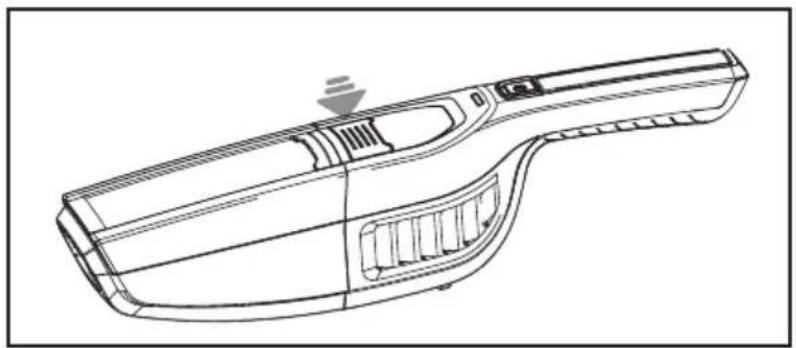
It is recommended to empty the dust container after every use. Please follow the instructions in the “Cleaning & Storage” section.
CLEANING AND STORAGE
- Always turn OFF the power and disconnect the power plug from the power outlet before starting any maintenance.
Handheld Unit and Main Body
- Wipe off any dirt from the vacuum using a dry and soft cloth.
- In case of stubborn dirt, clean using a soft and slightly damp cloth soaked in a water solution diluted with a little neutral detergent and then wipe clean with a dry rag.
- Do not use soap powder, detergent and solvents like thinner, benzene, and spray type cleaners.
• After cleaning, wipe with a dry cloth. - Ensure that there is no water in the nozzle after cleaning the handheld unit.
Handheld Unit
natural_image
Line drawing of a handheld electronic device with handle and control panel (no text or symbols)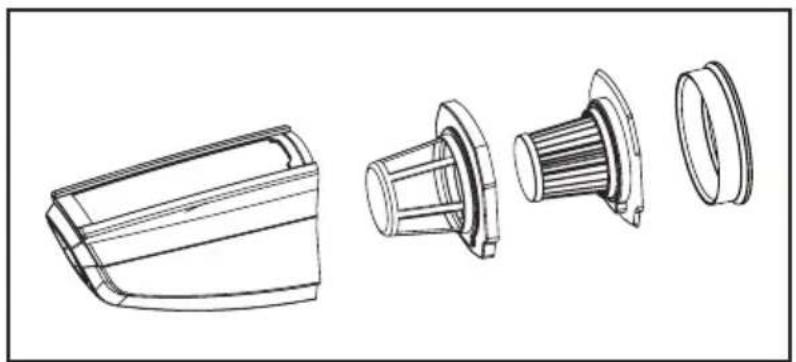
natural_image
Technical line drawing of a mechanical component with exploded views (no text or symbols)- Remove the dirt / dust from the nozzle of handheld unit after each use.
CLEANING AND STORAGE
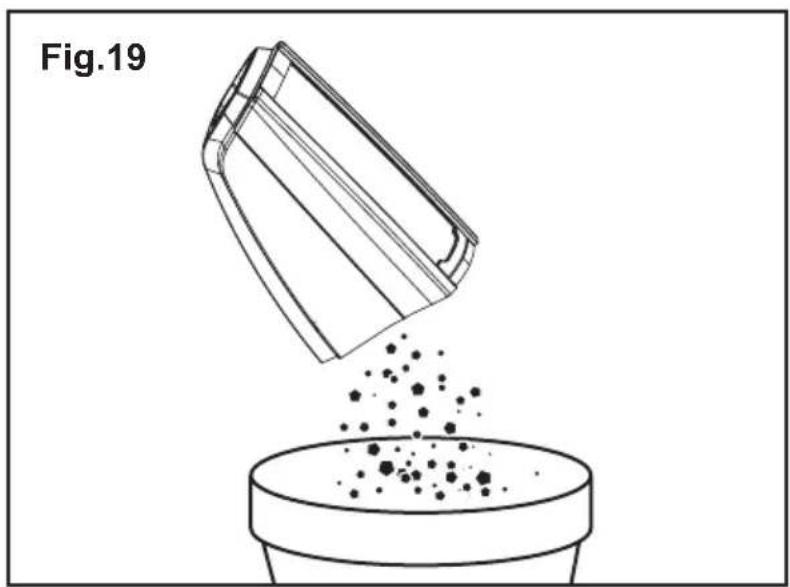
• Empty the contents into a dust bin. (Fig.19)
- Remove the HEPA filter by turning the housing in the anti-clockwise direction. (Fig.20), then remove seal ring. (Fig.21) as indicated below, wash outer filter with tap water and clean the HEPA filter, let it dry completely before reinserting into the handheld unit. (Fig.22)
natural_image
Diagram of a container pouring liquid into a granular substance, labeled Fig.19 (no text or symbols on the diagram itself)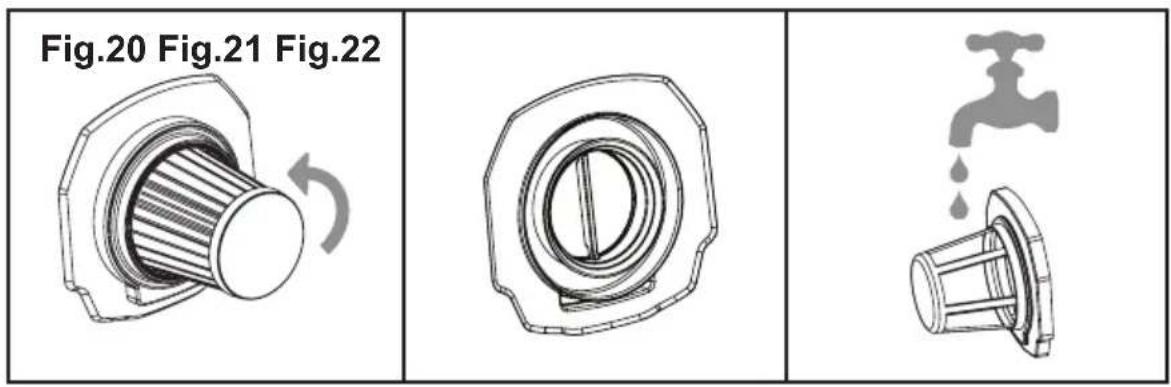
NOTE:
The Handheld nozzle, HEPA filter, outer filter and seal ring must not be put into dish-washer, it has to be hand-washed.
CLEANING AND STORAGE
Reservoir Disposal
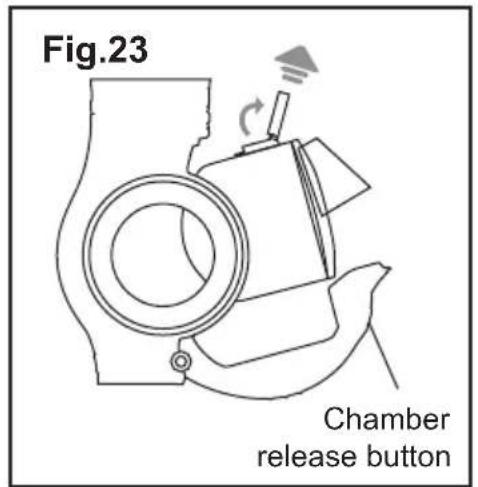
- Press the chamber release button to eject the chamber. (Fig.23)
- Pull out the reservoir handle and remove.
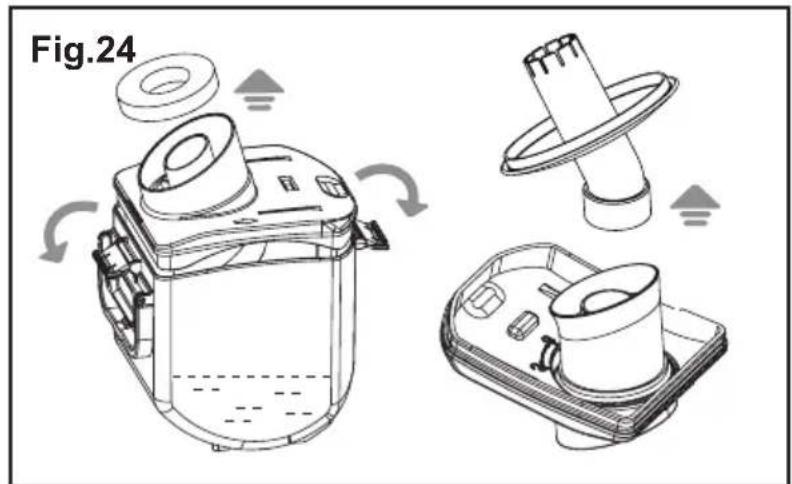
- Unlock the top lids of the reservoir. (Fig.24)
- Take off the reservoir cover. Empty the reservoir and wash thoroughly.
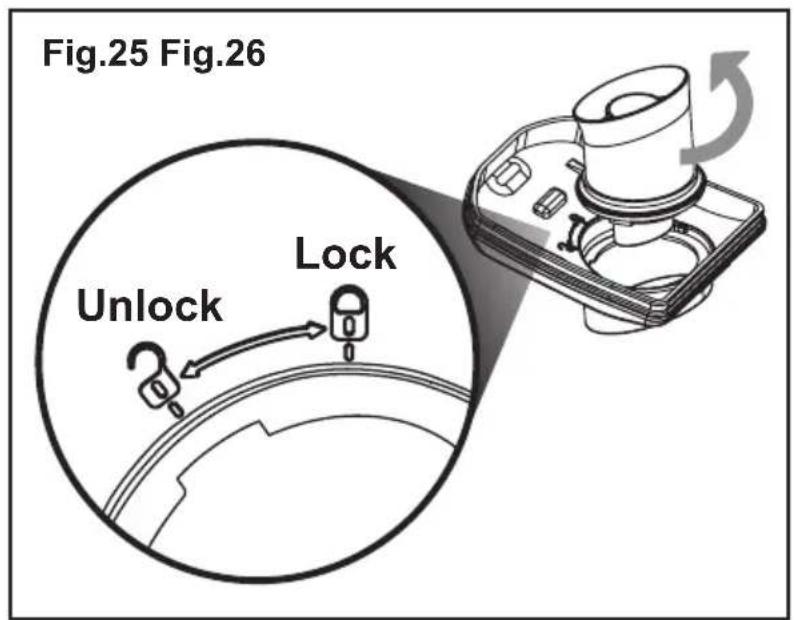
- Pull out the tube head. Turning the inner tube in an anti-clockwise direction to the unlock position. (Fig.25)
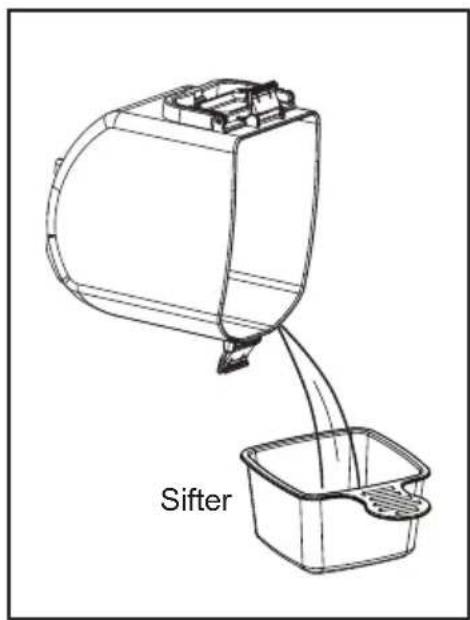
- Empty the reservoir by using the sifter. Pour the dirt water through the sifter into the sink, the big particles or hairs will be filter out and disposed separately into rubbish bin. (Fig.26)
- Wash the cover, tube head, inner tube and active carbon fiber with tap water, let it dry completely before inserting back into the reservoir cover.
- Close and lock the top lid. Put the reservoir back into the chamber and lock it.
CLEANING AND STORAGE
Floor nozzle
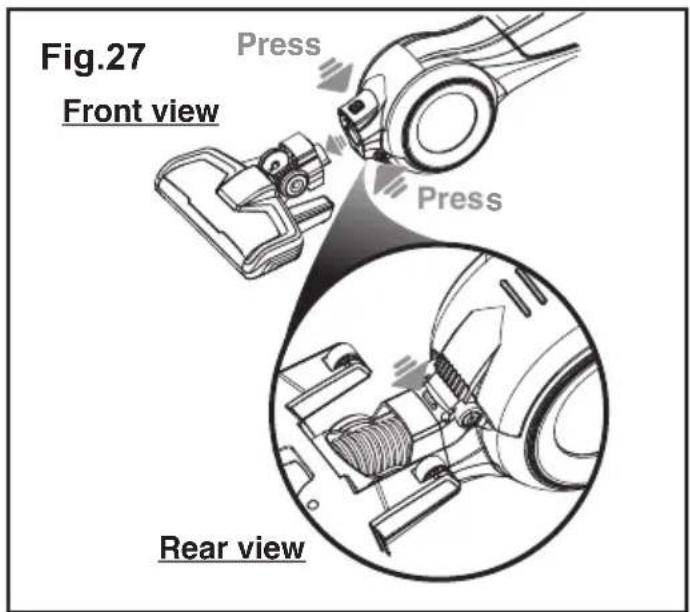
- To take the floor nozzle out, lay the vacuum cleaner flat on the floor. Press and hold the floor nozzle release buttons at the same time as indicated below and pull out the floor nozzle. (Fig.27)
- Carry out the cleaning and maintenance if any waste or hair has tangled in the brush.
Regular Maintenance
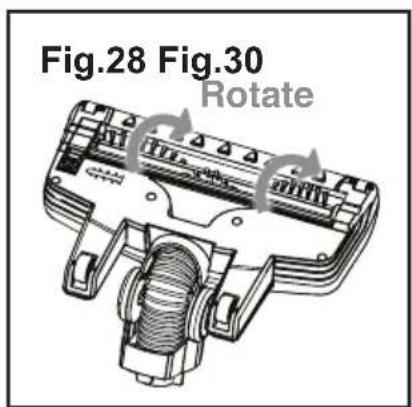
- Slowly rotate the brush manually and remove any foreign objects tangled around the roller brush. (Fig.28)
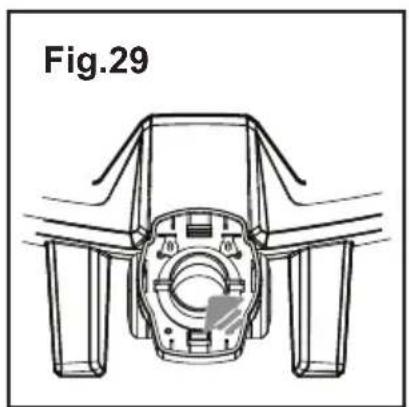
- Check and clean the vacuum channel of floor nozzle brush and the main stick body (above the reservoir) occasionally. Remove the blockage and take out any waste. (Fig.29 & 30)
natural_image
Technical line drawing of a mechanical component with no visible text or symbols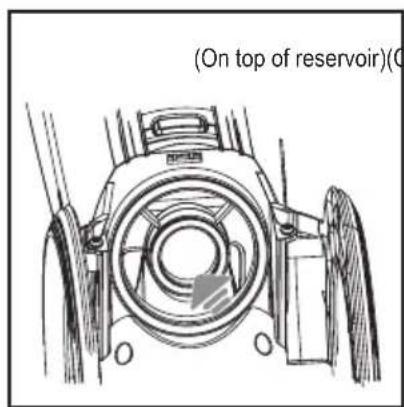
CLEANING AND STORAGE
Maintenance when the brush cannot be smoothly rotated
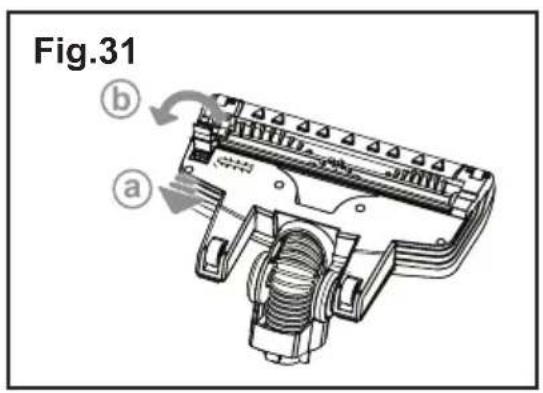
- Pull backward (Fig.31 a) and dislodge the brush cover (Fig.31 b).
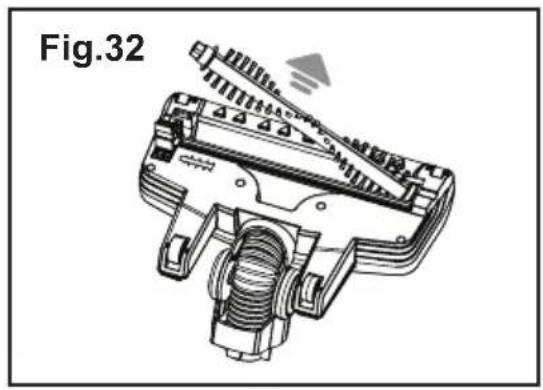
- Lift up the left side of the roller brush and then remove. Then remove the blockage and take out any waste. (Fig.32 & 33)
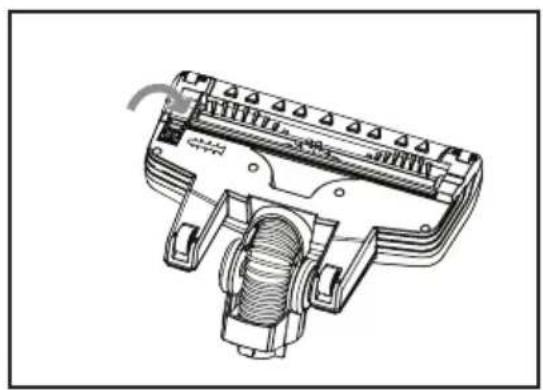
- Re-install the rotating brush again. Finally, check if the brush cover is securely fixed and the roller brush easily rotates properly with your hand. (Fig.34)
natural_image
Technical illustration of a mechanical component with spring and housing (no text or symbols)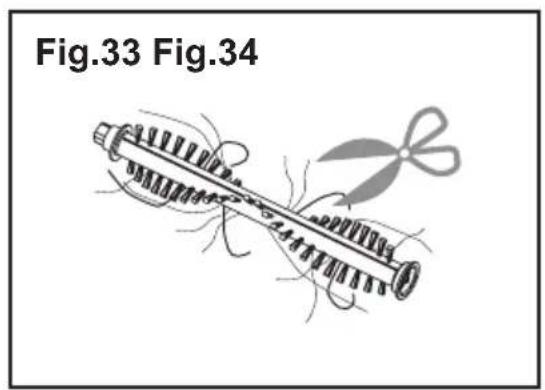
natural_image
Technical line drawing of a mechanical component with no visible text or symbolsNOTE:
Check the rotating brush whether it is being clogged by hair or other obstacle and remove it after each use
WASTE DISPOSAL
- When the battery pack no longer maintain a charge, the product may have reached the end of its lifespan. Before discarding the product, the rechargeable battery pack must be removed and recycled in accordance with the federal and local laws. Do not dispose the battery pack with other household waste.
TROUBLESHOOTING
| Problem Possible cause Solution | ||
| The vacuum cleaner will not start | The vacuum cleaner has not been charged | Make sure the vacuum cleaner has been fully charged for first time use or if it has not been used for a long time. |
| The vacuum cleaner is not charging | The power switch is not turned on | Make sure the power switch of main power supply is turned on. |
| The power cord is damaged | Do not use a damaged power cord. Please bring to customer service centre. | |
| The suction power is decreasing | The crevice tools or extension hose may be blocked | Check that there are no blockages in the crevice tools and/or extension hose. If so, clear the blockages before using. |
| Water in the reservoir is very dirty | Change the water in the reservoir to fresh water. | |
| Filter is dirty Clean the filter | It is recommended to replace the filter one time per year to maintain maximum performance. | |
| Vacuum cleaner is over heating | Filter is dirty Check the filter | and clean off any dirt. |
| The air coming out of the vacuum cleaner smells | Filter is dirty Check the filter | and clean off any dirt. |
| Filter is not dry Make sure | the filter has been left to dry before inserting it back into the handheld unit. | |
| The battery/charging indicator light is blinking | The vacuum cleaner is out of power | Recharge the vacuum cleaner to its full capacity. The light will stop blinking. |
| The brush does not turn anymore | The brush has encountered too much resistance | Clean the brush |
PRODUCT SPECIFICATIONS
Model : GWC25V
Power Source : 25.2V Rechargeable Battery
Motor : DC 25.2V
Adaptor (Input) : AC 100-240V 50/60Hz
Adaptor (Output) : DC 32V 400mA
Type of Battery Used : Li-ion Battery, 2000mAh
Charging Time : 6 - 8 Hours
Power Consumption : 130 Watt
Operation temperature : 0°C to 40°C
Product dimensions : 260(W) x 1105(H) x 263(D) mm
* The final product specification may be varied according to a different lot of material and actual input voltage power of the usage area.
安全使用注意事項
警告:
手提吸塵機
natural_image
Line drawing of a rectangular plastic housing or container (no text or symbols)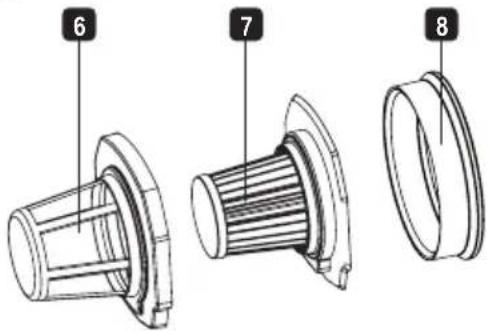
產品配件(隨機附送)
| 1. | 吸咀 |
| 2. | 隔塵器 |
| 3. | 量杯 |
安装
拆包装及安装
natural_image
Technical line drawing of a mechanical component with no visible text or symbols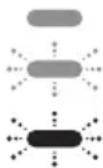
電池充滿 - 藍燈亮起
電池低於20% - 藍燈閃爍
電池低電量 - 紅燈閃爍
natural_image
Technical line drawing of a mechanical component with a highlighted section (no text or symbols)注意:
natural_image
Technical line drawing of a hand cleaner with a close-up view of its internal components (no text or symbols)注意:
natural_image
Line drawing of a handheld electronic device with handle and control panel (no text or symbols)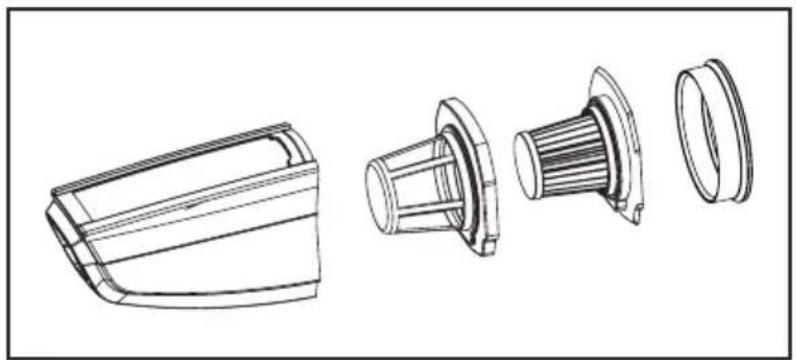
natural_image
Technical line drawing of a mechanical component with exploded views (no text or symbols)natural_image
Line drawing of a mechanical device pouring liquid into a container (no text or symbols)清潔和保養
吸塵地耙
natural_image
Technical line drawing of a mechanical component with no visible text or symbols清潔和保養
natural_image
Technical line drawing of a mechanical component with no visible text or symbols注意:
Proudly Serviced by:

a Gilman Group Company
- IMPORTANT SAFEGUARDS
- PRECAUTIONS
- PRODUCT OVERVIEW
- MAIN BODY
- RESERVOIR
- HANDHELD UNIT
- ACCESSORY INCLUDED
- ASSEMBLY
- Unpacking and assembly
- CHARGING
- INSERTING THE HANDHELD UNIT INTO THE MAIN BODY
- CONNECTING THE ADAPTOR
- NOTE:
- Caution!
- WARNING:
- UV Sterilization
- Using the handheld unit
- CAUTION:
- CLEANING AND STORAGE
- Handheld Unit and Main Body
- Reservoir Disposal
- Floor nozzle
- Regular Maintenance
- Maintenance when the brush cannot be smoothly rotated
- WASTE DISPOSAL
- TROUBLESHOOTING
- PRODUCT SPECIFICATIONS
- 安全使用注意事項
- 警告:
- 手提吸塵機
- 產品配件(隨機附送)
- 安装
- 拆包装及安装
- 注意:
- 清潔和保養
- 吸塵地耙
Brand : GEMINI
Model : GWC25V
Category : Vacuum Cleaner