Sequel 6052 - Office BDI - Free user manual and instructions
Find the device manual for free Sequel 6052 BDI in PDF.


| Product Type | Electric height-adjustable desk |
| Brand | BDI |
| Model | Sequel 6052 |
| Height Range | 24.75" - 49.75" (63 - 126 cm) |
| Travel Speed | 1.5 inches per second |
| Weight Capacity | 150 lbs (68 kg) |
| Duty Cycle | 10%, max 2 minutes on, 18 minutes off |
| Memory Presets | 4 positions |
| Monitor Arm Compatible | Yes (compatible with most third-party arms) |
| Warranty | 3-year limited warranty |
| Power Supply | AC power cord (included) |
| Control Module | Integrated with keypad and LED display |
| Top Material | Glass panel (optional) and wood veneer/steel |
| Assembly Required | Yes; manual and tools provided (hex wrenches, screwdriver) |
| Maintenance | Clean glass with glass cleaner; steel/wood with moist cloth |
| Safety Features | Automatic stop during movement, reset procedure required |
| Optional Accessories | Surge protector, cord conduit, wire tray, drawer (for 6052) |
| Patents | Protected by US and international patents |
| Designed By | Matthew Weatherly |
| Country of Origin | Made in Taiwan |
Frequently Asked Questions - Sequel 6052 BDI
User questions about Sequel 6052 BDI
0 question about this device. Answer the ones you know or ask your own.
Ask a new question about this device
Download the instructions for your Office in PDF format for free! Find your manual Sequel 6052 - BDI and take your electronic device back in hand. On this page are published all the documents necessary for the use of your device. Sequel 6052 by BDI.
USER MANUAL Sequel 6052 BDI
Product Registration
Registering your new BDI product allows us to send you important product updates, service information and helpful hints related to your BDI products. Register today, and you will be entered to win free a BINK table from BDI: www.bdiusa.com/register
Placement and Maintenance
Sequel® Lift Desk is designed for indoor use on level floors. Clean glass with glass cleaner, and steel parts and wood veneer with a moist cloth.
Your Sequel® Office furniture is engineered for easy assembly. Carefully follow this procedure to prevent any damage. Do not use power tools for assembly of this product.
Step 1
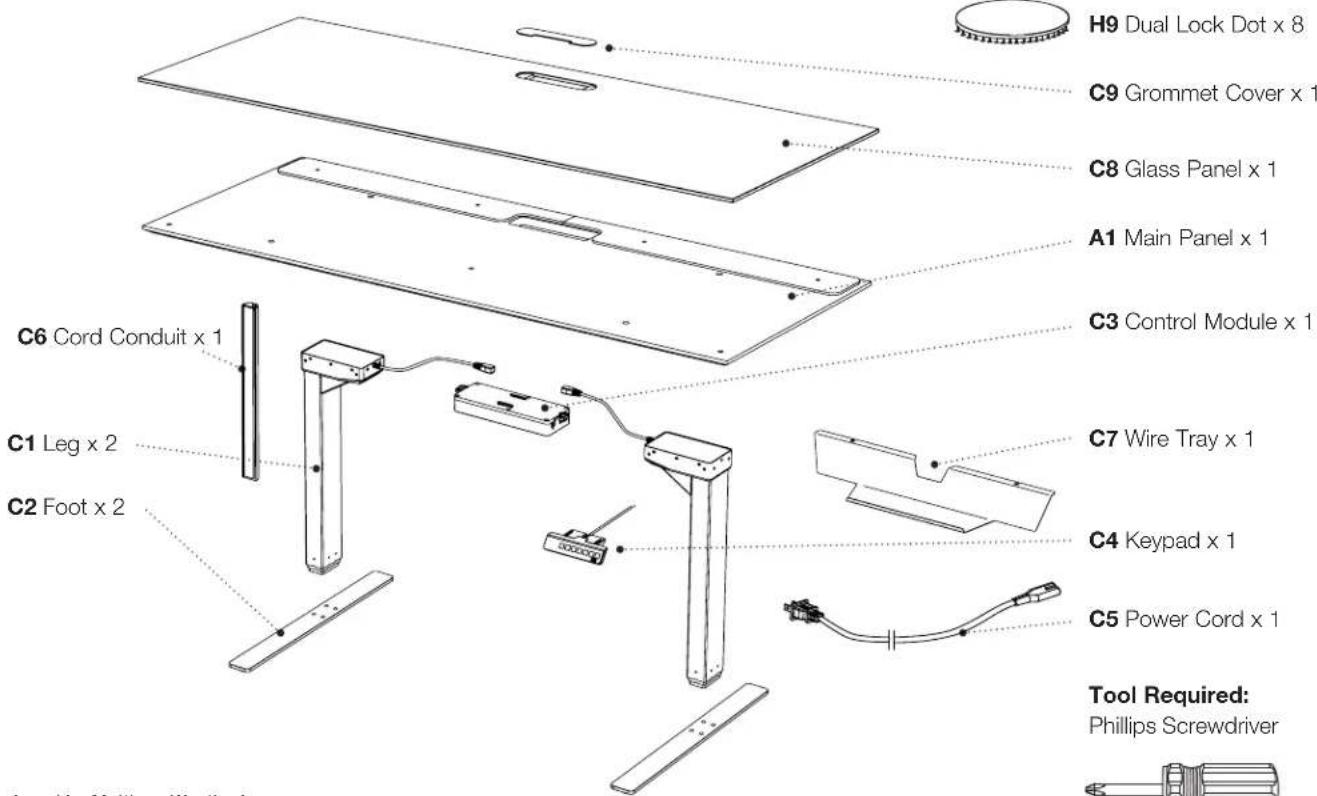
Unpack and identify the parts listed below. The assembly workspace should be a non-marring surface such as carpet. For missing hardware pieces, please contact BDI Customer Service at customerservice@bdiusa.com. For all other concerns, please contact your BDI retailer.
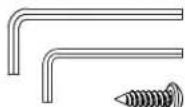

T1 5mm Hex Wrench
T2 4mm Hex Wrench
H1 #10 Wood Screw x 4
H2 #6 Wood Screw x 6

H3 M6 x 12mm Screw x 12

H4 M6 x 16mm Screw x 8
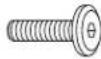
H5 1/4-20 x 12mm Screw x 6
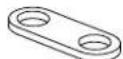
H6 Cord Clip x 6

H7 Leveler x 4

H8 Glass Bumper x 3
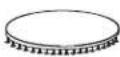
H9 Dual Lock Dot x 8
C9 Grommet Cover x 1
C8 Glass Panel x 1
A1 Main Panel x 1
C3 Control Module x 1
C7 Wire Tray x 1
C4 Keypad x 1
C5 Power Cord x 1
Tool Required:
Phillips Screwdriver
Designed by Matthew Weatherly.
These distinctive product configurations are protected by US and international patents, trade dress, and/or copyright laws. Sequel & BDI are trademarks of Becker Designed, Inc. All rights reserved. ©2016, BDI Made in Taiwan. 05.19.2016 v2
Step 2 - Install Control Module and Keypad
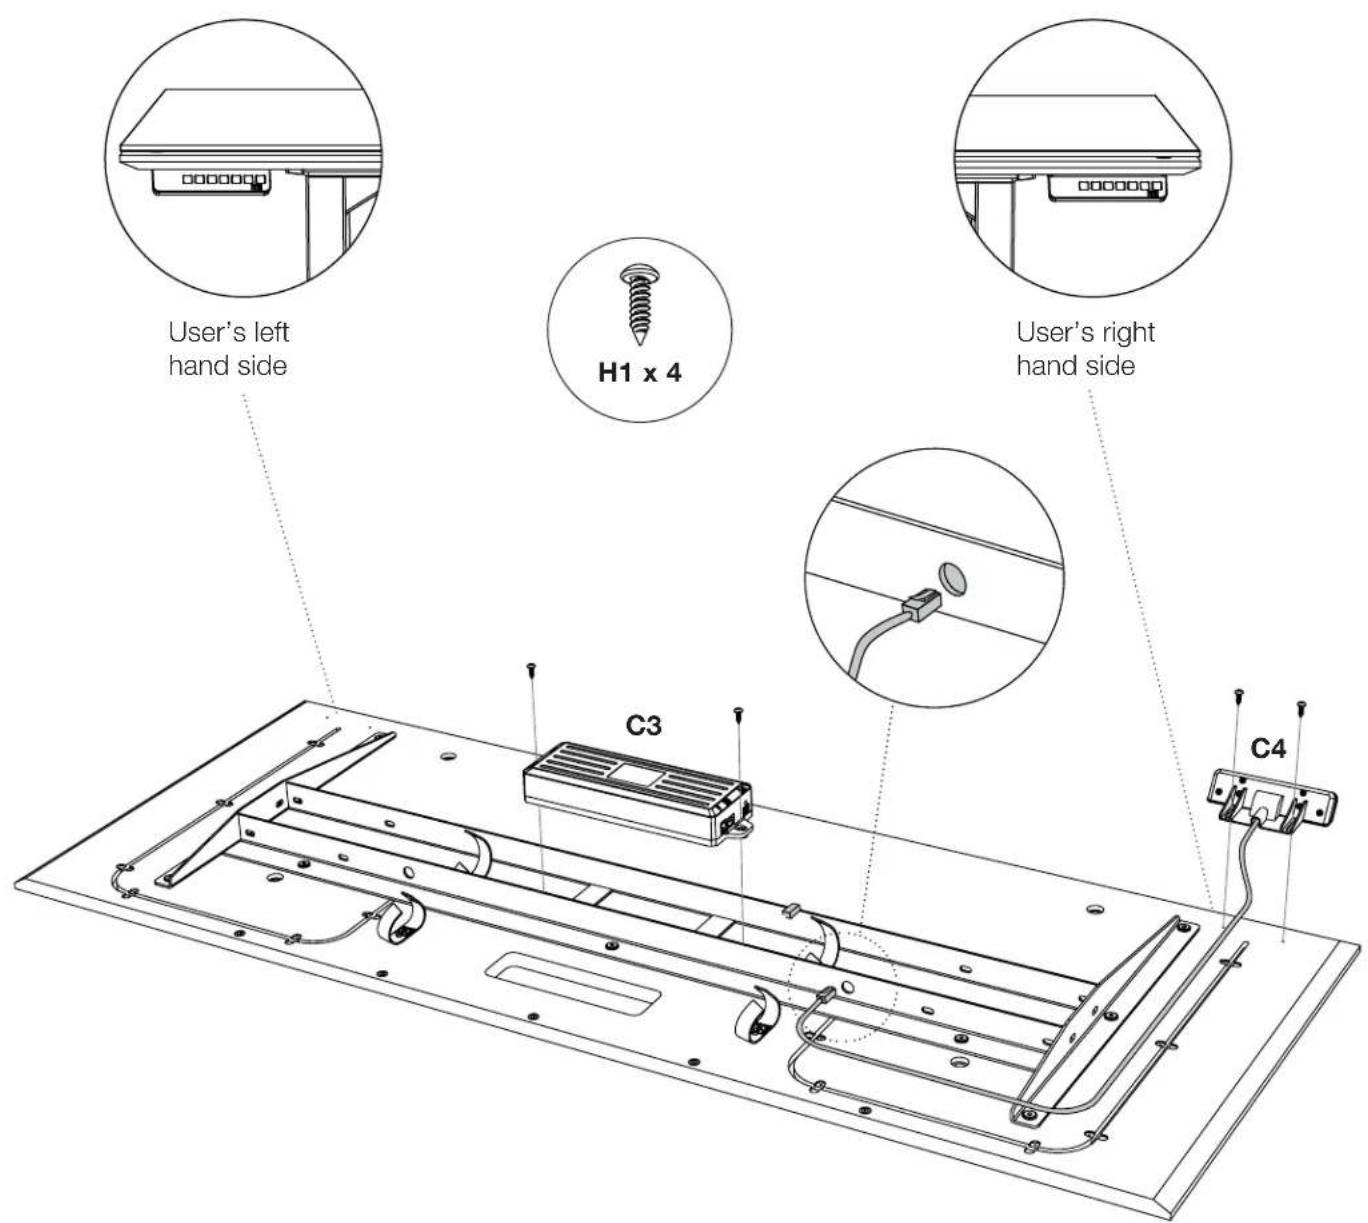
Lay top panel upside down on a soft surface (like carpet). Attach Keypad C4 on the desired side (left or right) with 2 Wood Screws H1. Orient the Control Module C3 so that the Keypad port is facing the Keypad side and secure between the 2 steel rails with 2 Wood Screws H1 as shown. Route the Keypad cord into the groove in the panel and through the hole in the metal frame.
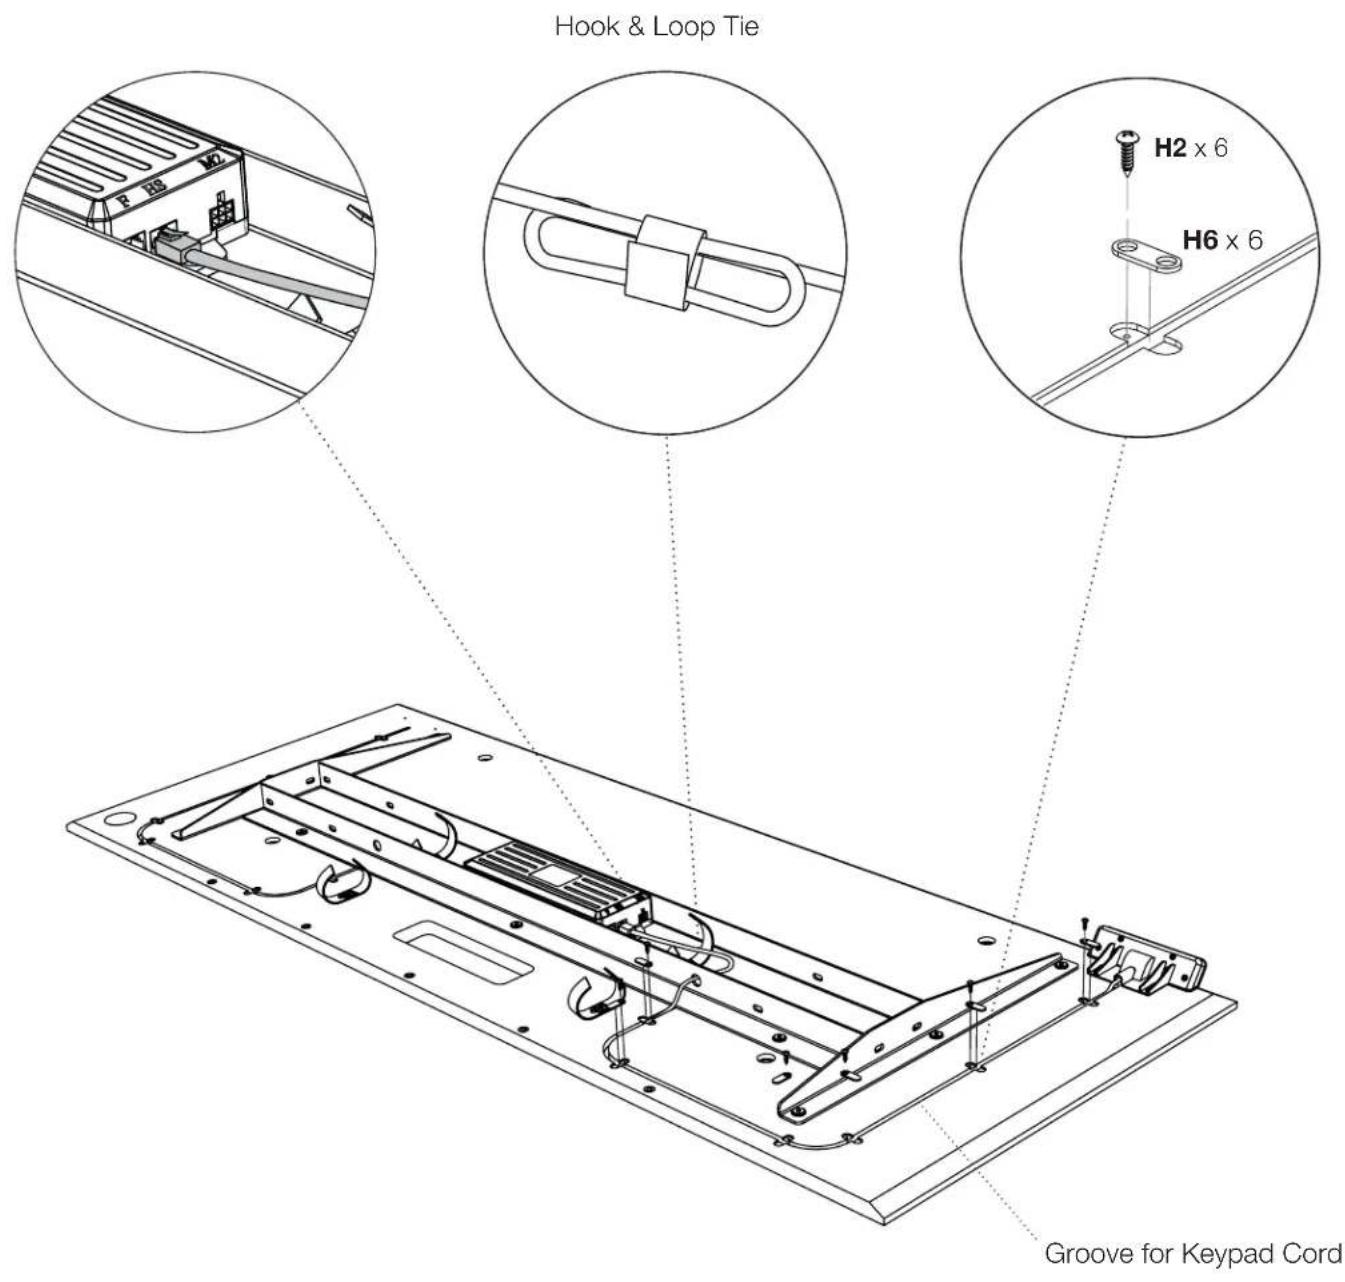
Step 3 - Secure the keypad cord into the groove using 6 cord clips H6 and 6 wood screws H2. Connect keypad cord into the Control Module Port (labeled HS) and bundle the slack with the Hook & Loop Tie.
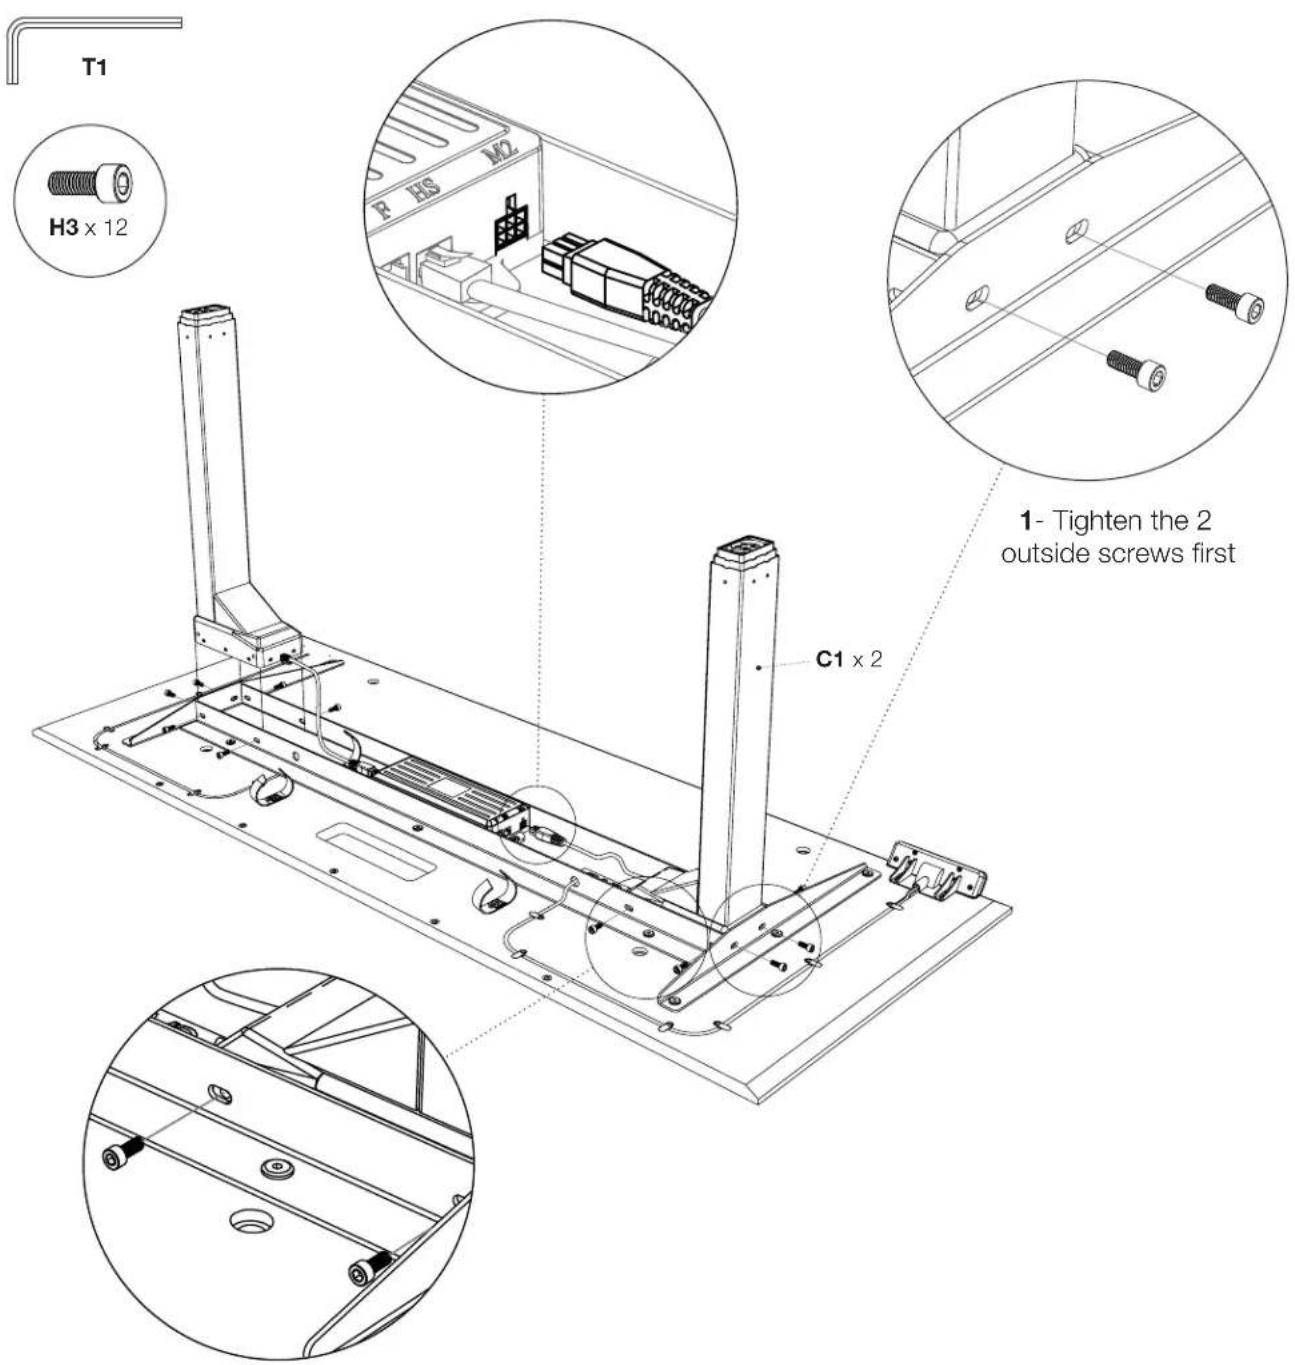
Step 4 - Attach 2 Legs C1 with 6 Screws H3 per Leg using Hex Wrench T1. Start all 6 screws before tightening them down. Tighten the 2 outside screws first, then tighten the other 4 screws.
Step 5 - Connect the leg cords to the closest port of the control module and bundle up any slack using the hook & loop tie.
2- Tighten the front/back screws next
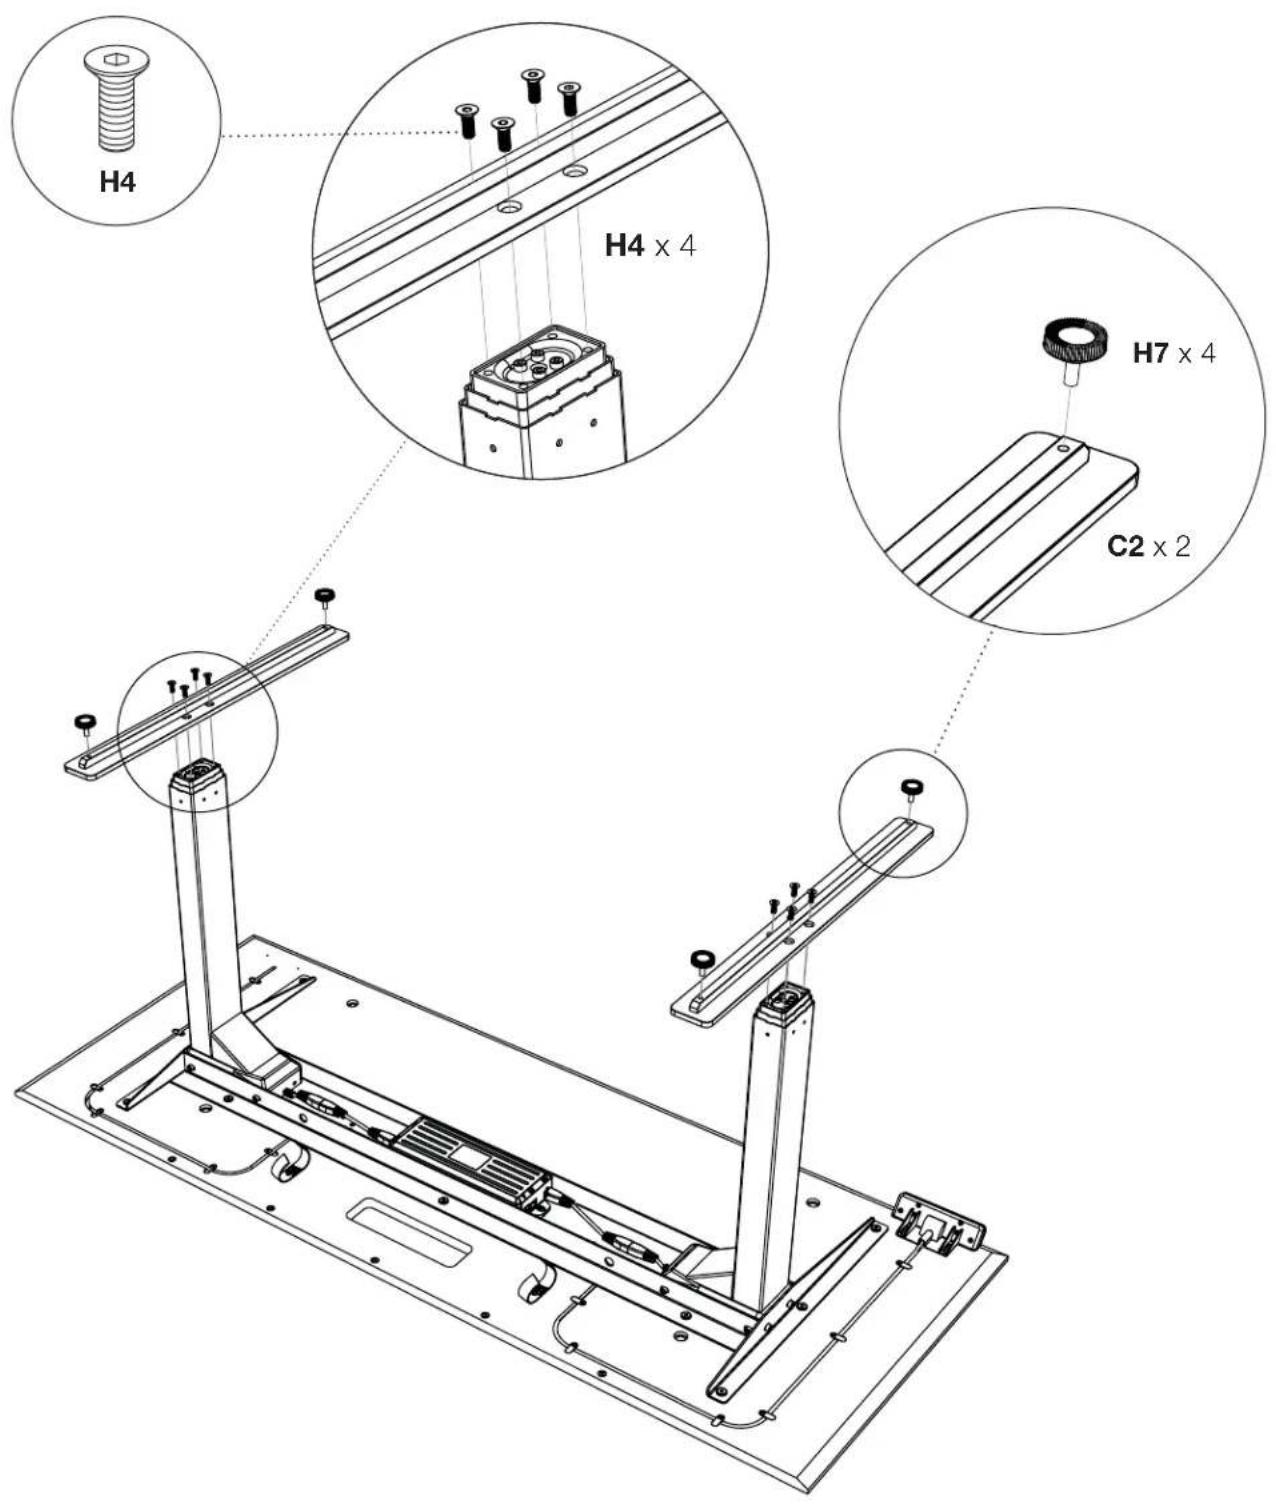
Step 6 - Attach each Foot C2 with 4 Screws H4 using Hex Wrench T2. The long end of the foot faces the front edge of the desk. Thread in Levelers H7 into the bottom front and back corners of each foot.
Optional Drawer Assembly for 6052
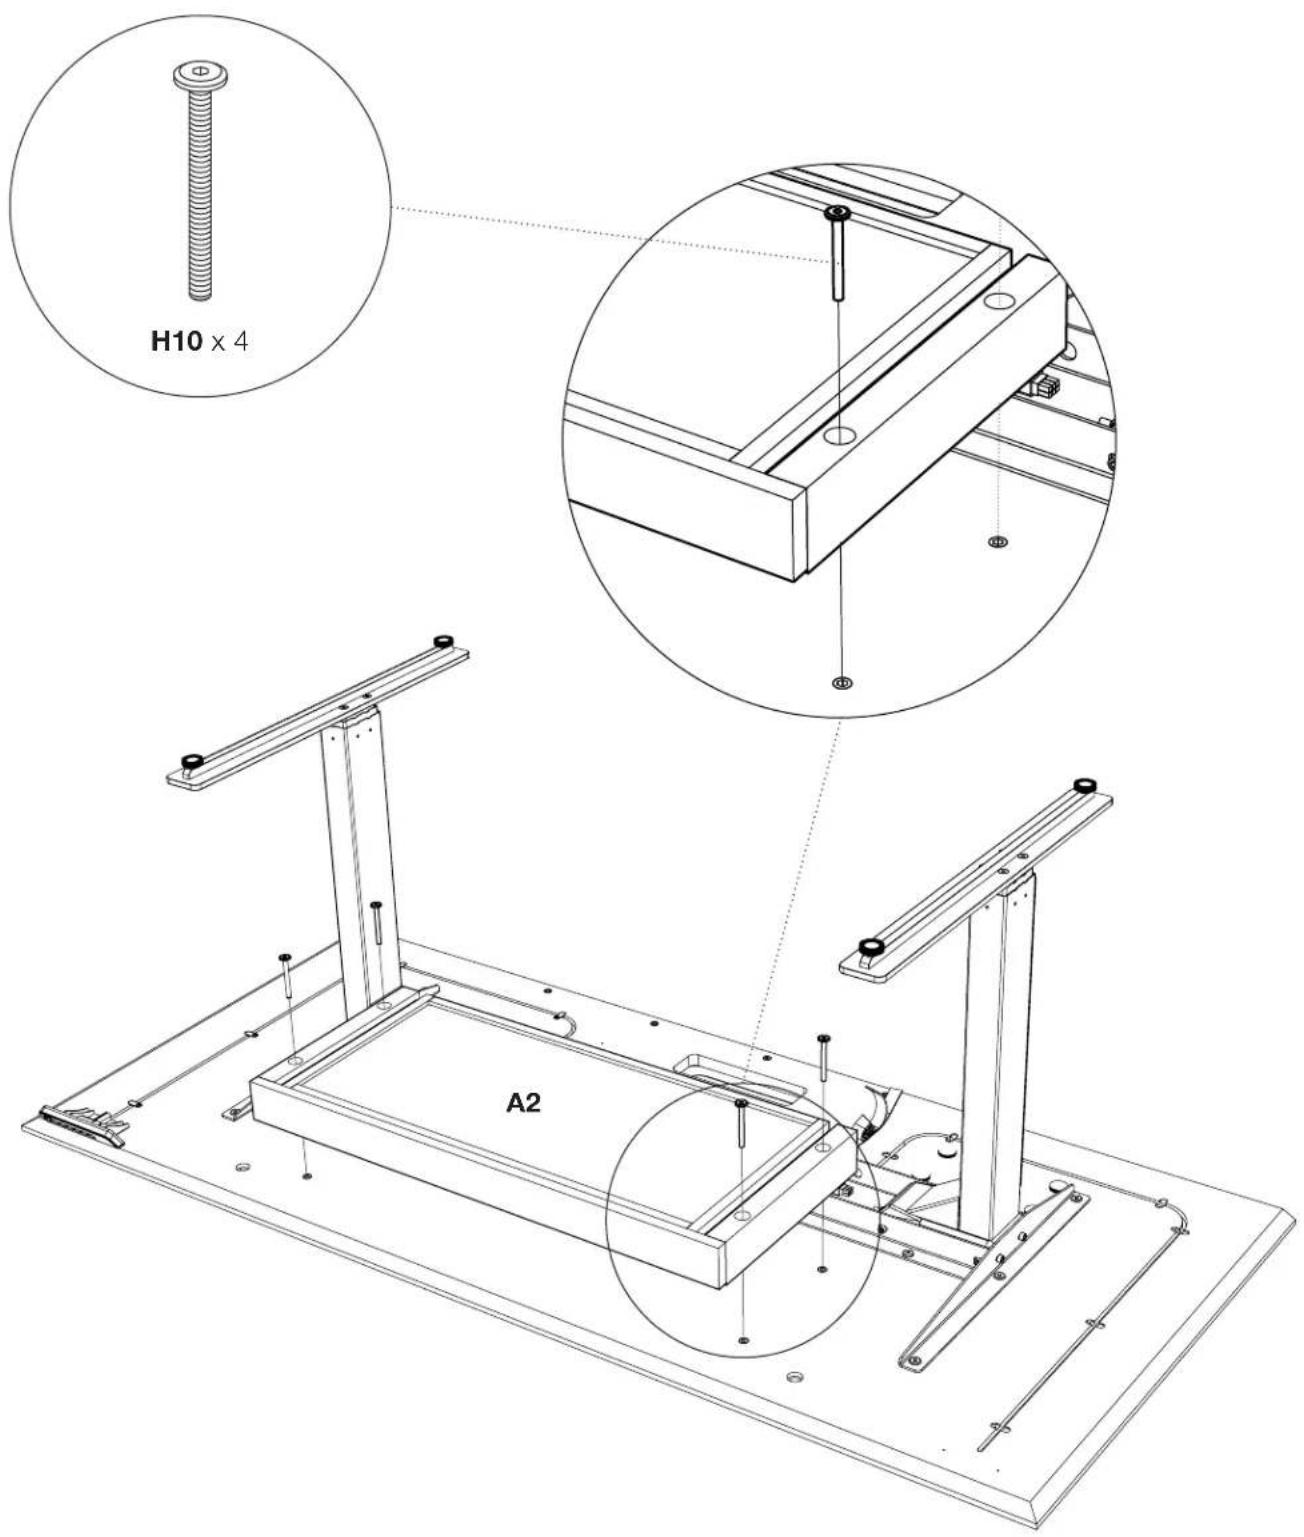
Attach the optional Drawer (for 6052) using 4 Screws H10 that came with your drawer as shown.
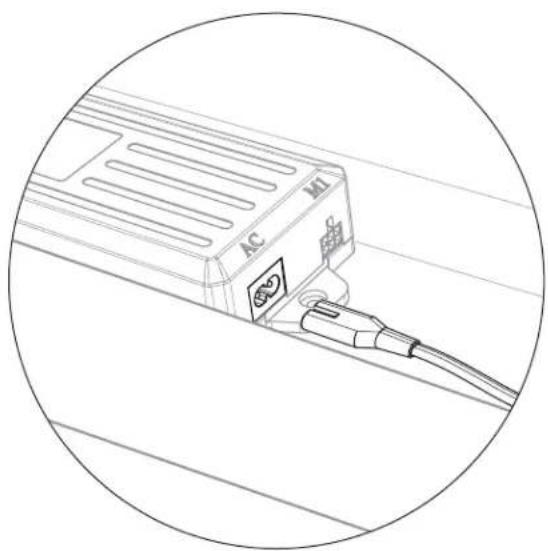
Step 7 - Plug the Power Cord C5 into the power port on the Control Module C3 (labeled AC).
natural_image
Line drawing of an electronic device with AC and M labels, connected to a cable (no text or symbols beyond labels)Step 8 - Turn the desk upright and plug it in to adjust the height
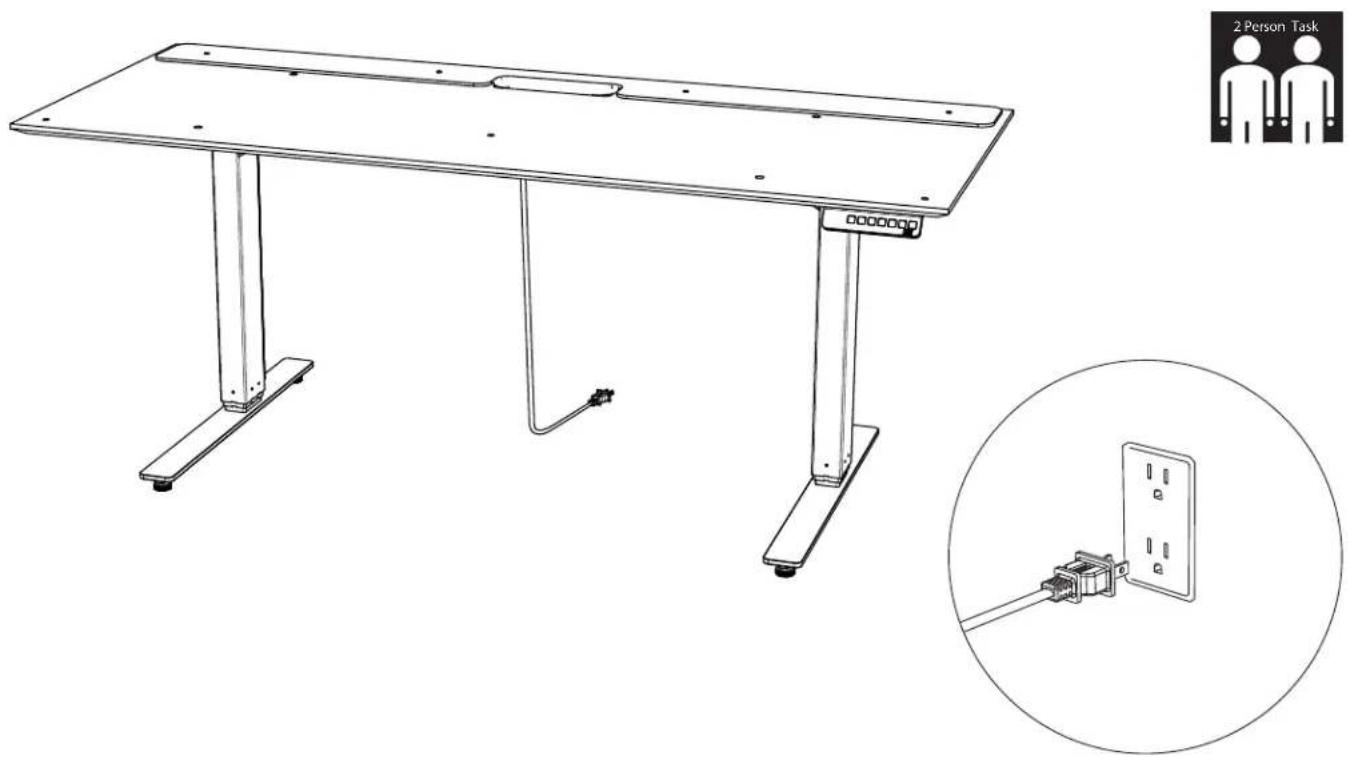
With the help of another person, carefully flip the desk on to its feet. Plug the other end of the Power Cord into the nearest wall socket. Refer to the User Manual on Page 13 and follow the Reset Procedure. You may now adjust the height of your desk to make the remaining steps easier.
natural_image
Line drawing of a modern office desk with two legs and a small cable, plus an inset showing a separate close-up of a connected electrical connector (no text or symbols)Step 9 -Install the glass bumpers.
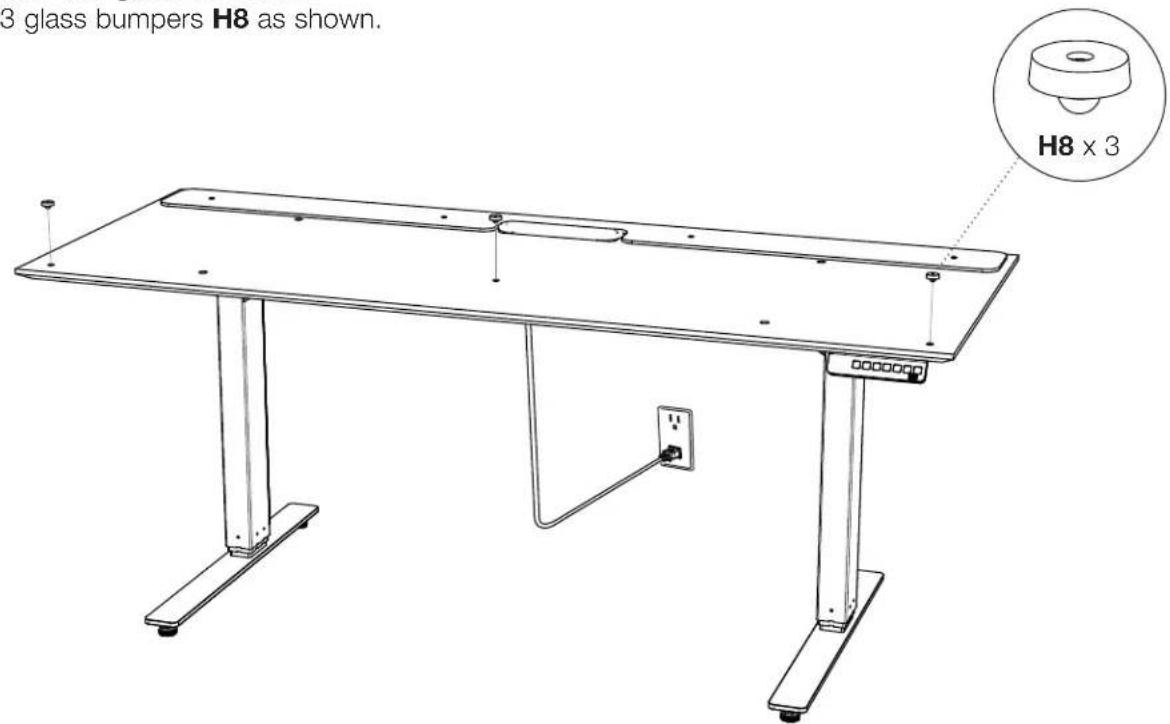
Install the 3 glass bumpers H8 as shown.
Step 10 - Install the glass panel.
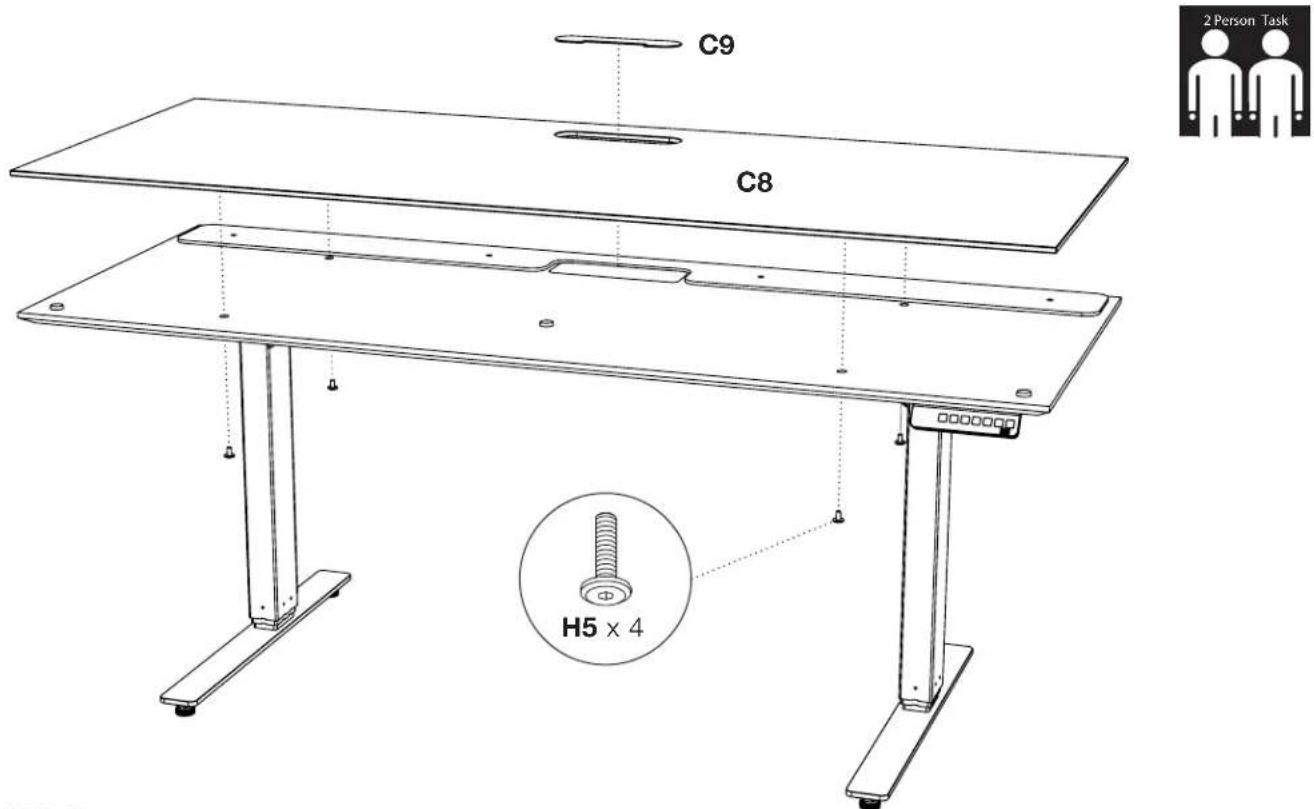
With the help of another person, carefully place the Glass Panel C8 on top of the desk top with the metal pucks facing down. The stem of the glass pucks should slip into 4 holes. Secure the glass panel in place from below using 4 Screws H5. Place Grommet Cover C9 into the grommet hole.
Attach dual lock fastener to the bottom of the surge protector (optional)
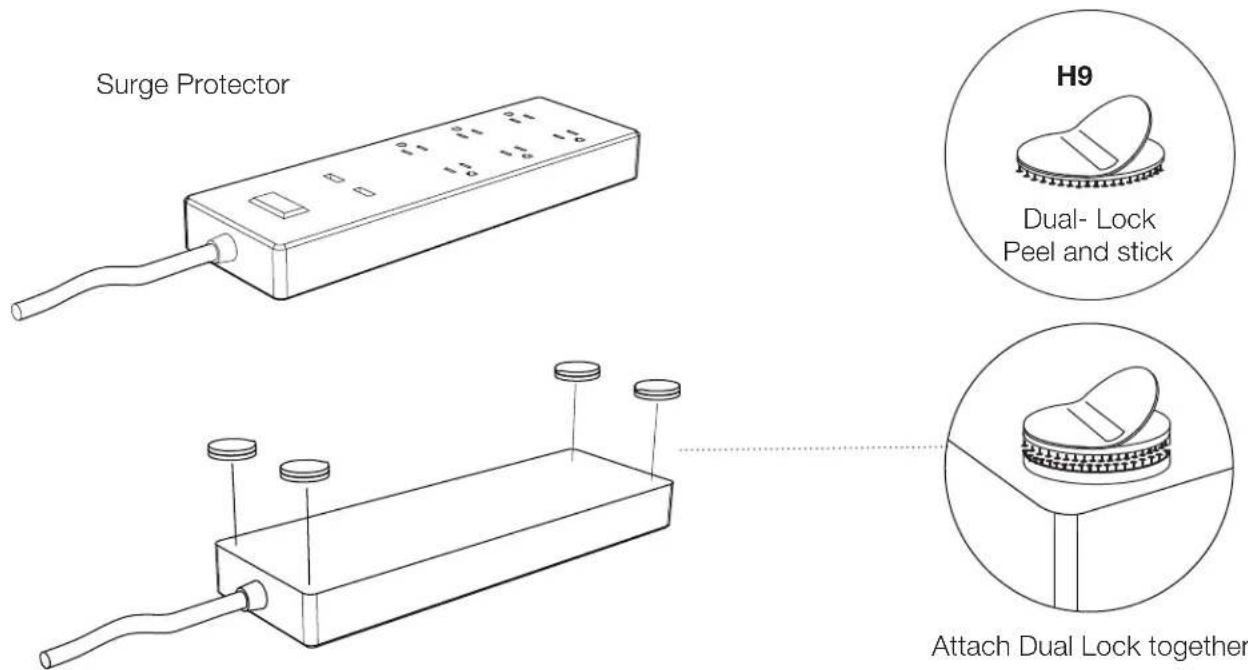
Secure 4 pairs of Dual-Lock Dots H9 to the bottom corners of the surge protector.
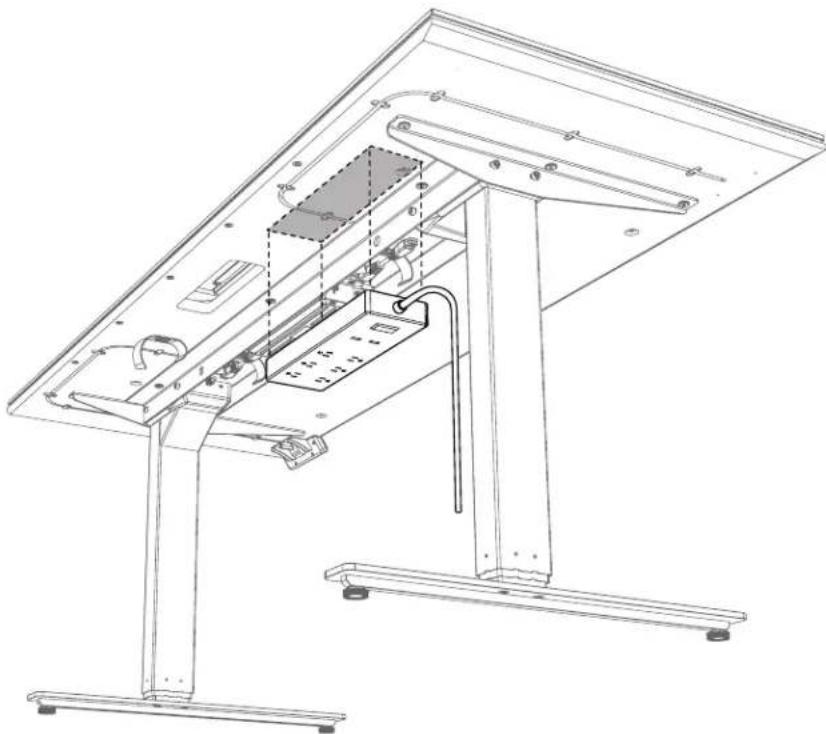
Attach the surge protector (optional)
For easy installation, raise the height of the desk. Determine where you prefer the surge protector to be mounted. We suggest just behind the metal rails towards the leg closest to your wall outlet. Make sure the area is dust free. Remove the adhesive film and attach the surge protector with the power cord facing the nearest leg. Press firmly to allow the pressure sensitive adhesive to set.
natural_image
Technical line drawing of a mechanical assembly with no visible text or symbolsAttach the Cord Conduit (optional)
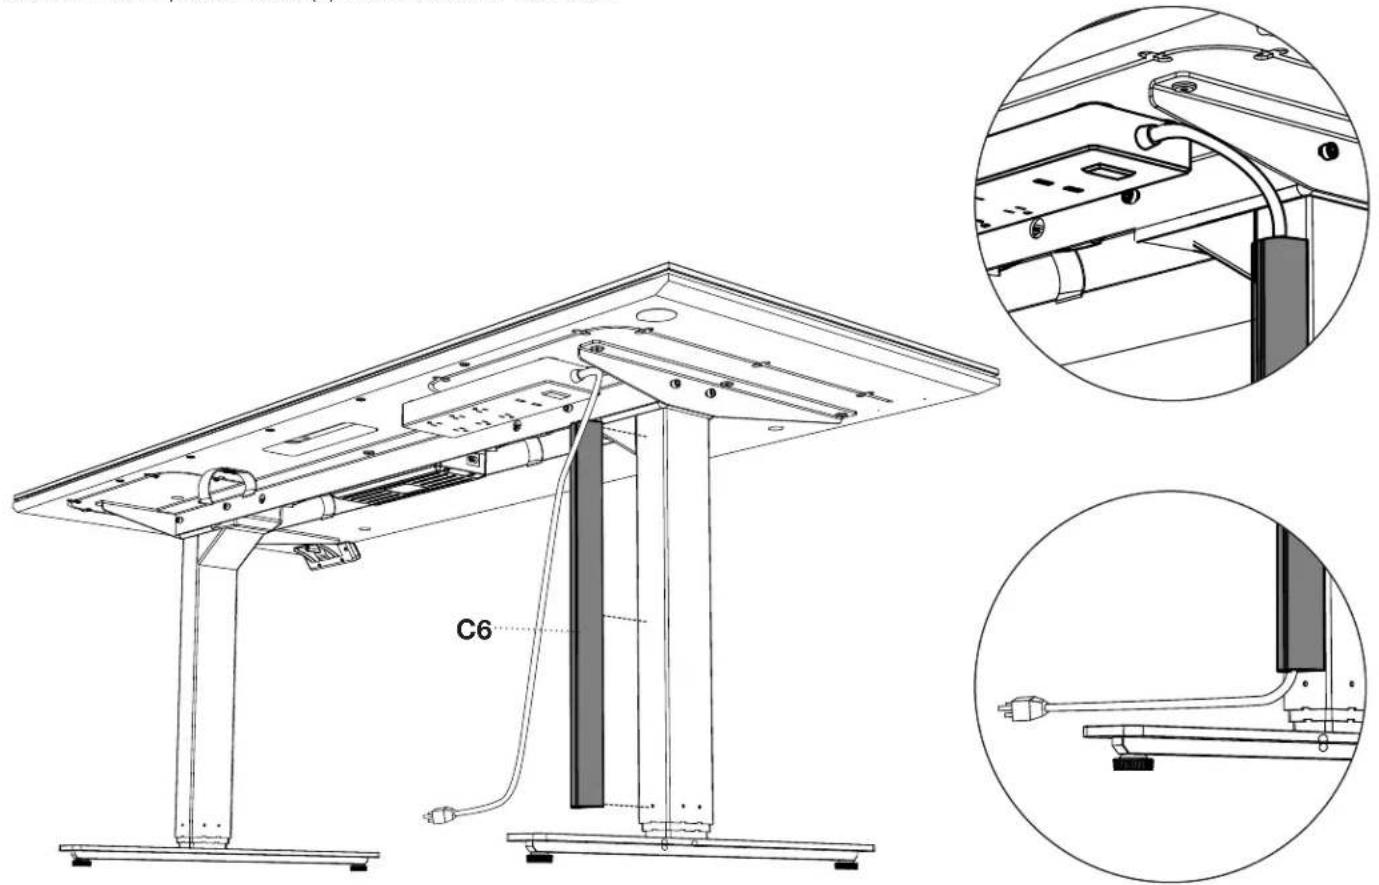
Remove adhesive film and attach the Cord Conduit C6 to the back of the top section of the leg nearest the wall outlet. Insert power cord(s) into the Cord Conduit.
natural_image
Technical line drawing of a mechanical assembly with labeled components (C6), showing internal components and external views (no text or symbols beyond labels)Remove excess lubricant from legs
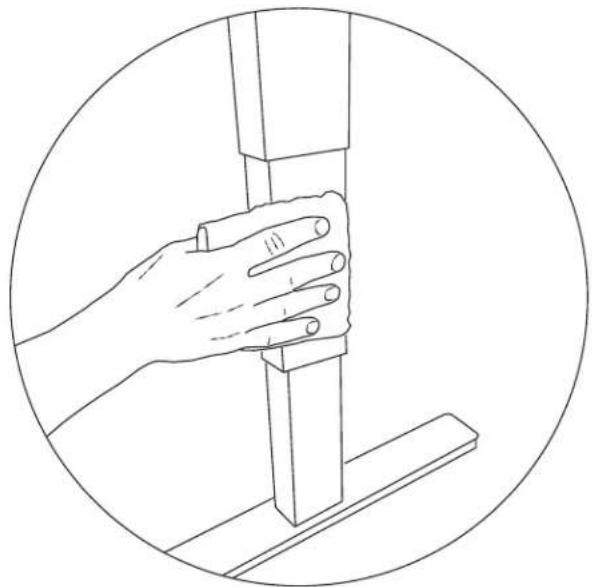
When new, the legs may have excess lubricant. Extend the legs to their highest position and wipe off excess lubricant with a clean, dry cloth or rag.
natural_image
Line drawing of a hand holding a vertical post with a circular frame (no text or symbols)Attach the wire tray (optional)
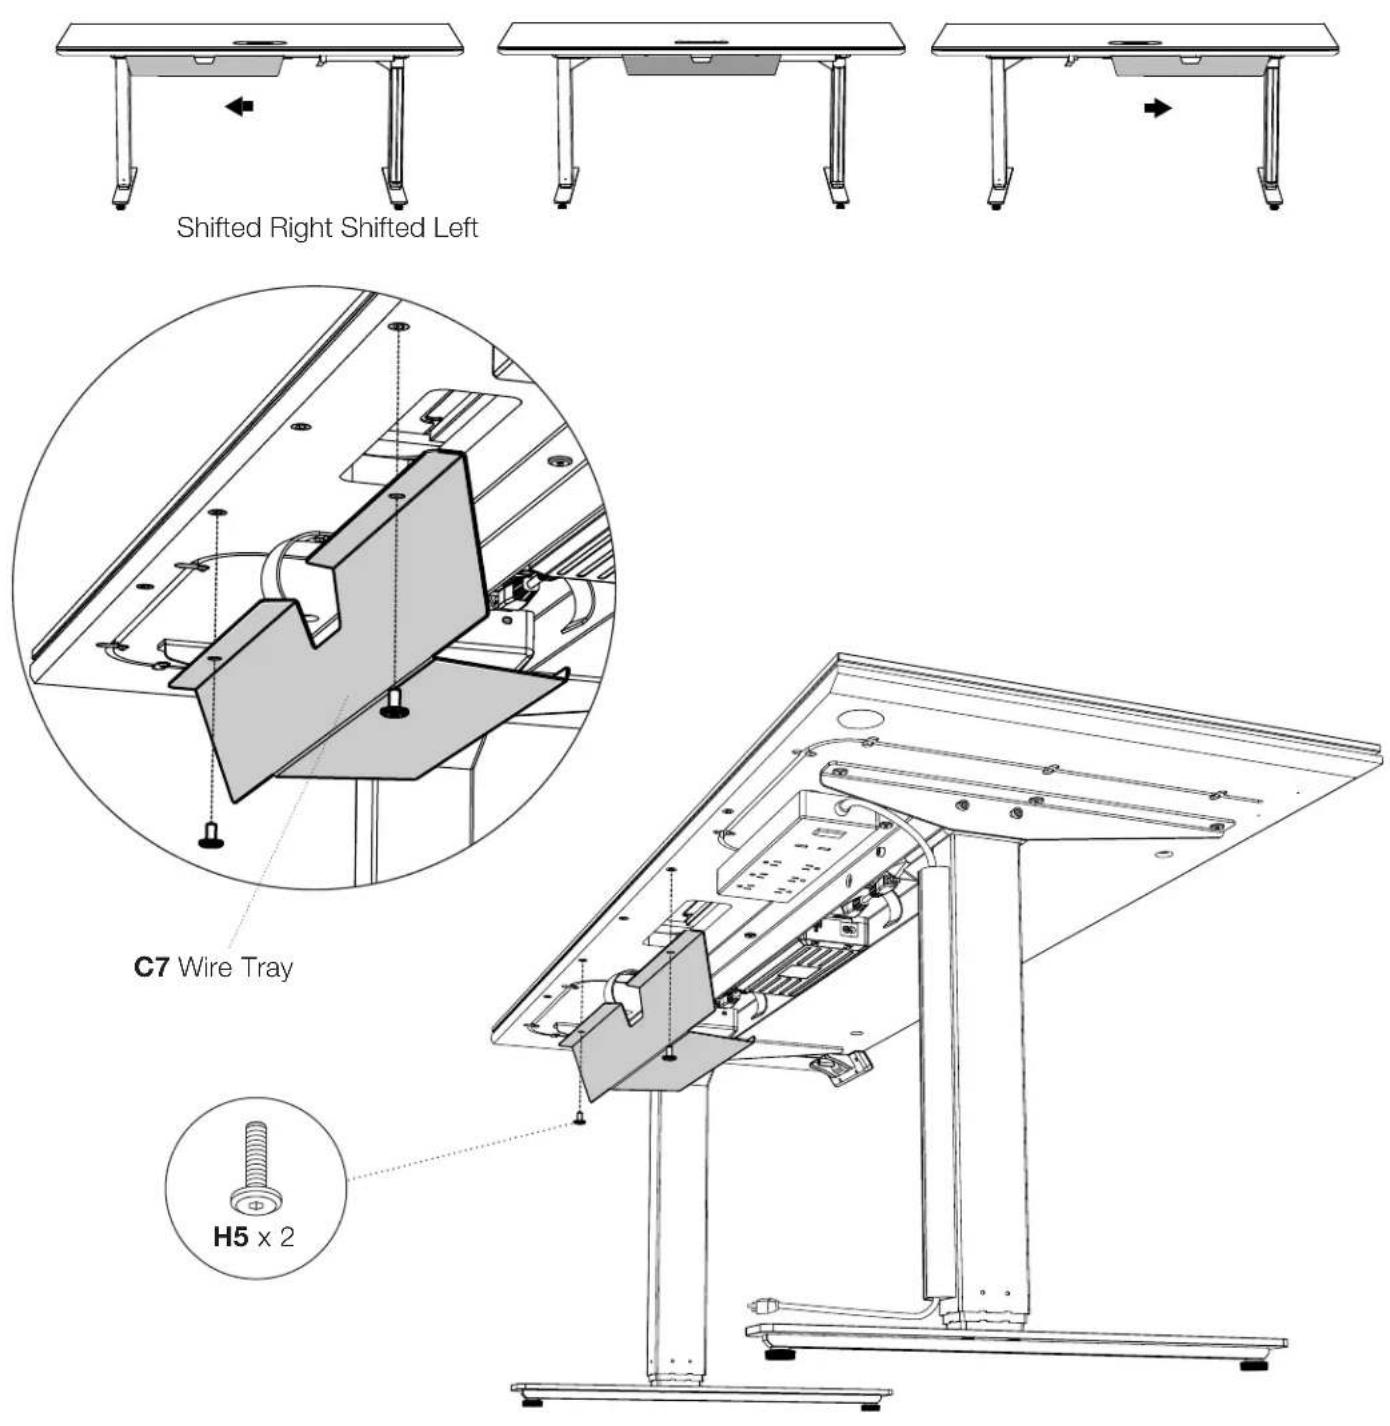
Determine if you prefer the wire tray to be centered, shifted left or shifted right. If you plan to use a monitor arm, it might be better to shift the position of the Wire Tray to make the monitor arm attach more centrally. Attach the metal Wire Tray C7 to the back edge of the bottom of the desk with 2 Screws H5.
Attach a monitor arm (optional)
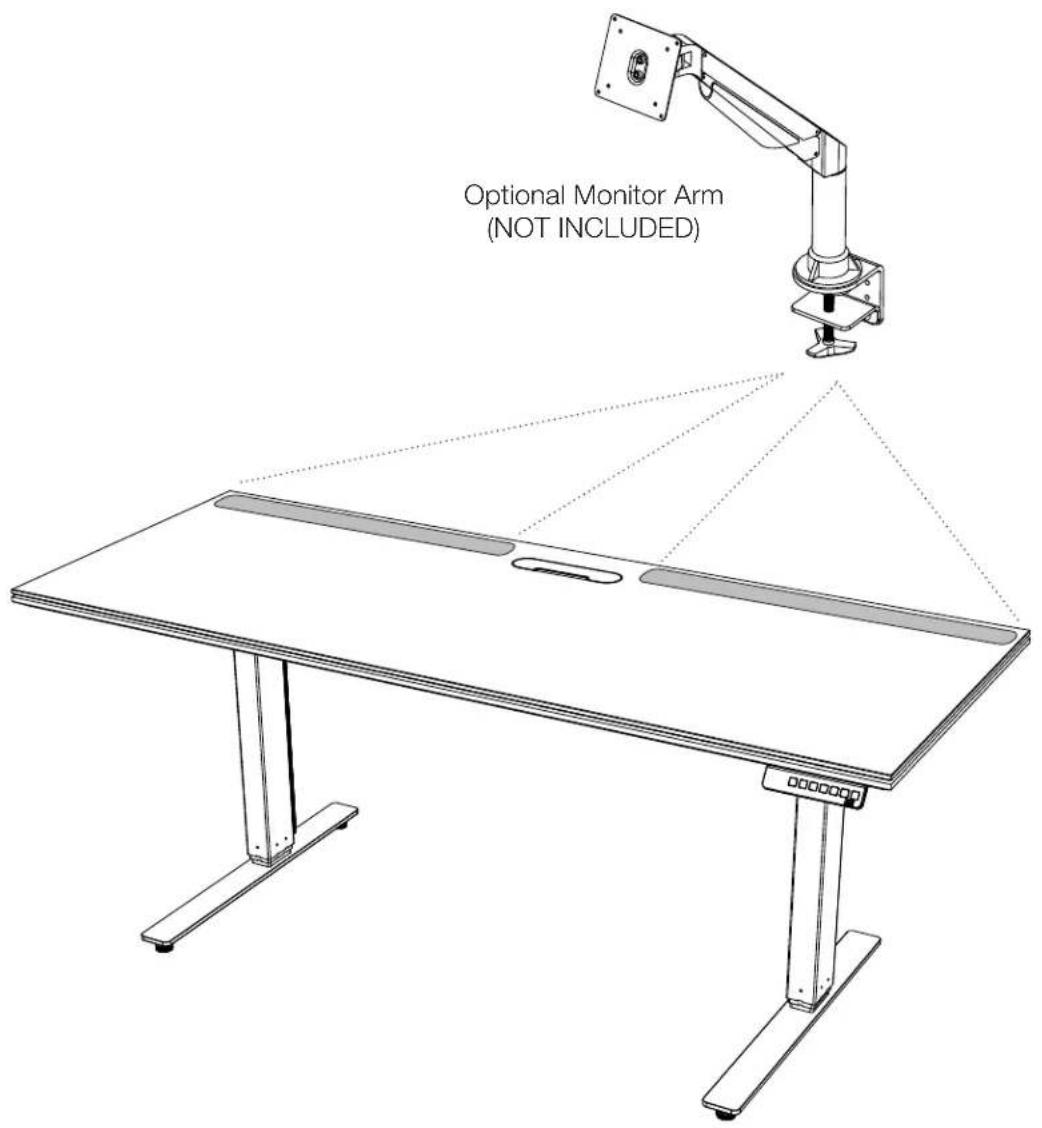
The Sequel Lift Desk is compatible with most third party monitor arms. Attach your monitor arm on either side of the grommet hole along the back edge (see gray area below), staying at least 1" away from the grommet hole.
User Manual
Caution!
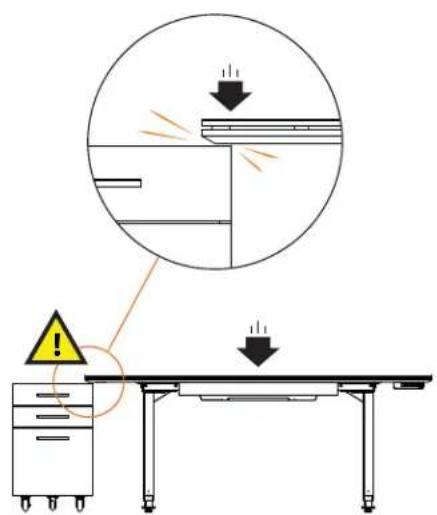
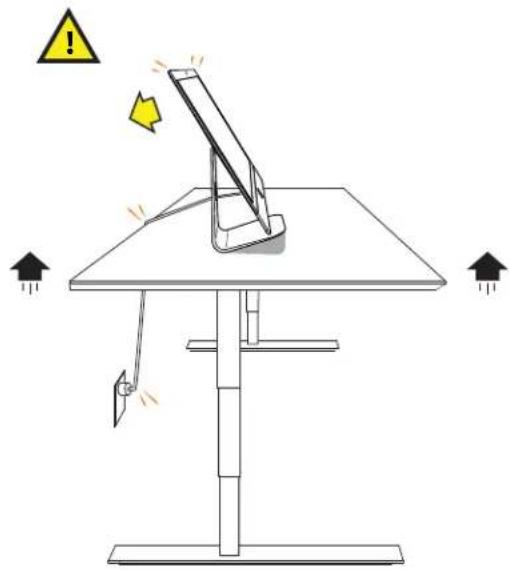
- Make sure there are no obstacles under the path of the desk.
- Make sure the desk top is not touching any walls.
- Make sure all the cords are long enough to reach lowest and highest desk positions.
natural_image
Diagram of a simple mechanical setup with a lever and stand, showing directional arrows and warning symbols (no text or labels)Important:
- You must reset the desk prior to use.
Reset Procedure:
- Press and hold the DOWN button on the keypad until the desk reaches its lowest height.
- Release the DOWN button.
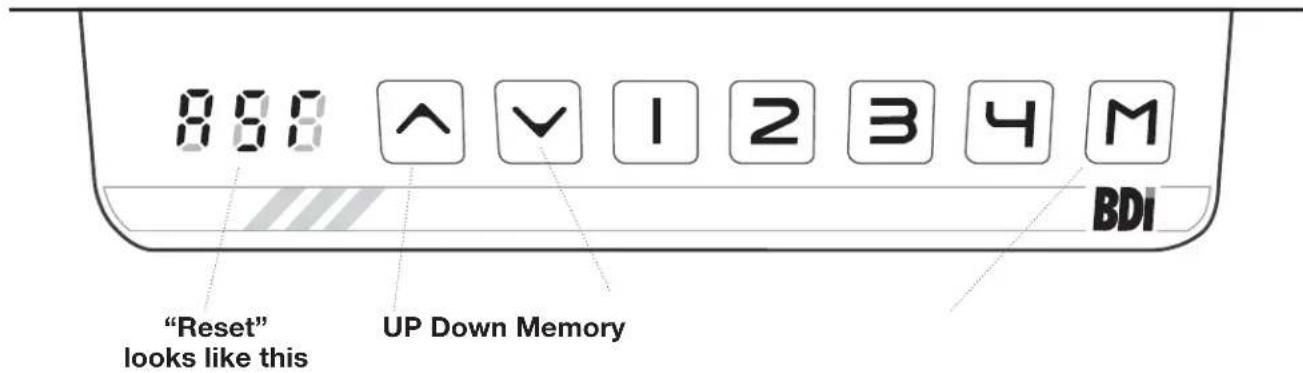
- Press and hold the DOWN button again until the LED sidplay reads "RST". 890
- Release the DOWN button.
- Press and hold the DOWN button again until the desk lowers a little bit more, slightly rises and stops.
- Release the DOWN button. Your desk is now ready for use.
Height Adjustment
The desk base can be adjusted by pressing and holding either the UP or DOWN button until the desired height is reached.
To program up to four presets, use the up/down buttons to find a desired height, then press "M" followed by a number 1-4.
Caution:
Once a preset button is pushed, the desk will move to the programmed height. To stop movement, press any button on the key pad.
Setting the Upper and Lower Limits
The base is designed to go to its minimum and maximum heights, allowing for the widest possible range. If you prefer to change the settings to a more narrow range, follow these steps:
Make sure the power is ON and a number reads in the LED display (if no number appears, please follow the RESET procedure on the previous page).
To set the Upper-limit position:
Use the UP/DOWN buttons to move the base to the desired maximum height position. Press and hold the M button until the LED display flashes "S" once and let go of the button. Then press and release the "M" button 2 more times quickly. The LED display will change to "999" on the third push, and then automatically return to the selected height. The new upper limit is now set.
To set the Lower-limit position:
Use the UP/DOWN buttons to move the base to the desired minimum height position. Press and hold the "M" button until the LED display flashes "S" once and let go of the button. Then press and release the "M" button 2 more times quickly. The LED display will change to "000" on the third push, and then automatically return to the selected height. The new lower limit is now set.
To remove the upper/lower limit positions:
Use the UP/Down button to move the desk to any new position. Press and hold the "M" button until the LED display flashes "S" once and let go of the button. Then press and release the "M" button in succession until the display changes to "555" (ignore any interim readings). After a few seconds, the display automatically will change back to the numbered height position. The upper and lower limits are now removed.
After the upper and lower limits are set, the previous memory positions (1,2,3,4) may be outside the new range of movement. If so, simply reset the memory positions.
If you attempt to revise a previously set upper or lower limit and it is outside of the existing range, you will need to remove the previously set upper/lower limits first.
Technical Specifications
| Height Range 24.75”–49.75” (63–126 cm) |
| Travel Speed 1.5" per second |
| Weight Capacity 150 lbs (68 kg) |
| Duty Cycle 10%, Max 2 m nutes with 18 minutes off |
| Memory 4 position presets |
| Monitor Arm Compatible Yes |
| Warranty 3-Year Limited Warranty |
Trouble Shooting
If your desk is not functioning properly it may need to be reset. Follow the RESET procedure above. If your LED readout displays an error message Er1 confirm that all wired connections are secure. Then perform the reset procedure above.
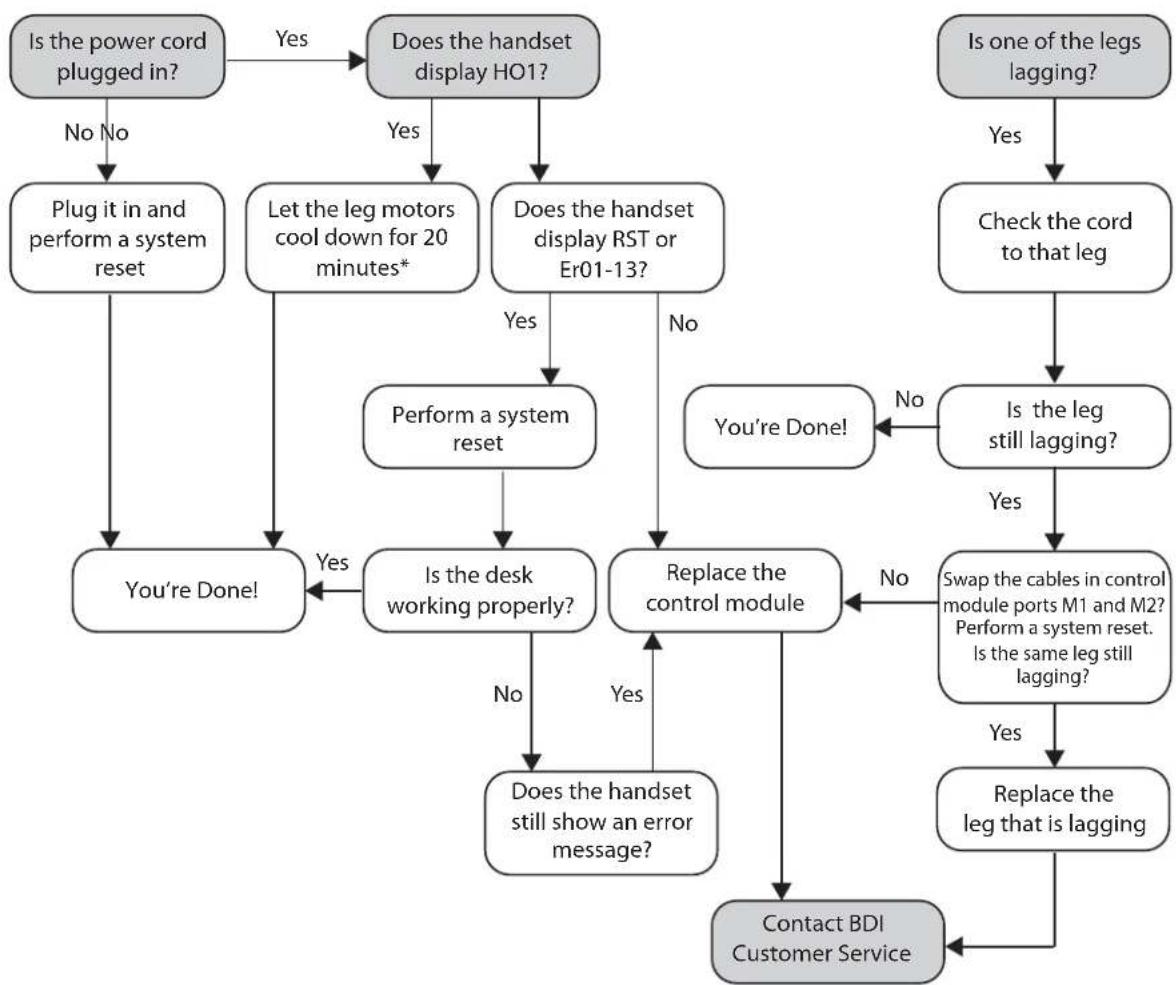
flowchart
graph TD
    A["Is the power cord plugged in?"] -->|No| B["Plug it in and perform a system reset"]
    A -->|Yes| C["Does the handset display HO1?"]
    C -->|Yes| D["Let the leg motors cool down for 20 minutes*"]
    C -->|No| E["Does the handset display RST or Er01-13?"]
    F["Is one of the legs lagging?"] -->|Yes| G["Check the cord to that leg"]
    G --> H["Is the leg still lagging?"]
    H -->|Yes| I["Swap the cables in control module ports M1 and M2? Perform a system reset. Is the same leg still lagging?"]
    H -->|No| J["Replace the control module"]
    I -->|Yes| K["Does the handset still show an error message?"]
    I -->|No| L["You're Done!"]
    J -->|Yes| M["Is the desk working properly?"]
    J -->|No| N["You're Done!"]
    K --> O["Does the handset still show an error message?"]
    L --> P["Replace the control module"]
    M --> Q["Contact BDI Customer Service"]
    N --> Q
    O --> Q
    P --> Q
* The desk has reached an automated cool down period due to overheating
- Product Registration
- Placement and Maintenance
- Step 1
- Step 2 - Install Control Module and Keypad
- Optional Drawer Assembly for 6052
- Step 8 - Turn the desk upright and plug it in to adjust the height
- Step 9 -Install the glass bumpers.
- Step 10 - Install the glass panel.
- Attach dual lock fastener to the bottom of the surge protector (optional)
- Attach the surge protector (optional)
- Attach the Cord Conduit (optional)
- Remove excess lubricant from legs
- Attach the wire tray (optional)
- Attach a monitor arm (optional)
- User Manual
- Caution!
- Important:
- Reset Procedure:
- Height Adjustment
- Caution:
- Setting the Upper and Lower Limits
- To set the Upper-limit position:
- To set the Lower-limit position:
- To remove the upper/lower limit positions:
- Technical Specifications
- Trouble Shooting
Brand : BDI
Model : Sequel 6052
Category : Office