55FL108MWXL - Washing machine Ardo - Free user manual and instructions
Find the device manual for free 55FL108MWXL Ardo in PDF.


| Product Type | Freestanding Washing Machine |
| Brand | Ardo |
| Model | 55FL108MWXL |
| Dimensions (H x W x D) | 850 x 600 x 540 mm |
| Weight | 65 kg |
| Power Supply | 220-240 V ~ 50 Hz, 10 A |
| Energy Efficiency Class | A+++ |
| Capacity (kg) | 8 kg |
| Maximum Spin Speed | 1400 rpm |
| Programs | Cotton, Synthetics, Delicates, Quick Wash, Wool, Rinse & Spin, Drum Clean |
| Noise Level (Wash/Spin) | 56 dB / 75 dB |
| Safety Features | Child Lock, Door Lock, Overflow Protection, Unbalance Control |
| Water Consumption per Cycle | 45 L (approx.) |
| Annual Energy Consumption | 180 kWh (approx.) |
| Display | LED Digital Display with Cycle Status |
| Detergent Dispenser | 3-Compartment Drawer (Main Wash, Pre-Wash, Fabric Softener) |
| Door Type | Porthole, 180° Opening, with Child Lock |
| Installation Type | Freestanding |
| Spare Parts Availability | Available (Belts, Filters, Door Seal, Inlet Valve) |
| Repairability Index | 8.2 / 10 |
Frequently Asked Questions - 55FL108MWXL Ardo
User questions about 55FL108MWXL Ardo
0 question about this device. Answer the ones you know or ask your own.
Ask a new question about this device
Download the instructions for your Washing machine in PDF format for free! Find your manual 55FL108MWXL - Ardo and take your electronic device back in hand. On this page are published all the documents necessary for the use of your device. 55FL108MWXL by Ardo.
USER MANUAL 55FL108MWXL Ardo
natural_image
Illustration of hands using a tool to adjust or install a component, with motion arrows indicating movement (no text or symbols present)
natural_image
Hand holding a mechanical component with a spring and arrow indicating rotation (no text or symbols)
natural_image
Hand holding a tool interacting with a mechanical component, showing a curved pipe and mounting bracket (no text or symbols visible)natural_image
Illustration of a hand using a faucet to clean a sink in a tiled bathroom (no text or symbols)natural_image
Diagram of a refrigerator interior with directional arrows indicating movement or flow, no text or symbols present

UTILIZZO DELLA LAVATRICE
AVVERTENZE PRIMA DELL'USO

natural_image
Illustration of a hand opening a washing machine with a black arrow indicating direction (no text or symbols)USO DEI DETERSIVI
natural_image
Person inserting a device into a car airbag (no text or symbols visible)
natural_image
Illustration of a bottle pouring liquid into a device with a handle, labeled '19' (no text or symbols on the diagram itself)natural_image
Diagram of a device drawer with internal compartments and a mouse, showing no text or symbols
COME ELIMINARE ALCUNE MACCHIE
natural_image
Illustration of a hand washing a washing machine with a hand operating the valve (no text or symbols present)natural_image
Illustration of a hand washing a sink with a tool, no text or symbols presentnatural_image
Hand inserting a device into a drawer, showing internal components and a directional arrow (no text or symbols)natural_image
Illustration of a hand inserting a card into a device (no text or symbols visible)
natural_image
Hand inserting a component into a device, showing a curved arrow and label '25' (no text or symbols on the diagram itself)SOLUZIONE DEI PROBLEMI
Thank you for choosing our product.
Please read these instructions carefully before connecting and using the appliance.

natural_image
Simple line drawing of an open book with no text or symbols visibleKnowledge of the operating principles will help guarantee correct and safe use of the appliance. This instruction booklet contains the technical characteristics of the washing machine and is full of useful information regarding its operation, all designed to help you get the best out of your appliance. If the appliance is sold or handed over for use by others, remember to give the new user the instruction booklet.
MODEL: ....DATE OF PURCHASE: ..../..../
SERIAL NUMBER:
CONTENTS

NOTES AND ADVICE FOR THE USER 14-15
DESCRIPTION OF THE APPLIANCE 15
INSTALLING THE WASHING MACHINE 16-18
- Unpacking the washing machine and removing the locking devices 16
• Levelling the washing machine 16 - Connecting to the mains water supply 17
- Connecting to the mains electricity supply 18
USING THE WASHING MACHINE 18-20
- Recommendations prior to use 18
• Use of detergents 19
• How to remove some stains 20
• International clothing care symbols 20
FAINTENANCE 21-22
- Cleaning the washing machine 21
- Cleaning the filter 21
- Resolving problems 22
This appliance is marked as complying with European Directive 2012/19/EU, Waste Electrical and Electronic Equipment (WEEE). Make sure that the product is disposed of in a correct manner. The user is obliged to contribute towards preventing negative consequences for health and the environment.

The symbol affixed to the product or accompanying documents signifies that the product must not be treated as normal domestic refuse, but must be delivered to an authorised collection centre to enable the electric and electronic equipment to be recycled. When disposing of the appliance, comply with local waste disposal regulations. For further information on the treatment, recovery and recycling of this product, refer to the appropriate offices, local domestic waste collection service or the retailer from where the appliance was purchased.

Before connecting the appliance read these instructions carefully. Repairing the failure arising from inappropriate connections or use of the appliance is not covered by the guarantee.
THE MANUFACTURER WILL NOT BE HELD RESPONSIBLE FOR ANY INCIDENTS RESULTING FROM NON-COMPLIANCE WITH SAFETY STANDARDS OR THE REQUIREMENTS OF THIS INSTRUCTION BOOK.
▼ This appliance can be used by children aged from 8 years and above and person with reduced physical, sensory or mental capabilities or lack of experience and knowledge if they have been given supervision or instruction concerning use of the appliance in a safe way and understand the hazard involved. Children shall not play with the appliance. Cleaning and user maintenance shall not be made by children without supervision.
▼ Children of less than 3 years should be kept away unless continuously supervised.
▼ The appliance must be properly connected to the system with new hoses provided. Used hoses must never be reused.
▼ The operating pressure of water (minimum and maximum) must be between 0.5bar (0.05MPa) and 10 bar (1 MPa).
▼ If the supply cord is damaged, it must be replaced by the manufacturer, its service agent or similar qualified person in order to avoid a hazard.
▼ Ventilation opening in the base must not be obstructed by a carpet.
▼ Observe the maximum volume of dry load as indicated in the section "Program Table".
▼ To stop the functions, refer to the washing guide.
▼ Before using the washing machine, remove all the packing and locking devices used for the transport (locking screws). If this is not done, serious damage may be caused to both the appliance and your home.
▼ Any modifications or attempts to interfere with the washing machine can be dangerous for the user and may damage the appliance itself.
▼ Considering the substantial weight of the washing machine, specific safety standards must be observed during handling.
When the appliance is in operation, avoid any contact with the water being discharged through the drain hose, as it may be very hot. Do not
touch the door glass either, as this will tend to heat up during washing.
Use the washing machine for machine-washable items only. In the case of any doubts, refer to the manufacturer's instructions on the label attached to the item to wash (see "Clothing care symbols")
Before placing the washing in the washing machine, make sure that all pockets are empty. Hard or pointed objects such as coins, pins, nails, screws or stones can cause serious damage to the appliance.
▼ Never wash items that have been soiled with substances containing petrol. In the case where stains have been removed using vaporising products, wait until these substances have fully evaporated from the surface of the material before loading into the washing machine.
The use and quantities of detergent, softener and bleach must comply with the instructions reported on the packaging.
▼ Do not use detergents designed for hand washing, in that the excessive suds produced could damage the internal components.
▼ After washing mats, blankets or any other long-fibre materials, remove the filter and clean it if necessary.
▼ It is advisable to leave the door open at the end of the wash cycle.
Do not attempt to repair any appliance faults alone, in that repairs carried out by a non-professional may cause serious damage and will invalidate any rights to repairs under guarantee.
▼ Repairs to the appliance can only be carried out by personnel authorised by the customer service centres. All repairs must make use of original spare parts only.
▼ Never insert or remove the plug from the mains socket with wet hands.
The washing machine must be connected to a mains socket fitted with an efficient earth complying with current safety standards.
▼ Do not use extension leads or multiple plug adapters to connect the washing machine to the mains electricity supply.
▼ Do not expose the appliance to atmospheric agents.
The washing machine can only be opened once the led or display indicates that the cycle has finished. On some models, this is signalled by a flashing start button.
▼ When servicing or cleaning the washing machine, remember to disconnect it from the
mains electricity supply.
▼ Do not pull the power supply cable to unplug the washing machine from the mains supply. Pull the plug only.
It is advisable to unplug the washing machine from the mains electricity supply and close-off the water supply after each wash.
FOR WASHER/DRIER VERSIONS:
▼ Never dry unwashed items.
▼ Do not dry items that have been washed or had stains removed using chemical products.
▼ Never dry items that have been soiled with substances such as cooking oil, petroleum, acetone, alcohol, petrol, kerosene, stain removers, turpentine, wax. Remove these substances in a hot wash using an abundant quantity of detergent prior to loading the items in the drier.
▼ Do not dry items such as foam rubber, latex, raincoats, waterproof fabrics, rubber mats, preformed items, clothes or
cushions with foam rubber padding, as these may melt and damage other items in the washing or even the appliance itself.
▼ Fabric softeners, or similar products, should be used as specified by the fabric softener instructions.
▼ Children of less than 3 years should be kept away unless continuously supervised.
▼ That the appliance must not be installed behind a lockable door, a sliding door or a door with a hinge on the opposite side to that of the appliance, in such a way that a full opening of the appliance door is restricted.

THE FINAL PART OF A DRYING CYCLE IS THE COOLING DOWN PHASE. CONSEQUENTLY, NEVER SWITCH OFF THE DRIER BEFORE THE CYCLE HAS BEEN COMPLETED. OTHERWISE, THE WASHING MUST BE TAKEN QUICKLY AND HUNG OUT TO ALLOW THE HEAT TO DISSIPATE.
DESCRIPTION OF THE APPLIANCE

The washing machine has been constructed in steel panels which have been treated and painted to guarantees that its aesthetic qualities remain unaltered over time.
▼ The motor and all moving parts have been designed and manufactured to guarantee the minimum possible noise levels
The large easily-accessible stainless steel drum will ensure a better quality wash and help to prolong the life of your washing
The easy to use control panel will satisfy all washing and drying needs (see control panel and programme table).
▼ The wide door makes loading and unloading
the washing much easier.
The very high stability of the appliance is the result of constant research by our technicians into the equilibrium of masses in movement.
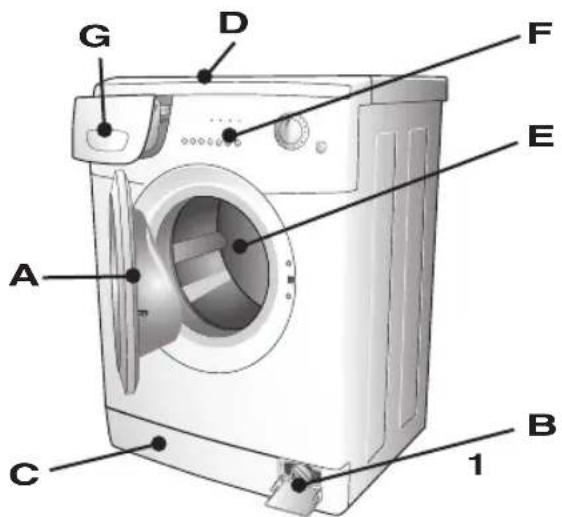
A - Door
B - Filter
C - Adjustable feet
D - Top cover
E - Drum
F - Control panel
G - Detergent drawer
Installation must be carried out by qualified personnel in line with the instructions supplied by the manufacturer. Incorrect installation may result in damage and injury.
The appliance can be installed anywhere providing that the ambient temperature is not less than 3^ C and that the wires or pipes on the rear of the machine are not squashed.
This appliance is intended to be used in household and similar applications such as:
▼ Staff kitchen areas in shops, offices and other working environments;
▼ Farm houses;
▼ By clients in hotels, motels and other residential type environments;
▼ Bed and breakfast type environments.

For transport reasons, the washing machine's oscillating group is locked in place by 4 spacers and screws. Before using the machine, remove the spacers and locking screws. Keep the screws and spacers for future use.
Close off the holes using the plugs supplied. The plugs can be found in the bag containing the documents.
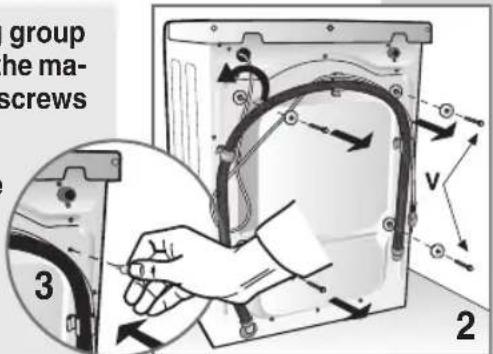

For transport reasons, the washing machine's oscillating group is locked in place by 4 spacers and screws. Before using the machine, remove the locking screws with a suitable tool.
Insert a screwdriver in the holes and lever out the 4 plastic spacers as shown in the figure.
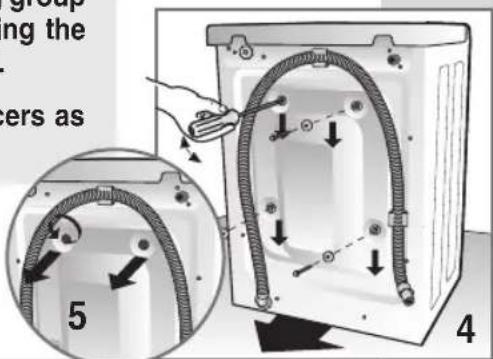

The washer/drier version must not be installed behind a locked door, a sliding door or with a hinged door on the opposite wall to the washer/drier itself.
LEVELLING THE WASHING MACHINE
After having selected the most suitable location for the appliance, make sure it is level by regulating the adjustable feet (Fig. 6).
Pay particular attention to the positioning and levelling of the washing machine and make sure that the lock nuts are tight.

If the appliance is not levelled correctly, it will be unstable and noisy and may cause damage.
If the washing machine is installed on a carpeted floor, leave sufficient space between the appliance and the floor to guarantee the free circulation of air.
It is not advisable to install the appliance in rooms where the temperature could fall below 0^ C.
In the under-worktop versions, screw in the feet until the spring is fully compressed, thus allowing the appliance to be installed under the worktop (Fig. 6B).

natural_image
Illustration of hands holding a small object with directional arrows indicating movement (no text or symbols)
natural_image
Hand holding a mechanical component with a screw and directional arrow, labeled '6B' (no text or symbols on the diagram itself)CONNECTING THE WATER SUPPLY
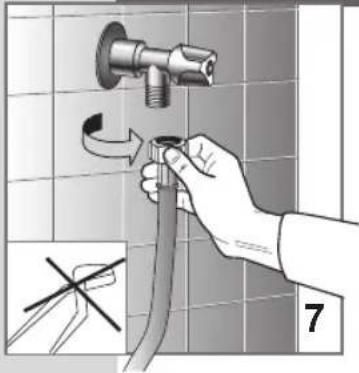

The mains water pressure must be between 0.05 and 1.00 Mpa (0.5 - 10 bar.)
Before connecting the washing machine, open the valve and allow a certain quantity of water to flow out in order to clean the pipes of any sand or rust.
This operation is particularly important in the case where the washing machine has been left standing for a long time or when connecting to a new water supply system.
The fill hose must be connected to the mains supply using a 34 " threaded connection.


On electronic washing machines fitted with a dual solenoid valve (hot and cold water), connect the red hose to the hot water supply valve and the other hose to the cold water supply valve.
If a hot water supply is not available, both hoses must be connected to the cold supply using the fitting supplied (see fig. 8).
Do not connect to the hot water supply.

natural_image
Hand holding a tool interacting with a mechanical component, showing a curved pipe and handle (no text or symbols visible)▼ Connect the fill hose (fig. 9).

Washing machines and condensation type washer/driers must be connected to the mains water supply using the new hoses provided with the appliance. The old hoses must not be re-used.
▼ During the wash, the water supply valve must be fully open.

The drain hose must be positioned at a height of between 60 cm and 90 cm (fig. 10).
If the water is drained directly into the drainage system, the free end of the drain hose must be inserted in a pipe of internal diameter not less than 40 mm.
The drain hose connection to the drainage system must not be hermetically sealed, as this would cause a build up of air in the siphon and allow water to leak out.

natural_image
Illustration of a hand washing a sink with faucet, no text or symbols presentIf the wash water is drained into a washbasin, sink or other similar system, the free end of the hose must be reinforced at the bend using the bracket supplied with the washing machine. Place the hose over the edge of the washbasin and anchor the bracket in such as manner that prevents the hose from falling (fig. 11). The washbasin outlet must be clean and must allow the water to flow freely.
CONNECTING TO THE MAINS ELECTRICITY SUPPLY

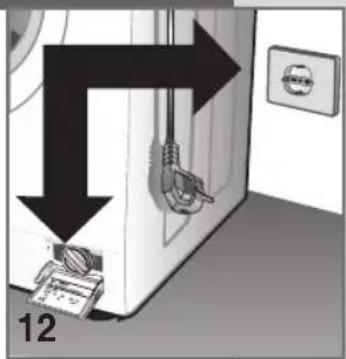
Make sure that the voltage indicated on the identification plate attached to the inside of the filter door corresponds to that of the mains supply (fig. 12).
All cut-outs, electric wiring and mains sockets must have a rating such that enables them to support the maximum load indicated on the identification plate.
Once the appliance has been installed, it must be connected to the mains supply through a single-pole switch.
The mains supply to which the appliance is connected must be fitted with an earthing system. If this is not the case, the manufacturer will not be held liable for any incidents that may occur (fig. 13).
If the mains socket to which the appliance is connected is faulty or unsuitable, it must be replaced by a qualified electrician.
The washing machine must not be connected to the mains supply using indirect methods such as extension leads or multiple adapters.
During maintenance work, the washing machine must be disconnected from the mains electricity supply.
Do not insert or remove the plug from the mains socket with wet hands.
If the power supply cable is damaged in any way, contact the appropriate specialised service centre.
The plug used to connect the machine to the power supply must never be fixed behind the machine, but must be in a position easily accessible in an emergency.
natural_image
Diagram of a refrigerator with directional arrows indicating movement or change, no text or symbols present

USING THE WASHING MACHINE
RECOMMENDATIONS PRIOR TO USE

Before carrying out the first wash, allow the washing machine to effect a short wash cycle without any washing.
This will allow the operation of the washing machine to be checked and will clean the drum.
Before each wash make sure that:
the water connections are correct, the drain hose is properly positioned (see connecting to the water supply) and that the water supply valve is open.
▼ with dry hands, insert the plug in the mains socket.
▼ sort the wash into types of fabric (refer to clothing care symbols).
▼ check that there are no objects left in any of the pockets of the items to wash, as these may damage the washing, the appliance or the filter.


natural_image
Illustration of a hand pressing down on a washing machine with a black arrow indicating motion (no text or symbols)USE OF DETERGENTS
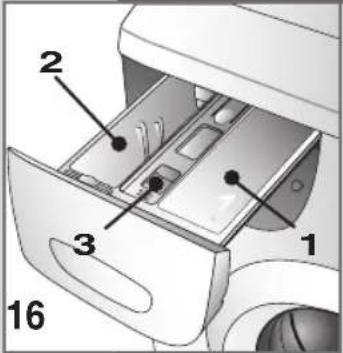
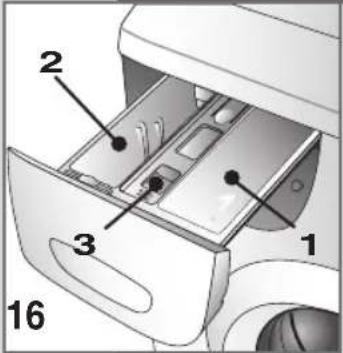
The washing machine is fitted with a three-compartment detergent drawer
1 compartment for pre-wash or soak soap powder (1)
2 compartment for normal wash soap powder (2)
softener compartment (3)
Use a low-suds detergent and softener (if required) recommended for automatic washing machines. Follow the dosage instructions written on the packet.
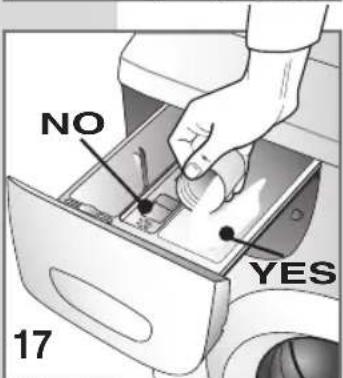

Too much detergent can produce excessive suds and may result in a poor wash.
Too little detergent will produce an unsatisfactory wash.

When adding detergent to the dispenser, remember to avoid any spillage into the softener compartment, in that this would create a soapy rinse and stain the fabrics white. Vice versa, if softener is added to the detergent compartment, the quality of the wash
will be compromised.

natural_image
Hand inserting a device into a car airbag (no text or symbols visible)
When using a liquid detergent (recommended for programmes without pre-wash) proceed as follows: remove the baffle from its housing at the front of compartment 2 and insert it in the guides
near the centre of the same compartment.

natural_image
Illustration of a bottle pouring liquid into a device with a handle, labeled '19' (no text or symbols on the diagram itself)▼ close the detergent drawer before starting the wash.

natural_image
Diagram of a device drawer with internal compartments and a mouse, showing no text or symbols
Do not attempt to remove the detergent drawer while the washing machine is in operation, as this will cause water to flow out.
HOW TO REMOVE SOME STAINS
Stains exist that cannot be removed by machine washing alone. Before trying to remove any type of stain by hand, first try the removal procedure on a small area of hidden fabric. Start from the edge of the stain and working inwards, this will prevent a dark ring from forming around the site of the stain. A few methods to adopt for removing stains are reported below.
▼ WAX: Scrape the wax using a rounded point in order not to damage the fabric. Then, with the fabric placed between two pieces of absorbent paper, run a hot iron over the stain.
▼ BALL POINT PENS AND FELT-TIP PENS: clean using a soft cloth soaked in ethyl alcohol. Take care not to spread the stain.
▼ DAMP AND MOULD: if the fabric supports the use of bleach, carry out a wash cycle adding bleach. Otherwise, soak the soiled part in hydrogen peroxide (10 volumes) and leave for 10 to 15 minutes.
LIGHT SCORCH MARKS LEFT BY IRONING: follow the instructions for mould and damp.
▼ Rust: use products specially designed for rust stains, following the manufacturer's instructions written on the packet.
CHEWING GUM: rub ice over the fabric, scrape away as much chewing gum as possible and then rub with a piece of cotton soaked in acetone.
▼ PAINT: do not allow the paint to dry. Rub the area with the solvent recommended by the paint manufacturer (e.g. water, turps, trichloroethylene), soap and then rinse.
Lipstick: stains on cotton or wool can be eliminated using a cloth soaked in ether. Stains on silk require the use of trichloroethylene.
▼ NAIL VARNISH: place a sheet of absorbent paper on the stained material, then dampen the back of the fabric with acetone, frequently changing the absorbent paper placed over the stain. Continue in this manner until the stain has disappeared.
▼ TAR OR DIRT: spread a little fresh butter over the stain, allow to stand and then wash with oil of turpentine.
▼ GRASS: delicately soap the stain, use diluted bleach. Good results can be obtained on woollen fabrics using 90% alcohol.
▼ Blood: put into soak in cold water with added salt, then wash with washing soap.
INTERNATIONAL CLOTHING CARE SYMBOLS
Before placing the clothes in the washing machine and selecting the wash programme, examine the symbols on the manufacturer's label. The table reported below will provide a useful guide to reading the symbols.


Normal wash
Delicate wash
Wash at max 95°C
Wash at max 60°C
Wash at max 40°C
Wash at max 30°C
Hand wash
Dry-clean only
Bleach in cold water
Do not bleach

Iron at up to max 200°

Iron at up to max 150°

Iron at up to max 100°

Do not iron

Dry-clean using solvent

Dry-clean using benzine, pure alcohol and R113 only

Dry-clean using ethyl perchlorate, benzine, pure alcohol, R111 and R113.

Do not dry-clean

Dry flat

Dry hanging

Dry on hanger

Dry in tumble dryer at normal temperature

Dry in tumble dryer at low temperature

Do not tumble-dry
CLEANING THE WASHING MACHINE
natural_image
Illustration of a hand washing a washing machine with a hand operating the valve (no text or symbols present)The washing machine has been specifically designed to reduce maintenance to a minimum. Nevertheless, it is important that it is cleaned regularly.
Before cleaning, make sure that the appliance has been disconnected from the power supply and that the water supply valve has been closed.
The external structure and the parts of the washing machine in plastic must be cleaned with a soft damp cloth only.

natural_image
Illustration of a hand washing a sink with a tool, no text or symbols present
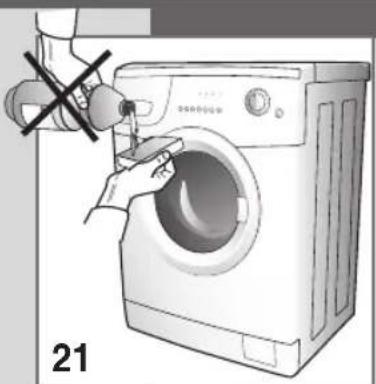
Never use chemicals, abrasive products, alcohol, soap, petrol or other solvents to clean the appliance as these may cause damage. (fig. 21)
After washing, leave the door open for a short time to allow rubber parts to dry.
Periodically wash out the detergent compartments. To do this, remove the detergent compartment and rinse it under running water (fig. 22). Then replace it.
REMOVING THE DETERGENT DRAWER

natural_image
Hand inserting a device into a car drawer, showing internal components and directional arrow (no text or symbols)▼ open the detergent drawer;
▼ press on the word "PUSH" with the right hand and pull out the drawer with the left hand (fig. 23).
CLEANING THE FILTER

natural_image
Illustration of a hand using a tool to press or install a mechanical component, no text or symbols visible
Before starting the operations described below, make sure that the washing machine is empty. Do not remove the filter while the washing machine is running, or when full of water.

natural_image
Hand inserting a component into a machine, showing a curved arrow indicating rotation (no text or symbols present)Place a cloth or tray under the filter to collect any water that may still be inside Open the filter door, unscrew the filter and remove it by turning it in an anticlockwise direction (fig. 24-25).
The filter must be cleaned periodically.
Rinse the filter under running water to eliminate any residues. Replace the filter by screwing it in clockwise, making sure it closes and seals properly.
RESOLVING PROBLEMS
If the appliance is not working properly, check through the following troubleshooting guide before calling for technical assistance. In some models malfunctions are indicated by an error code displayed at the end of the cycle.
Code: E:00 Carry out all the checks listed in paragraphs marked with *
E:01 Carry out all the checks listed in paragraphs marked with **
E:02 Technical malfunction "Call Customer Service"
E:03 Technical malfunction "Call Customer Service"
The washing machine does not work (warning lights are off) (Display off)
- Make sure that:
1) The mains power supply is working
2) The plug is inserted correctly in the socket
3) The On/Off button has been pressed, or if not present, check that the programming knob is positioned on a programme.
The washing machine does not work (warning lights are off) (Display lit)\*
- Make sure that:
1) The programme has been selected
2) The door is closed properly
3) The "Start" button has been pressed (elec tronic models only)
4) Refer to the information provided for "The washing machine does not fill with water"
The washing machine does not fill with water\*
- Check that:
1) There is water in the water supply system
2) The water fill pipe is connected to the washing machine
3) The mains water supply valve is open
4) The filter is not blocked If it is, clean the filter after first unplugging the appliance from the power supply
The washing machine continuously fills and drains the water\*\*
- Check that:
1) The drain hose has been installed at the correct height (60-90 cm)
2) The end of the drain hose is not under water
The washing machine does not drain or spin\*\*
- Check that:
1) The drain hose is properly connected
2) The drain hose is not kinked
3) The drain filter is not blocked
4) The no-spin function has not been selected
5) The Stop with water function has not been selected.
The washing machine vibrates and is noisy
- Make sure that:
1) All the locking elements used for transporta-
tion have been removed.
2) The washing machine is perfectly level
3) Bulky items such as sheets, tablecloths etc. are not all bundled in one part of the drum
The door will not open
- Make sure that:
1) The wash cycle has finished.
2) The Stop with water function has not been selected (automatic on some models).
The washing has not been spun properly
- Make sure that:
1) The washing is evenly distributed in the drum
2) The correct spin speed has been selected
The washing machine stops during a wash
- Make sure that:
1) The mains power supply is working
There is still a lot of detergent in the compartment
- Make sure that:
1) The mains water supply valve is open
2) The filter between the valve and the supply hose is clean
The washing is not clean at the end of the wash cycle
- Make sure that:
1) The drum has not been overloaded
2) The correct amount of detergent has been used
3) The correct programme has been selected
The washing has shrunk or faded
- Make sure that:
1) The correct washing programme has been selected
2) The correct washing temperature has been selected
The washing machine does not dry (washer-dryer models only)
- Make sure that:
1) The mains water supply valve is open
2) The drain filter is clean
3) The washing machine is switched on (indicator light or display lit)
4) The drying program has been selected
5) The drying time has been set
If, after all these checks have been carried out, the appliance still does not work, inform the nearest customer service centre. When contacting the service centre, inform them of the appliance model, serial number and type of fault. The data relating the appliance can be found on the rating plate affixed to the inside of the filter door. This information will help the service centre operator in procuring the necessary spare parts, thus guaranteeing a speedy and efficient repair.
6 ARDO
J.P. Industries S.p.A.
Via Dante, 284 60044 Fabriano (AN)
Tel. +39 0732 6161 Fax +39 0732 616900
www.ardo.it
6 ARDO
IT GUIDA PROGRAMMI LAVAGGIO
EN WASHING GUIDE
natural_image
Medical illustration showing a human body with attached muscles and a close-up of internal organs (no text or labels)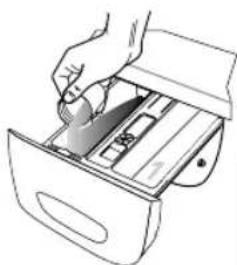
natural_image
Line drawing of a hand inserting a device into a drawer (no text or symbols)
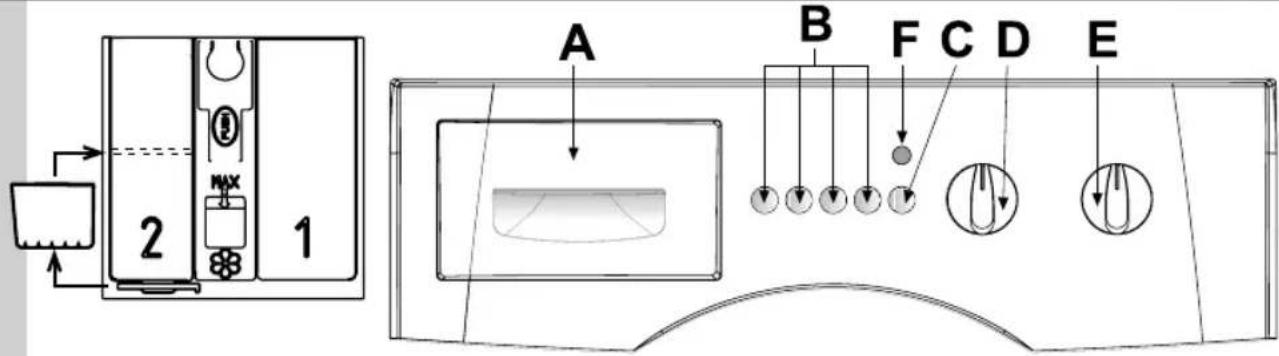
A Table of Programmes
B Extra Functions
C On/Off Button
D Thermostat Dial
E Programmator Dial
natural_image
Medical illustration showing a human body with attached muscles and a close-up of internal organs (no text or labels)
natural_image
Line drawing of a hand inserting a device into a drawer (no text or symbols)
Before attempting to operate the washing machine, ensure that the installation has been performed correctly, as described in the instruction booklet.
Daily use
- Before putting clothes in the washing machine, empty the pockets of any hard or sharp object (nails, screws, coins, pins and stones) that may damage the machine and garments.
- To improve washing performance, introduce laundry into the washing machine without compressing it or overloading the machine. A whole load of highly absorbent fabrics, such as bathrobes and towels, can unbalance the machine during the spin cycle. The automatic load balancing system arranges laundry in the most even manner possible, and sets the optimum spin speed to minimise any vibrations.
- Close the door making sure that garments are not caught between the seal and the door.
- Put the correct amount of detergent in the drawer 2. Insert the bulkhead supplied if you are using liquid detergent. If you want to enable the prewash option, add the detergent in the drawer 1. Use the drawer marked with the special symbol ✝ for the softener. After adding the detergent, gently close the drawer.
- Choose and set the desired washing cycle program and temperature using the relative E and D knobs.

Do not turn the programming knob to the left. If you pass the desired program, continue to turn to the right until you reach the desired position again.
- Buttons B are used to select the extra functions.
- To start the wash machine to press the On/Off button (the indicator light will turn on).
- To turn off the machine in the event of an emergency, set the ON/OFF button to OFF, the selection will be confirmed by the switching off of the LED.
At the end of the washing cycle, the washing machine will stop at one of the STOP points on the programming knob.
- Turn off the washing machine by pressing the On/Off push button.
- Take out the laundry
- With dry hands, unplug the machine
- Close the water tap.
ON/OFF BUTTON: To push button for to switch ON the machine, the indicator light will be illuminated.
HIGH LEVEL BUTTON: Press the button for to have an improvement of washing and spinning results.
NO SPIN BUTTON: Pushing this button the washing machine carries out a normal wash cycle but does not spin.
EXTRA RINSE BUTTON: The washing machine has been designed to reduce water consumption to a minimum. Three rinse cycles are normally sufficient.
For very soft water zones or for those who are allergic to detergent residues, pressing this button and the machine will carry out an extra rinse.
ADJUSTABLE SPIN: Pressing this button, the spin speed can be adjusted to choose 500rpm or 1000rpm.

Unbalanced load control during spin cycle:
This washing machine is equipped with a special electronic control system for proper load balancing. Prior to every spin, the system makes sure that the cloths are spread as evenly as possible in the drum. In the case of uneven laundry distribution, for safety reasons, the final spin speed will be reduced and in cases of high load imbalance, will not be performed.
| Programs | Type of laundry | Maximum spin speed (rpm/min) | Max Load recommended (kg) | Prewash | Wash | Rinses | Softener | Final Spin | Options | |
| Program | Max Temperature | |||||||||
| 190° | Max | The washing machine will carry out a prewash at 40°C max. A Prewash is recommended for items soiled with dust, soil, sand or with particularly resistant stains. Heavily soiled white linen and cotton fabrics. | 8.0 | ● | ● | ● | ● | ● | [IMAGE] | |
| 2 | 60°C40°C | The standard 60°C and 40°C cotton programmes are suitable to clean normally soiled cotton laundry and they are the most efficient programmes in terms of combined energy and water consumption for washing that type of cotton laundry. The above mentioned programs are in accordance with European Regulations 1015/2010 and 1061/2010 on the specific eco-design requirements. The actual water temperature may differ from the declared cycle temperature. The standard 60°C and 40°C cotton programmes were verified in compliance with standard EN60456. | Max | 8.0 | — | ● | ● | ● | ● | [IMAGE] |
| 360° | Max | Resistant white and coloured fabrics in linen and cotton. | 8.0 | — | ● | ● | ● | ● | [IMAGE] | |
| 440° | Max | Coloured items in linen or cotton. Mixed light and dark colours can be safely washed without any risk of discolouring. | 8.0 | — | ● | ● | ● | ● | [IMAGE] | |
| 5 | - | The Rinse programme is useful for rinsing hand Max and items or for refreshing items that have not been used for a long time. | 8.0 | — | — | ● | ● | ● | [IMAGE] | |
| 6 | - | White Max hented, softener. | 8.0 | — | — | — | ● | ● | [IMAGE] | |
| 7 | - | A special programme for spinning hand-washed washing and for draining water from the tub. | 8.0 | — | — | — | — | ● | [IMAGE] | |
| 860° | The washing machine will carry out a prewash at 40°C max. Programme designed for synthetic and mixed fibres such as rayon and viscose declared as being machine washable by the manufacturer.500 | 4.0 | ● | ● | ● | ● | ● | [IMAGE] | ||
| 960° | Programme designed for synthetic and mixed fibres such as rayon and viscose declared as being made 500 washable by the manufacturer. | 4.0 | — | ● | ● | ● | ● | [IMAGE] | ||
| 10 | 50° | The programme allows different fabrics and synthetics (cotton, synthetics, mixed) to be washed together with perfect results. | 500 | 4.0 | — | ● | ● | ● | ● | [IMAGE] |
| 11 | 35° | The wool program is ideal for washing delicate items with labels stating "machine washable". It ensures colour care and that garments stay in good shape. | 500 | 2.0 | — | ● | ● | ● | ● | [IMAGE] |
| 12 | -- | The delicate rinse programme is useful for rinsing hand-washed delicate items or for refreshing items that have not been used for a long time. | 500 | 8.0 | — | — | ● | ● | ● | [IMAGE] |
| 13 | -- | Whitener, schented, softener. | 500 | 8.0 | — | — | — | ● | ● | [IMAGE] |
| 14 | -- | A delicate special programme for spinning hand-washed washing and for draining water from the tub. | 500 | 8.0 | — | — | — | — | ● | [IMAGE] |
(*) Actual water temperature may differ from that indicated in the program. ● Washing phase active
| MODEL → | 55FL108MWXL | |
| Dimensions | Width (cm) | 59.5 |
| Height (cm) | 85.0 | |
| Depth (cm) | 55.0 | |
| Maximum spin speed (rpm/min) | 1000 | |
| Maximum load (kg) | 8.0 | |
| Water pressure | 0.05 MPa - 1 MPa | |
| Electrical connection | See plate affixed with characteristics | |

NOTES
6 ARDO
J.P. Industries S.p.A.
Via Dante, 284 60044 Fabriano (AN)
Tel. +39 0732 6161 Fax +39 0732 616900
www.ardo.it
- UTILIZZO DELLA LAVATRICE
- AVVERTENZE PRIMA DELL'USO
- USO DEI DETERSIVI
- COME ELIMINARE ALCUNE MACCHIE
- SOLUZIONE DEI PROBLEMI
- CONTENTS
- THE MANUFACTURER WILL NOT BE HELD RESPONSIBLE FOR ANY INCIDENTS RESULTING FROM NON-COMPLIANCE WITH SAFETY STANDARDS OR THE REQUIREMENTS OF THIS INSTRUCTION BOOK.
- FOR WASHER/DRIER VERSIONS:
- DESCRIPTION OF THE APPLIANCE
- LEVELLING THE WASHING MACHINE
- CONNECTING THE WATER SUPPLY
- CONNECTING TO THE MAINS ELECTRICITY SUPPLY
- USING THE WASHING MACHINE
- RECOMMENDATIONS PRIOR TO USE
- USE OF DETERGENTS
- HOW TO REMOVE SOME STAINS
- INTERNATIONAL CLOTHING CARE SYMBOLS
- Normal wash
- Delicate wash
- CLEANING THE WASHING MACHINE
- REMOVING THE DETERGENT DRAWER
- CLEANING THE FILTER
- RESOLVING PROBLEMS
- The washing machine does not work (warning lights are off) (Display off)
- The washing machine does not work (warning lights are off) (Display lit)\*
- The washing machine does not fill with water\*
- The washing machine continuously fills and drains the water\*\*
- The washing machine does not drain or spin\*\*
- The washing machine vibrates and is noisy
- The door will not open
- The washing has not been spun properly
- The washing machine stops during a wash
- There is still a lot of detergent in the compartment
- The washing is not clean at the end of the wash cycle
- The washing has shrunk or faded
- The washing machine does not dry (washer-dryer models only)
- ARDO
- Daily use
- Unbalanced load control during spin cycle:
- NOTES
Brand : Ardo
Model : 55FL108MWXL
Category : Washing machine