020-192 - Saw Meec Tools - Free user manual and instructions
Find the device manual for free 020-192 Meec Tools in PDF.


| Brand | Meec Tools |
| Model | 020-192 |
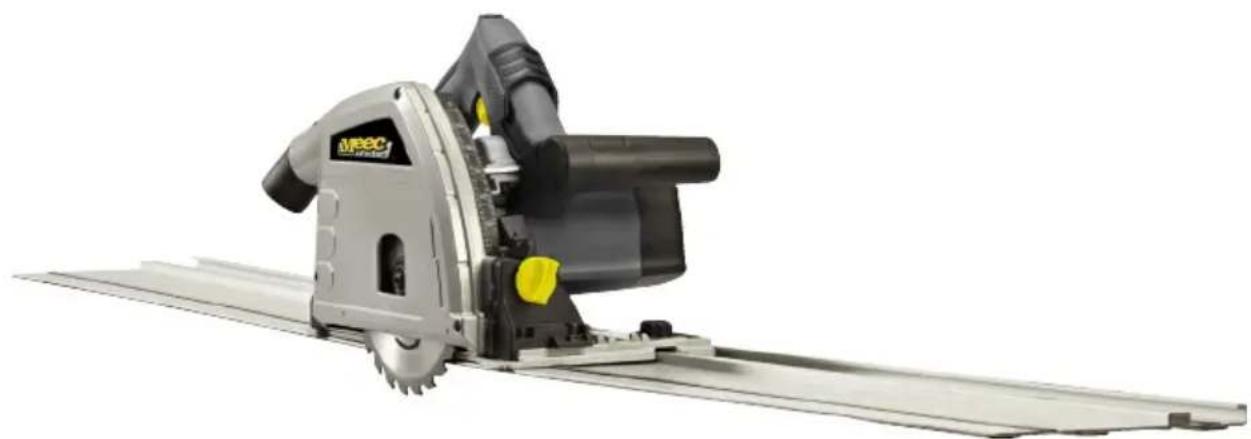
| Product Type | Plunge Saw |
| Power Supply | 230 VAC, 50 Hz |
| Power Output | 1200 W |
| No-Load Speed | 5200 min⁻¹ |
| Blade Diameter | 165 mm |
| Blade Arbor | 20 mm |
| Blade Thickness | 2.6 mm |
| Number of Teeth | 24 T |
| Max Cutting Depth at 90° | 56 mm |
| Max Cutting Depth at 45° | 42 mm |
| Bevel Angle Range | 0° – 45° |
| Guide Rail Size | 2 × 700 mm |
| Weight | Approx. 4.75 kg |
| Sound Pressure Level (LpA) | 89.9 dB(A), K=3 dB |
| Sound Power Level (LwA) | 100.9 dB(A), K=3 dB |
| Vibration Value (ahw) | 2.663 m/s², K=1.5 m/s² |
| Safety Class | II |
| Intended Use | Lengthwise and cross-cut sawing in hard and soft materials (not for metal) |
| Dust Extraction Adapter | Yes (connects to external dust extractor) |
| Carbon Brush Replacement | Both carbon brushes should be replaced simultaneously; use same type |
| Maintenance | Keep safety devices, vents, motor housing clean; wipe with damp cloth and mild detergent; avoid strong solvents |
Frequently Asked Questions - 020-192 Meec Tools
User questions about 020-192 Meec Tools
0 question about this device. Answer the ones you know or ask your own.
Ask a new question about this device
Download the instructions for your Saw in PDF format for free! Find your manual 020-192 - Meec Tools and take your electronic device back in hand. On this page are published all the documents necessary for the use of your device. 020-192 by Meec Tools.
USER MANUAL 020-192 Meec Tools
natural_image
Exterior view of a modern office building (no signage)EN - Operating instructions (Translation of the original instructions)
Jula reserves the right to make changes. In the event of problems, please contact our service department.
www.jula.com
Tillverkare/ Produsent / Produenci/ Manufacturer
Jula AB, Box 363, 532 24 SKARA
Importör/ Importør/ Importer/ Importer
Care for the environment!
Must not be discarded with household waste! This product contains electrical or electronic components that should be recycled. Leave the product for recycling at the designated station e.g. the local authority's recycling station.
SVENSKA....6
SÄKERHETSANVISNINGAR....6
Symboler 14
TEKNISKA DATA....15
BESKRIVNING 16
HANDHAVANDE 17
SAFETY INSTRUCTIONS 65
Symbols 73
TECHNICAL DATA....74
DESCRIPTION 75
USE....76
Intended use 76
Adjustments....76
Fitting the guide rail....78
Sawing 79
MAINTENANCE 81
Changing the blade 81
Replacing the carbon brushes 82
Cleaning....82
TROUBLESHOOTING 83
SÄKERHETSANVISNINGAR
natural_image
Diagram of a cut-out saw blade and gear assembly with numbered parts (19, 20, 21), no readable text or symbols beyond labelsnatural_image
Person using a large circular saw on a cutting board (no visible text or symbols)natural_image
Person using a saw on a workbench, no visible text or symbolsnatural_image
Close-up of a mechanical tool or machine component with black connectors and a metallic frame (no visible text or symbols)UNDERHÅLL
natural_image
Close-up of a robotic arm component with a black arrow indicating rotation (no text or symbols visible)BYTE AV KOLBORSTAR
natural_image
Close-up of a mechanical piston assembly with internal cavities and a labeled component '30' (no text or symbols beyond label)RENGÖRING
natural_image
Diagram of a cutting cutter with labeled parts (19, 20, 21), showing blade and gear assembly (no text or symbols beyond labels)natural_image
Person using a large circular saw on a workbench, no visible text or symbolsnatural_image
Person using a saw on a workbench, no visible text or symbolsnatural_image
Close-up of a mechanical tool or machine component with black connectors and a metallic frame (no visible text or symbols)VEDLIKEHOLD
natural_image
Close-up of a mechanical component with a black arrow pointing to a feature, no visible text or symbolsBYTTE AV KULLB∅RSTER
• Ta ut og kontroller kullbørstene regelmessig.
- Begge kullbørstene skal byttes samtidig.
- Bruk kun kullbørster av samme type.
natural_image
Close-up of a mechanical component with internal cavities and a labeled arrow pointing to part 30 (no text or symbols beyond label)RENGJ∅RING
natural_image
Diagram of a cutting cutter with labeled parts (19, 20, 21), showing blade and gear assembly (no text or symbols beyond labels)natural_image
Person using a large circular saw on a cutting board (no visible text or symbols)natural_image
Person using a saw on a workbench, no visible text or symbolsnatural_image
Close-up of a mechanical tool or machine component with no visible text or symbolsKONSERWACJA
natural_image
Close-up of a mechanical component with a black arrow pointing to a feature, no visible text or symbolsWYMIANA SZCZOTEK WĘGLOWYCH
natural_image
Close-up of a mechanical piston assembly with internal cavities and a labeled component '30' (no text or symbols beyond label)CZYSZCZENIE
Read the operating instructions carefully before use.
Save them for future reference.
WARNING: Failure to follow all the instructions and safety instructions can result in the risk of electric shock, fire and/or serious personal injury.
The tool complies with all the relevant regulations for the safety of electrical equipment.
Persons who are not familiar with these instructions should not use the machine.
Do not allow children to use the tool.
The term "power tool" in all the warnings below refers to your mains-powered (corded) or battery-powered (cordless) power tool.
Work area
- Keep the work area clean and well lit. Dark and cluttered work areas increase the risk of accidents and injuries.
- Do not use power tools in explosive environments, such as in the vicinity of flammable liquids, gases or dust. Power tools produce sparks that can ignite dust and fumes.
- Keep children and onlookers at a safe distance when using power tools. You can easily lose control of the tool if you are distracted.
Electrical safety
- The plug on the power tool must match the power point. Never modify the plug in any way. Never use an adapter with earthed power tools. Unmodified plugs and matching outlets reduce the risk of electric shock.
- Avoid body contact with earthed surfaces such as pipes, radiators, cookers and refrigerators. There is an increased risk of electric shock if your body is earthed.
- Do not expose power tools to rain or moisture. There is a greater risk of electric shock if water gets into a power tool.
- Be careful with the power cord. Never use the power cord to carry or pull the tool, or to pull out the plug from the mains socket. Keep the power cord away from heat, oil, sharp edges and moving parts. Damaged or tangled power cords increase the risk of electric shock.
- If using the tool outdoors, only use an extension cord approved for outdoor use. Cords intended for outdoor use reduce the risk of electric shock.
- If it is absolutely necessary to use power tools in damp conditions, use a power point protected by a residual current device RDC. Using an RCD reduces the risk of electric shock.
Personal safety
- Stay alert. Pay attention to what you are doing, and use your common sense when working with power tools. Never use power tools if you are tired or under the influence of drugs, alcohol or medication. A moment of inattention when using a power tool can result in serious personal injury.
- Use personal safety equipment. Wear safety glasses. Depending on the type of tool and how it is used, safety equipment such as dust masks, non-slip safety shoes, safety helmets and ear protection reduce the risk of personal injury.
-
Avoid accidental starting. Check that the power switch is in the OFF position before plugging in the power cord and/or the battery, or lifting/carrying the tool. Carrying a power tool with your finger on the switch, or connecting a tool to the mains supply when the switch is in the ON position, increases the risk of accidents and injuries.
-
Remove Allen keys/spanners etc. before starting the power tool. Spanners or the like that are left in a rotating part of the tool can cause personal injury.
- Do not overreach. Always maintain a firm footing and good balance. This will ensure you have better control over the tool in unexpected situations.
- Wear suitable clothing. Do not wear loose-fitting clothing or jewellery. Keep your hair, clothing and gloves away from moving parts. Loose-fitting clothing, jewellery and long hair can get caught in moving parts.
- If dust extraction and dust collection equipment is available, this should be connected and used correctly. The use of such devices can reduce the risk of dust-related problems.
Use and care
- Do not force the power tool. Use the correct power tool for the planned work. The tool does the job better and safer when used at the rate for which it was designed.
- Do not use the tool if it cannot be switched on and off with the power switch. Power tools that cannot be controlled with the power switch are dangerous and must be repaired.
- Unplug the power cord and/or remove the battery before making any adjustments, changing accessories or putting the power tool away. These safety precautions reduce the risk of accidentally starting the tool.
-
Store power tools out of the reach of children when not in use. Never allow children, or anyone who is unfamiliar with the power tool and these instructions, to use the tool. Power tools are dangerous if used by inexperienced persons.
-
Keep the power tool properly maintained. Check that moving parts are properly adjusted and do not jam, and that no parts are incorrectly fitted or damaged. Check for other factors that could affect functionality. If the power tool is damaged, it must be repaired before being used again. Many accidents are caused by poorly maintained power tools.
- Keep cutting tools sharp and clean. Properly maintained cutting tools with sharp cutting edges are less likely to jam and are easier to control.
- Use the power tool, accessories and bits etc., in accordance with these instructions, taking into account the actual working conditions and the work that is to be done. It can be dangerous to use power tools for purposes other than those they are intended to be used for.
Service
- The power tool must only be serviced by qualified personnel using identical spare parts. This will ensure that the power tool remains safe to use.
- The saw does not have any parts that can be repaired by the user. Repairs should be carried out by qualified service personnel. Only use the parts and accessories recommended by the manufacturer.
- If the power cord is damaged it must be replaced by qualified service personnel to ensure safe to use.
Special safety instructions
WARNING: Keep your hands away from the cutting area and blade.
- When sawing always hold your right hand on the back handle and your left hand on the front handle. If you hold the tool with both hands, they cannot come into contact with blade.
- Do not put your hand under the workpiece. The guard does not protect you from the blade under the workpiece.
- Adjust the sawing depth to the thickness of the workpiece. Slightly less than one full tooth on the blade should be visible below the workpiece.
- Never hold the workpiece in your hands or across your legs. Secure the workpiece on a stable surface. It is important to support the workpiece properly so that body contact is minimised, the blade does not jam, and you do not lose control.
- Hold the power tool by the insulated grips when working in areas where it may come into contact with concealed electrical cables or its own power cord. Contact with a live cable will cause the metal parts on the tool to also become live – risk of electric shock.
- Always use a fence or guide to obtain a straight cut when sawing. This makes the cut more precise and reduces the risk of the blade jamming.
- Always use blades with the correct size and shape of centre hole (rhomboidal or round). Blades that do not fit properly on the tool will run eccentrically, which will reduce performance.
- Never use damaged or incorrect washers or screws for the blade. Blade washers and screws are specially designed for the tool to ensure optimum functionality and maximum safety.
Additional special safety instructions
- Causes of kickback and ways to prevent it
- Kickback can suddenly occur if the blade gets stuck, jams or is incorrectly adjusted. The saw kicks back up from the work-piece towards the user.
- If the blade jams, or gets caught in a cut that is squeezed together, it will lock and the power of the motor can cause the saw to kickback towards the user.
- If the blade is twisted, or comes out of alignment in the cut, the teeth on the back edge of the blade can cut into the surface of the workpiece, so that the blade jerks out of the cut and kicks back towards the user. Kickback occurs during incorrect use of the tool and/or incorrect working methods or conditions, but can be prevented by taking the following measures.
- Hold the tool firmly with both hands and hold your arms in a position that prevents kickback. Stand to the side of the blade, not in line with it. Kickback can cause the tool to jerk backwards, but the user can control this by taking the appropriate measures.
- If the blade jams, or the sawing action is interrupted for any reason, release the power switch and hold the saw still in the material until the blade has completely stopped. Never attempt to remove the saw from the workpiece, or pull the saw back, while the blade is still moving – otherwise kickback can occur. Check and rectify the reason why the blade has jammed.
- When restarting the tool in the workpiece, centre the blade in the kerf and check that the teeth are not gripping the material. If the blade jams it can slip or kick back from the workpiece when the saw is started again.
- Support large boards to minimise the risk of kickback or the blade jamming. Large boards often sag under their own weight. Supports must be placed under the board on both sides, close to the cutting line and close to the edge of the board.
- Do not use blunt or damaged blades. Poorly sharpened or incorrectly adjusted blades produce narrow saw cuts, which generate excessive friction and cause the blade to jam or kick back.
- The locking devices for the depth and angle of the blade must be tightened and secured before you start sawing. If the blade is adjusted during the sawing there is a risk of the blade jamming or kicking back.
• Take extra care when plunge cutting in walls or other similar areas where you cannot see what lies behind. The protruding blade may strike objects that can cause kickback.
Special safety instructions
- Always check that the guard is closed before using the tool. Do not use the saw if the guard does not move freely and immediately closes around the blade. Never fasten or lock the guard in the open position. If you accidentally drop the saw this could bend the guard. Check in all cutting depths and angles that the guard moves freely and does not touch the blade or any other part.
- Check that the guard's return spring works and is in good condition. If the guard and the spring do not function correctly they must be repaired before use. The guard can become stiff as a result of damaged parts, tacky residues or the accumulation of dirt.
- Check that the base plate cannot move during plunge sawing, if the blade has a bevel angle other than 90^ . If the blade moves sideways it can get stuck and cause kick-back.
- Always check that the guard covers the blade before placing the saw on the bench or floor. An unprotected and freely rotating blade can cause the saw to move backwards, and cut everything in its path. Bear in mind that it takes a while for the blade to stop after you have released the power switch.
Remaining risks
This tool has been manufactured in compliance with the applicable safety standards. Using the tool does, however, involve the following risks.
- Risk of electric shock as a result of a damaged or unsuitable extension cord.
- Follow all the instructions and safety instructions when working with the tool, to reduce the risk of electric shock, personal injury and material damage etc.
- Do not press the tool too hard when working, this will cause the blade to wear faster and will reduce performance and precision.
- Avoid accidental starting. Make sure the power switch is in the OFF position before plugging in the cord.
- Only use the tool as it is intended to be used and in accordance with these instructions for best results.
- Keep your hands away from the cutting area when the tool is in use. Switch off the tool, unplug the power cord and wait until all moving parts have completely stopped before any kind of intervention.
IMPORTANT:
The vibration value varies according to the application of the power tool and can exceed the specified value in exceptional circumstances. Take appropriate measures to reduce exposure to vibration and noise.
- Only use the tool if all parts are working properly.
- Clean and maintain the tool regularly.
- Adapt the working method to the tool.
- Do not overload the tool.
- Have the tool immediately repaired when necessary.
- Switch off the tool when it is not in use.
- Wear safety gloves.
SYMBOLS
 | Read the operating instructions carefully before use. |
 | Use ear protection. |
 | Wear a dust filter mask if the work produces a lot of dust. |
 | Wear safety glasses. |
 | Wear safety gloves. |
 | Wear safety clothing |
 | Safety class II |
TECHNICAL DATA
| Voltage 230 VAC, 50 Hz | |
| Output | 1200 W |
| Speed, no load 5200/min | |
| Mitre angle 0^ – 45^ | |
| Sawing depth at 90^ 56 mm | |
| Sawing depth at 45^ 42 mm | |
| Saw blade 165 x 20 mm x 2.6 mm, 24T | |
| Safety class II | |
| Weight approx. 4.75 kg | |
| Sound pressure level, LpA 89.9 dB(A), K=3 dB | |
| Sound power level, LwA 100.9 dB(A), K=3 dB | |
| Vibration value ahw 2.663 m/s ^2 , K=1.5 m/s ^2 | |
| Rail size 2 x 700 mm | |
The total vibration value (vector sum in three directions) has been determined in accordance with EN 60745.
Measured values have been determined in accordance with EN 60745.
Wear ear protection. Noise can cause permanent hearing impairment.
DESCRIPTION
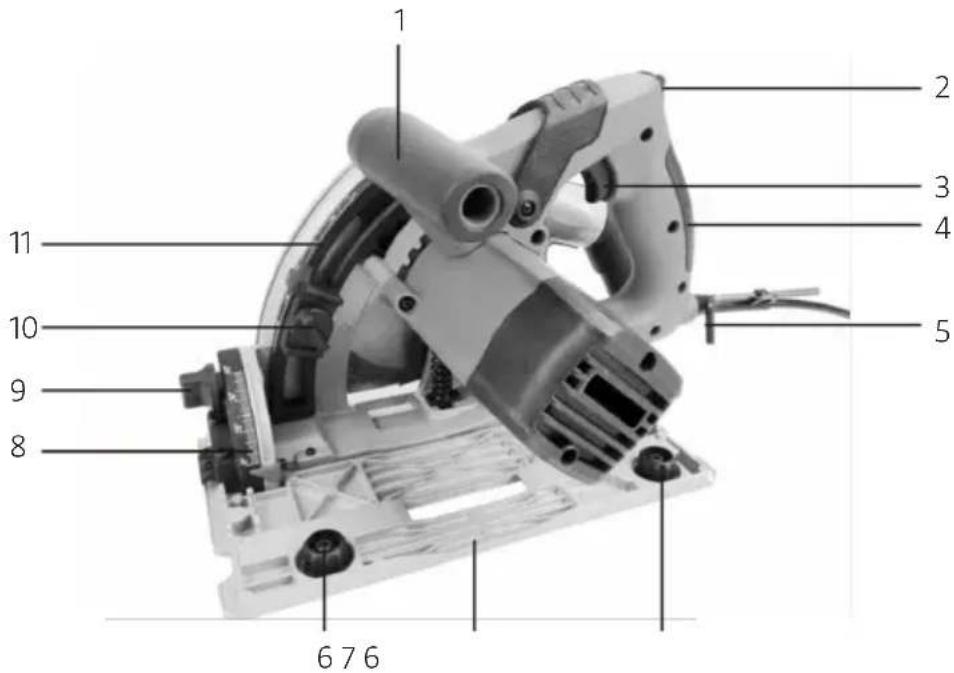
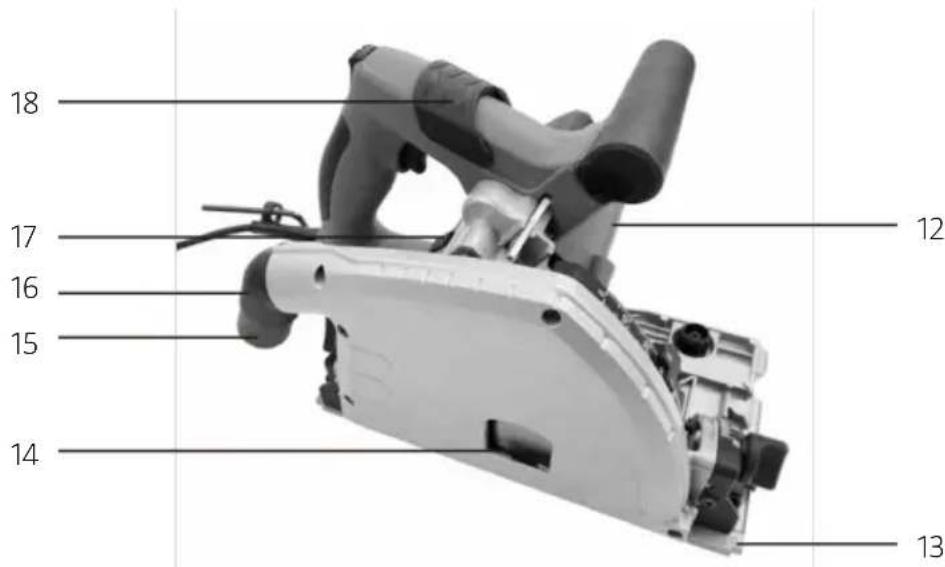
- Front handle
- Power switch lock
- Power switch
- Back handle
- Hex key (5 mm)
- Adjuster screw for guide rail
- Base plate
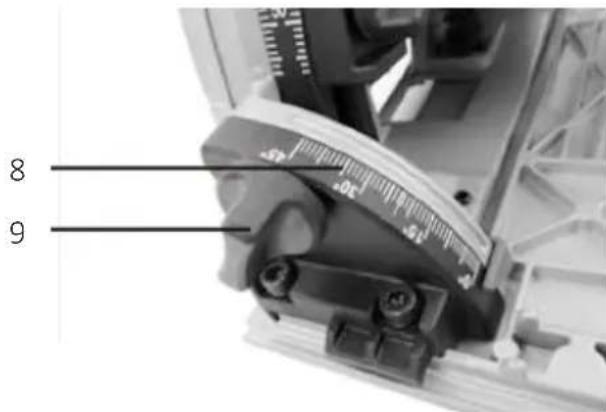
- Bevel angle scale
-
Knob to adjust sawing angle
-
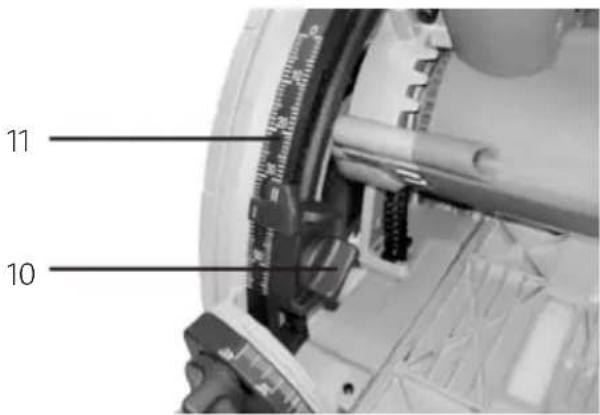
Knob to adjust sawing depth
- Scale for sawing depth
- Motor
- Sawing line pointers
- Blade
- Dust extraction adapter
- Dust ejector
- Spindle lock button
- Locking lever to change blade
USE
INTENDED USE
The plunge saw is suitable for lengthwise and cross-cut sawing in hard and soft materials. The saw is not intended for sawing in metal.
ADJUSTMENTS
IMPORTANT: Make sure the saw is switched off and unplugged from the mains. Wait until all moving parts have completely stopped before making any adjustments.
Adjusting the sawing depth
The sawing depth can be adjusted from 0 to 56 mm.
- Undo the knob for adjusting the sawing depth.
- Set the required sawing depth according to the scale and tighten the knob.
— The scale marked I shows the sawing depth without guide rail.
— The scale marked II shows the sawing depth with guide rail.
Mitre sawing
The angle can be adjusted from 0° to 45°.
- Undo the knobs for adjusting the sawing angle on each side.
- Adjust the required sawing angle according to the scale and tighten both knobs.
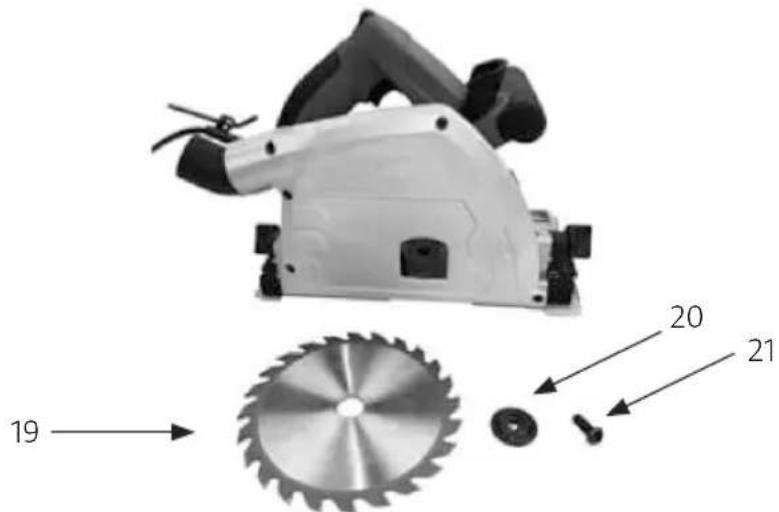
- Press in spindle lock button and undo the clamping screw anticlockwise with a hex key.
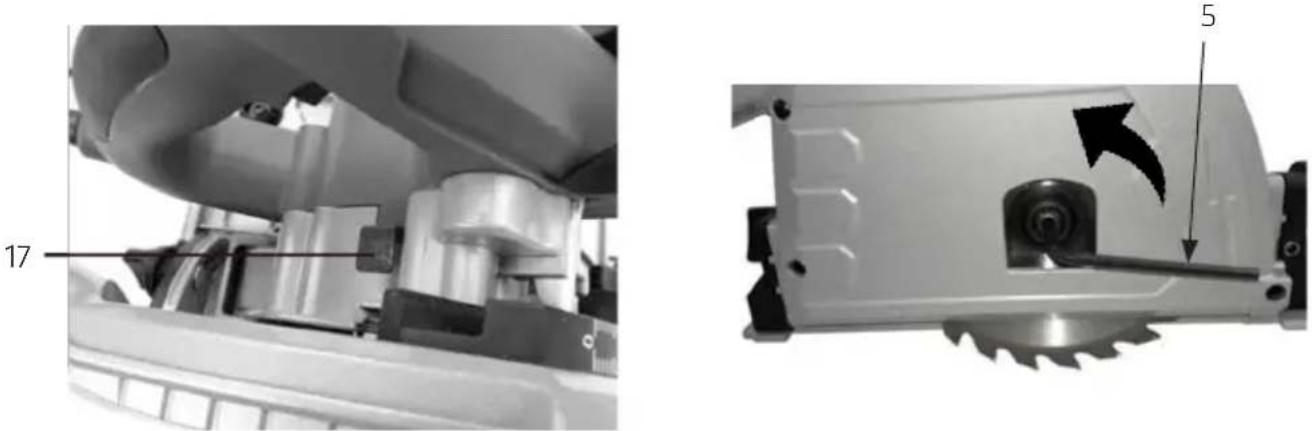
- Remove the clamping screw, washer and blade.
natural_image
Diagram of a cut-out saw blade and gear assembly with numbered parts (no text or symbols)- Blade
- Washer
-
Clamping screw
-
Put the new blade in place.
- Keep the spindle lock button pressed in and tighten the clamping screw clockwise.
- Press in the power switch lock and pull back the locking lever for replacing the blade and handle. Release the power switch lock.
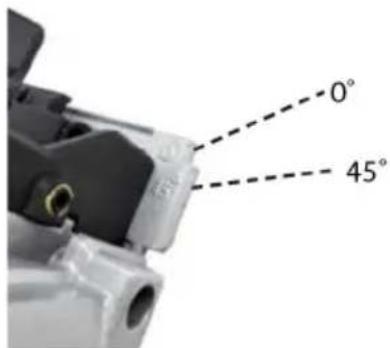
Sawing line pointers
- When sawing at an angle of 0^ the sawing line must be aligned to the 0^ marking.
- When sawing at an angle of 45^ the sawing line must be aligned to the 45^ marking.
FITTING THE GUIDE RAIL
IMPORTANT: Switch off the saw, unplug the power cord from the mains and wait until all moving parts have completely stopped before assembly and/or maintenance.
- Connect the two guide rails together, insert the connector in the guides on the rails.
- Tighten the locking screws with the supplied hex key.
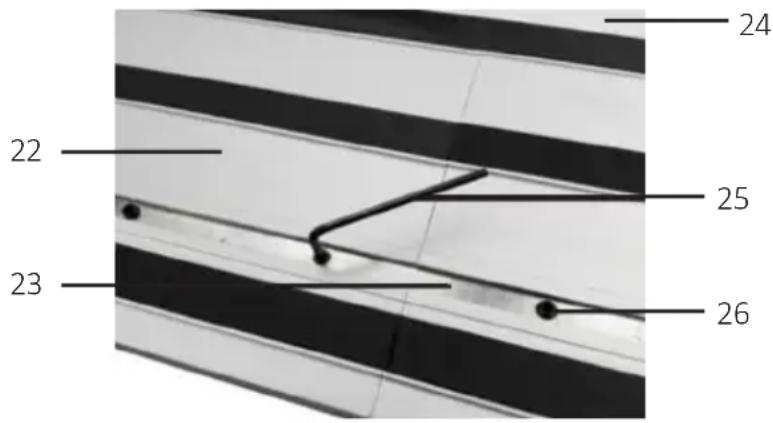
- Guide rail
- Connector
- Splinter guard moulding
- Hex key (3 mm)
- Locking screws
Adjusting the guide rail
The play between the base and guide rail can be minimised by using the adjuster screws for the guide rail.
- Undo the adjuster screws anticlockwise.
- Fine adjust if necessary by turning the adjuster screws clockwise to minimise the play between the base and the guide rail.
- Tighten the adjuster screws clockwise.
Adjusting the splinter guard moulding
NOTE: The guide rail has a black rubber moulding to provide protection from splinters. To adjust the splinter guard to the saw blade it is sawn off the first time it is used.
- Fasten the guide blade to a workpiece with clamps.
- Adjust the sawing depth to about 10 mm.
- Press up the power switch lock and start the saw by pressing the power switch.
- Press down the saw to reach the set sawing depth.
- Move the saw forwards at a steady speed.
- Switch off the saw by releasing the power switch when the cut is finished.
SAWING
IMPORTANT:
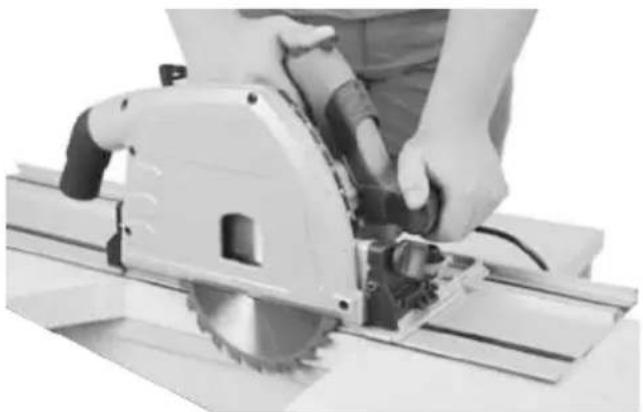
- Keep your hands away from the cutting area when the saw is in use. Secure the workpiece with clamps so that it cannot move during the work.
- Move the saw forwards, not backwards.
- When sawing always hold your right hand on the back handle and your left hand on the front handle.
natural_image
Person using a large circular saw on a workbench, no visible text or symbols- If the guide rail is used it must be secured with clamps.
-
Check that the blade cannot come into contact with the power cord.
-
Place the saw with the front part of the base plate against the workpiece. NOTE: When plunge sawing, place the saw on the workpiece.
- Press up the power switch lock and start the saw by pressing the power switch.
- Press down the saw to reach the set sawing depth.
- Move the saw forwards at a steady speed.
- Switch off the saw by releasing the power switch when the cut is finished.
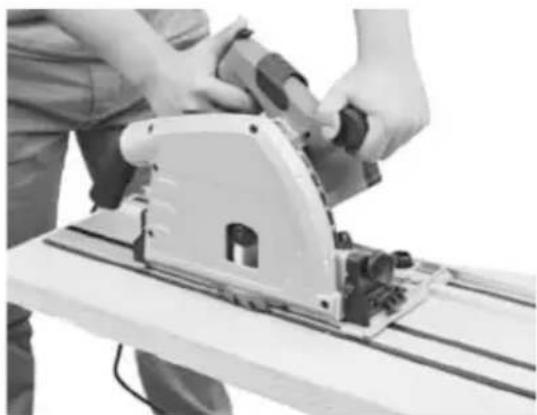
Sawing with guide rail
Use the guide rail to make straight cuts.
- Fasten the guide blade to a workpiece with clamps.
- Place the saw in the slot on the guide rail.
- Press up the power switch lock and start the saw by pressing the power switch.
- Press down the saw to reach the set sawing depth.
- Move the saw forwards at a steady speed.
natural_image
Person using a saw on a workbench, no visible text or symbols- Switch off the saw by releasing the power switch when the cut is finished.
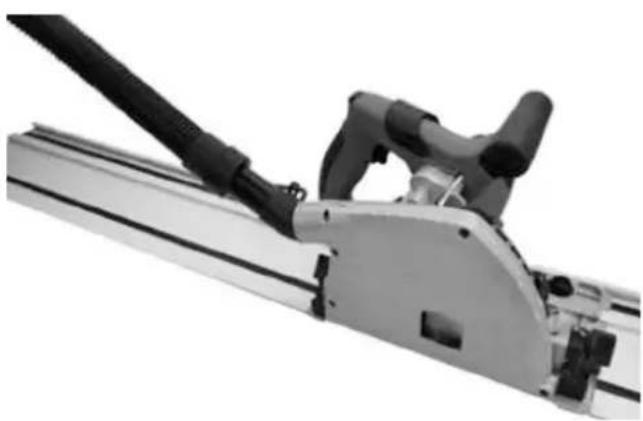
Using a dust extractor
- Connect the hose from the dust extractor to the outlet on the saw.
natural_image
Close-up of a mechanical tool or machine component with black connectors and a metallic frame (no visible text or symbols)MAINTENANCE
IMPORTANT: Switch off the saw, unplug the power cord from the mains and wait until all moving parts have completely stopped before assembly and/or maintenance.
CHANGING THE BLADE
IMPORTANT:
- Switch off the tool, unplug the power cord, and wait until all moving parts have completely stopped before changing the blade.
-
Wear safety gloves – risk of cut injuries.
-
Press the power switch lock up and push forward the handle.
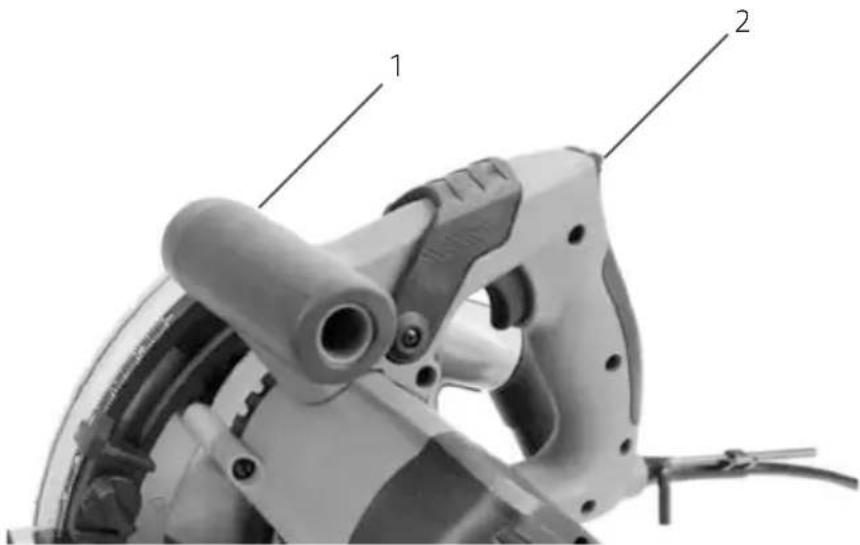
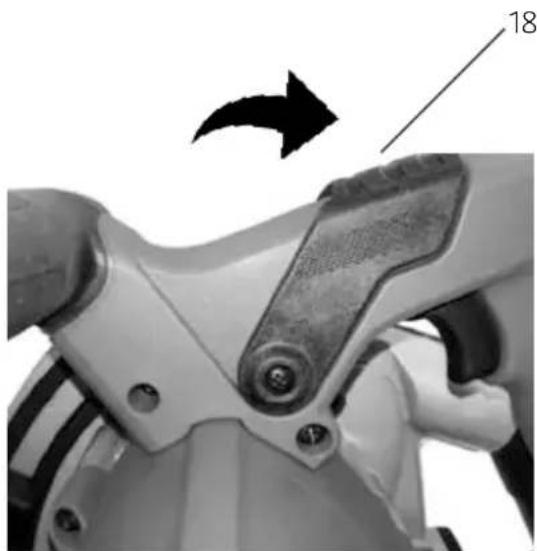
- Push the locking lever for changing the blade forwards to fix the blade in the correct position. Release the power switch lock.
natural_image
Close-up of a mechanical component with a black arrow pointing to a feature, no visible text or symbolsREPLACING THE CARBON BRUSHES
- Remove and check the carbon brushes regularly.
- Both carbon brushes should be replaced at the same time.
-
Only use carbon brushes of the same type.
-
Undo the two screws on the motor casing with a Phillips screwdriver and lift off the casing.
- Undo the screws for the retaining washers on the carbon brushes with a Phillips screwdriver.
- Pull off the clamp from the pin on the carbon brush.
- Twist the pin so that it comes loose from the carbon brush holder.
- Remove the carbon brush and insert a new one.
- Reassemble in the reverse order.
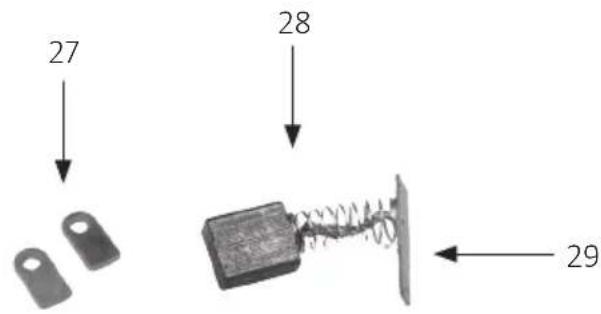
- Retaining washers
- Carbon brush
- Carbon brush pin
- Clamp
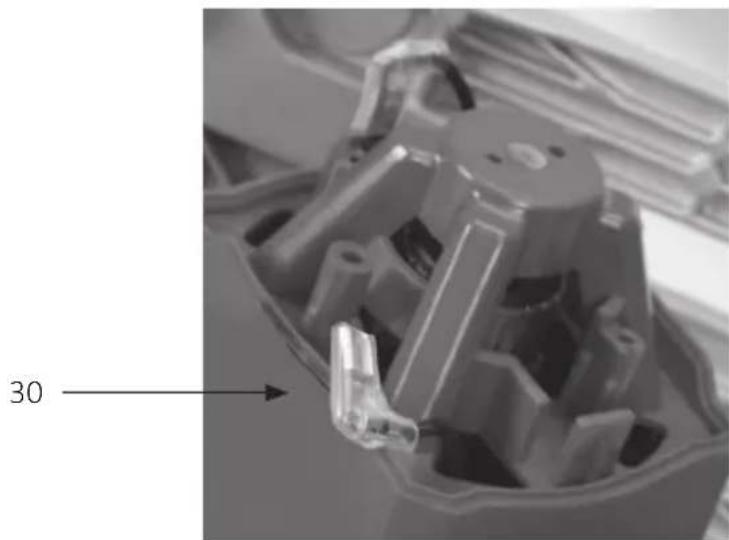
natural_image
Close-up of a mechanical component with internal cavities and a labeled arrow pointing to a feature (no readable text or symbols)CLEANING
- Keep the safety devices, ventilation openings and the motor housing free from dust and dirt. Wipe clean with a cloth, or blow clean with compressed air at low pressure.
-
Clean the saw immediately after using it with a cloth moistened with water and a mild detergent.
-
Do not use strong detergents or solvents, they can damage the plastic parts.
- Make sure that water does not get into the saw.
TROUBLESHOOTING
| Problem Possible cause Help | ||
| The motor will not start. Fault in | the motor, power cord or plug.Fuse has tripped. | Have the saw checked and repaired by qualified service personnel.Do not dismantle the saw or try to repair it – risk of personal injury. Check the fuses and replace, if necessary. |
| The motor starts at a low speed and does not reach motor on-speed. | Low supply voltage. Damaged windings. Defective capacitor. | Check that the mains voltage corresponds to the rated voltage on the type plate.Have the motor checked and repaired by qualified service personnel. Have the capacitor checked and repaired by qualified service personnel. |
| Motor noise. Damaged windings. | Defective motor. | Have the motor checked and repaired by qualified service personnel. |
| The motor does not work at full power. | The power circuit is overloaded. | Connect the saw to a separate circuit. |
| The motor overheats. The motor | is overloaded or not cooling properly. | Do not overload the motor and always keep the ventilation openings clean. |
| The cut is splintered or not straight. | The blade is blunt, or does not have the correct toothing for the actual material. | Use a sharp blade, suitable for the actual material. |
| The sawn material cracks or splinters. | To much pressure on the saw, or the blade does not have the correct toothing for the actual material. | Do not press the saw too hard.Use a sharp blade, suitable for the actual material. |
CE
EC DECLARATION OF CONFORMITY
EG FÖRSÄKRAN OM ÖVERENSSTÄMMELSE
EF SAMSVARSERKLÆRING
DEKLARACJA ZGODNOŚCI WE

Jula AB, Box 363, SE-532 24 SKARA, SWEDEN
Machinery Directive 2006/42/EC
EN 60745-1:2009+A11, EN 60745-2-5:2010
Electromagnetic Compatibility Directive 2014/30/EU
EN 55014-1:2006+A1+A2, EN 55014-2:1997+A1+A2
EN 61000-3-2:2014, EN 61000-3-3:2013
RoHS Directive 2011/65/EU
IEC 62321
This product was CE marked in year -16
Name and address of the person authorised to compile the technical file:
- Care for the environment!
- SVENSKA....6
- SÄKERHETSANVISNINGAR....6
- TEKNISKA DATA....15
- BESKRIVNING 16
- HANDHAVANDE 17
- SAFETY INSTRUCTIONS 65
- TECHNICAL DATA....74
- DESCRIPTION 75
- USE....76
- MAINTENANCE 81
- TROUBLESHOOTING 83
- SÄKERHETSANVISNINGAR
- UNDERHÅLL
- BYTE AV KOLBORSTAR
- RENGÖRING
- VEDLIKEHOLD
- BYTTE AV KULLB∅RSTER
- RENGJ∅RING
- KONSERWACJA
- WYMIANA SZCZOTEK WĘGLOWYCH
- CZYSZCZENIE
- Read the operating instructions carefully before use.
- Work area
- Electrical safety
- Personal safety
- Use and care
- Service
- Special safety instructions
- Additional special safety instructions
- Remaining risks
- IMPORTANT:
- SYMBOLS
- DESCRIPTION
- USE
- INTENDED USE
- ADJUSTMENTS
- Adjusting the sawing depth
- Mitre sawing
- Sawing line pointers
- FITTING THE GUIDE RAIL
- Adjusting the guide rail
- Adjusting the splinter guard moulding
- SAWING
- Sawing with guide rail
- Using a dust extractor
- MAINTENANCE
- CHANGING THE BLADE
- REPLACING THE CARBON BRUSHES
- CLEANING
- TROUBLESHOOTING
- CE
- EC DECLARATION OF CONFORMITY
- EG FÖRSÄKRAN OM ÖVERENSSTÄMMELSE
- EF SAMSVARSERKLÆRING
- DEKLARACJA ZGODNOŚCI WE
Brand : Meec Tools
Model : 020-192
Category : Saw