006-783 - Multicooker Menuett - Free user manual and instructions
Find the device manual for free 006-783 Menuett in PDF.


| Product Type | Multicooker |
| Brand | Menuett |
| Model | 006-783 |
| Capacity | 5 liters |
| Power | 800 W |
| Voltage | 220-240 V, 50/60 Hz |
| Dimensions (W x D x H) | 250 x 250 x 250 mm |
| Weight | 2.5 kg |
| Main Functions | Rice, Slow Cook, Steam, Sauté, Stew, Soup, Porridge |
| Inner Pot Material | Aluminum with non-stick coating |
| Display | LED with timer and program selection |
| Control Type | Touch buttons or rotary knob |
| Delayed Start | Up to 24 hours |
| Keep Warm | Automatic after cooking |
| Safety Features | Overheat protection, automatic shut-off, locking lid |
| Cleaning | Removable inner pot, wipe exterior with damp cloth |
| Spare Parts Availability | Inner pot, sealing ring, steam basket via Menuett service |
| Repairability | Serviceable by authorized technicians; user-replaceable parts |
| Warranty | 2 years |
Frequently Asked Questions - 006-783 Menuett
User questions about 006-783 Menuett
0 question about this device. Answer the ones you know or ask your own.
Ask a new question about this device
Download the instructions for your Multicooker in PDF format for free! Find your manual 006-783 - Menuett and take your electronic device back in hand. On this page are published all the documents necessary for the use of your device. 006-783 by Menuett.
USER MANUAL 006-783 Menuett
natural_image
Exterior view of a modern cooking pot with digital display and control buttons (no visible text or symbols on the device itself)
SE MULTICOOKER
Operating instructions (Translation of the original instructions) Important! Read the user instructions carefully before use. Save them for future reference.
Värna om miljön!
Care for the environment!
Must not be discarded with household waste! This product contains electrical or electronic components that should be recycled. Leave the product for recycling at the designated station e.g. the local authority's recycling station.
Jula reserves the right to make changes. In the event of problems, please contact our service department.
www.jula.com

Tillverkare/ Produsent/ Producenci/ Manufacturer
Jula AB, Box 363, 532 24 SKARA
Distributör/ Distributør/ Dystrybutor/ Distributor
Jula Poland Sp. z o.o., ul.
EU DECLARATION OF CONFORMITY
EU FÖRSÄKRAN OM ÖVERENSSTÄMMELSE
EU SAMSVARSERKLÆRING
DEKLARACJA ZGODNOŚCI UE

Jula AB, Box 363, SE-532 24 SKARA, SWEDEN
This declaration of conformity is issued under the sole responsibility of the manufacturer
Pressure Equipment Directive 2014/68/EU
EN 12778:2002+AC+A1
ERP Implementing Measure Regulation (EC) No 1275/2008+801/2013
EN 50564:2011
RoHS Directive 2011/65/EU
EN 50581:2012
This product was CE marked in year -18
Skara 2018-11-07
JONAS ÖSTERBACKA
BUSINESS AREA MANAGER
1

2

3
3

5
A

natural_image
Diagram of a hand operating a mechanical component inside a circular frame (no text or symbols)B

natural_image
Technical line drawing of a mechanical component with no visible text or symbols6
natural_image
Diagram of a hand holding a circular device with an arrow pointing upward (no text or symbols present)
7

natural_image
Three-step line drawing of a cooking pot with lid, showing progressive assembly from top to side (no text or symbols)

natural_image
Two labeled diagrams (A and B) showing cellular or vesicular structures with no text or symbols beyond labels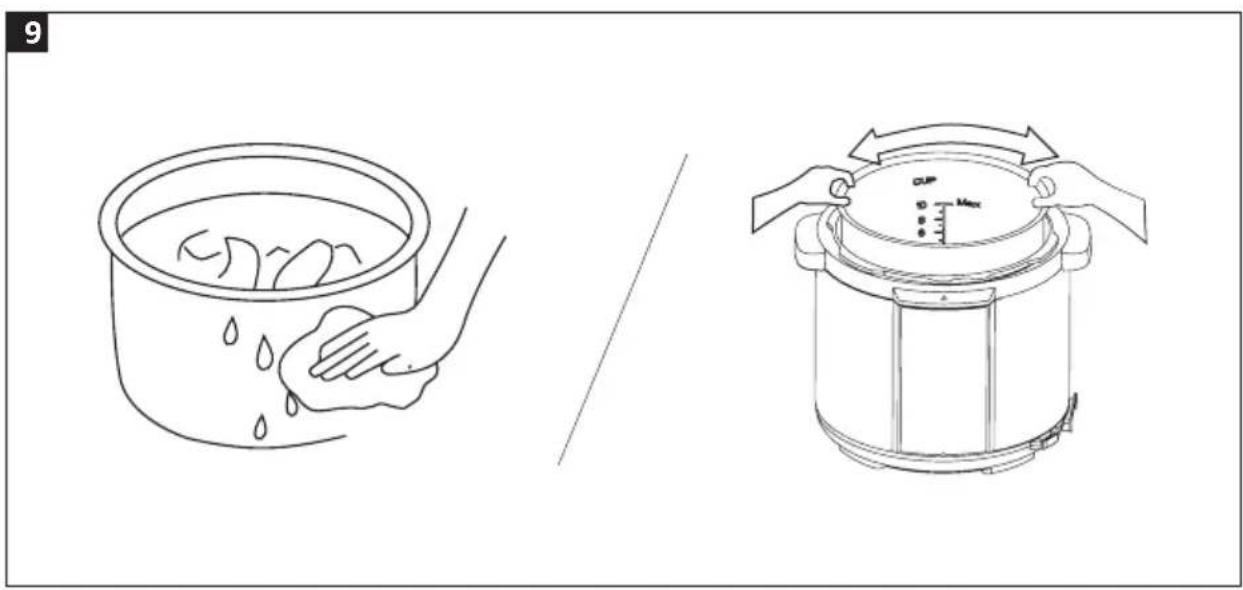
natural_image
Illustration showing a cooking process: adding liquid into a pot and then boiling with a speedometer (no text or symbols)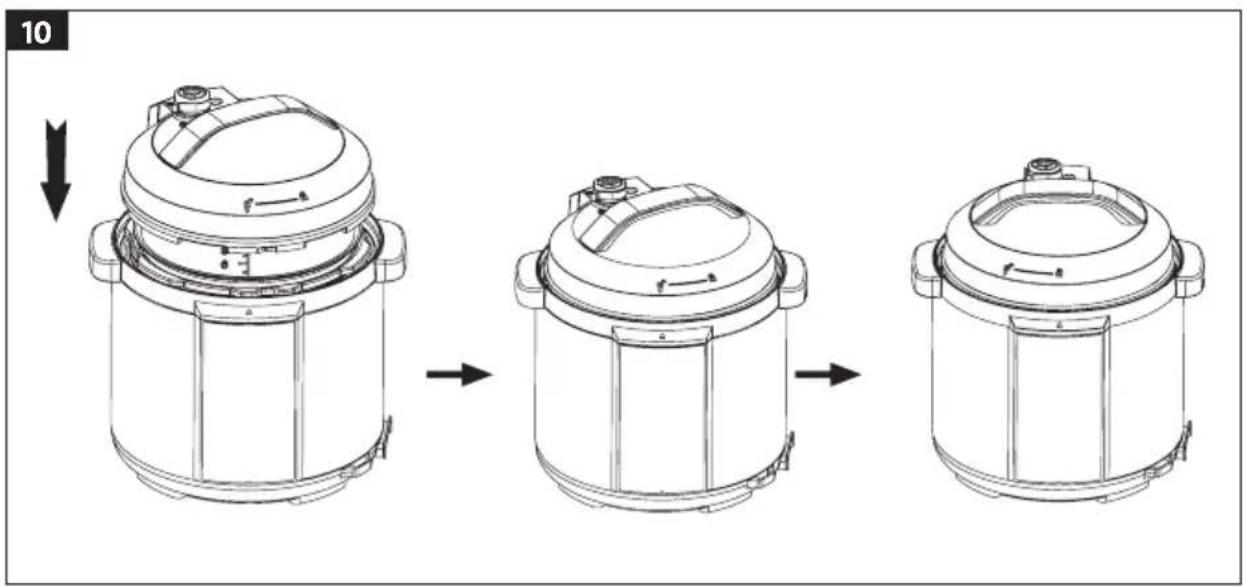
SÄKERHETSANVISNINGAR
Vegetable (grønnsaker)
- This appliance shall not be used by children. Keep the appliance and its cord out of reach of children. Do not let children near the appliance when in use.
- The product is only intended for household use. Do not use the product outdoors.
- The product is not intended to be used by persons (children or adults) with any form of functional disorders, or by persons who do not have sufficient experience or knowledge on how to use it, unless they have received instructions concerning the use of the product from someone who is responsible for their safety.
- A damaged power cord or plug must be replaced by an authorised service centre or other qualified personnel to ensure safe use.
-
Keep children under supervision to make sure they do not play with the product.
-
Do not use any accessories other than those recommended by the appliance manufacturer – risk of personal injury.
- Switch off the product and pull out the plug before cleaning and maintenance, before moving the product, and when the product is not in use.
- Do not allow the power cord to hang over the edge of a table or worktop, or to come into contact with hot surfaces. Handle the product with care when there is hot food or hot liquid in it.
- Never use the product for anything other than the purpose it was designed for.
- The product gets hot when in use.
- Never immerse the power cord, plug or product in water or any other liquid – risk of electric shock.
- Never open the pan before the pressure has been released.
- The product is not intended to be controlled by an external
timer or a separate remote control.
- Always put the product on a stable surface with the handles turned, to avoid spilling hot liquid when in use.
- Note that the product will still be hot after it is switched off – risk of burn injury.
- The lid must be closed for pressure to build up in the pan. The lid cannot be opened when there is a lot of pressure in the pan.
- The pan is pressurised. Incorrect use can result in the risk of scalding. Do not switch on the product if the lid is not properly closed.
- Never switch on the product without any water or food in the pan (except when using sauté mode), this can ruin the pan.
-
Do not fill the pan to more than 2/3 full. When cooking food that expands during the cooking, such as rice or dry vegetables, do not fill the pan to more than 1/2 full.
-
Never attempt to heat the pan with a source of heat other than described in these instructions.
- When cooking meat with skin (e.g. ox tongue) the pressure can cause the skin to expand. In which case, do not puncture the skin – risk of scalding.
- When cooking food that swells up, carefully shake the pan before taking off the lid otherwise the hot food could burst out.
• Always check before use that the valves are not blocked. - Do not use the product in pressurised mode to fry or deep-fry.
- Only use parts and accessories recommended by the manufacturer.
- The pressure regulator allowing the escape of steam should be checked regularly to ensure that it is not blocked.
- Do not put the appliance into a heated oven.
- Move the appliance under pressure with the greatest care.
Do not touch hot surfaces. Use the handles and knobs. If necessary, use protection.
- Do not tamper with any of the safety systems beyond the maintenance instructions specified in the instructions for use.
WARNING!
- Keep your hands and face away from the steam outlet and lid when the product is in use – risk of scalding.
- Pull out the plug before taking the food out of the product.
- Do not touch the lid during cooking or keeping warm.
- Never modify or block the locking mechanism – risk of serious personal injury and/or material damage.
- Never attempt to open the lid when the float valve is moving or the pan is pressurised.
-
Hot water can run out from the pressure relief valve when the lid is opened – risk of scalding.
-
The silicone ring is not a safety device.
- Incorrect fitting can result in a risk of personal injury. Make sure to fit it correctly.
- Connect the product to a 230 power point, otherwise there is a risk of fire and/or electric shock.
- Connect the product to a separate power circuit. Connect the product to an earthed power point with a fuse of at least 10 A. If other appliances are connected to the same power circuit there is a risk of overheating that can cause a fire.
- Do not plug in the power cord if the cord, plug and or the power point are damaged – risk of fire and or electric shock.
- Avoid spilling on the power cord and plug.
- Only use the supplied lid. Never use any other lid that the one supplied with the product – risk of electric shock, scalding and/or
personal injury.
- Do not insert foreign objects or short circuit the terminals. Never allow metal objects to come into contact with the terminals – risk of electric shock and/or personal injury.
- Keep your hands and face away from the outlet opening when the product is in use.
- Never cover the outlet with a cloth or any other object. Do not touch the lid when the product is in use.
SYMBOLS
| Read the instructions. | |
| Approved in accordance with the relevant directives. | |
| Recycle discarded product as electrical waste. |
TECHNICAL DATA
| Voltage 230 V | ~50 Hz |
| Output | 1000 W |
| Volume | |
| Pan diameter 220 mm | |
| Operating pressure 1.6 bar/160 kPa | |
| Warming temperature 60–80°C |
DESCRIPTION
- Lid
- Base
- Control panel
- Container
FIG. 1
Accessories
A. Ladle
B. Spoon
C. Level indicator
D. Measuring cup
FIG. 2
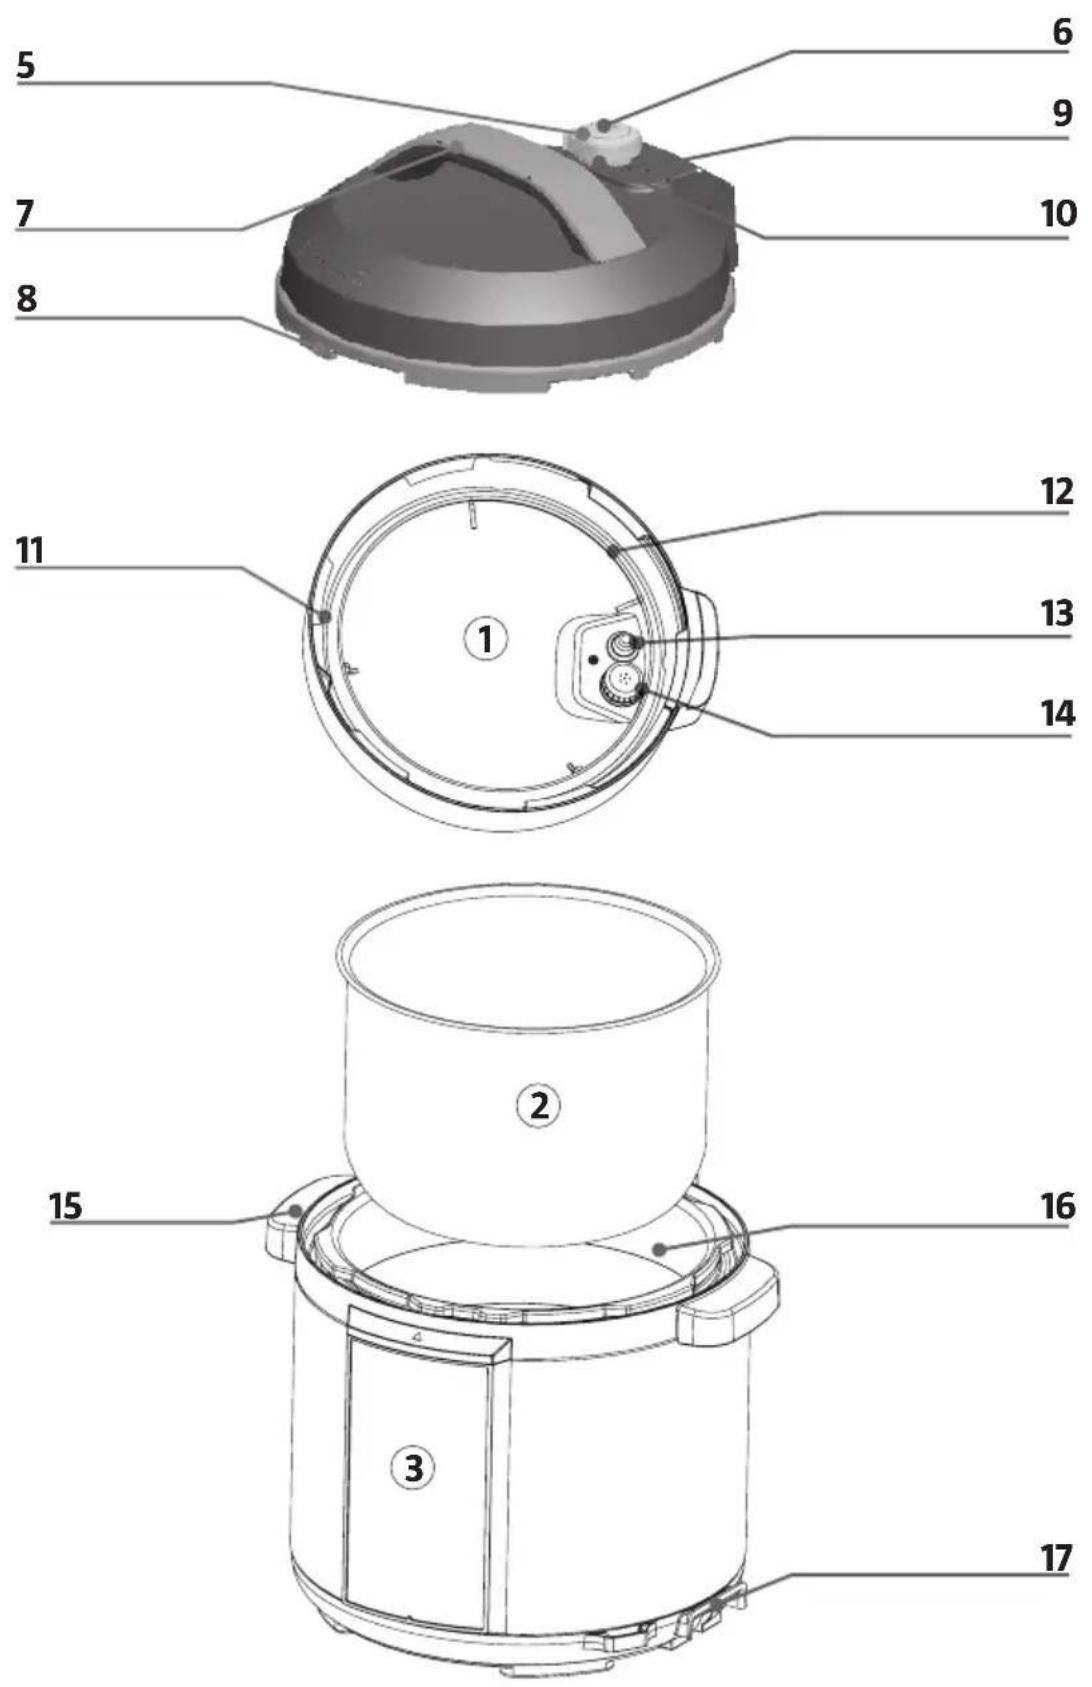
Pressure cooker parts
- Handle pressure relief valve
- Outlet
- Lid handle
- Seal
- Float valve
- Pressure relief valve
- Seal holder
- Protective cover
- Water container
- Lock
- Container handle
- Pan
- Connection for power cord
FIG. 3
Control panel
5.5L
- Delay timer
- Setting the pressure
- (-) reduce set value
- Manual setting
- Keep warm/switch

EN
- Cooking time
- Display
- (+) increase set value
- Menu button
- Programme menu
FIG. 4
USE
BEFORE USE
• Always check before use that the float valve, protective cover and seal are correctly fitted.
- Check that the outside of the pan and inside of the container are clean and dry before putting the pan in the pressure cooker.
- Use the container handles to move the pressure cooker. Wipe off any water from the container lid with a cloth.
- Check at frequent intervals that the protective cover and pressure relief valve are not blocked.
- The pressure relief valve must not be replaced or pressed down with a heavy object.
IMPORTANT:
Do not use the pressure cooker in the following places:
- Unstable surface.
• Near water or naked flame.
• Near walls or furniture.
• Near hot fat or direct sunlight. - Near a cooker or other sources of heat – fire risk.
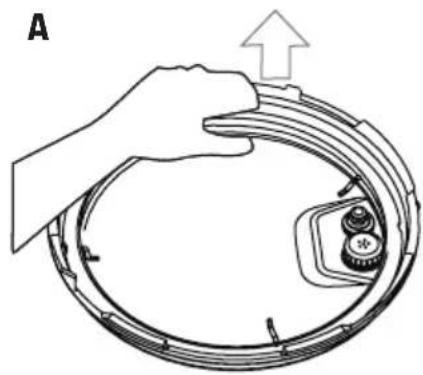
Protective cover
| Dismantling | Pull out |
| Fitting | Press down to fit |
FIG. 5
NOTE:
- Check before use that the seal and protective cover are correctly fitted in the
lid.
- After use, clean the seal and around the protective cover to ensure that the cover does not stick and to avoid smelling.
Seal
| Dismantling | Pull out |
| Fitting | Press down to fit |
FIG. 6
NOTE:
- Do not pull on the seal this can cause it to become deformed and seal poorly, which will reduce the pressure in the cooker.
- Do not use the pressure cooker if the seal is damaged. Contact the retailer for a new seal.
USE
- Do not heat the pan when it is empty. This can deform or discolour the pan.
- Do not leave sour or alkaline substances, or food in the pan for long periods.
- The pan is resistant to corrosion, but can corrode. The longest recommended time for warming is 2 hours.
- Do not soak the pan for a long time.
Pressure function
Set the required pressure with the pressure button in manual mode.
Setting the cooking time
Set the required pressure with the +/- buttons in manual mode.
Delay timer
Set the time for the cooking to finish with the +/- buttons.
PREPARATIONS FOR COOKING
- Opening the lid. Turn the lid handle anticlockwise about 30^ , so that the marking ▼ on the edge of the lid is in line with the marking ▲ on the container lid. Lift off the lid.
FIG. 7
- Check that all the lid part are fitted correctly. Check that the float valve or pressure relief valve are not blocked or stuck, and that the seal and protective cover are correctly fitted.
- Lift out the pan and put the food and water in it. Do not fill the pan over the Max mark.
FIG. 8
- Put the pan in the pressure cooker. Clean the outside of the pan and wipe off any water before putting the pan in the pressure cooker. Twist the pan from side to side to ensure it is in good contact with hot plate.
FIG. 9
NOTE:
- Do not fill the pan over the Max mark, this can cause malfunctioning or prevent the food cooking properly. Only use the supplied pan.
- Check that the hot plate and bottom of the pan are clean and free from foreign objects, otherwise there is a risk of overheating and/or malfunctioning.
- Never attempt to heat the pan on or near other sources of heat. This can cause deformation and/or material damage.
-
Only use the supplied pan.
-
Close the lid correctly:
-
Before putting the lid on, check that the seal is fitted correctly.
- Hold the lid handle and align the marking ▼ on the lid to the marking ▲ in the container lid.
- Put the lid level on the pressure cooker
and turn clockwise about 30^ , so that the marking 🙏 on the lid is in line with the marking ▲ on the container lid.
FIG. 10
-
Close the pressure relief valve:
-
Turn the pressure relief valve to closed position before switching on the pressure cooker, so that the pan can pressurise.
- For manual pressurising, turn the pressure relief valve handle to the open position to relieve the pressure in the cooker. Keep your hands and face away from the outlet.
• A: Pressure relief valve is closed position. B: Pressure relief valve in open position.
FIG. 11
NOTE:
- Always check before use that the float is moving correctly.
- Use the container handles to move the pressure cooker. Never use the lid handle to move the pressure cooker – risk of scalding, serious personal injury and/or material damage if the lid comes loose and the pressure cooker drops.
FUNCTION SETTING
- Prepare the pressure cooker and the food according to the instructions.
- Switch on the pressure cooker. If the buttons do not work, check that the lid is properly closed.
- Select the required function by pressing the menu button and selecting the required menu programme menu with the +/- buttons. Different menu programmes have different cooking times and larger amounts of food require longer cooking times.
- Press the button for the required menu programme. The corresponding programme is selected after 10 seconds and the pressure cooker starts after another 10 seconds. The cooking can be stopped at any time with the
keep warm button/switch ⏻whereby the pressure cooker goes into standby mode.
- When the cooking is finished the pressure cooker goes automatically into keep warm mode. The keep warm time should not exceed 2 hours. The status light for the menu programme goes off when the cooking is finished, the status light for keep warm goes on, and an audio prompt is given to show that the pressure cooker is in keep warm mode. If the keep warm button/switch is pressed when the pressure cooker is in standby mode the status light for keep warm goes on, and an audio prompt is given to show that the pressure cooker is in keep warm mode.
NOTE:
- All active modes can be stopped at any time with the keep warm button/switch ⏻, whereby the pressure cooker goes into standby mode.
- A bubbling or clucking sound can be heard when the pressure cooker is on. This is quite normal.
- When cooking small amounts of food the pan can come up when lifting the lid off. If so, shake the lid so that the pan comes loose and then lift off the lid.
SAFE OPENING OF THE LID
- Switch off the pressure cooker and pull out the plug.
- Pressure relief:
Quick opening of the lid
Turn the pressure relief valve to open position to relieve the pressure until the float sinks (for non-liquid flood).
Normal opening of the lid
Allow the pressure cooker to cool until the float sinks.
- Opening the lid:
- Turn the lid anticlockwise with the left
hand to the marking for open position and lift off the lid with the right hand.
- When the pressure cooker is not on the pan is not pressurised and the float is in the bottom position.
NOTE:
- Do not open the lid until the pressure in the pan is fully relieved. Do not force up the lid if it is difficult to open.
- Do not pull out the pressure relief valve while turning it.
- When cooking liquid food (porridge and soup, etc.) do not turn the pressure relief valve, switch off the pressure relief valve instead, unplug the power cord and allow the pressure cooker to cool until the float sinks before opening the lid.
- Do not open the pressure relief valve immediately after cooking a large amount of food. Leave the pressure cooker in keep warm mode for a short while before opening the lid.
PROGRAMME MENU
Standby mode
When switched on the pressure cooker is in standby mode and (---) flashes in the display.
Meat
- Normal cooking: Press the menu button in standby mode. The status light M goes on and P01 flashes in the display. If no other buttons are pressed within 10 seconds the cooking starts automatically with the menu programme Meat. The display shows P01 and the countdown starts when the pressure increases in the cooker.
- Delayed cooking: Press the menu button in standby mode and then press the delay button. The status light Delay Timer flashes and the time flashes in the display. Set the required time with the buttons +/- . The time changes in steps of 10 minutes every time
the button is pressed. The time when the cooking is ready is shown after 10 seconds in the display and the countdown starts.
- Finish: Press the button ⏻ to end mode.
Poultry
-
Normal cooking: Normal cooking: Press the menu button in standby mode. The status light M goes on and P01 flashes in the display. Press the button + to show P02 in the display. If no other buttons are pressed within 10 seconds the cooking starts automatically with the menu programme Poultry. The display shows P02 and the countdown starts when the pressure increases in the cooker.
-
Delayed cooking: Press the menu button in standby mode and then press the + button. The display shows PO2. Press the delay button. The status light Delay Timer flashes and the time flashes in the display. Set the required time with the buttons +/- . The time changes in steps of 10 minutes every time the button is pressed. The time when the cooking is ready is shown after 10 seconds in the display and the countdown starts.
-
Finish: Press the button ⏻ to end mode.
Vegetable
-
Normal cooking: Normal cooking: Press the menu button in standby mode. The status light goes on and P01 flashes in the display. Press the button + twice, to show P03 in the display. If no other buttons are pressed within 10 seconds the cooking starts automatically with the menu programme Vegetable. The display shows P03 and the countdown starts when the pressure increases in the cooker.
-
Delayed cooking: Press the menu button in standby mode and then press the + button twice. The display shows P03. Press the delay
button. The status light Delay Timer flashes and the time flashes in the display. Set the required time with the buttons +/- . The time changes in steps of 10 minutes every time the button is pressed. The time when the cooking is ready is shown after 10 seconds in the display and the countdown starts.
- Finish: Press the button ⏻ to end mode.
Steam
-
Normal cooking: Normal cooking: Press the menu button in standby mode. The status light goes on and P01 flashes in the display. Press the button + three times, to show P04 in the display. If no other buttons are pressed within 10 seconds the cooking starts automatically with the menu programme Steam. The display shows P04 and the countdown starts when the pressure increases in the cooker.
-
Delayed cooking: Press the menu button in standby mode and then press the + button three times. The display shows P04. Press the delay button. The status light Delay Timer flashes and the time flashes in the display. Set the required time with the buttons +/- . The time changes in steps of 10 minutes every time the button is pressed. The time when the cooking is ready is shown after 10 seconds in the display and the countdown starts.
-
Finish: Press the button ⏻ to end mode.
Sauté
- Normal cooking: Normal cooking: Press the menu button in standby mode. The status light M goes on and P01 flashes in the display. Press the button + four times, to show P05 in the display. If no other buttons are pressed within 10 seconds the cooking starts automatically with the menu programme Sauté. The display shows 0:30
and the countdown starts.
- Finish: Press the button ⏻ to end mode.
NOTE:
The lid should not be used in this mode.
Slow Cook
-
Normal cooking: Normal cooking: Press the menu button in standby mode. The status light goes on and PO1 flashes in the display. Press the button + five times, to show PO6 in the display. If no other buttons are pressed within 10 seconds the cooking starts automatically with the menu programme Slow Cook. The display shows the countdown from 8:00.
-
Finish: Press the button ⏻ to end mode.
White Rice
-
Normal cooking: Normal cooking: Press the menu button in standby mode. The status light ☐ goes on and P01 flashes in the display. Press the button + six times, to show P07 in the display. If no other buttons are pressed within 10 seconds the cooking starts automatically with the menu programme White Rice. The display shows P07 and the countdown starts when the pressure increases in the cooker.
-
Delayed cooking: Press the menu button in standby mode and then press the + button six times. The display shows P07. Press the delay button. The status light Delay Timer flashes and the time flashes in the display. Set the required time with the buttons +/- . The time changes in steps of 10 minutes every time the button is pressed. The time when the cooking is ready is shown after 10 seconds in the display and the countdown starts.
-
Finish: Press the button ⏻ to end mode.
Brown Rice
-
Normal cooking: Normal cooking: Press the menu button in standby mode. The status light M goes on and P01 flashes in the display. Press the button + seven times, to show P08 in the display. If no other buttons are pressed within 10 seconds the cooking starts automatically with the menu programme Brown Rice. The display shows P08 and the countdown starts when the pressure increases in the cooker.
-
Delayed cooking: Press the menu button in standby mode and then press the + button seven times. The display shows P08. Press the delay button. The status light Delay Timer flashes and the time flashes in the display. Set the required time with the buttons +/- . The time changes in steps of 10 minutes every time the button is pressed. The time when the cooking is ready is shown after 10 seconds in the display and the countdown starts.
-
Finish: Press the button ⏻ to end mode.
Beans
-
Normal cooking: Normal cooking: Press the menu button in standby mode. The status light M goes on and P01 flashes in the display. Press the button + eight times, to show P09 in the display. If no other buttons are pressed within 10 seconds the cooking starts automatically with the menu programme Beans. The display shows P09 and the countdown starts when the pressure increases in the cooker.
-
Delayed cooking: Press the menu button in standby mode and then press the + button eight times. The display shows P09. Press the delay button. The status light Delay Timer flashes and the time flashes in the display. Set the required time with the buttons +/- . The time changes in steps of 10 minutes every time the button is pressed.
The time when the cooking is ready is shown after 10 seconds in the display and the countdown starts.
- Finish: Press the button ⏻ to end mode.
Broth
-
Normal cooking: Normal cooking: Press the menu button in standby mode. The status light 📄 goes on and P01 flashes in the display. Press the button + nine times, to show P10 in the display. If no other buttons are pressed within 10 seconds the cooking starts automatically with the menu programme Broth. The display shows P10 and the countdown starts when the pressure increases in the cooker.
-
Delayed cooking: Press the menu button in standby mode and then press the + button nine times. The display shows P10. Press the delay button. The status light Delay Timer flashes and the time flashes in the display. Set the required time with the buttons +/- . The time changes in steps of 10 minutes every time the button is pressed. The time when the cooking is ready is shown after 10 seconds in the display and the countdown starts.
-
Finish: Press the button ⏻ to end mode.
Curry
-
Normal cooking: Normal cooking: Press the menu button in standby mode. The status light 📂 goes on and P01 flashes in the display. Press the button + 10 times, to show P11 in the display. If no other buttons are pressed within 10 seconds the cooking starts automatically with the menu programme Curry. The display shows P11 and the countdown starts when the pressure increases in the cooker.
-
Delayed cooking: Press the menu button in standby mode and then press the + button
10 times. The display shows P11. Press the delay button. The status light Delay Timer flashes and the time flashes in the display. Set the required time with the buttons +/-. The time changes in steps of 10 minutes every time the button is pressed. The time when the cooking is ready is shown after 10 seconds in the display and the countdown starts.
- Finish: Press the button ⏻ to end mode.
Soup
-
Normal cooking: Normal cooking: Press the menu button in standby mode. The status light M goes on and P01 flashes in the display. Press the button + 11 times, to show P12 in the display. If no other buttons are pressed within 10 seconds the cooking starts automatically with the menu programme Soup. The display shows P12 and the countdown starts when the pressure increases in the cooker.
-
Delayed cooking: Press the menu button in standby mode and then press the + button 11 times. The display shows P12. Press the delay button. The status light Delay Timer flashes and the time flashes in the display. Set the required time with the buttons +/- . The time changes in steps of 10 minutes every time the button is pressed. The time when the cooking is ready is shown after 10 seconds in the display and the countdown starts.
-
Finish: Press the button ⏻ to end mode.
Multigrain
- Normal cooking: Normal cooking: Press the menu button in standby mode. The status light 📂 goes on and P01 flashes in the display. Press the button + 12 times, to show P13 in the display. If no other buttons are pressed within 10 seconds the cooking starts automatically with the menu
programme Multigrain. The display shows P13 and the countdown starts when the pressure increases in the cooker.
-
Delayed cooking: Press the menu button in standby mode and then press the + button 12 times. The display shows P13. Press the delay button. The status light Delay Timer flashes and the time flashes in the display. Set the required time with the buttons +/- . The time changes in steps of 10 minutes every time the button is pressed. The time when the cooking is ready is shown after 10 seconds in the display and the countdown starts.
-
Finish: Press the button ⏻ to end mode.
Congee
-
Normal cooking: Normal cooking: Press the menu button in standby mode. The status light ☐ goes on and P01 flashes in the display. Press the button + 13 times, to show P14 in the display. If no other buttons are pressed within 10 seconds the cooking starts automatically with the menu programme Congee. The display shows P14 and the countdown starts when the pressure increases in the cooker.
-
Delayed cooking: Press the menu button in standby mode and then press the + button 13 times. The display shows P14. Press the delay button. The status light Delay Timer flashes and the time flashes in the display. Set the required time with the buttons +/- . The time changes in steps of 10 minutes every time the button is pressed. The time when the cooking is ready is shown after 10 seconds in the display and the countdown starts.
-
Finish: Press the button ⏻ to end mode.
Chili
- Normal cooking: Normal cooking: Press the menu button in standby mode. The
status light ☐ goes on and P01 flashes in the display. Press the button + 14 times, to show P15 in the display. If no other buttons are pressed within 10 seconds the cooking starts automatically with the menu programme Chili. The display shows P15 and the countdown starts when the pressure increases in the cooker.
-
Delayed cooking: Press the menu button in standby mode and then press the + button 14 times. The display shows P15. Press the delay button. The status light Delay Timer flashes and the time flashes in the display. Set the required time with the buttons +/- . The time changes in steps of 10 minutes every time the button is pressed. The time when the cooking is ready is shown after 10 seconds in the display and the countdown starts.
-
Finish: Press the button ⏻ to end mode.
Manual setting
-
Normal cooking: Press the button for manual setting in standby mode. The status lights Manual Setting and High go on and the display shows 30. Press the button for cooking time and set the time with the +/- buttons. If no other buttons are pressed within 10 seconds the cooking starts automatically. The display shows and the countdown starts when the pressure increases in the cooker.
-
Delayed cooking: Press the button for manual setting in standby mode. The status lights Manual Setting and High go on and the display shows 30. Press the delay button. The status light Delay Timer flashes and the time flashes in the display. Set the required time with the buttons +/- . The time changes in steps of 10 minutes every time the button is pressed. The time when the cooking is ready is shown after 10 seconds in the display and the countdown starts.
-
Setting the pressure: Press the button for manual setting in standby mode. The status lights Manual Setting and High go on
and the display shows 30. Change the set pressure with the pressure setting button. The status light High for high pressure goes off and the status light Low for low pressure goes on. If no other buttons are pressed within 10 seconds the cooking starts automatically. The display shows and the countdown starts when the pressure increases in the cooker.
- Finish: Press the button ⏻ to end mode.
WARMING
- When the cooking is finished the pressure cooker goes automatically into keep warm mode and the status light for keep warm goes on.
- Keep warm mode can also be enabled from standby mode with the keep warm button.
- The keep warm temperature is 60 to 80^ C .
MAINTENANCE
- Keep the pan clean for best functionality and lifespan. Clean the pressure cooker often and remove any grease and scraps.
- Clean the pan with hot water and a mild detergent. Do not use metal utensils, abrasive or scratching utensils when cleaning, they can damage the surface of the pan.
- Store the pressure cooker at least 30cm from other kitchen appliances.
CLEANING
- Pull out the plug, and wait until the pressure cooker has completely cooled before cleaning and/or maintenance.
- Take off the lid and wash the pan in hot water and washing-up liquid, rinse and then wipe dry with a soft cloth.
- Clean the inside of the lid with water. The seal, protective cover, pressure relief valve and float valve can be removed and cleaned.
Refit all parts and wipe the inside of the lid with a cloth.
- Wipe the pressure cooker with a cloth. Do not immerse the pressure cooker or the base in water or any other liquid, or pour water on them.
Pressure relief valve
Pull the pressure relief valve out of the lid. Clean the inside and outside of the pressure relief valve with a brush or cloth at least once every month.
Seal holder for pressure relief valve
Clean the seal holder with hot water, washing-up liquid and a brush. The seal holder can become discoloured from residual oil or fat. Remove all such residue. Clean the seal holder every other month.
Water container
The water container can contain condensation after the cooking. Empty the water container and wipe dry with a clean cloth. Residual water can smell.
TROUBLESHOOTING
Problem Action
- The power cord or plug is damaged, deformed or discoloured.
- Part of the power cord and/or plug is hot.
- Loose contact in power cord. The pressure cooker does not heat up as usual and/or smells.
- Abnormal noise or vibration when the pressure cooker is switched on.

Switch off the pressure cooker immediately and pull out the plug. Take the pressure cooker to an authorised service centre, or other qualified personnel, to be checked and repaired.
THE STATUS LIGHTS ARE FLASHING
| Problem Cause Action | ||
| E1 is shown in the display. Circuit fault in bottom sensor. | Take the appliance to an authorised service centre to be checked, repaired or adjusted. | |
| E2 is shown in the display. Short circuit in bottom sensor. | ||
| E5 is shown in the display. Circuit fault in lid sensor. | ||
| E6 is shown in the display. Short circuit in lid sensor. | ||
| E8 is shown in the display. Pressure switch fault. | ||
| E11 is shown in the display. | Communication error between control card and transmission card. | |
| E12 is shown in the display. | Communication error between receiver card and transmission card. | |
| E13 is shown in the display. | Circuit fault/short circuit in float sensor. | |
| E14 is shown in the display. Correction fault in float sensor. | ||
| E15 is shown in the display. | Fault on temperature sensor in receiver card. | |
| E17 is shown in the display. Fault on receiver card. | ||
| E18 is shown in the display. Fault on transmission card. | ||
| EC is shown in the display. The lid is not properly closed. Close the lid correctly. | ||
| PROBLEM CAUSE ACTION | ||
| It is difficult to close the lid. Seal | is not correctly fitted. Fit the seal | correctly. |
| The float has stuck. Gently press | the float. | |
| It is difficult to open the lid. | The float is in the top position. | Gently press the float with a pin. |
| The pan is pressurised. Wait until | the pressure is relieved before opening the lid. | |
| Steam is leaking out from under the lid. | Seal is not correctly fitted. Fit the | seal correctly. |
| Scraps of food on the seal. Clean | the seal. | |
| The seal is damaged. Replace seal. | ||
| The lid is not properly closed. Close the lid correctly. | ||
| Steam is leaking out through the float valve. | Scraps of food on the float valve seal. | Clean the float valve seal. |
| The float valve seal is worn or damaged. | Replace float valve seal. | |
| The float does not rise. Too little | food and water in the pan. | Add food and water according to recipe. |
| Steam is leaking out from under the lid or through the pressure relief valve. | Take the appliance to an authorised service centre to be checked, repaired or adjusted. | |
| Steam is continuously forced out through the pressure relief valve. | Pressure relief valve is not in closed position. | Turn the pressure relief valve to closed position. |
| Pressure regulation does not work. | Take the appliance to an authorised service centre to be checked, repaired or adjusted. | |
| The power status light does not go on. | The power point is without power. | Check the power point. |
| Rice half cooked or too hard. Too | little water. | Add more water. |
| The lid was opened too soon. | Wait 5 minutes after cooking before opening the lid. | |
| Rice is too soft. | Too much water. | Use less water. |
- SE MULTICOOKER
- EU DECLARATION OF CONFORMITY
- EU FÖRSÄKRAN OM ÖVERENSSTÄMMELSE
- EU SAMSVARSERKLÆRING
- DEKLARACJA ZGODNOŚCI UE
- SÄKERHETSANVISNINGAR
- Vegetable (grønnsaker)
- WARNING!
- DESCRIPTION
- Accessories
- Pressure cooker parts
- Control panel
- EN
- USE
- BEFORE USE
- IMPORTANT:
- Do not use the pressure cooker in the following places:
- Protective cover
- NOTE:
- Pressure function
- Setting the cooking time
- Delay timer
- PREPARATIONS FOR COOKING
- 7
- 8
- 9
- 10
- 11
- FUNCTION SETTING
- SAFE OPENING OF THE LID
- Quick opening of the lid
- Normal opening of the lid
- PROGRAMME MENU
- Standby mode
- Meat
- Poultry
- Vegetable
- Steam
- Sauté
- The lid should not be used in this mode.
- Slow Cook
- White Rice
- Brown Rice
- Beans
- Broth
- Curry
- Soup
- Multigrain
- Congee
- Chili
- Manual setting
- WARMING
- MAINTENANCE
- CLEANING
- Pressure relief valve
- Seal holder for pressure relief valve
- Water container
- TROUBLESHOOTING
- Problem Action
Brand : Menuett
Model : 006-783
Category : Multicooker