
NV-GS60GC - Camcorder PANASONIC - Free user manual and instructions
Find the device manual for free NV-GS60GC PANASONIC in PDF.


| Product Type | MiniDV Camcorder |
| Brand | Panasonic |
| Model | NV-GS60GC |
| Dimensions (W x H x D) | 66 x 83 x 137 mm |
| Weight (without battery) | 410 g |
| Power Source | 7.2 V DC (Rechargeable battery pack) |
| Image Sensor | 1/6-inch CCD |
| Effective Pixels | Approx. 340,000 |
| Optical Zoom | 24x |
| Digital Zoom | 800x |
| Lens | Panasonic Lens, F1.8 |
| LCD Monitor | 2.5-inch Color LCD (approx. 113,000 pixels) |
| Viewfinder | Color Electronic Viewfinder (0.33-inch, approx. 113,000 pixels) |
| Recording Media | MiniDV tape |
| Video Recording System | Digital (SD mode) |
| Audio Recording System | 16-bit (48 kHz) / 12-bit (32 kHz) |
| White Balance | Auto / Indoor / Outdoor / Manual |
| Minimum Illumination | 1 lux (Night View mode) |
| Connectors | USB 2.0, AV (Video & Audio), S-Video, DC In |
| Included Accessories | AC Adapter, Battery Pack, Remote Control, AV Cable, USB Cable, Shoulder Strap |
| Care and Cleaning | Clean the lens with a soft, dry cloth. Avoid exposing to direct sunlight or high temperatures. |
| Safety Precautions | Do not disassemble. Keep away from water and moisture. Use only specified battery and charger. |
| Spare Parts & Repairability | Spare batteries, chargers, and remote controls available. Repairs should be carried out by qualified service personnel. |
| General Information | Panasonic NV-GS60GC MiniDV camcorder with 24x optical zoom and 2.5-inch LCD screen. |
Frequently Asked Questions - NV-GS60GC PANASONIC
User questions about NV-GS60GC PANASONIC
0 question about this device. Answer the ones you know or ask your own.
Ask a new question about this device
Download the instructions for your Camcorder in PDF format for free! Find your manual NV-GS60GC - PANASONIC and take your electronic device back in hand. On this page are published all the documents necessary for the use of your device. NV-GS60GC by PANASONIC.
USER MANUAL NV-GS60GC PANASONIC
Operating Instructions
ค่มีอาการใช้งาน
natural_image
Illustration of a digital camera with lens and frame (no text or symbols)Model No. NV-GS60GC
natural_image
Black-and-white landscape photo showing two blooming flowers near a road with trees and distant hills (no text or symbols)Mini DY PAL
使用前,請完整閱讀本說明書。
Before use, please read these instructions completely.
natural_image
Pure geometric diagram with intersecting lines and circular shapes, no text or symbols present

natural_image
Pure electrical circuit lines without any symbols安全注意事項
警告:
若想降低起火、電擊或產品損壞的危險,
natural_image
Symbol of a trash bin crossed out by two crossed lines, with no text or labels present.本符號只適用於歐盟國家。
natural_image
Pure geometric diagram with intersecting lines and shapes, no text or symbols present使用之前
使用之前
附件
隨本攝錄放影機共有下列附件一起提供。

natural_image
Pure electrical circuit lines without any symbols使用之前
⑪取景器-11-46-
28 三腳架座
natural_image
Diagram of a mechanical device with a magnified inset showing a component (no text or symbols present)29 肩背带固定器

natural_image
Pure geometric diagram with intersecting lines and a central circle, no text or symbols present使用之前
安裝鏡頭蓋
安裝鏡頭蓋以保護鏡頭的表面。
natural_image
Three-step diagram showing a device with attached components, no text or symbols present- 取下鏡頭蓋時,請按住突起。

手柄带
調整為適合于您手的長度。
1 調整帶子的長度。
natural_image
Diagram of an electronic device with a plug and internal components (no text or symbols)■ 充電指示燈
點亮:充電正在進行
熄滅:充電已經完成
natural_image
Line drawing of a camera module with an arrow indicating the opening or insertion point (no text or symbols present)■ 取下電池
natural_image
Diagram of a handheld electronic device with rotating button and connector (no text or symbols)- LCD 顯示屏或収景器將被啟動。
2 關閉 LCD 顯示屏並縮回取景器。

natural_image
Pure geometric diagram with intersecting lines and shapes, no text or symbols present使用之前
使用LCD顯示屏
natural_image
Diagram of a mechanical device with a rotating arm and housing (no text or symbols)- 它能打開至 90°。
natural_image
Line drawing of a digital camera with an arrow indicating rotation (no text or symbols)①180°

② 90°
natural_image
Line drawing of a hand holding a cylindrical device with a knob (no text or symbols)natural_image
Pure geometric diagram with intersecting lines and shapes, no text or symbols present使用之前
插入/取出錄影帶
- 當倉蓋完全打開時,將露出錄影帶倉。
natural_image
Line drawing of a mechanical device with a clamped component (no text or symbols)natural_image
Illustration of a handheld device with a magnified inset showing its internal components (no text or symbols)■ 當錄影帶倉不能座合時
錄影帶拍攝模式
當在錄影帶上錄製影像時使用這個模式。
錄影帶播放模式
使用本模式播放錄影帶。
控制桿的使用方法
■ 控制桿的基本操作
使用菜單熒屏
關於每個單獨的菜單,請參見-36-。
1 按 [MENU] 鍵。

natural_image
Line drawing of a hand holding a cylindrical device with attached components (no text or symbols)3)

natural_image
Hand holding a camera with a cross mark, no text or symbols present
natural_image
Diagram of a digital camera with a close-up view of its circular component (no text or symbols)1 按拍攝啟動 / 停止鍵開始錄製。

natural_image
Illustration of a digital camera and a dog photo (no text or symbols)natural_image
Line drawing of a portable washing machine with handle and control panel (no text or symbols)natural_image
Black-and-white photo collage showing three dog portraits with a downward arrow overlay (no text or symbols)natural_image
Line drawing of a digital camera with two arrows indicating motion (no text or symbols)natural_image
Black-and-white photo collage showing silhouettes of two dogs on a beach, with no visible text or symbols.拍攝暫停。(淡出)
natural_image
Two silhouetted animals in black and white poses, one standing on a flat surface, the other holding a curved object (no text or symbols visible)■ 取消淡入淡出
再次選擇 [D] 指示。
2 將 [AUTO/MANUAL/FOCUS] 開關設置為 [FOCUS]。

natural_image
Technical line drawing of a mechanical device with a close-up inset showing internal components (no text or symbols)1 用控制桿操作。


▶/II: 重播/暂停
◀◀: 回捲 / 回捲搜索重播
(用 ▶/■ 圖標回復重播。)
▶▶: 快進 / 快進搜索重播
(用 ▶/□ 圖標回復重播。)
■: 停止
朝[+]方向:增大音量
制[-]方向:减小音量
(豎條越接近[+],音量越大。)
- 調整結束後,音量指示將消失。
natural_image
Pure electrical circuit lines without any symbols重播模式
逐格重播
- 設定為錄影帶播放模式。


朝 [T] 方向: 正常方向
朝 [W] 方向:相反方向
2 設定[進階功能] >> [拍攝待機] >> [是]。(錄影機)
3 開始重播。(播放機)
4 開始拍攝。(錄影機)

1) USB 連接電纜
2) USB 端口
3) 網路攝影模式顯示幕




編輯模式
3 啟動 Windows Messenger/MSN Messenger/Windows Live Messenger。
- 單擊 [start] >> [Programs] >> [Windows Messenger]/[MSN Messenger]/ [Windows Live Messenger].
■ 當使用攝錄放影機作為網路攝影機時
natural_image
Two abstract diagrammatic symbols: a circular control knob with bidirectional arrows and a cross-shaped grid with directional arrows (no text or labels)natural_image
Pure geometric diagram with intersecting lines and circles, no text or symbols present編輯模式
■ 注意事項
natural_image
Pure geometric diagram with intersecting lines and shapes, no text or symbols present其他方面
無法同時使用的功能
natural_image
Pure geometric diagram with intersecting lines and shapes, no text or symbols present其他方面
術語解釋
■ 自動白平衡
82.0 mm (宽 ×69.0 mm (高)×120.0 mm (深)
(不包括突出部分)
重量:
natural_image
Pure electrical circuit lines without any symbolsInformation for your safety
WARNING:
TO REDUCE THE RISK OF FIRE, ELECTRIC SHOCK OR PRODUCT DAMAGE.
- DO NOT EXPOSE THIS APPARATUS TO RAIN, MOISTURE, DRIPPING OR SPLASHING AND THAT NO OBJECTS FILLED WITH LIQUIDS, SUCH AS VASES, SHALL BE PLACED ON THE APPARATUS.
- USE ONLY THE RECOMMENDED ACCESSORIES.
- DO NOT REMOVE THE COVER (OR BACK); THERE ARE NO USER SERVICEABLE PARTS INSIDE. REFER SERVICING TO QUALIFIED SERVICE PERSONNEL.
CAUTION!
- DO NOT INSTALL OR PLACE THIS UNIT IN A BOOKCASE, BUILT-IN CABINET OR IN ANOTHER CONFINED SPACE. ENSURE THE UNIT IS WELL VENTILATED. TO PREVENT RISK OF ELECTRIC SHOCK OR FIRE HAZARD DUE TO OVERHEATING, ENSURE THAT CURTAINS AND ANY OTHER MATERIALS DO NOT OBSTRUCT THE VENTILATION VENTS.
- DO NOT OBSTRUCT THE UNIT'S VENTILATION OPENINGS WITH NEWSPAPERS, TABLECLOTHS, CURTAINS, AND SIMILAR ITEMS.
• DO NOT PLACE SOURCES OF NAKED FLAMES, SUCH AS LIGHTED CANDLES, ON THE UNIT.
• DISPOSE OF BATTERIES IN AN ENVIRONMENTALLY FRIENDLY MANNER.
The socket outlet shall be installed near the equipment and easily accessible.
The mains plug of the power supply cord shall remain readily operable.
To completely disconnect this apparatus from the AC Mains, disconnect the power supply cord plug from AC receptacle.
Product Identification Marking is located on the bottom of units.
Carefully read the Operating Instructions and use the Movie Camera correctly.
- Injury or material damage resulting from any kind of use that is not in accordance with the operating procedures explained in these Operating Instructions are the sole responsibility of the user.
Try out the Movie Camera.
Be sure to try out the Movie Camera before recording your first important event and check that it records properly and functions correctly.
The manufacturer is not liable for loss of recorded contents.
The manufacturer shall in no event be liable for the loss of recordings due to malfunction or defect of this Movie Camera, its accessories or cassettes.
Carefully observe copyright laws.
Recording of pre-recorded tapes or discs or other published or broadcast material for purposes other than your own private use may infringe copyright laws. Even for the purpose of private use, recording of certain material may be restricted.
- The Movie Camera uses copyright-protected technologies and is protected by the patented technologies and intellectual properties of Japan and the U.S. To use these copyright-protected technologies, authorization of the Macrovision Company is required. It is prohibited to disassemble or modify the Movie Camera.
- All other company and product names in the operating instructions are trademarks or registered trademarks of their respective corporations.
Pages for reference
Pages for reference are indicated by dashes either side of a number, for example: -00-
The menu operation flow is indicated by >> in the description.
Use only the recommended accessories.
- Do not use any other AV cables except the supplied one.
- When you use the cable which are sold separately, please make sure to use the one whose length is less than 3 metres.
How to replace the Fuse
The location of the fuse differ according to the type of AC mains plug (figures A and B). Confirm the AC mains plug fitted and follow the instructions below.
Illustrations may differ from actual AC mains plug.
1) Open the fuse cover with a screwdriver.
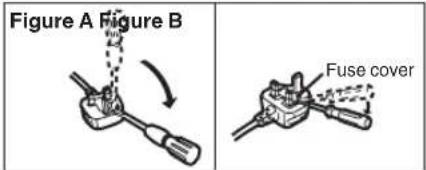
2) Replace the fuse and close or attach the fuse cover.

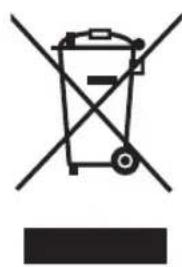
-If you see this symbol-
Information on Disposal in other Countries outside the European Union
natural_image
Symbol of a trash bin crossed with no visible text or labelsThis symbol is only valid in the European Union. If you wish to discard this product, please contact your local authorities or dealer and ask for the correct method of disposal.

natural_image
Pure geometric diagram with intersecting lines and circular shapes, no text or symbols presentContents
Information for your safety 49
Before using
Accessories 52
Optional 52
Parts identification and handling.... 52
Fitting the lens cap 54
The grip belt....54
Power supply 55
Charging time and recordable time.... 56
Turning the camera on.... 56
Setting date and time.... 57
Using the LCD monitor 58
Using the viewfinder 58
Quick Start....59
Inserting/removing a cassette.... 60
Selecting a mode 61
How to use the joystick.... 61
Help mode 62
Switching the language.... 63
Using the menu screen.... 63
Adjusting LCD monitor/viewfinder.... 64
Record mode
Check before recording 65
Recording on a tape 66
Recording check 66
Blank search function 67
Recording a still picture on a tape (Photoshot)....67
Zoom in/out function 68
Recording yourself....69
Backlight compensation function 69
Colour Night view function 70
Soft skin mode....70
Fade in/fade out function 71
Wind noise reduction function.... 71
Recording images for wide-screen TVs...... 72
Image stabilizer function 72
Recording in various situations (Scene mode)....73
Recording in natural colours (White balance)....74
Manual focus adjustment.... 75
Manual shutter speed/aperture adjustment ... 75
Playback mode
Playing back tape 77
Frame-by-frame playback 78
Playback on TV 78
Edit mode
Copying onto a DVD recorder or a VCR (Dubbing) 79
Using the DV Cable for Recording (Digital Dubbing) 79
Using the movie camera as a Web Camera (Windows XP SP2) 80
Using on Macintosh.... 81
Menu
Menu list 82
Menus related to taking pictures 83
Menus related to playback 84
Other menus.... 84
Others
Indications 85
Warning/alarm indications 86
Functions cannot be used simultaneously .... 87
Before requesting repair (Problems and solutions) 87
Cautions for Use.... 90
Explanation of terms.... 94
Specifications
Specifications 96




Before using
Before using
Accessories
The followings are the accessories supplied with this product.
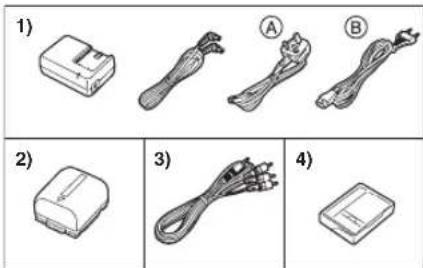
1) AC adaptor, DC input lead, AC mains lead -55-
Ⓐ Hong Kong Special Administrative Region of China and Saudi Arabia
⑧ Areas Other than Hong Kong Special Administrative Region of China and Saudi Arabia
2) Battery pack -55-
3) AV cable -79-
4) Digital video head cleaner -90-
Optional
1) AC adaptor (VW-AD11E/EB)
2) Battery pack (lithium/CGR-DU06/640 mAh)
3) Battery pack (lithium/CGA-DU07/680 mAh)
4) Battery pack (lithium/CGA-DU12/1150 mAh)
5) Battery pack (lithium/CGA-DU14/1360 mAh)
6) Battery pack (lithium/CGA-DU21/2040 mAh)
7) Wide conversion lens (VW-LW3007E)
8) Tele conversion lens (VW-LT3014E)
9) ND filter (VW-LND30E)
10) MC protector (VW-LMC30E)
11) Tripod (VW-CT45E)
12) DV cable (VW-CD1E)
- Some optional accessories may not be available in some countries.
Parts identification and handling
Camera

① White balance sensor -74-
② Grip belt -54-
③ Lens
●Fit the MC protector (VW-LMC30E; optional), the ND filter (VW-LND30E; optional), the tele conversion lens (VW-LT3014E; optional) or the wide conversion lens (VW-LW3007E; optional) in front of the lens. Do not fit the other accessories. (except for the lens cap)
④ Microphone (built-in, stereo) -68-, -71-
⑤ Audio-video output terminal [A/V] -79-
- Use the supplied AV cable only, otherwise audio may not be played back normally.

⑥Speaker -77-
⑦ Cassette eject lever [OPEN/EJECT] -60-
⑧ Cassette holder -60-
⑨ DV terminal [DV] -79-,
10 USB terminal [ ]


natural_image
Pure geometric diagram with intersecting lines and shapes, no text or symbols presentBefore using
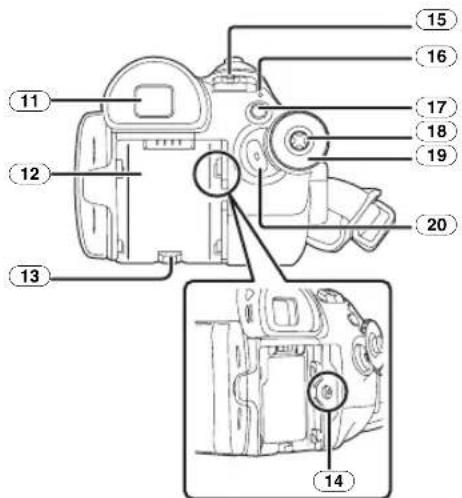
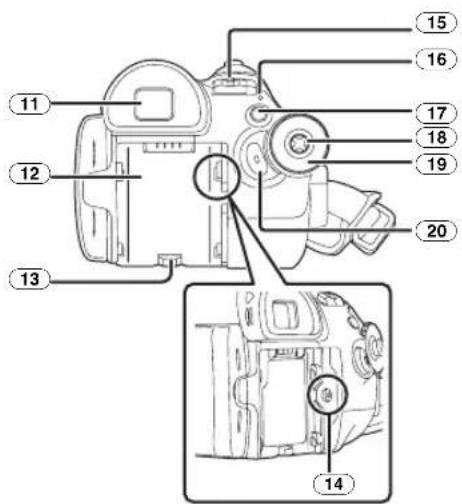
11 Viewfinder -58-, -93-
Due to limitations in LCD production technology, there may be some tiny bright or dark spots on the Viewfinder screen. However, this is not a malfunction and does not affect the recorded picture.
⑫ Battery holder -55-
13 Battery release lever [BATTERY RELEASE] -55-
14 DC input terminal [DC/C.C.IN] -55-
15 Power switch [OFF/ON] -56-
16 Status indicator -56-
17 Menu button [MENU] -63-
18 Joystick -61-
19 Mode dial -61-
20 Recording start/stop button -66-

21 LCD monitor -58-, -93-
Due to limitations in LCD production technology, there may be some tiny bright or dark spots on the LCD monitor screen. However, this is not a malfunction and does not affect the recorded picture.
②2 LCD monitor open part [OPEN] -58-
23 Reset button [RESET] -86,-89-
24 Mode select switch [AUTO/MANUAL/FOCUS] -65-, -73-, -75-

25 Cassette cover -60-
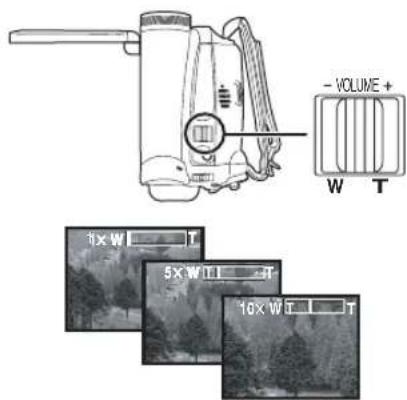
26 Zoom lever [W/T] -68-Volume lever [-VOLUME+] -77-
27 Photoshot button [D67-
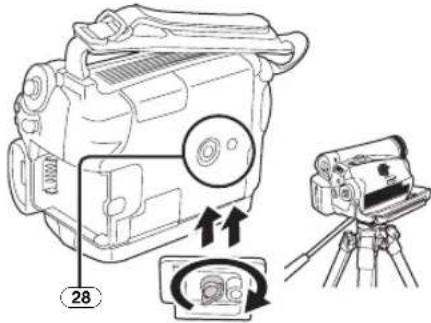
28 Tripod receptacle
This is a hole for attaching the camera to optional tripod/VW-CT45E. (Please carefully read the operating instructions for how to attach the tripod to the camera.)

29 Shoulder strap fixture

- Put the strap (optional) through the fixture ① and through the stopper ② so it will not come off. Extend part ③ by at least 2 cm.
●Fit the other end of the belt similarly.





Before using
Fitting the lens cap
Fit the lens cap to protect the surface of the lens.
1 The lens cap and lens cap cord comes preattached to the grip belt.
Pass the end of the lens cap cord through the attached eye on the lens cap. Then pass the lens cap through the loop made by itself and pull tight.
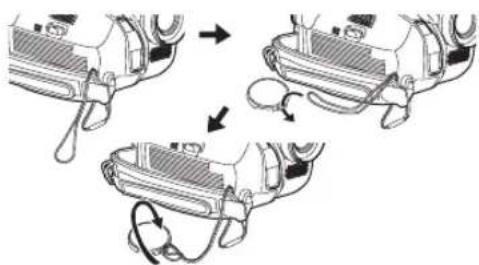
natural_image
Three-step diagram showing a device being connected to a device with a cable, no text or symbols present.- When not using the lens cap, pull the lens cap cord in the direction of the arrow. ①
- When you are not recording, be sure to cover the lens with the lens cap for protection. ②
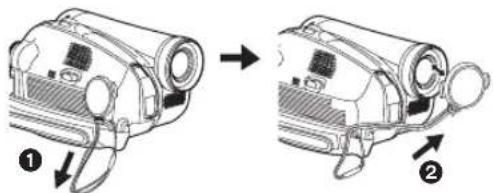
- When you remove the lens cap, press the knobs firmly.

The grip belt
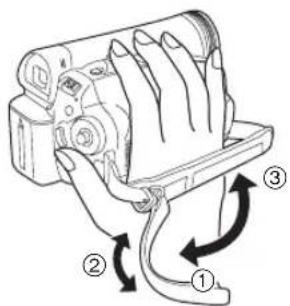
Adjust the belt length so it fits your hand.
1 Adjust the belt length.
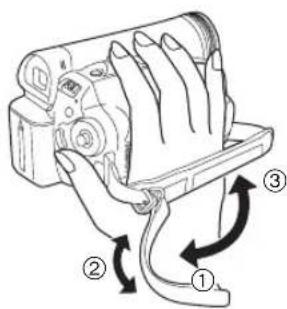
① Flip the belt.
② Adjust the length.
③ Fix the belt.
Before using
Power supply
Charging the battery
When this product is purchased, the battery is not charged. Charge the battery before using this product.
●Battery charging time (-56-)
- We recommend using Panasonic batteries. (-52-)
- If you use other batteries, we cannot guarantee the quality of this product.
- If the DC input lead is connected to the AC adaptor, then the battery will not get charged. Remove the DC input lead from the AC adaptor.
1 Connect the AC mains lead to the AC adaptor and the AC mains socket.
2 Put the battery on the battery mount by aligning the mark, and then securely plug it in.

natural_image
Diagram of a device with an open lid and plug, showing internal components (no text or symbols)Charging lamp
Lights up: Charging Goes off: Charging completed Flashing: The battery is over discharged (discharged excessively). In a while, the lamp will light up and normal charging will start. When the battery temperature is excessively high or low, the [CHARGE] lamp flashes and the charging time will be longer than normal.
■ Connecting to the AC outlet
The unit is in the standby condition when the AC adaptor is connected. The primary circuit is always "live" as long as the AC adaptor is connected to an electrical outlet.

1 Connect the AC mains lead to the AC adaptor and the AC mains socket.
2 Connect the DC input lead to the AC adaptor.
3 Connect the DC input lead to this product.
- The output plug of the AC mains lead is not completely connected to the AC adaptor socket. As shown in ①, there is a gap.
- Do not use the power cord for other equipment since the power cord is exclusively designed for the movie camera. Or do not use the power cord of other equipment for the movie camera.
■ Fitting the battery
Push the battery against the battery holder and slide it until it clicks.

natural_image
Line drawing of a digital camera module with an arrow indicating the open lid (no text or symbols present)■ Removing the battery
While sliding the [BATTERY RELEASE] lever, slide the battery to remove it.

- Hold the battery with your hand so it does not fall.
- Before removing the battery, be sure to set the [OFF/ON] switch to [OFF].
CAUTION
Danger of explosion if battery is incorrectly replaced. Replace only with the same or equivalent type recommended by the manufacturer. Dispose of used batteries according to the manufacturer's instructions.
Before using
Charging time and recordable time
The times shown in the table below show the times at a temperature of 25 °C and a humidity of 60%. This is just a guide. If the temperature is higher or lower than the specified value, the charging time will become longer.
| Supplied battery/ CGR-DU06 (7.2 V/ 640 mAh) | A | 1 h 40 min |
| B | 1 h 50 min(1 h 25 min) | |
| C | 55 min(45 min) | |
| CGA-DU12 (7.2 V/ 1150 mAh) | A | 2 h 25 min |
| B | 3 h 15 min(2 h 40 min) | |
| C | 1 h 40 min(1 h 20 min) | |
| CGA-DU14 (7.2 V/ 1360 mAh) | A | 2 h 45 min |
| B | 3 h 50 min(3 h) | |
| C | 1 h 55 min(1 h 30 min) | |
| CGA-DU21 (7.2 V/ 2040 mAh) | A | 3 h 55 min |
| B | 5 h 45 min(4 h 30 min) | |
| C | 2 h 55 min(2 h 15 min) | |
| CGA-DU07 (7.2 V/ 680 mAh) | A | 1 h 30 min |
| B | 1 h 55 min(1 h 30 min) | |
| C | 1 h(45 min) |
Ⓐ Charging time
⑧ Maximum continuously recordable time
© Intermittent recordable time
(The intermittent recordable time refers to recordable time when the recording and stopping operations are repeated.)
"1 h 40 min" indicates 1 hour 40 minutes.
●The battery CGR-DU06 is supplied.
- The times shown in the table are rough estimates. The times indicate the recordable times when the viewfinder is used. The times in parentheses indicate the recordable times when the LCD monitor is used.
- We recommend the Battery Pack CGA-DU12, CGA-DU14 and CGA-DU21 for long time recording (2 hours or more for continuous recording, 1 hour or more for intermittent recording).
- The recordable time will become shorter in the following cases:
- When you use both the viewfinder and the LCD monitor simultaneously while rotating the LCD monitor frontward to record yourself etc.
- The batteries heat up after use or charging. The main unit of the movie camera being used will also heat up. This is normal.
- Along with the reduction of the battery capacity, the display will change: → →
If the battery discharges, then ( ) will flash
Turning the camera on
When the camera is turned on with the lens cap fitted, the automatic white balance adjustment may not function properly. Please turn the camera on after removing the lens cap.
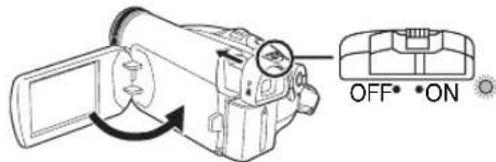
■ How to turn on the power
1 While pressing the button ①, set the [OFF/ON] switch to [ON].

- The status indicator lights red and the power turns on.
- If the LCD monitor is closed and the viewfinder is retracted while the [OFF/ON] switch is set to [ON] in the Tape Recording Mode, the power turn off.
■ How to turn off the power
1 While pressing the button ①, set the [OFF/ON] switch to [OFF].

- Set the [OFF/ON] switch to [OFF] when not using the camera.
- The status indicator goes off when the power turns off.



natural_image
Pure geometric diagram with intersecting lines and shapes, no text or symbols presentBefore using
■ How to turn the power on and off with the LCD monitor/viewfinder
When the power switch is set to [ON], the power can be turned on and off with the LCD monitor and the viewfinder when the unit is in Tape Recording Mode.

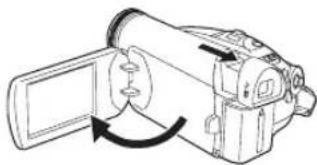
1 Open the LCD monitor out or extend the viewfinder to use. (-58-)
natural_image
Line drawing of a handheld device with a scroll wheel and directional arrows indicating motion (no text or symbols)- The LCD monitor or the viewfinder will be activated.
2 Close the LCD monitor and retract the viewfinder.

- The power will not turn off unless the LCD monitor is closed and the viewfinder is retracted.
- The status indicator automatically goes off and the power turns off. (If quick start is set to [ON] (-59-), the unit goes into quick start standby mode and the status indicator lights green.)
- The power does not turn off even if the LCD monitor is closed and the viewfinder is retracted while recording on a tape.
3 Open the LCD monitor or extend the viewfinder to turn the power on and use the movie camera again.

- The status indicator lights up and the power turns on.
Setting date and time
When the movie camera is turned on for the first time, [SET DATE AND TIME] will appear.

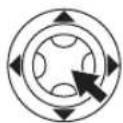
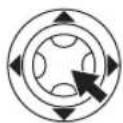
- Select [YES] and press the centre of the joystick. Do steps 2 and 3 below to set the date/time.
If the screen shows the incorrect date/time, then adjust it.
- Set to Tape Recording Mode.
1 Set [BASIC] >> [CLOCK SET] >> [YES]. (-63-)
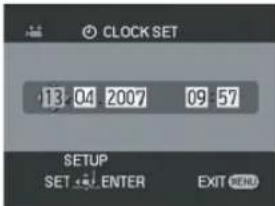
2 Move the joystick left or right in order to select the item to be set. Then move the joystick up or down to set the desired value.
●The year will change as follows 2000, 2001, ..., 2089, 2000, ...
●The 24-hour clock is used.
3 Press the joystick to determine the setting.
●The clock function starts at [00] seconds.
About date/time
●The date and time function are driven by a built-in lithium battery.
- Make sure to check the time before recording because the built-in clock is not very accurate.
■ Recharging the built-in lithium battery
- If [☑] or [--] is appears when the camera is turned on, then the built-in lithium battery has run down. Use the steps below to charge the battery. When turn on the power for the first time after charging, [SET DATE AND TIME] will appear. Select [YES] and set the date and time. Connect the AC adaptor to the camera or attach the battery to the camera, and the built-in lithium battery will be recharged. Leave the camera as is for approx. 24 hours, and the battery will drive the date and time for approx. 6 months. (Even if the [OFF/ON] switch is set to [OFF], the battery is still being recharged.)


Before using
Using the LCD monitor
You can record the image while viewing it on the opened LCD monitor.
1 Put a finger on the LCD monitor open part and open the LCD monitor out in the direction of the arrow.

natural_image
Diagram of a mechanical device with a rotating shaft and housing, showing internal components (no text or symbols)- It can open up to 90^ .
2 Adjust the angle of the LCD monitor as you prefer.

natural_image
Line drawing of a digital camera with an arrow indicating rotation (no text or symbols)①180°

② 90°
- It can rotate up to 180^ ① towards the lens or 90^ ② towards the viewfinder.
- The brightness and colour level of the LCD monitor can be adjusted from the menu.
- If it is forcibly opened or rotated, the camera may be damaged or fail.
- If the LCD monitor is rotated by 180^ towards the lens and the viewfinder is extended (when recording yourself), the LCD monitor and the viewfinder simultaneously light.
Using the viewfinder
■ Extending the viewfinder
1 Pull out the viewfinder. Extend it by pinching the extension knob.

natural_image
Line drawing of a hand holding a cylindrical device with a button, no text or symbols present- The viewfinder will be activated. (If the LCD monitor is opened, the viewfinder will be deactivated.)
■ Adjusting the field of view
1 Adjust the focus by sliding the eyepiece corrector knob.

- You can adjust the brightness of the viewfinder from the menu.





natural_image
Pure geometric diagram with intersecting lines and shapes, no text or symbols presentBefore using
Quick Start
When quick start is on the battery power is still being consumed, even when the LCD monitor and the viewfinder are closed.
The camera will resume recording/pause mode about 1.7 seconds after the LCD monitor or the viewfinder is reopened.
- Please note in quick start mode approximately half the pause recording power is being consumed. Using quick start mode will reduce the battery recording/playback time.
●This is only activated in the following cases.
●While using the battery
A tape is inserted, while the Tape Recording Mode is set.
●While using the AC adaptor
Quick Start can be used even if a tape is not inserted.
- Set to Tape Recording Mode.
1 Set [SETUP] >> [QUICK START] >> [ON].
(-63-)
2 While the [OFF/ON] switch is still set to [ON], close the LCD monitor and retract the viewfinder.
- The status indicator lights green and the unit goes into quick start standby mode.
- The movie camera will not go into quick start standby unless the LCD monitor is closed and the viewfinder is retracted.
3 Open the LCD monitor or extend the viewfinder.

- The status indicator lights red and the camera is put into recording pause approx.
1.7 seconds after it is turned on.
■ To cancell Quick Start
1 Set [SETUP] >> [QUICK START] >> [OFF]. (-63-)
- If the [OFF/ON] switch is set to [OFF] while the unit is in quick start standby, the power turns off.
- If the standby continues for approx. 30 minutes, then the status indicator will go off and the camera will be completely turned off.
- In the following cases, quick start is cancelled and the power turns off.
- When the Mode dial is moved.
- When the battery or AC adaptor is removed.
- When the tape is removed while using the battery in Tape Recording Mode.
- When the camera is quick-started with the white balance on automatic, it may take some time until the white balance is adjusted if the scene being recorded has a light source different from the scene last recorded. (When the colour night view function is used, however, the white balance of the scene last recorded is retained.)
- If the power is turned on in quick start standby, the zoom magnification becomes 5 × and the picture size may differ from what it was before quick start standby.
- If [POWER SAVE] (-83-) is set to [5 MINUTES] and the unit automatically goes into quick start standby mode, set the [OFF/ON] switch to [OFF], then to [ON] again. Also, close the LCD monitor and retract the viewfinder and then open the LCD monitor or extend the viewfinder again.




Before using
Inserting/removing a cassette
1 Fit the AC adaptor or the battery and turn on the power.
2 Slide the [OPEN/EJECT] lever and open the cassette cover.
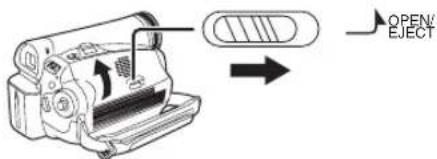
- When the cover is fully opened, the cassette holder will come out.
3 After the cassette holder is opened, insert/remove the cassette.

natural_image
Line drawing of a mechanical device with no visible text or symbols- When inserting a cassette, orient it as shown in the figure, and then securely insert it as far as it goes.
- When removing, pull it straight out.
- When inserting a cassette, orient it as shown in the figure, and then securely insert it as far as it goes. - When removing, pull it straight out.
4 Push the [PUSH] mark ① in order to close the cassette holder.
●The cassette holder is housed.

Caution:
Take care not to trap your fingers under the cassette holder when closing it.
5 Only after the cassette holder is completely housed, close the cassette cover by pressing the mark ②.

- When inserting a previously recorded cassette, use the blank search function to find the position where you want to continue recording. If you are overwriting a previously recorded cassette, be sure to find the position where you want to continue recording.
- Close the cassette cover tightly.
- When closing the cassette cover, do not get anything, such as a cable, caught in the cover.
●After use, be sure to rewind the cassette completely, remove it and put it in a case. Store the case in an upright position. (-93-)
- If the indicator of the condensation does not display on the LCD monitor and/or the viewfinder and you notice condensation on the lens or the main unit, do not open the cassette cover otherwise condensation may be formed on the heads or the cassette tape. (-90-)
- When inserting a previously recorded cassette, use the blank search function to find the position where you want to continue recording. If you are overwriting a previously recorded cassette, be sure to find the position where you want to continue recording. - Close the cassette cover tightly. - When closing the cassette cover, do not get anything, such as a cable, caught in the cover. - After use, be sure to rewind the cassette completely, remove it and put it in a case. Store the case in an upright position. (-93-) - If the indicator of the condensation does not display on the LCD monitor and/or the viewfinder and you notice condensation on the lens or the main unit, do not open the cassette cover otherwise condensation may be formed on the heads or the cassette tape. (-90-)
■ When the cassette holder does not come out
- Close the cassette cover completely, and then open it again completely.
- Check if the battery has run down.
- Check if the cassette compartment cover is in contact with grip belt as shown below. If so, be sure the grip belt stays clear of the cover when opening.
- Close the cassette cover completely, and then open it again completely. - Check if the battery has run down. - Check if the cassette compartment cover is in contact with grip belt as shown below. If so, be sure the grip belt stays clear of the cover when opening.

natural_image
Illustration of a handheld device with a magnified inset showing its internal components (no text or symbols)■ When the cassette holder cannot be housed
- Set the [OFF/ON] switch to [OFF], then to [ON] again.
- Check if the battery has run down.
- Set the [OFF/ON] switch to [OFF], then to [ON] again. - Check if the battery has run down.
■ Accidental erasure prevention
If the accidental erasure prevention slider 1 of a cassette is opened (slide in the direction of the [SAVE] arrow), the cassette cannot be recorded. When recording, close the accidental erasure prevention slider of the cassette (slide in the direction of the [REC] arrow).

Before using
Selecting a mode
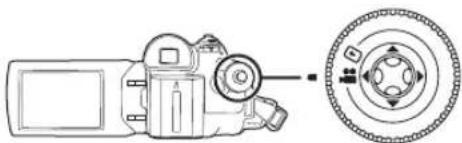
Rotate the mode dial to select the desired mode.
1 Rotate the mode dial.
- Set your desired mode to ①.
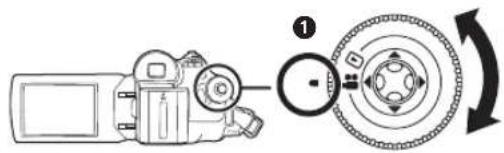

: TAPE RECORDING MODE
Use this when you record the image on a tape.

: TAPE PLAYBACK MODE
Use this to play back a tape.
How to use the joystick
■ Basic joystick operations
Operations on the menu screen and selection of files to be played back on the multi-image display
Move the joystick up, down, left or right to select an item or file, and then push in the centre to set it.

| 1 | Select by moving up. |
| 2 | Select by moving down. |
| 3 | Select by moving left. |
| 4 | Select by moving right. |
| 5 | Determine by pushing the centre. |
Joystick and screen display
Push the centre of the joystick, and icons will be displayed on the screen. Each time the joystick is moved down, the indication changes. (In the Tape Playback Mode, the icons will be automatically displayed on the screen.)
1) Tape Recording Mode
([AUTO/MANUAL/FOCUS] switch is set to [AUTO])

flowchart
graph TD
    A["1/4 NEXT"] --> B["2/4 NEXT"]
    B --> C["3/4 NEXT"]
    C --> D["4/4 NEXT"]
| 1/4 | Fade | -71- | ||
| ▲ | Backlight compensation | 69- | ||
| ▶ | Help mode | -62- | ||
| 2/4 | Soft skin mode | -70- | ||
| 3/4 | ▲ | Colour night view | -70- | |
| 4/4 | Recording check | -66- | ||
| ▶ | Blank search | -67- | ||
- ① is displayed while recording on a tape.




Before using
2) Tape Recording Mode
([AUTO/MANUAL/FOCUS] switch is set to [MANUAL])

flowchart
graph TD
    A["1/5 NEXT"] --> B["7/5 NEXT"]
    B --> C["3/5 NEXT"]
    C --> D["4/5 NEXT"]
    D --> E["5/5 NEXT"]
    E --> F["6/6 NEXT"]
    F --> G["MF + MF -"]
    style A fill:#f9f,stroke:#333
    style B fill:#f9f,stroke:#333
    style C fill:#f9f,stroke:#333
    style D fill:#f9f,stroke:#333
    style E fill:#f9f,stroke:#333
    style F fill:#f9f,stroke:#333
    style G fill:#f9f,stroke:#333

flowchart
graph LR
    A["1/2 NEXT"] --> B["2/2 NEXT"]
    B --> C["3/3 NEXT"]
    D["MF -"] --> E["MF +"]
    F["WB IRIS"] --> G["SHTR"]
| 5/5 | RIG | s or gain value | -75- | |
| ▲ | WB | White balance -74- | ||
| ▶ | SH | hutter speed -75- | ||
| 6/6 | MF | Manual focus adjustment -75- | ||
| ▶ | MF+ |
- ① is displayed while recording on a tape.
- ② is displayed only when the [AUTO/MANUAL/FOCUS] switch is set to [FOCUS].
3) Tape Playback Mode

| ▲ | ▼/■ | Playback/pause | -77- | |
| ▼ | ■ | Stop | -77- | |
| ◀ | ◀◀ | Rewind (review playback) | -77- | |
| ▶ | ▶◀ | Fast forward (cue playback) | -77- |
Help mode
Select an icon for an explanation of the function.
- Set to Tape Recording Mode.
1 Press the joystick to display the icon during the recording pause. Move the joystick down until icon ① appears.

2 Move the joystick right to select the Help mode icon [D]


- The help mode explains the operation icons displayed when the [AUTO/MANUAL/FOCUS] switch is set to [AUTO] in Tape Recording Mode.
3 Move the joystick up, left, or right to select the desired icon.

- An explanation of the selected icon is displayed on the screen.
- Each time the joystick is moved down, the indication changes.
■ To exit the Help mode
Select [EXIT] or press the [MENU] button.
- When the Help mode is used, it is not possible to record or set the functions.
Before using
Switching the language
You can switch the language on the screen display or the menu screen.
1 Set [LANGUAGE] >> select the desired language.

Using the menu screen
For each individual menu, please refer to -82-.
1 Press the [MENU] button.

- The menu corresponding to the mode selected by the mode dial is displayed.
- Do not switch the mode dial when the menu is displayed.
2 Move the joystick up or down in order to select the top menu.

3 Move the joystick right or press it to set the selection.

4 Move the joystick up or down in order to select the sub-menu.

5 Move the joystick right or press it to set the selection.


6 Move the joystick up or down in order to select the item to be set.


7 Press the joystick to determine the setting.

■ To exit the menu screen
Press the [MENU] button.
■ To get back to the previous screen
Move the joystick left.

■ About the menu setting
- The menu is not displayed while recording on a tape. Also, you cannot record on a tape while the menu is displayed.




Before using
Adjusting LCD monitor/viewfinder
■ Adjusting the brightness and colour level
1 Set [SETUP] >> [LCD SET] or [EVF SET] >> [YES].

2 Move the joystick up or down in order to select the item to be adjusted.
[LCD SET]
☀️: Brightness of the LCD monitor
: Colour level of the LCD monitor
[EVF SET]
EVF: Brightness of the viewfinder
3 Move the joystick left or right to move the bar indication representing the brightness.
4 Press the [MENU] button or the joystick to complete the settings.
- When the LCD monitor is rotated by 180^ towards the lens, the brightness of the LCD monitor cannot be adjusted.
- To adjust the brightness of the viewfinder, close the LCD monitor and extend the viewfinder to activate it.
- These settings will not affect the images actually recorded.
- If you adjust the colour level of the LCD monitor, the colour level of the viewfinder also automatically changes.


Record mode
Record mode
Check before recording
Check the following before recording important events such as weddings or when the movie camera has not been used for a long time. Conduct a test recording to make sure that the image recording and the audio recording work properly.
■ Basic camera holding
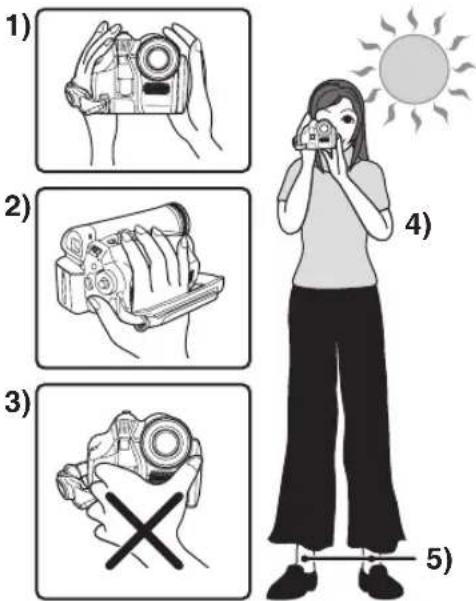
1) Hold the camera with both hands.
2) Run your hand through the grip belt.
3) Do not cover the microphones or sensors with your hands.
4) Keep your arms near your body.
5) Slightly open your legs.
- When you are in the open air, record pictures with the sunlight as far in the background as possible. If the subject is backlit, it will become dark in the recording.
Check points
- Remove the lens cap. (-54-)
(When the camera is turned on with the lens cap fitted, the automatic white balance adjustment may not function properly. Please turn the camera on after removing the lens cap.)
●Grip belt adjustment (-54-) - Open the LCD monitor or extend the viewfinder (Recording cannot start while the LCD monitor and the viewfinder are closed. Even if the LCD monitor and the viewfinder are closed during recording, the power will not turn off until recording stops.)
- Adjustment of LCD monitor/viewfinder (-64-)
●Power supply (-55-)
- Insert a cassette (-60-)
- Setting date/time (-57-)
- Setting SP/LP mode (-65-)
■ About auto mode
- Set the [AUTO/MANUAL/FOCUS] switch to [AUTO], and colour balance (white balance) and focusing will be adjusted automatically.
●Auto white balance: -94-
●Auto focusing: -95- - Depending on the brightness of the subject etc., the aperture and shutter speed are automatically adjusted for an optimum brightness. (When set to the Tape recording mode: The shutter speed is adjusted to a maximum of 1/250.)
- Colour balance and focus may not be adjusted depending on light sources or scenes. If so, manually adjust the white balance and focus.

- Scene mode setting (-73-)
● White balance setting (-74-)
●Shutter speed setting (-75-) - Iris/gain value setting (-75-)
- Focus setting (-75-)
■ Recording mode
You can switch the tape recording mode.
- Set to Tape Recording/Playback Mode.
1 Set [BASIC] or [ADVANCED] >> [REC SPEED] >> [SP] or [LP].
If the LP mode is selected, the recording time will be 1.5 times the SP mode, but some functions will be disabled.
- We recommend using the SP mode for important recording.
- In order to fully exhibit the performances of the LP mode, we recommend using Panasonic cassettes marked LP mode.
- In the LP mode, the picture quality will not be degraded in comparison with the SP mode, but mosaic noise may appear on the playback image or some functions may be disabled.
- Playback on other digital video equipment or on digital video equipment without the LP mode
- Playback of the image on other digital video equipment recorded in the LP mode
- Frame-by-frame playback


Record mode
Recording on a tape
Remove the lens cap. (-54-)
(When the camera is turned on with the lens cap fitted, the automatic white balance adjustment may not function properly. Please turn the camera on after removing the lens cap.)
- Set to Tape Recording Mode.
natural_image
Technical line drawing of a mechanical device with a close-up inset showing internal components (no text or symbols)1 Press the recording start/stop button to start recording.

natural_image
Illustration of a digital camera and a dog photo (no text or symbols)2 Press the recording start/stop button again to pause recording.

- For the recording time on a tape, refer to -56-.
- Carry out a recording check (-66-) to verify that the image is recorded properly.
- In order to find the unrecorded section, carry out the blank search (-67-).
■ On-screen display in the tape recording mode

1) Recording time elapse
2) Remaining tape indication
■ Concerning the remaining tape time indication on the screen
- The remaining tape time is indicated in minutes. (When it reaches less than 3 minutes, the indication starts flashing.)
- During a 15 seconds or shorter recording, the remaining tape time indication may not be displayed or the remaining tape time may not be displayed correctly.
- In some cases, the remaining tape time indication may display remaining tape time that is 2 to 3 minutes shorter than the actual remaining tape time.
Recording check
The last image recorded is played back for 2 to 3 seconds. After checking, the camera will be set to a recording pause.
- Set to Tape Recording Mode.
1 Press the joystick to display the icon during the recording pause. Move the joystick down until icon ① appears.
2 Move the joystick left to select the recording check icon [☐]


- The [RECORDING CHECK STARTED] indication appears on the screen of the movie camera.



natural_image
Pure geometric diagram with intersecting lines and shapes, no text or symbols presentRecord mode
Blank search function
Searches for the last part of the image recorded (unused part of the tape). After the search is finished, the blank search function is cancelled and the camera is put into recording pause.
- Set to Tape Recording Mode.
1 Press the joystick to display the icon during the recording pause. Move the joystick down until icon ① appears.
2 Move the joystick right to select the blank search icon [ ]


3 When the confirmation message appears, select [YES] and press the centre of the joystick.
■ Stopping blank search midway through
Move the joystick down to select the [■] icon.


- If the cassette tape has no blank part, then the camera will stop at the end of the tape.
- The camera stops at a point approx. 1 second before the end of the last image recorded. When you start recording at that point, the image can be recorded seamlessly from the last image.
Recording a still picture on a tape (Photoshot)
Still pictures can be recorded from the movie camera lens.
- Set to Tape Recording Mode.
1 Press the [Button in the recording pause mode.

natural_image
Line drawing of a portable washing machine with attached circular button (no text or symbols)- The movie camera records a still picture for about 7 seconds and then switches back to the recording pause mode.
- If you set [ADVANCED] >> [SHTR EFFECT] >> [ON], you can add image and a sound like releasing the shutter.

natural_image
Black-and-white photo collage showing a dog's face and profile, with a downward arrow pointing to the bottom image (no text or symbols)- Photoshot recording results in slightly inferior image quality.
■ Continuous photoshop
If you set [ADVANCED] >> [SHTR EFFECT] >> [ON] and keep the [Button pressed, the movie camera will continuously record still pictures in approx. 0.7 seconds intervals until the button is released. - The screen blinks and, at the same time, a shutter clicking sound is recorded.




Record mode
Zoom in/out function
You can zoom in up to 30× optically.
- Set to Tape Recording Mode.
1 Wide-angle recording (zoom out): Push the [W/T] lever towards [W]. Close-up recording (zoom in): Push the [W/T] lever towards [T].
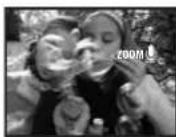
- When zooming in and taking a picture while holding the movie camera by hand, we recommend using the image stabilizer function.
- When you are zooming on a faraway subject, a sharper focus is achieved if the recording subject is 1.3 metres or further from the movie camera.
- When the zoom speed is high, the subject may not be focused easily.
- When the zoom magnification is 1 × , the movie camera can focus on a subject approx. 2 cm distant from the lens.
- Be aware that a mechanical sound may be recorded when the [W/T] lever is released while zooming. Gently move the zoom lever back to it's original position before releasing it.
Digital zoom function
- If the zoom magnification exceeds 30 times, then the digital zoom function will be activated. The digital zoom function allows you to select a magnification from 50 × to 1000 × .
- Set to Tape Recording Mode.
1 Set [ADVANCED] >> [D.ZOOM] >> [50×] or [1000×].

[OFF]: Optical zoom only (Up to 30×)
[50×]: Up to 50×
[1000×]: Up to 1000×
- The larger the digital zoom magnification, the more the image quality is degraded.
■ About the variable speed zoom function
- The zoom speed varies according to the amount of movement of the [W/T] lever.
■ To use the zoom microphone function Interlocked with the zooming operation, the microphone will collect sounds clearly far away with the tele-shot or those in the vicinity with the wide-angle shot.
- Set to Tape Recording Mode.
1 Set [ADVANCED] >> [ZOOM MIC] >> [ON].


natural_image
Pure geometric diagram with intersecting lines and shapes, no text or symbols presentRecord mode
Recording yourself
You can record yourself while viewing the LCD monitor. You can record persons in front of the camera while presenting them the image. The image is horizontally flipped as if you see a mirror image. (The image to be recorded is the same as that recording.)
- Extend the viewfinder to see the picture while recording.
1 Rotate the LCD monitor towards the lens side.

natural_image
Line drawing of a digital camera with an arrow indicating rotation (no text or symbols)●A vertically oriented display appears on the viewfinder screen, this is normal and not indicative of any trouble.
- When the LCD monitor is rotated towards the lens side, the icon will not be displayed even if you push the centre of the joystick.
Backlight compensation function
This protects a backlit subject from being darkened.
- Set to Tape Recording Mode.
1 Press the joystick to display the icon. Move the joystick down until icon ① appears.
2 Move the joystick up to select the backlight compensation icon [ ]
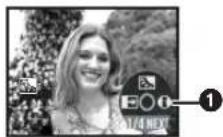

- The [BACKLIGHT COMPENSATION ON] indication appears on the screen of the movie camera.
- The image on the screen will become brighter.
■ To return to normal recording
Select the [icon again.
- The [BACKLIGHT COMPENSATION OFF] indication appears on the screen of the movie camera.
- If you turn off the power or operate the mode dial, the backlight compensation is cancelled.



Record mode
Colour Night view function
This function allows you to record colour subjects in dark locations to stand out against the background.
Attach the camera to a tripod, and you can record images free from vibration.
- Only manual focusing can be used.
- Recorded scene is seen as if frames were missed.
Colour night view function
You can record dark locations brightly in colour.
- Set to Tape Recording Mode.
1 Press the joystick to display the icon. Move the joystick down until icon ① appears.
2 Move the joystick up to select the colour night view icon [ ]


•The [COLOUR NIGHT VIEW ON] indication appears on the screen of the movie camera.
• Each upward press switches the modes.
OFF → Colour night view function → OFF
■ To cancell the colour night view function
Select the [icon again.
●The [COLOUR NIGHT VIEW OFF] indication appears on the screen of the movie camera.
- If set in a bright place, the screen may become whitish for a while.
- The colour night view function makes the signal charging time of the CCD up to approximately 25 × longer than usual, so that dark scenes (a minimum of 2 lx) can be recorded brightly. For this reason, bright dots that are usually invisible may be seen, but this is not a malfunction.
- The colour night view function is cancelled when you turn off the power or operate the mode dial.
Soft skin mode
This allows the skin colour to be recorded in a softer tone. This is more effective if you record the bust image of a person.
- Set to Tape Recording Mode.
1 Press the joystick to display the icon. Move the joystick down until icon ① appears.
2 Move the joystick left to select the soft skin icon [ ]

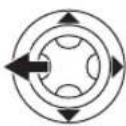
- The [SOFT SKIN MODE ON] indication appears on the screen of the movie camera.
■ To cancell the soft skin mode
Select the [icon again.
●The [SOFT SKIN MODE OFF] indication appears on the screen of the movie camera.
- If the background or anything else in the scene has colours similar to the skin colour, they will also be smoothed.
- If the brightness is insufficient, the effect may not be clear.

Record mode
Fade in/fade out function
Fade in
The image and audio gradually appear.
Fade out
The image and audio gradually disappear.
- Set to Tape Recording Mode.
1 Press the joystick to display the icon. Move the joystick down until icon ① appears.
2 Move the joystick left to select the fade icon [☐].


●The [FADE ON] indication appears on the screen of the movie camera.
3 Press the recording start/stop button. Start recording. (fade in)
When you start recording, the image/audio disappeared completely and the image/audio gradually appears.

natural_image
Two black-and-white photos of animals on a beach, one with wings raised and the other with legs raised (no text or symbols)Pause recording. (fade out)
The image/audio gradually disappears. After the image/audio completely disappears, recording stops.

natural_image
Two black-and-white photos of dogs in motion, one with wings raised and the other blurred (no text or symbols visible)■ To cancell fading
Select the [icon again.
●The [FADE OFF] indication appears on the screen of the movie camera.
■ To select the colour for fade in/out
The colour which appears in fading pictures can be selected.
1 Set [ADVANCED] >> [FADE COLOUR] >> [WHITE] or [BLACK].
- While the fade in/fade out function is selected, it takes several seconds to display the image when you start recording images. Besides, it also takes several seconds to pause recording.
Wind noise reduction function
This reduces the wind noise coming into the microphone when recording.
- Set to Tape Recording Mode.
1 Set [BASIC] >> [WIND CUT] >> [ON].
■ To cancell the wind noise reduction function
Set [BASIC] >> [WIND CUT] >> [OFF].
•The default setting is [ON].
- Reduces the wind noise depending on the wind strength. (If this function is activated in strong winds, the stereo effect may be reduced. When the wind weakens, the stereo effect will be restored.)
Record mode
Recording images for wide-screen TVs
This allows you to record images compatible with wide-screen TVs.
Cinema Function
Images are recorded with a black belt appearing along the top and bottom of the screen so that they look like theatre movies.
- Set to Tape Recording Mode.
1 Set [BASIC] >> [CINEMA] >> [ON].
■ To cancell the Cinema function Set [BASIC] >> [CINEMA] >> [OFF].
- Images played back vary depending on the TV connected. Please refer to the operating instructions for your TV.
- This function does not widen the recording range.
- When images are played back on a TV screen, the date/time indication may be erased in some cases.
- Depending on the TV, the picture quality may deteriorate.
- When a cinema picture is imported into a personal computer, the imported picture may not be displayed correctly, depending on the software in used.
Image stabilizer function
Reduces the image shaking due to hand movement when recording.
- Set to Tape Recording Mode.
1 Set [ADVANCED] >> [SIS] >> [ON].

■ To cancell the image stabilizer function
Set [ADVANCED] >> [SIS] >> [OFF].
- When a tripod is used, we recommend that you turn the image stabilizer off.
- Under fluorescent lighting, image brightness may change or colours may not look natural.
- When the colour night view function is used, the image stabilizer function does not work. If so, the [图标] indication flashes.
- In the following cases, the image stabilizer function may not work effectively.
- When the digital zoom is used
- When a conversion lens is used
- When recording is done in an extremely dark place
- When the camera is shaken greatly
- When you record a moving subject while tracking it




natural_image
Pure geometric diagram with intersecting lines and shapes, no text or symbols presentRecord mode
Recording in various situations (Scene mode)
When you record images in different situations, this mode automatically sets optimum shutter speeds and apertures.
- Set to Tape Recording Mode.
1 Set the [AUTO/MANUAL/FOCUS] switch to [MANUAL].

2 Set [BASIC] >> [SCENE MODE] >> select the desired mode.
1)


3)

4)
5)

1) [ ] Sports mode
- To record sports scenes or scenes where there are quick motions
2) [ ] Portrait mode
- To make persons stand out against the background
3) [ ] how light mode
●To record dark scenes so they are brighter
4) [ ] Spotlight mode
●To record subjects spotlit in a party or theatre
5) [ ] Surf & snow mode
- To record images at dazzling places such as ski slopes and beaches
■ To cancell the scene mode function
Set [BASIC] >> [SCENE MODE] >> [OFF] or set the [AUTO/MANUAL/FOCUS] switch to [AUTO].
Sports mode
- For playback pause of recorded pictures, this mode presents free of camera shakes.
- During normal playback, the image movement may not look smooth.
- Avoid recording under fluorescent light, mercury light or sodium light because the colour and brightness of the playback image may change.
- If you record a subject illuminated with strong light or a highly reflective subject, vertical lines of light may appear.
- If the brightness is insufficient, the sports mode does not function. The [ ] indication flashes.
- If this mode is used indoors, the screen may flicker.
Portrait mode
- If this mode is used indoors, the screen may flicker. If so, change the scene mode setting to [OFF].
Low light mode
- Extremely dark scenes may not be able to be recorded finely.
Spotlight mode
- If the recording subject is extremely bright, the recorded image may become whitish and the periphery of the recorded image extremely dark.
Surf & snow mode
- If the recording subject is extremely bright, the recorded image may become whitish.


Record mode
Recording in natural colours (White balance)
The automatic white balance function may not reproduce natural colours depending on the scenes or lighting conditions. If so, you can adjust the white balance manually.
- Set to Tape Recording Mode.
1 Set the [AUTO/MANUAL/FOCUS] switch to [MANUAL].

2 Move the joystick up to select the white balance icon [WB]


3 Move the joystick left or right in order to select the white balance mode.
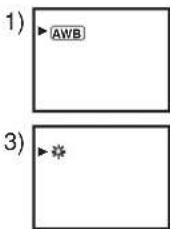

1) Auto white balance adjustment [ ] AWB
2) Indoor mode (for recording under incandescent lamps) [ ]
3) Outdoor mode [ ] ✱
4) Manual adjustment mode [ ]
■ To restore to the automatic adjustment
Move the joystick left or right until the [AWB indication appears. Or, set the [AUTO/MANUAL/FOCUS] switch to [AUTO].
- When the camera is turned on with the lens cap fitted, the automatic white balance adjustment may not function properly. Please turn the camera on after removing the lens cap.
- When setting both the white balance and the iris/gain, set the white balance first.
- Whenever recording conditions change, re-set the white balance for correct adjustment.
■ To set the white balance manually
Select [ ] in Step 3. Then, while viewing a white subject on the entire screen, move the joystick up to select the [ ] indication.
■ About flashing of the [ ]indication
When the manual adjustment mode is selected
- Flashing indicates that the white balance previously adjusted is stored. This setting is stored until the white balance is adjusted again.
When white balance cannot be set in the manual adjustment mode
- White balance may not be adjusted properly in the manual adjustment mode in dark places. If so, use the auto white balance mode.
During setting in the manual adjustment mode
- When the setting is completed, it will keep lit.
■ About the white balance sensor
The white balance sensor detects the type of light source during recording.
- Do not cover the white balance sensor during recording, or it may not function properly.




natural_image
Pure geometric diagram with intersecting lines and shapes, no text or symbols presentRecord mode
Manual focus adjustment
If auto focusing is difficult due to the conditions, then manual focusing is available.
- Set to Tape Recording Mode.
1 Set the [AUTO/MANUAL/FOCUS] switch to [MANUAL].

2 Set the [AUTO/MANUAL/FOCUS] switch to [FOCUS].

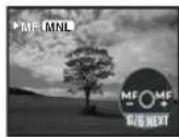
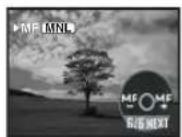
- The [] indication and the manual focus [MF] indication is displayed.
3 Move the joystick left or right in order to adjust the focus.


- When focused with a wide angle, the subject may not be in focus when zoomed in. First, zoom in on the subject, and then focus on it.
■ To restore to the automatic adjustment
Set the [AUTO/MANUAL/FOCUS] switch to [AUTO] or [FOCUS].
Manual shutter speed/aperture adjustment
Shutter Speed
Adjust it when recording fast-moving subjects. Aperture
Adjust it when the screen is too bright or too dark.
- Set to Tape Recording Mode.
1 Set the [AUTO/MANUAL/FOCUS] switch to [MANUAL].

2 Move the joystick left or right to select the shutter aperture icon [FOX] shutter speed icon [SHTR]
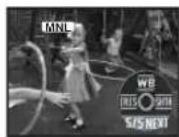

3 Move the joystick left or right in order to adjust the shutter speed or aperture.

1)

2)

1) Shutter speed
2) (Aperture) Iris/gain value
Record mode
■ To restore to automatic adjustment Set the [AUTO/MANUAL/FOCUS] switch to [AUTO].
Manual shutter speed adjustment
- Avoid recording under fluorescent light, mercury light or sodium light because the colour and brightness of the playback image may change.
- If you increase the shutter speed manually, the sensitivity lowers and accordingly the gain value increases automatically, which may increase the noises on the screen.
- You may see vertical lines of light in the playback image of a brightly shining subject or highly reflective subject, but this is not a malfunction.
- During normal playback, image movement may not look smooth.
- When recording in the extremely bright place, the colour of the screen may change or flickers. If so, adjust the shutter speed manually to 1/50 or 1/100.
Manual iris/gain adjustment
- Set the shutter speed before setting the aperture (iris/gain) when manually adjusting both settings.
- If the value does not become "OPEN", you cannot adjust the gain value.
- If the gain value is increased, the noise on the screen increases.
- Depending on the zoom magnification, there are iris values that are not displayed.
■ Shutter speed range
1/50 to 1/8000 seconds: Tape Recording Mode The shutter speed closer to 1/8000 is faster.
Iris/gain value range
CLOSE (Closed), F16, ..., F2.0, OPEN (Opened: F1.8) 0dB, ..., 18dB Value closer to [CLOSE] darken the image. Value closer to [18dB] brighten the image. Values with dB are gain values.
Playback mode
Playback mode
Playing back tape
- Set to Tape Playback Mode.
(An operation icon automatically appears on the LCD monitor.)

natural_image
Diagram of a digital camera with an inset showing its circular component (no text or symbols present)1 Operate with joystick.
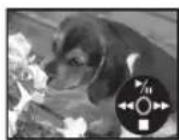

▶/III: Playback/Pause
◀◀: Rewind/Review playback (Reverts to playback with the ▶/■ icon.)
▶▶: Fast forward/Cue playback (Reverts to playback with the ▶/■■ icon.)
■: S t o p
- The power will not turn off when the LCD monitor and the viewfinder are closed and retracted during Tape Playback Mode.
- During cue/review playback, fast-moving images may show noise as a mosaic.
- Before and after cue/review playback, the screen may become black for a moment or images may be disturbed.
To adjust volume
Adjust the speaker volume for playback.
1 Move the [-VOLUME+] lever to adjust the volume.

Towards [+]: increases the volume
Towards [-]: decreases the volume
(Nearer the bar to [+], larger the volume.)
- When the adjustment is completed, the volume indication will disappear.
- If you do not hear the sound, check the settings of [SETUP] >> [12bit AUDIO].
■ Repeat playback
When the tape end is reached, the tape will be rewound and played back again.
1 Set [ADVANCED] >> [REPEAT PLAY] >> [ON].
- The [indication appears. (In order to cancell the repeat playback mode, set [REPEAT PLAY] >> [OFF] or turn off the power.)
■ Settings on the audio
- If you cannot listen to the desired audio when playing back a tape, check the settings in [SETUP] >> [12bit AUDIO].
- When you record and dub the audio in [12bit] and set [SETUP] >> [12bit AUDIO] >> [MIX], the audio will be played back in stereo sound regardless of the settings in [AUDIO OUT].





Playback mode
Frame-by-frame playback
- Set to Tape Playback Mode.
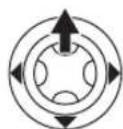
1 During playback, move the joystick up to select the [▶/■] icon to pause playback.


2 Push the [-VOLUME+] lever.
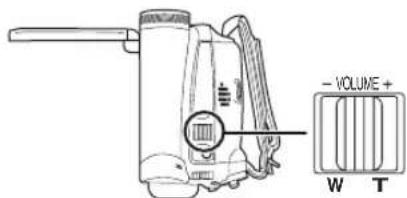


Towards [T]: normal direction
Towards [W]: reversed direction
- If you keep pushing the lever, then the images will continuously be played back frame by frame.
- The pause icon appears for an instant. Continuous frame-by-frame playback will start after the pause icon disappears.
■ To return to normal playback
Move the joystick up to select the [▶/■] icon to start playback.

Playback on TV
Images recorded by this camera can be played back on a TV.
- Insert a recorded tape into this camera.
- Be sure that the power of the unit is turned off before connecting it to a TV.
1 Connect the movie camera and a TV.
![A/V [VIDEO IN] [AUDIO IN] ①](/content/2026/05/991745/images/3fbb668b034c3024e6bea3bcf1311b97a77a942def72aac1520b9e3d50e40e62.jpg)
- Connect the movie camera and a TV by using the AV cable ①.
2 Turn on this camera and set the mode dial to the Tape Playback Mode.
3 Select the input channel on the TV.
4 Move the joystick up to select the [▶/■] icon to start playback.
●The image and audio are output on the TV.
5 Move the joystick down to select the [■] icon to stop playback.
- Use the AC adaptor to free you from worrying about the battery running down.
■ If the image or audio from this camera is not output on the TV
- Check that the plugs are inserted as far as they go.
- Check the [12bit AUDIO] settings. (-84-)
- Check the connected terminal.
- Check the TV's input setting (input switch). (For more information, please read the operating instructions for the TV.)




natural_image
Pure geometric diagram with intersecting lines and circles, no text or symbols presentEdit mode
Edit mode
Copying onto a DVD recorder or a VCR (Dubbing)
Pictures recorded by the movie camera can be stored on a DVD-RAM or other such media. Refer to the instructions for the recorder.
- Place a recorded cassette in the movie camera, and an unrecorded DVD-RAM or cassette in the DVD recorder or VCR.
1 Connect the movie camera and the recorder.
Connecting with the AV cable
![A/V [VIDEO IN] [AUDIO IN] ①](/content/2026/05/991745/images/7e058cb3fbd32157e7a5bccaf2abaf2b39085b25983e4c2321b2f6d2842c13f4.jpg)
- Connect the movie camera and the recorder by using the AV cable ①.
Connecting with the optional DV cable (Only for equipment with a DV terminal)

2 Turn on the movie camera and set to Tape Playback Mode.
3 Select the input channel on the TV set and recorder.
4 Move the joystick up to select the [▶/■] icon to start playback. (Player)
●The image and sound are reproduced.
5 Start recording. (Recorder)
6 Stop recording. (Recorder)
7 Move the joystick down to select the [■] icon to stop playback. (Player)
- For more information, refer to the operating instructions for your TV set and recorder.
- When you do not need functional indications or date and time indication, respectively set [SETUP] >> [DISPLAY] >> [OFF] or set [BASIC] >> [DATE/TIME] >> [OFF] in the Tape Playback Mode. (When you connect the movie camera and a recorder with the DV cable, these indications may not appear.)
■ When neither image nor sound from the movie camera is output to the TV set
- Check that the plugs are inserted as far as they go.
- Check the [12bit AUDIO] settings. (-84-)
- Check the connected terminal.
Using the DV Cable for Recording (Digital Dubbing)
By connecting other digital video equipment with DV terminal and the movie camera by using the DV cable VW-CD1E (optional) ①, high-image-quality dubbing can be done in digital format.
- Set to Tape Playback Mode.
(Player/recorder)
1 Connect the movie camera and digital video equipment with the DV cable.

2 Set [ADVANCED] >> [REC STDBY] >> [YES]. (Recorder)
3 Start playback. (Player)
4 Start recording. (Recorder)
- Move the joystick up to select [●/■] icon.

5 Move the joystick up to select the [●/■] icon again to stop recording. (Recorder)
6 Stop playback. (Player)
■ To cancel the standby for recording
When the camera is standby for recording, move the joystick down and select the [■] icon.




Edit mode
- Do not plug or unplug the DV cable during dubbing, or the dubbing may not be completed properly.
- If a picture (bilingual video, etc.) containing main sound and sub sound has been dubbed, select the desired sound by [SETUP] >> [AUDIO OUT] on playback.
- Even if you use a device equipped with DV terminals such as IEEE1394, you may not be able to perform digital dubbing in some cases. For more information, see the instructions for equipment connected.
- Regardless of the menu settings on the recorder, digital dubbing is carried out in the same mode as the [AUDIO REC] mode of the playback tape.
- The images on the recorder monitor may be disturbed, but it does not affect the recorded images.
- If a picture containing a copyright protection signal (copy guard) is recorded by the movie camera, the picture is distorted by mosaic-like patterns at playback.
- Disconnect the USB cable since input signals from the external input terminal cannot be recorded while it is connected with the USB cable.
- When wide images are input, the display such as the menu screen or the operation icon is expanded horizontally.
- While pictures are input from the DV terminal, the operation icon blinks on instead of appearing from the side of the screen when you press the centre of the joystick.
Using the movie camera as a Web Camera (Windows XP SP2)
To upgrade Windows XP to SP2, click [start] >> [All Programs (Programs)] >> [Windows Update]. If the movie camera is connected to your personal computer, you can send video and sound from the movie camera to the other parties via the network. Audio may also be exchanged if the personal computer is configured accordingly. (You can use the microphone equipped with the personal computer instead of the one on the movie camera.)
Software:
Windows Messenger 5.0/5.1 (Windows XP) MSN Messenger 7.0/7.5 (Windows 2000/XP) Windows Live Messenger 8.0 (Windows XP) DirectX 9.0b/9.0c
■ Connecting the movie camera to personal computer (For using as a Web Camera)
1 Set the movie camera to tape playback mode or tape recording mode.
2 Connect the movie camera to personal computer with auxiliary USB connection cable.


1) USB cable
2) USB terminal
3) The Web Camera mode screen
3 Start the Windows Messenger/MSN Messenger/Windows Live Messenger.
- Click [start] >> [Programs] >> [Windows Messenger]/[MSN Messenger]/[Windows Live Messenger].
■ When you use the movie camera as a Web Camera
When you use the movie camera as a Web Camera in the tape playback mode, the indication of the operation icon is different from the one in usual operation.
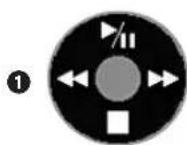
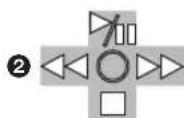
① In usual operation
② In the Web Camera mode (Tape playback mode)



natural_image
Pure electrical circuit lines without any symbolsEdit mode
- Even if you move the joystick up/down/right/left (▶/□, ▪, ▶▶, ◀◀), the selected direction on the operation icon is not lit in yellow.
- The operation icon blinks on instead of appearing from the side of the screen when you press the centre of the joystick.
- If the movie camera is used as a Web Camera, the quality of the video to be exchanged will depend on the Internet connection status.
- In the Web Camera mode, video (picture) cannot be recorded onto a tape.
- In the Web Camera mode, the audio may be interrupted in the midway of communication depending on the communication environment or the performance of the personal computer.
- If you connect the USB connection cable while you operate a tape in the tape playback mode, the tape will be stopped.
- If you connect the USB connection cable in the Web Camera mode (tape recording mode), the time code indication, the SP/LP indication, or icons disappear.
- In the Web Camera mode (tape playback mode), the operation icon is changed.
- If the movie camera is used as a Web Camera while virus checking software is running, the movie camera's operation may stop midway through. In this case, exit the Messenger, reconnect the movie camera and restart the Messenger.
Using on Macintosh
■ Operating environment on iMovie 4/iMovie HD
OS:
With pre-installed;
Mac OS X v10.3 to 10.4
CPU:
PowerPC G3 (400 MHz or higher), G4, G5
Intel Core Duo
Intel Core Solo
Interface:
DV (FireWire) terminal (IEEE1394.a)
- iMovie/iMovie HD, included with any new Macintosh or sold with iLife.
1 Set the movie camera to Tape Playback Mode.
2 Connect the movie camera to your Macintosh with the DV Interface Cable (optional).
- For more information, please contact Apple Computer, Inc. at http://www.apple.com.
Notes
- Microsoft® and Windows® are either registered trademarks or trademarks of Microsoft Corporation in the United States and/or other countries.
- Intel® and Pentium® are either registered trademarks or trademarks of Intel Corporation in the United States and/or other countries.
- Apple, Mac OS, iMovie/iMovie HD, FireWire are either registered trademarks or trademarks of Apple Computer, Inc. in the United States and/or other countries.
- All other names, company names, product names, etc. in these instructions are the trademarks or registered trademarks of their respective corporations.
- Microsoft product screen shot(s) reprinted with permission from Microsoft Corporation.
- The names of the products you are using may differ from the names given in the text. Depending on the operating environment and other factors, the contents of the screens used in these instructions may not necessarily match what you will see on your screen.
- Although the screens in these operating instructions are shown in English for the sake of example, other languages are supported as well.
- In this manual, the Panasonic make digital video camera with USB terminal is referred to as movie camera.
- These instructions do not cover the basic operations of the personal computer or define any terms. For this information, refer to the operating instructions which accompany your personal computer.
Menu
Menu
Menu list
Menu figures and illustrations are provided for easy-to-understand explanations, and so they are different from the actual menu indications.
[TAPE RECORDING MENU]

1) [BASIC]
[SCENE MODE] -73-
[REC SPEED] -65-
[WIND CUT] -71-
[CINEMA] -72-
[CLOCK SET] -57-
2) [ADVANCED]
[SIS] -72-
[FADE COLOUR] -71-
[AUDIO REC] -83-
[D.ZOOM] -68-
[ZOOM MIC] -68-
[SHTR EFFECT] -67-
3) [SETUP]
[DISPLAY] -83-
[DATE/TIME] -83-
[POWER SAVE] -83-
[QUICK START] -59-
[BEEP SOUND] -83-
[LCD SET] -64-
[EVF SET] -64-
[INITIAL SET] -84-
[DEMO MODE] -84-
4) [LANGUAGE] -63-
natural_image
Pure geometric diagram with intersecting lines and shapes, no text or symbols presentMenu
Menus related to taking pictures
[DATE/TIME]
This switches between date and time indications.
●The movie camera automatically records the date and time of picture taking on the tape.
[AUDIO REC]
Switches the audio (PCM audio) recording systems.
[12bit]: Records audio in "12 bit 32 kHz 4 tracks". (The original sound recorded is preserved after audio dubbing.)
[16bit]: Records audio in "16 bit 48 kHz 2 tracks". Audio can be recorded in higher quality. (The original sound recorded is erased after audio dubbing.)
- Audio dubbing cannot be performed on this unit. If you want to edit the sound on a model with an audio dubbing function, set [12bit] to take pictures.
[DISPLAY]
Set to [ON] and the display mode can be switched to all functions. Set to [OFF] and it can be switched to minimum display.
[BEEP SOUND]
Set to [ON] and confirmation/alarm beeps are issued as follows.
1 Beep
- When you start recording
- When you turn on the power
- When the unit goes from quick start standby mode to recording pause
2 Beeps
- When you pause recording
- When you turn off the power
- When the unit goes into quick start standby mode
2 Beeps for 4 times
- When a cassette with its erasure prevention tab set to [SAVE] is inserted, condensation occurs (-90-), and at other times. Check the sentence displayed on the screen. (-86-)
[POWER SAVE]
[OFF]: When about 5 minutes passed without any operation, the standby mode automatically will be set. In the standby mode, [■■] blinks and it takes time more than usual to start recording after you press the recording start/stop button.
[5 MINUTES]: When about 5 minutes passed without any operation, the movie camera automatically turns off to protect the tape or to prevent the battery from running down. When you use the movie camera, turn it on again.
- In the following cases, the power may not turn off even when set [POWER SAVE] >> [5 MINUTES].
- When connecting to the AC outlet (When using the AC adapter)
- When connecting the USB cable or the DV cable to a personal computer or other equipment
![PANASONIC NV-GS60GC - [POWER SAVE] - 1](/content/2026/05/991745/images/02570cad4c3faeab959cdfb1f2a39814edff83a44f0d3bd85fb9bdb3dd51d147.jpg)
![PANASONIC NV-GS60GC - [POWER SAVE] - 2](/content/2026/05/991745/images/d632e2ad68a81638f554c931531521066474318dffd1fa26efd3742f30b1ac94.jpg)
![PANASONIC NV-GS60GC - [POWER SAVE] - 3](/content/2026/05/991745/images/85df87d30fcc2a63a48e8139f6c396680251b19eb471ede522ce8cc5b5df364e.jpg)
![PANASONIC NV-GS60GC - [POWER SAVE] - 4](/content/2026/05/991745/images/8e348be583b7d12ffe680a763f8b2c20afacfbfff8a581392b20e7baf949ef14.jpg)
![PANASONIC NV-GS60GC - [POWER SAVE] - 5](/content/2026/05/991745/images/15da488153d67360254c7055c20660ad7491f84473ffa40b455de9fedc457bd0.jpg)
![PANASONIC NV-GS60GC - [POWER SAVE] - 6](/content/2026/05/991745/images/deb797cf15a0b9d6455bfc295407e10b4a1af4c6ccb61ad42b132066be4325b6.jpg)
![PANASONIC NV-GS60GC - [POWER SAVE] - 7](/content/2026/05/991745/images/ffc5aa800ddd4ad56c68b92e43ea2fd577a36547e1f292f08c52c1cf9753ecf1.jpg)
![PANASONIC NV-GS60GC - [POWER SAVE] - 8](/content/2026/05/991745/images/768560ab74d3094a41f94a6236afcf21698c4ab8bafb8f8001692b82b63bc677.jpg)
![PANASONIC NV-GS60GC - [POWER SAVE] - 9](/content/2026/05/991745/images/ca9f63810c1aa379b2038b66f36e6618acbed406fbf04335d6d13caf18106449.jpg)
Menu
Menus related to playback
[12bit AUDIO]
If you want to edit the sound on a model with an audio dubbing function, set [12bit] to take pictures.
You can switch the sound (PCM Audio) when playing back a tape with sound recorded in [12bit].
ST1: It only plays back the original sound recorded.
ST2: It only plays back the sound on the tape added with audio dubbing.
[MIX]: It simultaneously plays back both ST1 and ST2 sounds.
- Audio dubbing cannot be performed on this unit. When playing back a tape recorded on this unit, you will not be able to hear the sound if ST2 is set. Set ST1.
[AUDIO OUT]
This switches the sound to be played back.
[STEREO]: Stereo sound (main sound and sub sound)
L: Left channel sound (main sound)
R: Right channel sound (sub sound)
Other menus
[INITIAL SET]
When there is a menu that cannot be selected depending on a combination of functions, set to [YES] for changing the menu settings back to the initial shipping condition.
(Language setting cannot be back to the initial shipping condition.)
[DEMO MODE]
If you set to [DEMO MODE] >> [ON] without inserting a cassette, the movie camera is automatically set to the demonstration mode for introducing its functions. If any button is pressed or operated, the demonstration mode is cancelled. If no operations take place for approx. 10 minutes, the demonstration mode automatically starts. To terminate the demonstration mode, insert a cassette, or set to [DEMO MODE] >> [OFF]. For normal use, set this function to [OFF].
Others
Others
Indications
Various functions and the movie camera status are shown on the screen.
Basic indications
: Remaining battery power
0h00m00s00f: Time code
15:30:45: Date/Time indication
Recording indications
R0:45: Remaining tape time
- Remaining tape time is indicated in minutes. (When it reaches less than 3 minutes, the indication starts flashing.)
SP: Standard Play mode
(Recording speed mode) -65-
LP: Long Play mode
(Recording speed mode) -65-
●: Recording -66-
II (Green): Recording pause -66-
II (Green flash):
Standby mode
II (Red): Fade out
: Recording check
-66-
AUTO: Automatic mode -65-
MNL: Manual mode -73-
MF: Manual focus -75-
5×: Zoom magnification indication
-68-
W: Fade (White) -71-
: Indoor mode (recording under incandescent lamp) -74-
☀: Outdoor mode -74-
■: White balance adjustment mode -74-
WEB : WEB CAMERA mode (Recording)
Playback indications
●: Recording underway
▶: Playback -77-
II: Pause -77-
▶▶: Fast-forward/Cue playback -77-
◀◀: Rewind/Review playback -77-
▶/◄◄: Frame-by-frame playback -78-
▶: Repeat playback -77-
12bit, 16bit: Audio recording mode -83-
: Volume adjustment -77-
WEB : WEB CAMERA mode (Playback)



Others
Warning/alarm indications
If any one of the following indications lights up or flashes, please check the movie camera.
Confirmatory indications
☐: A cassette with the accidental erasure prevention slider placed in the [SAVE] position is inserted. No cassette is inserted.
[--]/@: The built-in battery is low. -57-
☐: The warning/alarm indication appears when you record yourself. Turn the LCD monitor towards the viewfinder and check the warning/alarm indication.
END: The tape came to the end during recording. ✗: The video heads are dirty. -90-
Textual indications
DEW DETECT/ EJECT TAPE: Condensation has occurred. Take out the cassette and wait for a while. It takes some time until the cassette holder opens, but this is not a malfunction. -90-
LOW BATTERY: The battery is low. Recharge it. -55-
NO TAPE : No tape is inserted. -60-
TAPE END: The tape came to the end during recording. CHECK REC TAB:
You are attempting to record pictures on a tape with the accidental erasure prevention slider placed in the [SAVE] position. You are attempting digital dubbing on a tape with the accidental erasure prevention slider placed in the [SAVE] position.
WRONG TAPE FORMAT: You are attempting to play back a tape section that has been recorded with a different TV system. This cassette is incompatible.
CLOSE CASSETTE DOOR The cassette cover is open. Close the cassette cover.
COPY PROTECTED: Images cannot be recorded correctly because the medium is protected by a copy guard.
NEED HEAD CLEANING: The video heads are dirty. -90-
PUSH THE RESET SWITCH: An irregularity in the equipment has been detected. Press the [RESET] button (-53-). This may solve the problem.
86
LSQT1135
DISCONNECT USB CABLE: You are attempting to record pictures on a tape with the USB cable connected to the movie camera.
PC DOES NOT SUPPORT USB2.0: The movie camera is connected to a personal computer that does not support USB 2.0.
CAN NOT USE USB: You are connecting the USB cable with the DV cable connected.
CHANGE TO MANUAL MODE: You are attempting to select the item on the [SCENE MODE] when the [AUTO/ MANUAL/FOCUS] switch is set to [AUTO].
REVERSE THE LCD MONITOR: When the LCD monitor is rotated by 180° towards the lens, the brightness of the LCD monitor cannot be adjusted.
CANCEL NIGHT VIEW MODE: You are attempting to select an item other than [OFF] in [SCENE MODE] during colour night view mode.
Others
Functions cannot be used simultaneously
Some functions in the movie camera are disabled or cannot be selected due to its specifications. The table below shows examples of functions restricted by conditions.
| Functions Conditions which disable the functions | |
| ●Image stabilizer | ●When the colour night view function is used |
| ●Backlight compensation | ●When the iris/gain is set●When the colour night view function is used |
| ●Help mode●Blank search●Soft skin●Recording check | ●While recording to a tape |
| ●Colour Night View | ●While recording to a tape |
| ●Scene mode ●When setting the [AUTO/MANUAL/FOCUS] switch to [AUTO]●When the colour night view function is used | |
| ●Change of white balance | ●When digital zoom (30× or higher) is used●When the colour night view function is used |
| ●Adjusting the shutter speed, iris/gain | ●When the colour night view function is used●When the scene mode is used |
Before requesting repair (Problems and solutions)
Power/Body
1: The movie camera power cannot be turned on.
- Is the battery fully charged? Use a fully charged battery.
- The battery protection circuit may have operated. Attach the battery to the AC adaptor for 5 to 10 seconds. If the movie camera still cannot be used, the battery is faulty.
- Is the LCD monitor open or the viewfinder extend?
2: The movie camera power is turned off automatically.
- If you set [POWER SAVE] to [5 MINUTES] and do not operate the movie camera for about 5 continuous minutes, the power is automatically turned off for tape protection and power conservation. To resume recording, turn the [OFF/ON] switch to [OFF]. Then turn it to [ON] again. (-83-) Also, if you set [POWER SAVE] to [OFF], the power does not automatically turn off.
3: The movie camera power does not stay on long enough.
- Is the battery low? If the remaining battery power indication is flashing or the message "LOW BATTERY" is displayed, the battery has run down. Charge the battery or attach a fully charged battery. (-55-)
- Has condensation occurred? When you carry the movie camera from a cold place into a warm place, condensation may occur inside it. If so, the power is turned off automatically, disabling all operations except for taking cassettes out. Wait until the condensation indication disappears. (-90-)
4: Battery runs down quickly.
- Is the battery fully charged? Charge it with the AC adaptor. (-55-)
- Are you using the battery in an extremely cold place? The battery is affected by ambient temperature. In cold places, the operating time of the battery becomes shorter.
- Has the battery worn out? The battery has a limited life. If the operating time is still too short even after the battery is fully charged, depending on the usage, the battery has worn out and can no longer be used.
Others
5: The movie camera cannot be operated though powered up. The movie camera does not operate normally.
- The movie camera cannot be operated unless you open the LCD monitor or extend the viewfinder.
- Remove the cassette and then press the [RESET] button. (-89-) If normal conditions are not restored yet, turn off the power. Then, about 1 minute later, turn on the power again.
6: The cassette cannot be removed. - Does the status indicator comes on when opening the cassette cover? (-56-) Make sure that the battery and the AC adaptor are properly connected. (-55-)
- Is the battery in use discharged? Charge the battery and remove the cassette.
- Close the cassette cover completely, and fully open it again. (-60-)
7: No operation other than cassette removal can be performed. - Has condensation occurred? Wait until the condensation indication disappears. (-90-)
Recording
1: Recording does not start although power is supplied to the movie camera and the cassette is correctly inserted.
- Is the accidental erasure prevention slider on the cassette open? If it is open (set to [SAVE]), recording cannot be performed. (-60-)
- Is the tape wound to the end? Insert a new cassette.
- Is the recording mode set? When in the playback mode, recording cannot be performed. (-65-)
- Has condensation occurred? No operation other than cassette removal can be performed when condensation occurs. Wait until the condensation indication disappears. (-90-)
- Is the cassette cover open? If the cover is open, the movie camera may not operate normally. Close the cassette cover. (-60-)
2: The screen has changed suddenly.
- Has the demonstration started? In the Tape Recording mode, if you set [DEMO MODE] >> [ON] without inserting a cassette, the demonstration starts. For normal use, set this function to [OFF]. (-84-)
3: A cassette cannot be inserted.
- Has condensation occurred? Wait until the condensation indication disappears.
4: Auto focus function does not work.
- Is manual focus mode selected? If auto focus mode is selected, focus is automatically adjusted.
- There are some recording subjects and surroundings for which the auto focus does not operate correctly. (-95-) If so, use the manual focus mode to adjust the focus. (-75-)
- Is the colour night view function set? When the colour night view function is working, focusing shifts into the manual mode.
Indications
1: A sentence is displayed in red in the screen centre.
- Read the contents and respond to them. (-86-)
2: The remaining tape time indication disappears.
- The remaining tape time indication may disappear temporarily during frame-by-frame playback or other operation. If you continue ordinary recording or playback, the indication is restored.
3: The remaining tape time Indication does not match the actual remaining tape time.
- If scenes of less than 15 seconds are continuously recorded, the remaining tape time cannot be correctly displayed.
- In some cases, the remaining tape time indication may show remaining tape time that is 2 to 3 minutes shorter than the actual remaining tape time.
4: A function indication such as mode indication, remaining tape time indication, or time code indication is not shown. - If you set [SETUP] >> [DISPLAY] >> [OFF], indications other than the tape running condition, warning, and date indications disappear.



natural_image
Pure geometric diagram with intersecting lines and shapes, no text or symbols presentOthers
Playback (Sound)
1: Sound is not played back from the built-in speaker of the movie camera.
- Is the volume too low? During playback, push the [-VOLUME+] lever to display the volume indication and adjust it. (-77-)
2: Different sounds are reproduced at the same time.
- Have you set [SETUP] >> [AUDIO OUT] >> [STEREO] and reproduced a picture containing the main sound and sub sound? Set to L to hear main sound, and set to R to hear the sub sound. (-84-)
3: Sounds cannot be played back.
- Have you set [SETUP] >> [12bit AUDIO] >> ST2? Set [12bit AUDIO] >> ST1. (-84-)
Playback (Pictures)
1: Mosaic-pattern noise appears on images during cue or review playback.
- This phenomenon is characteristic of digital video systems. It is not a malfunction.
2: Horizontal stripes appear on images during cue and review playback.
• Horizontal stripes may appear depending on the scene, but this is not a malfunction.
3: Although the movie camera is correctly connected to a TV, playback images cannot be seen.
- Have you selected video input on the TV? Please read the operating instructions of your TV and select the channel that matches the input terminals used for the connection.
4: Playback picture is not clear.
- Are the heads of the movie camera dirty? If the heads are dirty, playback image cannot be clear. Clean the heads by using the head cleaner for digital video. (-90-)
- If the terminal for the AV cable is soiled, noises may appear on the screen. Wipe the soil off the terminal with a soft cloth, and then connect the cable to the AV terminal.
- Is a picture containing a copyright protection signal (copy guard) being recorded? When a protected picture is played back by the movie camera, mosaic-like patterns appear on the picture.
Others
1: The indication disappears, the screen is frozen, or no operation can be performed.
- Turn off the power to the movie camera. If the power cannot be turned off, press the [RESET] button, or detach the battery or the AC adaptor and then reattach it. After that, turn on the power again. If normal operation is still not restored, detach the power connected, and consult the dealer who you purchased the movie camera from.
2: "PUSH THE RESET SWITCH" is displayed.
- An irregularity in the movie camera has been automatically detected. Remove the cassette for data protection and then press the [RESET] button. The movie camera will be activated.
- If you do not press the [RESET] button, the power to the movie camera is turned off automatically about 1 minute later.
- Even after you press the [RESET] button, the indication may still appear repeatedly. If so, the movie camera needs repair. Detach the power connected, and consult the dealer who you purchased the movie camera from. Do not attempt to repair the appliance by yourself.
3: The warning/alarm indication [!] appears when the camera is operated in the WEB camera mode.
- Did you press the menu button or the recording start/stop button? You cannot use the menu or record onto the tape in the WEB camera mode.
- Did you attempt to play a tape without inserting it? Insert a tape.
- Did you attempt to play a tape with copyright protection (copy guard)? Pictures of the tape with copyright protection (copy guard) cannot be displayed on the PC. (The audio of the tape can be played.)




Others
Cautions for Use
■ About condensation
If you turn the movie camera on when condensation occurs on the head or the tape, condensation Indication [♠] is displayed on the viewfinder or the LCD monitor and the messages [♠DEW DETECT] or [♠EJECT TAPE] (only when the tape is inserted) appear. If so, follow the procedure below.
1 Remove the tape if it is inserted.
- It takes about 20 seconds to open the cassette holder. This is not a malfunction.
2 Leave the movie camera with the cassette cover closed to cool or warm it to the ambient temperature.
●The status indicator blinks for about 1 minute and then the movie camera automatically turns off. Leave it for about 1.5 to 2 hours.
3 Turn the movie camera on again, set it to the Tape Recording/Playback Mode and then check if the condensation indication disappears.
Especially in cold areas, moisture may be frozen. If so, it may take more time before the condensation indication disappears.
Watch for condensation even before the condensation indication is displayed.
- If the indicator of the condensation does not display on the LCD monitor and/or the viewfinder and you notice condensation on the lens or the main unit, do not open the cassette cover otherwise condensation may be formed on the heads or the cassette tape.
When the lens is fogged:
Set the [OFF/ON] switch to [OFF] and leave the movie camera in this condition for about 1 hour. When the lens temperature becomes close to the ambient temperature, the fogging disappears naturally.
■ About dirty heads
If video heads (the parts that closely contact with the tape) become dirty, normal recording and playback are not properly performed. Clean the heads with the digital video head cleaner.
- Insert the head cleaner into the movie camera, set it to the Tape Playback Mode, and play it back for about 10 seconds. (If you do not stop the playback, it automatically stops about 15 seconds later.)
- We recommend cleaning the heads periodically. If the heads become dirty, "NEED HEAD CLEANING" appears during recording. During playback, moreover, the following symptoms appear.
● Mosaic-like noise appears partially or the sound is interrupted.
- Black or blue mosaic-like horizontal stripes appear.
● The whole screen becomes black and there is no picture and sound.
When normal playback cannot be performed even after the head cleaning.
One possible cause is that normal recording could not be performed because the heads were dirty at the time of recording. Clean the heads, and perform recording and playback again. If normal playback can be performed, the heads are clean. Before an important recording, be sure to conduct a test recording to make sure that normal recording can be performed.
- If the heads become dirty soon after cleaning, the problem may be attributable to the tape. If so, try another cassette.
- During playback, the picture or sound may be interrupted momentarily, but this is not a malfunction of the movie camera. (One possible cause is that the playback is interrupted by dirt or dust that momentarily adheres to the heads.)
Others
■ About the movie camera
- When the movie camera is used for a long time, the camera body becomes warm, but this is not a malfunction.
Keep the Digital Video Camera as far away as possible from electromagnetic equipment (such as microwave ovens, TVs, video games etc.).
- If you use the Digital Video Camera on top of or near a TV, the pictures and sound on the Digital Video Camera may be disrupted by electromagnetic wave radiation.
- Do not use the Digital Video Camera near cell phones because doing so may result in noise adversely affecting the pictures and sound.
- Recorded data may be damaged, or pictures may be distorted, by strong magnetic fields created by speakers or large motors.
- Electromagnetic wave radiation generated by microprocessors may adversely affect the Digital Video Camera, disturbing the pictures and sound.
- If the Digital Video Camera is adversely affected by electromagnetic equipment and stops functioning properly, turn the Digital Video Camera off and remove the battery or disconnect AC adaptor. Then reinsert the battery or reconnect AC adaptor and turn the camera on.
Do not use the Digital Video Camera near radio transmitters or high-voltage lines.
- If you record near radio transmitters or high-voltage lines, the recorded pictures and sound may be adversely affected.
Do not spray insecticides or volatile chemicals onto the movie camera.
- If the movie camera is sprayed with such chemicals, the camera body may become deformed and the surface finish may peel off.
- Do not keep rubber or plastic products in contact with the movie camera for a long time. When you use your movie camera in a sandy or dusty place such as on a beach, do not let sand or fine dust get into the body and terminals of the movie camera. Also, protect the movie camera from getting wet.
- Sand or dust may damage the movie camera or cassette. (Care should be taken when inserting and removing a cassette.)
- If sea water splashes onto the movie camera, wet a soft cloth with tap water, wring it well, and use it to wipe the camera body carefully. Then, wipe it again thoroughly with a soft dry cloth.
While carrying the movie camera, do not drop or bump it.
●A strong impact on the movie camera may break its housing, causing it to malfunction.
Do not use benzine, paint thinner or alcohol for cleaning the movie camera.
- Before cleaning, detach the battery or pull out the AC mains lead from the AC mains socket.
- The camera body may be discoloured and the surface finish may peel off.
- Wipe the movie camera with a soft dry cloth to remove dust and fingerprints. To remove stubborn stains, wring well a cloth that is soaked in a neutral detergent diluted with water and wipe the movie camera with it. Afterwards, wipe it with a dry cloth.
- When you use a chemical dust cloth, follow the instructions.
Do not use this movie camera for surveillance purposes or other business use.
- If you use the movie camera for a long time, the internal temperature increases and, consequently, this may cause malfunction.
- This movie camera is not intended for business use.
When you are not going to use the movie camera for an extended time.
- When storing the unit in a cupboard or a cabinet, it is recommended that you put a desiccant (silica gel) in with it.


Others
■ About the battery
The battery used in the movie camera is a rechargeable lithium ion battery. This battery is susceptible to temperature and humidity, and the effect of temperature increases with increasing or decreasing temperature. In the low temperature range, the fully charged indication may not appear, or the low battery indication may appear about 5 minutes after the start of use. At high temperature, moreover, the protection function may work, disabling use of the movie camera.
Be sure to detach the battery after use.
- If the battery is left attached to the movie camera, a minute amount of current is consumed even when the movie camera power is [OFF]. If the battery is left attached to the movie camera for a long time, over-discharge takes place. The battery may become unusable after it is charged.
- The battery should be stored in a cool place free from humidity, with as constant temperature as possible. (Recommended temperature: 15 °C to 25 °C, Recommended humidity: 40% to 60%)
- Extremely high temperatures or low temperatures will shorten the life of the battery.
- If the battery is kept in a high-temperature, high-humidity, or oily-smoky places, the terminals may rust and cause malfunctions.
- To store the battery for a long period of time, we recommend you charge it once every year and store it again after you have completely used up the charged capacity.
- Dust and other matter attached to the battery terminals should be removed.
Prepare spare batteries when going out for recording.
●Prepare batteries appropriate to 3 to 4 times the period during you want to record pictures in. In cold places such as a ski resort, the period during which you can record pictures is shortened.
- When you travel, do not forget to bring an AC adaptor so that you can recharge the batteries at your destination.
If you drop the battery accidentally, check to see if the terminals are deformed.
- Attaching a deformed battery to the movie camera or the AC adaptor may damage the movie camera or the AC adaptor.
Do not throw old battery into fire.
●Heating a battery or throwing it into a fire may result in an explosion.
- If the operating time is very short even after the battery has been recharged, the battery has worn out. Please purchase a new battery.
■ About the AC adaptor
- If the battery is warm, charging requires more time than normal.
- If the temperature of the battery is extremely high or extremely low, the [CHARGE] lamp may continue flashing, and the battery may not be charged. After the battery temperature has decreased or increased sufficiently, recharging starts automatically. So, wait for a while. If the lamp still continues flashing even after the recharging, the battery or the AC adaptor may be faulty. If so, please contact a dealer.
- If you use the AC adaptor near a radio, radio reception may be disturbed. Keep the AC adaptor 1 metre or more away from radio.
- When using the AC adaptor, it may generate whirring sounds. However, this is normal.
●After use, be sure to pull out the AC mains lead from the AC mains socket. (If they are left connected, a minute amount of current is consumed.)
●Always keep the electrodes of the AC adaptor and the battery clean.



natural_image
Pure geometric diagram with intersecting lines and a central circle, no text or symbols presentOthers
■ About the cassette
Never place the cassette in a high temperature place.
- The tape may be damaged, producing mosaic-like noise at the time of playback. When storing the cassette after use, be sure to rewind the tape to the beginning and take it out.
- If the cassette is left for more than 6 months (depending on the storage condition) in the movie camera or stopped midway, the tape may sag and be damaged.
- Once every 6 months, wind the tape to the end and then rewind it to the beginning. If the cassette is left for 1 year or longer without winding or rewinding, the tape may be deformed by expansion or shrinkage attributable to temperature and humidity. The wound tape may stick to itself.
- Dust, direct sunlight (ultraviolet rays), and humidity may damage the tape. Such usage may cause damage to the movie camera and the heads.
- After use, be sure to rewind the tape to the beginning, put the cassette in the case to protect it from dust, and store it upright.
Keep the cassette away from strong magnetism.
- Apparatuses using magnets such as magnetic necklaces and toys have magnetic force that is stronger than expected, and they may erase the contents of a recording or may increase noise.
LCD monitor/viewfinder
LCD monitor
- When the LCD monitor gets dirty, wipe it with a dry soft cloth.
- In a place with drastic temperature changes, condensation may form on the LCD monitor. Wipe it with soft dry cloth.
- If your movie camera is extremely cold, the LCD monitor is slightly darker than usual immediately after you turn the power on. However, as the internal temperature increases, it goes back to normal brightness.
Extremely high precision technology is employed to produce the LCD monitor screen featuring a total of approximately 105,000 pixels. The result is more than 99.99% effective pixels with a mere 0.01% of the pixels inactive or always lit. However, this is not a malfunction and does not affect the recorded picture.
Viewfinder
Extremely high precision technology is employed to produce the viewfinder screen featuring a total of approximately 113,000 pixels. The result is more than 99.99% effective pixels with a mere 0.01% of the pixels inactive or always lit. However, this is not a malfunction and does not affect the recorded picture.
Periodical check-ups
- To maintain the highest image quality, we recommend replacing worn parts such as heads after approx. 1000 hours of use. (This, however, depends on operating conditions including temperature, humidity and dust.)


Others
Explanation of terms
■ Automatic white balance
White balance adjustment recognizes the colour of light and adjusts so the white colour will become a pure white. The movie camera determines the hue of light that comes through the lens and white balance sensor, thereby judging the recording condition, and selects the closest hue setting. This is called automatic white balance adjustment. However, since the movie camera only stores white colour information under several light sources, automatic white balance adjustment does not function normally under the other light sources.

Outside of the effective range of automatic white balance adjustment, the image will become reddish or bluish. Even within the effective range of automatic white balance adjustment, the automatic white balance adjustment may not function properly if there is more than one light source. For light outside the functional auto white balance adjustment range, use the manual white balance adjustment mode.
1) The effective range of automatic white balance adjustment on this movie camera
2) Blue sky
3) TV screen
4) Cloudy sky (rain)
5) Sunlight
6) White fluorescent lamp
7) 2 hours after sunrise or before sunset
8) 1 hour after sunrise or before sunset
9) Halogen light bulb
10) Incandescent light bulb
11) Sunrise or sunset
12) Candlelight
White balance
The image recorded by the movie camera may become bluish or reddish under the influence of light sources. To avoid such phenomena, adjust the white balance.
White balance adjustment determines the white colour under different light sources. By recognizing which is the white colour under sunlight and which is the white colour under a fluorescent lamp, the movie camera can adjust the balance among the other colours.
Since white colour is the reference of all colours (light), the movie camera can record pictures in a natural hue if it can recognize the reference white colour.
Others
Auto focus
Auto focus automatically moves the focusing lens forward and backward inside the movie camera to bring the subject into focus.
Auto focus has the following characteristics.
- Adjusts so that the vertical lines of a subject are seen more clearly.
- Attempts to bring an object with higher contrast into focus.
- Focuses on the screen centre only.
Due to these characteristics, auto focus does not work correctly in the following situations. Record pictures in the manual focus mode.
Recording a subject with one end located closer to the movie camera and the other end farther away from it
- As auto focus adjusts at the centre of an image, it may be impossible to focus on a subject that is located in both the foreground and background.
Recording a subject behind dirty or dusty glass
- The subject behind the glass will not be focused because the focus is on the dirty glass.
Recording a subject that is surrounded by objects with glossy surfaces or by highly reflective objects
- The recording subject may become blurry because the movie camera focuses on the objects with glossy surfaces or on highly reflective objects.
Recording a subject in dark surroundings
- The movie camera cannot focus correctly because the light information that comes through the lens decreases considerably.
Recording a fast-moving subject
- As the focus lens-inside moves mechanically, it cannot keep up with a fast-moving subject.
Recording a subject with little contrast
- A subject with little contrast, such as a white wall, may become blurry because the movie camera achieves focus based upon the vertical lines of an image.


Specifications
Specifications
Specifications
Digital Video Camera
Information for your safety
Power source:
DC 7.9/7.2 V
Power consumption:
Recording
4.1 W
Recording format:
Mini DV (Consumer-use digital video SD format)
Tape used:
6.35 mm digital video tape
Recording/playback time:
SP: 80 min; LP: 120 min (with DVM80)
Video
Recording system:
Digital component
Television system:
CCIR: 625 lines, 50 fields PAL colour signal
Audio
Recording system:
PCM digital recording
16 bit (48 kHz/2 ch), 12 bit (32 kHz/4 ch)
Image sensor:
1/6-inch CCD image sensor
Lens:
Auto Iris, F1.8 to F3.9,
Focal length; 1.9 mm to 57.0 mm
Macro (Full range AF)
Filter diameter:
30.5 mm
Zoom:
30:1 Power zoom
Monitor:
2.5-inch LCD
Viewfinder:
Colour electronic viewfinder
Microphone:
Stereo (with a zoom function)
Speaker:
1 round speaker∅ 20 mm
Standard illumination:
1,400 lx
Minimum required illumination:
2 lx (Colour Night View Mode)
Video output level:
1.0 Vp-p, 75 Ω
Audio output level (Line):
316 mV, 600 Ω
USB:
No copyright protection support
Digital interface:
DV input/output terminal (IEEE1394, 4-pin)
Dimensions:
82.0 mm (W)×69.0 mm (H)×120.0 mm (D)
(excluding the projection part)
Mass:
Approx. 410 g
(without supplied battery, DV cassette and lens cap)
Approx. 480 g
(with supplied battery, DV cassette and lens cap)
Operating temperature:
0^ C to 40^ C
Operating humidity:
10% to 80%
WEB camera
Compression:
Motion JPEG
Image size:
320×240 pixels (QVGA)
Frame rate:
Approx. 6 fps
AC adaptor VSK0651
Information for your safety
Power source:
AC 110 V to 240 V, 50/60 Hz
Power consumption:
19 W
DC output:
DC 7.9 V, 1.4 A (Movie camera operation)
DC 8.4 V, 0.65 A (Battery charging)
Dimensions:
Specifications may change without prior notice.


natural_image
Pure geometric diagram with intersecting lines and circular shapes, no text or symbols presentnatural_image
Symbol of a trash bin with crossed lines indicating no waste or discharge, and a solid black rectangle below (no text or labels)natural_image
Pure geometric diagram with intersecting lines and circles, no text or symbols presentก่อนการใช้งาน
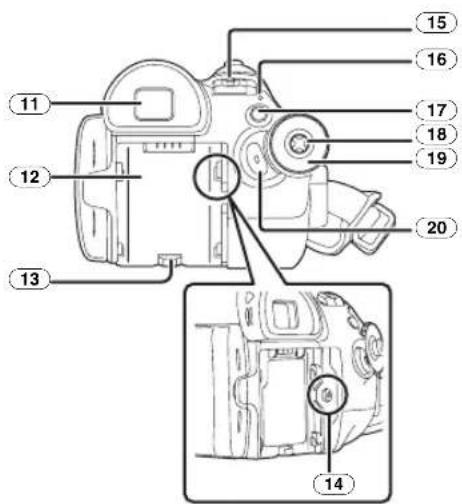
natural_image
Diagram of a mechanical device with a magnified inset showing a component labeled '29' (no text or symbols present)29 ที่ยิดสายคล้องคอ

natural_image
Three-step diagram showing a device being connected to a cable, with arrows indicating motion (no text or symbols present)natural_image
Pure geometric diagram with intersecting lines and shapes, no text or symbols presentก่อนการใช้งาน
อุปกรณ์จ่ายไฟ
การซาร์จะตเตอรี่
natural_image
Diagram of a device with an open box and plug, showing internal components (no text or symbols)การซาร์จหลอดไฟ
ไฟสว่าง: ทำลังชาร์จ
natural_image
Line drawing of a DSLR camera with an attached case and a black arrow indicating the component (no text or symbols present)การถอดแบตเตอรืออก
natural_image
Line drawing of a digital camera with an open screen and scroll wheel (no text or symbols)natural_image
Diagram of a mechanical device with a rotating arm and housing (no text or symbols)natural_image
Line drawing of a digital camera with an 180-degree angle indicator (no text or symbols on the device itself)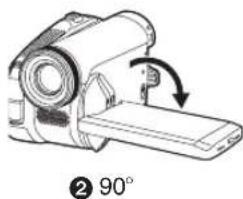
natural_image
Illustration of a digital camera with an arrow indicating rotation, labeled with number 90° (no text or symbols on the device itself)natural_image
Line drawing of a hand holding a cylindrical device with a handle (no text or symbols)natural_image
Line drawing of a printer with a paper feed and paper holder (no text or symbols)natural_image
Illustration of a camera with a magnified inset showing the hand holding a seatbelt (no text or symbols present)
โหมดบันทึกลงเทป
flowchart
graph TD
    A["1/4 NEXT"] --> B["2/4 NEXT"]
    B --> C["3/4 NEXT"]
    C --> D["4/4 NEXT"]
natural_image
Pure geometric diagram with intersecting lines and shapes, no text or symbols presentก่อนการใช้งาน
การเปลี่ยนภาษา
การใช้หน้างอเมนู
natural_image
Technical line drawing of a camera with a circular component detail (no text or symbols)natural_image
Line drawing of a DSLR camera with a close-up view of its lid (no text or symbols)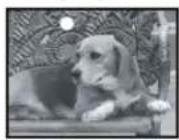
natural_image
Line drawing of a mechanical device with handle, shaft, and circular base (no text or symbols)natural_image
Black-and-white photo collage showing a dog's head, profile, and body (no text or symbols)natural_image
Pure geometric diagram with intersecting lines and shapes, no text or symbols presentโหมดบันทึก
■ฟังก์ชันดิจิตอลซุม
natural_image
Line drawing of a digital camera with an arrow indicating rotation (no text or symbols)natural_image
Two black-and-white photos of a dog on a beach, one with wings raised and the other with legs raised (no text or symbols visible)natural_image
Black-and-white photo collage showing two animals in motion, one standing and one running, with a gray arrow pointing to the right (no text or symbols)ในการยกเลิกการเฟต
natural_image
Pure geometric diagram with intersecting lines and circles, no text or symbols presentโหมดบันทึก
natural_image
Line drawing of a digital camera with a circular component inset (no text or symbols)1 ทำงานด้วยจอยสติก

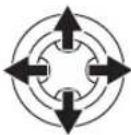


natural_image
Pure geometric diagram with intersecting lines and shapes, no text or symbols presentโหมดแก้ไข

natural_image
Pure geometric diagram with intersecting lines and shapes, no text or symbols presentไม่น
natural_image
Pure geometric diagram with intersecting lines and circles, no text or symbols presentอื่นๆ
natural_image
Pure geometric diagram with intersecting lines and circles, no text or symbols presentอื่นๆ
natural_image
Pure geometric diagram with intersecting lines and shapes, no text or symbols presentอื่นๆ
16 bit (48 kHz/2 ch), 12 bit (32 kHz/4 ch)
ตัวตรวจจับภาพ:
natural_image
Symbol of a trash bin crossed with two crossed lines, no text or numbers presentnatural_image
Pure electrical circuit lines without any symbolsप्रयोग करने से पहले
प्रयोग करने से पहले
सहायक पुर्ज
⑥ स्पीकर -172-
natural_image
Diagram of a car interior showing a vehicle and a handle, with a magnified inset highlighting a component (no text or symbols present)natural_image
Diagram showing three steps of a car interior with handbags and straps, no text or symbols presentnatural_image
Diagram of a device with an open lid and internal components connected to a power outlet (no text or symbols)





प्रयोग करने से पहले
लैम्प चार्ज करना
natural_image
Line drawing of a DSLR camera with an arrow pointing to the internal component (no text or symbols present)बैटरी निकालना
natural_image
Pure geometric diagram with intersecting lines and circles, no text or symbols presentप्रयोग करने से पहले
natural_image
Line drawing of a digital camera with an arrow indicating rotation or sound flow (no text or symbols)natural_image
Pure geometric diagram with intersecting lines and shapes, no text or symbols presentप्रयोग करने से पहले
natural_image
Diagram of a mechanical device with a rotating arm and housing (no text or symbols)natural_image
Line drawing of a digital camera with an arrow indicating rotation, labeled '180°' (no text or symbols on the device itself)
natural_image
Diagram of a digital camera with an arrow indicating rotation, labeled with 90° (no text or symbols on the device itself)natural_image
Line drawing of a hand using a handheld device to adjust or install a component (no text or symbols visible)natural_image
Pure geometric diagram with intersecting lines and shapes, no text or symbols presentप्रयोग करने से पहले
कैसेट डालना/निकालना
natural_image
Line drawing of a mechanical device with no visible text or symbolsnatural_image
Illustration of a handheld device with a magnified inset showing its internal structure (no text or symbols)
flowchart
graph TD
    A["1/4 NEXT"] --> B["2/4 NEXT"]
    B --> C["3/4 NEXT"]
    C --> D["4/4 NEXT"]
natural_image
Technical line drawing of a digital camera with an inset circular component detail (no text or symbols)natural_image
Line drawing of a DSLR camera with a close-up view showing the lens (no text or symbols)
natural_image
Line drawing of a portable electric shaver with attached circular button (no text or symbols)natural_image
Black-and-white photo collage showing three separate panels of a dog, with a downward arrow pointing to the bottom panel (no text or symbols)natural_image
Line drawing of a digital camera with an arrow indicating rotation (no text or symbols)natural_image
Pure geometric diagram with intersecting lines and shapes, no text or symbols presentरिकॉर्ड मोड
natural_image
Two black-and-white photos of a dog running on a beach, one with wings raised and the other with legs raised (no text or symbols)natural_image
Abstract grayscale image composition with three panels showing silhouetted animals in motion (no text or symbols)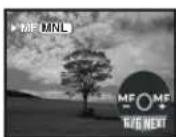
natural_image
Diagram of a digital camera with an inset showing the camera's internal components (no text or labels)natural_image
Pure geometric diagram with intersecting lines and shapes, no text or symbols presentलेबैक मोड


natural_image
Two abstract diagrammatic symbols: a circular control knob with directional arrows and a cross-shaped grid with geometric shapes (no text or labels)natural_image
Pure geometric diagram with intersecting lines and circles, no text or symbols presentमेनू
मेनू
मेनू लिस्ट
natural_image
Pure geometric diagram with intersecting lines and shapes, no text or symbols presentअन्य
कैसेट के बारे में
16 bit (48 kHz/2 ch), 12 bit (32 kHz/4 ch)
इमेज सेंसर:
natural_image
Pure geometric lines forming a crosshair symbol (no text or labels)Matsushita Electric Industrial Co., Ltd.
Web site: http://panasonic.net
松下電器產業株式會社
日本國大阪

Panasonic®
تعليمات التشفيل
کتابجه راهنما

natural_image
Illustration of a digital camera with lens and frame (no text or symbols)Digital Video Camera
Model No. NV-GS60GC

natural_image
Black-and-white landscape photo showing two white flower silhouettes and a winding road under a cloudy sky (no text or symbols)
LSQT1135 B
F1206Kk1017 ( 4000 Ⓑ )

natural_image
Pure geometric diagram with intersecting lines and circular shapes, no text or symbols present-30 -سماعات ⑥
-13-[OPEN/EJECT] ذراع إخراج الكاسیت ⑦
⑧ حامل الكاسيت-13
(lithium/CGR-DU06/640 mAh) (2
(lithium/CGA-DU07/680 mAh) (3) طارية ليثيم
(lithium/CGA-DU12/1150 mAh) بطارية ليثيم (4
(lithium/CGA-DU14/1360 mAh) (5)
(lithium/CGA-DU21/2040 mAh) (6)
(VW-LND30E) ND مresearch (9
(VW-LMC30E) MC حامي 10
-13 - £25
natural_image
Diagram of a car engine component with a magnified inset showing a cable or connector detail (no text or symbols present)29 مثبت رابطة الكتف

-46-11- 11
natural_image
Diagram of a DSLR camera showing the internal components and an arrow indicating a location (no text or symbols present)إزالة البطارية
natural_image
Diagram of a device with an open lid and internal components, no text or symbols presentم MSNBC الشحن
قبل الاستخدام

natural_image
Diagram of a digital camera with an open screen and directional arrow indicating rotation (no text or symbols)natural_image
Line drawing of a hand holding a device with a button (no text or symbols)natural_image
Diagram of a mechanical device with a rotating shaft and housing (no text or symbols)• شاشة LCD يمكن فتحها لزاوية أقصاما 90 درجة 2 ∪ ∪ ∪ ∪ ∪ ∪ ∪ ∪ ∪ ∪ ∪ ∪ ∪ ∪ ∪ ∪ ∪ ∪ ∪ ∪ ∪ ∪ ∪ ∪ ∪ ∪ ∪ ∪ ∪ ∪ ∪ ∪ ∪ ∪ ∪ ∪ ∪ ∪ ∪ ∪ ∪ ∪ ∪ ∪ ∪ ∪ ∪ ∪ ∪ ∪ ∩

natural_image
Line drawing of a digital camera with an arrow indicating rotation (no text or symbols)①180°

② 90°
natural_image
Diagram showing a camera with a magnified inset of its cable and grip (no text or symbols present)natural_image
Line drawing of a printer with a paper feed insert (no text or symbols)قبل الاستخدام
flowchart
graph TD
    A["1/4 NEXT"] --> B["2/4 NEXT"]
    B --> C["3/4 NEXT"]
    C --> D["4/4 NEXT"]
flowchart
graph LR
    A["1/2 NEXT"] --> B["WB IRIS SHTR"]
    B --> C["MF MF 3/3 NEXT"]
    C --> A

natural_image
Line drawing of a hand holding a cylindrical device with multiple blades (no text or symbols)4)

natural_image
Illustration of a person holding a phone to their face, wearing casual clothing (no text or symbols visible)3)

natural_image
Illustration of a hand holding a helmet with a cross mark (no text or symbols)5)
natural_image
Line drawing of a vintage digital camera with a close-up view of its circular component (no text or symbols)natural_image
Illustration of a DSLR camera and a dog photo (no text or symbols)natural_image
Line drawing of a portable vacuum cleaner with attached cable and circular button (no text or symbols)natural_image
Black-and-white photo collage showing a dog's head and face, with a downward arrow pointing to the bottom image (no text or symbols)
natural_image
Line drawing of a digital camera with scroll wheel and screen (no text or symbols)natural_image
Two black-and-white photos of a dog in motion on a beach, one with wings raised and the other with legs raised (no text or symbols visible)natural_image
Two silhouetted animals in motion, one standing and one running, with a shadowy frame on the right (no text or symbols)• demands nothing something might be used by the purpose of getting in the hall at the tatalia?
على [AUTO/MANUAL/FOCUS] ضع مفتاح 2
.[FOCUS]

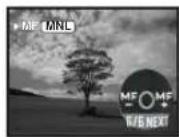
natural_image
Line drawing of a digital camera with a circular inset showing a mechanical component (no text or symbols)

3)

نمط التحرير
ملاحظات
ستخدام مع ماكينتوش
-17-[ Expected Minimization
-37-[ Sudanowski
-37-[عرض توضيحي]
-16 - [LANGUAGE] (4)
حوانال
توفير الطاقة
. (PCM ∪ ∪ ∪ ∪ ∪ ∪ ∪ ∪ ∪ ∪ ∪ ∪ ∪ ∪ ∪ ∪ ∪ ∪ ∪ ∪ ∪ ∪ ∪ ∪ ∪ ∪ ∪ ∪ ∪ ∪ ∪ ∪ ∪ ∪ ∪ ∪ ∪ ∪ ∪ ∪ ∪ ∪ ∪ ∪ ∪ ∪ ∪ ∪ ∪ ∪ ∸ ∪ ∸ ∸ ∸ ∸ ∸ ∸ ∸ ∸ ∸ ∸ ∸ ∸ ∸ ∸ ∸ ∸ ∸ ∸ ∸ ∸ ∸ ∸ ∸ ∸ ∸ ∸ ∸ ∸ ∸ ∸ ∸ ∸ ∸ ∸ ∸ ∸ ∸ ∸ ∸ ∸ ∸ ∸ ∸ ∸
"16 bit 48 kHz 2 tracks"
ت Connectivity Retirements.
-78-بلندگو ⑥
-61-[OPEN/EJECT] ⑦
-61 - محقظه کاست ⑧
natural_image
Illustration of four different cable types: a battery, two cordages with labeled points A and B, no text or symbols present.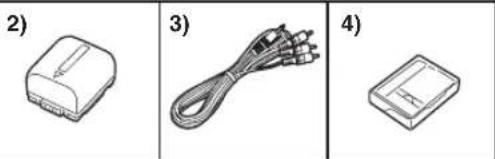
natural_image
Three-panel image showing battery, cable, and electronic device (no text or symbols)(lithium/CGR-DU06/640 mAh) (2
28 ∪ ∩ ∩ ∩ ∩ ∩ ∩ ∩ ∩ ∩ ∩ ∩ ∩ ∩ ∩ ∩ ∩ ∩ ∩ ∩ ∩ ∩ ∩ ∩ ∩ ∩ ∩ ∩ ∩ ∩ ∩ ∩ ∩ ∩ ∩ ∩ ∩ ∩ ∩ ∩ ∩ ∩ ∩ ∩ ∩ ∩ ∩ ∩ ∩ ∩ ∩ ∸
natural_image
Mechanical assembly diagram showing a motor with a gear and a handle, no visible text or symbols29 ∪ ∩ ∩ ∩ ∩ ∩ ∩ ∩ ∩ ∩ ∩ ∩ ∩ ∩ ∩ ∩ ∩ ∩ ∩ ∩ ∩ ∩ ∩ ∩ ∩ ∩ ∩ ∩ ∩ ∩ ∩ ∩ ∩ ∩ ∩ ∩ ∩ ∩ ∩ ∩ ∩ ∩ ∩ ∩ ∩ ∩ ∩ ∩ ∩ ∩ ∩ ∸

-94- -59-
11 چشى
-56-[DC/C.C.IN] DC 14
natural_image
Three-step diagram showing a mechanical device with meshing and rotation arrows (no text or symbols)natural_image
Line drawing of a DSLR camera with an attached battery and arrow indicating the component (no text or symbols present)درآوردن باتری
natural_image
Diagram of a device with an open lid and plug, showing internal components (no text or symbols)چراغ شارز
قبل از بکارگیری

روشن کردن دوربين

natural_image
Diagram of a handheld device with a circular component and directional arrows indicating rotation (no text or symbols)natural_image
Line drawing of a hand using a handheld device to adjust or install a component (no text or symbols visible)natural_image
Diagram of a mechanical device with a rotating shaft and housing (no text or symbols)natural_image
Illustration of a digital camera with an 180-degree angle indicator (no text or symbols on the device itself)
natural_image
Illustration of a handheld device with a 90-degree angle indicator (no text or symbols on the device itself)natural_image
Illustration of a printer with a magnified inset showing the cable being inserted (no text or symbols present)natural_image
Line drawing of a mechanical device with a paper feed and paper holder (no text or symbols)natural_image
Illustration of a printer with a paper roll and a label pointing to it (no text or symbols present)قبل از بکارگیری
flowchart
graph TD
    A["1/4 NEXT"] --> B["2/4 NEXT"]
    B --> C["3/4 NEXT"]
    C --> D["4/4 NEXT"]
: (+) (+)
flowchart
graph LR
    A["1/2 NEXT"] --> B["WB IRIS SHTR"]
    B --> C["MF + 3/3 NEXT"]
    C --> D["Feedback Loop"]
natural_image
Illustration of a person in casual attire holding a phone to their ear (no text or symbols visible)3)

natural_image
Simple line drawing of a hand holding a camera lens with a cross mark (no text or symbols)5)
natural_image
Technical line drawing of a camera with a close-up view of its circular component (no text or symbols)natural_image
Line drawing of a DSLR camera with a magnified inset showing the lens (no text or symbols)
natural_image
Line drawing of a handheld device with attached cable and circular button (no text or symbols)natural_image
Black-and-white photo collage showing a dog's head and body, with a large arrow pointing to the bottom image (no text or symbols)natural_image
Line drawing of a digital camera with an arrow indicating rotation (no text or symbols)natural_image
Black-and-white photo collage showing two dogs in a beach, one with wings raised and the other standing on the ground (no text or symbols)مكت ضبط (عمل محو)
natural_image
Abstract grayscale image with three silhouettes of a dog in motion, no text or symbols present
natural_image
Line drawing of a vintage camera with an inset showing the camera's circular components (no text or symbols)

USB سيم اتصال (1)
USB 2 پایانه اتصال
<< [All Programs (Program)] << [start]
.[Windows Update]
"12 bit 32 kHz 4 tracks" :[12bit]
"16 bit 48 kHz 2 tracks" :[16bit]
natural_image
Pure geometric lines forming a crosshair symbol (no text or labels)
Matsushita Electric Industrial Co., Ltd.
Web site: http://panasonic.net
- 安全注意事項
- 警告:
- 使用之前
- 附件
- 安裝鏡頭蓋
- 手柄带
- ■ 充電指示燈
- ■ 取下電池
- 使用LCD顯示屏
- 插入/取出錄影帶
- 控制桿的使用方法
- 使用菜單熒屏
- 重播模式
- 逐格重播
- 編輯模式
- 啟動 Windows Messenger/MSN Messenger/Windows Live Messenger。
- ■ 當使用攝錄放影機作為網路攝影機時
- ■ 注意事項
- 其他方面
- 無法同時使用的功能
- 術語解釋
- ■ 自動白平衡
- Information for your safety
- WARNING:
- CAUTION!
- Carefully read the Operating Instructions and use the Movie Camera correctly.
- Try out the Movie Camera.
- The manufacturer is not liable for loss of recorded contents.
- Carefully observe copyright laws.
- Pages for reference
- Use only the recommended accessories.
- How to replace the Fuse
- -If you see this symbol-
- Information on Disposal in other Countries outside the European Union
- Contents
- Before using
- Record mode
- Playback mode
- Edit mode
- Menu
- Others
- Specifications
- Accessories
- Optional
- Parts identification and handling
- Camera
- Fitting the lens cap
- The grip belt
- Power supply
- Charging the battery
- Charging lamp
- ■ Connecting to the AC outlet
- ■ Fitting the battery
- ■ Removing the battery
- CAUTION
- Charging time and recordable time
- Turning the camera on
- ■ How to turn on the power
- ■ How to turn off the power
- ■ How to turn the power on and off with the LCD monitor/viewfinder
- Setting date and time
- About date/time
- Using the LCD monitor
- Using the viewfinder
- ■ Extending the viewfinder
- ■ Adjusting the field of view
- Quick Start
- ■ To cancell Quick Start
- Inserting/removing a cassette
- Caution:
- ■ When the cassette holder does not come out
- ■ When the cassette holder cannot be housed
- ■ Accidental erasure prevention
- Selecting a mode
- How to use the joystick
- 2) Tape Recording Mode
- 3) Tape Playback Mode
- Help mode
- ■ To exit the Help mode
- Switching the language
- Using the menu screen
- Adjusting LCD monitor/viewfinder
- ■ Adjusting the brightness and colour level
- Check before recording
- ■ Basic camera holding
- Check points
- ■ About auto mode
- ■ Recording mode
- - Set to Tape Recording/Playback Mode.
- Recording on a tape
- Recording check
- Blank search function
- Recording a still picture on a tape (Photoshot)
- Zoom in/out function
- Digital zoom function
- ■ About the variable speed zoom function
- ■ To use the zoom microphone function Interlocked with the zooming operation, the microphone will collect sounds clearly far away with the tele-shot or those in the vicinity with the wide-angle shot.
- Recording yourself
- Backlight compensation function
- ■ To return to normal recording
- Colour Night view function
- ■ To cancell the colour night view function
- Soft skin mode
- ■ To cancell the soft skin mode
- Fade in/fade out function
- Fade in
- Fade out
- Press the recording start/stop button. Start recording. (fade in)
- Pause recording. (fade out)
- ■ To cancell fading
- ■ To select the colour for fade in/out
- Wind noise reduction function
- ■ To cancell the wind noise reduction function
- Recording images for wide-screen TVs
- Cinema Function
- Image stabilizer function
- Recording in various situations (Scene mode)
- ■ To cancell the scene mode function
- Sports mode
- Portrait mode
- Low light mode
- Spotlight mode
- Surf & snow mode
- Recording in natural colours (White balance)
- ■ To restore to the automatic adjustment
- ■ To set the white balance manually
- ■ About flashing of the [ ]indication
- ■ About the white balance sensor
- Manual focus adjustment
- Manual shutter speed/aperture adjustment
- Manual shutter speed adjustment
- Manual iris/gain adjustment
- ■ Shutter speed range
- Iris/gain value range
- Playing back tape
- To adjust volume
- ■ Repeat playback
- ■ Settings on the audio
- Frame-by-frame playback
- Playback on TV
- Copying onto a DVD recorder or a VCR (Dubbing)
- ■ When neither image nor sound from the movie camera is output to the TV set
- Using the DV Cable for Recording (Digital Dubbing)
- ■ To cancel the standby for recording
- Using the movie camera as a Web Camera (Windows XP SP2)
- Software:
- Using on Macintosh
- ■ Operating environment on iMovie 4/iMovie HD
- Notes
- Menu list
- [TAPE RECORDING MENU]
- Menus related to taking pictures
- [DATE/TIME]
- [AUDIO REC]
- [DISPLAY]
- [BEEP SOUND]
- [POWER SAVE]
- Menus related to playback
- [12bit AUDIO]
- [AUDIO OUT]
- Other menus
- [INITIAL SET]
- [DEMO MODE]
- Indications
- Basic indications
- Recording indications
- Playback indications
- Warning/alarm indications
- Confirmatory indications
- Textual indications
- Functions cannot be used simultaneously
- Before requesting repair (Problems and solutions)
- Power/Body
- Recording
- Playback (Sound)
- Playback (Pictures)
- Cautions for Use
- ■ About condensation
- ■ About the movie camera
- ■ About the battery
- Be sure to detach the battery after use.
- Prepare spare batteries when going out for recording.
- If you drop the battery accidentally, check to see if the terminals are deformed.
- Do not throw old battery into fire.
- ■ About the AC adaptor
- ■ About the cassette
- Keep the cassette away from strong magnetism.
- LCD monitor/viewfinder
- LCD monitor
- Viewfinder
- Periodical check-ups
- Explanation of terms
- ■ Automatic white balance
- White balance
- Auto focus
- ก่อนการใช้งาน
- อุปกรณ์จ่ายไฟ
- การซาร์จะตเตอรี่
- การซาร์จหลอดไฟ
- การถอดแบตเตอรืออก
- การเปลี่ยนภาษา
- การใช้หน้างอเมนู
- โหมดบันทึก
- ■ฟังก์ชันดิจิตอลซุม
- ในการยกเลิกการเฟต
- โหมดแก้ไข
- อื่นๆ
- प्रयोग करने से पहले
- सहायक पुर्ज
- लैम्प चार्ज करना
- बैटरी निकालना
- कैसेट डालना/निकालना
- रिकॉर्ड मोड
- लेबैक मोड
- मेनू
- मेनू लिस्ट
- कैसेट के बारे में
- Panasonic®
- توفير الطاقة
Brand : PANASONIC
Model : NV-GS60GC
Category : Camcorder