
TVSIII - Camcorder CONTAX - Free user manual and instructions
Find the device manual for free TVSIII CONTAX in PDF.
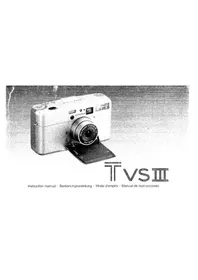


| Product Type | 35mm Lens-Shutter Auto Exposure Camera |
| Lens | Carl Zeiss T* Vario Sonnar T* 30-60mm F3.7-6.7 (6 elements in 5 groups) |
| Aperture Range | F3.7 – F16 (at 30mm) |
| Shutter Speeds | 16 sec – 1/1000 sec |
| Exposure Control | Aperture Priority Auto (Av) and Program Auto (P) |
| Metering Range | EV 0 – EV 18 (at ISO 100) |
| Exposure Compensation | ±2 EV in 1/3 EV steps (switchable to 1/2 EV steps) |
| Film Speed Setting | ISO 25 – 5000 automatic via DX code; defaults to ISO 100 for non-DX films |
| Focusing System | Autofocus (external passive method) with AF-assist beam; manual focus switchable |
| Viewfinder | Real-image viewfinder, 0.42–0.76× magnification, 83% field of view at 3m |
| Diopter Adjustment | Built-in, range +2 to –3.5 diopters |
| Flash | Built-in zoom flash with auto-flash, red-eye reduction, fill-in, night scene, and flash-off modes |
| Self-Timer | Electronic with 10sec and 2sec delay; can be cancelled mid-cycle |
| Film Transport | Auto loading, auto advance, auto rewind with mid-roll rewind capability |
| Date/Time Printing | Selectable imprinting of date or time on film |
| Battery | One 3V lithium CR123A or DL123A; approx. 7 rolls of 24exp with 50% flash use |
| Dimensions (W×H×D) | 116.5 × 64 × 40 mm |
| Weight | 320 g (camera body only) |
| Custom Functions | 6 functions covering film leader, lens movement timing, focus area, exposure mode memory, manual focus adjustment step, compensation step |
| Accessories (Optional) | CONTAX Flash Adapter SA-1, ever-ready leather case, deluxe hand/shoulder strap |
| Care & Maintenance | Clean lens with blower and lens tissue; wipe body with soft cloth; avoid organic solvents, heat, moisture, and dust |
| Safety Precautions | Contains high-voltage circuits; do not disassemble; avoid dropping, shock, and extreme temperature changes |
Frequently Asked Questions - TVSIII CONTAX
User questions about TVSIII CONTAX
0 question about this device. Answer the ones you know or ask your own.
Ask a new question about this device
Download the instructions for your Camcorder in PDF format for free! Find your manual TVSIII - CONTAX and take your electronic device back in hand. On this page are published all the documents necessary for the use of your device. TVSIII by CONTAX.
USER MANUAL TVSIII CONTAX
Thank you for your purchase of the CONTAX Tvs III.
Based on the CONTAX philosophy of producing a "camera,
which is pleasurable to own, to use and takes an excellent photograph",
this 35mm lens-shutter camera is extremely simple to use.
The camera features a newly designed retractable zoom lens. The focusing system is switchable between auto focus or manual, and the exposure control system
offers aperture-priority auto exposure and programmed auto exposure.
Before using the camera, be sure to read this instruction manual carefully.
Quick Guide to Shooting 16
Name of Parts 20
Preparations before Taking Pictures
- Loading the Battery 26
- Front Cover 36
- Concerning the main power switch and/or focusing dial. 40
- Diopter Adjustment 42
- Display in the viewfinder 44
- Display Panel and Aperture Display LCD 52
- How to Press the Shutter Release Button 58
- Set up and Printing the Date and Time 62
- Loading the Film: 74
- Holding the Camera 80
- Basic Photographic Concepts 83
Basic Procedures for Taking Pictures
- Turn the Main Power Switch to "AF" 88
- Choose the subject size (Zooming) 94
- Taking picture 96
- Taking out the film: 102
Shooting Techniques
- Focus Lock 106
- Aperture Priority Auto Exposure (Av) 114
- Exposure Compensation 122
- Flash Photography: 130
<1. Auto-flash Mode> <2. Red-eye Reduction Auto-flash Mode> <3. Flash-off Mode> <4. Fill-in Flash Mode> <5. Night Scene Portrait Mode>
- Shooting with the Self-timer: 152
- Manual Focus Shooting 160
- Custom Functions 166
- Others 177
Optional Accessories. 184
CONTAX Tvs III Specifications 188
Camera Strap and Camera Case: 196
Inhalt
Camera Care and Precautions:
● Fingerprints and dirt on the lens and other parts can adversely affect the accuracy of the camera. If they are soiled, clean them lightly with lens cleaning tissue moistened with cleaning fluid. That is enough in most cases. To remove dust, blow off with a blower or dust off with a lens brush. ● To clean the camera body, wipe off with a soft cloth. Never use organic solvents such as benzene and thinner. ● After shooting on a beach or in a dusty place, clean the camera thoroughly. Salt air can cause corrosion, and sand and dust can adversely affect the camera mechanism. - If the camera is suddenly brought into a warm room from the outside where it is cold, the lens may be clouded.
The cloudiness will disappear after a while, but avoid sudden temperature changes if possible.
● This camera contains high-voltage circuits. In case of malfunction, never try to disassemble it by yourself because it is dangerous. - If you are going to use the camera for important events such as an overseas trip or wedding ceremony, check to make sure it operates correctly or make test exposures beforehand. It is also recommended to bring a spare battery with you. ● The camera is a precision instrument. Do not drop it and avoid intense shock.
If you are using the camera in cold weather, keep it inside your clothing to warm it up.
As the temperature drops, the battery performance will be temporarily reduced and the camera may not operate. However, the battery performance returns to normal at ordinary temperature.
It occurs, though rarely, that the camera does not operate due to strong external electricity. In this case, turn off the main switch again and take out the battery. Turn on and off the main switch and then reload the battery after the display on display panel disappears. Also, re-set date and time.
- Keep the camera away from heat, moisture and dust and store it in an airy place. Do not store it in a wardrobe drawer containing mothballs or in a laboratory which handles chemicals.
- Do not leave the camera and film for a long time in hot places. (on a beach in summer, in a closed car under direct sunlight, etc.) because the camera, film and battery may be adversely affected.
Quick Guide to Shooting
- Insert the battery. (Page 26)

- Set the date or time. (Page 62)

- Loading the film. (Page 74)

- Turn the Main Power Switch to "AF". (Page 88)
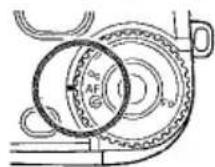
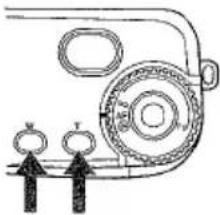
- Choosing the size of subject. (Page 94)
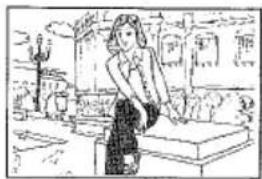
- Take a picture. (Page 96)
- Take out the film after rewinding the film. (Page 102).
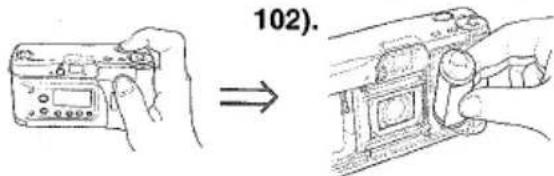
After the entire roll of film is exposed
Name of Parts
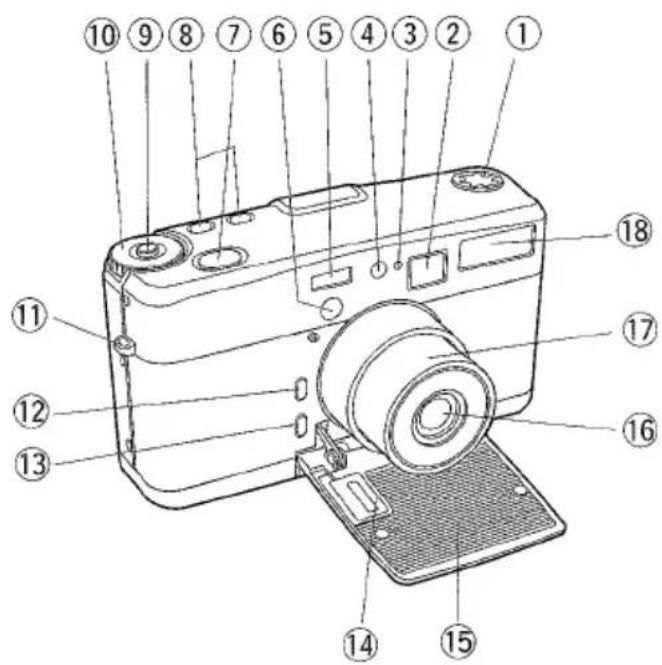


① Exposure compensation dial (Page 122) ② Viewfinder (Page 44) ③ Self-timer LED (Page 152) ④ Light Sensor ⑤ Focusing Window ⑥ AF-assist Beam Emitter (Page 98) ⑦ Shutter Release Button (Page 58) ⑧ Zooming Button (Page 94) ⑨ Dial Lock Release Button (Page 160) ⑩ Main Power Switch and Focusing Dial (Page 40) ⑪ Strap Lug (Page 196) ⑫ Aperture Button A (Page 114)
⑬ Aperture Button B (Page 114) ⑭ Aperture Display LCD (Page 114) ⑮ Front Cover (Page 36) ⑯ Lens ⑰ Lens Barrel ⑱ Flash (Page 130) ⑲ Display Panel (Page 52) ⑳ Viewfinder Eyepiece (Page 44) ② Diopter Adjustment Dial (Page 42) ② Flash Mode Button (Page 130) ②③ Camera Back ⑳ Strap Lug (Page 196) ⑲ Self-timer Button (Page 152) ⑳ Date Button (Page 59)
⑰ Select Button (Page 59) ⑳ Tripod Socket (Page 152) ⑲ Set Button (Page 59) ③⓪ Manual Rewind Button (Page 102) ③① Battery Compartment/ Cover (Page 26) ③② Film Check Window ③③ Camera Back Release Knob (Page 74) ③④ Film Tip Mark (Page 74) ③⑤ Spool (Page 74) ③⑥ Film Chamber (Page 74) ③⑦ DX Contact (Page 74) ③⑧ Film Guides (Page 74)
Preparations before Taking Pictures
1. Loading the Battery
①
②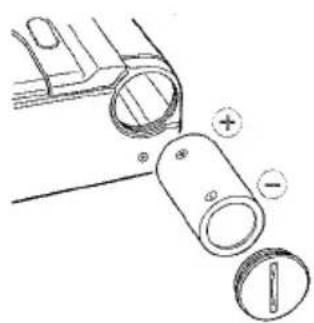

① Open the battery compartment cover by turning it with a coin in the direction of the arrow.
② Load the battery in the battery compartment with the plus(+) and minus(-) ends correctly placed as illustrated, then replace the cover.
After the battery is loaded, turn on the camera. Then, " [ ]" (Display of Remaining Battery Capacity) appears in the display panel.
Display of Remaining Battery Capacity Battery capacity is enough.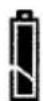
Prepare for new battery
(Blinks) Replace the battery with new one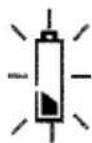
(Blinks) Ran down the battery capacity
You should replace the battery when the "☐" mark appears on the display panel. Turn the main switch off, then replace the battery with a new one.
- When you take out the battery from the camera, replace it with a new one immediately. If you leave the battery out for more than thirty seconds, the date and time will reset. If this happens, please reset the date and time.
- Although you can still take pictures even after the "☐" mark blinks, you should replace the battery as soon as possible. If the battery capacity drops below the effective limit, the "☐" mark on the display panel blinks and the camera will no longer operate.
- The voltage of some batteries may temporarily decrease, causing the "🔍" mark to blink when loaded in the camera. If the "🔍" mark blinks soon after a new battery is loaded, turn the main switch off and back on again. If the "🔍" mark does not appear again, you can use the battery.
● Generally, battery performance is temporarily reduced by low temperatures. If you are taking pictures in cold weather, keep the camera warm by putting it inside your jacket and taking it out only when needed. The battery performance reduced by low temperature returns to normal at an ordinary temperature. - If the (+) and (-) poles of the battery are soiled with sweat or grease, poor contact will result. Wipe both poles clean with a dry cloth before use. - If you are going on a long trip, bring a spare new battery with you. ● Never put the battery in fire and do not recharge, short, disassemble, or heat it because it is dangerous.
- The camera does not operate if the battery is loaded with the "+" and "-" ends reversed. ● The 3V lithium battery (CR123A or DL123A) cannot be recharged.
- Keep the battery out of reach of children.
2. Front Cover
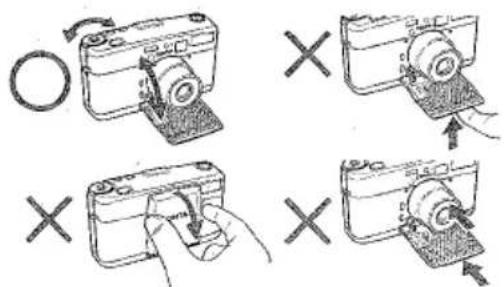
- Opening and closing the front cover must be done through "∅" ⇔ "AF" of the main power switch. If you force the cover to open by hand or try to push it closed by hand, it may cause malfunction or damage.
- Do not put extreme force on the tip of the front cover or the tip of the lens barrel. It may cause malfunction or damage.
- When the front cover or lens barrel is operating, do not force it to stop.
- If you put pressure on the tip of the lens by accident or turn the main power switch to "∅" ⇒ "AF" while in a camera case, it may rattle for approx. 1 to 6 seconds. This is not a malfunction, but it works to protect the inner mechanism. At that time, if the lens is stuck, try the following:
① Turn the main power switch to "G" once.
② Turn the main power switch to "AF" again after a while.
If the lens does not return with the first try, repeat ① and ② several times. Then, the protection mechanism will be released and return to normal condition.
3. Concerning the main power switch and/or focusing dial.
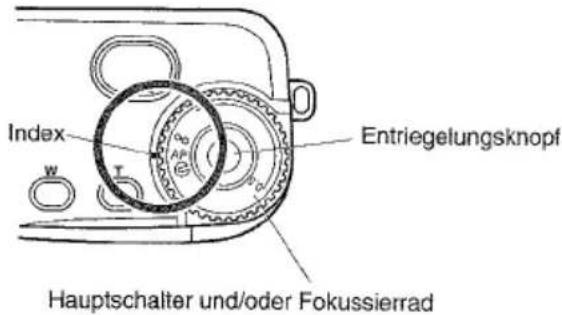
Use the main power switch and/or focusing dial for the camera's power on/off switch and manual focus shooting (Page 160). When you change from "AF" to "MF", then the camera can be set to 'Full Automatic Shooting Mode' (Page 88). Also, when pressing the 'Dial Lock Release Button' and setting "infinity \~ 0.5", then 'Manual Focus Shooting Mode' can be set.
4. Diopter Adjustment
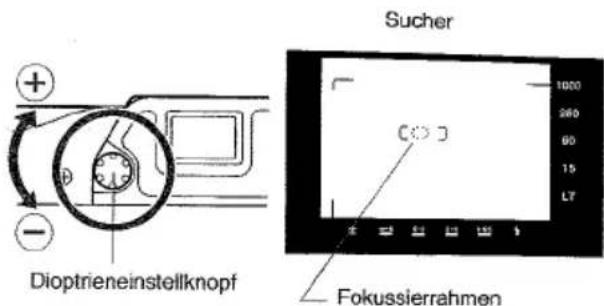
This camera has a built-in diopter adjustment unit. To adjust the viewfinder eyepiece to your eyesight, turn the diopter adjusting dial until the focus frame in the viewfinder appears sharp and clear. The adjustable range is from +2 to -3.5 diopters.
5. Display in the viewfinder
(This illustration shows all information available in the viewfinder for reference. It does not represent an actual example of the display)
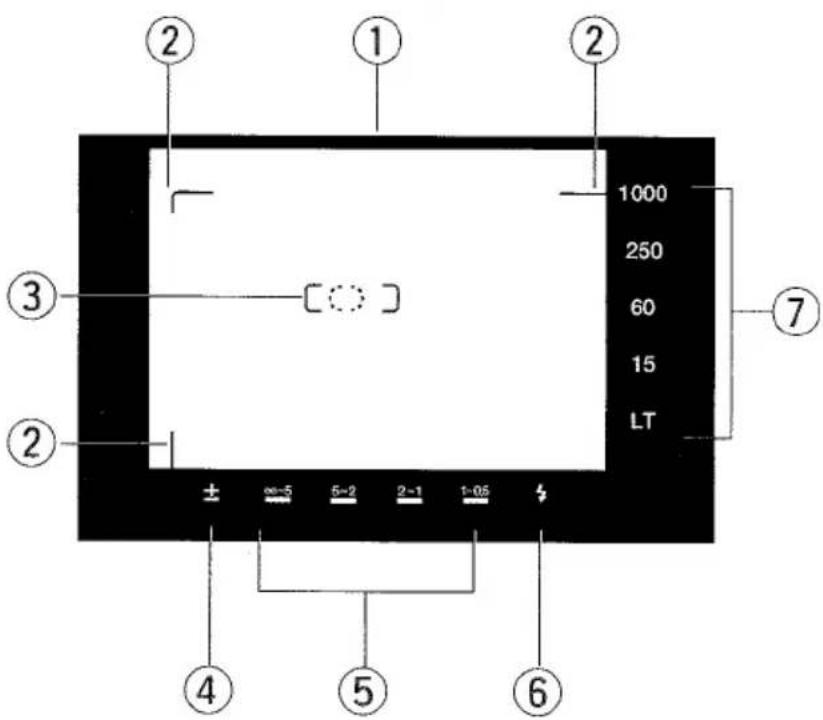
① Picture Area Frame:
For subjects at normal shooting distances; beyond 1.0m (39 in.). The frame illustrates the picture taking area. (Page 96)
② Close-range Parallax Frame:
For subjects at close shooting distances: Approx. 0.5m (19-3/4 in.) to 1.0m (39 in.). To compose your picture, place your subject within the displayed close-up frame.
③ Focusing Frame:
Place your subject to focus in this frame. (Page 96, Page 177)
④ Exposure Compensation Mark:
Lighted when setting 'Exposure Compensation'. (Page 122)
⑤ Focusing Indicator (also Distance Indicator)
Lights up or blinks according to the focusing results.
Indication
∞ - 5, 5-2, 2-1,
1-0.5 either
one of them is
lit.
1 - 0.5 blinks
∞ - 5 and
1-0.5 blinks
Contents
Focus within
the distance
range of
display
Too close to
subject. Make
distance more
than 0.5m.
Not possible
to focus
Either one of ∞-5 , 5-2, 2-1, 1-0.5 is lighted according to the setting value.
⑥ Flash mark:
Lighted : Ready to fire the flash.
Delayed blinks(Twice per second): The flash is charging.
Quick blinks(Four times per second): Warning out of range of flash shooting. (If the subject is too close, it will be 'Over Exposed. And if the subject is too far, it will be 'Under Exposed'.)
⑦ Shutter Speed:
'1000' means 1/1000 seconds as to the display of 'Shutter Speed' and '15' means 1/15 seconds.
When two shutter speeds display at the same time, it means that the shutter speed is in-between.
Also, if 'LT' is lit, it means that the shutter speed is between 1/10 sec, and 16 sec.
And if it blinks, it means that there is a deviation from the exposure control range. It will be 'Under Exposed'.
Also, if '1000' blinks, this means deviation from the exposure control range. It will be 'Over Exposed'.
Display in the viewfinder is indicated when the following operation is performed. The display will go off automatically after 8 seconds. This design of display in the viewfinder is to save the battery.
1) When main switch turned to 'AF' 2) With main power switch to 'AF', it displays by pressing the shutter release button halfway down. Also, if you operate the buttons during display, the display is postponed for another 8 seconds.
6. Display Panel and Aperture Display LCD
(Display Panel and Aperture Display LCD shows all information available in the viewfinder for reference. This does not represent an actual example of display.)

① Date Mark (Page 62) Y.M.D (Year, Month, Date), D.H.M (Day, Hour, Minute), M.D.Y (Month, Day, Year), D.M.Y (Day, Month, Year) ② Spot Focus Display It is displayed when focus range is spot focus. (Page 166, 178) ③ Display of Remaining Battery Capacity (Page 28)
④ Self-timer Display (10 seconds or 2 seconds) (Page 152)
⑤ Exposure Counter, Date and Time, Exposure Compensation Value, Manual Focusing Set-up Distance, Self-timer counter, Each display of Custom Function
⑥ Flash Mode Mark (Page 130)
Auto Flash mode "AUTO" Red-eye reduction flash mode "AUTO" Flash-off mode "⑤" Fill-in flash mode "⑦" Night Scene Portrait mode "AUTO ★"

⑦ " P " (Page 90, 180) When exposure mode is set 'Program Auto', is displayed.
⑧ Aperture Scale (Page 114, 180)
This scale displays when Aperture Priority Auto is set.
⑨ Aperture Value (Page 114)
The display of aperture value is the value at 30mm (wide-angle side). Actual aperture value at 60mm (telephoto side) is indicated on Page 118.
6.7
This is the actual aperture value at 60mm (telephoto side) when set with an actual aperture value of F3.7 at 30mm (wide-angle side).
7. How to Press the Shutter Release Button

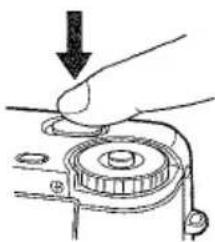
The operation of the shutter release button has two steps. Pressing down to the first step is called 'Press the shutter release button halfway'. Pressing down from the first step to the second step is called 'Press the shutter release button fully'. The shutter release button works for the following functions.
Press the shutter release button halfway:
This works for focusing and exposure metering.
Press the shutter release button fully:
The lens moves to the focusing position, trips the shutter for shooting. After that, the film is wound.
- Press the shutter release button lightly with the pad of your index finger to prevent camera shake. Also, please refer to 'Holding the Camera' (Page 80).
- The focusing position can be changed when pressing the shutter release button halfway down.
8. Set up and Printing the Date and Time
![graph TD A["No Printing"] --> B["Day-Hour-Minute"] B --> C["Month-Day-Year"] C --> D["Day-Month-Year"] D --> E["Year-Month-Day"] subgraph Printing A B end style A fill:#f9f,stroke:#333 style B fill:#ccf,stroke:#333 style C fill:#cfc,stroke:#333 style D fill:#fcc,stroke:#333 style E fill:#cff,stroke:…](/content/2026/05/990798/images/8212816abbba75f45bddc9e6934b65d2c9ec3fa2166f587cc7237642a731f543.jpg)
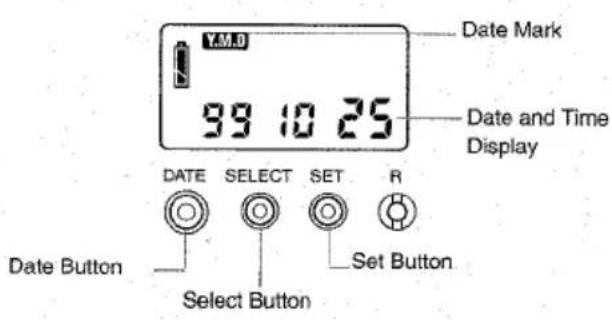
Set up and printing the date and time
Press the date button after loading the battery (Page 26), it displays "----".

① Press the date button and display the date or time.
Each time you press the date mode button, the dating mode switches in the following order: ---- (No Printing) Month-day-year → Day-Month-Year → Year-Month-Day → Day-hour-minute.
● Date Mark also displays to set the date and time.

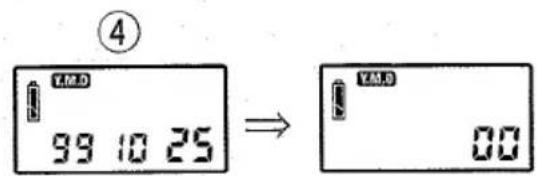
② Press the select button and the number you want to set blinks. ③ Press the set button to set the correct number. ④ When you finish setting 'Date' and 'Time', press the select button until the blinking of the number turns off.
- As for setting the time, when 'Minute' blinks, press the select button simultaneously with the time signal to set the correct time, starting from "00" seconds.
- The date and time display to be set turns off after 8 seconds and switches to the exposure counter with date mark display only.
- The blinking display changes to the date mark and the exposure counter display if left as is for approx. 60 seconds. This can be set to the number of the display of the blinking value. Correction of date and time must be finished while blinking.

This camera can print the date or time automatically while taking pictures.
① Press the date button and choose the date mode.
Each time you press the date button, the dating mode switches in the following order: (No printing) ⇒ Month-Day-Year. ⇒ Day-Month-Year ⇒ Year-Month-Day ⇒ Day-Hour-Minute. Set your desired mode.
- The setting date and time display disappears after approx. 8 sec. and switches to the exposure counter with date mark display only. Press the date button if you desire to check the contents of printing. ② Depress the shutter release button to shoot and the date or time will print.

● The position of printing is in the bottom right corner. If the background of the printing position is bright like white or yellow, it may be difficult to read the number. - If you do not want to print the date or time, set ---- and shoot.
The last frame taken beyond the prescribed frames may not print correctly according to the mechanism of this camera.
9. Loading the Film:


The film tip mark / Symbol für Filmanfangsposition / Repère pour l'amorce / Marca para la punta de la película
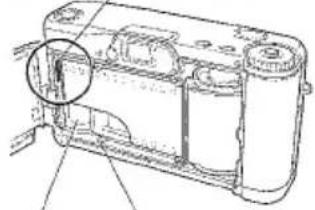
① Open the camera back by pushing down the camera back release knob in the direction of the arrow. ② Load DX-coded films and set the film tip to the mark "I". The film cassette is inserted slantwise in the film chamber.
The film tip should be pulled out as far as the orange "I" mark and placed on the spool. Place the film inside the upper and lower film guides and take care that it does not curl up.
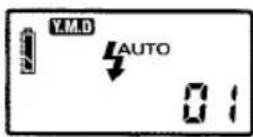
③ Close the camera back securely. ④ Turn the main power switch to "AF" (main power switch is 'ON'), then the film advances automatically and stops when the exposure counter shows "01".
If the main power switch is off "©" the film does not advance automatically.
① Bring your elbows close to your body, and stabilize the camera. ② At the moment you take a picture, hold your breath. ③ Depress the shutter release button gently.
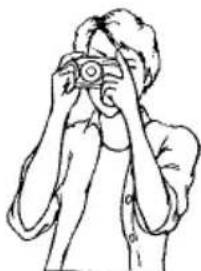
Horizontal Position / Horizontalhaltung / Cadrage horizontal / Posición horizontal
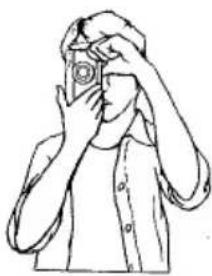
Vertical Position / Vertikalhaltung / Cadrage vertical / Posición vertical
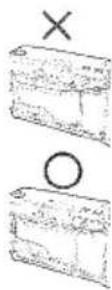
To take sharp pictures, the camera must be held steady. Blurred pictures are most often caused by camera shake. The camera can be held not only in the horizontal position, but also in the vertical position depending on the subject. In any case, study your comfortable camera positioning and practice until you get used to it. It is also good to support your body or camera with a building, tree, and so on.
● Pay attention not to cover the lens, focusing window, light sensor, AF assist beam, flash with the fingers. ● Emission of light of flash must be located in the upper part of camera when you take a photograph at the vertical position.
11. Basic Photographic Concepts
When a picture is taken, the aperture value and shutter speed adjusts the amount of light to the film.
The shutter in the camera controls the amount of light that reaches the film by the length of time it stays open. The time the shutter stays open is the shutter speed.
The aperture in the lens controls the amount of light going through the lens by becoming smaller or larger. The size of the opening produced by the size of the aperture is the aperture value.
The larger the aperture value, the smaller the opening.
Film speed is measured by values determined by ISO (the International Standardization Organization). A small ISO value means lower sensitivity but finer grain and higher image quality.
A large ISO value means high sensitivity. Such films can be used in locations with poor ambient lighting or with fast shutter speeds, but it has coarser grain and therefore a slightly poorer image quality.
When a subject is in focus, not only the subject itself but also some area in front and behind the subject will also be sharp. The range between the nearest and farthest point that is sharp is the depth of field.
① The depth of field increases with small apertures and decreases with larger apertures. ② The depth of field is larger for a distant subject and smaller for a closer subject. ③ The depth of field is larger behind than in front of a subject in focus. A lens with a long focal length (telephoto lenses) has a narrower depth of field than a lens with a shorter focal length.
Basic Procedures for Taking Pictures
1. Turn the Main Power Switch to "AF"
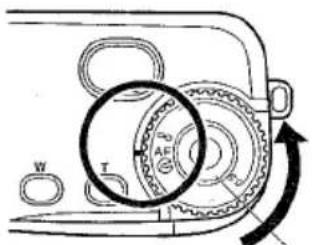
Main Power Switch / Hauptschalter / Interrupteur principal / Botón de encendido/apagado
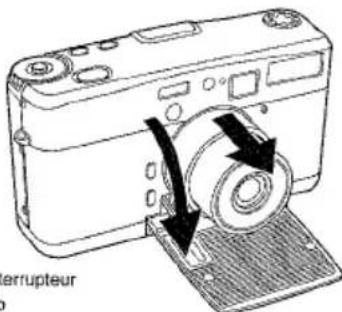
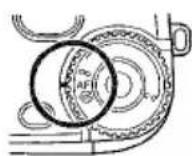
When the main power switch is turned to "⊖" → "AF", the camera power is turned on and the front cover opens automatically.
Then, the lens extends and is ready to shoot. At that time, the camera is ready with the following automatic shooting mode.
Shooting with Programmed AE
Under normal conditions, it is recommended to use the programmed AE mode. In this mode, both shutter speed and aperture are set automatically to provide optimum exposure under ambient lighting conditions.
Auto Focus Shooting Mode
The camera is focused automatically by pressing the shutter release button halfway down.
Auto Flash Mode

The flash is fired automatically when shooting is done under dark conditions or backlight photography. If "⚡" is lighted in the viewfinder, that means the warning that the flash will be fired.
- When the focus dial is set to "AF" → "⊖", the lens will retract into the camera and the front cover closes. Then, the camera main power switch is off.
- If you do not use the camera right away, turn off the camera's main power switch in order not to trip the shutter inadvertently.
- You can change the flash mode which is set at first when the camera's power switch is on. (Page 150).
- You can set focusing position manually. (Manual Focus Shooting: Page 160)
2. Choose the subject size (Zooming)
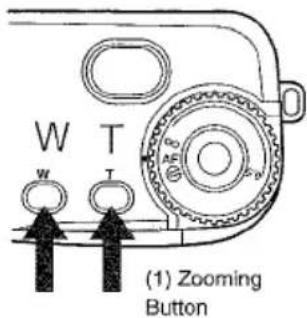
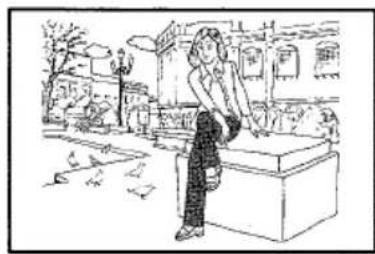
While looking at the subject through the viewfinder, choose the subject size by using the zoom button.
(2) "W" at wide angle side
Zooming Button "W"
Use this button when shooting for wide range such as scenery.


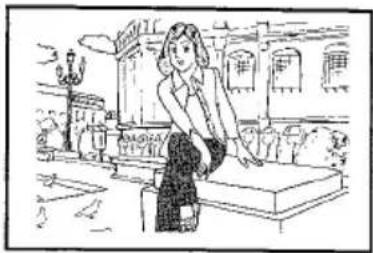
(3) "T" at telephoto side
Zooming Button "T"
Use this button when you wish to take photograph largely for the subject.
3. Taking picture
①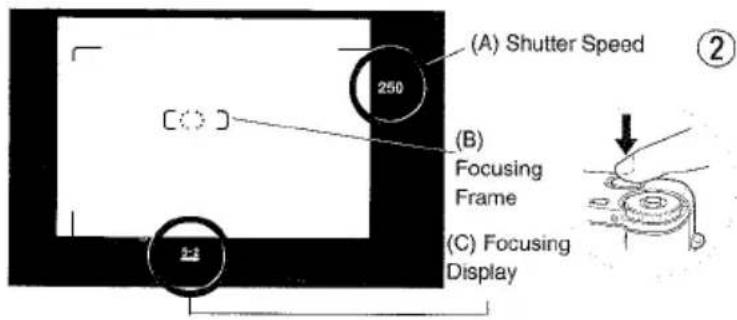
① Aim the focusing frame at the subject you want to focus, and depress the shutter release button halfway.
The lens focuses itself automatically and the "Focus Display" turns on, which corresponds to the distance of subject, shutter speed is also displayed.
② Depress the shutter release button all the way and take the photograph, after making sure that "Focus Display" is lighted.
Since this camera has employed external passive system multi-focus, the subject can be focused even if it is out of the focusing frame a little bit. (Page 178).
- If the mark "⚡" blinks when pressing the shutter release button half-way down, the flash will fire.
- If "1 - 0.5" of focus display blinks, the shutter release button can not be tripped because the subject is too close to the camera.
Take your picture at a distance of 0.5m or more.
- If it is difficult to focus because the subject is dimly lighted or its contrast is low, an infrared beam from the AF-assist beam window is automatically emitted on the subject to increase the accuracy of the auto-focus system.
Effective range of AF assist beam is approx. 5m(16.5 ft.)
- If subject can not be focused, '∞ - 5' and '1 - 5' blinks. Then, the shutter release button can not be tripped. Use the focus-lock feature(Page 106) to lock the camera's focus on another object located at an equivalent distance from the camera as the desired subject, then return the camera to the original position and take the picture.
- When shutter speed blinks '1000' in the viewfinder, the light conditions have exceeded the exposure control range. This means it is over-exposed.
- When "LT" blinks, the light conditions have exceeded the exposure control range. This means, it is under-exposed.
4. Taking out the film:
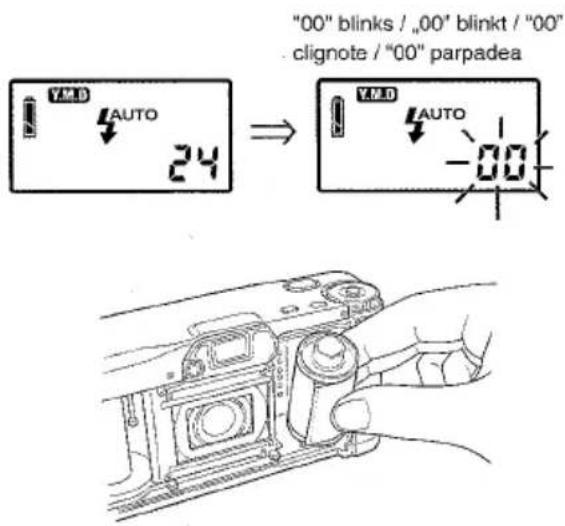
As soon as the entire roll of film is exposed, the camera rewinds the film automatically.
While the film is rewinding, the exposure counter counts down. When rewinding is complete, the motor stops and the number "00" in the counter blinks. After the film is rewound, open the camera back and take out the film.
Do not open the camera back until the film is completely rewound.
● The camera does not operate unless the camera back is opened once. - To rewind the film in the middle of a roll, press "R", the manual rewind button, on the camera bottom with the strap adjuster or a fine-pointed object. ● Take the exposed film for processing as soon as possible.
Shooting Techniques
Shooting Techniques
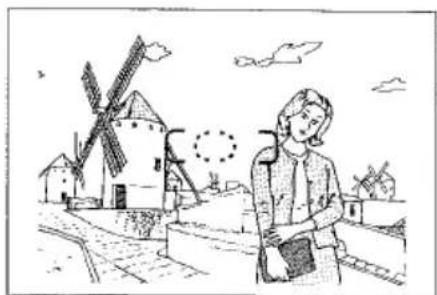
If you press the shutter release button halfway when shooting in the auto-focus mode, the focus and the distance are locked (Focus Lock). If the subject you want to focus is not in the focusing frame when shooting in the auto-focus mode, use focus lock.
1. Aim the focusing frame at the subject you want to focus, and depress the shutter release button halfway.
The lens is focused on the subject and the 'focus indication' turns on, corresponding to the distance to the subject.
- When the shutter release button is depressed halfway, the focus and the exposure value are locked at the same time (AE lock).
2. While the shutter release button is depressed halfway, move the camera to recompose the picture and take it by depressing the shutter release button all the way. ● Because the focus remains locked as long as the shutter release button is depressed halfway, your subject is in sharp focus even if you move the camera to the left or right. ● The focus lock is released if you remove your finger from the shutter release button.
The camera's auto-focus mechanism may not be able to focus properly on the following kinds of subjects. In such cases, use the focus-lock feature to lock the camera's focus on another object located at an equivalent distance from the camera as the desired subject, then return the camera to the original position and take the picture.
● Subjects with very low contrast. ● Subjects characterized by a recurring pattern. ● Very dark subjects. ● Subjects composed primarily of horizontal stripes. ● Extremely bright or glossy subjects. ● Scenes in which a bright light source is located inside or very near the focusing frame, or when the sun or other bright light source is visible inside the viewfinder. ● Scenes in which two objects visible inside the focusing frame are located at greatly differing distances. ● Quickly moving subjects.
2. Aperture Priority Auto Exposure (Av)
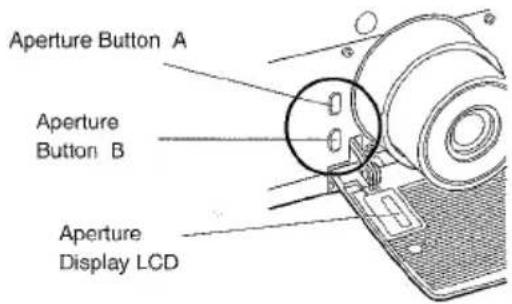
As general characteristics of lenses, if you focus on some subject, there is not only an area in which the subject itself is in focus, but also a zone in front of and behind the subject that is in focus (called 'depth of field'; see pages 83, 164). A small aperture produces greater depth of field, while a large aperture produces smaller depth of field.
This characteristic can be used to take photographs with both the subject and the background in focus.
Or you can focus attention on the subject by blurring the
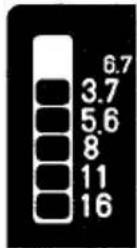
Aperture Display LCD (This illustration shows when Aperture Priority Auto Exposure is set)

The depth of field (the "in focus" area in front of and behind the subject) decreases.

The depth of field increases.
background. Set the aperture depending on the type of photograph you want to take.
In Aperture Priority Auto Exposure mode, when you set the aperture in advance, the shutter speed is controlled automatically to match the brightness of the subject.
![graph LR A["Program Auto Exposure"] -->|①| B["F3.7"] B -->|②| C["Example: F8"]](/content/2026/05/990798/images/ccf4f80b54635fad75f04ca1b8bb23d36918363d1c867641c08d34eaf7fb9b21.jpg)
① When you press the Aperture Button A, "P" disappears and the "Aperture Scale" is displayed. Then, Aperture Priority Auto Exposure Shooting Mode is set. ② Each time you press Button A or Button B, the "Aperture Scale" switches in the following order. Set your desired aperture value.

- In the viewfinder, the shutter speed is displayed corresponding to the aperture that has been set manually.
- When you zoom, the actual aperture value changes as follows. Also, please note that the flash shooting range is shorter at the telephoto side. (See Page 146).
| 30mm at Wide Angle Side | 60mm at Telephoto Side | |
| F 3.7 | ⇔ | F 6.7 |
| F 5.6 | ⇔ | F10.3 |
| F 8 | ⇔ | F14.6 |
| F11 | ⇔ | F20.7 |
| F16 | ⇔ | F26.8 |
3. Exposure Compensation
Set the exposure compensation value.
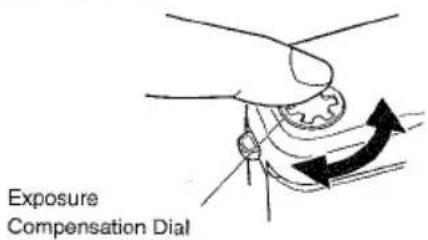
Display Panel
Display Compensation Value
Display in the viewfinder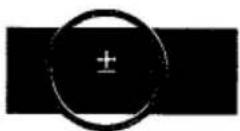
If there is a great difference in brightness between the main subject and its background, the subject cannot be correctly exposed. In this case, use the exposure compensation. The exposure compensation can also be used for intentional over or under exposure.
To compensate exposure, turn the main power switch on and turn the exposure compensation dial, then set the desired compensation value on the display panel. Compensating values can be set in 1/3 EV steps within the range of +2 EV to -2 EV. The '±' mark is displayed in the viewfinder.
● Compensating value can also be set in 1/2 EV steps. (See Page 167) ● After shooting, return the dial to the original position (without exposure compensation) (compensation value disappears).
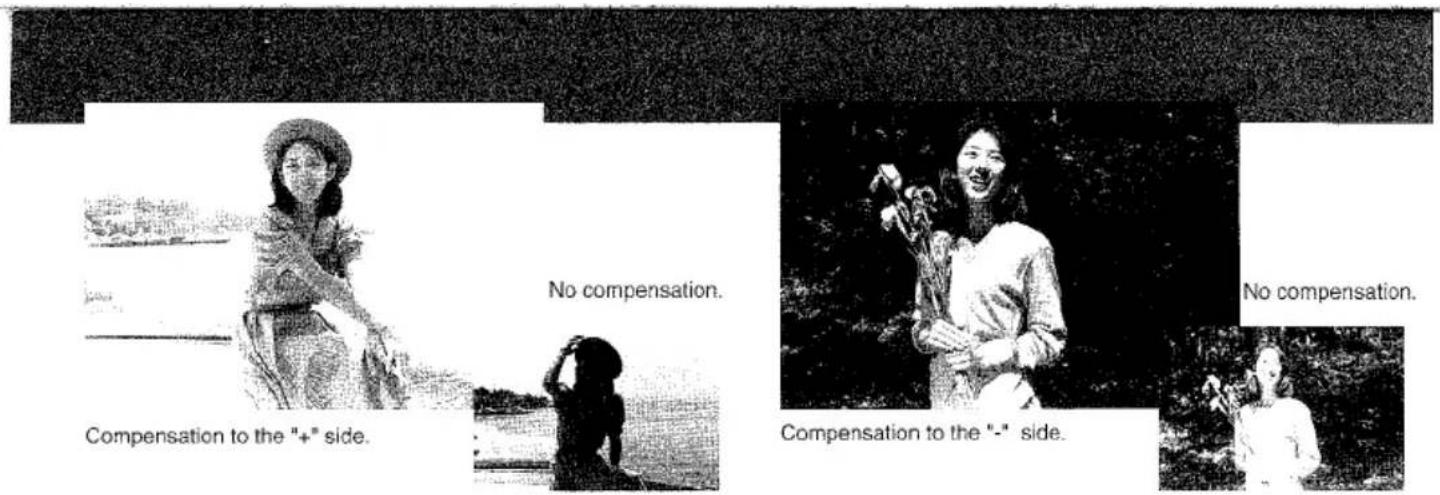
For backlit subjects, compensate exposure in a range of "+0.3" to "+2".
If you are shooting a portrait in backlight, against a bright sky or sea, in front of a window, etc., where the greater part of your picture is occupied by a bright background, your subject will be underexposed and turn out dark like a silhouette. In such cases, compensate exposure in a range of +0.3 to +2 EV to increase the exposure.
For stage scenes, compensate exposure in a range of "-0.3" to "-2".
If you are shooting a spotlighted subject on a stage where a dark background predominates in the scene, the main subject will be overexposed and turn out too light. In this case, compensate exposure in a range of "-0.3" to "-2" to reduce the exposure.
4. Flash Photography:
![graph LR A["Flash Mode button"] --> B["Auto Flash"] B --> C["Red-eye Reduction Flash"] C --> D["Flash-off"] D --> E["Night Scene Portrait"]](/content/2026/05/990798/images/2721e6d167e639b2874edf54a6318915125e94cc67483e0266eed52e0429227e.jpg)
You can fire or turn off the flash depending on the subject you want to shoot. When you turn the main power switch on, each time you press the flash mode button, the flash mode switches in the following order and is displayed in the display panel.
1. Flash-auto Mode (When the main power switch is turned on, this mode will be displayed.) → 2. Red-eye Reduction Flash Mode → 3. Flash-off Mode → 4. Fill-in Flash Mode → 5. Night Scene Portrait Mode
- Set your desired mode in the display panel and shoot. You can easily change the flash mode. Please see the details on Page 150.
1. Auto-flash Mode "AUTO":
If the subject is so dark that it requires a shutter speed slower than 1/60 sec., the flash is automatically activated to take your picture.
The shutter speed is set to 1/60 sec.
- When the flash is activated, the mark "⚡" in the viewfinder turns on.
2. Red-eye Reduction Flash Mode " AUTO ":
If a person is photographed in dim light with flash, the pupils of his (or her) eyes may turn out red in the picture (red-eye effect). This pre-flash mode is useful for reducing this red-eye effect.
In this mode, the flash fires twice at an interval of approx. 0.7 sec.
After the flash fires for the first time, the self-timer LED blinks until it fires for the second time. The shutter trips when it fires for the second time. Take care not to move the camera or that the subject does not move after the first firing of flash.
3. Flash-off Mode "":
If you want to take pictures without flash such as twilight scenes or indoor mood pictures, set the camera to this mode. Because the exposure is determined in accordance with the brightness of the subject, the picture is taken in a natural mood.
- If a shutter speed slower than "60" (1/60 sec.) is displayed in the viewfinder, use a tripod to prevent camera shake.
- In the flash-off mode, the mark "⚡" is not displayed in the viewfinder.
④ Fill-in Flash Mode "⚡":
This mode makes the flash fire all the time. In outdoor photography, portrait pictures against bright sunlight or backlight without fill-in flash, may make the subject dark or silhouetted. When the Fill-in flash mode is set, both the person and background can be photographed beautifully. (Daylight Flash)
- When appropriate shutter speed is less than 1/60 sec., shutter speed will be set 1/60 sec.
⑤ Night Scene Portrait Mode "AUTO★".
In addition to the feature of Red-eye reduction flash mode, the shutter speed will be slowed in response to the brightness of the ambient light. (Slow-shutter synchronization.)
When taking portrait pictures in the evening or capturing night scenes with lit backgrounds, this mode can be used. Both the subject and its background will be beautifully exposed.
● Since the shutter speed may become quite slow with slow-shutter synchronization, a tripod is recommended to prevent camera shake.
'Auto-flash mode in backlight.'
If you are shooting in the auto-flash mode or red-eye reduction flash mode, night scene portrait mode and the subject is in the center of the picture frame with very strong backlight, the flash may fire depending on the contrast between subject and backlight.
- When the flash is activated, the mark "⚡" is lighted in the viewfinder.
When you take flash photography, we recommend to use ISO 400 film which offers a larger flash range.
Precaution for Flash Photography:
- The display of "L" in the viewfinder indicates the following: Lighted: Flash will fire. Within Flash Shooting Distance Range. (When the shutter release button is pressed half-way down) Delayed blinks (twice per second): Flash is recharging. Delayed blinks (four times per second): Warning for out of flash shooting range (When the shutter release button is pressed half-way down.). When the subject is too close, it will be over-exposed. When the subject is too far, it will be under-exposed. Change the distance between the subject and the camera, or the aperture referring to a chart on Page 146. When using slide film, shooting distance range will narrow further, take a photograph within the range of 'Flash Shooting Distance Range' in the next page.
- You cannot trip the shutter when "⚡" delayed blinks.
Flash effective range at 30mm Flash effective range at 60mm
| Aperture\Distance(m) | When using ISO 100 film | ||||||
| 0.5 | 1 | 2 | 3 | 4 | |||
| "P" / | F 3.7 F3.7 <6.7> | ||||||
| F5.6 <10.3> | |||||||
| F8 <14.6> | |||||||
| F11 <20.7> | |||||||
| F16 <26.8> | |||||||
| When using ISO 400 film | ||||||||
| 0.5 | 1 | 2 | 3 | 4 | 5 | 6 | 7 | |
The figures in parentheses show the actual aperture values at 60mm (Telephoto) for the aperture values at 30mm (Wide Angle). When you set your desired aperture (aperture-priority AE), the quantity of light of the flash changes with the shooting distance. When the exposure mode is set to "P" (program AE), the aperture changes with the shooting distance (flashmatic method).
When you take flash pictures, it is recommended to set the exposure mode to "P". If you stop down the aperture, the flash effective range becomes shorter. Also, please be careful that if you take a photograph at the telephoto side, the flash effective range becomes shorter.
- If you want to take pictures with flash at longer distances than the effective range of the built-in flash, use an external clip-on flash with the aid of the CONTAX Flash Adapter SA-1 (optional accessory).
![graph TD A["Flash Button / Blitztaste / Touche de mode de flash / Botón del flash"] --> B["Auto"] B --> C["①"] B --> D["②"] B --> E["③"] C --> F["Blinks / Blinkt / Clignotement / Parpadeo"] D --> G["Blinks / Blinkt / Clignotement / Parpadeo"] E --> H["→"] style A fill:#f9f,stroke:#333 style B fill:#…](/content/2026/05/990798/images/ffa8721da103ebade71d8b43b5a766c5d79937bd0eae11a3f8dd041407635416.jpg)
You can easily change the flash mode (home position). It is convenient when you set the flash mode, which you use often.
① When the camera main power switch is on, continue to press the flash button (approx. 2 sec.) until the flash mark blinks.
② When it starts to blink, release your finger from the flash button once and press the button again to select the desired mode.
③ It changes from 'blinking' to 'lighted' after approx. 8 seconds and is finished being set.
● This can be set by pressing the shutter release button half-way down or switching off the camera main power.
5. Shooting with the Self-timer:
![graph LR A["Woman in server room"] --> B["Camera"] B --> C["Signal transmission to device"] C --> D["Device with 2.5V, 3V, 4V power"] D --> E["Output: Signal output"]](/content/2026/05/990798/images/642383e5424369c33429e87bb65d519e8c3ded0358f9a8b199ae7735ef1e1adc.jpg)
There are two types of self-timer, 2 sec. and 10 sec. If you want to get into the picture yourself, use "10" (10 sec.), and use "2" (2 sec.) in order to prevent the camera shake and when pressing the shutter release button for shooting in a dark place.
① Mount the camera on a tripod. ② Turn the main power switch 'on' and press the self-timer button. Each time you press the self-timer button, the indication of display panel switches in the following order. Set your desired mode in the display panel.
"No display" (self-timer off) → "10" → "2"
③ Depress the shutter release button halfway, make sure the focus indication turns on in the viewfinder, and then depress the shutter release button all the way.
The self-timer starts and the shutter trips after 10 seconds or 2 seconds.
● The camera will return to normal shooting after shooting with the self-timer has finished. ● To stop the self-timer after it has started, press the self-timer button. ● While the self-timer is operating, the exposure counter shows the remaining time in seconds before the shutter trips. The self-timer LED blinks in the viewfinder. ● The exposure and focus are locked when the self-timer starts. - If the shutter release button is depressed while the self-timer is operating, the exposure counter is reset and counts the remaining time. ● The self-timer cannot be started while the flash is charging.
If you want to shoot with self-timer continuously, set 'Continuous shooting with self-timer mode'.
Keep pressing the self-timer button until the mark ("10" or "2") blinks in self-timer mode. (Approx. 2 sec.)
By doing so, the setting has been finished.
- When you turn the main power switch off, 'Continuous shooting with self-timer mode' has been cancelled.
6. Manual Focus Shooting

You can set the focus position manually. ① Turn the main power switch or focus dial while pressing the dial lock release button, and set 'Manual Focus Range (0.5 \~ ∞)'.
② When you turn the dial, the shooting distance (focusing point) is displayed on the display panel. Set your desired shooting distance.
● Shooting distance is displayed while moving the focus dial. It is displayed for approx. 2 seconds after the focus dial has stopped. - Set shooting distance is displayed for approx. 2 sec. by pressing the shutter release button half way down. - Focus display is lighted to match the set shooting distance in the viewfinder. - Set the shooting distance referring to the 'Depth of field table' on the next page.
③ Decide on the size of the subject and compose it. Then press the shutter release button. The shutter trips to match the shooting distance.

(Unit: m) The range is in clear focus which is linked with a set camera-subject distance and aperture.
| (3) 30mm (Wide Angle Side) | (4) 60mm (Tele Photo Side) | |||||
| (1) Aperture value()is actual aperture value | 3.7 | 8 | 16 | 3.7 (6.7) | 8 (14.6) | 16 (26.8) |
| (2) Shooting distance(m) | ||||||
| 0.5 | 0.48 - 0.52 | 0.45 - 0.56 | 0.41 - 0.65 | 0.49 - 0.51 | 0.48 - 0.53 | 0.46 - 0.55 |
| 0.7 | 0.64 - 0.75 | 0.61 - 0.84 | 0.53 - 1.06 | 0.68 - 0.72 | 0.65 - 0.76 | 0.61 - 0.83 |
| 1.0 | 0.90 - 1.13 | 0.81 - 1.33 | 0.68 - 2.03 | 0.95 - 1.06 | 0.89 - 1.14 | 0.82 - 1.31 |
| 1.5 | 1.28 - 1.83 | 1.09 - 2.44 | 0.86 - 7.0 | 1.38 - 1.65 | 1.26 - 1.88 | 1.11 - 2.39 |
| 2.0 | 1.62 - 2.64 | 1.33 - 4.2 | 1.00 - ∞ | 1.78 - 2.29 | 1.58 - 2.76 | 1.35 - 4.0 |
| 3.0 | 2.20 - 4.7 | 1.69 - 14.9 | 1.19 - ∞ | 2.51 - 3.7 | 2.12 - 5.2 | 1.72 - 13.7 |
| 5.0 | 3.1 - 13.4 | 2.17 - ∞ | 1.40 - ∞ | 3.8 - 7.5 | 2.94 - 17.9 | 2.21 - ∞ |
| 10 | 4.5 - ∞ | 2.75 - ∞ | 1.61 - ∞ | 6.0 - 31.6 | 4.2 - ∞ | 2.80 - ∞ |
| ∞ | 8.0 - ∞ | 3.8 - ∞ | 1.91 - ∞ | 14.6 - ∞ | 7.0 - ∞ | 3.9 - ∞ |
7. Custom Functions
This camera has six kinds of "Custom Functions" as shown in the following table. When you use the camera for the first time after purchase, it has been set to the standard set of functions (item 0). (Instructions in this manual refer to Case 0 unless otherwise stated.)
If you want to change the Custom functions, refer to "Setting the Custom Functions" on Page 175.
| Item No. | Standard Setting | Setting Change | |
| Function No. | (0) | (1) | (2) |
| CF1:Remaining film at film rewound | The film leader is rewound into the cassette | The film leader is left out of the cassette | |
| CF2:The timing of lens moving forward | Just before the shutter trips | When shutter release button half-way down | |
| CF3:Focusing Range of Auto Focusing (*) | Program Auto: Multi Focus Aperture Priority Auto: Multi Focus | Program Auto: Spot Focus Aperture Priority Auto: Spot Focus | Program Auto: Multi Focus Aperture Priority Auto: Spot Focus |

| Item No. | Standard Setting | Setting Change |
| Function No. | (0) | (1) (2) |
| CF4: Exposure Mode when camera main power switch is on and Lens moving position | Exposure Mode: P(Program Auto)Lens Position: end of wide angle side | Exposure Mode: Same setting as just before camera main power switch offLens position: Same zoom position as just before camera main power switch off |
| CF5: Focus adjustment during manual focus | Turn focus dial and set to shooting distance | While holding set button depressed, turn focus dial and set to shooting distance. |
| CF6: Exposure compensation range | 1/3 EV (Sample display: +0.3) | 1/2 EV (Sample display: +0.5) |
(*) Please see the details regarding the focusing range of Auto Focus.
① Turn the camera main power switch off, and keep pressing flash button and set button at the same time until the 'Custom Function Switch Mode' is displayed. (more than 2 sec.) ② Press select button and make "Function No" or "item No." blinks. ③ Press set button and makes change to desired number. ④ If you leave as is for 8 seconds, return to normal display and set custom function. - When you turn the main power switch to 'AF' during blinking, custom function is set, also. - If you leave as is for 8 seconds while setting up the custom function, custom function is set.
(2) Focus Frame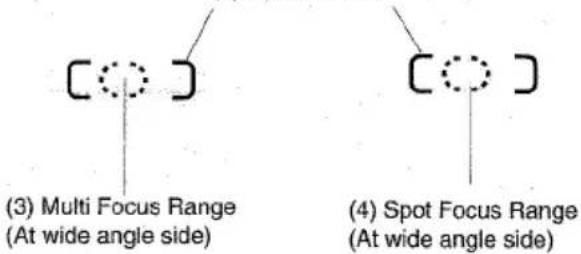
(1) Viewfinder Visor Visor (2) Focus frame Cadre de mise au point Encuadre de enfoque (3) Multi-area (wide-angle) Zone d'AF multipoints (en focale grand angle) Modo multienfoque (gran angular) (4) Spot area (wide-angle) Zone d'AF spot (en focale grand angle) Modo de enfoque puntual (gran angular)
8. Miscellaneous
Two types of focusing range are available when using the camera's auto focus system.
When Program Auto is used: Multi Focus
When Aperture Priority Auto is used: Multi Focus
① Multi Focus:
If the subject is slightly out of the focus frame, it can be focused.
② Spot Focus:
It is convenient if you want to focus on a specific part of the subject.
You can change the setting of focus range by custom function. See the details on Page 166.
The relationship of aperture settings to the camera's metering range and shutter speeds is shown in the accompanying table. (At ISO 100)
Program Auto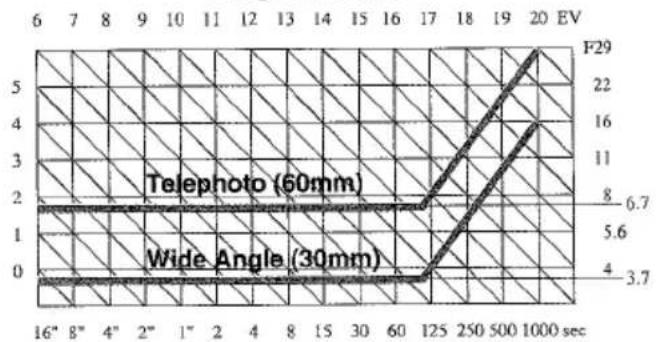
When shooting dark indoor subjects, night scenes, or occasions requiring the use of flash, it is recommended that the lens be set to F3.7, or the camera set to "P".
● Aperture value is varied linked with zooming. (Refer to Page 118)
Aperture Priority Auto (At Wide Angle Side)
When using the lens at its 30mm focal length and with wide-open aperture, some darkening around the edges of the image may be noticeable. Stopping the lens down to a value of F5.6 or smaller aperture will help prevent such vignetting.
● Metering function of camera is operating normally, linked with the variation of aperture value by zooming.
Optional Accessories.
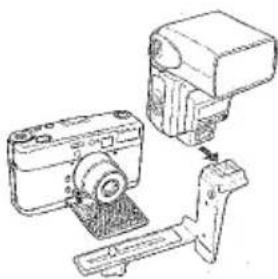
This adapter is used for connecting a clip-on flash to the camera without a cord. It is useful when the light output of the built-in flash is not enough.
□ When using for CONTAX Tvs III
Please use the direct metering auto-flash unit or manual flash unit.
Set the aperture value to match the direct metering aperture value of flash which is in use when using direct metering auto-flash.
When you set 'P' to the camera, the aperture value would be F3.7 at 30mm and F6.7 at 60mm when shooting distance of built-in flash is exceeding the limit.
When using the manual flash, calculate the shooting distance in order to get the proper exposure according to following formula and try not to exceed the limit of distance for shooting.
Shooting Distance (m) = Guide Number / Aperture Value ( At ISO 100 )
( Regarding the guide number, please refer to the instruction manual of the flash which is in use).
Set the mode which built-in flash is fired with camera and press the shutter release button for shooting after the attached flash and built-in flash are fully charged.
● Red-eye Reduction Flash Mode or Night Scene Portrait Mode are not useable. - Attach this adapter to the position so that it does not hit the camera back when it opens.
This ever-ready leather case can contain the CONTAX Tvs III.
Deluxe strap for the CONTAX Tvs III.
CONTAX Tvs III Specifications
Type : 35mm lens-shutter auto exposure camera.
Negative Size : 24 x 36mm
Lens : Carl Zeiss T* Vario Sonnar T* 30-60mm F3.7-6.7 (6 elements in 5 groups)
Aperture : F3.7 - 16(f=30mm)
Shutter Speeds: 16 sec. - 1/1000 sec.(the fastest shutter speeds: 1/500 sec at full opened aperture)
Exposure Control: Aperture Priority Auto and Program Auto
Metering Range : EV 0 - EV 18
Metering System : External metering system with SPD cell
Exposure compensation : ±2 EV(1/3 EV steps.), (switchable to 1/2 EV steps.)
Film Speed : ISO 25 - 5000 for automatic setting(DX system) Film speed is automatically set to ISO 100 for non-DX-coded films.
Focusing: Automatic focusing with focusing dial, switchable to manual focusing.
Distance Measurement: External passive method, provided with AF-assist beam and focus lock.
Viewfinder: Real-image viewfinder, 0.42 - 0.76X magnification and 83% field of view (3m).
Display in Viewfinder: Picture Area Frame, Close-Range Parallax Correction Frame, Focusing Frame, Shutter Speeds, Exposure Compensation Marks, Focusing Distance Indicator, Flash Mark.
Diopter Adjustment: Built-in diopter adjuster, correctable range +2 to -3.5D.
Display Panel: Spot Auto Focus Indicators, Indicators of Remaining Battery Capacity, Self-timer Indicators (10 sec. or 2 sec.), Exposure Counter/Date and Time/Exposure Compensation Value/Set-up distance/Self-timer counter/Custom Function Display, Flash Mode (Auto Flash, Red-Eye Reduction Mode, Fill-Flash, Flash-off mode, Night-Scene Portrait Mode), Date Mark.
Film Loading: Auto loading (film automatically advances to frame No.1).
Film Winding: Automatic.
Film Rewinding: Auto-return/auto-stop system. Film can be rewound in the middle of a roll.
Exposure Counter: Indicated on display panel, automatic-resetting additive type.
Self-timer: Electronic self-timer with 10 sec. and 2 sec. delay; can be cancelled midway.
Flash: Built-in Zoom Flash, Flashmatic, and guide number controlled.
Shooting Range: See Page 146.
About 6 sec. recycle time (with new battery, at ordinary temperature, as tested according to CONTAX testing standard).
Custom Function: Remaining film at film rewound, the timing of lens moving forward, focusing range of auto focusing, exposure mode when camera main power switch is on and lens moving position, focus adjustment during manual focus, exposure compensation range.
Camera back: Opened and closed with camera back release knob.
Battery: 3V lithium battery (CR 123A or DL 123A). About 7 rolls of 24-exposure film can be exposed with 50% flash (with new battery, at ordinary temperature, according to CONTAX testing standard).
Printing Function: Printing of date and time.
Dimensions: 116.5 (W) x 64 (H) x 40 (D) mm
Weight: 320g
• Specifications and design are subject to change without notice.
Camera Strap and Camera Case:
Camera Strap (Supplied Accessory)
Attach the strap as shown in the illustration.
(There are two straps: hand strap and shoulder strap. Both types are supplied with the camera.)
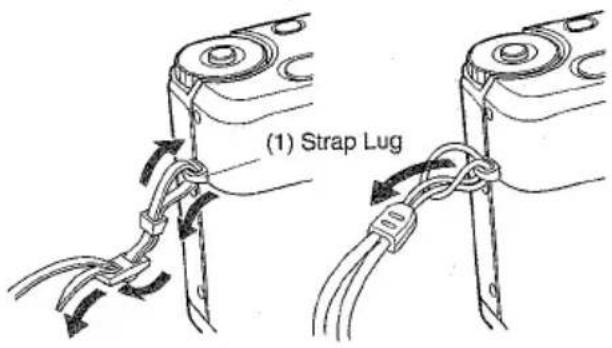
Leather Camera Case (Supplied Accessory)
There are two hooks to prevent the camera from falling away from the case at right and left.
Please use the hook at shutter side when using the hand strap, and use the hook at flash side when using the shoulder strap.


KYOCERA CORPORATION
Optical Equipment Group
2014.9 Temadewarak Sama
Tel:03-3708-4616
ntur www.kyopera.eu
\$200 Boxe Road Unit 13 Misses auge, On hand, L5 26/11 Canada
Tel:150-1564 9385
YASHIGAI Kyocera GmbH-Erstrasse 76, L34, Czech Hamburg, J. M. Germany
The following table is a table with the following columns:
The following table is a section of the text:
PROCESSED BY: MELKCHI, Unit 7. Switch Industrial Park, Suite 1
B.P. 40067, From May on France 95913, Paris 207 Cedex France Tel (01) 49 89 38 60
KVOCERA YASHICA DO BRASIL INDUSTRIA E COMERCIO LTDA.
Aùlì Béchardino de Campo No. 98, 5 Andar Paraiso, São Paulo (EP: 04004-000)
BrazilTel.101-809-8055
UNIVERSAL OPTICAL INDUSTRIES LTD. PARE Plaza Industrial Building
4133 HoDue Road, Kyung Tong, Kowloon, Yang Kong, 23(3)5151
- PREPARATIONS BEFORE TAKING PICTURES
- BASIC PROCEDURES FOR TAKING PICTURES
- SHOOTING TECHNIQUES
- INHALT
- CAMERA CARE AND PRECAUTIONS
- QUICK GUIDE TO SHOOTING
- NAME OF PARTS
- LOADING THE BATTERY
- FRONT COVER
- CONCERNING THE MAIN POWER SWITCH AND/OR FOCUSING DIAL
- DIOPTER ADJUSTMENT
- DISPLAY IN THE VIEWFINDER
- ⑤ FOCUSING INDICATOR (ALSO DISTANCE INDICATOR)
- ⑥ FLASH MARK
- ⑦ SHUTTER SPEED
- DISPLAY PANEL AND APERTURE DISPLAY LCD
- HOW TO PRESS THE SHUTTER RELEASE BUTTON
- PRESS THE SHUTTER RELEASE BUTTON HALFWAY
- PRESS THE SHUTTER RELEASE BUTTON FULLY
- SET UP AND PRINTING THE DATE AND TIME
- LOADING THE FILM
- BASIC PHOTOGRAPHIC CONCEPTS
- TURN THE MAIN POWER SWITCH TO "AF
- SHOOTING WITH PROGRAMMED AE
- AUTO FOCUS SHOOTING MODE
- AUTO FLASH MODE
- CHOOSE THE SUBJECT SIZE (ZOOMING)
- ZOOMING BUTTON "W
- ZOOMING BUTTON "T
- TAKING PICTURE
- TAKING OUT THE FILM
- APERTURE PRIORITY AUTO EXPOSURE (AV)
- EXPOSURE COMPENSATION
- FOR BACKLIT SUBJECTS, COMPENSATE EXPOSURE IN A RANGE OF "+0.3" TO
- FOR STAGE SCENES, COMPENSATE EXPOSURE IN A RANGE OF "-0.3" TO
- FLASH PHOTOGRAPHY
- ④ FILL-IN FLASH MODE "⚡
- ⑤ NIGHT SCENE PORTRAIT MODE "AUTO★
- AUTO-FLASH MODE IN BACKLIGHT
- PRECAUTION FOR FLASH PHOTOGRAPHY
- SHOOTING WITH THE SELF-TIMER
- MANUAL FOCUS SHOOTING
- CUSTOM FUNCTIONS
- MISCELLANEOUS
- WHEN PROGRAM AUTO IS USED: MULTI FOCUS
- OPTIONAL ACCESSORIES
- WHEN USING FOR CONTAX TVS III
- CONTAX TVS III SPECIFICATIONS
- CAMERA STRAP AND CAMERA CASE
- CAMERA STRAP (SUPPLIED ACCESSORY)
- LEATHER CAMERA CASE (SUPPLIED ACCESSORY)
- KYOCERA CORPORATION
Brand : CONTAX
Model : TVSIII
Category : Camcorder