
NX - Camcorder CONTAX - Free user manual and instructions
Find the device manual for free NX CONTAX in PDF.


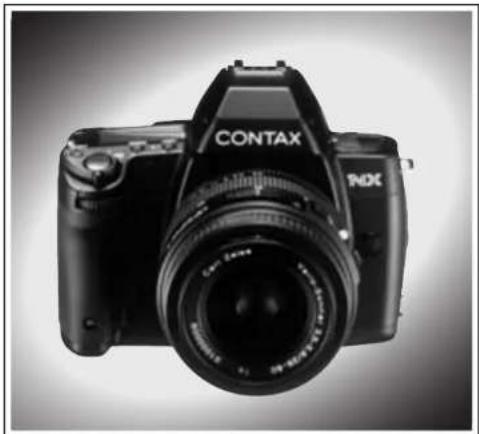
| Product Type | Camcorder |
| Brand | Contax |
| Model | NX |
| Dimensions (approx.) | 150 mm x 100 mm x 200 mm |
| Weight (approx.) | 500 g |
| Power Supply | Rechargeable battery (e.g., Li-ion 7.2V) |
| Recording Media | MiniDV tape or memory card (depending on version) |
| Video Resolution | Standard definition (720x576 or 720x480) |
| Optical Zoom | 10x |
| Digital Zoom | Up to 100x (digital) |
| LCD Screen | 2.5-inch color LCD |
| Viewfinder | Color electronic viewfinder |
| Key Functions | Video recording, still image capture, playback, zoom, autofocus, image stabilization |
| Connectivity | USB, AV out, S-Video, microphone input |
| Maintenance | Clean lens with soft cloth; store in dry place; avoid extreme temperatures |
| Safety Precautions | Do not expose to water or moisture; avoid dropping; use only recommended batteries |
| Spare Parts / Repairability | Available: battery, charger, remote control, USB cable; service by authorized technician |
| General Information | User manual in English; 61 pages; PDF download available |
Frequently Asked Questions - NX CONTAX
User questions about NX CONTAX
0 question about this device. Answer the ones you know or ask your own.
Ask a new question about this device
Download the instructions for your Camcorder in PDF format for free! Find your manual NX - CONTAX and take your electronic device back in hand. On this page are published all the documents necessary for the use of your device. NX by CONTAX.
USER MANUAL NX CONTAX
CONTAX NX

KYOCERA
KYOCERA CORPORATION
Optical Equipment Group
2-14-9 Tamagawadai, Setagaya-ku, Tokyo 158-0610 Japan
Tel:03 3708 4506
KYOCERA OPTICS, INC.
2301 200 Cottontail Lane, Somerset, New Jersey 08873, U.S.A.
Tel:(732) 560-0060
KYOCERA OPTICS, INC.
6020 Irwindale Avenue, Unit A C, Irwindale, California 91706, U.S.A.
Tel: (626) 812-8888
KYOCERA OPTICS, INC.
6200 Dixie Road, Unit 11 Mississauga, Ontario, L5T 2E1, Canada
Tel: (905) 564-9385
YASHICA Kyocera GmbH Eiffestraße 76, D-20537 Hamburg, F.R. Germany
Tel: (040) 25 16 07
YASHICA Handelsges. mbH Rustenschacherallee 30, A-1020 Wien, Austria
Tel: 0172809260
YASHICA AG. Zürksherräse 73, CH 8900 Thalwil, Switzerland
Tel: 101 720 34 34
KYOCERA YASHICA (U.K.) Ltd. Unit 7, Suttons Industrial Park, Sutton Park
Avenue. Earley Reading, RG6 1AZ, U.K. Tel: 101181 935 8200
KYOCERA YASHICA (FRANCE) S.A. ZAC de Paris Nard II -13, rue de la perdrix
B.P. 40067 Tremblay en France 95913 Roissy CDG Cedex France Tel: (01) 49 89 39 60
KYOCERA YASHICA DO BRASIL-INDUSTRIA E COMERCIO LTDA.
Av. Bernardino de Campas No. 98, 5 Andar Paraisb, S do Paulo CEP: 04004-000, Brazil Tel (831) 698-9255
Brazil Tel: (011) 889-8995
UNIVERSAL OF TICAL INDUSTRIES LTD. 14;FL. Frieza Industrial Building, 123 Hoi Run Road, Kuur Tong, Kowigan, Hoa Kang Tel: 2912 E151
Printed in Japan RI110010
ENGLISH
We greatly appreciate your purchase of this Contax NX camera. The Contax NX is an autofocus single lens reflex camera based on the Contax fundamental principle of "building cameras for creating works of art". Automatic or manual focus can be selected according to the subject and setting so that the user can achieve the desired results with accuracy. Read these instructions carefully before using the camera to ensure proper use and a long service life.
This camera incorporates 'Custom Functions' which may be used in applications beyond the normal requirements of photography. See page 87 for details.
The abbreviation 'CF' used throughout this manual indicates a custom function.
Safety warnings
This manual contains the following warnings to ensure safe use of the camera. Please read the explanations thoroughly before use.
Caution
Failure to use the product correctly may result in injury to the user or damage to property.
Warning
Failure to use the product correctly may result in serious injury and/or death of the user.
Cautions in Handling
- Any foreign matter on the lens or mount should be removed with a blower or by wiping with a soft lens cloth. Fingerprints should be removed by wiping gently with a commercially available lens paper. Foreign matter on the mirror should be removed by wiping gently with a soft lens cloth.
- Remove dust and dirt from the camera body by wiping with a soft cloth. Use of organic solvents such as benzene or thinners may result in damage to the body and should be avoided under all circumstances.
| Caution | Clean the camera thoroughly after use at the beach or in dusty areas. Salt spray may corrode metal components, and may result in damage to, and short-circuit of, electronic components, with the possibility of smoke or fire. The presence of sand in the mechanism of the camera will cause problems in operation.The lens may fog-up if the camera is moved immediately from a cold area into a warm room. The condensation on the lens will disappear after a few minutes, however if this process is repeated water droplets will form in the lens and camera body, and may result in damage to, and short-circuit of, electronic components, with the possibility of smoke or fire. Avoid moving the camera suddenly between areas of differing temperature.Do not place the camera in direct sunlight. The focusing effect of the lens on nearby objects may result in damage or fire. Always fit the lens cap, and store out of direct sunlight.The camera contains precision electronic equipment. Damage to the electronic circuits may result in smoke or fire and consequent damage to the mechanism, and care should be taken to avoid dropping the camera or subjecting it to physical shocks.Check operation of the camera, or take test photographs before using it for important occasions such as overseas trips or weddings. Always carry spare batteries. |
| Warning | If the batteries becomes overheated the camera may emit smoke or a burning smell. In this case, remove the batteries immediately to prevent fire or burns (take care to avoid bums when removing the batteries).Do not use the camera in locations where it will be in direct contact with water or in locations with a high moisture content, and do not use the camera with wet hands. Use under such conditions may result in electric shock, short-circuit of electronic components, overheating, smoke, fire, or corrosion. (Note that it is particularly important to be careful when using the camera in rain, snow, or at the beach.)Do not use the camera in the vicinity of inflammable gases. Use in such situations may result in fire.Do not disassemble or modify the camera. The camera employs high voltage, and modification may result in electric shock.The camera contains high-voltage circuits. If it has been dropped, care must be taken not to touch the internal mechanism as this may result in electric shock.During flash photography, ensure that the flash is not close to the human eye (particularly the eyes of infants). Use of the flash near the eyes may result in vision disorders.Do not look directly at the sun or a strong light source through the camera. Such use may result in vision disorders. |
| Warning | Do not take photographs while moving. In particular, do not move while looking through the viewfinder. Use in such situations may result in a fault in the camera. Do not pay excessive attention to the subject at the expense of your surroundings during photography. Do not leave the camera within reach of infants or children. Take particular attention when using the camera near infants or chil- dren, and do not leave it unattended. Infants and children do not understand the safety warnings and cautions, and this may result in the following. The camera dropping or falling, with consequent injury. The camera strap being wrapped around the neck, resulting in suffocation. |
• Leaving the camera in a warm place (e.g. at the beach during the summer, in direct sunlight inside a vehicle) for a long period of time will result in deterioration of the film and batteries, having a negative effect on the camera. - If the camera is to be left unused for a long period of time, remove the batteries to guard against damage from fluid leakage.
| Caution | • Avoid storing the camera in humid and dusty locations, wardrobes containing insecticide, or laboratories containing chemicals. Storage under these conditions may result in damage to, and short-circuit of, electronic components, with the possibility of smoke or fire. Ensure that the camera is stored in a location with good ventilation. |
- Battery performance generally deteriorates as temperature is reduced. In cold areas, the camera should be placed under thermal protective covering, or inside the clothing, before and after use. Batteries which have deteriorated due to low-temperature will recover if returned to normal temperatures.
- Contamination of the + and - terminals of the batteries with sweat and oils may prevent good contact. Always wipe the terminals thoroughly with a dry cloth before using the batteries. • Always take new, spare batteries on long trips etc.
- The camera will not operate if the battery contacts do not match those in the battery compartment.
| Caution | Do not touch the battery terminals with conductive metal objects (e.g. tweezers). This will reduce the life of the batteries, and may result in a short-circuit. |
| Warning | Adhere strictly to the following requirements. Failure to do so may result in damage to the batteries, fire, injury or contamination of the immediate surroundings.1 Use only the specified batteries in the camera.2 Do not throw batteries in the fire, short-circuit while charging, dismantle, or heat under any circumstances.3 Do not mix new and used batteries, batteries from different manufacturers, or different types of batteries, in the camera.4 CR2 batteries (3V lithium batteries) must not be charged under any circumstances.When disposing of batteries, insulate the terminals by covering with tape etc. to prevent contact with other metal objects which may result in splitting of the batteries, or fire.Store batteries out of reach of children. Contact a doctor immediately if a battery is swallowed. Swallowing may result in a leak in the battery, causing damage to the stomach and intestines. |
CONTENTS
| Safety warnings......2Cautions in Handling......2 | Names of Parts......8 | Display Panel and Viewfinder Display...10 | |
| BASIC OPERATIONS PRIOR TO SHOOTING | 1. Fitting the strap and viewfinder shade adapter......142. Fitting the eye cup/diopter correction lens......15 | 3. Inserting the batteries and checking the battery power......164. Mounting and removing lenses......185. Holding the camera......19 | 6. Loading film......207. Setting the film speed manually......238. Removing film......24 |
| BASIC OPERATIONS | 1. Main switch......262. Shutter release button......273. Position dial......28 | 4. F and R dials......295. Mode button and mode details......306. Selecting the mode......31 | 7. ABC/Button......338. Focus button......339. Sync switch......33 |
| SIMPLE SHOOTING PROCEDURE | Using the * (green) setting on the position dial......36 | ||
| FOCUSING | 1. Selecting focus frames......39 | 2. Focusing in the autofocus mode......40 | 4. Focusing manually......44 |
| SELECTING THE METERING MODE | 1. Types of metering modes and their features..48 | 2. Metering range......49 | |
| APPLIED PHOTOGRAPHIC TECHNIQUES | 1. Autoexposure photography<1. Taking photographs with the aperture priority mode "Av" (aperture priority auto exposure)>......51<2. Taking photographs with shutter speed priority settings "Tv" (shutter priority auto exposure) mode>......52<3. Taking photographs in the program auto mode "P" (program auto exposure) mode>......53 | 2. Manual exposure photography<1. Taking photographs with the exposure set manually "M" (manual exposure) mode>......55<2. Using the bulb exposure mode>......573. Taking photographs with exposure compensation<1. Setting exposure compensation manually (with Av, Tv, P)>......58 | <2. Taking photographs with the AE lock>......60<3. Taking photographs with the Exposure Autobracketing Exposure Mode (ABC Exposure mode)>......624. Using the selittimer......655. Date and time Imprinting......666. Checking the depth of field......687. Cable switch socket......698. Replacing the camera back......69 |
| FLASH PHOTOGRAPHY | 1. Taking photographs using the internal flash...722. Taking photographs using a Contax TLA flash..76 | 3. Taking photographs using other flashes with the X contact......81 | 4. Flash photography techniques......82 |
| CUSTOM FUNCTIONS | 1. List of custom functions......87 | 2. Setting custom functions......89 | |
| REFERENCE | 1. Basic information on photography......91 | 2. Troubleshooting......92 | 3. Shutter speed and aperture value display......94 |
| MAIN ACCESSORIES | 1. Contax Data back D-11......962. Contax Cable switch LA type......973. Contax Power pack P-8, P-8D......98 | 4. Contax Power pack adapter GP-1...1015. Contax Mount adapter NAM-1......1026. Contax Flexible case C-9......103 | Main specifications......104 |

Names of Parts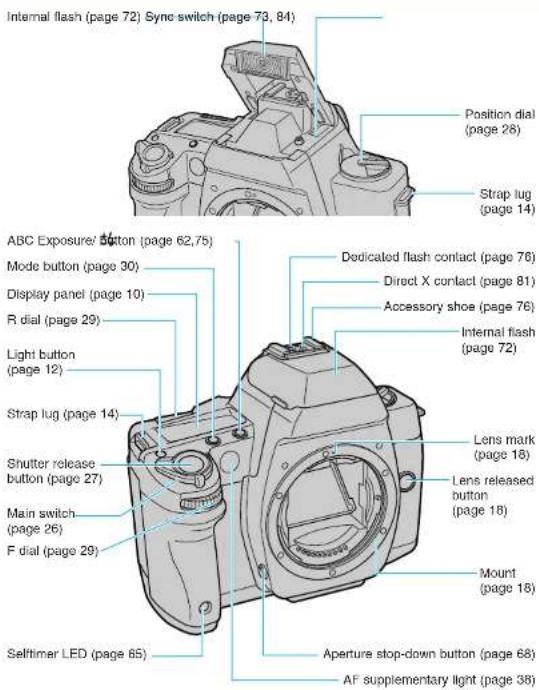

Display Panel and Viewfinder Display

(This page describes the contents of the displays. All the information is indicated on these diagrams for explanation purposes. The display will not show all this information at once but only pertinent information for settings and modes.)

The display in the viewfinder incorporates a variety of information - as well as the focus, aperture, and shutter speed, it also shows the exposure meter and exposure counter.
The viewfinder display turns on when the operations below are performed, then automatically turns off after 16 seconds to save power.
① When the main switch is turned on.
② When the shutter button is half-pressed while the main switch is turned on. If any dial is changed while the viewfinder display is switched over while the viewfinder display is lit, the display time is extended another 16 seconds.
* CF splay time may be changed. (Power hold time, page 87).
The viewfinder display turns off in the following cases:
Photography, Film finished, Rewinding, Rewinding finished, Film advance failure, Battery discharged
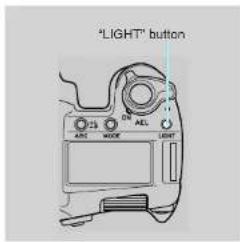
The display panel has an illumination function. Press the "LIGHT" button once to light the display panel, and press it again to extinguish it. The panel is cleared automatically after 16 seconds.
If other dials or buttons are operated while the display panel is lit, the duration of illumination is automatically extended. The display panel light turns off as soon as the shutter is released.
* CF illumination time may be changed. (Power hold time, page 87)
BASIC OPERATIONS PRIOR TO SHOOTING
This section describes procedures that should be taken prior to photographing and includes basic operations of this camera. If you already have basic knowledge on handling a camera and wish to start taking photographs immediately, proceed to "SIMPLE SHOOTING PROCEDURE" on page 35.
1. Fitting the strap and viewfinder shade adapter
First pass the strap through the viewfinder shade adapter supplied with the camera, and then attach the strap to the camera as shown below.
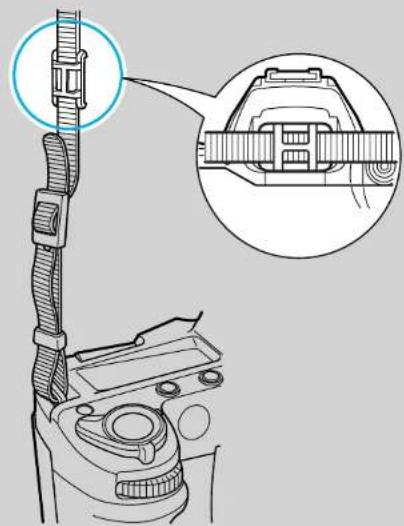
When using the selftimer, light entering the viewfinder when the eye is moved away may interfere with a correct reading of incident light. In such cases, fit the viewfinder shade adapter to the viewfinder.
2. Fitting the eye cup/diopter correction lens
The eye cup F-3 is fitted as shown below.

The separately available FL diopter correction lenses (+3, +2, +1, 0, -2, -3, -4, -5 available) are fitted as shown below. The eye cup may be fitted on the diopter correction lens.

3. Inserting the batteries and checking the battery power
Turn the main switch off before inserting the batteries.
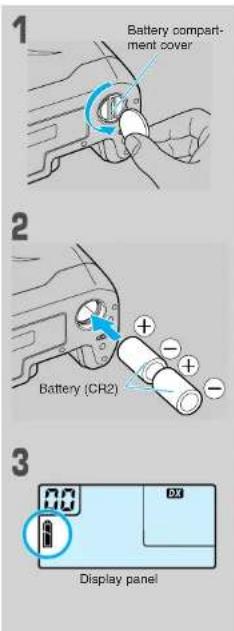
1 Open the battery compartment cover. Use a coin to turn the battery cover in the direction of the arrow.
2 Insert two 3V lithium batteries (CR2) into the battery compartment. Ensure that the battery contacts and those in the battery compartment match.
- The camera will not operate, and may malfunction, if the batteries are inserted in the wrong direction.
3 Close the battery compartment cover.
The "1" mark appears in the display panel.
- Even when using new batteries, during continuous shooting or at low temperatures, the voltage may decrease momentarily and the "mark" may light. If this happens, set the main switch to OFF then back ON two or three times. If the "mark" lights there is enough battery power.
The meaning of the battery marks are as follows: Check the battery power with the main switch turned ON.
| Display when main switch is on | Meaning |
| There is sufficient battery power. | |
| Battery power is low and will need replacement soon. | |
| (fashing) | Replace with a new battery. |
| (fashing) | Camera will not operate. |
4. Mounting and removing lenses

1 Remove the camera's body cap and the lens rear cap. 2 Line up the mount mark on the lens with the lens mark on the camera, insert the lens, then turn it clockwise until a click is heard and the lens is firmly engaged. • Use Contax N-mount lenses. - Contax 645 system lenses can be used by mounting on an NAM-1 mount adapter. (page 102)

Press the lens release button and turn the lens counterclockwise all the way until it stops, then pull it forward to remove it.
- Be careful not to touch the lens surface or the inside of the body when mounting and removing lenses.
- When replacing the lens while film is loaded in the camera, do so in the shade, avoiding direct sunlight.
5. Holding the camera
① Tuck in your elbows and stabilize the camera. ② Hold your breath when pressing the shutter button. ③ Keep your arms and hands relaxed and press the shutter button gently.

It is important to hold the camera firmly in order to achieve sharp photographs. Unsharp photographs are often due to camera shake caused by the photographer's abrupt motion when taking a picture. Practice working with the camera and making both vertical and horizontal compositions. Find positions that are comfortable for you. Propping yourself or the camera against a building or tree can often be effective. - When taking photographs in dark places or in other cases where the shutter speed is slow, use a tripod to avoid camera shake.
6. Loading film
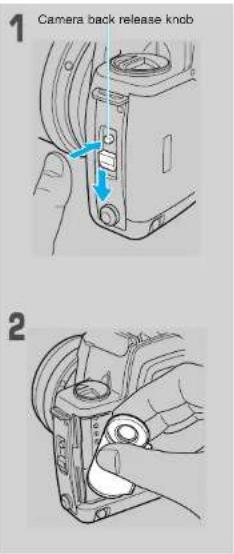
1 Open the camera back by lifting the camera back release knob while sliding the camera back opening lever downwards.
- The first time you use the camera be sure to remove the protective sheet inside the camera before loading film.
- Be careful not to touch the DX and data back contacts. If they become dirty clean them off with a soft cloth.
- Load and remove film out of direct sunlight.

2 Insert the film at an angle as shown on the diagram.
Insert the film fixing shaft onto the projection in the film cartridge.
Shutter curtain
The shutter curtain is a precision part. Be extremely careful not to touch it or poke it with the tip of the film or your finger. In particular, never press the shutter release button when the tip of the film is positioned over the shutter curtain.

3 Pulling on the tip of the film, draw out the film to the position of the orange "I" mark, then set it over the spool. Make sure the film is flush (not bulging out), as shown in the diagram.
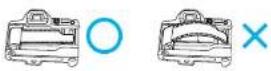
- If the drawn out section of the film is too long, do not try to continue loading the film. Wind it back up into the film cartridge to adjust the length.
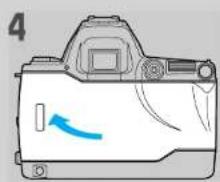
4 Securely close the camera back, turn the main switch on and press the shutter release button.
The film is automatically advanced to the first frame and the exposure counter is set to "01".
- If "00" still flashes on the exposure counter, the film has not been properly loaded. Open the camera back and reload the film.
Display panel

When "DX" is displayed on the display panel, the camera reads the DX code and sets the film speed automatically.
The automatic film speed settings range from ISO 25 to 5000.
- When film with no DX code is loaded, the film speed is automatically set to ISO 100.
- If "DX" is not displayed on the display panel, be sure to set the ISO manually. (See page 23.)
To check the ISO of the film loaded in the camera, set the position dial to "ISO".
"DX" or "ISO" and the speed of the film loaded in the camera appear on the display panel.
7. Setting the film speed manually
Use the procedure described below to set the film speed for film with no DX code or when you want to set a different ISO from the one indicated for the film.
• The manual ISO setting range is ISO 6 to 6400. - If you set the film speed manually this setting will be used even when using film with a DX code.

1 Turn the position dial to "ISO". "DX" or "ISO" and the film speed appear on the display panel. 2 Move the R dial to set the film speed to the desired value. DX ←→ 6 ←→ 8 ←→ 10 ←→ • ←→ 5000 ←→ 6400 ←→ DX ←→ 6 (repeated) - Film speed determined automatically when set to DX. 3 Return the position dial to “○” (white) or “○” (green). Setting is now complete. The display panel returns to the normal display. - Once the film speed is set, it is stored in memory until it is changed again. - Photographs cannot be taken if the position dial is set to "SET", "ISO", or "CF".
8. Removing film
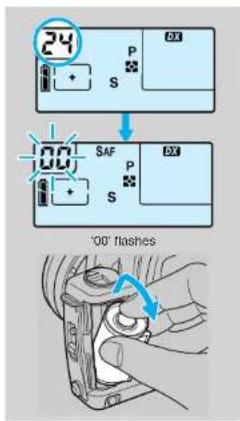
Once the film has been fully exposed, it is automatically rewound.
The numbers on the exposure counter decrease while the film is rewinding. Once the film is completely rewound, the motor stops and "00" flashes on the exposure counter.
Check that the motor has stopped and that "00" is flashing on the exposure counter, then open the camera back and remove the film.
Remove the film in a place out of direct sunlight.
Be sure to remove the film after rewinding it. After the film has been rewound, the camera will not operate until the camera back has been opened.
After removing the film, have it developed as soon as possible.
Note that if more photographs than the regular number of frames on the film have been taken, the last frame may be cut during the developing process.
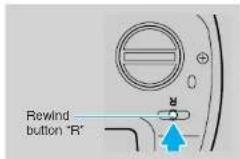
To rewind film mid-way through the film, first make sure that the main switch is ON, and using a coin or a fingernail, press the rewind button "R" on the base of the camera (do not use a sharp pointed object for this purpose).
It is also possible to use the Custom Functions to prevent automatic rewind (page 88). Once the film has been fully exposed, film advance stops and the first and second digits of the exposure counter flash alternately. Rewind as described in the manual.
It is possible to rewind and leave the film tip protruding from the film cartridge when rewinding with the Custom Functions (page 88).
1. Main switch 2. Shutter release button
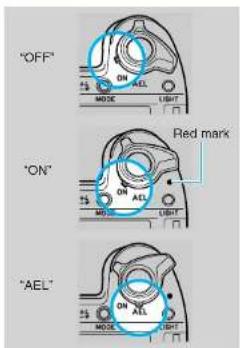
The main switch is used to turn the power on and off and to activate the AEL (AE lock) mode.
Set the main switch at the click position to prevent accidental operation.
OFF: When the red mark is not visible The camera's power is off.
ON: The camera's power is on.
AEL: Use this when you want to lock the exposure (AE lock). It is often used when photographing backlit subjects. It is also used when a subject that is constantly lit moves through a background with varied brightness values. (page 60)
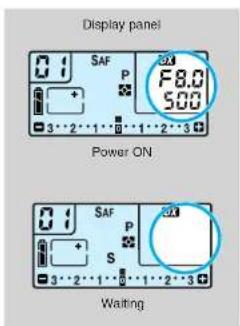
If no action is taken, the panel is cleared automatically after 16 seconds to reduce power consumption. The following occurs in the wait state.
① The display in the viewfinder is cleared. ② The aperture and shutter speed values in the display panel are cleared.
③ The F and R dials cannot be used. The display is activated again when the shutter button is half-pressed.
The fine power hold time in Custom Functions may be changed (page 87).

The shutter release button operates in two steps.
When the shutter button is half-pressed, the viewfinder display turns on and the autofocus and metering functions are activated. When pressed further (full pressure), the shutter is released and the photograph is taken.
- Before loading film, practice pressing the shutter release button to get used to the half-pressed position. • To prevent camera shake, use a smooth motion when pressing the shutter release button.
3. Position dial 4. F and R dials
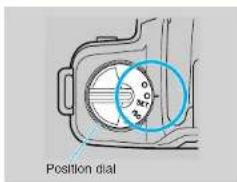
The position dial may be set at any one of five positions - “○(white), “○(green), “SET”, “ISO”, or “CF”.
<1. Photography>
The “○(white) and ” (green) settings are for photography.
“(white): Stores the current photography mode (focus, exposure, metering, drive) in memory. When the main switch is set to ON, the camera begins operation in the previously set mode.
“(green): The same combination of photography modes (focus, exposure, metering, drive) is selected each time the main switch is set to ON.
When shipped from the factory, the modes are focusing mode "SA", exposure mode
"Metering mode", and drive mode "S". The details of each mode may be altered as necessary (page 31, 37).
<2. SET>
Setting details for "○ (green)".
<3. ISO>
Checking film speed, and setting film speed manually.
<4. CF>
Setting "CF Custom Functions" (page 86).
The F dial (front command dial) and R dial (rear command dial) are used for a variety of settings.
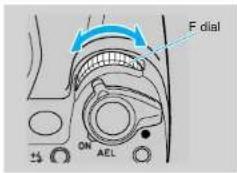
F dial (front command dial): - Exposure correction settings - Selecting the photography mode (focusing mode, exposure mode, metering mode, drive mode). - ABC settings - Internal flash metering correction - "CF" Custom function settings
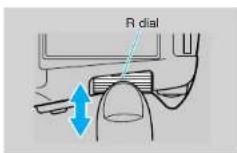
R dial (rear command dial): - Shutter speed settings - Selecting the photography mode (focusing mode, exposure mode, metering mode, drive mode). - Film speed settings - "CF" Custom function settings
5. Mode button and mode details 6. Selecting the mode
Mode button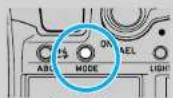
The mode button is used to select the focusing mode, exposure mode, metering mode, or drive mode. Press the "MODE" button and set with the F or R dial as necessary.
[Mode details]
<1. Focusing mode>
• Single autofocus (page 41)
• Continuous autofocus (page 41)
• Manual focus (page 44)
Used for manual focusing.
<2. Exposure mode> • : Aperture priority auto (page 51). Used for automatic photography with a fixed aperture. - : Shutter priority auto (page 52). Used for automatic photography with a fixed shutter speed. • : Program auto (page 53). Used for automatic photography without intervention by the user. • : Manual exposure (page 55). Used for photography with the exposure (aperture and shutter speed) controlled by the user. <3. Metering mode> (page 48) • : Evaluative metering • : Center-weighted average metering • : Spot metering <4. Drive mode> (page 45) • : Single frame photography. A single photograph is taken, and the film advanced and stopped, with each press of the shutter button. • C : Continuous photography. Continuous photography at a maximum rate of approximately 2.3 frames per second while the shutter button is pressed. (The rate varies with shutter speed, film speed, whether or not data back is used, and the state of the batteries.) • : Self-timer photography (page 65). Used for self-timer photography.
![CONTAX NX - [Mode details] - 1](/content/2026/05/785596/images/e3b7f5d7cfc8e140d775e9d351a8cf7016024d0560f9fda3f3c5033b4ca1c25b.jpg)
Focusing mode details![CONTAX NX - [Mode details] - 2](/content/2026/05/785596/images/660124a6824c971cf6493fc589c3bc59060d3925d432ae4c731d9c74549ddc8d.jpg)
![CONTAX NX - [Mode details] - 3](/content/2026/05/785596/images/8b6a6eea84b5f5ba73db3d4abe7e2a470501f013f0656fad97273f0c7508a206.jpg)
![CONTAX NX - [Mode details] - 4](/content/2026/05/785596/images/c1c6a0e2153388e8dfca5f42928c178c38d1feecb9c585076817dea4ed4d9ed3.jpg)
![CONTAX NX - [Mode details] - 5](/content/2026/05/785596/images/dd7396214ffe54ef46a086424bb5c27147b5470dc5dac92ed13d6ab2f733c13f.jpg)
Exposure mode details![CONTAX NX - [Mode details] - 6](/content/2026/05/785596/images/fb255b22c81831ef059895c989c4b545e81b0f087b59caa6cc01e6900c8fb511.jpg)
![CONTAX NX - [Mode details] - 7](/content/2026/05/785596/images/ff1263a9b24b57176c4a4201fa1da74266fc39f5bb2e3ca32598eb564bcb0da4.jpg)
![CONTAX NX - [Mode details] - 8](/content/2026/05/785596/images/5ccba45f5edf766df87c2dc0bed980507d3f9af96cb5b80e47124196f9622020.jpg)
focusing mode, exposure mode, metering mode, drive mode
1 Set the main switch to ON and set the position dial to “○(white) or “○(green). 2 Press the mode button. "Focusing mode details" appears on the display panel and the current focusing mode flashes. 3 Turn the F dial to the desired focusing mode. The selected focusing mode flashes (select the focusing mode details). 4 Turn the R dial in the direction of the arrow to display "Exposure mode details". "Exposure mode details" appears on the display panel, and the current exposure mode flashes. 5 Turn the F dial to the desired exposure mode. The selected exposure mode flashes (select the exposure mode details).
6![CONTAX NX - [Mode details] - 9](/content/2026/05/785596/images/393ebc925ec26f6641992edc40f63841e55e9d33bcdbecf8af888e77ab3f7468.jpg)
7![CONTAX NX - [Mode details] - 10](/content/2026/05/785596/images/5a6c8a00881bbb77a45918972cc80ffc1876191f4dac458a6ec8a06d74c71810.jpg)
![CONTAX NX - [Mode details] - 11](/content/2026/05/785596/images/0ebec17915d02cfca741d8863db8dd126223ce085d0be4de8df229e81521a6d0.jpg)
8![CONTAX NX - [Mode details] - 12](/content/2026/05/785596/images/056636070a0bc968b96d4ad4cb83090c6b0af3e180f2b2a488f94eb5d3b1308d.jpg)
6 Turn the R dial in the direction of the arrow to display "Metering mode details". "Metering mode details" appears on the display panel, and the current metering mode flashes. 7 Turn the F dial to the desired metering mode. The selected metering mode flashes (select the metering mode details). 8 Turn the R dial in the direction of the arrow to display "Drive mode details". "Drive mode details" appears on the display panel, and the current drive mode flashes. 9 Turn the F dial to the desired drive mode. The selected drive mode flashes (select the drive mode details).
10 Press the mode button to return to the normal display. The details of the selected modes are displayed, and setting is complete.
- Setting may also be completed by half-pressing the shutter button.
7. ABC/ button

Used for ABC setting (page 62). Press the ABC button, and set with the F dial. This button may also be used for flash correction (page 75).
8. Focus button

Used for focus lock during autofocusing (page 43). Also used for one-shot autofocus with manual focusing (page 45).
9. Sync switch

Selects first curtain synchronization (NORMAL) or second curtain synchronization (page 84). Normally set to "NORMAL".
SIMPLE SHOOTING PROCEDURE
USING THE “○(GREEN) SETTING ON THE POSITION DIAL
Use the ○ (green) position for simple photography. This setting is recommended if you are using a camera for the first time, or if you wish to take photographs without worrying about aperture and shutter speed settings.
Using the “🔒 (green) setting on the position dial
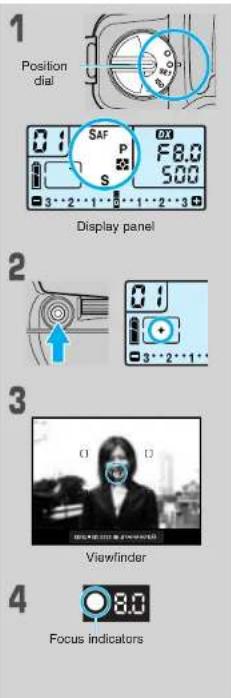
1 Set the main switch to "ON", and turn the position dial to "☐" (green). The camera is set to the following modes when shipped from the factory. ① Focusing mode: SAF ② Exposure mode: P ③ Metering mode: ④ Drive mode: S - The mode details appear on the display panel. If the display differs from the mode details shown above, reset in accordance with the next page. 2 Push the focusing frame select lever to select the central portion. The selected position appears on the display panel. The selected focus frame flashes red once in the viewfinder. 3 Point the focus frame in the center of the viewfinder towards the subject and half-press the shutter button. 4 When the subject is focused, the focus frame at the center of the viewfinder flashes red once, a beep is heard, and the mark indicating focusing is lit in the viewfinder. 5 Press the shutter button to take the photograph.
In the green position on the position dial, the same combination of photography modes (focusing, exposure, metering, drive) are selected when the main switch is set to ON.

The mode details for the green position on the position dial are changed as described below. Create your own mode details as required for your unique type of photography.
1. Set the main switch to "ON", and set the position dial to "SET". The mode details appear on the display panel, and the current focusing mode details flash. 2. Set the F dial to the desired focusing mode. The selected focusing mode flashes. 3. Set the R dial to the desired exposure mode. The selected exposure mode appears on the display panel. Set the F dial to the desired exposure mode. The selected exposure mode details flash on the display panel. Set the R dial to the desired metering mode and drive mode details in the same way. The desired mode details flash on the F dial. 4. Set the position dial to ".". The mode details are now changed.
FOCUSING
This camera offers two types of focusing: autofocus (AF), in which the camera adjusts the focus automatically, and manual focus (MF) in which the user adjusts the focus manually.
There are two AF modes: "SAF" (single AF) which is convenient for general photography when photographing stationary subjects, and "CAF" (continuous AF) which comes in handy for taking photographs of moving subjects. Use them according to the subject and scene.
AF supplementary light: If the subject is dark, or contrast is so low that it is difficult to focus, it is illuminated automatically with AF supplementary light to increase the precision of autofocusing. The center of the viewfinder is illuminated. The effective distance of AF supplementary light is approximately 4m.
1. Selecting focus frames
Viewfinder Focus frame (select one of five) Display in viewfinder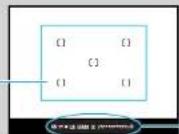
Focusing frame select lever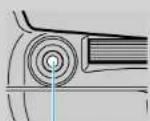
This camera has five focusing frames: the frame at the center of the picture, and four peripheral frames positioned diagonally.
The most appropriate frame for the position of the subject is selected.
When the auto select mode is switched, the selected focusing frames flash red once.
Select the desired focusing frame using the manual select lever. Select the diagonally opposite focusing frame by moving the lever in that direction.
Push the lever to select the center focusing frame. The camera is focused at the selected point.
Select the focusing frame while the display in the viewfinder is lit. The frame position cannot be changed unless the viewfinder is lit. (Half-press the shutter button to display the content of the viewfinder (page 11).)
" CI rocking a selected frame
A lock may be applied to prevent accidental movement of the selected focus frame while setting custom functions (page 87). When making this setting, select the frame with the focusing frame select lever while pressing the "LIGHT" button.
2. Focusing in the autofocus mode
The autofocus mechanism is activated when the shutter button is half-pressed while the focus dial is at the "SAF" or "CAF" position. The focusing frame selected when the shutter button is half-pressed lights red momentarily. After the distance is measured, the frame for which the focus was adjusted lights red momentarily.
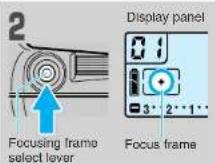

1. Set the focus dial to "SAF" (single autofocus) or "CAF" (continuous autofocus). See page 31 for setting details. 2. Select a focus frame for focusing. Use the focusing frame select lever (page 39). 3. Point the selected focus frame in the viewfinder at the subject to be focused, and half-press the shutter button. The subject is focused automatically, the selected focus frame flashes red once, a beep is heard (*), and the "○" mark indicating focusing is lit in the viewfinder. - "○" lit: Focused - "○" flashing: Cannot focus * The beep is emitted only with SAF. It is possible to make settings without the beep (page 87). 4. Now press the shutter button all the way in to take the picture.
<“SAF” (single autofocus)>
This mode is recommended for general photography (still life, portraits, landscapes, etc.).
Half-press the shutter button to focus. Once the subject is in focus, the focus is locked at that position.
• The shutter cannot be released if the subject is not in focus. - It is not possible to focus on the desired subject if the ○ mark is flashing. Focus on a different object at the same distance as the subject, lock the focus, then recompose and photograph the original subject. (Page 42) - If the ○ mark is flashing but you want to take the photograph anyway, the shutter can be released by pressing the shutter button while pressing the focus button. - When the drive mode is set to "C", the focus is locked at the first focusing distance and remains at that set distance for subsequent photographs.
When using lenses fitted with the dual focusing mechanism, manually turning the distance ring while the "○" mark indicating focusing is lit and the SAF focusing mode is selected automatically selects the dual focusing mechanism for fine focus adjustment.
<“CAF” (continuous autofocus)>
This mode is recommended for photographing moving subjects.
When the shutter button is half-pressed, the focus is adjusted continuously. Check that the subject is in focus before taking the picture.
- In the "C" (continuous shooting) mode, the focus is continuously adjusted as you shoot.
- In this mode, the shutter is released when the shutter button is pressed, even if * is flashing. • In some instances, depending on the movement or change in the subject position, the camera may not be able to keep the subject in focus during continuous shooting.
If the subject is not within a focusing frame with the desired composition, use the procedure described below to lock the focus on that subject.
Example: Center focus frame selected.

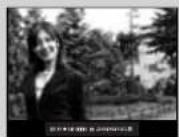
◆In the "SAF" (single autofocus) mode
1 Point the camera at the subject on which you want to focus, position the subject within a focusing frame, then half-press the shutter button. The focus is adjusted automatically. When the subject is in focus, the focus display ("①" lights in the viewfinder and the focus is locked at that position.
2 Still half-pressing the shutter button, position the camera to achieve the desired composition, then press the shutter button all the way in to take the picture.
- The focus is locked as long as the shutter button is half-pressed, so it does not change when the camera is repositioned.
- The focus lock is canceled when you release your finger from the shutter button.
◆In the "CAF" (continuous autofocus) mode
1 Point the camera at the subject on which you want to focus, position the subject within the focusing frame, then half-press the shutter button. The focus is adjusted continuously while the shutter button is half-pressed. 2 Check that the focus display in the viewfinder is lit, then press the focus button. The focus is locked when the focus button is pressed. 3 Still pressing the focus button, position the camera to achieve the desired composition. The focus is locked as long as the focus button is pressed. 4 Press the shutter button all the way in to take the picture.
For the subjects described below, the camera may not be able to focus automatically and the “(focusing not possible) display may flash. In such cases, either use the focus lock function to first focus on a different object at the same distance as the subject or adjust the focus in the manual focus mode.
① Extremely bright or extremely dark subjects. ② Subjects which have little or no contrast. ③ When the sun or other strong light sources are within or near the focusing frame. ④ When there are two or more subjects at extremely different distances within the focusing frames. ⑤ A very small subject in relation to the focus frame. ⑥ Subjects with repeating patterns. ⑦ When the ambient light level is very low or an ND or polarizing filter is used.
3. Focusing manually
Picture is in focus. Picture is not in focus.

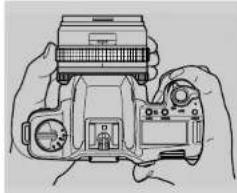
Set the focus dial to "MF" (see page 31 for details).
Adjust the focus by turning the lens' focus ring manually.
The image on the matte surface is clearly visible when the subject is in focus, blurry when subject is out of focus.
The focus display in the viewfinder with manual focusing displays the distance measured for the selected focusing frame.

* : Focused on subject
No display: Not focused on subject
* Flashing : Cannot focus
- When the object in the selected focusing frame is in focus, the focusing frame lights red.
Focusing button
When a lens fitted with the dual focus mechanism is used the autofocus mechanism can be used while in the manual focusing mode. To use autofocusing, press the focus button. The camera adjusts the focus automatically while the focus button is pressed, and when the subject is in focus the focus is locked in that position (SAF: focusing with single autofocus). Use for one-shot autofocus.
* CF e focusing method may be changed to CAF (continuous autofocus) (page 88).
| 'SAF' | 'CAF' | 'MF | |
| • S" single frame mode | When the shutter button is half-pressed, the focus is adjusted. Once the subject is in focus, the focus is locked at that position (focus lock). • The shutter cannot be released if the subject is not in focus. | The focus is adjusted continuously while the shutter button is half-pressed. • The shutter can be released even if the subject is not in focus. | The focus is adjusted by turning the lens' focus ring by hand. |
| • C" continuous shooting mode | Focusing is performed in the same way as in the single frame mode. In the continuous shooting mode, the focus is locked at the distance at which the first frame (photograph) was exposed and remains at that position for subsequent frames. | Focusing is performed in the same way as in the single frame mode. In the continuous shooting mode, the focus is readjusted for each new frame of film exposed. |
It is not necessary to set both the lens and the camera to MF when using manual focus on a lens incorporating an AF/MF select switch with the NX. When setting the camera to AF (SAF or CAF)
AF or MF may be selected immediately with the switch on the lens. When the camera is set to MF, setting the switch on the lens to AF allows use of one shot autofocus.
Operation with each combination is as shown below. Select the appropriate combination for your photography.
| Camera focusing mode setting | ||||
| SAF | CAF | MF | ||
| Setting on lens | AF | Operation in SAF mode. Focus is locked while the focus button is pressed. | Operation in CAF mode. Focus is locked while the focus button is pressed. | AF operation is not possible with the shutter button. One shot autofocus possible with the focus button.Fine adjustment is not possible with the focus ring following AF operation. |
| MF | Manual focus with focus ring.Atter focusing with AF, set the lens to MF for fine focus adjustment. One shot autofocus not possible with the focus button. | MF using the focus ring for focusing.One-shot AF is not possible using the focus button. | ||
* To indicate the setting (SAF or CAF) on the camera, the display panel shows the focus mode setting. With auto power off, the display shows the setting on the camera.
![[Display example] Lens set to MF, camera set to SAF Lens setting Power hold AF MF 0.3 MF Av F8.0 250 3...2...1...1...2...3 Auto power OFF 0.3 SAF Av S 3...2...1...1...2...3](/content/2026/05/785596/images/a881788bbd55ffa17112bf0e2f331573ad493b07b66041dc8b6dcebe290cc21b.jpg)
SELECTING THE METERING MODE
This camera is equipped with three metering modes: evaluative metering, center-weighted average metering, and center divided partial metering. See page 31 for setting details. To achieve highly effective photographs with higher precision, read "Types of metering modes and their features" on the next page carefully and select the metering mode according to the shooting conditions and your desire to achieve a certain exposure effect.
1. Types of metering modes and their features 2. Metering
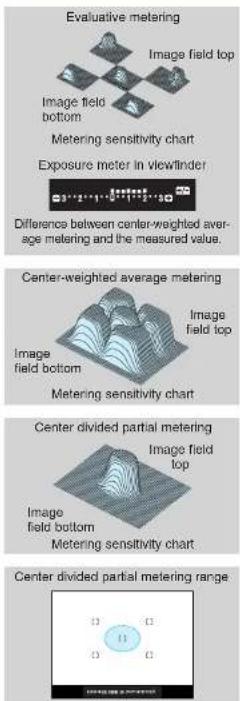
With evaluative metering, the picture is divided into five sections, as illustrated. The autoexposure system calculates the appropriate exposure based on an analysis of subject conditions and positioning. Because of this, evaluative metering can be used not only for general photography but also when the subject is lit from behind, with virtually no exposure compensation or adjustment required.
* The exposure meter in the viewfinder may be changed to display evaluative metering and center-weighted average metering, or the difference between center divided partial metering and the measured value.
In this mode, the light is measured with emphasis on the brightness of the subject at the center of the viewfinder. To a certain extent it also takes into consideration the brightness of the area surrounding the center to determine the exposure value. This mode can be used for general photography but also for easily determining the exposure for subjects in motion.
(● mark)
Only the brightness value of the subject corresponding to an area of approximately 5% of the scene is measured.
Use spot metering when the difference between the brightness value of the subject and the background is high. A good example is people lit from behind or standing in spotlights on center stages. It can also be used for making very selective readings of specific areas within the scene.
e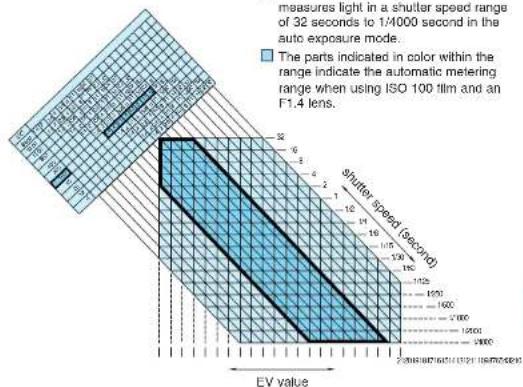
☐ The autoexposure system in the camera measures light in a shutter speed range of 32 seconds to 1/4000 second in the auto exposure mode. ☐ The parts indicated in color within the range indicate the automatic metering range when using ISO 100 film and an F1.4 lens.
This table shows the mutual relationship between aperture, shutter speed and EV (exposure value). For example, when using ISO 100 film and a 50mm F1.4 lens in the average metering mode, the automatic metering range is the range indicated by the points where the line extending diagonally from "16" (the Planar T* 50mm minimum aperture is F16) and "1.4" (the maximum aperture) on the aperture table's ISO 100 section intersects with the vertical line (the EV line) and horizontal line (the shutter speed line). Thus, that is EV '0' to EV '20'.
The EV expresses the combinations of aperture and shutter speed that achieve the same exposure effect on film. For example, the table shows that at EV 13 the same exposure effect can be achieved at F16 at 1/30 and F8 at 1/125 second. While the EV represents an equivalent exposure, the image effects of faster and slower shutter speeds and larger and smaller apertures differ.
APPLIED PHOTOGRAPHIC TECHNIQUES
This camera allows for a wide range of creative possibilities.
1. Autoexposure photography
<1. Taking photographs with the aperture priority mode "Av" (aperture priority auto exposure)>
(Av is the abbreviation of "Aperture value", and is the degree of aperture.)
In this mode, when the aperture is set, the camera automatically sets the shutter speed for a correct exposure.
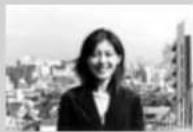
Example 1: When photos are taken with a larger aperture, the zone of sharpness (* Depth of Field, page 68) is narrowed. Use a larger aperture when you want the subject to stand out against a less sharp background.
Example 2: When photos are taken with a small aperture, the zone of sharpness (^ Depth of Field, page 68) is increased. Use a small aperture when you want both the subject and the background to be sharp.
Example 1: Large aperture Example 2: Small aperture
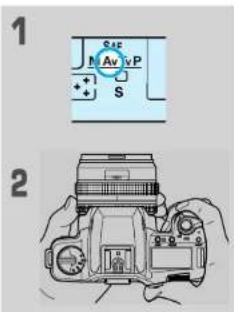
1 Set the exposure mode lever to "AV".
See page 31 for setting details.
2 Turn the lens' aperture ring to set the aperture, then take the picture.
The aperture you have set and the automatically selected shutter speed are indicated on the display panel and in the viewfinder.
<2. Taking photographs with shutter speed priority settings "Tv" (shutter priority auto exposure) mode> ("Tv" stands for "Time value".)
When the shutter speed is set, the camera automatically sets the aperture in accordance with the brightness of the subject. This is suitable for photographing moving subjects. Adjust the shutter speed to your application while referring to the examples below. Example 1: To freeze the action of a moving subject, set a fast shutter speed. Example 2: To express the movement of water, for example, set a slow shutter speed. • When using a slow shutter speed, use a tripod to prevent camera shake.
Example 1: Fast shutter speed Example 2: Slow shutter speed

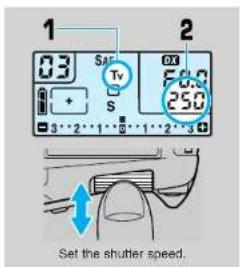
1. Set the exposure mode to "Tv". See page 31 for setting details.
2. Turn the R dial to set the shutter speed and take the photograph. The aperture scale may be set at any position. The set shutter speed and automatically set aperture value are displayed on the display panel and in the viewfinder.
<3. Taking photographs in the program auto mode "P" (program auto exposure) mode>
In this mode, the camera automatically selects the combination of aperture and shutter speed most suitable for the brightness of the subject. This mode is convenient when you want to take photographs easily without worrying about the exposure settings.

1. Set the exposure mode to "P". See page 31 for setting details.
2. Take the photograph. The aperture value selected automatically by the camera, and the shutter speed, are displayed on the display panel and in the viewfinder.
The aperture and shutter speed combinations with program auto are shown in the diagram below. The program line moves with the focusing distance of the lens in use (set to ISO100 with an F1.4/50mm lens).

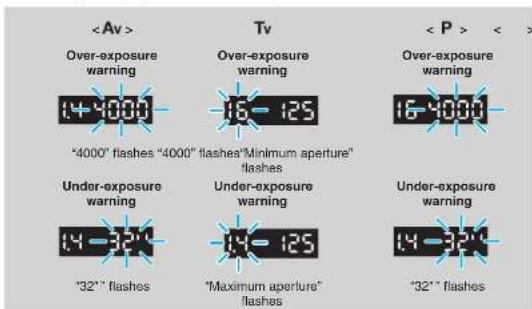
Over-exposure warning
Shutter speed "4000" flashes during aperture priority auto photography, "Minimum aperture value" for the attached lens flashes during shutter priority auto photography, and shutter speed "4000" flashes during program priority auto photography, to warn of over-exposure. As the subject is too bright, adjust the aperture or shutter speed until the flashing display is lit continuously. Optional or other commercially available ND filters (light reduction filters) may also be used for this adjustment.
Under-exposure warning
Shutter speed "32" flashes during aperture priority auto photography, "Maximum aperture value" for the attached lens flashes during shutter priority auto photography, and shutter speed "32" flashes during program priority auto photography, to warn of under-exposure. As the subject is too dark, increase the brightness of the subject, or change the shutter speed and aperture until the flashing display is lit continuously. Note that the use of the internal flash, or a separate flash, improves the brightness and clarity of photographs.
- The shutter button may be pressed even when the over- or under-exposure warning is displayed.
2. Manual exposure photography
<1. Taking photographs with the exposure set manually "M" (manual exposure) mode>
In this mode, you set the aperture and shutter speed yourself. This mode can also be used to intentionally achieve over- or under-exposure effects. Refer to the exposure meter display in the viewfinder to set the exposure.
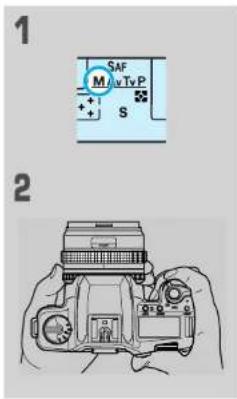
1 Set the exposure mode to "M". See page 31 for setting details.
2 Set the aperture and shutter speed, and take the photograph. The aperture is set with the lens aperture ring, and the shutter speed is set with the R dial.
The set shutter speed and aperture are displayed in the viewfinder and on the display panel.
The exposure meter in the viewfinder displays the difference with the standard exposure. Change the shutter speed or lens aperture to obtain "Recommended" on the exposure meter display.
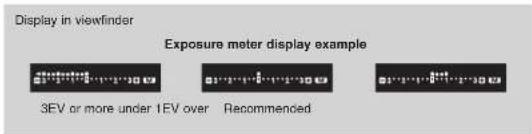
[Taking photographs with exposure compensation in the manual exposure mode]
Exposure compensation display
Display panel![CONTAX NX - [Taking photographs with exposure compensation in the manual exposure mode] - 1](/content/2026/05/785596/images/209cc0ba8f3f71db9b80ffce91fbc4e1a48aea9df623a522c1b702491468ed9e.jpg)
Exposure difference display
+/- flashes
![CONTAX NX - [Taking photographs with exposure compensation in the manual exposure mode] - 2](/content/2026/05/785596/images/d1b6ab5b415b8bc5a2892d0e3955d686e524b3f045663e0cb8f408ecfe5274c5.jpg)
Manual exposure display
Exposure meter in viewfinder
① The exposure compensation appears on the display panel. ② The "+/-" exposure compensation mark flashes in the viewfinder. ③ The exposure difference obtained with the aperture and shutter speed combination set for the camera is displayed in relation to the set exposure compensation value on the exposure meter in the viewfinder. ④ The "M" mark indicating the manual exposure mode is displayed in the viewfinder.
![CONTAX NX - [Taking photographs with exposure compensation in the manual exposure mode] - 3](/content/2026/05/785596/images/f2048825a82396515a0648c010bb7927a8e5fd16ace5a103efecab7f1066cd1a.jpg)
![CONTAX NX - [Taking photographs with exposure compensation in the manual exposure mode] - 4](/content/2026/05/785596/images/a583faf0693817cc6333c8df76d875a2ac8fdb92dada81150f5dd86a1ee2ca57.jpg)
2 Display panel![CONTAX NX - [Taking photographs with exposure compensation in the manual exposure mode] - 5](/content/2026/05/785596/images/5e9c523c69a3b2a091b8202d8c545fcef46fd7350c535860cb77848a393612c1.jpg)
![CONTAX NX - [Taking photographs with exposure compensation in the manual exposure mode] - 6](/content/2026/05/785596/images/63c78b493503e3a489c2c6375a6dd900d3df4552e260dc16f1ba7cdde2d220ec.jpg)
![CONTAX NX - [Taking photographs with exposure compensation in the manual exposure mode] - 7](/content/2026/05/785596/images/5ba4715fb3f1c5da51afae8c686dcb426f2685efee565dd3366136943570c4a6.jpg)
<2. Using the bulb exposure mode buLb>
Use the bulb mode for nighttime or astronomical photography requiring long exposure times.
1 Set the exposure mode to "M".
See page 31 for setting details.
2 Turn the R dial to "buLb".
3 Set the aperture with the lens aperture ring, and take the photograph.
The shutter is released and the film is exposed while the shutter button is pressed.
• To prevent the camera from shaking, either fix it to a tripod or place it on a stable surface, and connect a separately sold LA type cable switch to the camera and use it when taking the picture. - While the film is being exposed, the display panel's exposure counter switches to a timer display indicating the elapsed bulb shooting time. The counter counts from "00" to "59" (59 seconds), then starts over from "00". - The entire viewfinder display remains off while the film is being exposed.
3. Taking photographs with exposure compensation
When the correct exposure cannot be obtained for the primary subject due to extreme differences in brightness between the subject and background, or when deliberate over or under-exposure is required, exposure can be compensated using the three methods described below.
<1. Setting exposure compensation manually (with Av, Tv, P)>
Turn the F dial to set the amount of exposure compensation. Compensation may be set in 1/3 EU steps within a range of +3EV--3EV.
Exposure mode What Is compensated
| Aperture priority auto (Av) Shutter speed |
| Shutter priority auto (Tv) Aperture |
| Program auto (P) Aperture and shutter speed |
Example: Setting a compensation value of -2/3 EV. Display panel
Exposure meter in viewfinder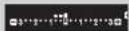
The set compensation appears in the display panel, and the compensation and the "+/-" mark are displayed in the exposure meter in the viewfinder.
- Always return the exposure compensation value to "0" when photography is complete. The exposure compensation remains until the main switch is turned OFF.
- Be careful to ensure that the compensation value is not changed accidentally. • See page 56 for details of the exposure compensation display in the manual exposure mode.
* The exposure compensation may be set to remain until cleared (page 88). * Press the "LIGHT" button while turning the F dial to prevent exposure compensation being changed accidentally (page 88). * Exposure compensation is changed in half-steps (page 87).


(+ compensation)
(no compensation)
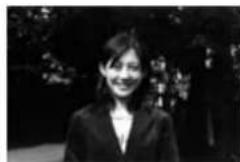
(- compensation)
(no compensation)
Example
When the subject is lit from behind, compensate within the range of "+1/3 EV or +1/2 EV to +3 EV".
In the average metering mode, when the percentage of the picture occupied by a bright background is large (for example, people with a light, a bright sky, or the sea behind them, people in front of a window, etc.), the people tend to be under-exposed and appear as dark silhouettes. In such cases, compensate the exposure within the range of +1/3 EV or +1/2 EV to +3 EV to increase the exposure on the main subject.
When the background is dark, compensate within the range of "-1/3 EV or -1/2 EV to -3 EV".
When the percentage of the picture occupied by a dark background is large (people standing in spotlights, etc.), if the photograph is taken in the average metering mode, the people tend to be over-exposed. In such cases, compensate the exposure within the range of -1/3 EV or -1/2 EV to -3 EV to reduce the exposure.

<2. Taking photographs with the AE lock>
AE lock allows you to hold a certain exposure value even if the light changes or the composition is altered. It allows you to customize exposure in autoexposure modes. Use it when the subject is lit from behind or when you want to take a series of photographs of a moving subject with a constant exposure.

- When the exposure is locked, the metering mark in the viewfinder flashes.
- Set the AE lock mode while the display in the viewfinder is lit.
1 Point the camera so that the center of the viewfinder is on the area for which the exposure is required, turn the main switch "ON" and select "AEL". The exposure is then locked (AE lock). When you want to set the exposure on a select area within the frame, set the center divided partial metering mode ■ then lock the exposure. See page 31 for setting details.

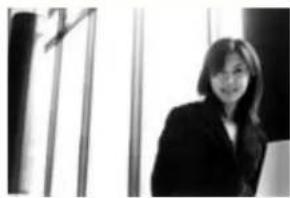
2 Reposition the camera for the desired composition, then take the picture.
- When the exposure is locked, the exposure remains in the memory and photographs can be taken as many times as you want with the same exposure value. To save energy, the mark turns off after 16 seconds.
- In the continuous shooting mode (drive mode "C") the exposure can be locked on a moving subject so that it is possible to take multiple photographs with the same exposure regardless of changes in the background.
- When AE Lock is set the camera stores the exposure determined by the combination of the shutter speed and aperture. In the "Av" mode, if the aperture is changed after the exposure is locked, the shutter speed is shifted so that the overall exposure remains constant.
- If the position of the exposure compensation dial is changed while the exposure is locked, the exposure compensation changes, depending on the exposure mode, as shown below.
Exposure mode What is compensated
Aperture priority auto (Av) Shutter speed
Shutter priority auto (Tv) Aperture
Program auto (P) Aperture and shutter speed
CF half-press the shutter button to change to "AE lock". (page 87)
<3. Taking photographs with the Autobracketing Exposure Mode (ABC Exposure mode)>
The ABC Exposure mode can be used to take a series of three photographs with three exposures: standard, overexposed, and underexposed. This mode allows photography under very subtle lighting conditions without the need to determine exposure. Continue pressing the shutter button to catch that important shot.
* ABC stands for Automatic Bracketing Control.
In the ABC Exposure mode, the shutter speed and aperture are controlled for automatic exposure compensation.
| Exposure mode What is controlled |
| Aperture priority auto (Av) Shutter speed |
| Shutter priority auto (Tv) Aperture |
| Program auto (P) Aperture and shutter speed |
| Manual exposure (M) Shutter speed |
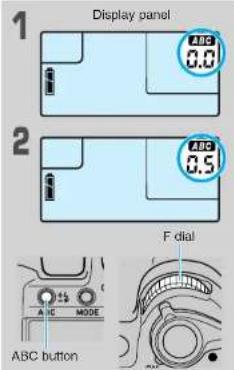
1 Press the ABC button to select the ABC mode. The "ABC" and "0.0"(compensation range) appear on the display panel.
2 Turn the F dial to select the compensation range.
The "0.3" (1/3EV), "0.5" (1/2EV) and "1.0" (1EV) compensation ranges are available.
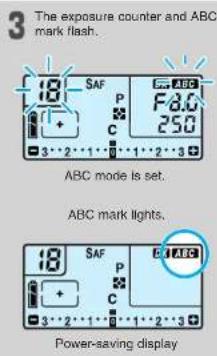
3 Press the ABC button to set the ABC mode. The exposure counter and ABC mark appear on the display panel, and the exposure counter flashes in the viewfinder.
4 Focus on the subject and press the shutter button.
Photographs are taken with standard exposure, over-exposure, and under-exposure in the selected drive mode.
- To cancel during operation, set the ABC compensation range to "0.0".
- Always return the ABC compensation range to "0.0" after the ABC Exposure mode is terminated. The set ABC compensation range is stored in memory until the camera power supply is switched "OFF".
| Drive mode ABC Exposure mode | |
| S ABC Exposure mode set for each frame. | |
| C | ABC Exposure mode set for three frames and then terminated. |
| ABC Exposure mode set with continuous photography after ten seconds. | |
Standard
Over
Under
For example, if the ABC Exposure is used at the 18th frame, the exposure counter is as follows:
1st frame 2nd frame 3rd frame 4th frame Focus position Standard Over Under (repeated)
Standard
Counter 18 19 20 21


Display Both left and Left flashing Right flashing Both left and right flashing right flashing
- When used with exposure compensation in the ABC Exposure mode, the exposure value is used as the base value for autobracketing.
- Metering is repeated for each photograph, and compensation determined for the metered value at that time. It is recommended that the AE lock be set before beginning photography if autobracketing without the effects of changing brightness is required.
- If the compensation range exceeds the compensation limits of the camera, photographs are taken at the limit of the possible compensation values.
- If the main switch is turned "OFF" and "ON" again in the ABC Exposure mode, ABC photography begins again from the first frame for three frames. • The flash cannot be used in the ABC Exposure mode. “CF” The compensation sequence may be changed to over-exposure → standard exposure → under-exposure (page 87).
4. Using the selftimer
Use this mode to include yourself in the photograph.

1 Set the drive mode to "🔊".
For instructions on setting the drive mode, see page 31.
Adjust the focus, then press the shutter button.
The self-timer is activated and the shutter is released after 10 seconds. The self-timer LED on the front of the camera flashes while the self-timer is operating.
- When using the self-timer, light entering the viewfinder when the eye is moved away may interfere with a correct reading of incident light. In such cases, fit the viewfinder shade adapter to the viewfinder before taking photographs. (page 14)
- Use a tripod when taking photographs with the self-timer.
- The self-timer cannot be used when the bulb mode is set.
- If the shutter button is pressed after the self-timer has been activated, the self-timer time is reset. • To cancel the self-timer after it has been activated, turn the main switch off.
5. Date and time imprinting
![graph TD A["SET button"] --> B["SELECT button"] B --> C["MODE"] C --> D["SELECT SET"] D --> E["MODE select button"] F["Year Month Date Date Month Year"] --> G["01 12:24"] G --> H["24 15:36"] H --> I["Date Hour Minute Month Date Year"] I --> J["No imprint"] J --> K["24 12:01"] K --> L["12:24:07"] L -…](/content/2026/05/785596/images/9bfefc7234c9dbf36be0c184e62207692ab8952b74a071c46ba1e3f12de2ff7e.jpg)
The date and time may be imprinted during photography in cameras fitted with the data back. The separately available Contax Data Back D-11 may be fitted to cameras not supplied with this option.
• The data back contains a battery when shipped from the factory.
1 Select the imprint mode.
A different mode is selected each time the mode select button is pressed. Selection is in the following order. Year Month Date → Date Hour Minute → ---- (No imprint) → Month Date Year → Date Month Year
2 Press the shutter button to take a photograph.
- The "mark flashes at the top-right of the display window to indicate that the display has been imprinted on the photograph. • The "M" mark on the numbers indicates the month, and is not imprinted.
- Select —— if the date or time is not required.
- The date or time is printed at the bottom-right of the photograph. If the photograph is bright (e.g. white or yellow) in this area, the numbers may be difficult to read.
The date and time are changed as follows.
① Press the mode select button to display the date. ② Press the select button until the item to be changed flashes. ③ Press the set button to change to the correct value. (The seconds may be changed when “*” appears on the time display. Press the set button at the tone for accurate adjustment.)
④ When the time and date have been changed, press the select button until the numbers no longer flash.
As a long-life lithium battery (CR2025) is used in the Data back, it only needs to be replaced at 3-4-year intervals. As the battery deteriorates the date and time display become faint, and the LCD no longer functions in the normal manner. When this stage is reached, the battery should be replaced in the diagram (battery replacement every 2 to 3 years is recommended if the Data back is used frequently).

1. Remove the screw holding the battery cover on the data back, and open the cover. 2. With the + terminal of the new battery facing outwards, place it in the battery compartment and replace the cover and screw. - Always reset the date and time after replacing the battery.
Warning
It is particularly important to ensure that the date battery (CR2025) is kept out of the reach of children. Contact a doctor immediately if the battery is swallowed.
6. Checking the depth of field 7. Cable switch socket

When a lens is focused on the subject, objects within a range in front of, and behind, the subject are also in focus. This range is referred to as the "depth of field". The aperture remains fully open in the viewfinder, however when the aperture stop-down button is pressed the aperture is closed down to the previously set value to allow checking of the depth of field and the fuzziness of the background.
• The viewfinder becomes darker in accordance with the aperture value. - Checking the exposure, and taking a photograph, with the aperture button pressed, will not result in the standard exposure.

F1.4 F16
Cable switch socket
Connect an LA type cable switch.
- When taking photographs using an LA type cable switch and shooting automatically without looking through the viewfinder, it may not be possible to achieve the proper exposure due to light entering through the eyepiece. In such cases, fit the viewfinder shade adapter to the viewfinder before taking the photograph (page 14). - Do not use a commercially available mechanical cable release with the cable switch socket as it may result in a fault.
8. Replacing the camera back
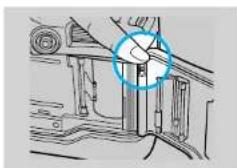
The camera back can be removed and replaced with the separately available D-11 data back (page 96). Remove the camera back by pressing down on the release pin.
Depth of field for a given lens varies as follows. ① Depth of field increases as the aperture is closed down, and is reduced as the aperture is opened. ② The depth of field is increased as the distance to the subject increases, and is reduced as the distance to the subject decreases. ③ Depth of field for a subject in focus is greater behind than in front of the subject. Depth of field is greater for lenses with short focal lengths, and shorter for lenses with long focal lengths.
FLASH PHOTOGRAPHY
Use of the flash is recommended with indoor and night-time photography when the shutter speed is 1/30 second or shorter. The camera incorporates the "TTL direct metering" function for controlling the built-in flash automatically from the camera when it is used together with a Contax TLA flash system.
When using the TLA360 flash, be sure to read "2. Taking photographs using a Contax TLA360 flash" (page 7B).
Refer to page 81 when using a non-dedicated flash with only an X contact.
1. Taking photographs using the internal flash
<1. Taking photographs using the TTL auto flash function with the internal flash>
The amount of light from the flash reflected off the subject onto the film is measured (TTL direct metering) to control the flash intensity.
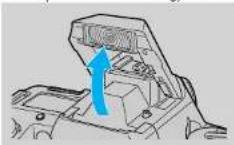
1 When the internal flash is raised manually the flash power supply is switched ON and charging begins. Once the flash is charged, the " \$ mark lights in the viewfinder and the shutter speed is set automatically as follows in accordance with the selected exposure mode.
❖AV (aperture priority auto) mode
| Metered value of ambient light Automatically set shutter speed Display | |
| 32 to 1/60 sec. 1/60 sec. "60" lit | |
| 1/60 to 1/125 sec. 1/60 to 1/125 sec. "60" to "125" lit | |
| 1/125 to 1/4000 sec. 1/125 sec. "125" flashes (*) | |
* "125" flashes to indicate overexposure. Close the aperture until the flashing ceases and the LED is lit continuously.
◆Tv (shutter priority auto)
| Set shutter speed Automatically set shutter speed Display | ||
| 32 to 1/125 sec. | 32 to 1/125 sec. | Set shutter speed |
| 1/125 to 1/4000 sec. 1/125 sec. | "125" lit | |
❖P (program auto) mode
| Metered value of ambient light Automatically set shutter speed Display | |
| 32 to 1/60 sec. 1/60 sec. "60" lit | |
| 1/60 to 1/125 sec. 1/60 to 1/125 sec. "60" to "125" lit | |
| 1/125 to 1/4000 sec. 1/125 sec. "125" lit | |
❖M (manual) modes
- In the "M" mode, the shutter speed is not set automatically. Be sure to set it to 1/125 seconds or slower. • The set shutter speed is displayed in the viewfinder.

2 Set sync select switch to "NORMAL". 3 Set the aperture or shutter speed in accordance with the following table, and take the photograph.
| Exposure mode | Aperture or shutter speed |
| P | Set automatically by camera. |
| Av, M Set the aperture. Take the photograph at the set aperture. | |
| Tv | The aperture is set automatically to the standard value for ambient light. Closed down automatically in bright light. |
- The " " mark flashes (twice per second) while the internal flash is charging. The shutter will not operate while the internal flash is charging.
- If the light is adjusted following photography, the "$" mark flashes rapidly (four times per second) for two seconds.
- If the "" mark does not flash following photography, the subject is too far away resulting in under-exposure. Either move the camera closer to the subject, or open the aperture, and take the photograph. The distance range for photography is reduced if using reversal film, and photographs should be taken within the flash photography range shown on the following page. • Over-exposure may still occur even if the "" mark flashes following close-up photography. Photographs should be taken within the flash photography range shown on the following page. • The ABC Exposure mode cannot be used with the flash.
- When drive mode "C" (continuous photography mode) is selected, the shutter operates repeatedly only waiting for the flash to charge.
- Use ISO25 to 800 film (does not include exposure compensation).
4 When photography is complete, close the internal flash by pressing it.
* CF the flash may be set to reduce red-eye (*).
* The pupil of the eye may sometimes appear red (red-eye) when taking photographs of people in dark locations. This setting reduces this problem. - The flash is lit twice at approximately 0.7 second intervals, and the shutter operated simultaneously with the second flash. Take care to ensure that the camera and the subject remain stationary after the first flash. • The effects of red-eye reduction differ between individuals.
Range for internal flash photography (units in m)
| Film speed (ISO) Aperture | ISO 100 ISO 400 | |
| F1.4 2.0 - 9.6 (m) | 4.0 - 19.0 (m) | |
| F2 1.4 - 6.7 (m) | 2.8 - 13.4 (m) | |
| F2.8 1.0 - 4.8 (m) | 2.0 - 9.5 (m) | |
| F4 1.0 - 3.3 (m) | 1.5 - 6.6 (m) | |
| F5.6 1.0 - 2.4 (m) | 1.0 - 4.8 (m) |
- The angle of illumination of the built-in flash is such that the angle of view is covered with a focal length of 28mm. When using wide-angle lenses of less than 28mm the edges of the scene will appear darker.
- When using the built-in flash, always remove the lens hood before taking photographs. Using the flash with the lens hood in place will restrict illumination of the scene, and the shadow of the hood may appear in some photographs. Always stand at least 1 m from the subject when using the built-in flash. Photographs may appear darker if the distance to the subject is less than 1 m.
Illumination from the built-in flash is insufficient for use with the Vario-Sonnar 17-35mm F2.8 lens. Use a Contax TLA flash (except the TLA200) with this lens.
- When the distance to the subject is greater than the range of the internal flash, the light may not reach the subject and it will therefore be underexposed. In such cases, use an external Contax TLA flash with a high guide number.
- The built-in flash cannot be used simultaneously with a Contax TLA flash fitted on the accessory shoe.
- Close the internal flash before fitting a Contax TLA flash.
2. Light compensation with the internal flash
The internal flash may be used for light compensation with the camera in the same way as exposure compensation. The compensation range is -3 EV to +1 EV.

1. Raise the internal flash and press the button to select the light compensation setting mode. 2. Turn the F dial to set the compensation value. 3. Press the button to set light compensation. " " is added to the display panel. " " is displayed in the viewfinder. The set light compensation is saved in memory until the camera is switched off or the internal flash is retracted. Always cancel the setting after photography with light compensation. The compensation value is returned to "0.0" after it is cancelled. 4. Check that "1/2" is lit in the viewfinder (charging complete) before taking the photograph.

2. Taking photographs using a Contax TLA flash
A Contax flash unit is controlled from the camera in the same way as an internal flash to permit simple flash photography.
A flash unit separated from the camera is recommended when photographing subjects at a distance beyond the range available with the internal flash.
1. Taking photographs using the TTL auto flash function
The amount of light from the flash reflected off the subject onto the film is measured (TTL direct metering) to control the intensity of the flash.

1. Fit the TLA flash to the camera accessory shoe shown and switch the flash power supply ON. The built-in flash cannot be used simultaneously with a Contax TLA flash fitted on the accessory shoe. 2. Set the flash to the "TTL auto mode".
When the flash is charged, the * mark is lit in the viewfinder and the shutter speed is set automatically in accordance with the camera exposure mode.
Av (aperture priority auto)
| Metered value of ambient light Automatically set shutter speed Display | |
| 32 to 1/60 sec. 1/60 sec. "60" lit | |
| 1/60 to 1/125 sec. 1/60 to 1/125 sec. "60" to "125" lit | |
| 1/125 to 1/4000 sec. 1/125 sec. "125" flashes (*) | |
* *125" flashes to indicate overexposure. Close the aperture until the flashing ceases and the LED is lit continuously.
Tv (shutter priority auto)
| Set shutter speed | Automatically set shutter speed | Display |
| 32 to 1/125 sec. | 32 to 1/125 sec. | Set shutter speed |
| 1/125 to 1/4000 sec. 1/125 sec. | “125” lit |
P (program auto)
| Metered value of ambient light Automatically set shutter speed Display | |
| 32 to 1/60 sec. 1/60 sec. "60" lit | |
| 1/60 to 1/125 sec. 1/60 to 1/125 sec. "60" to "125" lit | |
| 1/125 to 1/4000 sec. 1/125 sec. "125" lit | |
M (manual exposure)
- The shutter speed is not set automatically with "M" selected. Always set to 1/125 sec. or less. • The set shutter speed is displayed in the viewfinder.
3 Set the aperture or shutter speed in accordance with the table below, and take the photograph.
| Exposure mode | Aperture or shutter speed |
| P | Set automatically by camera. |
| Av, M | Set the aperture. Take the photograph at the set aperture. |
| Tv | The aperture is set automatically to the standard value for ambient light. Closed down automatically in bright light. |
- If the light is adjusted following photography, the "$" mark flashes for two seconds.
- If the "$" mark does not flash following photography the subject is under exposed. Change the aperture and distance to the subject and take another photograph. • Over-exposure may still occur even if the "↓" mark flashes following close-up photography. Photograph within the range described in the manual supplied with the flash unit. • The ABC Exposure mode cannot be used with the flash.
- Check the flash performance when selecting drive mode "C" (continuous photography mode).
- Use ISO 25-800 film (does not include exposure compensation).
<2. Taking photographs using a Contax TLA360 flash>

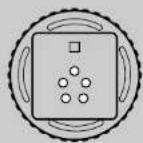
The TLA360 flash has a guide number 36 (ISO 100/35 mm lens angle of view). When used with this camera it offers the six functions described below in addition to regular TTL auto flash photography.
- These functions can be used when the flash unit is directly attached to the accessory shoe on the camera top. The flash system is not automatically set when it is used off the accessory shoe and through the TLA extension code or TLA lighting system.
- With Contax TLA flashes equipped with the auto flash function, the flash mount has five contacts.

① Auto set function
| FunctionFlash photography mode | Auto setting offilm speed | Auto setting ofaperuture value |
| TTL auto | ○ | ○ |
| External meteringauto | ○ | × |
| Manual | ○ | ○ |
| Multi-flash | ○ | ○ |
☐: The camera's settings are automatically set for the flash as well (after the flash is charged). X: The flash is not automatically set.
② Auto setting of the angle of illumination
The flash's angle of illumination is set automatically according to the focal length of the lens mounted on the camera.

❖ Making the setting
Mount the flash on the camera's accessory shoe and turn it "on" the flash. The angle of illumination is set automatically according to the lens mounted on the camera.
The flash display panel indicates the automatically set angle of illumination for the focal distance of a 35 mm lens.
• The focal length of the lens is set to 24 mm, 28 mm, 35 mm, 50 mm, 70 mm or 85 mm. - When a zoom lens is mounted, this function works automatically in conjunction with the lens setting within the above range. - If the lens is replaced when "AUTO ZOOM" is indicated on the flash, the angle of illumination is reset according to the new lens.
③ Manual setting of the angle of illumination
When the flash's zoom button is pressed, the manual setting mode is set. The zoom focal length switches each time the zoom button is pressed. Display the desired focal distance on the display panel.

④ Flash intensity compensation
This is available only in the TTL auto flash photography mode.
Compensation is not possible in other modes. - The flash intensity can be compensated within the range of -3 EV to +1 EV in 1/3 EV steps.
- The flash intensity is compensated in conjunction with the camera's exposure compensation value. If for example the camera's exposure compensation is "+1" and the flash's compensation is set to "+1", the flash intensity compensation is "+2EV".
1 Press the flash's "SEL" button.
- The compensation scale appears on the display panel and the "+/-" mark flashes.
2 Use the flash's "▲" and "▼" (up and down) buttons to set the compensation scale to the desired value.
Press the "SEL" button again.
The “+/-” mark stops flashing, remaining lit, and the compensation is set.
- The compensation scale on the flash's display panel indicates the compensation value for the flash.
- If the flash's compensation value is set to "0" (no compensation), the compensation scale turns off after 8 seconds.
⑤ "Auto off" and "auto on" functions
When the flash's power switch is set to "auto off", the flash's power turns off automatically after approximately 80 seconds. When the camera's shutter release button is half-pressed, the flash automatically turns on and charging starts.
These functions help save power when using the flash for long periods of time.
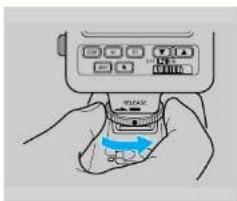
⑥ Shoe stopper
The TLA360's "mount" is equipped with a shoe stopper that prevents the flash from accidentally coming off the camera. When attaching and removing the flash from the camera, be sure to line up the flash's "mount" mark with the mark on the shoe lock ring.
The TLA360 is equipped with a variety of other functions as well. Be sure to read the TLA360's operating instructions to take advantage of all the flash photography possibilities the TLA360 has to offer.
3. Taking photographs using other flashes with the X contact

1. Fit the flash to the camera, select "M" as the exposure mode, and set the shutter speed to a maximum of "X125".
2. Set the aperture and take the picture.
Determine the aperture by following the flash's operating instructions.
- For non-direct contact flashes requiring cords, connect the flash to the synchronization terminal on the side of the camera.
4. Flash photography techniques
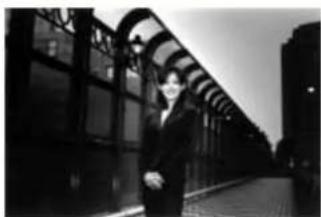
Slow synchronization photography
<1. Slow synchronization photography>
Slow synchronization with the shutter speed set at 1/30 second or slower can be effective for shooting evening or night views using a flash. Slow synchronization often adds more ambient light to the final picture. When the TLA flash's TTL auto mode is used, photographs can easily be taken with slow synchronization.
When the exposure mode is set to "P" or "Av"
Determine the composition, then set the main switch to "AEL". The shutter speed is locked at the metered value of the ambient light. Check that the flash is charged, then take the photograph.
When the exposure mode is set to "Tv"
Set the shutter speed to 1/30 sec. or less. Compose the picture and then set the main switch to "AEL". The aperture is locked at the metered value of the ambient light. Check that the flash is charged, and then take the photograph.
When the exposure mode is set to "M"
Set the shutter speed to 1/30 seconds or less. Adjust the aperture to set the exposure to the metered value of the ambient light so that the exposure meter indicates that the exposure is appropriate, then check that the flash is charged and take the photograph.
• The shutter speed is slow when slow synchronization is used, so use a tripod to prevent camera shake.
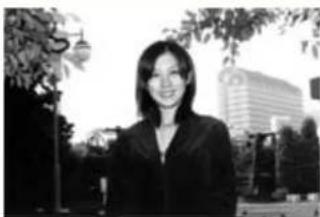
Daylight synchronization photography

<2. Daylight synchronization photography>
When taking photographs outdoors, for example of people in bright sunlight or lit from behind, the people tend to be dark in the resulting photograph. In such cases, photographs in which both the people and the background are well exposed can be achieved by using the internal flash or the TLA flash in the TTL auto mode.
When the exposure mode is set to "P"
In bright scenes, the aperture and shutter speed are adjusted automatically and the daylight synchronization mode is set.
When the exposure mode is set to "Tv"
In bright scenes, the aperture is adjusted automatically and the daylight synchronization mode is set.
When the exposure mode is set to "Av"
If "125" flashes in the shutter speed indication after the flash is charged, the picture will likely be overexposed. Decrease the aperture so that a shutter speed of under "125" is displayed, then take the picture.
When the exposure mode is set to "M"
When in the "M" mode, set the shutter dial to 1/125(×125) or less. Adjust the aperture so that the exposure meter in the viewfinder indicates that the exposure is appropriate, then take the photograph.

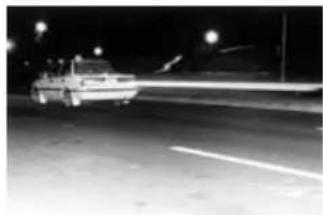
Second curtain synchronization

<3. Second curtain synchronization>
Taking photographs with second curtain synchronization is effective for shooting moving subjects using slow synchronization.
Normally with flash photography the flash is emitted directly after the shutter's front curtain has finished traveling (first curtain synchronization).
When an internal flash or a Contax flash equipped with the second curtain synchronization function is used, the flash can be triggered immediately before the shutter's rear curtain begins movement (second curtain synchronization).
The "ghost" movement of the subject thus appears more natural.
① Second curtain synchronization photography with the internal flash
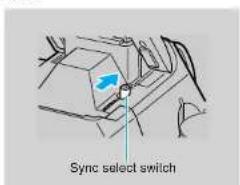
1 Set the sync select switch to ">>\$".
2 Check that the “ \$ mark in the viewfinder is lit (flash is charged), and take the photograph.
- Exposure control is the same as for normal flash photography (first curtain synchronization).
② Second curtain synchronization photography with a Contax TTL auto flash

1 Set the sync select switch to ">>\$".
2 Check that the “ \$ mark in the viewfinder is lit (flash is charged), and take the photograph.
- Exposure control is the same as for normal flash photography (first curtain synchronization).
<4. Use with exposure compensation>
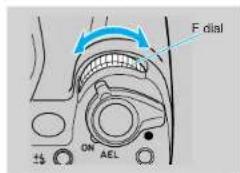
The flash intensity is compensated in conjunction with the camera's F dial exposure compensation with TTL auto flash photography. Use the F dial to adjust flash intensity for maximum effect.
CUSTOM FUNCTIONS
The functions of this camera can be customized to match your shooting style. As you work with this camera, you will develop your own personal approach.
1. List of custom functions
This camera is equipped with the 20 custom functions shown in the table below. When the camera is first purchased, these are all set to the standard or "default" functions (standard setting number "0"). (Note that all the explanations in this manual assume the detail numbers are set to "0"). To change the custom functions, refer to "Setting custom functions" (page 89).
- When the custom functions are set, the camera's functions and operating procedures change. Read this section carefully and be sure to use these features to your best advantage.
| Detail numberFunction number | Standard setting (0) | Changed setting (1) | Changed setting (2) | Changed setting (3) |
| 1 Power hold time• Illumination time also changed. | 16 sec. | 12 sec. | 8 sec. | 4 sec. |
| 2 AE lock by half-pressing the shutter button | No AE lock AE lock on | — | — | |
| 3 Shutter time setting step | 1 Tv 1/2 Tv | — | — | |
| 4 Exposure compensation step | 1/3 EV 1/2 EV | — | — | |
| 5 Evaluative metering display | Exposure compensation value | Difference to the center divided partial metering | Difference to center-weighted average metering | — |
| 6 ABC Exposure order | Standard → over → under | Over → standard → under | — | — |
| 7 AF target setting | Focus frame select lever | LIGHT button + focus frame select lever | — | — |
| 8 AF supplementary light | On Off | — | — | |
| 9 AF focus beep | On Off | — | — | |
| 10 Superimpose when shutter button half-pressed | On Off | — | — | |
| Detail numberFunction number | Standard setting (0) | Changed setting (1) | Changed setting (2) | Changed setting (3) |
| 1 Superimpose when focused | On Off | —— | —— | |
| 2 Rewind auto return | Auto return on | Auto return off | —— | —— |
| 3 Leave film tip when rewinding | Film tip not left | Film tip left | —— | —— |
| 4 Selection of aperture stop-down button operation | Aperture stopped down while pressed | Aperture switches between stopped down and open each time button is pressed | —— | —— |
| 5 Focus button function in "MF" mode | SAF CAF | —— | —— | |
| 6 Red-eye reduction with internal flash | Off On | —— | —— | |
| 7 Exposure compensation setting (with Av, P) | F dial | F dial and R dial | —— | —— |
| 8 Exposure value display when zoom lens is fitted (*) | Align aperture ring | Link to zooming | —— | —— |
| 9 Continued exposure compensation | Until power supply OFF | Until setting cancelled | —— | —— |
| 10 Exposure compensation setting | F dial | Set with F dial while pressing LIGHT button | —— | —— |
* When using lenses for which the open aperture value (brightness) varies with zooming (e.g., Vario Sonnar 28-80mm F3.5-5.6), the actual aperture is controlled by the camera so that it assumes the value set with the aperture ring, rather than being controlled by zooming. Set Custom Function (1) to vary the aperture with zooming.
2. Setting custom functions
1 Function number - Detail number
Custom function setting mode

2 Function number
3 Detail number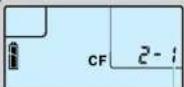
1 Set the position dial to "CF". The display panel is as shown at left (custom function setting mode). 2 Turn the R dial to select "Function number". 3 Turn the F dial to select "Detail number". 4 Set the position dial to a position other than "CF". The custom function is set. Return the dial to "(white) or " (green) and take the photograph. The display panel returns to the normal display. - To initialize all set functions, display "CLE" as previously described in 2, and set to a position other than "CF".
REFERENCE
90 91
1. Basic information on photography
Exposure is the act of exposing the film to light, thus converting brightness values in a scene to tonal values on film. Exposure is composed of the size of the opening in the lens (the aperture) and the duration of time in which the light passes through the lens to strike the film (the shutter speed).
The camera adjusts the amount of light to which the film is exposed by adjusting the length of time in which the shutter is open. The length of time that the shutter is open is called the shutter speed.
The aperture is an opening in the lens. The amount of light passing through the aperture to the film is adjusted by increasing or decreasing the diameter of the opening. The size of this opening is called the aperture value.
The film speed indicates the extent to which the film reacts to light, and is expressed as a figure determined by the ISO (International Standardization Organization).
2. Troubleshooting
If there seems to be a problem, check the following table before assuming the camera is malfunctioning.
| Symptom | Cause | Solution | See page |
| 1. Nothing appears on the display panel | No battery is loaded.Battery is fully spent.Battery is loaded upside-down. | Insert battery.Replace the bat-tery with a new one.Insert the battery properly. | 161616 |
| 2. Battery mark (‘) is flashing | Battery is spent. Replace the bat-tery with a new one. | 17 | |
| 3. Exposure counter flashes ‘00’ when film is loaded and camera back is closed | Film has not been advanced properly. | Reload the film. 20 | |
| 4. Viewfinder display is not clear | Diopter is not properly adjusted. | Turn the diopter adjustment dial to adjust. | 15 |
| 5. Shutter cannot be released | Drive mode is set to the “selftimer” mode.Internal flash is charging. | Switch to a different drive mode.Walt until charging is complete (i.e. “$lit) before taking the photo-graph. | 3173 |
| Symptom | Cause | Solution | See page |
| 6. Photographs are blurry | Focus is not properly adjusted walls. Camera is shaking when shutter button is pressed.Shutter speed is slow. | Adjust the focus properly.Press the shutter button gently so that the camera does not shake.Use a tripod. | 3819, 27 |
| 7. Exposure compensation mark is displayed. | Exposure compensation is still set. | Set the exposure compensation back to "0.0".Turn the main switch OFF. | 5858 |
| 8. Shutter speed or aperture value flashes during auto photography | Subject is either too bright or too dark. | Adjust the exposure as described on page 54. | 54 |
| 9. Exposure counter is flashing (other than "00") | ABC mode is set. Set ABC compensation back to "0.0". | 62 | |
| 10. Metering mark flashes when shutter button is half-pressed | "AE lock on" selected when half-pressed. | Set custom function to "2-0". | 87 |
3. Shutter speed and aperture value display
The shutter speed and aperture value are displayed as described below.
• The shutter speed display indicates shutter speeds between "4000" (1/4000 second) and "32" (32 seconds). When the camera's exposure mode is set to "Av" or "P", the shutter speed value with respect to the aperture is displayed in steps of 1/2, and when the exposure mode is set to "Tv" or "M", the set shutter speed value is displayed at every step (may also be displayed in steps of 1/2 with mode "Tv" and "M" in the iGEL mode). - The aperture value is displayed in steps of 1/2 within the aperture range of the currently mounted lens. When operating with a precision of greater than 1/2 step, the closest value is displayed. For example, when the aperture is 3.3, the aperture is displayed "3.5".
| Shutter speed Aperture value | |||
| Av or P (displayed in steps of 1/2Tv as custom function with Tv and M) | Shutter speed set in modes Tv and M | All modes | |
| 4000 | 10 | 4000 | 1.2 |
| 2800 | 8 | 2000 | 1.4 |
| 2000 | 6 | 1000 | 1.7 |
| 1400 | 4 | 500 | 2.0 |
| 1000 | 3 | × 250 | 2.4 |
| 700 | 2 | 125 | 2.8 |
| 500 | 0° 7 | 60 | 3.5 |
| 350 | 1" | 30 | 4.0 |
| 250 | 1° 4 | 15 | 4.5 |
| 180 | 2" | 11 | 5.6 |
| 125 | 2° 8 | 8 | 6.5 |
| 90 | 4" | 4 | 8.0 |
| 60 | 5° 6 | 2 | 9.5 |
| 45 | 8" | 1" | 11 |
| 30 | 11° | 2" | 13 |
| 20 | 16" | 4" | 16 |
| 15 | 22" | 8" | 19 |
| 32" | 16" | 22 | |
| 32" | 27 | ||
| 32 | |||
| 38 | |||
| 45 | |||

1. Contax Data back D-11 2. Contax Cable switch LA type
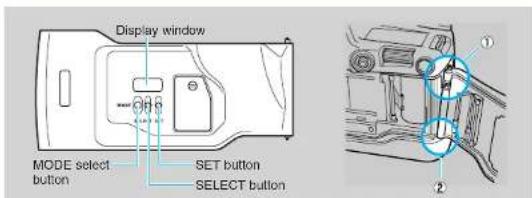
The D-11 is a quartz clock-controlled LCD data back mounted on the camera in place of the Contax NX camera back.
The auto date mechanism allows automatic imprinting of the date and time on the film.
1 Open the standard camera back, hold the release pin down, and remove the back.
2 Insert the bottom of the shaft on the data back into the corresponding hole in the camera, hold the release pin down, align the top of the shaft with the corresponding hole in the camera, and release the pin. The data back is now fitted to the camera.
Data back specifications
Type: Quartz clock-controlled (auto calendar) LCD data back
Imprint function: Year Month Date, Date Hour Minute, No imprint, Month Date Year, Date Month Year
Imprint method: Automatic imprinting linked to shutter movement
Film speed setting: Automatic
Battery: 3V lithium (CR2025)
Dimensions: 139mm (width) x 62mm (height) x 12mm (depth)
Weight: 75g (excluding battery)
* Specifications and appearance liable to change without prior notice.
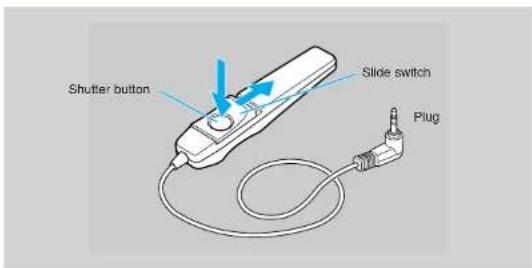
The Cable switch LA type can be used for close-up or tele photograph photography when using a tripod or to release the shutter remotely from the camera. It is especially suited for close-up or tele photograph photography because it eliminates the risk of camera shake when the shutter is released.
Photographs are taken using the cable switch's shutter button (which also has a half-press function). The slide switch offers convenience for extended exposures and continuous shooting.
The cord length is 50 cm for the LA-50, 5 meters for the LA-500.
Insert the cable switch's plug into the camera's cable switch socket.
The cable switch's shutter button functions in the same way as the camera's shutter button. Half-press it to measure the distance or light or to lock the focus, press it all the way in to release the shutter.
When taking long-time exposures or using continuous advance, use the slide switch for convenience. The shutter operates continuously when the slide switch is pulled forward (when the red mark is visible), and closes (exposure stops) when the switch is set back to its original position.
3. Contax Power pack P-8, P-8D
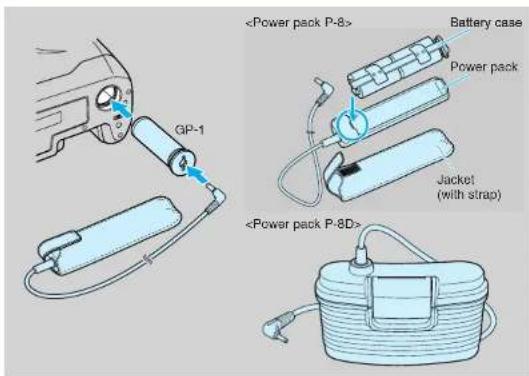
The Power pack P-8 is an external power supply using four 1.5V LR6/AA NIH batteries or four 1.2V LR6/AA Ni-Cd batteries. This pack allows the camera to be used with a remote power supply kept in a warm place. This prevents loss of battery performance due to the influence of cold working conditions.
The Power pack P-8D is an external power supply using four 1.5V D-size NIH batteries. Use it as required when large numbers of photographs are to be taken.
* The separately available GP-1 Contax power pack adapter is required when using the P-8D in conjunction with the Contax NX.
- Fit the GP-1 Contax power pack adapter to the camera.
Remove the lithium batteries from the camera, insert the GP-1, and turn to lock in place.
- Keep the battery cover in a safe place.
- Load the batteries in the Power pack.
[P-8]
① Insert four AA-size batteries in the battery case (supplied with the P-8 power pack) as shown, and fit to the P-8.
② Place the P-8 main unit inside a jacket (case).
[P-8D]
Insert the batteries as described in the manual supplied with the P-8D.
- Insert the plug on the power pack cord in the socket on the GP-1 adapter.
- When shooting, place the power pack in a thermal cover to prevent heat loss.
- When replacing batteries, do not mix different types of batteries, or old batteries with new batteries. Replace all four batteries at the same time with new batteries of the same type.
- When not using the power pack for a long period of time, remove the batteries from the battery case to prevent leakage of battery fluid.
- Hold the plug when disconnecting. Do not pull on the cord.
■P-8 specifications
Configuration: Power pack body, battery case, jacket (with strap), cord (1.5m).
Power supply: Four 1.5V AA-size alkali batteries, or four 1.2V AA-size NiH batteries (cheap AA-size manganese batteries have insufficient capacity and should not be used).
■Batteries and Films
Lens: VS28-80/3.5-5.6
Film: 24-exposure cartridge
Battery type: 1.5V AA-size alkali dry battery
Condition A: Close-up → ∞ → close-up, single shutter release, leave for 16 seconds.
| Normal temperature (20°C) Low temperature (-10°C) | |
| Approx. 20 rolls Approx. 12 rollsNot using flash | |
| Approx. 10 rolls Approx. 6 rollsUsing flash 50% of time | |
| Approx. 8 rolls Approx. 4 rollsUsing flash 100% of time |
Condition B: Close-up → ∞ → close-up, single shutter release, leave for 4 seconds.
| Normal temperature (20°C) Low temperature (-10°C) | |
| Approx. 50 rolls Approx. 25 rolls Not using flash | |
| Approx. 15 rolls Approx. 8 rolls Using flash 50% of time | |
| Approx. 10 rolls Approx. 5 rolls Using flash 100% of time |
Battery type: 5V AA-size lithium battery
Condition A: Close-up → ∞ → close-up, single shutter release, leave for 16 seconds.
| Normal temperature (20°C) Low temperature (-10°C) | |
| Approx. 60 rolls Approx. 25 rolls Not using flash | |
| Approx. 25 rolls Approx. 15 rolls Using flash 50% of time | |
| Approx. 15 rolls Approx. 12 rolls Using flash 100% of time |
Condition B: Close-up → ∞ → close-up, single shutter release, leave for 4 seconds.
| Normal temperature (20°C) Low temperature (-10°C) | |
| Approx. 150 rolls Approx. 50 rolls Not using flash | |
| Approx. 40 rolls Approx. 20 rolls Using flash 50% of time | |
| Approx. 20 rolls Approx. 15 rolls Using flash 100% of time |
Battery type: 1.2V AA-size NiH battery (fully charged)
Condition A: Close-up → ∞ → close-up, single shutter release, leave for 16 seconds.
| Normal temperature (20°C) Low temperature (-10°C) | ||
| Approx. 30 rolls Approx. 25 rolls Not using flash | ||
| Approx. 15 rolls Approx. 12 rolls Using flash 50% of time | ||
| Approx. 10 rolls Approx. 8 rolls Using flash 100% of time | ||
| Condition B: Close-up →∞→ close-up, single shutter release, leave for 4 seconds. | ||
| Normal temperature (20°C) | Low temperature (-10°C) | |
| Approx. 80 rolls Approx. 60 rolls Not using flash | ||
| Approx. 20 rolls Approx. 15 rolls Using flash 50% of time | ||
| Approx. 15 rolls Approx. 10 rolls Using flash 100% of time | ||
■P-8D specifications
Type: Contax camera external power supply, cord (1.5m)
Power supply: Four 1.5V D-size dry batteries, or four 1.2V D-size NiH batteries (D-size
manganese batteries have insufficient capacity and should not be used). Cord: Approximately 1.5m
Dimensions: 148mm (width) x 84mm (height) x 58mm (depth)
Weight: 160g (excluding batteries)
4. Contax Power pack adapter GP-1
The GP-1 adapter is used in combination with the Contax power packs P-8 and P-8D when used as external power supplies for the Contax NX.
5. Contax Mount adapter NAM-1 6. Contax Flexible case
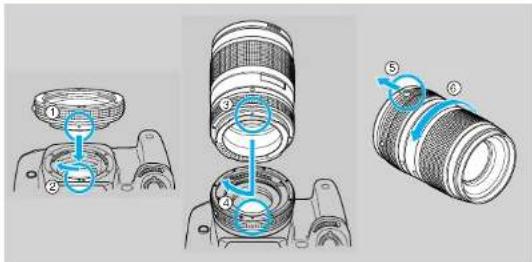
This adapter allows the use of Contax 645 System lenses with the Contax NX. Usable with all NX models.
- Line up the body mount mark on the mount adapter with the camera's lens mark insert, then turn in the direction of the arrow to mount.
- Line up the mark on the lens (red) with the lens mount mark on the adapter then turn in the direction of the arrow to mount.
- To remove the lens, slide the mount adapter's release button ⑤ hold it there, then turn the lens counterclockwise and remove it.
- To remove the mount adapter, turn it counterclockwise while pressing the camera's lens release button.
By extending or contracting the tip of the case, the NX can be placed in the case with the Data back D-11 and the following Carl Zeiss T* lenses mounted (645 mount lenses require the NAM-1 mount adapter).
| Lenses (with one filter, lens cap, and hood (reversed)) | |||
| TlpCase | N mount lens | 645 mount lens | |
| C-9 | Contracted | VS28-80/3.5-5.6P50/1.4 | P80/2 |
| Extended | VS70-200/3.5-4.5VS24-85/3.5-4.5VS17-35/2.8*( * without hood) | S140/2.8D55/3.5 | |
* Use the C-8 flexible case (for the N1) when the MS100/2.8, VS70-300/4.0-5.6, and 645 mount lens AMP 120/4, D45/2.8, D3.5/3.5 (* without hood) lenses are filled.
Main specifications
Type: 35mm focal plane type AF/AE single lens reflex camera
Picture size: 24 x 36mm
Lens mount: Contax N mount
Shutter type: Vertical travel focal plane shutter
Shutter speed: Av, Tv and P: 32~1/4000 sec.
M: 32-1/4000 sec. and bulb
X: 1/125 sec. (M mode)
Sync contact: X contact (synchronized at up to 1/125 sec.)
Direct contact and synchronization terminal included
Selftimer: Electronic type, 10 sec. delay
Shutter release: Electronic release, with dedicated cable switch socket
Exposure control: ① Aperture priority auto ② Shutter priority auto ③ Program auto
④ Manual exposure ⑤ TTL auto flash
Metering system: TTL evaluative metering, center-weighted average metering, or center
divided partial metering selectable
Metering range (ISO 100, F1.4):
Center-weighted average metering : EV 0-20
Center divided partial metering : EV 3-20
Film speed range: Automatic setting with DX code ISO 25-5000
Manual setting ISO 6-6400
AE lock: Image surface value memory
Exposure compensation:
+3EV--3EV (in steps of 1/3 or 1/2)
ABC mechanism: Exposure compensation with ABC button and F dial setting
Compensation range ±1/3EV/±1/2EV/±1EV
Internal flash: Guide number 13.5 (ISO 100), angle of illumination up to a focal length
of 28mm, red-eye reduction flash
Automatic flash intensity adjustment:
TTL direct metering
Flash synchroniza
Automatic selection of shutter speed when flash charged
Flash auto setting function:
Possible by combination with Contax flash unit with flash auto setting
function
Second curtain synchronization:
Possible with Internal flash or Contax flash unit with second curtain
synchronization function
Autofocus: 5-point TTL phase difference detection
Viewfinder: Pentaprism eye-level (long-eye point)
• Field of view 93% • Magnification 0.78x
(with 50mm standard lens at infinity, -1D diopter)
Diopter correction: Eight different FL type lenses are available
Focusing screen: Fixed, full matte
Viewfinder display:
Focus frame, exposure counter/selftimer time/ABC shooting order/film
loading, flash mark, compensation mark, focus display, aperture value,
shutter speed, metering mark, exposure meter, exposure compensation
mark, manual exposure mark
Display panel: Exposure counter/selftimer time/ABC shooting order/bulb elapsed
Time/film loading, battery mark, distance display, focus mode (manual
focus, single autofocus, continuous autofocus), exposure mode (manu-
al exposure, aperture priority auto, shutter priority auto, program auto),
metering display (center divided partial metering, center-weighted aver-
age metering, evaluative metering), drive mode (selftimer photography,
single-frame photography, continuous photography), DX/ISO mark, ABC
compensation mark, internal flash intensity compensation mark, aper-
ture value/ABC compensation/internal flash intensity compensation,
shutter speed/film speed/custom functions, exposure compensation, CF
mark
Film loading: Auto loading with automatic advance to exposure counter '01'
Film advance: Automatic with built-in motor
Film rewind: Automatic with built-in motor (with auto return/auto stop function), mid-
roll rewinding possible
Drive modes: Single frame, continuous, 10 sec. delay selftimer
Winding speed: Up to approximately 2.3 frames/sec, continuous shooting ("C" mode)
(using a new battery, at normal temperature, and based on Contax test-
(ng standards)
Exposure counter: Auto reset additive type for display panel and viewfinder
Accessory shoe: Direct X contact (with TLA flash interlocking contacts)
Custom functions: See list of custom functions on page 86
Camera back: Opened and closed with camera back release lever, removable, with
film check window
Batteries: 3V lithium battery (CR2) x 2
Battery check: Auto check, indicated on display panel

Number of films: Using a new battery based on Contax testing standards
Lens: V328-60/3.5-5.6 Film: 24-exposure cartridge
Condition A: Close-up → ∞ → close-up, single shutter release, leave for 16 seconds.
| Normal temperature (20°C) Low temperature (-10°C) | |
| Approx. 25 rolls Approx. 12 rolls Not using flash | |
| Approx. 8 rolls Approx. 5 rolls Using flash 50% of time | |
| Approx. 5 rolls Approx. 3 rolls Using flash 100% of tin |
Condition B: Close-up → ∞ → close-up, single shutter release, leave for 4 seconds.
| Normal temperature (20°C) | Low temperature (-10°C) | |
| Approx. 60 rolls | Approx. 25 rollsNot using flash | |
| Approx. 10 rolls | Approx. 8 rollsUsing flash 50% of time | |
| Approx. 7 rolls Approx. 4 rollsUsing flash 100% of time | ||
Miscellaneous: Aperture stop-down button, AF supplementary light
Dimensions and weight:
NX : 142mm (width) x 113mm (height) x 66mm (depth)
605g (Not including batteries)
NXD : 142mm (width) x 113mm (height) x 66mm (depth)
625g (with Data back, not including batteries)
* Note that specifications and design are subject to change without notice. In order to take full advantage of the functions of this product, we recommend using Carl Zeiss interchangeable lenses and Contax accessories. Contax warranties do not cover accidents or damage resulting from the use of products of other manufacturers, even when such products are sold for use with Contax products.
- CONTAX NX
- KYOCERA CORPORATION
- ENGLISH
- SAFETY WARNINGS
- CAUTION
- WARNING
- CAUTIONS IN HANDLING
- DISPLAY PANEL AND VIEWFINDER DISPLAY
- BASIC OPERATIONS PRIOR TO SHOOTING
- FITTING THE STRAP AND VIEWFINDER SHADE ADAPTER
- FITTING THE EYE CUP/DIOPTER CORRECTION LENS
- INSERTING THE BATTERIES AND CHECKING THE BATTERY POWER
- MOUNTING AND REMOVING LENSES
- HOLDING THE CAMERA
- LOADING FILM
- SHUTTER CURTAIN
- SETTING THE FILM SPEED MANUALLY
- REMOVING FILM
- MAIN SWITCH 2. SHUTTER RELEASE BUTTON
- POSITION DIAL 4. F AND R DIALS
- MODE BUTTON AND MODE DETAILS 6. SELECTING THE MODE
- [MODE DETAILS]
- ABC/ BUTTON
- FOCUS BUTTON
- SYNC SWITCH
- SIMPLE SHOOTING PROCEDURE
- USING THE “○(GREEN) SETTING ON THE POSITION DIAL
- USING THE “🔒 (GREEN) SETTING ON THE POSITION DIAL
- FOCUSING
- SELECTING FOCUS FRAMES
- CI ROCKING A SELECTED FRAME
- FOCUSING IN THE AUTOFOCUS MODE
- ◆IN THE "SAF" (SINGLE AUTOFOCUS) MODE
- ◆IN THE "CAF" (CONTINUOUS AUTOFOCUS) MODE
- FOCUSING MANUALLY
- SELECTING THE METERING MODE
- TYPES OF METERING MODES AND THEIR FEATURES 2. METERING
- (● MARK)
- APPLIED PHOTOGRAPHIC TECHNIQUES
- AUTOEXPOSURE PHOTOGRAPHY
- OVER-EXPOSURE WARNING
- UNDER-EXPOSURE WARNING
- MANUAL EXPOSURE PHOTOGRAPHY
- [TAKING PHOTOGRAPHS WITH EXPOSURE COMPENSATION IN THE MANUAL EXPOSURE MODE]
- TAKING PHOTOGRAPHS WITH EXPOSURE COMPENSATION
- EXAMPLE
- REPOSITION THE CAMERA FOR THE DESIRED COMPOSITION, THEN TAKE THE PICTURE
- USING THE SELFTIMER
- DATE AND TIME IMPRINTING
- SELECT THE IMPRINT MODE
- PRESS THE SHUTTER BUTTON TO TAKE A PHOTOGRAPH
- CHECKING THE DEPTH OF FIELD 7. CABLE SWITCH SOCKET
- CONNECT AN LA TYPE CABLE SWITCH
- REPLACING THE CAMERA BACK
- FLASH PHOTOGRAPHY
- TAKING PHOTOGRAPHS USING THE INTERNAL FLASH
- ❖M (MANUAL) MODES
- TAKING PHOTOGRAPHS USING A CONTAX TLA FLASH
- ② AUTO SETTING OF THE ANGLE OF ILLUMINATION
- ③ MANUAL SETTING OF THE ANGLE OF ILLUMINATION
- ④ FLASH INTENSITY COMPENSATION
- ⑥ SHOE STOPPER
- TAKING PHOTOGRAPHS USING OTHER FLASHES WITH THE X CONTACT
- FLASH PHOTOGRAPHY TECHNIQUES
- WHEN THE EXPOSURE MODE IS SET TO "P" OR "AV
- WHEN THE EXPOSURE MODE IS SET TO "TV
- WHEN THE EXPOSURE MODE IS SET TO "M
- WHEN THE EXPOSURE MODE IS SET TO "P
- WHEN THE EXPOSURE MODE IS SET TO "AV
- CUSTOM FUNCTIONS
- LIST OF CUSTOM FUNCTIONS
- SETTING CUSTOM FUNCTIONS
- REFERENCE
- BASIC INFORMATION ON PHOTOGRAPHY
- TROUBLESHOOTING
- SHUTTER SPEED AND APERTURE VALUE DISPLAY
- CONTAX DATA BACK D-11 2. CONTAX CABLE SWITCH LA TYPE
- DATA BACK SPECIFICATIONS
- CONTAX POWER PACK P-8, P-8D
- P-8 SPECIFICATIONS
- BATTERIES AND FILMS
- BATTERY TYPE: 1.5V AA-SIZE ALKALI DRY BATTERY
- BATTERY TYPE: 5V AA-SIZE LITHIUM BATTERY
- BATTERY TYPE: 1.2V AA-SIZE NIH BATTERY (FULLY CHARGED)
- P-8D SPECIFICATIONS
- CONTAX POWER PACK ADAPTER GP
- CONTAX MOUNT ADAPTER NAM-1 6. CONTAX FLEXIBLE CASE
- MAIN SPECIFICATIONS
Brand : CONTAX
Model : NX
Category : Camcorder