25BCSDD1 - Microwaves IFB - Free user manual and instructions
Find the device manual for free 25BCSDD1 IFB in PDF.


| Product Type | Countertop Microwave Oven |
| Brand | IFB |
| Model | 25BCSDD1 |
| Capacity | 25 Liters |
| Dimensions (W x D x H) | Approx. 510 x 420 x 310 mm |
| Net Weight | Approx. 14 kg |
| Power Supply | 230 V, 50 Hz, 16 A |
| Power Consumption | Microwave: 1400 W, Grill: 1000 W |
| Microwave Output Power | 900 W |
| Control Type | Digital Touch + Dial |
| Display | LED Display |
| Door Type | Side-opening with handle |
| Interior Light | Yes |
| Cooking Functions | Microwave, Grill, Convection, Auto Cook, Defrost |
| Auto Cook Programs | Multiple preset menus |
| Defrost Function | By weight or time |
| Safety Lock | Child lock |
| Interior Material | Stainless steel or enamel |
| Cleaning | Wipe with damp cloth; avoid abrasive cleaners |
| Spare Parts Availability | Contact IFB service center or authorized dealers |
| Repairability | Serviceable by qualified technicians; user-replaceable: fuse, lamp, turntable |
| Warranty | Standard 1-2 years (check local terms) |
Frequently Asked Questions - 25BCSDD1 IFB
User questions about 25BCSDD1 IFB
0 question about this device. Answer the ones you know or ask your own.
Ask a new question about this device
Download the instructions for your Microwaves in PDF format for free! Find your manual 25BCSDD1 - IFB and take your electronic device back in hand. On this page are published all the documents necessary for the use of your device. 25BCSDD1 by IFB.
USER MANUAL 25BCSDD1 IFB
Microwave Oven Instructions
Please read these instructions carefully before installing and operating the oven.
Record in the space below the SERIAL NO. found on the nameplate on your oven and retain this information for future reference.
SERIAL NO.
Content
Precautions to Avoid Possible Exposure to Excessive Microwave Energy 3
Important Safety Instructions .... 3
Specifications....6
Installation Guide 6
Grounding Instructions....7
Radio Interference 7
Before Calling For Service 8
Cooking Techniques....8
Cooking Utensils Guide....9
Product Diagram....10
Control Panel 11
Operation Instructions 12
Microwave Cooking....12
Quick Start....12
Grill Cooking....13
Microwave + Grill Cooking .... 13
Reheat/Weight Defrost....13
Convection Cooking....13
Microwave + Convection Cooking....14
Heater Selector (Single/Double)....15
Auto Cook Menus 16
Keep Warm/Ferment....35
Steam Clean/Deodorize/Disinfect....36
Multistage Cooking .... 36
Setting Child Lock....36
Power Save 37
Automatic Protection Mechanism 37
Cleaning and Care 38
Precautions to Avoid Possible Exposure to Excessive Microwave Energy
- Do not attempt to operate this oven with the door open since open-door operation can result in harmful exposure to microwave energy. It is important not to defeat or tamper with the safety interlocks.
- Do not place any object between the oven front face and the door or allow soil or cleaner residue to accumulate on sealing surfaces.
- Do not operate the oven if it is damaged. It is very important that the oven door close properly and that there is no damage to the
a) Door (including any dents),
b) Hinges and latches (broken or loosened),
c) Door seals and sealing surfaces. - The oven should not be adjusted or repaired by anyone except qualified service personnel.
Important Safety Instructions
When using electrical appliance basic safety precautions should be followed, including the following:
WARNING!--To reduce the risk of burns, electric shock, fire, injury to persons or exposure to excessive microwave energy:
- Read all instructions before using the appliance.
- Use this appliance only for its intended use as described in the manual. Do not use corrosive chemicals or vapors in this appliance. This type of oven is specifically designed to heat, cook or dry food. It is not designed for industrial or laboratory use, drying of food or clothing and heating warming pads, slippers, sponges, damp cloth and similar may lead to risk of injury, ignition or fire. The microwave oven is intended for defrosting, cooking and steaming of food only.
- Do not operate the oven when empty.
- Do not operate this appliance if it has a damaged cord or plug, if it is not working properly, or if it has been damaged or dropped. If the supply cord is damaged, it must be replaced by the manufacturer or its service agent or a similarly qualified person in order to avoid a hazard.
- WARNING!--When the appliance is operated in the combination mode, children should only
use the oven under adult supervision due to the temperatures generated.
-
WARNING!--Only allow children to use the oven without supervision when adequate instructions have been given so that the child is able to use the oven in a safe way and understands the hazards of improper use.
-
To reduce the risk of fire in the oven cavity:
When heating food in plastic or paper container, check the oven frequently to the possibility of ignition.
Remove wire twist-ties from paper or plastic bags before placing bag in oven.
If smoke is observed, switch off or unplug the appliance and keep the door closed in order to stifle any flames.
Do not use the cavity for storage purposes. Do not leave paper products, cooking utensils, or food in the cavity when not in use.
-
WARNING!--Liquid or other food must not be heated in sealed containers since they are liable to explode.
-
Microwave heating of beverage can result in delayed eruptive boiling, therefore care has to be taken when handle the container.
-
Do not fry food in the oven. Hot oil can damage oven parts and utensils and even result in skin burns.
-
Eggs in their shell and whole hard-boiled eggs should not be heated in microwave ovens since they may explode even after microwave heating has ended.
-
Pierce foods with heavy skins such as potatoes, whole squashes, apples and chestnuts before cooking.
-
The contents of feeding bottles and baby jars should be stirred or shaken and the temperature should be checked before serving in order to avoid burns.
-
Cooking utensils may become hot because of heat transferred from the heated food. Potholders may be needed to handle the utensil.
-
Utensils should be checked to ensure that they are suitable for use in microwave oven.
-
WARNING!--It is hazardous for anyone other than a trained person to carry out any service or repair operation which involves the removal of any cover which gives protection against exposure to microwave energy.
-
This product is a Group 2 Class B ISM equipment. The definition of Group 2 which contains all ISM (Industrial, Scientific and Medical) equipment in which radio-frequency energy is intentionally generated and/or used in the form of electromagnetic radiation for the treatment of material, and spark erosion equipment. For Class B equipment is equipment suitable for use in domestic establishments and in establishments directly connected to a low voltage power supply network which supplies buildings used for domestic purpose.
-
This appliance is not intended for use by persons (including children) with reduced physical, sensory or mental capabilities, or lack of experience and knowledge, unless they have been given supervision or instruction concerning use of the appliance by a person responsible for their safety.
- Children should be supervised to ensure that they do not play with the appliance.
- The microwave oven is only used in freestanding.
- WARNING!--Do not install oven over a range cooktop or other heat-producing appliance. if installed could be damaged and the warranty would be avoid.
- The accessible surface may be hot during operation.
- The microwave oven shall not be placed in a cabinet.
- The door or the outer surface may get hot when the appliance is operating.
- The temperature of accessible surfaces may be high when the appliance is operating.
- The appliance shall be placed against a wall.
- Appliance is not to be used by children or persons with reduced physical, sensory or mental capabilities, or lack of experience and knowledge, unless they have been given supervision or instruction.
- Children being supervised not to play with appliance.
- WARNING!--If the door or door seals are damaged, the oven must not be operated until it has been repaired by a competent person.
- The instructions shall state that appliances are not intended to be operated by means of an external timer or separate remote-control system.
- The microwave oven is for household use only and not for commercial use.
- Never remove the distance holder in the back or on the sides, as it ensures a minimum distance from the wall for air circulation.
- Please secure the turn table before you move the appliance to avoid damages.
- CAUTION!--It is dangerous to repair or maintain the appliance by no other than a specialist because under these circumstances the cover have to be removed which assures protection against microwave radiation. This applies to changing the power cord or the lighting as well. Send the appliance in these cases to our service centre.
- The microwave oven is intended for defrosting, cooking and steaming of food only.
- Use gloves if you remove any heated food.
- Caution! Steam will escape, when opening lids or wrapping foil.
- This appliance can be used by children aged from 8 years and above and persons with reduced physical, sensory or mental capabilities or lack of experience and knowledge if they have been given supervision or instruction concerning use of the appliance in a safe way and understand the hazards involved. Children shall not play with the appliance. Cleaning and
user maintenance shall not be made by children unless they are aged from 8 years and above and supervised.
- If smoke is emitted, switch off or unplug the appliance and keep the door closed in order to stifle.
Specifications
| Power Consumption | 230V/50Hz,1400W(microwave); 1200W(grill); 2050W(convection) |
| Output | 900W |
| Operation Frequency | 2450MHz |
| Outside Dimensions | 303mm(H)×504mm(W)×489mm(D) |
| Oven Capacity | 25Litres |
| Cooking Uniformity | Glass turntable |
| Net Weight | Approx.18.6kg |
Installation Guide
- Make sure that all the packing materials are removed from the inside of the door.
- WARNING!--Check the oven for any damage, such as misaligned or bent door, damaged door seals and sealing surface, broken or loose door hinges and latches and dents inside the cavity or on the door. If there is any damage, do not operate the oven and contact qualified service personnel.
- This microwave oven must be placed on a flat, stable surface to hold its weight and the heaviest food likely to be cooked in the oven.
- Do not place the oven where heat, moisture, or high humidity are generated, or near combustible materials.
-
For correct operation, the oven must have sufficient airflow. Allow 20cm of space above the oven, 10cm at back and 5cm at both sides. Do not cover or block any openings on the appliance. Do not remove feet.
-
Make sure that the power supply cord is undamaged and does not run under the oven or over any hot or sharp surface.
- The socket must be readily accessible so that it can be easily unplugged in an emergency.
- Do not use the oven outdoors.
Grounding Instructions
This appliance must be grounded. This oven is equipped with a cord having a grounding wire with a grounding plug. It must be plugged into a wall receptacle that is properly installed and grounded. In the event of an electrical short circuit, grounding reduces risk of electric shock by providing an escape wire for the electric current. It is recommended that a separate circuit serving only the oven be provided. Using a high voltage is dangerous and may result in a fire or other accident causing oven damage.
WARNING!--Improper use of the grounding plug can result in a risk of electric shock.
Note:
- If you have any questions about the grounding or electrical instructions, consult a qualified electrician or service person.
- Neither the manufacturer nor the dealer can accept any liability for damage to the oven or personal injury resulting from failure to observe the electrical connection procedures.
The wires in this cable main are colored in accordance with the following code:
Green and Yellow = EARTH
Blue = NEUTRAL
Brown = LIVE
Radio Interference
Operation of the microwave oven can cause interference to your radio, TV, or similar equipment. When there is interference, it may be reduced or eliminated by taking the following measures:
- Clean door and sealing surface of the oven.
- Reorient the receiving antenna of radio or television.
-
Relocate the microwave oven with respect to the receiver.
-
Move the microwave oven away from the receiver.
- Plug the microwave oven into a different outlet so that microwave oven and receiver are on different branch circuits.
Before Calling For Service
Before asking for service, please check each item below:
- Check to ensure the oven is plugged in securely. If not, remove the plug from the outlet, wait 10 seconds, and plug it in again securely.
- Check for a blown circuit fuse or a tripped main circuit breaker. If these seem to be operating properly, test the outlet with another appliance.
- Check to ensure the control panel is programmed correctly and the timer is set.
- Check to ensure the door is securely closed, engaging the door lock system. If the door is not properly closed, the microwave energy will not flow inside.
IF NONE OF THE ABOVE RECTIFIES THE SITUATION, THEN CONTACT A QUALIFIED TECHNICIAN. DO NOT TRY TO ADJUST OR REPAIR THE OVEN YOURSELF.
Cooking Techniques
- Arrange food carefully. Place thickest areas towards outside of dish.
- Watch cooking time. Cook for the shortest amount of time indicated and add more as needed. Food severely overcooked can smoke or ignite.
- Cover foods while cooking. Covers prevent spattering and help foods to cook evenly.
- Turn foods over once during microwave cooking to speed cooking of such foods as chicken and hamburgers. Large items like roasts must be turned over at least once.
- Rearrange foods such as meatballs halfway through cooking both from top to bottom and from the center of the dish to the outside.
- The ideal material for a microwave utensil is transparent to microwave, it allows energy to pass through the container and heat the food.
- Microwave cannot penetrate metal, so metal utensils or dishes with metallic trim should not be used.
- Do not use recycled paper products when microwave cooking, as they may contain small metal fragments which may cause sparks and/or fires.
- Round /oval dishes rather than square/oblong ones are recommend, as food in corners tends to overcook.
- Narrow strips of aluminum foil may be used to prevent overcooking of exposed areas. But be careful don't use too much and keep a distance of 1 inch (2.54cm) between foil and cavity.
The list below is a general guide to help you select the correct utensils.
| Cookware | Microwave | Grill | Convection | Combination* |
| Heat-Resistant Glass | Yes | Yes | Yes | Yes |
| Non Heat-Resistant Glass | No | No | No | No |
| Heat-Resistant Ceramics | Yes | Yes | Yes | Yes |
| Microwave-Safe Plastic Dish | Yes | No | No | No |
| Kitchen Paper | Yes | No | No | No |
| Metal Tray | No | Yes | Yes | No |
| Metal Rack | No | Yes | Yes | No |
| Aluminum Foil & Foil Containers | No | Yes | Yes | No |
Combination: applicable for both "microwave + grill", and "microwave + convection" cooking.
Product Diagram
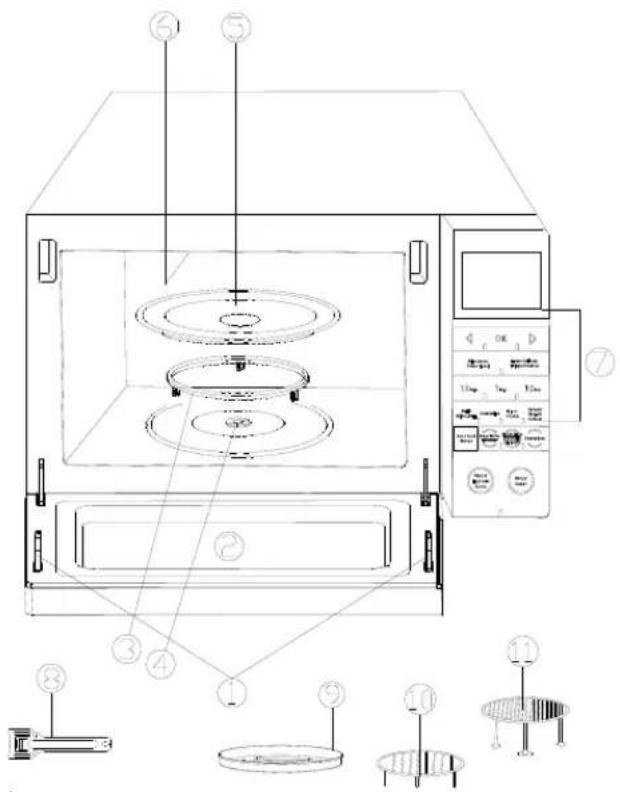
- Door Safety Lock System
- Oven Window
- Roller Ring
- Shaft
- Control Panel
- Glass Tray
- Heater
- Handle
- Baking Plate
- Metal Rack
- Metal Rack
Control Panel
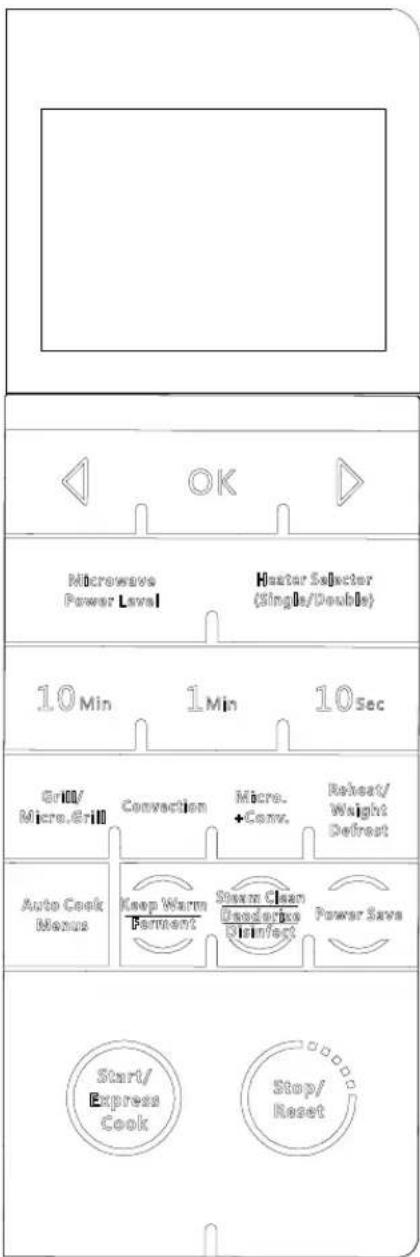
flowchart
graph TD
    A["Start/Express Cook"] --> B["Stop/Reset"]
    C["Auto Cook Menu"] --> D["Keep Warm Perman"]
    D --> E["Stem Clean Deodorize Stirnfect"]
    E --> F["Power Saws"]
    G["Grill/Micro.GriI"] --> H["Convection"]
    H --> I["Micro.+Conv."]
    I --> J["Reset/Weight Defrost"]
    K["Microwave Power Level"] --> L["Heater Selector (Single/Double)"]
    M["10 Min"] --> N["1 Min"] --> O["10 Sec"]
- DISPLAY
Cooking time, power, indicators and child lock are displayed.
● DIRECTION PADS( ◀ ▷ )
Use to select auto cook menus.
Use to select microwave power level.
Use to select the weight or amount of food.
Use to select micro and grill combination cooking.
Use to select conv. or micro and conv. cooking temperature.
• OK
Use to confirm auto cook menus selecting.
Use to set microwave cooking.
● NUMBER PADS( 10/1MIN and 10SEC)
Use to enter cooking time.
● HEATOR SELECTOR (Single/Double)
Use to set H-1 or H-2 cooking program.
- GRILL/MICRO.GRILL
Use to set grill or micro and grill combination cooking program.
- CONVECTION
Use to set convection cooking.
- MICRO.+CONV
Use to set microwave and convection combination cooking.
• AUTO COOK MENUS
Use to set auto menu cooking.
- KEEP WARM/FERMENT
Use to set Keep Warm or Ferment program.
● REHEAT/WEIGHT DEFROST
Use to set reheat or weight defrosting program.
- STEAM CLEAN/DEODORIZE/DISINFECT
Use to set Steam Clean/Deodorize/Disinfect.
- POWER SAVE
Use to set power save program.
- STOP/RESET
Use to pause a cooking or cancel all settings or set child lock.
- START/EXPRESS COOK
Use to start the oven or set quick start program.
Operation Instructions
- During cooking, if press Stop/Reset pad once, the program will be paused, then press Start/Express Cook pad to resume, but if press Stop/Reset pad twice, the program will be canceled.
- After ending cooking, the display will show End to remind user until user press any pad or open the door.
- In standby mode, if the oven without operation for 1 minute, the screen backlight will darken until user press any pad, open or close the door.
Microwave Cooking
During cooking, the current power level can be seen by opening the door to touch Microwave Power Level pad.
- Press Microwave Power Level pad once.
- Then press ▶ and ▶ to select microwave power level.
| Power Level | 100% | 80% | 60% | 40% | 20% | 0% |
| Display | P100 | P-80 | P-60 | P-40 | P-20 | P-00 |
-
Use number pads “10Min”、“1Min”、“10Sec” to enter cooking time. Up to 99 minutes 50 seconds.
-
Press Start/Express Cook pad.
Note: In standby mode, if you want to cook at 100% power level, please omit step 1 and 2.
Quick Start
In standby mode, press Start/Express Cook pad continually to enter cooking time, the longest time is 10 minutes, and the oven will start automatically at 100% high power level. During cooking, each press Start/Express Cook pad to add 30 seconds.
Grill Cooking
Grill cooking is particularly useful for thin slices of meat, steaks, chops, kebabs, sausages and pieces of chicken. The longest cooking time is 99 minutes 50 seconds.
- Press Grill/Micro. Grill pad.
- Use number pads to enter cooking time.
- Press Start/Express Cook pad.
Microwave + Grill Cooking
GRILL/MICRO+GRILL Cooking has two cooking mode: CO-1 and CO-2. You can press ▪ or ▪ pad to select one. The longest cooking time is 99 minutes 50 seconds. During cooking, the current power level can be seen by touching Grill/Micro. Grill pad.
- Press ▶ or ▶ pad to select the combination mode.
- Use number pads to enter cooking time.
- Press Start/Express Cook pad.
Reheat/Weight Defrost
Reheat:
- In standby mode, press Reheat/Weight Defrost pad once.
- Press ▶ or ▶ pad to select the food weight.(from 200 to 800g)
- Press Start/Express Cook pad to start.
Weight Defrost:
- In standby mode, press Reheat/Weight Defrost pad twice.
- Press ▶ or ▶ pad to select the food weight.(from 100 to 1800g)
- Press Start/Express Cook pad to start.
Note: During defrosting program, the system will pause to remind user to turn food over, and then press Start/Express Cook pad to resume.
Convection Cooking
During convection cooking, hot air is circulated throughout the oven cavity to make crisp foods quickly and evenly. This oven has ten different cooking temperatures from 110C to 200C. The longest cooking time is 99 minutes 50 seconds. During cooking, the current temperature can be
seen by opening the door to touch Convection pad.
To Preheat and Cook with Convection:
Your oven can be programmed to combine preheating and convection cooking operations.
- Press Convection pad once.
- Press ▶ or ▶ pad to select desired temperature and close the door.
- Press Start/Express Cook pad. When the oven reaches the programmed temperature, beeps will sound.
- Open the door and place container of food at the center of cavity floor.
- Use number pads to enter cooking time.
- Press Start/Express Cook pad.
Note: The maximum auto reheat time is 30 minutes, and the preheat time cannot be set. When the temperature reaches the preheat temperature, the countdown stop with sound every 2 seconds for 30 minutes. If you don't open the oven door within the 30 minutes, the system will stop automatically with END in display.
To Cook with Convection:
- Press Convection pad once.
- Press ▶ or ▶ pad to select desired temperature.
- Use number pads to enter cooking time.
- Press Start/Express Cook pad.
Microwave + Convection Cooking
This oven has four different combination cooking temperatures from 110C to 200C. It's easy to cook with both convection heat and microwave automatically. The longest cooking time is 99 minutes 50 seconds. During cooking, the current combination temperature can be seen by opening the door to touch Micro.+Conv. pad.
- Press Micro.+Conv. Pad once.
- Press ▶ or ▶ pad to select desired combination temperature.
- Use number pads to enter cooking time.
- Press Start/Express Cook pad.
Heater Selector (Single/Double)
- H-1 (operates with grill mode set at different temperature combination)
- In standby mode, press HEATER SELECTOR option once. The display shows H_1
- Place Teflon coated tawa on low rack on glass turntable.
- Press start /express cook option to start .During this time oven preheats tawa .Grease the tawa with oil if desired before preheating (optional) .
- Place food on tawa and set the cooking time within a minute.
- Press start.
-
Turn over food in-between for even browning.
-
H-2 (operates with convection mode set at temperature favorable for cooking food at high temperature)
- In standby mode, press HEATER SELECTOR option once. The display shows H_2
- Place Teflon coated tawa on low rack on glass turntable.
- Press start /express cook pad to start .During this time oven preheats tawa .Grease the tawa with oil if desired before preheating (optional) .
- Place food on tawa and set the cooking time within a minute.
- Press start.
- Turn over food in-between for even browning.
Guide to low fat frying:
| Heater selector Option | Applicable for | Approx. cooking time |
| H1-Grill mode | Pizza | 10-12 minutes |
| Bread toast | 8 to 10 minutes | |
| H2-Convection mode | Samosa | 15 minutes |
| Naan | 10-12 minutes | |
| Omlette | 10-12 minutes | |
| Cheese pops breaded | 14 -16 minutes |
Note : Inbuilt preheat option is set for 2 minutes where microwaves mode helps preheat the Teflon coated tawa greased with less oil /no oil before food is cooked . Place the tawa on the low rack before starting the programme.
When the preheating of tawa is complete, place food on the hot tawa and set the cooking
time. This time cannot be changed in-between and you will have to preheat the tawa again if you wish to cook for more time, hence it is recommended to set more time (10+ minutes for heater option 1 & 20+ for heater option 2) and stop once desired browning and cooking is obtained. Monitor the food until you are familiar with the performance of the mode for the food you wish to cook.
Turn over the food in-between.
Auto Cook Menus
It is not necessary to program the cooking time and power level. During the program, the system will pause to remind user to turn food over, and then press Start/Express Cook pad to resume.
- Press Auto Cook Menus pad once.
- Press ▶ or ▶ pad to select menu code.
- Press OK pad once.
- Press ▶ or ▶ pad to select the weight or amount of food.
- Press Start/Express Cook pad.
I. AUTO COOK MENUS-Recipe Guide (cooking timings of the auto cook menu are approximate, factors that may affect cooking are – starting temperature of food, volume, size and shape of food, cookwares used. As you become familiar with the oven, you will be able to adjust the timings)
| Sr.no | Food icons | Weight range | Mode of cooking |
| 1 | Beverage's-A1 | 200, 400 and 600 ml | Microwave mode |
| 2 | Soup -A2 | 300,600 and 900 ml | Microwave mode |
| 3 | Potato -A3 | 230,460 and 690gms | Microwave mode |
| 4 | Popcorn - A4 | 100gms | Microwave mode |
| 5 | Rice - A5 | 150,300,450 and 600gms | Microwave mode |
| 6 | Noodles- A6 | 100,200 and 300 gms | Microwave mode |
| 7 | Bake Chicken-A7 | 800,1000,1200 and 1400 gms | Microwave + Convection/ In the 2/3of cooking time, turn food over. |
| 8 | Pizza- A8 | 150,300 and 450 gms | Convection |
| 9 | Cake-A9 | 475gms | Convection |
| 10 | Cookies- A10 | 240 gms | Convection |
| 11 | Milk (baby's formula)-A11 (reheat) | 100,120,140,160, 180 and 200 ml | Microwave mode |
| 12 | Yoghourt-A12 | 1000 ml milk/yoghourt culture 100gms | Microwave mode |
| 13 | Puree -A13 (reheat ) | 100gms | Microwave mode |
| 14 | Porridge -A14 | 50gms oats and 500 ml water | Microwave mode |
| Sr.no | BEVERAGE | COOKWARE | INGREDIENTS | METHOD |
| 1 | Plain milk tea | Microwave proof tea cup/microwave safe kettle | Water- 34 cup; Milk- 14 cupTea leaves- 1 tspSugar-1 tsp | Mix all the ingredients and keep it in the microwave and then select the menu to select the weight and press start.NOTE: Amount of ingredients may differ as per individual preferences. |
| 2 | Ginger tea | Water-1/2 cup; Milk-1/2 cup; Tea leaves- 1 tsp; 34 inch crushed ginger Sugar-1 tsp | ||
| 3 | Masala tea | Water-1/2 cupWhole Milk-1/2 cupSugar-1 tsp; Tea leaves- 1 tspMasala (crush with mortar and pestle or coffee/spice grinder) :1 pod cardamom,2 pea size fresh ginger (mulched),1-2 big size whole black pepper,1/8 to 1/6 cinnamon stick | ||
| 4 | Non Fat Masala tea | Water-1/2 cupSkimmed Milk-1/2 cupSugar-1 tsp; Tea leaves- 1 tspMasala (crush with mortar and pestle or coffee/spice grinder) :1 pod cardomon,2 pea size fresh ginger (mulched),1-2 big size whole black pepper,1/8 to 1/6 cinnamon stick | ||
| 5 | Cardamom tea | Water- 34 cup; Milk- 14 cupCrush two pieces of cardamon, add to it little SaffronSugar-1 tsp; Tea leaves- 1 tsp | ||
| 6 | Rose Tea | Water-1/2 cup; Milk-1/2 cupTea leaves- 1 tspSugar-1 tsp | ||
| 7 | Tulsi Tea | Water-1 cupTulsi leaves-1 tsp | ||
| 8 | Chocolate flavour tea | Water-1/2 cup,Milk-1/2 cupChocolate flavorTea leaves- 1 tspSugar-1 tsp | ||
| 9 | Lemon tea | Water-1 cup ;Tea leaves-1 tspFresh lemon juice-1 tspSugar-1 tsp | ||
| 10 | Coffee | Water- 34 cup; Milk- 14 cup; Coffee-1 tspSugar -1 tsp | ||
| 11 | Jeera Water | Microwave proof cup/microwave safe kettle | Water- 34 cupJeera - 1 tsp18 | |
| 12 | Herbal Water | Microwave proof tea cup/microwave safe kettle | Water -200ml,Saunf –a pinch, Ajwain –a pinch, Cardamom-1,Tulsi leaves---2-3, Mint leaves-2 to 3 | |
| Sr.no | SOUP (Instant mix Powder) | COOKWARE | INGREDIENTS | METHOD |
| 13 | Tomato Soup | Microwave Safe Cookware | Instant Soup mix, water as per recommendation by Soup mix manufacturer | Follow Instant Soup Mix, Manufacture's procedure for mixing. Keep the dish on glass turntable, select weight and press start. |
| 14 | Spinach Soup | |||
| 15 | Mix. Veg Soup | |||
| 16 | Sweet Corn Veg. Soup | |||
| 17 | Chicken Soup |
| Sr.no | Potato (Root vegetables) | COOKWARE | INGREDIENTS | METHOD |
| 18 | Sweet potato, carrot, beet etc. | Place on glass turntable | Potatoes | Prick potatoes with fork and place on glass turntable .select potato menu, set quantity and press start. |
| Sr.no | POPCORN | COOKWARE | INGREDIENTS | METHOD |
| 19 | Plain Popcorn | Borosil with a lid, covered loosely or ready to cook popcorn in microwave proof bag. | Popcorn and salt | Pop the popcorn with olive oil, and mix the grated cheese/dry fruits/ grated chocolate or sugar caramel as per desired choice for flavor. |
| 20 | Cheese popcorn | Popcorn and grated cheese | ||
| 21 | Nutty Popcorn | Dry fruit roasted and popcorn | ||
| 22 | Chocolate Popcorn | Grated chocolate and popcorn | ||
| 23 | Buttery popcorn | Popcorn and butter | ||
| 24 | Caramel popcorn | Popcorn and sugar caramel. |
| Sr.no | RICE | INGREDIENTS | METHOD |
| Cookware: Microwave Safe rice cooker | |||
| 25 | Plain rice | Rice 1 cupWater 2 cups | Wash and soak the rice for about half an hour.Drain water from the rice and add 2 cups or 1 3⁄4 cup water, cover and cook, selecting the menu.Allow it to stand for 5 to 10 minutes and then serve hot. |
| 26 | Prawn Biryani | Uncooked rice (Soaked for 30 minutes)-1 cup, peeled and deveined tiger prawns-100gms,ginger garlic paste-1 tbsp, Garam masala-1 tbsp, black pepper -1 tbsp,cloves-4,cardamom seeds-4,cinnamon stick,salt-to taste, plain yogurt- 1⁄2 cup, vegetable oil- 1⁄4 cup,water 2 cup, Chicken bouillon cube-5 | Stir together the prawns, ginger garlic paste, garam masala, black pepper, cloves, cardamom seeds, cinnamon sticks, salt, yogurt, and oil in a microwave safe bowl until well mixed. Stir the rice, water, and chicken bouillon cubes and mix well.Add water and cook by selection the menu Rice.Discard cinnamon stick, cloves, and cardamom seeds before serving. |
| 27 | Rajasthani Pulao | 1 1⁄4 cup long grain rice1 tablespoons ghee or oil, 2 medium onions- finely sliced ,2 sticks cinnamon, 3 cardamom pods, bruised, 5 whole cloves,8 whole black pepper,2 1⁄2 cups hot stock or water ,Salt to taste.Note:Serves 2 | If the rice needs washing, wash well in several changes of cold water and leave to soak for 1 hour.Then drain in a colander for at least 30 minutes.Mix all the ingredients, add water or stock and cook by selecting the menu Rice.Serve hot with curry. |
| 28 | Rice with Peas | 1 1/2 cups long grain rice,1 tablespoon ghee,4 whole cloves,1 small cinnamon stick,3 or 4 cardamom pods, bruised,1 teaspoon cumin seeds,1/2 teaspoon ground turmeric ,1 1/2cups shelled green peas and diced carrots ,2 1/2 teaspoons salt,3 1/4 cups hot water | Wash the rice well and leave to soak in cold water for 30 minutes, then drain well.Mix all the ingredients, add water or stock and cook by selecting the menu.Remove whole spices, fork rice grains lightly and serve hot with meat or vegetable curries. |
| 29 | Rice in coconut milk | Coconut milk-2 cupRice -1 cupCarrot-50 gmsBeans-50 GmsGhee-1 tbspBay leafCloves-4Salt to tastePoppy seeds-1/4 tsp | Wash and soak rice for 10 minutes. Mix all the ingredients, and cook by selecting the menu. |
| 30 | Namkin Chawal | 1 cup long grain rice ,2 cups hot water, 2 teaspoons ghee ,2 1/2 teaspoons salt | Wash rice well and soak 1 hour in cold water. Mix all the ingredients, and cook by selecting the menu.Lift lid to allow steam to escape for about 5 minutes, and then lightly fluff up rice with fork, taking care not to mash the grains, which will be firm, separate and perfectly cooked. Dish up using a slotted metal spoon rather than a wooden spoon, which will crush the grains. Serve with curries or other spiced dishes. |
| 31 | Veg Pulao | 1 cup Rice ,2 cups Water, 1/4 cup chopped Vegetables,1/2" Cinnamon stick,2 Cloves,2 Cardamom, Salt as per taste,1/4 teaspoon turmeric powder,1 teaspoon coriander powder ,2 Chillies ,4 tomatoes, 1⁄2 cup Coconut (grated),1 bunch Coriander leaves,2 pieces Garlic,1/2" piece Ginger (made into a paste),2 tablespoons Butter,1 onion cut lengthwise | Mix all the ingredients, and cook by selecting the menu.Serve Hot with Raitha. |
| 32 | Spiced Rice | 1 cup Rice, 2 cups Water, Cinnamom, Cloves.Salt to taste. | Mix all the ingredients, and cook by selecting the menu. |
| 33 | Khichdi | Rice -1 cup, tur dal (arhar dal-1/2 cup, Ghee or oil-1tbsp, Hing powder-1/4 tsp, Laung-3-4 , Dalchini (cinnamon)-2 inch stick, Jeera-1/2 tsp, Dry red chillies (broken to 2-3 pieces) -2 no ,groundnuts roasted-25 gms , Turmeric powder- 1⁄4 tsp, salt as per taste, water 3 cups. | Wash and soak dal and rice for 30 minutes.Mix all the ingredients, and cook by selecting the menu.Serve hot with ghee and kadhi. |
| 34 | Jeera Rice | 1 cup basmati rice ,1 tsp shahjeera or caraway seeds ,1 black cardamom ,1 green cardamom ,2-3 black peppercorns ,2 cloves ,1 inch cinnamon ,2 tsp ghee ,2 cups water . | Wash and soak dal and rice for 30 minutes.Mix all the ingredients, and cook by selecting the menu.Once done, remove the microwave safe rice cooker and let it stand for 5 minutes. |
| 35 | Methi Pulao | Methi ( Fenugreek leaves) 1 cup chopped ( you can use the frozen one)1 cup Basmati rice ,2 to 4 black Peper ( Kali Mirch), 2 Cloves1 Cinnamon stick, 2 Green Elaichi ( Cardamom), 1 Medium sized sliced Onion, 1/2 Cup sweet corn kernels 1/4 Teaspoon turmeric powder (haldi) ,1 Tablespoon butter1 Tablespoon oil ,Water 2 cupsSalt to taste | Wash the rice well and leave to soak in cold water for 30 minutes, then drain well.Mix all the ingredients, and cook by selecting the menu. |
| 36 | Carrot rice | 1cup Basmati Rice2 medium onions chopped2 cups water3 carrots grated2 tsp fried groundnuts cinnamon sticks 14 tsp clovesOil -1 tbspSalt as per taste | Wash the rice well and leave to soak in cold water for 30 minutes, then drain well.Mix all the ingredients, and cook by selecting the menu. |
| 37 | Mint Rice | 1 Thinly sliced Onions1 chopped Tomatoes1/4 Bunch of Mint Leaves1 Cups of Basmati 12 tsp Red Chili Powder 14 tsp Turmeric Powder 14 tsp Fresh Ginger Paste 14 tsp Fresh Garlic Paste1Green Chilies slit into half2 Bay leaves1 inch cinnamon stick 14 tsp clovesFried Cashews -2tbspGhee 1tbspSalt (As required) | Wash the rice well and leave to soak in cold water for 30 minutes, then drain well.Mix all the ingredients, and cook by selecting the menu. |
| 38 | Sweet Corn Rice | 1 Cup Basmati Rice 12 cup Fresh corn1 finely chopped Onion 12 tsp Grated ginger2 cloves 14 tsp Black Pepper PowderChopped Coriander leavesOil -1tbspSalt to taste | Wash the rice well and leave to soak in cold water for 30 minutes, then drain well.Mix all the ingredients, and cook by selecting the menu. |
| 39 | Palak Pulao | 1 cup Rice , 12 bunch palak ( washed & chopped) ,2 cups Water, 1/4 cup chopped Vegetables,1/2"Cinnamon stick,2 Cloves,2 Cardamom, Salt as per taste,1/4 teaspoon turmeric powder,1 teaspoon coriander powder ,2 Chillies ,4 tomatoes, 12 cup Coconut (grated),1 bunch Coriander leaves,2 pieces Garlic,1/ 2" piece Ginger (made into a paste),2 tablespoons Butter,1 onion cut lengthwise | Mix all the ingredients, and cook by selecting the menu.Serve Hot with Raitha. |
| Sr.no | Noodles | INGREDIENTS | METHOD |
| 40 | Noodles/pasta boiling | Noodles, pasta, Spaghetti, Macaroni for stew etc (for 100 gms add 800 ml water) | Mix in 800ml of water for 100gms pasta and cook by selecting pasta programme. |
| Sr.no | Bake Chicken | Cookware | Ingredients | Method |
| 41 | Chicken Tandoori | Heat resistant flat dish | Chicken- Make slits in the flesh of the chicken pieces, Add Tandoori masala and Salt -As per taste | Marinate the chicken and then use this programme to prepare the tandoor. Turn over the chicken tandoor inbetween. |
| 42 | Chicken tikka | Grill rack | Chicken Cubes Crushed Ginger-1 Tsp Crushed Garlic-2 Cloves Lemon Juice, Turmeric -1/2 Tsp Chilli Powder-1 Tsp Curry Powder-1/4 Tsp Hung Curd-2/3rd Cup Garam Masala -1/4 Tsp Coriander -1/4 Tsp Corn Starch-1/4 Tsp Oil ,Salt-as per taste | Mix all the ingredients together and let the chicken marinate for 3-4 hours. Put the chicken onto the grill rack and use the menu to cook.Turn over the chicken tikka in-between the programme. |
| 43 | Minced meat kebab | Heat resistant flat dish | 500 gms minced lamb -boiled 1/2 cup besan, Ingredients to be ground to paste: 1/2 teaspoon poppyseeds-roasted,4 cloves garlic,1 teaspoon garam masala,1 teaspoon black cumin seeds roasted1 tablespoon coriander seeds roasted,1 teaspoon grated green ginger ;salt to taste;2 green chilies (chopped),1 large onion-finely chopped,2 large eggs,3 tablespoons chopped green coriander,3 tablespoons bread crumbs. | Grind cooked and water dried lamb mince along with 1⁄2 cup besan, poppy seeds, garlic cloves, garam masala, black cumin, coriander seeds.Add the chillies and onion and mix well. Add one egg over the mince and addthe chopped coriander and mix thoroughly.Divide the mixture into 16 portions.First roll each one into a ball and then flatten into a fat round disc.Dip each kabab in the beaten egg and then roll it over the bread crumbs.Cook kebab by selecting the menu .Serve with garnishing and chutney of your choice. |
| 44 | Chicken kebabs | Heat resistant flat dish | Minced meat-500gms1 Onion chopped very fineGarlic paste -6 clovesGinger paste -1tbspFresh chopped corianderLemon Juice-1 tbspYogurt (not sour)Garam masala -1 tspGreen chillies very finely -2 tsp, chopped (optional) ,Salt to tasteVegetable/ canola/ sunflower cooking oil for basting kebabs while cooking1 large onion cut into thin rings (to serve the kebabs on) | Mix all the ingredients till all the ingredients are well blended. Cover the bowl with cling film and put into the refrigerator for an hour. Soak bamboo skewers in water to prepare the kebabs. Remove the meat mixture from fridge and divide the mix into equal portions. Take each portion and form it into a long kebab while pressing on to a skewer. Do this till the mix has firmly adhered to the skewer. Put some oil on your hands to prevent meat from sticking. Cook the kebab Basting with cooking oil as required selecting the menu.Turn the kebab as often as required. Serve piping hot on a bed of onion rings, with Mint-Coriander Chutney |
| 45 | Chicken Cafreal | Heat resistant flat dish | Chicken cut into 8 piecesOil 3 tablespoonsIngredients to be ground to paste:Onion ,sliced finely2 mediumCoriander seeds 1 tablespoonCumin seeds 1 teaspoonCloves 6Green cardamoms 8Black peppercorns 8Cinnamon 1 inch stickGinger roughly chopped1 1/2 inch piecesGarlic roughly chopped4-5 clovesGreen chillies roughly chopped -6Salt to tasteVinegar 3 tablespoons | Mix all the ingredients. Cover the bowl with cling film and put into the refrigerator for an hour and then use this programme to cook by selecting weight of the food to be cooked. |
| 46 | Achaari Chicken | Heat resistant flat dish | 500gms chicken pieces (any pieces of your choice) skin removedIngredients to be ground to paste: 12 tsp fenugreek seeds 12 tsp mustard seeds 12 tsp aniseed/fennel seeds 12 tsp cumin seeds 12 tsp onion seeds1 tsp red chilli powder1 tsp turmeric powder6 green chillies1 large onions sliced thin1 tsps garlic paste 12 tsp ginger paste 12 cup yogurtJuice of 1 limeSalt to taste2 tbsps-vegetable oil | Mix all the ingredients. Cover the bowl with cling film and put into the refrigerator for an hour and then use this programme to cook by selecting weight of the food to be cooked. |
| 47 | Pudina Chicken | Heat resistant flat dish | 500 gms chickenIngredients to be ground to paste:1 bunch Pudina leaves , 6 sprigs of cilantro(corainder) leaves, 1 sprig CurryLeaves, 1 medium minced onion ,1 cup curd ,2 tbsp garlic ginger paste, 4 number green chilli ,2 Red Chillies ,1tsp Shahi Jeera ,3 Cloves ,1 inch Cinnamon Stick, 2 Elachi ,1 1/2tsp Pepper powder, 2tsp Coriander powder ,1/2 tsp garam masala powder, 2 tbsp oil ,1 pinch turmeric powder salt to taste | Mix all the ingredients. Cover the bowl with cling film and put into the refrigerator for an hour and then use this programme to cook by selecting weight of the food to be cooked. |
| 48 | Spicy Chilli Chicken | Heat resistant flat dish | 500gms boneless chicken 4-5 green chillies (The ones I used were not very hot)5-6 red chillies1/2 tsp black pepper4-5 cloves1 tsp fresh ground ginger1 tsp fresh ground garlic2-3 strands coriander leaves1/2 cup onionOilLemon wedgesSalt | Marinate the chicken and then use this programme to prepare the spicy chilli chicken fry. Turn over the chicken halfway during the programme. |
| 49 | Coriander Chicken fry | Heat resistant flat dish | Boneless chicken -500gms6 tbsps vegetable oil5 cloves chopped garlic (finely)1 tbsp ginger (fresh grated, mixed with 4 tbsps water)1 cup coriander (fresh, leaves, washed and very finely chopped)1 green chili peppers (finely chopped and deseeded)14 tsp cayenne pepper-ground2 tsps ground cumin1 tsp ground coriander12 tsp ground turmeric salt2 tbsps lemon juice | Marinate the chicken and then use this programme to prepare coriander chicken. Turn over the chicken halfway during the programme. |
| 50 | Pepper chicken Fry | Heat resistant flat dish | Chicken -350gms, cleaned n cut into bite size pieces, preferably with boneOnion - 1 cup, choppedTomato - 1 medium sized, cubed (optional)Ginger garlic paste - 1 1/2 tbspTurmeric powder - a dashCoriander powder - 1 1/2 tspSalt - to tasteCurry leaves - a sprigCoriander leaves - 2 tbsp, choppedSesame oil - 2 tbspOil - 2 tspWater - as neededLemon juice - juice of half a lemonTo dry roast and grind:Whole peppercorns - 3 tspCumin seeds - 1 3/4 tspFennel seeds - 1 1/2 tspCinnamon - 1/2" pieceCloves - 2 nos.Cardamom - 1nos. | Marinate the chicken and then use this programme to prepare the pepper chicken fry. Turn over the pepper chicken halfway during the programme. |
| Sr.no | PIZZA | INGREDIENTS | METHOD |
| Cookware : Baking plate | |||
| 51 | Pickled Ginger Pizza | Pizza base, toppings of your choice, Pickled ginger minced mozzarella cheese and pizza sauce. | Apply Pizza sauce on Pizza base, arrange Precooked toppings, Grate mozzarella cheese, Sprinkle pickled ginger and cook by selecting the menu. |
| 52 | Paneer Pizza | Pizza base, cut pieces of paneer (Tikka), mozzarella cheese and pizza sauce. | Apply Pizza sauce on pizza base, arranged paneer pieces, grate mozzarella cheese and cook by selecting the menu. |
| 53 | Chicken Tikka Pizza | 1 pizza baseChicken tikka Chunks -1cup Sliced onion -1Capsicum Sliced-1Tomato Sliced-11 cup shredded mozzarella cheeseRed chillies -1 (Crushed)Olive oil to brushPizza Sauce -3 tbsp. | Brush pizza base with olive oil. Top the pizza crust with the Pizza sauce. .Then layer on the shredded mozzarella, then the chicken tikka Chunks, arrange sliced tomato, onion and capsicum., sprinkle red chilli on top . Cook using the, menu Pizza. |
| Sr.no | CAKE | INGREDIENTS | METHOD |
| Cookware : Cake tin , greased with butter and maida . | |||
| 54 | Vanilla Sponge Cake | 100gms Maida, 50gms cornflour150gms sugarBaking powder -1/2 tsp4eggsVanilla essence -1tsp | Separate egg white and yoke.Whisk egg whites until peak stage.Gradually add sugar powder and mix well , fold in flour + baking powder (Sieved ).Add essence/additional ingredients based on the type of flavor sponge cake you are preparing.Bake by selecting the menu CAKE. |
| 55 | Whole Wheat Sponge Cake | 50gms Maida, 50gms Whole wheat flour, 50gms cornflour150gms sugar4eggsVanilla essence -1tsp | |
| 56 | Chocolate Sponge Cake | 100gms Maida, 50gms cornflour150gms sugar, 20gms cocoa powder4eggs | |
| 57 | Coffee Sponge Cake | 100gms Maida, 50gms cornflour150gms sugar, 4eggsInstant Coffee -2tsp | |
| 58 | Dark Chocolate Sponge Cake | 100gms Maida, 50gms cornflour150gms sugar20gms dark chocolate grated.4eggs | |
| 59 | Spice Mix Sponge Cake | 100gms Maida, 50gms cornflour150gms sugar4eggsSpice mix powder (laung/cinnamon)-1tsp | |
| 60 | Strawberry Sponge Cake | 100gms Maida, 50gms cornflour150gms sugar4eggsStrawberry essence -1tsp | |
| Sr.no | COOKIES | INGREDIENTS | METHOD |
| Cookware : Baking plate + Butter paper | |||
| 61 | Melting Moments | 100 gm (3/4 cup) plain flour30 gm (2 tbsp) cornflour60 gm (1/2 cup) icing sugar100 gm (1/2 cup) butter2 tbsp egg1 tsp vanilla extract | Sieve the flour and the cornflour together into a bowl.In another bowl mix in the butter and the sugar with a hand blender or a wire whisk or put in the stand mixer with the paddle attachment and blend until smooth and creamy.Put in the flour mixture and vanilla extract and mix until smooth and there are no lumps. Add egg and mix well. Empty the contents in piping bag and pipe it onto a parchment paper as per desired shape . Bake using the programme cookies. Cool the cookies on wire rack. |
| 62 | Coconut Snowball Melting Moments | Maida (All Purpose Flour) – 100gmsCorn flour - 30 gmsSalt –a pinchPowdered or icing sugar -20Unsalted Butter - 110 gms)Vanilla essence - 1 tspChopped nuts - 2 to 3 tbsp(walnuts & cashewnuts)For the topping:Powdered or icing sugar – to coat cookies | In a bowl add butter, icing sugar and vanilla essence - beat well until creamy.Now add the chopped nuts and give a quick stir. Mix in maida and cornflour.Add salt and mix well. Pinch equal sized balls and roll them with your palms and place it in prepared baking sheets, spacing about 1 inch apart. Bake using the programme cookies.Once done , coat the cookies in powdered sugar while they are still warm |
| 63 | Strawberry Melting moments | 125g unsalted butter, softened 12 teaspoon vanilla extract 12 teaspoon strawberryessence1⁄4 cup confectioners' sugar (icing), sifted, plus more for dusting180 gms Maida60gms strawberry custard powder, sifted | Use an electric mixer to combine the butter, vanilla extract, strawberry essence and sifted confectioners' sugar in a largebowl until pale and fluffy.Sift together the plain flour and strawberry custard powder into a separate bowl. Add the flour mixture to the butter mixture, and beat on low speed until just combined, making sure to scrape down the bowl.Roll teaspoonfuls of dough into balls.Place on the lined tray about 1" apart-cookies will expand slightly in the oven. Use the end of a fork to press down lightly on top of each ball.Bake using the programme cookies.Remove from oven and stand 5 minutes in tray before transferring to a wire rack to cool completely. |
| 64 | Eggless melting moments | 100 gm plain flour30 gm cornflour60 gm icing sugar100 gm) butter2 tbsp milk (optional)1 tsp vanilla extract | Sieve the flour and the cornflour together into a bowl.In another bowl mix in the butter and the sugar with a hand blender or a wire whisk or put in the stand mixer with the paddle attachment and blend until smooth and creamy.Put in the flour mixture and vanilla extract and mix until smooth and there are no lumps. Add egg and mix well.Empty the contents in piping bag and pipe it onto a parchment paper as per desired shape . Bake using the programme cookies. Cool on tray for 5 minutes, then turn onto a wire rack to cool completely. |
| 65 | Red velvet melting moments | 125g unsalted butter80gmsicing sugar40gms cornflour1⁄4 cup cocoa powder140gms Maida1 tbsp red food colouring | Beat butter and sifted icing sugar with an electric mixer in a small bowl for 3 minutes, or until mixture is light and fluffy.Gradually add remaining dry ingredients, continuously beating on medium speed until all is combined. Mix in the food colouring.Spoon mixture into a piping bag fitted with a 1cm fluted tube. Pipe rosettes ontobaking trays. Alternatively, roll teaspoons of dough and press down onto baking trays with a fork.Bake using the programme cookies.. Cool on tray for 5 minutes, then turn onto a wire rack to cool completely. |
| 66 | Spicy Melting moments | 125g butter60g icing sugar2 teaspoons mixed spice110g Maida30g cornflour | Sift in the other ingredients and stir to combine. At this stage, the mixture can be wrapped in plastic wrap and kept in the fridge for up to a week.Make balls by rolling between floured palms, place on baking tray, then press down with a fork until 1cm thick. Bake using the programme cookies. Cool on tray for 5 minutes, then turn onto a wire rack to cool completely. |
| 67 | Melting moments cornflakes Coated | 100 g butter75 g caster sugar1 egg yolkfew drops of vanilla flavouring150 g Self raising flourcrushed cornflakes | Cream the butter and sugar together until pale and fluffy. Beat in the egg yolk.Add the vanilla flavouring, stir in the flour to give a smooth dough and divide into about 24 portions.Form each piece into a ball and roll in crushed cornflakes.Bake using the programme cookies. Cool on tray for 5 minutes, then turn onto a wire rack to cool completely. |
| Sr.no | Milk /Baby's formula (milk + baby food) | INGREDIENTS | METHOD |
| 68 | Milk /milk based food reheat programme | Milk or milk with instant food | Keep the milk or baby food in microwave proof container , on the glass turntable .select the programme and press start. |
| Sr.no | Yoghourt | INGREDIENTS | METHOD |
| 69 | yoghourt | Milk & yoghourt culture.50g powdered sugarAdd flavours (vanilla essence-1 tsp or strawberry crush-2tsp) as per your preference | 1 liter warm milk, add yoghourt culture (50gms) or 5 gms of dry culture. Cover with cling wrap, allow it to rest for 5 minutes before stirring. keep the container (borosil or pyrex bowl) on the glass turntable, select yoghourt programme and press start. |
| Sr.no | Puree | INGREDIENTS | METHOD |
| 70 | Veg puree | boiled and mashed vegetables | In a microwave safe bowl, reheat veg puree.Select programme and press start. |
| Sr.no | Porridge | INGREDIENTS | METHOD |
| 71 | Oats porridge | 50g(50g oatmeal500g water or milk) | Mix oats and water or milk as per your preference and cook by selecting the programme porridge. |
Keep Warm/Ferment
Keep Warm:
- In standby mode, press Keep Warm/Ferment pad once.
- Press number pads to enter cooking time. Up to 99 minutes 50 seconds.
- Press Start/Express Cook to start.
Ferment:
- In standby mode, press Keep Warm/Ferment pad twice.
- Press number pads to enter cooking time. Up to 99 minutes 50 seconds.
- Press Start/Express Cook to start.
Steam Clean/Deodorize/Disinfect
Steam Clean:
-
The default setting for steam clean is microwave mode for 5 minutes at full power level.
-
Place a microwave safe bowl with 200 ml water on glass turntable.
- Touch Steam clean/Deodorize/Disinfect pad once.
- Press Start/Express Cook to start the programme.
- After programme ends, move water bowl and glass tray away.
- Use a soft and dry cloth to clean the oven cavity and door.
Deodorize:
- In standby mode, press Steam Clean/Deodorize/Disinfect pad twice. Press Start/Express Cook to start.
Disinfect:
- In standby mode, press Steam Clean/Deodorize/Disinfect pad thrice. Press Start/Express Cook to start.
This programme is beneficial to sterilize baby feeder bottles (microwave safe) or cookware's (microwave safe). Half fill baby feeder bottles with water (do not place lid) and place on glass turntable. Select disinfect and press start. Rinse thoroughly and discard the water.
Multistage Cooking
| First stage | Microwave cooking / Grill cooking / Microwave+Grill cooking / Convection cooking / Microwave+Convection cooking |
| Second stage | Microwave cooking / Grill cooking / Microwave+Grill cooking / Convection cooking / Microwave+Convection cooking |
- Set the first stage cooking program. NOT TOUCH START/EXPRESS COOK.
- Set the second stage cooking program.
- Press Start/Express Cook pad.
Setting Child Lock
The lock prevents unsupervised operation by children.
- To set the child lock: In standby mode, press Stop/Reset pad for 3 seconds. In the lock state, the oven can't be operated.
- To cancel the child lock: Press Stop/Reset pad for 3 seconds, and the oven can be operated.
Power Save
When the oven isn't used, you can set power save mode.
In standby state, press POWER SAVE pad, then the display will be black. The system enters into power save mode until you press any pad or open the door.
Automatic Protection Mechanism
Cooling Feature: The controlling system of the microwave oven has the feature of cooling. As for any cooking mode which cooking time above 2 minutes, after finishing cooking, the oven fan will work about 3 minutes automatically to cool the oven for prolonging the life of the oven.
High Temperature Protection: While entering into super high temperature protection status, the system sounds beeps and the display shows "E01". After the error code disappears, press Stop/Reset pad, the system comes back to normal condition.
Please open the door to cool the oven cavity or call for consumer service to check.
Low Temperature Protection: While entering into super low temperature protection status, the system sounds beeps and the display shows "E02" until user press Stop/Reset pad to return normal condition. Please call for consumer service to check.
Sensor Malfunction Protection: When the sensor is short circuited, the system enters into protection mode and sound beeps, the display shows "E03" until user press Stop/Reset pad to return normal condition. Please call for consumer service to check and replace the faulty sensor.
Cleaning and Care
- Turn off the oven and unplug the power cord from the wall when cleaning.
- Keep the inside of the oven clean. When food splatters or spilled liquids adhere to oven walls, wipe with a damp cloth. Mild detergents may be used if the oven gets very dirty. Avoid using spray or other harsh cleaners. They may stain, streak or dull the door surface.
- The outside of the oven should be cleaned with a damp cloth. To prevent damage to the operating parts inside the oven, water should not be allowed to seep into the ventilation openings.
- Wipe the door and window on both sides, the door seals and adjacent parts frequently with a damp cloth to remove any spills or spatters. Do not use abrasive cleaner.
- Do not allow the control panel to become wet. Clean with a soft, damp cloth. When cleaning the control panel, leave oven door open to prevent oven from accidentally turning on.
- If steam accumulates inside or around the outside of the oven door, wipe with a soft cloth. This may occur when the microwave oven is operated under high humidity condition. And it is normal.
- The oven floor should be cleaned regularly to avoid excessive noise. Simply wipe the bottom surface of the oven with mild detergent.
- Remove odors from your oven by combining a cup of water with the juice and skin of one lemon in a microwaveable bowl. Microwave for 5 minutes. Wipe thoroughly and dry with a soft cloth.
- If the light bulb burns out, please contact customer service to have it replaced.
- The oven should be cleaned regularly and any food deposits should be removed. Failure to maintain the oven in a clean condition could lead to deterioration of surface that could adversely affect the life of the unit and could possibly result in a hazardous situation.
- Please do not dispose of this appliance into the domestic rubbish bin; it should be disposed to the particular disposal center provided by the municipalities.
- When the microwave ovens have grill function is first used, it may produce slight smoke and smell. This is a normal phenomenon, because the oven is made of a steel plate coated with lubricating oil, and the new oven will produce fumes and odor generated by burning the lubricating oil. This phenomenon will disappear after a period of using.
WARRANTY
IFB Industries Limned. ("The Company") warrants to the original domestic purchase of this microwave oven ("Appliances") that it is free from defects in workmanship & materials. During 12 months from the date of purchase of the new microwave oven model, all the parts of the microwave oven and 36 months on Magnetron & Cavity, shall be replaced or repaired free of charge, on intimation to the Company I) Company's authorized service centre nearest to the place where the appliance is installed
This warranty is subject to Limitations of Warranty : This warranty is not valid in case of the following events.
- If the warranty card is not fully and properly filled in and signed at the time of purchase I installation by the company's authorised dealer I service engineer.
- If the completed warranty card is not presented to the authorised personnel at the time of service I repair.
- If the appliance is not used in accordance with manufacturer's instructions given in the Operating Manual.
- If the appliance has been serviced, repaired, opened or tampered by any unauthorized personnel.
- If defects arise I caused by accidents, alteration, misuse, neglect, abuse, substitution of original components with spurious I non-genuine components, attack by household pests I rodents, fire, flood, earth-quake, lightning and I or any other acts of God I natural calamities.
- If damages occur by improper electrical, circuit outside the appliance or by any defective electrical supply thereof.
- If the machine serial number on the appliance is defaced, missing or altered.
- If the appliance is taken out of India.
- This warranty does not cover any type of painting, plating including rusting etc or defects thereof.
- This warranty does not cover normal wear and tear of parts.
- Liability for consequential damages is neither accepted nor implied.
- Parts replaced or repaired under this warranty are warranted throughout the remaining of the original warranty period.
- Company is not liable for any delay in servicing due to reasons beyond the control of the company or any of its authorised service center.
- This warranty is not applicable, if the microwave oven is used for commercial purpose of at places like Institutions, Hotels, Hostels, Hospitals, Community Halls and other similar applications.
- For any service under this warranty beyond city I town I municipal limits from the Company I authorized service centre, a fixed charge of Rs. 250 /- will be collected from the customer in addition to the actual to and fro charges by the shortest route. Alternatively the customer can bring the appliance to the nearest service centre for carrying out the necessary repairs, at customer's own cost.
- During the warranty period whenever the appliance is shifted from the original city of purchase to another city / town where service is provided by the company's authorized service agent, a warranty transfer charge of Rs. 300 /- will be collected from the customer by the company's authorized service agent. The above charges also include the reinstallation of the appliance. However in case of transfer to a city where the company provides direct service, a nominal charge of Rs. 250 /- only will be collected from the customer towards reinstallation. The Company, however, shall not undertake the responsibility of shifting I transferring the appliance from the location where the appliance was originally installed.
- This warranty is issued subject to the jurisdiction of Kolkata courts, and I or other judicial/ quasi judicial forums having jurisdiction over the registered office of the Company.
- Note: For all types of repairs I maintenance under warranty, the appliance shall be brought to the nearest Company service centre or its authorised service agent.
CUSTOMER COPY
Mr./Mrs./Ms
Address
Telephone No.:
Model Name:
Serial No.:
Date of Purchase:
Cash Memo No.:
Dealer Name and:
Address stamp:
SERVICE STATION COPY
Mr./Mrs./Ms
Address
Pin code :
Telephone No.:
Model Name:
Serial No.:
Date of Purchase:
Cash Memo No.:
(R)
(0)
IFB Industries Limited
Regd.off.: 14 Taratolla Road
Kolkata - 700088
- Microwave Oven Instructions
- Content
- Precautions to Avoid Possible Exposure to Excessive Microwave Energy
- Important Safety Instructions
- Installation Guide
- Grounding Instructions
- Note:
- Radio Interference
- Before Calling For Service
- Cooking Techniques
- Product Diagram
- Control Panel
- - DISPLAY
- ● DIRECTION PADS( ◀ ▷ )
- • OK
- ● NUMBER PADS( 10/1MIN and 10SEC)
- ● HEATOR SELECTOR (Single/Double)
- - GRILL/MICRO.GRILL
- - CONVECTION
- - MICRO.+CONV
- • AUTO COOK MENUS
- - KEEP WARM/FERMENT
- ● REHEAT/WEIGHT DEFROST
- - STEAM CLEAN/DEODORIZE/DISINFECT
- - POWER SAVE
- - STOP/RESET
- - START/EXPRESS COOK
- Operation Instructions
- Microwave Cooking
- Quick Start
- Grill Cooking
- Microwave + Grill Cooking
- Reheat/Weight Defrost
- Reheat:
- Weight Defrost:
- Convection Cooking
- To Preheat and Cook with Convection:
- To Cook with Convection:
- Microwave + Convection Cooking
- Heater Selector (Single/Double)
- Auto Cook Menus
- Keep Warm/Ferment
- Keep Warm:
- Ferment:
- Steam Clean/Deodorize/Disinfect
- Steam Clean:
- Deodorize:
- Disinfect:
- Setting Child Lock
- Power Save
- Automatic Protection Mechanism
- Cleaning and Care
- WARRANTY
- CUSTOMER COPY
- SERVICE STATION COPY
Brand : IFB
Model : 25BCSDD1
Category : Microwaves